1
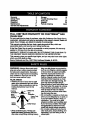
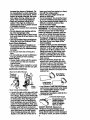
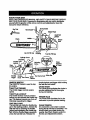
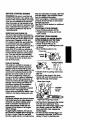
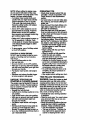
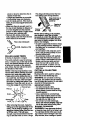
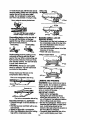
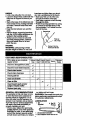
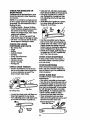
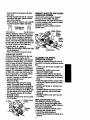
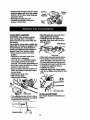
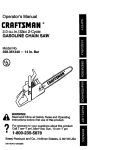
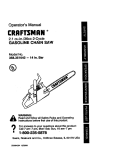
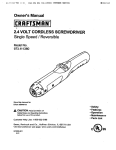
Operator's Manual
CRRFTSMRN
2.2 cu. in./36cc 2-Cycle
GASOLINE CHAIN SAW
Model No.
358.351560 - 16in. Bar
@
Read and follow all Safety Rules and Operating
WARNING:
Instructions before first use of this product.
For
to your
questions
thispm,
product:
Call answers
7 am--7 pm,
Mon.-Sat.,
or about
10 arn--7
Sun.
•
1-800-235-5878
(.o..,=_=_._m.)
I
'S_s,
Roebuck and Co., Hoffman Estates, IL 60179 USA
530087619 06/08/98
!saW_e_n_/ules
:_mb)
)Operation
Maintenance
Service and Adjustments
Storage ShootingChart
Trouble
11
14
Pads
List
Spanish
, Pads & Ordering
16
17
20
24
Back
FULL ONE YEAR WARRANTY ON CRAFTSMAN ® GAS
CHAIN SAW
For one year from the date of purchase, when this Craftsman Gas Chain Saw is
maintained, lubdcated and tuned up according to the owner's manual, Sears will
repair, free of charge, any defect in matedai or wodornanship.
This warranty excludes the bar, chain, spark plug and air filter,which are
expendable parts, and become wom dudng normalusa.
If this Gas Chain Saw is used for commercial or rental purposes, this warranty
applies for 30 days from the date of purchase.
WARRANTY SERVICE IS AVAILABLEBY RETURNING THIS CHAIN SAW TO
THE NEAREST SEARS SERVICE CENTER IN THE UNITED STATES.
This warranty gives you specific legal dghts,and you may also have other dghts
which vary from state to state.
Sears, Roebuck and Co., D/817 WA, Hoffman Estet_'s,:lL 60179
WARNING: Always disconnect spark
plug wire when making repairs except
for carburetor adjustments. Because a
chain saw is a high-speed woodcutting
tool, careless or improper use of this
tool can cause sedous injury.
PLAN AHEAD
• Reetdct the use of your saw to adult
users who understand and can follow
the safety rules, precautions, and op-erating Instructionsfound in this
manual.
Snug
Firing _
Clothing
Heavy Duty
Gloves
Safety
Shoes
j
\
•
•
•
Chaps
NM
•
,_Wear protective gear. Always use
steef-toed safety f_twear with nonslip soles; snug-fittingclothing;heavy2
duty, non-slipgloves; eye protection
such as non-fogging,vented goggles
or face screen; an approved safety
hard hat; and sound barriers (ear
plugs or mufflers)to protect your
hsadng. Regular users should have
headng checked regularlyas chain
saw noise can damage hearing. Secure hair above shoulder length.
Keep aimparts of your body away from
the chainwhen the engine is running.
Keep chgdrsn,bystanders, and animals at least 30 feet (10 meters)
away from the work area when starting and usingthe saw.
Do not handle or operate a chain saw
when you are fatigued, ill, or upset, or
if you have taken alcohol, drugs, or
medication. You must be in good
physicalconditionand mentally alert.
If you have any conditionthat might
be aggra.vatedby strenuous work,
check with doctorbefore operating.
Do not stert cuttinguntilyou have a
clear work area, secure footing, and
especially if you are felling a tree, a
retreat path.
OPERATE YOUR SAW SAFELY
• Donot operatewithonehand Seriousinjurytothe operator,helpers,or
bystandersmayresultfromonehandedoperation.A chainsaw is intendedfortwo-h.anded
use.
• Operate the ch_unsaQwonly-ine,wellventilated outdoor area.
• Do not operate saw from a ladder or
in a tree, unless you are specifically
trained to do co.
• Make sure the chain will not make
contact with any object whge starting
the engine NeverW to startthe saw
whenthe guidebar is in a cut.
• Store the unit and fuel in a cool, dry
well ventilatedspace where fuel vapors cannot reach sparks or open
flames from water heaters, electric
motors or switches,furnaces, etc.
GUARD AGAINST KICKBACK
Follow all safety rules to help.avoid
kickback and otherforces which can
result in ssdous injury.
k Path
Avoid Obstructions
• Do not put pressure on the saw, espeoiailyat the end of the cut. Doing
so can cause you to lose control
when the cut is completed.
• Stop engine before seffing saw down.
• Hand carry saw only when engine is
stopped. Carry with muffler away from
Qear The WoddngArea
body;,guide bar & chain projectingbeWARNING: Rotational Kickback can
hind you; guide bar preferably covered with a scabbard.
occur when the moving chain contacts
an object at the upper portion of the tip
MAINTAIN YOUR SAW IN GOOD
WORKING ORDER
• Have all chain saw service performed
by a qualified service dealer except
the items listed in the maintenance
section of this manual.
• Make certain the saw chain stops
movingwhen the throttle trigger is released. For correction, refer to "CarburetorAdjustments."
• Keep the handles dry, Clean, and free
from oil or fuel mixture.
• Keep caps and fasteners securely
tightened.
• Use only Craftsman accassodes and
replacement parts as recommended.
Ne'ger modifyyour saw.
ofthe guidebar.Contactat the upper
portion of th6'tip of the guide bar can
cause the cl'_ainto dig into the object,
which stops the chainfor an instant.The
resultis a lightningfast, reverse reaction
which kicks the guide bar up and back
toward the operator.
Pinch-K]ckhackand Pull-In occur when
the chain is suddenly stopped by being
pinched, caught, or by contacting a foreign object in the wood. This sudden
stopping of the chain results in a reversal of the chain force used to cut wood
and causes the saw to move in the opposite direction of the chain rotation.
Pinch-Kickback drivesthe saw straight
back toward the operator. Pull-In pulls
the saw away from the operator.
HANDLE FUEL WITH CAUTION
REDUCE THE CHANCE OF
• Do not smoke while handling fuel or
KICKBACK
while operatingthe saw.
R_
that kickbackcan happen.
• Eliminatsallsourcssof sparksor ltame • With
a basic unden_mding 1ofkiddoeck,
in arees where fusl is mixed or psured.
you can reducethe element of surprise
• Mix and pourfuel in an outdoor area
which conlrbutesto eccidents.
and use an approved, marked con• Never let the moving chain contact
tainer for all fuel purposes. Wipe up
any object at the tip of the guide bar.
all fuel spills before starting saw.
• Keep working area free from oi0struc• Move at least 10 feet (3 meters) from
tions such as other trees, branches,
fueling site before starting.
rocks, fences, stump, et_. Eliminate
• Turn the engine off and let saw cool in
or avoid any obstructionthat your saw
' a-nt)rPcombustiblearea, not on dry
chain could hit while cutting.
leaves, straw, paper, etc. Slowly re• Keep saw chain sharp and propedy
tensioned. A loose or dull chain can
move fuel cap and refuel unit.
increase the chance of kickback. Follow manufacturer's chain sherpenlng
and maintenance instructions.Check
tension at regular intervals, but never
with engine running. Make sure bar
clamp nuts are securely tightened.
• Begin and continue cuttin_lat full
speed. If the chain _movmg at a
slower speed, there _sgreeter chance
of kickback occurring.
• Use extreme caution when reentering
a cuL
• Do not attempt cuts startingwith the
tip of the bar(plunge cuts).
• Watch for shifting logs or oti_erforces
that could dose a cut and pinch orfall
into chain.
• Use the specified Reduced-Kiokback
Guide Bar and Low-KiokbackChain.
Avoid Pinch-Kickback:
• Be extremely swam of situations or
obstructions that can cause matedal
to pincl_,the top of or otherwise stop
the chron.
• Do not cut more than one log at e
time.
• Do not twist saw as bar is withdrawn
from an undercut when bucking.
Avoid PulHn:
• Always begin cutting with the engine
at full speed and the saw housing
against wood.
• Use wedges made of plastic or wood.
Never usa metal to hold the cut open.
MAINTAIN CONTROL
Stand to the left of the saw
keep your body from being in a direct
line with'the cuffing chain.
• Stand with,your walght evenly balanced on both feet.
• Do not overreach. You could be drawn
or thrown off balance and lose control.
• Do not cut above shoulder height. It Is
difficultto maintain control of saw
'above shoulder height.
KICKBACK SAFETY FEATURES
WARNING: The followingfeatures are
included on your saw to help reduce
hazard of kickback;however, such features will not totally eliminate this danger. Do not rely only on safety devices.
• Handguard: designed to reduce the
chance of your left hand contacting
the chain ifyour hand slips off the
front handlebar.
• Positionof front and rear handlebars:
designed _
distance between handles and ",n-line"with each other.The
spread and."in-line" position of the
hands prodded by this design work
together to give balance and rasmtance in controlling the pivot of the
saw back toward the operator if kickback occum.
• Reduced-I_ckback Guide Bar:.designed with a small radius tip which
reduces the size of the kickback dan_er zone. This type b.m has been
emonstrated to significantlyreduce
the number and sedousness of kickbacks when tested in accordance with
ANSI B175.1.
Small Radius
Tip Guide Bar
underside
of handlebar
Thumbon
I
i
Elbow
locked
• Low-KickbackChain: has met kickback
performance r_jui_
when tested
on a represent_ve sample of chain
Neverreverse han@podtJons
saws below 3.8 cubic inch
• A good, firm grip on the saw with both
displacementspecifiedin ANSI B175.1.
hands will help ,you maintain control.
Low-_ckbackChain
Don't let go. Gdp the rear handle with
Contoured Depth Gauge
your dght hand whether you are dght
or left handed. Wrap the tingem of
Deflects
your left hand over and around the
Force And Allows
front handlebar, and your left thumb
_ Wood
longsted
To Grsdu_
Guard Link
under the fiord handlebar. Keep your
Ride Into Cutter
left arm straight with the elbow locked.
SAFETY NOTICE: Exposure to.
• Positionyour !eft hand on the front
handlebar so it is in a straight line with _"mations through prolonged use of
your dght hand on the rear handle
gasoline powared hand tools could
when making bucking cuts. Stand
cause blood vessel or nerve damage in
the fingers, hands, and joints of people
slightlyto the left side of the saw to
\
4
prone to circulation disorders or
abnormalswelling. Prolonged use in
cold weather has been linked to blood
vessel damage in otherwise healthy
people. If symptoms occur such as
numbness,10am,lossof strpng__,_
change in.sldncolor o'ttextu-re,or_
of fee._. m the fingers, hands,'or joints,
discontinuethe use of th=stool and
seek medical attention. An
anti-vibrationsystem does not
guarantee the avoidance of these
problems.Users who operate power
tools on a continual and regular baszs
must closely monitor their physical.
cond_on and the condrdion of thzstooL
CHAIN BRAKE If this saw is to be used
for commercial logging, you must order
and installa chain brake to comply with
Federal OSHA Regulations for CommerciaiLogging. Contact your Sears
Service Center or call 1-800-235-5878.
SPARK ARRESTOR: Your saw is
equipped with a tempomtum limiting
CARTON CONTENTS
Check cation contents against the followinglist.
Model 358.351560
• Chain Saw (fully assembled)
• Bar tool
• 2-cycle engine oil
• Examineparis for damage. Do not
use damaged parts.
n_.er and spark arre_
s_rsan
which meets the re remante
of
California Codes 4442 and 4443. All
U.S. forest land and the slates of
Califomia, Idaho, Maine, Minnesota,
New Jersey, Oregon, and Washington
require by law that many internal
combustion engines be equipped with a
spark arrestor screen. If you operate a
chainsaw in a stateor localeW,hem
n_oonr_llationse.xi_,youare legally
• for m=,nteining
the
operating condition of these pads.
Failure to do so is a viola_on of the law.
Refer to Customer Responsibilities
chart in the MAINTENANCEsection.
STANDARDS." This chain saw is listed
by UndenmitersLaboratories, Inc. in
accordance with American National
Standards for Gasoline-Powered Chain
Saws Safety Requirements (ANSI
B175.11-t_1991).
• If you need assistance or find that
parts are missing or damaged, please
call 1-800-235-5878.
NOTE: It is normal to hear the fuel filter .
rattle in an empty fuel tank.
Your unit has been factory tested and
the carburetorprecisely a_usted. As a
resultyou may smell gasoSne orflnd a
drop of oil/fuel residue on the muffler
when you unpackthe unit.
ASSEMBLY
Your saw is fully assembled; no
assamUy
le
KNOW YOUR SAW
READ THIS OPERATOR'S MANUAL AND SAFETY RULES BEFORE OPERATING YOUR CHAIN SAW. Compare the illustrationswith your unit to familiadze
yourseff withthe _ocation of_thevadous controlsand adjustments. Save this
manual for future reference.
'
Bar Tool
Front Handle
Starter Rope
OWSTOP
CRRFT3MRN"
Bar Oil RII Cap
Housing
Fuel Mix RII Cap
Cylinder Cover
Fast Idle
Lockout
Adjus_ng
Screw
Rear
Handle
Throttle
Tdgger
Ct_n
Direction
of Travel
Choke
Knob BarClarnp Chain Bar Clamp Nuts GuideBar
Catcher
ON/STOP SWITCH
The ON/STOP Switch is used to stop
the engine.
THROTTLE TRIGGER
The throttletdgger controlsengine
speed.
THROTTLE LOCKOUT
The throttle lockout must be pressed
before you can squeeze the throttletrigger. This feature prevents you from accidentallysqueezing the tdgger.
F_
IDLE LOCK
The fast idle lock holds the throttle tdgger in the starting position.Activate the
fast idle lock by pressing the throttle
lockout and squeezing the throttle tfig_e_. With the throttle rigger squeezed,
press the fast idle lock. Release the
thmffie lockoutand tdgger while holding
the fast idle lockbutton.
CHOKE KNOB
The Choke Knob activates the choke to
provideadditionalfuel to the engine
duringcold starting.
PRIMER BULB
The Pdmer Bulb circulates fuel to the
carburetor to provide quicker starting.
CHAIN TENSION
It is normal for a new chain to stretch
dudng first 30 minutes of operation. You
should check your chain tension frequent. See Chain Tension under the
enaca and Adjustments section.
6
BEFORE STARTING ENGINE
WARNING: Be sure to read the fuel
handling informationin the safety rules
section of this manuel before you begin.
If you do not understand the fuel hendling informationdo net attempttofuel
your unit. Seek help from someone that
does understand the informationor cell
the customerassistance help line at
1-800-235-5878.
GUIDE BAR AND CHAIN OIL
The chain oiler provides continuous lubricationto the chain and guide bar. Be
sure to fill the bar o01.tankwhen you fill
the fuel tank (Capacity = 6.8 ft. oz.).
For maximum guide bar and chain life,
we recommend you use Craftsman
chain saw bar oil. If Craftsmen bar oil is
not available, you may use a good
grade SAE 30 oil untilyou are able to
obtainCraftsmen brand. The oil output
is automatically metered during operation. Your saw will use approximately
one tank of bar oil for every tank of fuel
mix.Always fill the bar oil tank when
you flil the fuel tank.
FUELING ENGINE
This engine is certifiedto operate on
unleaded gasoline. Before operation,
gasoline must be mixed with a good
quality2-cycle air-ccoled ehgine oil. We
recommend Craftsman brand o,1.Mix
gasoline and oil at a ratio of 40:1 (A
4_.1 ratio is ob_nsd by mixing 3_.
ounces of oil with 1 gallon of unleaded
gasoline). DO NOTUSE automotive oil
or boat oil. These oilswill cause engine
damage. When mbdngfuel follow the
instructions
pdntedonthe container.
Once.oilisaddedto the gasoline,
shake container momentarily to assure
that the fuel is thorougldymlxed.
Always read and follow the safetyrules
relatingto fuel before fueling your unit.
IMPORTANT
ExpedenceindicaWs
that elcohoiblanded
(ce,edgasoh¢
or
or
mathenoi)cen atirad moielurewhich
linesand catouratorare emply. Use fresh
fuel nsxt ssason. See STORAGEk_'tructions for edd_x_ informa_on.
Never use engine or carburetor deener
products in the fuel tank or permanent
damage may occur.
See the STORAGEsection for additional
information.
STOPPING YOUR ENGINE
• MoveOn/Stopswitchto STOP.
• If enginedoes notstop,pullchoke
knoboutfully.
STARTING YOUR ENGINE
COLD ENGINE OR WARM ENGINE
AFTER RUNNING OUT OF FUEL
• Fuel engine with 40:.1 fuel mix.
• Fillbar oil tenk with bar oil.
• Prime engine by pressing primer bulb
six times.
• Move On/Stop switch to ON.
Primer Bulb
t
•
•
Full
• Acluate choke by pulling choke knob
fully ouL
• Set saw on the ground. Grip front
handle with your left hand and place
rightfoot through mar handle.
Starter Rope Handle
LeJtHand
on Front
Handle
RearHandle
• Set fast idle by depressing the throUle
lock with your right hand. Then,
adds duringstorage.Addio gas can
squeeze end holdthrottie trigger. With
whdd_,_e
the fuel systemof an engine
your thumb, press the fast idle lock
storage.
,
down and hold. Next, release the
To _Q_-engine problems,the fuel systhrottie _gger.
tem should be emplbd before storagefor • .DONOT squeeze throttie trigger dur30 claysor longer.Dlain the gas tank,
ing starling; othelwise, it will be necstaxtthe engine and let it run unffithe fuel
essary to msot the fast Idle iock.
lesdsto eepar_on and_
of
NOTE: When pullingthe starter rope,
OPERATING
do not use the full extent of the rope.
Do not let stinter rope snap bad_ Hold
handle. Let rope rewind slowly.
• Check chain tendon before first use
and aftor,1 minute of operation. See
Chain Tension in the Maintenance
8eotJon.
TIPS
• Pull miter rope handle firmly and
quicklywith your righthand untl"lthe
• Cut woed only.Do not out metsl, plasengine attempts to start or 5 pulls.
tics, masonry,non-wood buildingrnaThen push tl_ chokeknob fully in.
tedab, etc;
• Stop the saw ifthe chatn atnlcse a forResume pullinghandle until engi0e
starts. See Igustration.
eign object.Inspectthe saw and re• Above 40°F, allow engine to runfor
pair paits as .r.r._.:
• Keep the chain out of dirt and sand.
approximately 5 seconds. Push the
Even a small amount of dirtwillquick.
choke knob in to the OFF position;
then squeeze and release throttle trig.
blY
dulia chainandincreasetheposslllHyof idcid:)ask.
ger to allow engineto idte.
• Practice cuttinga few small logsusing
• Below 40°F, allow engine to warm up
the foflowingsteps. This wil helpyou
for 30 saconds to 1 mirnJte.Push
get the "feet"of using your saw before
choke knob in 1/2 way;,then squeeze
you begin a majorsawing operaSon.
and release throffie tdgger to allow
• Squeeze the throttle _gger and alengine to idle.
• To stop engine, move On/Stop switch
to the STOP position.
STARTING A WARM ENGINE
DO NOT use the choke to start a warm
lowthe engineto reach full speed
beforecutting.
• Begincuttingwiththe saw frame
againstthe log
• Keep the engine at full speed the
enbretime you are cutting.
• AJIowthe chain to cut for you. Exert
only lightdownward pressure.
• Release the throttle tdgger as soon
as the cutis completed, allowingthe
engineto idle. If you run the saw at
full throttle without a cuffing load,
unnecessarywear can occur.
• To avoidlosingcontrol when cut is
complete, do not put pressure on
saw at end of cut.
• Stop enginebefore setting saw down.
engine or floodingand hard starting
may occur.
• Move On/Stop switchto ON.
• Set fast idle lock.
• Be sure choke is in the OFF position.
• With saw on ground,gdp front handle
with left hand and place your dght foot
through rear handle.
• Pull starter rope handle until engine
starts.
• Squeeze and release throttle trigger
to return engine to idlespeed.
TREE FELUNG TECHNIQUES
WARNING: Check for broken or dead
DIFFICULT STARTING OR
branches whichcan fall while cutting
STARTING A FLOODED ENGINE
The engine may be flooded if it has not ca_ing serious .injury.DO not cut near
buddingeorelectrical wires if you do not
started after 10 pulls.Flooded engines
know the directionof tree fall, norcut at
;can be cleared of excess fuel with the
night since you will not be able to see
following procedure:
well, nor dudngbad weather suchas
• Engage the fast idl_ lock.
• Verify that the On/Stop switch ls in the rain, snow,or strongwinds, etc.
ON position.
• Carefully plan your sawing operation
in advance.
Push choke knob to the OFF position.
•"With saw on ground,gnp front handle • Clear the workarea. You need a dear
with left hand and place dght foot
area allaround the tree so you can
through rear handle.
have secure footing.
• Study the naturalconditions thatcan
• Pull starter rope handle until engine
starts.
_usa the tree to fall in a partbular
direction.These conditions include:
• Starting could require many pulls de• The wind directionand speed.
pending on how badly the unit is
• The lean of the tree. The lean of a
_ flooded, if en_ne still fails to start, re-fer to the TROUBLESHOOTING chart or
tree mightnot be apparent due to
call 1-800-235-5878.
uneven or sloping terrain. Use a
8
plumbor levelto determinethe directionoftree lean.
• Weightendbrancheson oneside.
• Surroundingtrees end obstacles.
• Look for decay and roL If the trunk is
rotted, itcan snap end fall toward the
operator.
*
• Make sure there is enough room for
the tree to fall. Maintain a distance of
2-1/2 tree lengths from the nearest
person or other objects. Engine noise
can drown out a warning call.
• Remove dirt, stones, loose bark,
nails, staples, end wire from the tree
where cuts are to be made.
This hinge will help prevent the tree
from
in the wrong direction.
HingeholdsYeson
stumpandhelps
controlfall
NOTE: Before falling cut is complete,
use wedges to open the cut wben
neceesaw to controlthe direction of fall.
To avoid klcld)ack end _n
damage,
use wood or plastic wedges, but never
steel or iron wedges.
Plana dear retreatpath
• Be alert to signsthat the tree is ready
to fall: crackingsounds, widening of
the fellingcut, or movement in the upper branches.
• As tree startsto fall, st.op saw, put it
down, and get away quickly on your
planned retreat path.
FELUNG' LARGE TREES
• Be extremely cautious with partially
fallen trees that may be poorly sup(6 inches in diameter or larger)
ported. When a tree doesn't fall cornThe notch method is used to fell large
pletely,seLthe saw aside and pull
trees. A notch is cut on the side of the
down the tree _vith a cable winch,
tree in the desired directionof fall. After
block and tackle, or tractor. Do not
a felling cut is made on the opposite
use your saw to cut down a partially
side of tree, the tree will tend to fall in
fallen tree.
the directionof the notch.
CUTTING
A FALLEN TREE
NOTE: If tree has large buttress roots,
remove them before rnaldng the notch. (BUCKING)
Bucking is the term used for cuttinga
NOTCH CUT AND FELUNG TREE
fallen tree to the desired log s'rTe.
• Make notch cut by cuffingthe top of
WARNING: Do not stand on the log
the notch first. CUt through 1/3 of the
being cut. Any porlJoncan rollcausing
diameter of the tree. Next complete
loss of footingend control. Do not stand
the notch by cuttingthe bottom. See
illustration.Once the notch is cut, re- downhill of the log being cut.
move the wedge of wood from tree.
IMPORTANT POINTS
RnaJcuthere
• Cut only one logat a time.
Rrstcut
• Cut shatteredwood very carefully;,
sharp pieces of wood could be flung
toward operator.
• Use a sawhorse to cut small logs.
Notch _
Never allow another person to hold
the log while cuffingend never hold
the logwith your leg or fooL
• Do notcut in enaree where logs,
=r on of
&
.
• After removing the wood, make the
fellingcut on the opposite side of the
notch.Thisisdoneby makinga cut
abg_-two inches higher than the center of the notch. This will leave
enough uncut wood between the felling cut and the notch to form a hinge.
,mb endroo m tanCecL
Drog
intoa deer en)a before cultJngthem.
BUCKING TECHNIQUES
WARNING: If saw becomes pinched
or hung in a log, don'ttry to force It out.
You can losecontrol ofthe saw resulting in injury end/or damage to the saw.
Stop the saw, drive a wedge of plastic
orwood intothe cut unt_the saw can be • UMngs log
rernovndeasily.Rsstartsaw and carefulty for support
reenterthe cut. Do not usa a mstal
wedge.Donotattampt
to restart
your
.....
saw when it is pinchedor hung In a log.
Use a wedge to mrnove pinched saw
,..,__
_.,. _ut,_,
.
._
o
_1_
INjt
_
._
_
_
O"
la_
-£--
.4_ql:_
__
---"
"1_1'
Turn.sawORFand usas pisstJc
or
wcoaenwedgeto forcecutogen.
Overcutting begins on the top side of
the log with the bottom of the saw
against the log. When overcuttJnguse
lightdownward pressure.
Ovemuttlng
Undercutting
BUCKING USING A LOG OR
SUPPORT STAND
• Remember your first cut is always on
the compression side of the log. (Refer to the illustrationbelow for your
first and second cut).
• Your first cut should extend 1/3 of the
diameter of the log.
• Finishwith your second cut.
Undercutting involvescutting on the
underside of the log with top of saw
against the log. When undercuttinguse
lightupward pressure. Hold saw firmly
and maintaincontrol. The saw will tend
to push back toward you.
Using a support stand
WARNING: Never turn saw upside
down to undercut. The saw cannot be
controlled in this position.
Always make your first cut on the
compression side of the log.
Rrst cut on common
_
2ndCut
1stCut
L
2_ Cut
side of log
2
-P Second cut
Rrst cut on compression side of log
BUCKING WITHOUT A SUPPORT
• Overcut through 1/3 of the diameter of
the log.
• Roll the log over and finish with a sacond overcut.
•-Watch for logs with a compresion
side. See ,lustratlon above for cutting
logs with a compression side.
LIMBING AND PRUNING
WARNING: Never climb intoa tree to
limb or prune. Do not stand on ladders,
platforms,a log, or in any position
which can cause you to lose your balance or control of the saw.
IMPORTANT POINTS
• Watch out for spfingpoles.
Springpolesare small size limbs
which can whip toward you, or pull
you off balance. Use extreme cautmn
when cuttingsmall size limbs.
• Be alert for spdngback. Watch out for
branches that are bent or under pressure. Avoid being struckby the
branch or the saw when the tension in
the wood fibers is released.
• Frequentlyclear branches out of the
way to avoid tdpping over them.
10
•UMBING
Limba tree onlyafterit is cutdown.
branchesarehigherthanyourshouldef.Geta professionalto dothe job.
• Leave the larger limbs underneath the • Make your first cut 1/3 of the way
felled tree to support the tree as you
through the bottom of the limb.
work.
• Next make a second cut ell the way
• Start at the base of the felled tree and
through the limb.
worktoward the top, _uttingbranches
• Rnish the pruningoperation by using
and limbs. Remove small limbswith
an overcut so that the stump of the
one cut.
limb protrudes I to 2 inches from the
trunk of the tree.
• Keep the tree between you and the
chain.
Second cut
• Remove larger, supporting branches
withthe 1/3,2/3 cuttingtechniques descdbsd in the bucldng section.
• Always use an overcut to cut small
Rrst cut
and freely hanging limbs. Undercut1/3 of way
ting could cause limbsto fall and
pinch the saw.
PRUNING
3rd cut I to 2 in.
from trunk of tree
WARNING: Limit pruningto limbs
shoulder height or below. Do not cut it
CUSTOMER RESPONSIBILITIES
Fill in dates as you complete
regular service
Before After Ever_ Every Yearly Service
Dates
Use Use 5 hrS. 25 hrs
Check for damaged/wom parts
p,,
Check for loose fasteners/parts
_,
Check chain tension
11
Check chain sharpness
p-
Check guide bar
p,,
Clean unit & labels
p,,
Clean air filter
_'
ClaaNiuspect spark arrestor
sqr_rL& inspect muffler
_"
Replace spark plug
GENERAL RECOMMENDATIONS
The warranty on this unit does not cover items that have been subjected to
operator abuse or negligence. To recalve fullvalue from the warranty, the
operator must maintain unit as instructed in this manual. Various adjustments
will need to be made periodically to
propady maintain your unit.
• Once a year, replace the spark plug,
air filter element, and checl_ guide bar
• _"€:_a-'infor wear. A new spark plug
and air filter element assures proper
alr-fual mixture and helps your engine
_'
run better and last longer.
WARNING: Disconnect the spark plug
before performing maintenance except
for carburetor adjustments.
LUBRICATION
1 Bar
Sn,_L._,
-'_---,
2 Bar Oil
R"Ca0 'j_
1 Usesprocketlubd_tion ="
"_
2 Use Craftsman chain saw bar oil
44
CHECK FOR DAMAGED OR
WORN PARTS
Replacement of damaged_om parts
should be referred to your _ears _ervice Center.
NOTE: It is normal for a small amount
of oil to appear under the saw after engine stops. Do ndt confusethis with a
laaidng oiltank.
• On/Stop Switch- Ensure On/Stop
switch functionsproperly_by moving
the switch to the "Stop position.
Make sure engine stops; then restart
engine and continue.
• Fuel Tank- Do not use saw if fuel
tank shows signs of damage, or leaks.
• Oil Tank- Do not use saw if oiltank
shows signs of damage or leaks.
CHECK FOR LOOSE
FASTENERS AND PARTS
• Bar Clamp Nut
• Chain
• Muffler
• Cylinder Shield
• Air Filter
• Clutch Drum/Sprocket
• Handle Screws
• Vibration Mounts
• Starter Housing
• Handguard
CHECK CHAIN TENSION
• Use the screwdriver end of the bar
tool to move chain around guide bar
to ensure kinks do not exist. The
chain should rotate freely.
•
bettool
around
har to ensure_ links ere In bet groove.
• Liftup tip Qfguide bar to check for
sag. Release tip of guide bar, then
turn adjustingscrew until sag does
not e_st.
• While liftingtip of.guide bar, tighten
,bar damp.nuts with the bar tool.
Torqueto 10-15 ft-lhs.
• Usa the screwdriver end of the bar
tool to move chain around guide bar.
• If chaindoes not rotate, it is too tight.
Slightlyloosen bar clamp nuts and
loosen chain by turningthe adjusting
screw. Rstightan bar clamp nuts.
• If chain is too loose, it wilt sag below
the guide bar. DO NOT operate the
saw if the chain is loose.
CHECK CHAIN SHARPNESS
A sharpchain makes wood chips. A
dull chain mitkes a sawdust powder
and cuts slowly.
CHAIN SHARPENING
Chain sharpening requires special
tools. You can purchase sharpening
tools at Sears or go to a professional
chain sharpener.
CHECK GUIDE BAR
Concrdionswhich require guide bar
maintenance:
• Saw cuts to one side or at an angle.
• Saw has to be forced through the cut.
• Inadequate supply of oil to bar/cheln.
Check the condifionof guide bar each
time chain is sharpened. A worn guide
bar willdamage the chain and make
cuttingdifficult.To maintain guide bar.
Bar ClampNuts
• Move On/Stop switchto "Stop."
• Remove bar and chain from saw.
• Looser bar clamp nuts untilthey are
• Clean all sawdust and any other
finger tight againstthe bar damp.
debrisfrom the guide bar groove and
•Tum adjusting screw untilchain baresprocket
hole after each use.
_ytouches the bottom of guide bar.
GuideBarGroove __
y
Remove Sawdust From
12
sp=k.t, .
IJ
=
• Add lubricantto sprocket hole after
each use.
• Burringof guide bar mils is a normal
process of railwear. Remove these
burrs with a fiat file.
• When railtop is uneven, use a flat file
to restore square edges _
sides.
sidesSquare
FileEdgesand
WomGroove
CorrectGroove
Replace guide bar when the groove is
wom, the guide bar is bent or cracked,
or when excess heating or burringof
the rails occurs, if replacement is necessary, use only the guide bar specified
for your saw in the repair parts listor on
the decal located on the chain saw.
CLEAN UNIT & LABELS
• Clean the unit using a damp cloth with
a mild detergent.
• Wipe off unit with a clean dry cloth.
CLEAN AIR FILTER
A dirty air filter decreases the life and
performance of the engine and increases fuel consumption and harmful
emissions. Always clean your air filter
after 15 tanks of fuel or 5 hours of operation, whichever comes first. Clean
more frequently in dusty conditions.A
used air filter can never be completely
cleaned. It is advisable to replace your
air filter with a new one after every 50
hours of operation, or annually, whichever comes first. To clean filter:.
• Loosen 3 screws on cylindercover.
• Remove cylinder cover.
• Remove air filter.
• Clean the air filter using hot soapy
water. Rinse with clean cool water.
Airdry completely before reinstalling.
• Lightlyoil air filter before installingto
improve the efficiency of eir filter. Use
2-cycle engine oil or motor oil (SAE
30). Squeeze excess oil from filter.
• Reinstall air filter.
• Reinstall cylinder cover and 3 screws
(15-20 in-lbs.).
CylinderCover
Air Filter
Screws
INSPECT MUFFLER AND SPARK
ARRESTOR SCREEN
As the unit is used, carbon deposits
build up on the muffler and spark
arrestor screen, and must be removed
to avoid creating a fire hazard or affecting engine performance.
Replace the spark arrestor screen if
breaks occur.
Muffler Diffuser
Muffler
Cover
Screws
Body
Muffler
Cover
CLEANING THE SPARK
ARRESTOR SCREEN
Cleaning is r_qtJiredevery 25 hours of
operation or anhually, whichever comes
fireL
• Loosen and remove the 2 muffler cover screws
• Remove the muffler cover (cover
snaps off muffler body).
• Remove muffler diffuserand spark
arrestor screen assembly.Notice the
orientationof these parts for reassembling.
• Clean thespark arrestor screen with a
wire brush. Replace screen if breaks
are found.
• Replace any broken or cracked muffler parts.
• Reinstall diffuserand spark arrestor
screen assembly with roundholes
facing up.
• Reinstall muffler cover and 2 screws
(7.8ft-bs).
REPLACE SPARK PLUG
The spark plug should be replaced
each year to ensure the engine starts
eesBr and runs better. Ignitiontiming is
fixed and nonadjustable.
• Loosen 3 screws on cylinder cover.
• Remove the cylinder cover.
Pull off the spark plug beoL.
• Remove spark plug from cyl,nderand
discard.
• ReplacewithChampionRCJ7Yspark
plugandtightenwitha 3/4inchsocket
wrench(10-12ft-lbs).Sparkpluggap
shouldbe .025in.
Cylinder
Cover
• Reinstall the spark plug boot.
• Reinstall the cylindercover and 3
screws (15-20 in-lbs).
Spark
Rug
CHAIN REPLACEMENT
• Slide the guide bar rearward until it
stops againstthe sprocket.
CAUTION: Wear protective gloves
• Carefully remove new chain from
when handling chain. The chain is
package. Hold cha,n with the drive
sharp and can cut you even when it is
linksas shown.
not moving.
Culters
Dep_ Gauge
It is normal for a new chalnto strstchduring • e flint "15minutes of operation.You
shouldrecheckyourchaintensionfrequentlyandadjustthachaintensionas
required.See Chain Tensionsection.
• Move On/Stop switchto the Stop
position.
• Replace the old chain when it becomes worn or damaged.
• Use only the Low-Kickback replacement chain specified in the repair
parts list. The correct replacement bar
and chain is also specified on a decal
located on the chain saw.
• See your Sears Sen_ce Center to replace and sharpen individual cutters
on your chain.
• Remove bar clamp nuts.
• Remove bar clamp.
• Remove the old chain.
DriveUn_
• Place chain over and behind clutch.
• Fit the bottam of the drive links between the:teethin the sprocket nose.
• Fit chain drive links into bar groove.
• Pullguide bar forward untilthe chain
is snug in the guide bar groove.
• Installthe bar clamp.
• Install bar clamp nuts; finger'tighten
only.Do not tighten any further at this
point.
Bar
Clamp
Bar
Clamp Nuts
•Tum adjusting screw on bar to move
the tensioning rack as far as it will go
toward the front of the bar.
BarClampNuts
CHAIN ADJUSTMENT
See "Chain Tension"in Maintenance
section.
TenslonlngRack
14
CLEAN FUEL FILTER
To clean fuel filter, drain your unit by
runningdry of fuel, remove fuel cap/retainer assembly from tank. Pull filter
from tank and remove from line. Clean
with mild detergent and rinse..Dry.thoroughly,reassemble.
•
CARBURETOR
ADJUSTMENT
WARNING: The chain will be moving
during most of this procedure. Wear
your protectiveequipment and observe
all safety precautions. During the low
speed mixture adjustment recheck idle
speed after each tum of the screw. The
chain must not move at idle speed.
Carburetor adjustment is c_
and if
done improperlycan permanently damage the engine as well as the carburetor. If you require further assistance or
are unsure about performing this procedure, call our customer assistance help
line at 1-800-235-5878.
Start motor,let it runfor 3 minutes, and
proceed tothe adjustment section. If
engine does not start, refer to troubleshootingchart or call 1-800-235-5878.
If engine performance is acceptable at
the preset positionsand there is no
chain movement at idle, no further adjustment is necessary.
ADJUSTING PROCEDURE,
Idle Speed-T
Allow engine to idle. Adjustspeed until
engine runs without chain movement or
stalling.
• Turn clockwiseto increase engine
speed if engine stalls or dies.
• Tum counterclockwiseto decrease
speed.
No furtheradjustments are necessary if
chain does not move at idle speed and
if performance is satisfactory.
Low Speed Mixtura-L
Allow engine to idle. Then accelerate
the engine and note performance. If enOld fuel, a dirty air filter, dirty fuel filler,
gine hesitates, bogs down, or smokes
or flooding may give the impression of
during acceleration, tum mixturescrew
an improperly adjusted carburetor.
clockwise in 1/16-turnincrements until
Check these conditions before adjustperforrnsncs_s_,atisfactory. Repeat this
ingthe carburetor.
The carburetor has been carefully set at procedure as necessary for proper adthe factory.Adjustments may be neces- justment. After completingadjustments,
check for acceleration and chain movesary if you notice any of the following
ment at idle. Reset if necessary.
conditions:
• Chain moves at idle. See "idle Speed" High Speed Mixture-H
under adjusting procedure.
DO NOT operate engine at full throttle
for prolonged periods while maidng ad• Saw will not idle. See "Idle Speed"
and "Low Speed Mixture'under adjustments. Damage to the engine can
occur.Make a test cut. Based on perjusting procedure.
• Engine dies or hesitates when it
formance of the saw while cutting, adshould accelerate. Sea "Acceleration just the high speed mixturesetting in
1/16-tumincrementsas follows:
Check" under adjusting procedure.
• Loss of cuffingpower. See "High
• Ckx::kwiseuntilsaw has gcod power in
Speed Mixture H" under adju_ng
tha cutwith no _.
Do not adjust
procedure.
bysound
orspee butj.dgebyhow
weUthe sew performs in the cut.
There are three adjustmentscrews on
•
Counterclockwiseif the saw has
the carburetor. They are labeled H, L,
speed, but dies in the cut or lacks
and T. They are located in the area just
power in the cut.
above the primer bulb.
After
completingadjustments, check for
CARBURETOR
PRESETS
accelerationand chain movement at
When making adjustments, do not force idle. Reset if necessary.
the plastic limitercaps beyond the
Acceleration Check
stops or damage will occur.
If the ongins dissor hedlatss instsadof
If carburetor presets are not needed,
sccelarating, turnthe low spesd mixture
proceed to "Idle Spead-T."
adj_nt
counterdcclodseuntilyou
•Tum beth mixture screws,counterhave
smoothaccela_
with no chain
.ql_o_wiea untilthey stop.
movementat idle.Recheck and adjust as
• TdrWthe idle speed screw clockwise
untilit stops. Now tum counterclock- necessa_ for acceptableperformance.
wise 4-1/2 full turns.
Prepare your unit for storage at the end
of the season or if if will not be used for
30 days or more.
WARNING:
• Allow the engir_ to c_01,'_mdSecure
the unit before storing or.t_an_.. rig.
• Store chain saw and fuel Jnawell
ventilated area where fuel vapors
cannot reach sparks or open flames
from water heaters, electric motors or
switches, fumeces, etc.
• Store chain saw with all guards in
place and position chain saw so that
any sharp objectcannot accidentally
cause injury.
• Store chain saw well out of the reach
of children.
tive in minimizingthe formation of fuel
gum depositsdudng storage. Add stabilizer to the gasoline in the fuel tank or
fuel storage sontainer. Followthe mix
instructions-foundon stabilizercontainers. Run engine at least 5 minutes after
adding stabilizer.
CRAFTSMAN 40:1, 2-cycle engine oil
(air cooled) is especially blended with
fuel stabilizer. If you do not use this
Sears oil, you can add a fuel stabilizer
to your fuel tank.
ENGINE
• Remove spark plug and pour 1 teaspoon of 40:1, 2-cycle engine oil (air
cooled) through the spark plug open°
ing. Slowly pull the starter rope 8 to
10 times to distr_ute oil.
EXTERNAL SURFACES
• Replace spark plug with new one of
If your chain saw is to be stored for a
recommended type and heat range.
pedod of time, clean it thoroughlybe• Clean air tilter.
fore storage. Store in a clean dry area.
• Check entire unit for loose screws,
• Lightlyoil external metal surfaces and
nuts, and bolts. Replace any damguide bar.
aged, broken, or worn parts.
• Oil the chain and wrap it in heavy pa- • At the beginning of the next season,
per or cloth.
use only fresh fuel having the proper
gasoline to oil ratio.
FUELSYSTEM
OTHER
Under Fueling Engine in the Operating
Section of this manual, see message
• Do not store gasoline from one season to another.
labeled IMPORTANTregarding the use
of gasohol in your chain saw.
• Replace your gasoline can if it starts
to rust.
Fuel stabilizer is an acceptable altema-
16
TROUBLE SHOOTING CHART
TROUBLE
CAUSE
REMEDY
Engine will not
start orwill run
only a few
seconds after
starting.
• Ignition switch off.
• Move Ignitionswitchto ON.
• See "StartingInstnJctions."
• RII tank with correct fuel mixture.
Engine will not
idle property.
Engine will not
accelerate,
lacks power,
or dies under
a load.
tank-er_ty.
i FuSl
Eqgine
flooded.
Spark plug not fidng.
• Fuel not reaching
carburetor.
• Carburetor requires
adjustment.
• None of the above.
• Idle speed set too high
or too low.
• Low Speed Mixture
requires adjustment.
• Crankshaft seals wom.
• Compression low.
• None of the above.
• Install new spark plug.
Check for dirty fuel filte_ replace.
Check for Idnked or splitfuel line;
repair or replace.
• See "CarburetorAdjustments,"
• Contact Sears Service.
• See "CarburetorAdjustments."
• See "CarburetorAdjustments.•
• Contact Sears Service.
• Contact Sears Service,
• Contact Sears Service.
• Clean or replace air filter.
• Clean or replace plug
and regal}.
• See "CarburetorAdjustments."
: Air filter dirty.
Spark plug fouled.
• Carburetor requires
adjustment.
• Exhaust ports or muffler outlets plugged.
• Compression low.
• None of the above.
• Contact,6ears Service.
•
?
:
• Contact Sears Service.
• Contact Sears Service.
Engine smokes • Choke partially on.
• Fuel mixture incorrect.
excessively.
• Adjustchoke.
• Empty fuel tank and refillwith
correct fuel mixture.
Engine runs
hot.
Oil inadequate
for bar and
chain
lubrication.
• Air filter dirty.
• High Spee_l Mixture
reqmres adjustment.
'. Crankcase leak.
• Clean or replace air filter.
• See "CarburetorAdjustments."
• Fuel mixture incorrecL
• Spark plug incorrect.
• High Speed Mixture
set too lean.
• Exhaust ports or muffler-outlets plugged.
• Carbon build-up on
muffler outlet ecmen.
• Fan housing/cyUnder
fins dirty.
• None of the above.
• See =Fuel_g Your Unit."
• Replace with correct plug.
• See "CarburetorAdjustments."
• Contact Sears Service.
• Contact Sears Service.
• Clean spark arrestor screen.
• Clean area.
• Contect Seers Service.
• Fill oil tank.
• Contect Seare Service.
: Oil tank empty.
Oil pomp or oil filter
dogged.
• Guide bar oil hole
• Remove bar and dean.
bleck .
.i,,- P
TROUBLE
SHOOTING
TROUBLE
CHART-
Continued
CAUSE
REMEDY
1
Chain moves
at idle speed.
• Idle speed requires
adjustment.
• Clutch requires repair.
• See "CarburetorAdjustments."
• Contact Sears Service.
Chain does
==Chain tension too
not move
tight.
• Carburetor requires
when engine
is accelerated.
adjustment.
• Guide bar roils
pinched.
• Clutchslipping.
• See "Chain Tension."
Chain clatters • Chain tension incorrect.
or cuts roughly • Cutters damaged.
• Chain worn.
• Cutters dull, improperly
sharpened, or depth
gauges too high.
• Sprocket worn.
• Chain installed
backwards.
•
•
•
•
Chain stops
within the cut.
• Chain cutter tops not
filed fiat.
• Guide bar burred or
bent; roilsuneven.
• Clutch slipping
• See "Sharpening
• Cutters damaged on
one side.
• Chain dull on one side.
• Guide bar bent or wom.
• See "Sharpening Chain."
Chain cuts at
an angle.
• See "CarburatorAdjustments."
• Repair or replace.
• Contact Sears Service.
See "Chain Tension."
Contact Sears Service.
Rssharpen or replace chain.
See "Sharpening Chain."
• Contact Sears Service.
• Install chain in fight direction.
Chain."
• Repair or replace guide bar.
;
• Cont;=ctSears Service.
• See -sharpening Chain."
• Replace guide bar.
If situationsoccur which are not covered in this manual, use cars and good
judgemenL If you need assistance, contact Sears Service or the CUSTOMER
ASSISTANCEBELPUNE at 1-800-235-5878.
U. S. EPA/CALIFORNIA
maintenance of your lawn and garden
equipment engine.
EMISSION CONTROL
Your emission control system includes
WARRANTY STATEMENT
parts
such
asthecarbure-tor
andtheignitionsystem.
Where a warrantable condition exits,
SEARS will repair your lawn and garden
equipment engine at no cost to you. ExOBLIGATIONS
penses covered under warranty include
The U. S. Environmental Protection dlagnosis,parts and labor.
Agency/Cailfomia Air Resources Board
and SEARS, ROEBUCKAND CO., USA MANUFACTURER'S
WARRANTY
are pleased to explain the emissions COVERAGE-control system warranty on your lawn If any emissions related part on your enand garden equipment engine. All new gine (as listed under EmissionsControl
utility and lawn and garden equipment Warranty Parts USt) is defective or a deengines must be designed, built, a.nd fact in the materials or wofio'oanshipof
equipped to meet the stringent anti- the engine causes the failure of such an
smog standards. SEARS must warrant emissionre ated part, the part will be retheemisaioncontrolsystemonyourlawn
paired or replaced by SEARS. "
, amlgardene.g,ulprnsntengineforthepe- OWNER'SWARRANTY
RESPON" _
of time I,stedbelow pmwded there SIBILITIES -has been no abuse, neglect, or improper As the lawn and garden equipment en18
" "_6UR WARRANTY
RIGHTS
AND
gineowner,you are responsible for the shall be warranted for the period
performance of the require.a malnte-,
nance listed in your Owners ManuaJ.
SEARS recommends that you retain all
receipts covering maintenance on your
lawn and garden equipment engine, out
SEARS cannot deny wan_
solely for
the lack of receipts or foryour failure to
ensure the performance of all scheduled
maintenance.
of time up-to the first scheduled replacement point forth at part.
DIAGNOSIS - The owner shall notbe charged for diagnoatic labor which leads to the daterminationthat a warranted part
is defective if the diagnosticwork is performed at an approvedSEARS servicing
As the lawn and garden equipment englne owner, you should be aware that
SEARS may deny you warranty coverage if your lawn and garden equipmant
engine or a part of R has failed due to
abuse, neglect, improper maintenance,
unapproved modifications, or the use of
parts not made or approved by the origb
nal equipment manufacturer.
You are responsible for presentingyour
lawn and garden equ=pmentengine to a
SEARS authorized repaircenterassoon
as a problem exists. Warranty repairs
should be completed in a reasonable
amount of time, not to exceed 30 days.
If you have any questionsregardingyour
center,
,
_
CONSEQUENTIAL
DAMAGESSEARSmaybeliablefordamagasto?ther angine componants caused bythe lalb
ureof
awarrantedpartstillundarwarranty.
warranty
rights and
should
contact
yourresponsibilities,you
nearest authorized
service center or call SEARS at
1-800-473-7247.
WARRANTY
COMMENCEMENT
DATE - The warranty period beduinson the date
thelawn and garden equipment engine is
purchased.
LENGTH OF COVERAGE -This warranty shall be for a period of two
years from the initial date of purchase.
dified parts.
HOW TOFILEACLAIM
If
warrant,
WHAT IS NOT COVERED - All failures caused by abuse, neglect, or
improper maintenance are not covered.
ADD-ON OR MODIFIED PARTS -The use of edd-on or _
p=ts can
I_, .__go_bfor
(tsalicwing a wananty
_1€1_IL oF-J._r'to
is not liableto cover failures ofwarranted
partsoausedbythe useof add-on or mo-
service center or call
1-800-473-7247.
WHERE
TO GET
SEARS
at
SERVICE -servicecenters.
WHAT IS COVERED --
MAINTENANCE,
REPAIR OR
OF PARTS --
AND
REPLACEMENT
-
REPAIR
OF EMISSION
RE-
LATED PARTS--
Reg_r or replacement of any warranted
par_Willbe performed at no charge to .the
owner at an approved_SE/_RSservicing
center,
If you haveanyquestionsre_ardingyour
warranty rights and responsibilities,you
should contact your nearest aumorlzed
service center or call SEARS at
1-800-473-7247.
Any SEARS approved replacement part
used in the performance of any warranty
maintenance or repair on emise=onrelated parts wiU be provided without
charge to the owner if the part is under
warranty.
WARRANTY PERIOD-Any warranted part which is not sched.
uledfor replacement as requiredmalntenance, orwhichisscheduled only for regular inspectionto the effect,of "repair or
replay_as necessary" shall be warrarfft_ for 2 years. Any
warmntedpartwhichlescheduledformplacement as required maintenance
1.
2.
EMISSION
CONTROL
TY PARTS LIST--
WARRAN-
Carburetor
IgnitionSystem
a.
Spark Plug, covered up to
maintenance schedule.
b. IgnitionModule
MAINTENANCE
STATEMENT-The owner is responsiblefor the performance of all required maintenance as
defined in the owner's manual.
REPAIR PARTS
I
5O
51
19
23
18
17
3O
5
Pem'_lon
I_f
Pall No.
24.
53O0712._
Ct_k Vldve
28.
W1m-Tltmt_
28.
CMch CO_
29.
30.
Nut- Bar Moum_
CIx_ Lev_
31.
7. _
Gmmma-.C;_
Knob 32.
33.
34.
35.
10. 530047061 Clut_ Dram AN'y._
w/Brg.
+ :
11. 530015611 ' W_h_" - Clutch
i
12. 530O14949 Q,t=h/u_'y.
; 38.
13. S30_8227
Sw_:h Lev_
14. 530016149 Sw_ s_
40,
15. 5300_264
P,_p-B_zeVent
41.
16. 530015922 NUt
17. s300_geso _ln C_cher
4_
18. 5.30015814 _w
43.
19. 530015907 Nuhw-Thmst
44.
20. 71-3_9
45.
21. 71-36596
EW_-lS"
48.
DustSeal
47.
48.
BxrMoumlr_ PIm
53ooloe46
53oo16oeo
53oo16o64
53oolg2o6
530049477
530038373
53oo3"/_1
53o_o18_
530015775
"rdggw& i.od_
2.
3.
530_6119
S300378_
Kit
oz P.mp_t
Ond.5O,$1&4S)
5300471_;
530016133
530047663
530O1602O
5300181_2
_0015O14
S300_/_>0
5O0015_0
53003"/7'_
S300_4
Screw
Se_I Block
Bbow.-O_
Pk:k.p
PIdPUpO_er
Oi Rter
Plug-OiF_w
F_l.lne
Part No.
49.
50.
51.
5P,
83.
54.
845,
$6.
57.
58.
530015940
530037485
530068232
5300158_
53004,g_
530027531
5300_817
5300_1209
530015127
530016134
D_crlptlon
Screw
St_r_ H4mdk_
Rope_t
;crew
Fan Housk_
S_,x P,_y
Ass_
I_
Fuel Cap Au'y.
w/Retldner
Bolt-Bar
Screw
Screw
Won_ Gur Sp_)
8crow
FrontHandle
2O
Ref.
Not Shown
83OO87619
530058_4
530053819 l_mll,.-IFlm Hou_
REPAIR PARTS
2
14
12 13
18
3
4
5
27
16
6
34
25
36
29
41
37
I
35
Ref.
1,
!2.
Pan NO.
5300_1163
5300_77_
530016101
G300_/804
_300697_
6.
7.
6.
9.
10.
11.
12.
13,
14.
15,
l&
,530019239
530015810
530O4970O
530016187
530018102
530053184
530038318
5300_8317
,S30049244
530047213
530069216
17.
18.
19,
20.
21.
53OO1578O
71.-88849
Part No.
BarWrw_
Foam-AirRIt_
Nut
AirFatorHom_
ClrburaorI_
(_ncL
12 & 15)
Catb.Ga4dce
Screw
_Adap_'
Scow.
Scowl
cye_ S_,Cd
LV,¢_Cap,-H_h
ume,
u Cap--Low
Orcmrn_-Caub
.,_just
_,..F'u_0o
,,um'y.
PdmerLk'mI_
(Stud P,*)
53OO696O6
53OO69604
_".5,,_¢2ge05
830O15697
Zk_004?0e2
(IneL
22,e-2a)
P_tonRk_0
_PIn
_
Au'yo
!28.
I_mdplk_
so_&e_._.
27.
28.
29.
530047027
G300_/9_
5300161_
530047442
530O69606
3O.
31.
_..
33.
34.
35.
53O052296
,G30014,_2
5300376_.
S3001g_21
53OO4987O
530047207
w_ HL.,_ _.
36.
_10037813
37.
5300361_
38.
5300161_2
3O.
5300¢Qg77
40.
530015814
41.
42.
530040'714
43.
53OO40715
Not6_ow_
5300_8486
_Sb_lpoe_lo_ I._d
IE_ 6P_ud_t
Kit
,17.19&33)
Ho_ b_lator
MUSI_
MumerBackPlate
u_
omu_
Sp_ s_e_
_
Modu_
CI_InB_I_ lot
8eal_ud-lS"
21
38
REPAIR PARTS
e P_'buft_
Jmumblv
lot Numb_/_g'/_
.
8
I
Flof.
1,
2.
3,
4.
5.
5.
7.
8.
22
6
23
For the repair or replacement parts you need
delivered directly to your home
Call 7 am - 7 pm, 7 days a week
1-800-366-PART
_(1-800-366-7278)
Para ordenar piezas con entrega a
domicilio - 1-800-659-7084
For in-house major brand repair service
Call 24 hours a day, 7 days a week
1-800-4-REPAIR
(1-800-473-7247)
Para pedir servicio de reparaciSn a
domicilio - 1-800-676-5811
For the location of a Sears Parts and
Repair Center in your area
Call 24 hours a day, 7 days a week
1-800-488-1222
For information on purchasing a Sears
Maintenance Agreement or to inquire
about an existing Agreement
Call 9 am - 5 pro, Monday-Saturday
1-800-827-6655
When requesting service or ordering
parts, always provide the following
mformabon:
SF.AR$
• ProductType
• Part Number
• Medef Number * Part Description
America's Repair Specialists