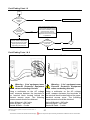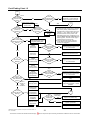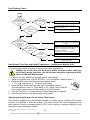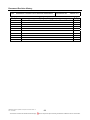
1
SERVICE INSTRUCTIONS
DBV Streamline
(Closed Circuit)
TM024-001
Revision: A
Published: December 07
DBV270
270DBV
This document is stored and maintained electronically by
Service. All printed copies not bearing this statement in RED are deemed “uncontrolled”
Contents
Safety Warning .................................................................................................................... 3 Introduction .......................................................................................................................... 3 Water Heater Model Identification ........................................................................................ 3 Specifications....................................................................................................................... 4 Wiring Diagrams .................................................................................................................. 5 Operation ............................................................................................................................. 7 Solar Circuit ....................................................................................................................... 11 Solar Circuit Plumbing Diagrams - All Models ................................................................ 12 Potable Water Plumbing Diagrams .................................................................................... 14 Tempering Valves ..............................................................................................................14 Electronic Controller .......................................................................................................... 15 Solar Monitor ..................................................................................................................... 15 Solar Monitor LED Indication .......................................................................................... 16 Components and Their Function ........................................................................................ 16 Product Changes ...............................................................................................................18 Solar Monitor Changes – All Models .............................................................................. 18 Gas Booster Integral Plumbing Changes – Gas Boosted Models Only .......................... 18 Minor Plumbing Changes – All Models........................................................................... 18 Thermostat Changes – Electric Boosted Models Only ................................................... 19 Preventative Maintenance ................................................................................................. 19 Common Faults .................................................................................................................20 Fault Finding ...................................................................................................................... 21 Testing the Sensor Strip ................................................................................................. 22 Testing the Hot and Cold Sensors ................................................................................. 23 Fault Diagnosis Sequence (General Fault Finding Chart) .............................................. 24 Fault Finding Chart 1 ...................................................................................................... 25 Fault Finding Chart 1.1 ................................................................................................... 26 Fault Finding Chart 1.2 ................................................................................................... 27 Fault Finding Chart 1.3 ................................................................................................... 28 Fault Finding Chart 1.4 ................................................................................................... 30 Fault Finding Chart 1.5 ................................................................................................... 31 Fault Finding Chart 1.6 ................................................................................................... 32 Fault Finding Chart 1.7 ................................................................................................... 35 Fault Finding Chart 1.8 ................................................................................................... 36 Fault Finding Chart 2 & 2.1 ............................................................................................ 37 Fault Finding Chart 3, 3.1, 3.2 & 3.3 .............................................................................. 38 Fault Finding Chart 4 ...................................................................................................... 39 Fault Finding Chart 5 ...................................................................................................... 40 Fault Finding Chart 6 ...................................................................................................... 41 Gas Booster Flow Rate and Outlet Temperature – Gas Boosted Models Only ................. 41 Electrical Insulation Testing ............................................................................................... 42 Component Replacement Procedures ............................................................................... 44 Exploded View 1 – Solar Preheat & Gas Boosted Models ................................................. 52 Exploded View 2 – Electric Boosted Models ...................................................................... 54 Exploded View Collectors .................................................................................................. 56 Commissioning Procedure ................................................................................................. 57 Warranty ............................................................................................................................ 67 Document Revision History................................................................................................ 68 TM024-001 Streamline (Closed Circuit) Service Instructions REV: A
D.O.I: 12/12/2007
This document is stored and maintained electronically by
2
Service. All printed copies not bearing this statement in RED are deemed “uncontrolled”
Safety Warning
The purpose of this service manual is to provide sufficient information to allow a person
with the skills as required by the Regulatory Authorities to carry out effective repairs to a
Solahart Streamline Water Heater in the minimum of time.
Safety precautions or areas where extra care should be observed when conducting tests
outlined in this service manual are indicated by print in bold italics and/or a warning
symbol. Take care to observe the recommended procedure.
Certain diagnostic procedures outlined in these Service Instructions require
“live” testing to be conducted. Personal Protective Clothing (PPE) shall be
worn and an RCD shall be installed between the power point and 3-pin cord
of the water heater to reduce the risk of electric shock.
If the supply cord is damaged, it must be replaced by the manufacturer or its
service agent or a similarly qualified person in order to avoid a hazard.
Introduction
The information provided in these instructions is based on the water heater being installed
in accordance with the Installation Instructions provided with each water heater.
Should you require further technical advice on a Solahart Streamline Water Heater,
contact your nearest Rheem Service Department where genuine replacement parts are
also available.
Water Heater Model Identification
The identification numbers are designed to convey detailed information about the water
heater to which it is attached. The model number consists of 8 digits and letters.
Model Number
DBV
270
N5
Type & Cylinder Warranty OR Storage Capacity
DBV - Solar Drain back 5 Year Cylinder Warranty
270 - 270 Litres
Type & Cylinder Warranty OR Storage Capacity
DBV - Solar Drain back 5 Years Cylinder Warranty
270 - 270 Litres
Booster Capacity
00 - No boost
24 - 2.4kW Element
36 - 3.6kW Element
48 – 4.8kW Element
N5 - Natural Gas
P5 - Propane gas
TM024-001 Streamline (Closed Circuit) Service Instructions REV: A
D.O.I: 12/12/2007
This document is stored and maintained electronically by
3
Service. All printed copies not bearing this statement in RED are deemed “uncontrolled”
Specifications
Specification
Storage capacity
Temperature setting
TPR valve setting
Solar circuit relief valve
Max supply pressure
Min supply pressure
Water connections- tank
Water connections- collector
Collector(s) type
Supply voltage
Solar circuit fluid
Anodes
Solar circuit pump
Solar circuit aux pump (optional)
All Models
270 Litres
60ºC
1000kPa
200kPa
800kPa (680kPa with ECV)
200kPa
Inlet RP¾/20, Outlet RP¾ /20
Hot pipe ½” BSP, Cold pipe ½” BSP
J or KF
220 – 250 Volts AC 50Hz
*4.5 Litres propylene glycol / 11.5 Litres water
2 X 1153mm
127.8 ohms
127.8 ohms
* Approximate propylene glycol / water ratio. Refer to ‘Commissioning Procedure’ on page
57 for more information.
Power Consumption
Solar controller
Solar pump
3 Watts
Constant load
165 Watts
Maximum load at solar heating cycle start up
(for approximately two (2) minutes)
50 Watts
Average load during the solar heating cycle
Heating unit (elec 2.4kW, 3.6kW
or 4.8kW
boost models only)
Consumption when booster heating unit is operating
depending upon model
Gas Booster (gas
boost models only)
When anti frost device is activated
146W
Electric Booster Specifications (electric boosted models only)
Heating unit rating depending upon model
2.4kW
3.6kW
4.8kW
Amps
10
15
20
Element circuit resistance (ohms)
22 – 26
15 – 17
11 - 13
Booster capacity
125 litres
Booster temperature setting
60ºC
Gas Booster Specifications (gas boosted models only)
Input
199mJ
Booster capacity
26L/min
Booster temperature setting
60ºC
For complete gas booster specifications refer to 26L Gas Booster Service Manual TM023001.
TM024-001 Streamline (Closed Circuit) Service Instructions REV: A
D.O.I: 12/12/2007
This document is stored and maintained electronically by
4
Service. All printed copies not bearing this statement in RED are deemed “uncontrolled”
Wiring Diagrams
Wiring Diagram – Solar Preheat & Gas Boosted Models
TM024-001 Streamline (Closed Circuit) Service Instructions REV: A
D.O.I: 12/12/2007
This document is stored and maintained electronically by
5
Service. All printed copies not bearing this statement in RED are deemed “uncontrolled”
Wiring Diagram – Electric Boosted Models (Robertshaw EWT Thermostat)
Wiring Diagrams - Electric Booster Circuit All Electric Boosted Models
Extended Off-Peak power supply to
booster circuit - All Electric Boosted
Models
Continuous power supply to booster circuit
- All Electric Boosted Models
Switchboard
Switchboard
Extended Off-Peak Power Supply
(no manual switch or timer)
Continuous Power Supply
(no manual switch or timer)
Continuous
Power Supply
Continuous Power Supply
(with manual switch or timer)
TM024-001 Streamline (Closed Circuit) Service Instructions REV: A
D.O.I: 12/12/2007
This document is stored and maintained electronically by
Extended Off-Peak
Power Supply
Extended Off-Peak Power Supply
(with manual switch or timer)
6
Service. All printed copies not bearing this statement in RED are deemed “uncontrolled”
Wiring Diagram – Electric Boosted Models (Robertshaw ST Thermostat)
Note: Refer to page 6 for continuous or off-peak booster circuit wiring diagrams.
Operation
The Streamline closed circuit water heater is an indirect drain back solar Loline (collectors
at roof level, cylinder at ground level) water heater. The fluid in the collector circuit is
isolated from the potable water in the cylinder, hence the term ‘indirect’.
When there is insufficient solar gain or the cylinder is fully heated the pump is turned off
allowing the heating fluid in the collectors and pipe work to ‘drain back’ to the central heat
exchanger within the water heater.
TM024-001 Streamline (Closed Circuit) Service Instructions REV: A
D.O.I: 12/12/2007
This document is stored and maintained electronically by
7
Service. All printed copies not bearing this statement in RED are deemed “uncontrolled”
Operational Flow Chart
Operational Flow Chart
Plug In
Power On
Restore Power
Rectify fault
Pump relay
de-energised (if on)
Isolate Power
(1)
Self
check routine
normal?
NO
Software
malfunction
YES
Pump relay
energised
Hot sensor open
circuit
Hot sensor short
circuit
Cold sensor open
or short circuit
Thermistors open
or short circuit
Sensor strip
unplugged
Red LED 1 flash
Red LED 2 flash
Red LED 3 flash
Red LED 4 flash
Red LED 5 flash
(2)
Is tank
temperature > or
= 75ºC?
Green LED
5 flash
YES
NO
A
YES
Green LED
on (solid)
Is hot
sensor temp < 4ºC
above cold sensor
temp?
YES
YES
YES
YES
(2)
NO
Is hot
sensor temp <
5ºC above tank
temp?
NO
Is cold
sensor temp >
75ºC?
NO
Is hot
sensor temp >
95ºC?
Is hot
sensor temp <
20ºC?
NO
NO
NO
(2)
Is hot
sensor temp
> or = tank temp
+ 12ºC?
YES
15 sec
Green LED
2 flash
Notes
(1) Self check routine is
performed every 20 milliseconds
regardless of stage of operation.
(2) Tank temp = average temp of
sensor strip top 3 thermistors.
(3) Pump 2 (auxiliary pump) is
optional and is utilised only if
collector heights are between 9
& 18 metres high.
(2)
Is tank
temperature > or
= 75ºC?
YES
YES
Pump 1 off
NO
Is hot
sensor temp < 4ºC
above cold sensor
temp?
YES
0 sec
NO
(3)
(2)
Pump 1 & 2 on
Is hot
sensor temp <
5ºC above tank
temp?
30 sec
2 min
(3)
Pump 1 & 2 on low
(pulse controlled)
NO
Is cold
sensor temp >
75ºC?
Green LED
3 flash
(3)
Pump 1 & 2 speed
pulse controlled
1 min
YES
The pump(s) speed is pulse
controlled by the control board
to limit the temperature rise of
the fluid across the collectors
to 10ºC. For pump 1 this will
occur from this period onwards
until pump 1 is switched off by
the control board.
YES
NO
Is hot
sensor temp >
95ºC?
YES
NO
Green LED
4 flash
Is hot
sensor temp
< 20ºC?
(3)
YES
Pump 1 off
Pump 2 off
NO
A
TM024-001 Streamline (Closed Circuit) Service Instructions REV: A
D.O.I: 12/12/2007
This document is stored and maintained electronically by
8
Service. All printed copies not bearing this statement in RED are deemed “uncontrolled”
Sequence of Operation - Solar
The following sequence of operation is common to all models and pertains to the solar
circuit which is a ‘closed circuit’ containing a heating fluid consisting of propylene glycol
and water. For information on electric and gas booster operation refer to page 10.
Refer to ‘Sequence of Operation Component Diagram’ on page 10 to view components
shown in brackets e.g. (1).
1. When power is supplied to the appliance the controller (1) performs a self check routine.
If the software, sensor strip (2), hot sensor (3) and cold sensor (4) are all functional the
control board will energise the pump relay (5). The pump relay (5) supplies power to the
control boards internal pump switch. If any of the aforementioned components are faulty
the pump relay will not be energised preventing pump (6) operation.
2. The cylinder (7) temperature is monitored by a sensor strip (2) containing 6 thermistors
spaced at equal intervals along the strip. The sensor strip (2) is attached to the outer
cylinder wall. The water temperature is derived by averaging the readings from the top 3
sensors.
3. As the vapour in the collector(s) (8) gains heat from solar radiation a sensor mounted in
the collector (hot sensor) (3) senses the temperature increase.
4. The controller (1) will turn the pump (6) on when the temperature in the collector(s) is
greater than or equal to 12°C above the average cylinder top temperature provided the
cylinder top temperature is less than or equal to 75°C.
5. Heating fluid consisting of propylene glycol and water is pumped from the central heat
exchanger (9) up to the collector(s) via the cold pipe (10).
6. The fluid gains heat as it passes through the collectors (8) and returns to the top of the
heat exchanger (9) where it passes through a distributor (11) which forces the fluid to
run down the heat exchanger (9) walls in a film (‘falling film’). The heating fluid gives off
its heat through the heat exchanger (9) wall to the water in the cylinder (7).
7. 15 seconds after the pump (6) commences operation the controller (1) limits the pump
(6) speed to ensure the temperature rise of the fluid across the collector(s) (8) is limited
to 10°C to prevent unnecessary cycling of the pump (6) and draining of the system.
8. The pump (6) is turned off when:
•
The Temperature rise across the collector(s) (8) (i.e. difference between the hot
sensor (3) and cold sensor (4)) is less than 4°C, or:
•
The average cylinder (7) top temperature is greater than 75°C, or:
•
The temperature of the heating fluid leaving the heat exchanger (9) is greater than
75°C (detected by cold sensor (4)), or:
•
The temperature of the heating fluid leaving the collector(s) (8) is greater than 95°C
(detected by hot sensor (3)), or:
•
The collector (8) temperature is less than 20°C (detected by hot sensor (3)), or:
•
The temperature of the heating fluid leaving the collector(s) (8) (detected by hot
sensor (3)) is less than 5°C above the average cylinder (7) top temperature
(detected by sensor strip (2)).
TM024-001 Streamline (Closed Circuit) Service Instructions REV: A
D.O.I: 12/12/2007
This document is stored and maintained electronically by
9
Service. All printed copies not bearing this statement in RED are deemed “uncontrolled”
9. Once the pump (6) ceases operation the system commences to drain back. Fluid in the
collectors (8) begins to fall back to the bottom of the heat exchanger (9) via the cold
pipe (10) due to gravity; this creates suction on the fluid in the hot pipe (12) which is
also drawn back through the collectors (8).
At the same time the heated vapour in the heat exchanger (9) is rising up through the
distributor (11) and into the hot pipe (12) also forcing the fluid back through the
collectors (8). At the end of the process all the heating fluid is stored in the central heat
exchanger (9) leaving the collectors (8) and connecting pipe work empty of heating fluid.
Sequence of Operation Component Diagram
1
2
3
4
5
6
7
8
9
10
11
12
Controller
Sensor Strip
Hot Sensor
Cold Sensor
Pump Relay
Pump
Cylinder
Collector(s)
Heat Exchanger
Cold Pipe
Distributer
Hot Pipe (not
shown)
Electric Booster Operation – Electric Boosted Models
Electric boosted models are fitted with either a 2.4kW, 3.6kW or 4.8kW electric immersion
type heating element depending upon model (refer to water heater model identification
table on page 3). The element will heat the volume of water in the storage cylinder directly
above the level of the element providing a 125 litre boost capacity.
Electric boosted models are fitted with a Robertshaw mechanical thermostat set at 60ºC.
This thermostat controls the electric boost element only. The electric boost circuit operates
simultaneously with the solar system and will heat the 125 litre boost volume to 60ºC
regardless of whether the solar circuit is heating or not. Simultaneous operation can be
prevented by the installation of a switch in the electric booster circuit.
The element & mechanical thermostat are located behind the top electrical access cover.
Gas Booster Operation – Gas Boosted Models
Gas boosted models have an integral in-line 26L Gas Booster mounted externally on the
jacket of the heater. The in-line gas booster will only operate provided the flow is greater
than 3 litres per minute and the inlet water temperature to the booster is less than or equal
to 58ºC.
Gas boosted models have additional integrated plumbing connections which are located
behind the front access cover (refer to ‘Gas Boosted Integrated Plumbing Arrangement’ on
page 11).
Two hot water outlets are available on gas boosted models; a tempered water outlet (50ºC
max) and an optional hot water outlet (65 - 75ºC). Gas boosted models do not require an
external tempering valve to comply with AS3500.4 Clause 1.9.2(b) provided the tempered
water plumbing is connected to the tempered water outlet. The tempered water outlet from
this water heater will not deliver temperatures exceeding 50°C in accordance with
AS 4032.2. For more information refer to ‘Tempering Valves’ on page 14.
TM024-001 Streamline (Closed Circuit) Service Instructions REV: A
D.O.I: 12/12/2007
This document is stored and maintained electronically by
10
Service. All printed copies not bearing this statement in RED are deemed “uncontrolled”
Gas Boosted Integrated Plumbing Arrangement
Solar Circuit
It is imperative that both the collector hot and cold pipes must fall
continuously by at least 5º, or a 1 in 10 fall, to ensure proper drain back of
heat exchange fluid into the storage cylinder.
Each collector should be angled 10-15mm from horizontal towards the hot
outlet to ensure proper drain back of heat exchange fluid and to ensure that
the hot sensor is located in fluid when the pump is on. Likewise it is
essential that the collector connections are angled slightly downwards.
Failure to provide correct fall for the hot and/or cold pipes, collector(s) and
collector connections will result in incorrect operation of this appliance.
The solar hot and solar cold pipes between the solar storage tank and the
solar collectors MUST BE of copper and fully insulated with closed cell
polymer insulation or similar (minimum thickness 13 mm). Thicker insulation
may be required to comply with the requirements of AS/NZS 3500.4. The
insulation must be weatherproof and UV resistant if exposed. All
compression fittings must use brass or copper olives.
Plastic pipe MUST NOT be used, as it will not withstand the temperature of
the closed circuit fluid generated by the solar collectors.
Solar pipe work which is oversized or is too long can result in the drain back
system not operating effectively.
TM024-001 Streamline (Closed Circuit) Service Instructions REV: A
D.O.I: 12/12/2007
This document is stored and maintained electronically by
11
Service. All printed copies not bearing this statement in RED are deemed “uncontrolled”
Solar Circuit Plumbing Diagrams - All Models
The solar collectors must be the
highest point of the system. The
maximum height of the solar
installation, from the base of the
solar storage tank to the top of the
solar collectors, is 9 m. The pump
supplied will not circulate closed
circuit fluid through heights
greater than 9 m and solar gain
will not be achieved.
For heights greater than 9m, an
auxiliary pump kit (PN 299914)
must be installed. Refer to
‘Auxiliary Pump - Solar Circuit’ on
page 13 for more information. The
installation of an auxiliary pump
will enable a maximum height of
18 m to be achieved.
Maximum Total Pipe Length (solar cold + solar hot) & Number of 90° Bends
Pipe Size
DN15
1 or 2 Collectors
3 Collectors
Pipe Length
90° Bends
Pipe Length
90° Bends
40 metres
20
30 metres
20
Notes:
• For each additional 90° bend, reduce the maximum total pipe length by 0.5 metres.
• For each additional metre of pipe length, reduce the number of 90° bends by two.
• One 90° elbow is equal to two 90° bends.
TM024-001 Streamline (Closed Circuit) Service Instructions REV: A
D.O.I: 12/12/2007
This document is stored and maintained electronically by
12
Service. All printed copies not bearing this statement in RED are deemed “uncontrolled”
Auxiliary Pump - Solar Circuit
The maximum height of the solar installation from the base of the solar storage tank to the
top of the solar collectors is 9 m. The pump supplied with the solar storage tank will not
circulate closed circuit fluid through heights greater than 9 m and solar gain will not be
achieved.
For heights greater than 9 m, an auxiliary pump kit (kit PN 299914) must be installed
above and within 1 m of the solar storage tank. The installation of an auxiliary pump will
enable a maximum height of 18 m to be achieved. Note: The installation of an auxiliary
pump does not allow for an increase in total pipe length of the system. The maximum pipe
lengths shown in the table on page 12 must still be observed.
The arrows on the rear face of the pump indicate the direction of flow and should be
pointing upwards when the pump is in the installed position.
The auxiliary pump speed setting must be set on 3. The solar control unit automatically
controls and adjusts the speed of the pump to maximise solar contribution. Manual
adjustment of the speed dial setting on a setting other than 3 may result in the system not
operating correctly or efficiently. Note: If an auxiliary pump is utilised it will switch on with
pump 1, run for 3 minutes to establish circulation then switch off. After this period pump 1
maintains circulation.
The two wire plug from the auxiliary pump connects to the terminals marked “PUMP 2” on
the control board (refer to wiring diagrams on pages 5 & 6) and the earth wire spade
connector from the auxiliary pump connects to a terminal on the earth connector strip
located on the bracket adjacent to the control board. For information on installing an
auxiliary pump refer to ‘Installation Instructions – Auxiliary Pump Kit Solar Drain Back
Water Heater’.
Auxiliary Pump Kit Part Number 299914 Contents
Part No
Description
Quantity
121994
Installation instructions auxiliary pump
1
299998
Pump Salmson HXL63-15P RU15/21 Union
1
108381
Bracket pump wall mount
1
108380
Cover pump wall mount
1
080031
Screw phillips pan head no 8 x 13
4
088063
Union fitting assembly ½” x ½” male (includes union ½”
x ½” male, copper olive, compression nut)
2
080138
Cable tie black 200 mm long
10
Cable tie mount adhesive backed 4 way
4
N/A
TM024-001 Streamline (Closed Circuit) Service Instructions REV: A
D.O.I: 12/12/2007
This document is stored and maintained electronically by
13
Service. All printed copies not bearing this statement in RED are deemed “uncontrolled”
Potable Water Plumbing Diagrams
Plumbing Diagram – Solar Preheat & Electric Boosted Models
Two temperature zones utilising temperature limiting device
Plumbing Diagram – Gas Boosted Models
Two temperature zones utilising temperature limiting device integrated with water heater
Gas boosted integrated
plumbing behind front
access cover contains
a tempering valve and
provides both a hot
(75ºC) and tempered
(50ºC) water outlet.
Note: Refer to page 11 for gas boosted integrated plumbing arrangement.
Tempering Valves
Solar preheat and electric boosted models require the installation of a tempering valve to
comply with the requirements of AS3500.4 (refer to plumbing diagram on top of page).
Gas boosted models do not require an external tempering valve to comply with AS3500.4
Clause 1.9.2(b) provided the tempered water plumbing is connected to the tempered
water outlet. The tempered water outlet from this water heater will not deliver temperatures
exceeding 50ºC in accordance with AS 4032.2.
To enable delivery of hot water at temperatures above 50ºC a separate untempered line
must be provided that supplies hot water exclusively to kitchen and laundry areas (refer to
plumbing diagrams above). Note: Gas boosted models have an integrated tempering valve
and provide both a tempered and untempered hot water outlet.
TM024-001 Streamline (Closed Circuit) Service Instructions REV: A
D.O.I: 12/12/2007
This document is stored and maintained electronically by
14
Service. All printed copies not bearing this statement in RED are deemed “uncontrolled”
Electronic Controller
The control board or electronic controller
is used to control the pump by monitoring
the water temperatures and heat transfer
temperatures at various locations within
the system.
By monitoring the temperature of the
heat transfer fluid returning to the solar
collectors (cold sensor) and the
temperature of the fluid at the outlet of
the collectors (hot sensor), the controller
adjusts the pump speed to regulate the
temperature rise through the collectors to
10ºC.
The controller also monitors the water
temperatures within the storage cylinder
and regulates when solar heating should
occur.
Solar Monitor
A remote solar monitor is located on the
front of the cylinder pump access cover.
The remote solar monitor plugs into the
control board display socket and has two
LED’s which indicate the operational mode
or fault status of the system. The green
LED (marked solar) is used to indicate the
present operating mode of the controller
whilst the red LED (marked attention) is
used to indicate a fault condition.
Solar preheat and gas boosted models
manufactured before 01/11/2006 do not
have a remote solar monitor however the
control board has an inbuilt solar monitor
(green and red LED mounted on the
control board) which can be viewed by
removing the pump access cover.
It should be noted that on early versions the solar monitor connection plug is not polaritive
sensitive and may be inserted into the control board plug socket either way. If unusual fault
codes are occurring, such as a solid red LED when in standby mode (instead of green), or
a flashing red LED whilst the pump is operating (instead of flashing green), the solar
monitor plug polarity should be tested by performing the following procedure:
TM024-001 Streamline (Closed Circuit) Service Instructions REV: A
D.O.I: 12/12/2007
This document is stored and maintained electronically by
15
Service. All printed copies not bearing this statement in RED are deemed “uncontrolled”
Solar Monitor Plug Polarity Test
1. Release water from the T&PR valve until the water temp in the cylinder is < 75ºC.
2. Switch off power for 5 seconds and then restore power.
3. If the LED flashes green (any combination) or is solid red within the first 15 seconds
from restoring power, the solar monitor plug is inserted the wrong way around.
Solar Monitor LED Indication
Each flash lasts for 0.5 seconds and each series of flashes is separated by a two second
interval.
Green LED - Operational Status
Flash Sequence
Indicates
Solid green (on) Standby mode
2 Flash
Flooding solar circuit period
3 Flash
Pump(s) flow control period
4 Flash
*Pump flow established.
5 Flash
Cylinder at maximum temp.
Red LED - Fault Condition
Flash Sequence
Indicates
1 Flash
Hot sensor open circuit
2 Flash
Hot sensor short circuit
3 Flash
Cold sensor open / short circuit
Open or short circuit of any top
4 Flash
3 thermistor on sensor strip
5 Flash
Sensor strip unplugged
* When pump flow is established auxiliary pump 2 is turned off by the control board (if
fitted) whilst pump 1 continues to operate.
Components and Their Function
Temperature and Pressure Relief Valve (T&PR)
A valve designed to provide automatic relief by discharging water in case of excessive
temperature and/or pressure.
Never fit a T&PR Valve with a pressure rating greater than that indicated on
the product-rating label.
Storage Cylinder
A fully welded steel cylinder incorporating a convex (plus) top, concave (minus) bottom
and central tube (heat exchanger). The cylinder is lined with vitreous enamel to provide
protection against corrosion throughout the life of the water heater.
Outlet Delivery Tube (Dip Tube)
A plastic tube installed in the hot water outlet of the water heater cylinder to conduct water
from the highest point to the outlet connection. It also acts as a fitting liner.
Fitting Liner
A plastic tube installed in the cold-water inlet of the water heater to provide protection
against corrosion throughout the life of the water heater.
Cold Pipe (Solar Return)
The pipe connecting the solar collectors to the storage water heater through which the
cooler solar transfer fluid returns from the storage cylinder to the collectors.
Hot Pipe (Solar Flow)
The pipe connecting the solar collectors to the storage cylinder through which the solar
heated solar transfer fluid flows back to the storage cylinder from the collectors.
Electronic Controller
An electronic control unit that interprets low voltage signals indicating water temperature
from the hot and cold sensors to switch on and off the 240 volt circulating pump circuit.
The unit is factory set and cannot be adjusted or mega-ohm tested. Refer to page 15 for
more information.
TM024-001 Streamline (Closed Circuit) Service Instructions REV: A
D.O.I: 12/12/2007
This document is stored and maintained electronically by
16
Service. All printed copies not bearing this statement in RED are deemed “uncontrolled”
Pump
An electro-mechanical device that pumps solar transfer fluid through the collectors by
centrifugal force. The control board varies the flow rate of the pump by pulsing the
electrical supply to the pump motor. The flow rate is proportionate to the pulse rate. e.g.
higher pulse rate = higher flow rate.
Pump Relay
The pump is controlled and switched by the control board however the pump power supply
may be interrupted by the relay in the event of a software malfunction or over temperature
condition. If a fault develops in the controller software or the cylinder reaches over
temperature (95ºC) the controller will de-energise the pump relay. This will open circuit the
pump wiring and prevent the pump from operating.
Hot Sensor
A thermistor type sensor utilised to sense the air/fluid temperature in the collector(s). The
hot sensor is fitted into the unused connection at the top of the collector array on the
opposite side to the hot pipe connection. The hot sensor plugs into and is monitored by the
control board.
Cold Sensor
A thermistor type sensor utilised to sense the fluid temperature leaving the heat
exchanger. The cold sensor is fitted into a pocket in the pipe work between the heat
exchanger outlet and the pump. The cold sensor plugs into and is monitored by the control
board.
Anode (Sacrificial)
A metal alloy electrode (magnesium) installed in the water heater cylinder that by galvanic
action protects the cylinder from corrosion. All Streamline models are fitted with two
anodes both of which are located in the potable water section of the storage cylinder.
Thermistor Strip (Sensor Strip)
A thermistor type sensor strip mounted down the external face of the storage cylinder
between the cylinder jacket and storage cylinder. The sensor strip has 6 equally spaced
thermistors however the water temperature of the cylinder is derived by averaging the
readings from the top 3 sensors only. It should be noted that the lower three sensors are
not used. The thermistor strip plugs into and is monitored by the control board.
Heat exchanger
Heat exchange from the solar heated transfer fluid to the water in the storage tank is by
means of a ‘falling film’ on the inside wall of the heat exchanger. The fluid entering the
heat exchanger top is diverted through an internal four channel distributor which creates
the falling film.
Mechanical Thermostat – Electric Boosted Models Only
A device responsive to temperature which controls the supply of electrical energy to the
element to maintain the heater water at the required temperature. The mechanical
thermostat controls the electric boost element only.
Over Temperature Energy Cut-out (E.C.O.) – Electric Boosted Models Only
A temperature-sensing device integral to the mechanical thermostat that automatically cuts
off the supply of electrical energy to prevent excessive water temperature occurring. This
device will not reset automatically but may be manually reset once temperatures have
fallen to a safe level.
TM024-001 Streamline (Closed Circuit) Service Instructions REV: A
D.O.I: 12/12/2007
This document is stored and maintained electronically by
17
Service. All printed copies not bearing this statement in RED are deemed “uncontrolled”
Heating Unit (Element) – Electric Boosted Models Only
A tubular device containing an electric resistance element that converts electrical energy
to heat. Standard element ratings are 2.4kW, 3.6kW and 4.8kW.
Integral Gas Booster – Gas Boosted Models Only
A 26L litre Gas Booster mounted externally on the heater jacket which will boost the solar
preheated water to 60ºC if required. Refer to page 10 for more information.
Product Changes
Solar Monitor Changes – All Models
A remote solar monitor was introduced to solar preheat and gas boosted models on the
01/11/2006. Solar preheat and gas boosted models manufactured before 01/11/2006 do
not have a remote solar monitor however the control board has an inbuilt solar monitor
(green and red LED mounted on the control board) which can be viewed by removing the
pump access cover.
All electric boosted models have a remote solar monitor regardless of date of manufacture.
Refer to page 15 for more information on solar monitors. For solar monitor LED indication
modes and their meaning refer to the table on page 16.
Gas Booster Integral Plumbing Changes – Gas Boosted Models Only
The gas booster insulated copper hot and cold pipes (items 32a & 33a) have been
replaced with insulated flexible hoses (items 32b & 33b) effective 17/09/2007. Note: Refer
to replacement parts list on page 53 for ‘a’ and ‘b’ items and exploded view 1 on page 52.
To replace an existing copper hot pipe (item 32a) with a flexible hose (item 32b):
•
•
•
•
Obtain 1 x 088137 Flexible hose insulated 440 x ¾” (item 32b).
Discard the nut and olive on the elbow at the heater hot outlet (item 31b) and screw
the flexible hose directly to the elbow.
Remove union from Integrity inlet (item 41a) and replace with elbow part number
088117 (item 41b).
Connect remaining end of flexible hose to elbow (item 41b).
To replace an existing cold pipe (item 33a) with a flexible hose (item 33b):
•
•
•
•
Obtain 1 x 088138 Flexible hose insulated 450 x ¾” (item 33b).
Discard the nut and olive on the elbow at the heater cold inlet (item 31b) and screw
the flexible hose (item 33b) directly to the elbow.
Remove union from tee (item 43a) and replace with elbow part number 088117
(item 43b).
Connect remaining end of flexible hose to elbow (item 43b).
Minor Plumbing Changes – All Models
Effective 19/09/06 –Solar Hot Connection
•
•
•
Item 12 - 088092 brass extension fitting replaced by 088118 brass extension fitting
Item 2 – 088063 Union ½”C x ½”M replaced by 088119 compression nut
Item 11 – 080163 washer replaced by 088027 compression olive
Note: This means the solar hot connection is different although the installing plumber still
makes to two ½” copper connections.
TM024-001 Streamline (Closed Circuit) Service Instructions REV: A
D.O.I: 12/12/2007
This document is stored and maintained electronically by
18
Service. All printed copies not bearing this statement in RED are deemed “uncontrolled”
Effective 10/08/07 – Solar Cold Connection
•
•
•
The cold pipe which is foamed into the heater had the large brass fitting removed so
that just the pipe protrudes.
Item 2 – Union ½”C x ½”M is replaced by 088065 compression union ½”C x ½”C
which is now item 2a.
Item 10 - 087035 Rubber disc is replaced by 221754 Kelvindale plug which is now
item 10a.
Note: This means the solar cold connection is different although the installing plumber still
makes to two ½” copper connections.
Thermostat Changes – Electric Boosted Models Only
The Robertshaw ST thermostat was introduced to electric boosted models on 14/08/2007
and replaces the Robertshaw EWT thermostat used previously.
It should be noted that although ST series thermostat is a direct replacement for the EWT
series thermostat the terminal connections and wiring arrangement is different, therefore;
Whenever an EWT series thermostat is replaced with a ST series
thermostat as a spare part, each appliance will require rewiring at the
thermostat. Refer to wiring diagrams on pages 6 & 7 for wiring
arrangements for EWT and ST series thermostats.
Preventative Maintenance
It is suggested for peak performance that the water heater be serviced annually.
Servicing is to be performed by qualified persons.
1. Check for discharge from the T&PR valve. Whilst the electric booster (if fitted) is off,
and during periods of low solar contribution there should be no discharge of water.
When the electric booster (if fitted) is operating or during periods of high solar
contribution, a small discharge of water may be evident. Operate the valve-easing lever
to ensure the valve opens and resets properly. Always open and close the valve gently.
The T&PR valve should be replaced at 5 yearly intervals.
2. Check for leaks at the collector connectors, hot and cold pipes and all tank fittings.
3. Check the collector glass is not cracked and the absorber plate finish is not
deteriorating.
4. Confirm all supports and anchors retaining the collector(s) to the roof are present, firmly
fixed and in good condition.
5. Clean the collector glass. Do not stand on the collectors while cleaning.
6. Check for signs of plant or tree growth that may be shading the collectors. Advise
customer to have pruned if possible.
7. Check for signs of excessive corrosion on the water heater jacket, collector panels and
roof stand if fitted.
8. Isolate power and check all electrical connections for signs of overheating due to poor
connection.
9. Electric Boosted Models Only
Conduct an electrical insulation test on the electric booster circuit only (refer to page
42). Note: Do not Megger test the electronic controller.
Gas Boosted Models Only - Refer to TM023-001 26L Gas Booster Service
Instructions for preventative maintenance information on the 26L Gas Booster.
TM024-001 Streamline (Closed Circuit) Service Instructions REV: A
D.O.I: 12/12/2007
This document is stored and maintained electronically by
19
Service. All printed copies not bearing this statement in RED are deemed “uncontrolled”
Common Faults
When a complaint is lodged about the performance of a hot water system there are a
number of causes that should be checked and eliminated. In an attempt to pinpoint the
most likely cause it is important to discuss with the customer their reasons for the
complaint, the duration of the problem, any change in circumstances or usage and recent
weather conditions. This information in conjunction with the following listed common
complaints will assist you in locating the most likely cause. All procedures assume there is
water flowing through the water heater.
Excessive hot water usage
The complaints of insufficient hot water and no hot water can on many occasions be
attributed to hot water usage exceeding the capacity of the water heater to provide hot
water.
When first attending a call of this nature it is essential to establish the probable hot water
usage by querying the usage habits of the household and then comparing this with the
potential delivery of the model water heater installed. It can then be established if the
usage is within or outside the capacity of the model. The areas to look at for excessive
usage are:
1.
2.
3.
4.
5.
6.
Automatic washing machines.
Showers exceeding 11 litres/minute for mixed water and 5 minutes in duration.
Two or more showers operating at the same time.
Change of occupancy or an increase in the number of persons.
High water pressure area (Excessive T&PR discharge).
Plumbing leaks.
Discoloured water
1. This may be the result of discoloured water entering from the cold water mains. Check
if the cold water is also discoloured.
2. Brown coloured water will generally indicate that the anode has been depleted or the
water heater is near the end of its useful life.
3. Milky coloured water is generally air in suspension and will disperse of its own accord.
In very hard water areas where anode gassing occurs, milky water may be evident. The
use of a blue anode should overcome this problem.
Water hammer
A water heater will not cause water hammer, however valves associated with the water
heater may be the source of the problem i.e. cold-water stopcock, non-return valve, T&PR
valve or relief valve.
Most water hammer problems are associated with hot and/or cold plumbing or appliances
i.e. solenoid valves, ballcocks, loose pipes, sharp angles in pipe work, faulty or worn valve
parts or neighbouring equipment.
High water pressure areas will have more complaints of this nature and the use of a
pressure-limiting valve (PLV) to reduce the household cold-water pressure will usually
solve most problems.
TM024-001 Streamline (Closed Circuit) Service Instructions REV: A
D.O.I: 12/12/2007
This document is stored and maintained electronically by
20
Service. All printed copies not bearing this statement in RED are deemed “uncontrolled”
Roof leaking
This complaint is usually made during or after wet weather and normally soon after
commissioning a new water heater. The movement of persons on the roof during
installation can crack roofing material if the load is borne on specific points or the roof
material is brittle.
\
Replacement of damaged roof materials is essential. Use of a woven plastic roof sheet
below the collectors will make water penetration more difficult in the future. It should also
be established if water is penetrating around the pipe or sensor joints through the roof.
Moisture under the collector glass
Small amounts of condensate on the underside of the collector glass are not a sign of
collector failure. The condensation is formed from humid air condensing when the collector
cools down. Because of high temperatures within the collector, ambient air is transferred in
and out of the collector through drain holes. Note: The collector is not hermetically sealed.
Hot water plumbing leaks
If hot water has not been used for a period of time, feeling the temperature of the hot water
line may give an indication of water flow if the pipe is warm. The method of checking for
plumbing leaks is:
1. Turn off the stopcock on the cold water supply to the water heater.
2. Open a hot tap to ensure the flow of water stops. This will confirm the stopcock is
operating correctly.
3. Turn off the hot tap.
4. Turn on the stopcock to make up the water pressure in the cylinder, and then turn the
stopcock off again.
5. Wait approximately 5 minutes then do either of the following:
a. With your ear close to the stopcock turn it on slightly and listen for any water
passing. If there are no leaks, water should not pass.
b. Open a hot tap while listening for any pressure release. If there is a pressure
release there will be no leaks in the plumbing system.
Mixing or crossed connections
If an automatic dishwasher, washing machine, flick mixer tap, tempering valve or
thermostatic mixing valve is installed there is always the possibility that the cold water
could mix with the hot water through a faulty or incorrectly installed valve. This is referred
to as a cross connection. The complaints of insufficient hot water, water too cold or
excessive discharge from the T&PR valve may be attributed to a cross connection. The
method of checking for a cross connection is:
1. Turn off the stopcock on the cold water supply to the water heater.
2. Open a hot tap. If water flow is persistent and cold a cross connection exists.
Fault Finding
Test Equipment
A list of test equipment which will assist in conducting diagnostic procedures is provided
below. This equipment is available from Rheem Service Spare Parts Department.
Fine probe adapter kit
Probe to alligator clip kit
TM024-001 Streamline (Closed Circuit) Service Instructions REV: A
D.O.I: 12/12/2007
This document is stored and maintained electronically by
WH0020082
WH0020084
21
Service. All printed copies not bearing this statement in RED are deemed “uncontrolled”
Testing the Sensor Strip
Unplug the sensor strip plug from the control board and using a multimeter on the kiloohms scale, measure between the pins of the sensor strip plug*. There are six individual
tests to be performed as there are six individual sensors contained along the length of the
sensor strip (sensors S0 – S5). As the resistance of each sensor will change according to
its temperature, the resistance measurements for each sensor will need to be checked
against the ‘Sensor Strip Temperature/Resistance Table’ shown below. For this reason it
is best to empty the tank of hot water and then measure the cold water temperature at the
T&PR so a known temperature datum can then be applied to all sensors which should
then in turn all have a similar resistance value when tested.
Sensor Test Points
S0 – Between Pins 1 and 9
S1 – Between Pins 2 and 9
S2 – Between Pins 4 and 9
S3 – Between Pins 6 and 9
S4 – Between Pins 3 and 8
S5 – Between Pins 3 and 10
Sensor strip plug
pin configuration
Testing the
sensor strip
*Note: The sensor strip plug test points are quite small, Fine Probe Adapters (part number
WH0020082) can be utilised as probe extensions. Alternatively small pins may be used
however ensure good contact is made when testing.
Sensor Strip Temperature / Resistance Table
T (°C)
-10
-9
-8
-7
-6
-5
-4
-3
-2
-1
0
1
2
3
4
5
6
7
8
9
R (kΩ)
37.45
35.73
34.11
32.56
31.10
29.71
28.39
27.13
25.94
24.81
23.73
22.71
21.73
20.81
19.92
19.09
18.29
17.52
16.80
16.11
T (°C)
10
11
12
13
14
15
16
17
18
19
20
21
22
23
24
25
26
27
28
29
R (kΩ)
15.45
14.82
14.22
13.65
13.10
12.58
12.09
11.61
11.16
10.72
10.31
9.913
9.535
9.173
8.826
8.495
8.177
7.873
7.583
7.304
TM024-001 Streamline (Closed Circuit) Service Instructions REV: A
D.O.I: 12/12/2007
This document is stored and maintained electronically by
T (°C)
30
31
32
33
34
35
36
37
38
39
40
41
42
43
44
45
46
47
48
49
R (kΩ)
7.037
6.782
6.537
6.302
6.076
5.86
5.653
5.454
5.264
5.081
4.905
4.736
4.574
4.418
4.269
4.125
3.987
3.854
3.726
3.603
T (°C)
50
51
52
53
54
55
56
57
58
59
60
61
62
63
64
65
66
67
68
69
R (kΩ)
3.485
3.371
3.262
3.157
3.055
2.957
2.863
2.773
2.686
2.602
2.521
2.442
2.367
2.295
2.225
2.157
2.092
2.029
1.968
1.91
T (°C)
70
71
72
73
74
75
76
77
78
79
80
81
82
83
84
85
86
87
88
89
R (kΩ)
1.853
1.799
1.743
1.695
1.646
1.589
1.552
1.508
1.465
1.424
1.384
1.345
1.307
1.271
1.236
1.202
1.169
1.137
1.107
1.077
22
Service. All printed copies not bearing this statement in RED are deemed “uncontrolled”
Testing the Hot and Cold Sensors
Unplug the relevant sensor from the control board and remove the sensor from its location
so its temperature will be the same as the ambient air temperature. Using a multimeter on
the kilo-ohms scale, measure between the two pins of the sensor plug*. As the resistance
of each sensor will change according to its temperature, the resistance measurements for
each sensor will need to be checked against the ‘Hot & Cold Temperature/Resistance
Table’ shown below and the value then compared to the ambient air temperature.
*Note: The sensor strip plug socket test points are quite small, Fine Probe Adapters (part
number WH0020082) can be utilised as probe extensions. Alternatively small pins may be
used however ensure good contact is made when testing.
Hot & Cold Sensor Temperature / Resistance Table
The table below sets out the resistance for the hot or cold sensor for a given water or air
temperature.
Temperature
Degrees C
0
10
20
30
40
50
60
70
80
TM024-001 Streamline (Closed Circuit) Service Instructions REV: A
D.O.I: 12/12/2007
This document is stored and maintained electronically by
Resistance (Hot or Cold Sensor)
Kilo-ohms
23.73
15.45
10.31
7.037
4.905
3.485
2.521
1.853
1.384
23
Service. All printed copies not bearing this statement in RED are deemed “uncontrolled”
Fault Diagnosis Sequence (General Fault Finding Chart)
General Fault Finding Chart
Fault
Electric boosted
Is the
complaint for no
hot water?
What is
the model
type?
YES
1
Gas boosted
1.1
Solar preheat
1.2
NO
Is the
complaint for
insufficient hot
water?
2
YES
NO
Electric boosted
Is the
complaint for
water too
hot?
What is
the model
type?
YES
3
Gas boosted
1.1
Solar preheat
3.1
NO
Is the
complaint for
high energy
bills?
YES
4
YES
5
NO
Is the
complaint for
leaking?
NO
TM024-001 Streamline (Closed Circuit) Service Instructions REV: A
D.O.I: 12/12/2007
This document is stored and maintained electronically by
Noisy Water Heater
6
24
Service. All printed copies not bearing this statement in RED are deemed “uncontrolled”
Fault Finding Chart 1
1
Is the
electric booster
connected to an off
peak tariff?
Test 1
Is 240
volts present
at the terminal
block?
NO
NO
YES
Possible failure of the off peak relay or
missed signal from energy supplier
Continue diagnosis to confirm booster
circuit is operational.
YES
Is a
switch to
control the booster
installed in the
house?
NO
Isolate power
and continue
with diagnosis
procedure.
YES
Is the
fuse blown at the
switchboard?
Is
the booster
switch turned
on?
YES
NO
Turn the
booster on.
NO
YES
Booster switch or wiring from
switchboard to terminal block
open circuit. Repair wiring or
replace switch.
Has
the weather
been conducive for
good solar
gain?
Test 1
Is
240 volts present
at the terminal
block?
NO
YES
YES
YES
Has
the weather
been conducive for
good solar
gain?
NO
NO
1.3
1.4
TM024-001 Streamline (Closed Circuit) Service Instructions REV: A
D.O.I: 12/12/2007
This document is stored and maintained electronically by
Booster circuit fault has been
repaired.
1.5
Advise customer that during
periods of low solar
contribution boosting will be
required.
25
Service. All printed copies not bearing this statement in RED are deemed “uncontrolled”
Fault Finding Chart 1.1
1.1
Is the
water temp
in the tank
< or = 58º?
No or
Insufficient
Hot Water
YES
Water Too Hot
Is the
gas booster
operating?
NO
The tank water temperature
can be determined by gently
lifting the easing lever on the
T&PR valve and measuring
the water temperature at the
discharge
Is the
gas booster
operating?
NO
Conduct fault finding on the gas
booster. Refer to appropriate
Service Instructions for model.
YES
Test 2
Is 240
volts present
at the terminal
block?
3.1
NO
*Is the
flow rate through the
booster > 3 litres per
minute?
YES
NO
YES
Ensure flow rate is > 3
litres per minute. Check
flow restrictors in shower
heads and hot taps if
fitted. Check tempering
valve for blockage.
Is the
gas booster
operating?
YES
NO
NO
Conduct fault finding on the gas
booster. Refer to appropriate
Service Instructions for model.
Repair gas booster before
progressing past this point.
Low flow rate rectified.
Gas booster is now
operational.
YES
Has
the weather
been conducive for
good solar
gain?
NO
Fault rectified. Gas booster is
now operational.
1.5
YES
Is the
fuse blown at the
switchboard?
1.4
YES
*Refer to section on
gas booster flow rate &
outlet temperature
*Is the
outlet temperature
of the gas booster
60º?
YES
Restore power at the GPO if
turned off. Locate household
wiring or cord fault and repair.
NO
Check pre-set temperature
setting or conduct fault finding on
the gas booster. Refer to
appropriate Service Instructions
for model.
NO
Is a
tempering valve
blocked or
faulty?
YES
Has
the weather
been conducive for
good solar
gain?
NO
Replace tempering valve.
TM024-001 Streamline (Closed Circuit) Service Instructions REV: A
D.O.I: 12/12/2007
This document is stored and maintained electronically by
NO
YES
1.5
Gas booster operational.
26
Service. All printed copies not bearing this statement in RED are deemed “uncontrolled”
Fault Finding Chart 1.2
1.2
Is a
tempering valve
blocked or
faulty?
YES
Replace tempering valve.
NO
Is an
in-line booster
plumbed in
series?
NO
Solar preheat models require an
in-line booster otherwise no hot
water will be available in periods
of low solar gain. Advise
customer and continue with
diagnosis to ensure solar system
is operational.
YES
Conduct fault finding on the gas
booster. Refer to appropriate
service instructions for model.
Repair gas booster before
progressing past this point.
Has
the weather
been conducive for
good solar
gain?
1.5
YES
NO
Gas booster fault rectified.
Fault Finding Tests 1 & 2
Test 1
Test 2
Warning – ‘Live’ equipment wear
Personal Protective Equipment
when conducting this test.
Warning – ‘Live’ equipment wear
Personal Protective Equipment
when conducting this test.
Using a multimeter on the AC voltage
scale, measure between the terminals of
the terminal block located behind the
element access cover. The following
measurements should be obtained:
Using a multimeter on the AC voltage
scale, measure between the terminals of
the terminal block located behind the upper
electrical access cover. The following
measurements should be obtained:
Active & Neutral – 240 volts.
Active & Earth – 240 volts.
Neutral & Earth – 0 volts.
Active & Neutral – 240 volts.
Active & Earth – 240 volts.
Neutral & Earth – 0 volts.
TM024-001 Streamline (Closed Circuit) Service Instructions REV: A
D.O.I: 12/12/2007
This document is stored and maintained electronically by
27
Service. All printed copies not bearing this statement in RED are deemed “uncontrolled”
Fault Finding Chart 1.3
1.3
Test 3A for EWT
type thermostats or
test 3B for ST type
Are
thermostats
the thermostat
ECO contacts
closed?
Reset the ECO or replace
thermostat.
NO
YES
Test 4A for EWT
type thermostats or
test 4B for ST type
thermostats
Are
the thermostat
NO
contacts
closed?
Is
the water in
the tank at least 6º
lower than the
thermostat
setting?
NO
NOTE: Water will
discharge through
the drain during this
procedure
Add water to the storage tank by
lifting the easing lever on the
T&PR valve until the water
temperature in the tank is 6º below
the set temperature.
YES
Did the
thermostat
contacts
close?
YES
Test 4A for EWT
type thermostats or
test 4B for ST type
thermostats
NO
Test 5
Does
the element
have the correct
resistance?
NO
YES
Replace thermostat.
Has
the weather
been conducive for
good solar
gain?
Replace element.
YES
NO
YES
Booster circuit fault has been
repaired.
Is a
tempering valve
blocked or
faulty?
NO
Has
the weather
been conducive for
good solar
gain?
YES
NO
YES
TM024-001 Streamline (Closed Circuit) Service Instructions REV: A
D.O.I: 12/12/2007
This document is stored and maintained electronically by
1.5
Booster circuit electrically
ok. Advise customer that
only 125 Litres of hot water
@ 60º is available during
periods of low solar gain.
Replace tempering valve.
28
Service. All printed copies not bearing this statement in RED are deemed “uncontrolled”
Fault Finding Tests 3A – 4B
Test 3A – EWT Type Thermostat
Test 3B – ST Type Thermostat
Warning - Ensure power is
isolated before conducting this
test.
Warning - Ensure power is
isolated before conducting this
test.
Using a multimeter on the ohms scale,
measure between the terminals of the
mechanical thermostat. The following
results should be obtained:
Using a multimeter on the ohms scale,
measure between the terminals of the
mechanical thermostat. The following
results should be obtained:
3L & 4L – 0 ohms.
3 & 4 – 0 ohms.
Test 4A – EWT Type Thermostat
Test 4B – ST Type Thermostat
Warning - Ensure power is
isolated before conducting this
test.
Warning - Ensure power is
isolated before conducting this
test.
Using a multimeter on the ohms scale,
measure between the terminals of the
mechanical thermostat. The following
results should be obtained:
Using a multimeter on the ohms scale,
measure between the terminals of the
mechanical thermostat. The following
results should be obtained:
1L & 2T – 0 ohms.
1 & 2 – 0 ohms.
TM024-001 Streamline (Closed Circuit) Service Instructions REV: A
D.O.I: 12/12/2007
This document is stored and maintained electronically by
29
Service. All printed copies not bearing this statement in RED are deemed “uncontrolled”
Fault Finding Chart 1.4
Electrical Insulation Test
1.4
Disconnect wiring to electric
booster at the terminal block
and megger between each wire
to the electric booster and earth.
Electric boosted
What is
the model
type?
Gas boosted
Solar preheat
Is the
reading below 1
mega-ohm?
NO
YES
Disconnect the element wiring
from the thermostat and
megger between each element
wire and earth.
Is the
reading below 1
mega-ohm?
YES
Replace element.
Is the
reading below 1
mega-ohm?
YES
Replace thermostat.
NO
Disconnect remaining wiring
from the thermostat and
megger between each terminal
on the thermostat and earth.
Check for pinched or
damaged wiring touching
the water heater chassis.
NO
Disconnect wiring to gas
booster and megger between
each terminal on the gas
booster and earth.
Is the
reading below 1
mega-ohm?
YES
Conduct fault finding on
the gas booster. Refer to
appropriate Service
Instructions for model.
NO
Megger between each wire to
the solar circuit on the terminal
block and earth.
Is the
reading below 0.66
mega-ohm?
NO
Is the
reading below 1
mega-ohm?
YES
Solar Preheat & Gas
Boosted Models
Check for pinched or
damaged wiring on the 3
pin plug and lead.
Electric Boosted Models
Household power supply
to appliance faulty.
YES
Disconnect the pump wiring at
the pump and megger between
each pump terminal and earth.
Replace pump.
NO
Is the
rear of the control
board shorting on
the backing
plate?
YES
NO
TM024-001 Streamline (Closed Circuit) Service Instructions REV: A
D.O.I: 12/12/2007
This document is stored and maintained electronically by
Readjust control board on
insulated stand-offs.
Check for pinched or
damaged wiring touching
the water heater chassis.
30
Service. All printed copies not bearing this statement in RED are deemed “uncontrolled”
Fault Finding Chart 1.5
1.5
Is 240 Test 2
volts present
at the terminal
block?
YES
Is the
fuse blown at the
switchboard?
NO
Reinsert solar monitor
plug firmly into control
board socket.
Does
solar monitor
provide any
indication?
NO
YES
Is the
solar monitor
plug inserted
correctly?
NO
NO
Replace solar
monitor.
(1)
Is the
solar monitor plug
inserted with correct
polarity?
Unplug solar monitor from
control board and reinsert
plug after rotating 180º.
NO
1 flash
Hot sensor
open circuit.
1.4
Notes
(1) To test if the solar monitor plug is inserted
with correct polarity; release water from
the T&PR valve until the water temp in the
cylinder is < 75ºC. Switch off power for 5
seconds and then restore power. If the
LED flashes green (any combination) or is
solid red within the first 15 seconds from
restoring power, the solar monitor plug is
inserted the wrong way around.
(2) Check to ensure hot sensor plug and
socket behind upper electrical access
cover is also plugged in.
YES
YES
Restore power at the GPO if
turned off. Locate household
wiring or cord fault and repair.
(2)
Is the
hot sensor plugged
into the correct
socket?
NO
Ensure the hot sensor is firmly
plugged into the correct socket
on control board.
YES
Is
the red LED
flashing?
YES
NO
Are the
hot, cold & sensor
strip resistances
correct?
Refer to
section on
sensor
YES resistance
Is the
green LED on or
flashing?
YES
2 flash
Hot sensor
short circuit.
YES
3 flash
Cold sensor open
or closed circuit.
Is the
cold sensor plugged
into the correct
socket?
Replace the relevant sensor.
YES
4 flash
Open or short
circuit thermistors.
YES
5 flash
Sensor strip
unplugged from
control board.
Is the
sensor strip plugged
into the correct
socket?
NO
Ensure the cold sensor is firmly
plugged into the correct socket
on control board.
Replace the sensor strip.
NO
Ensure the sensor strip is firmly
plugged into the correct socket
on control board.
Replace faulty sensor / sensor
strip.
NO
Conditions not conducive for
solar gain or too hot. Solar circuit
(pump) will not operate – normal
operation.
Solid green
Standby mode.
2 flash
Flooding solar
circuit period.
3 flash
Pump(s) flow
control period.
1.6
Refer to section
on testing the
Are
sensor strip
sensor strip
NO
resistances
correct?
4 flash
Pump flow
established.
5 flash
Cylinder at max
temperature.
YES
NO
TM024-001 Streamline (Closed Circuit) Service Instructions REV: A
D.O.I: 12/12/2007
This document is stored and maintained electronically by
Replace the sensor strip.
Cylinder at max temp (75º).
System operational.
Replace control board.
31
Service. All printed copies not bearing this statement in RED are deemed “uncontrolled”
Fault Finding Chart 1.6
1.6
(1) (2)
Does
the pump(s)
operate?
Pump operation
can be checked by
feeling the pump
body for vibration
NO
Is there
6VDC at the
relay coil?
Notes
(1) For collector heights between 9 & 18 metres an auxiliary pump (pump 2) must be
installed and included in these tests. For heights < 9 metres pump 2 is not required.
(2) If the green LED is indicating 4 flashes, pump 2 will be off and will not operate. To
test pump 2 ensure water in the tank is < 75º then reset heater by removing power
and then restoring power after waiting five seconds. Pump 2 operation can only be
tested during the green LED 2 or 3 flash periods.
Is the
relay plug inserted
YES
firmly into the socket
on the control
Refer to wiring
board?
diagrams & section
on control board
Test 6
NO
YES
Test 7A for
pump 1 and test
(1) (2)
7B for pump 2 if
Is there
fitted
correct voltage at the
control board pump(s)
sockets?
Replace the control board.
Reinsert relay plug firmly into
socket on control board.
NO
NO
Replace the control board.
YES
YES
Is the
pump relay
N/O contact
closed?
Test 8
NO
Replace the pump relay.
YES
(1) (2)
Is there
correct voltage at the
control board pump(s)
sockets?
Test 7A for
pump 1 and test
7B for pump 2 if
fitted
Refer to wiring
diagrams & section
on control board
Is the
Plug the pump(s) into the correct
pump(s) plugged
NO
socket(s) on the control board.
into the correct
socket?
(1)
Does
the pump(s)
YES
NO
have the correct
resistance? Test 9A for
(1)
YES
pump 1 and test
9B for pump 2 if
fitted
YES
(1)
Are
the pump(s)
seized?
(1)
NO
YES
Replace the pump(s).
(1)
NO
Has the
pump(s) impellor
come off the
shaft?
NO
YES
Is
the pump
isolation valve
open?
YES
1.7
NO
Replace the control board.
TM024-001 Streamline (Closed Circuit) Service Instructions REV: A
D.O.I: 12/12/2007
This document is stored and maintained electronically by
Open the pump isolation valve.
32
Service. All printed copies not bearing this statement in RED are deemed “uncontrolled”
Fault Finding Tests 5 – 7B
Test 5
Test 6
Warning - Ensure power is
isolated before conducting this
test.
Warning – ‘Live’ equipment wear
Personal Protective Equipment
when conducting this test.
Disconnect the element wires from the
thermostat, and using a multimeter on the
ohms scale, measure between the two
element wires. The following results should
be obtained:
Using a multimeter on the DC voltage
scale, measure between the two wires on
the control board relay plug.
Normal voltage is 6 Volts DC.
2.4kW element: 22 – 26 ohms.
3.6kW element: 15 – 17 ohms.
4.8kW element: 11 – 13 ohms.
Test 7A – Pump 1
Test 7B – Pump 2
Warning – ‘Live’ equipment wear
Personal Protective Equipment
when conducting this test.
Warning – ‘Live’ equipment wear
Personal Protective Equipment
when conducting this test.
Using a digital multimeter on the AC Using a digital multimeter on the AC
voltage scale, measure between the two voltage scale, measure between the two
wires on the pump 1 plug socket.
wires on the pump 2 plug socket.
Normal voltage is 240 Volts AC.
TM024-001 Streamline (Closed Circuit) Service Instructions REV: A
D.O.I: 12/12/2007
This document is stored and maintained electronically by
Normal voltage is 240 Volts AC.
33
Service. All printed copies not bearing this statement in RED are deemed “uncontrolled”
Fault Finding Tests 8 – 9B
Test 8
Warning – ‘Live’ equipment wear Personal Protective Equipment when
conducting this test.
Using a multimeter on the AC voltage scale, measure between the N/O terminal of the
pump relay and neutral on the control board power supply plug.
Normal reading is 240 Volts.
Test 9A – Pump 1
Test 9B – Pump 2
Warning - Ensure power is
isolated before conducting this
test.
Warning - Ensure power is
isolated before conducting this
test.
Using a multimeter on the ohms scale,
measure between the N/O terminal of the
pump relay and the first terminal on the
right of the pump 1 plug socket.
Disconnect the pump 2 plug socket from
the control board and using a multimeter
on the ohms scale, measure between the
two terminals of the pump 2 plug socket.
Normal reading is 127.8 ohms.
Normal reading is 127.8 ohms.
TM024-001 Streamline (Closed Circuit) Service Instructions REV: A
D.O.I: 12/12/2007
This document is stored and maintained electronically by
34
Service. All printed copies not bearing this statement in RED are deemed “uncontrolled”
Fault Finding Chart 1.7
1.7
Is the
collector height
between 9 & 18
metres high?
YES
NO
Is an
auxiliary pump
installed?
NO
Install an auxiliary pump.
YES
Is the
collector height >
18 metres?
YES
Max allowable collector
height is 18 metres. System will
not operate correctly at heights
> 18 metres.
YES
Reduce solar pipe work length
and/or number of bends.
NO
Remake pipe work and/or
bends/fittings so as correct fall is
provided. Adjust collectors to
provide correct fall.
NO
Refer to section
on solar closed
circuit
Is solar
pipe length or
number of bends >
allowable?
NO
Note: All bends
and fittings must
also be angled
Does
downwards
collector(s) & solar
pipe work have
correct fall?
YES
Refer to section on
commissioning
Does the
procedure
solar circuit have
NO
the correct amount
of fluid?
Are
there any
leaks around the
collectors or
heater?
YES
YES
Adjust solar circuit fluid level.
Refer to section on
commissioning procedure.
NO
Are the
collectors facing
within 45 degrees
of north?
5
NO
Reposition collectors into a cross
pitch roof stand or relocate to a
northerly aspect.
YES
Advise customer to have trees
pruned if possible or reposition
collectors to shade free location.
YES
Are
trees or
buildings shading the
collectors at any
time of the
day?
NO
The ideal collector inclination is
equal to the local latitude. The
minimum collector inclination
for the system to operate
efficiently is 10 degrees.
Are the
collectors lying
too flat?
YES
NO
TM024-001 Streamline (Closed Circuit) Service Instructions REV: A
D.O.I: 12/12/2007
This document is stored and maintained electronically by
Reposition collectors onto
flat roof stand.
1.8
35
Service. All printed copies not bearing this statement in RED are deemed “uncontrolled”
Fault Finding Chart 1.8
1.8
Is the
collector glass
broken or
dirty?
Clean the collector glass or
replace the collector.
YES
NO
Is the
coating on the
collector absorber plate
deteriorating?
YES
Is the
daily water
usage exceeding the
solar heating
capacity?
No hot water
NO
Is the
daily water
usage exceeding the
solar heating
capacity?
What was
the original
complaint
for?
YES
Replace the collector.
Insufficient hot water
or high energy bills
YES
Is
usage time
not suitable to hours
when solar gain is the greatest?
i.e. morning usage with
west facing
collectors
YES
NO
Solar system operational.
Suggest a usage pattern that
will minimise depletion of
hot water at night.
Reposition collectors to northerly
aspect or advise customer that
boosting will be required more often.
NO
NO
Is
the problem
only evident during
winter?
YES
NO
Are
the solar hot &
cold pipes
insulated?
Advise customer that boosting will be
required more often during the winter
months.
Advise customer on a usage
pattern that will suit needs.
NO
Solar hot and cold pipes must be
insulated. Uninsulated pipe work will
result in inefficient operation and
high (booster) energy bills.
NO
Replace or reposition dip tube
correctly.
YES
Refer to heater
exploded view
Is the
dip tube fitted
and in the correct
position?
Suggest a usage pattern that
will minimise depletion of
hot water at night.
YES
TM024-001 Streamline (Closed Circuit) Service Instructions REV: A
D.O.I: 12/12/2007
This document is stored and maintained electronically by
36
Service. All printed copies not bearing this statement in RED are deemed “uncontrolled”
Fault Finding Chart 2 & 2.1
2
Is the
water heater
of sufficient size for
the customers
needs?
Has
the usage pattern
changed recently? i.e.
additional appliances or
people using hot
water
NO
YES
2.1
Is
the T&PR
valve continuously
discharging
water?
NO
Is the
water heater
sized as recommended
in the sizing
guide?
NO
(1)
Notes
(1) The T&PR may under normal operating conditions discharge up
to 10 litres over a 24 hour period; therefore a small discharge
may occur whilst appliance is heating – Normal operation.
YES
NO
Is
the correct
T&PR valve
fitted?
YES
Recommend a water heater of
sufficient capacity to meet customers
needs.
Recommend a hot water usage
pattern that will suit the water heaters
capacity and the customers needs.
YES
Is the
water supply
pressure above
800kPa?
NO
Replace the T&PR valve with one of
the correct pressure rating.
Do not use reconditioned T&PR
valves.
The tank water temperature can be determined by
gently lifting the easing lever on the T&PR valve and
measuring the water temperature at the discharge
Is the
water temp in the
tank above
75º?
YES
NO
NO
Electric boosted
What is
the model
type?
NO
Check for crossed connection.
Replace T&PR valve.
Test 4A for EWT
type thermostats or
test 4B for ST type
Are
thermostats
the thermostat
3.3
YES
contacts
closed?
NO
Solar preheat & gas boosted
3.2
YES
Existing pressure limiting valve faulty.
Fit pressure limiting valve if not
already fitted.
Replace T&PR valve if required.
Are
there any
plumbing leaks,
crossed connections
or dripping
taps?
Repair any leaks.
Isolate crossed connections.
YES
Electric boosted
NO
What is
the model
type?
TM024-001 Streamline (Closed Circuit) Service Instructions REV: A
D.O.I: 12/12/2007
This document is stored and maintained electronically by
1
Gas boosted
1.1
Solar preheat
1.2
37
Service. All printed copies not bearing this statement in RED are deemed “uncontrolled”
Fault Finding Chart 3, 3.1, 3.2 & 3.3
3
Is the
water temperature
at a hot tap
60 - 75º?
Is a
tempering valve
fitted?
YES
Test 3A for EWT
type thermostats or
test 3B for ST type
Are
thermostats
the thermostat
NO
ECO contacts
ECO has tripped
closed?
YES
NO
Replace the tempering valve.
Advise customer on operation of
Premier Loline system and benefits of
storing water at 60 - 75º. Tempering
valves should be considered for
ablution areas if concerns surround
small children or elderly occupants.
NO
Is the
water temp
above
85º?
YES
Draw water until the water
temperature drops to 60º.
NO
YES
Reset the ECO and
continue with diagnosis.
NO
3.1
Are
the thermostat
contacts
closed?
NO
Test 4A for EWT
type thermostats or
test 4B for ST type
thermostats
3.3
3.2
YES
Is the
water temp in
the tank >
75º?
NO
Is a
tempering valve
fitted?
YES
YES
Replace the tempering valve.
Are the
hot, cold & sensor
strip resistances
Refer to
correct?
sections on
‘Testing the Hot
& Cold Sensors’
YES
and ‘Testing the
Sensor Strip’
NO
Is sensor
strip inserted
correctly into
duct?
Replace faulty sensor / sensor strip.
NO
Reinsert sensor strip into duct.
YES
Replace the control board.
YES
Is the
thermostat
in good contact with
the cylinder
wall?
YES
NO
Does
sensor strip
resistance match
tank water
Refer to section
temp?
on ‘Testing the
Sensor Strip’
NO
Sensor strip not touching face
of cylinder wall; replace tank.
Test 4A for EWT
type thermostats or
test 4B for ST type
Are
thermostats
the thermostat
NO
Thermostat mounting fault repaired.
contacts
closed?
Remove the thermostat and
clear scale from cylinder.
Re-tension holding bracket
and refit thermostat.
YES
Is the
element installed
in the correct
orientation?
YES
Replace the thermostat.
Refit element in the correct
orientation.
NO
TM024-001 Streamline (Closed Circuit) Service Instructions REV: A
D.O.I: 12/12/2007
This document is stored and maintained electronically by
38
Service. All printed copies not bearing this statement in RED are deemed “uncontrolled”
Fault Finding Chart 4
4
Notes
(1) The T&PR may under normal operating conditions discharge up to 10 litres over a 24 hour
period; therefore a small discharge may occur whilst appliance is heating – Normal operation.
Is
boosting
required during periods
of high solar gain to
meet hot water
demands?
NO
1.5
YES
Are
there any
leaks around the
collectors or
heater?
Is the
leak discharge
from the T&PR
valve?
YES
YES
NO
5
NO
(1)
Is
the T&PR
valve continuously
discharging
water?
YES
2.1
NO
Is the
water in the
solar storage tank
< or = 58º?
Gas boosted & solar preheat
with remote in-line gas booster
What is
the model
type?
NO
Electric boosted
Is the
gas booster
operating?
Is the
water temp at a
hot tap >
60º?
Test 4A for EWT
type thermostats or
test 4B for ST type
Are
thermostats
the thermostat
YES
contacts
closed?
YES
YES
YES
NO
1.5
Conduct fault finding on the gas
booster. Refer to appropriate Service
Instructions for model.
Is the
thermostat
in good contact with
the cylinder
wall?
YES
NO
NO
NO
Remove the thermostat and
clear scale from cylinder.
Re-tension holding bracket
and refit thermostat.
Are
the thermostat
YES
contacts
closed?
Test 4A for EWT type thermostats
or test 4B for ST type thermostats
NO
Is
the booster
circuit connected
to an off peak
tariff?
NO
Does
the customer
only boost when
required?
This document is stored and maintained electronically by
Thermostat mounting fault repaired.
NO
Advise customer to operate booster
only when required to maximise solar
contribution or switch to an off peak
tariff.
YES
1.5
Connect to continuous tariff and
install a booster switch to minimise
boosting at night or suggest a usage
pattern that will minimise depletion of
hot water at night.
YES
TM024-001 Streamline (Closed Circuit) Service Instructions REV: A
D.O.I: 12/12/2007
Replace the thermostat.
39
Service. All printed copies not bearing this statement in RED are deemed “uncontrolled”
Fault Finding Chart 5
5
Is the
leak from the
tank?
YES
Is the
leak discharge
from the T&PR
valve?
(1)
Is
the T&PR
valve continuously
discharging
water?
YES
NO
Is the
leak from the
anode?
NO
NO
If fitted
Is the
leak from
the element
gasket?
NO
YES
Reseal the anode.
Notes
(1) The T&PR may under normal operating conditions discharge
up to 10 litres over a 24 hour period; therefore a small
discharge may occur whilst appliance is heating – Normal
operation.
Is
the leak
from a plumbing
fitting?
NO
Normal operation.
Replace gasket.
Check for stripped bolts.
YES
YES
Is
the leak
from the
pump?
NO
2.1
YES
Reseal the plumbing fitting.
YES
Replace the pump.
NO
Is
the leak
from the solar
circuit
ECV?
Leak rectified.
YES
Does
the solar circuit
ECV still
leak?
Replace the solar
circuit ECV.
NO
Is
the leak from
the heat exchanger
isolation
valves?
Reseal or replace the isolation
valve.
YES
Cylinder may be leaking. Remove
pipe seals and inspect behind lower
access door to confirm leak.
Replace tank.
NO
YES Conduct fault finding for leaks on the
gas booster. Refer to appropriate
Service Instructions for model.
YES
NO
NO
Is
the leak from
the auxiliary
pump?
If fitted
Reseal the plumbing fitting.
Is the
leak from a
collector
connector?
NO
YES
This document is stored and maintained electronically by
NO
Is water
running from
the bottom of the
collector?
Replace the auxiliary pump.
TM024-001 Streamline (Closed Circuit) Service Instructions REV: A
D.O.I: 12/12/2007
Tighten or replace connector.
Is the
leak from the
collector?
YES
YES
Hole in heat exchanger allowing
entry of potable water into solar
circuit at mains pressure.
Replace tank.
YES
If fitted
Is the
NO
leak from gas
booster?
Is
the leak
from a plumbing
fitting?
NO
YES
NO
Condensate may be forming in
the collector.
This is a normal condition.
Replace the collector, recharge
with heating fluid and
re-commission system.
40
Service. All printed copies not bearing this statement in RED are deemed “uncontrolled”
Fault Finding Chart 6
6
Is
the noise
only evident when
the electric heating
cycle is
on?
YES
Is
there mineral build
up on the heating
unit?
YES
Poor quality water supply i.e. dam water
sludge. Flush Tank.
NO
Is
the noise water
hammer?
NO
Replace heating unit.
Refer to water hammer causes in the
‘Common Complaints’ section.
YES
NO
Is
the noise
only evident when water
is flowing through
the water
heater?
YES
Check all other appliances that can generate
noise i.e. washing machine, dishwasher, ball
cocks etc.
NO
Is the
water pressure above
800kPa?
NO
Check for:
Restrictions in pipe work, faulty valves, loose
plumbing, other appliances i.e. washing
machine or dishwasher.
Fit 600kPa PLV if pressure excessive.
YES
Is the
Pump(s)
noisy?
YES
NO
Replace noisy pump.
Check for a faulty stop cock, non-return
valve or T&PR valve
Gas Booster Flow Rate and Outlet Temperature – Gas Boosted Models Only
To view the gas booster flow rate and the preset outlet temperature:
Voltages up to 240 volts will be present within the water heater, take care
not to touch wiring terminals. Use an insulated tool when operating the DIP
switch or MIN and MAX buttons.
1. Remove the front panel from the gas booster water heater.
2. Using an insulated tool, turn DIP SWITCH 1 on (up position). Refer to figure 1.
3. Press the MIN button until left digit in the display reads:
1 – (To view flow rate) or 5 – (To view outlet temp).
4. Press the MAX button until the right digit in the display reads Y.
The maintenance code 1Y (Flow Rate) or 5Y (Outlet Temp) and the
value of that code will now be alternating on the LED display.
Figure 1
5. Turn DIP SWITCH 1 off (down position) when diagnosis is complete.
6. Refit the front panel to the gas booster water heater.
Adjusting the Gas Booster Preset Outlet Temperature
Gas boosters supplied with gas boosted models are factory preset to deliver 60ºC water
however it is possible to alter this setting. If for some reason the outlet temperature has
been altered it must be changed back to 60ºC for the system to operate correctly; to do
this perform the following procedure:
TM024-001 Streamline (Closed Circuit) Service Instructions REV: A
D.O.I: 12/12/2007
This document is stored and maintained electronically by
41
Service. All printed copies not bearing this statement in RED are deemed “uncontrolled”
Voltages up to 240 volts will be present within the water heater, take care
not to touch wiring terminals. Use an insulated tool when operating the DIP
switch or MIN and MAX buttons.
1. Remove the front cover from the water heater.
2. Turn DIP SWITCHES 3 and 4 on (up position) on the I.C. Board. The current preset
temperature is displayed on the LED.
3. Press the MIN or MAX button, located under the DIP Switches, until 60ºC is displayed.
4. Turn DIP SWITCHES 3 and 4 off (down position). The temperature display is now
turned off.
5. Refit the front cover to the water heater.
Electrical Insulation Testing
There are three basic test procedures that should be carried out when the operation and
function of a Streamline water heater’s electrical system is in doubt.
Wear Personal Protective Equipment when conducting step 1 of these
procedures to reduce the risk of electric shock. Refer to Rheem safety
procedure on electrical testing.
Solar Preheat & Gas Boosted Models
Procedure 1: Insulation resistance of the water heater Neutral Circuit. (Reading not
to be below 0.66 Mega ohm).
1. Isolate power to the water heater by switching off at power point and unplugging
appliance 3 pin plug from power point. Confirm with multi-meter across terminal
block Active and Neutral, then Active and Earth, then Neutral and Earth that
voltage is not present.
2. Connect megger leads to the Neutral of the water heater wiring and Earth.
3. Operate megger. A reading above 0.66 Mega ohm should be obtained.
4. If a reading below 0.66 Mega ohm is indicated, all component parts will need to be
individually tested to locate the fault. Refer to Fault Finding Chart 1.4 on page 30.
Procedure 2: Insulation resistance of the water heater Active Circuit (reading not to
be below 0.66 mega-ohm).
6. Connect megger leads to the Active of the water heater wiring and Earth.
7. Operate megger. A reading above 0.66 Mega ohm should be obtained.
8. If a reading below 0.66 Mega ohm is indicated, all component parts will need to be
individually tested to locate the fault. Refer to Fault Finding Chart 1.4 on page 30.
Procedure 3: To check “Continuity” of the water heater electrical circuit.
9. Set megger to resistance scale or multimeter to x1 resistance scale.
10.Measure between the Active and Neutral terminals on the power supply terminal block
located behind the upper electrical access cover. The resistance should be
approximately 1.82 kilo ohms for solar preheat models and 51.5 ohms for gas boosted
models. If a reading outside these resistance values is obtained, all electrical
component parts will need to be individually tested to locate the fault. Refer to
Specifications table on page 4 for indicative resistance values of components.
11.Plug appliance 3 pin plug back into power point and switch on power point. Note: If
continuing with any diagnostic procedures do not perform this step.
TM024-001 Streamline (Closed Circuit) Service Instructions REV: A
D.O.I: 12/12/2007
This document is stored and maintained electronically by
42
Service. All printed copies not bearing this statement in RED are deemed “uncontrolled”
Electric Boosted Models
Procedure 1: Insulation resistance of the water heater Neutral Circuit. (Reading not
to be below 0.66 Mega ohm).
1. Isolate power to the water heater by removing fuse(s) or switching off circuit
breaker(s). Confirm with multi-meter across terminal block Active A1 and Neutral,
then Active A1 and Earth, then Neutral and Earth that voltage is not present.
2. Confirm with multi-meter across terminal block Active A2 and Neutral, then
Active A2 and Earth that voltage is not present.
3. Once satisfied, mark and disconnect the Active and Neutral wires from the water heater
terminal block. Note: if two independent power supply circuits are provided, both Active
wires must be disconnected; one from terminal A1 and the other from terminal A2.
4. Remove the wiring loop fitted between terminals A1 and A2. Note: this loop will not be
fitted if two independent power supply circuits are provided.
5. Connect megger leads to the Neutral of the water heater wiring and Earth.
6. Operate megger. A reading above 0.66 Mega ohm should be obtained.
7. If a reading below 0.66 Mega ohm is indicated, all component parts will need to be
individually tested to locate the fault. Refer to Fault Finding Chart 1.4 on page 30.
Procedure 2: Insulation resistance of the water heater Active Circuit (reading not to
be below 0.66 mega-ohm).
9. Connect megger leads to the Active A1 terminal of the water heater wiring and Earth.
10.Operate megger. A reading above 0.66 Mega ohm should be obtained.
11.If a reading below 0.66 Mega ohm is indicated, all component parts of the solar circuit
will need to be individually tested to locate the fault. Refer to Fault Finding Chart 1.4 on
page 30.
12.Connect megger leads to the Active A2 terminal of the water heater wiring and Earth.
13.Operate megger. A reading above 1 Mega ohm should be obtained.
14.If a reading below 1 Mega ohm is indicated, all component parts of the booster circuit
will need to be individually tested to locate the fault. Refer to Fault Finding Chart 1.4 on
page 30.
Procedure 3: To check “Continuity” of the water heater electrical circuit.
12.Set megger to resistance scale or multimeter to x1 resistance scale.
13.Measure between the Active A1 and Neutral terminals on the power supply terminal
block located behind the upper electrical access cover. The resistance should be
approximately 1.82 kilo ohms. If a reading outside this resistance value is obtained, all
electrical component parts of the solar circuit will need to be individually tested to locate
the fault. Refer to Specifications table on page 4 for indicative resistance values of
components.
14.Measure between the Active A2 and Neutral terminals on the power supply terminal
block located behind the upper electrical access cover. The resistance should be
approximately 22 – 26 ohms for 2.4kW element models, 15 – 17 ohms for 3.6kW
element models and 11 – 13 ohms for 4.8kW element models. If a reading outside
these resistance values is obtained, all booster electrical component parts will need to
be individually tested to locate the fault.
15.Reconnect Active cables to A1 & A2 terminals and Neutral cable to N terminal at heater
terminal block.
16.Replace wire loop between terminals A1 and A2 if previously removed in step 4.
17.Replace fuse(s) or switch on circuit breaker(s). Note: If continuing with any
diagnostic procedures do not perform this step.
TM024-001 Streamline (Closed Circuit) Service Instructions REV: A
D.O.I: 12/12/2007
This document is stored and maintained electronically by
43
Service. All printed copies not bearing this statement in RED are deemed “uncontrolled”
Component Replacement Procedures
Draining the Water Heater (Procedure 1)
Elevated temperatures may be present during the draining process. Wear
Personal Protective Equipment to prevent scalds or burns.
Wear Personal Protective Equipment when conducting step 3 of this
procedure to reduce the risk of electric shock. Refer to Rheem Safety
Procedure on electrical testing.
1. Isolate power and water supplies to the water heater.
2. Relieve pressure from the water heater through the T&PR valve or a hot tap.
3. Remove the upper electrical access cover (refer to procedure 5) and confirm with a
multi-meter between the Active and Neutral, then Active and Earth, then Neutral
and Earth terminals of the terminal block that voltage is not present.
4. Disconnect the cold water supply pipe.
5. Fit a drain hose to the cold-water connection and run the other end to a drain or safe
location.
6. Open the temperature and pressure relief valve to allow air into the system.
Solar Circuit Relief Valve (Procedure 2)
Elevated temperatures may be present during this procedure. Wear Personal
Protective Equipment to prevent scalds or burns.
Wear Personal Protective Equipment when conducting step 2 of this
procedure to reduce the risk of electric shock. Refer to Rheem Safety
Procedure on electrical testing.
Under no circumstances should solar circuit work be performed whilst the
solar circuit is hot. It is recommended to conduct any solar circuit procedures
in the early morning before maximum solar gain is achieved. Work should
also be performed with the solar collectors covered.
It is dangerous to open any part of the closed solar circuit when the system is
hot. A serious and significant burn and scald hazard exists. The following
procedure is only to be performed when the system is cold.
1. Isolate power supply to the water heater and remove upper electrical access cover
(refer to procedure 5).
2. Confirm with a multi-meter between Active and Neutral, then Active and Earth,
then Neutral and Earth terminals of the terminal block that voltage is not
present.
3. Open a hot tap and draw off all hot water from the tank. This will help cool the solar
circuit fluid in the heat exchanger.
4. If the pump has been operating allow five minutes for closed circuit fluid to drain back
to heat exchanger.
5. Disconnect the drain line from the solar circuit relief valve.
6. Remove the spring clip from the solar circuit relief valve and remove the valve by lifting
upwards.
A quantity of hot vapour may discharge from the tank during this process.
Wear Personal Protective Equipment to prevent scalds or burns and do not
lean over relief valve.
7. Complete reassembly in reverse order of above.
TM024-001 Streamline (Closed Circuit) Service Instructions REV: A
D.O.I: 12/12/2007
This document is stored and maintained electronically by
44
Service. All printed copies not bearing this statement in RED are deemed “uncontrolled”
Temperature and Pressure Relief Valve (Procedure 3)
Never fit a T&PR valve with a rating higher than that indicated on the water
heater rating plate. Do not use reconditioned T&PR valves.
1.
2.
3.
4.
Isolate power and water supplies to the water heater.
Relieve pressure from the water heater through the T&PR valve or a hot tap.
Remove the drain line from the T&PR valve.
Unscrew the T&PR valve and remove.
A quantity of hot water will discharge from the tank during this process. Wear
Personal Protective Equipment to prevent scalds or burns.
5. Confirm the replacement T&PR valve is the correct rating and refit using thread tape.
6. Refit the drain line.
7. Close the hot tap and restore water supply.
8. Check T&PR valve thread for leaks.
9. Operate the T&PR valve lever to reset relief drain.
10. Purge air from the system through hot taps.
11. Restore the power supply to the water heater.
Pump Access Panel Removal: (Procedure 4)
1. Isolate power supply.
2. Remove two screws from the bottom of the access panel.
3. Remove the access panel by sliding down and then pulling forward, being careful not to
damage the solar monitor ribbon cable.
Upper Electrical Access Cover Removal: (Procedure 5)
1. Isolate power supply.
2. Remove two screws from the bottom of the upper electrical access cover.
3. Remove the cover by sliding down and then pulling forward.
Dip Tube (Procedure 6)
1. Isolate the power and water supplies to the water heater.
2. Relieve pressure from the water heater through the T & PR valve or a hot tap.
3. Disconnect the hot water line from the outlet of the water heater.
A quantity of hot water will discharge from the outlet during this process.
Wear Personal Protective Equipment to prevent scalds or burns.
4. Using a flat blade screwdriver gently split the outer rim at the top and bottom of the dip
tube face and prise the dip tube out of the cylinder fitting.
5. Fit the replacement dip tube into the cylinder fitting ensuring the flat lines up with the
fitting (dip tube facing up) and gently drive the dip tube into the fitting a short distance.
6. Reconnect the plumbing; this will push the dip tube into the correct location.
7. Restore the water supply and purge air from the system through hot taps.
8. Restore the power supply.
TM024-001 Streamline (Closed Circuit) Service Instructions REV: A
D.O.I: 12/12/2007
This document is stored and maintained electronically by
45
Service. All printed copies not bearing this statement in RED are deemed “uncontrolled”
Anodes (Procedure 7)
Elevated temperatures may be present during anode removal process. Wear
Personal Protective Equipment to prevent scalds or burns.
1. Isolate the power and water supplies to the water heater.
2. Relieve pressure from the water heater and drain approximately 10 litres of water
from the cylinder through the T&PR valve.
3. Remove the anode cap(s).
4. Using a 27mm tube or socket spanner remove the anode(s).
5. Apply thread seal tape to replacement anode, refit and tighten. Note: It may be
necessary to cut the anode to length prior to fitting. Refer to specifications table on
page 4 for the correct anode length.
6. Restore water supply and check for leaks.
7. Refit the anode cap(s) and restore power.
Sensor Strip (Procedure 8)
Wear Personal Protective Equipment when conducting step 2 of this
procedure to reduce the risk of electric shock. Refer to Rheem Safety
Procedure on electrical testing.
1. Isolate power supply to the water heater and remove pump access panel (refer to
procedure 4).
2. Confirm with a multi-meter between Active and Neutral, then Active and Earth,
then Neutral and Earth terminals of the control board power input plug that
voltage is not present (refer to diagram on page 15 for plug location).
3. Unplug sensor strip from control board.
4. Carefully grip the sensor strip and slide the sensor strip out by bending out through
pump access cover. Ensure that the sensor strip duct pocket has also not been
gripped. Note: The fitment between the sensor strip and the pocket is quite firm,
do not pull on the wires only as they will break away from the strip.
5. Carefully insert the replacement sensor strip into the duct pocket and plug into control
board. Note: When reinserting the replacement sensor strip ensure the plastic
backing is facing AWAY from the cylinder. The strip must be fully inserted to
operate correctly. Lubricants of any kind must NOT be used.
6. Replace pump access panel, restore electricity supply and check appliance operation.
Control Board (Procedure 9)
Wear Personal Protective Equipment when conducting step 2 of this
procedure to reduce the risk of electric shock. Refer to Rheem Safety
Procedure on electrical testing.
1. Isolate power supply to the water heater and remove pump access panel (refer to
procedure 4).
2. Confirm with a multi-meter between Active and Neutral, then Active and Earth,
then Neutral and Earth terminals of the control board power input plug that
voltage is not present (refer to diagram on page 15 for plug location).
3. Unplug sensor strip, cold sensor, hot sensor, remote solar monitor, pump 1, pump 2 (if
fitted) and power supply plugs from control board.
4. Disconnect pump 1 wire from N/O terminal of pump relay.
5. Remove retaining screw from control board backing plate and remove control board.
6. Complete reassembly in reverse order of above.
7. Restore electricity supply and check appliance operation.
TM024-001 Streamline (Closed Circuit) Service Instructions REV: A
D.O.I: 12/12/2007
This document is stored and maintained electronically by
46
Service. All printed copies not bearing this statement in RED are deemed “uncontrolled”
Pump Relay (Procedure 10)
Wear Personal Protective Equipment when conducting step 2 of this
procedure to reduce the risk of electric shock. Refer to Rheem Safety
Procedure on electrical testing.
1. Isolate power supply to the water heater and remove pump access panel (refer to
procedure 4).
2. Confirm with a multi-meter between Active and Neutral, then Active and Earth,
then Neutral and Earth terminals of the control board power input plug that
voltage is not present (refer to diagram on page 15 for plug location).
3. Unplug pump relay plug from control board.
4. Disconnect pump 1 wire from N/O terminal of pump relay.
5. Remove pump relay retaining screw and remove pump relay.
6. Complete reassembly in reverse order of above.
7. Restore electricity supply and check appliance operation.
Remote Solar Monitor (Procedure 11)
Wear Personal Protective Equipment when conducting step 2 of this
procedure to reduce the risk of electric shock. Refer to Rheem Safety
Procedure on electrical testing.
1. Isolate the power supply to the water heater and remove pump access panel (refer
to procedure 4).
2. Confirm with a multi-meter between Active and Neutral, then Active and Earth,
then Neutral and Earth terminals of the control board power input plug that
voltage is not present (refer to diagram on page 15 for plug location).
3. Unplug remote solar monitor plug from control board.
4. Remove existing remote solar monitor by peeling away from pump access panel and
then withdrawing ribbon cable through the slot in the pump access panel.
5. Remove adhesive backing from replacement solar monitor and complete reassembly
in reverse order of above.
6. Replace pump access panel, restore electricity supply and check appliance operation.
Cold Sensor (Procedure 12)
Ensure any escaping solar circuit fluid is contained and does not enter any
part of a rainwater tank system as entry will render the water undrinkable.
1. Remove the solar circuit relief valve by following steps 1 – 6 in procedure 2. This will
relieve the solar circuit pressure. Note: ensure all warnings in procedure 2 are
observed and adhered to.
2. Unplug cold sensor plug from control board.
3. Turn heat exchanger isolation valve off by rotating clockwise 90º.
4. Remove the spring clip retaining the cold sensor in the pipe work ‘tee’, and remove the
locating washer and cold sensor. Note: a small amount of solar circuit fluid will drain
from the cold sensor aperture during this procedure; have the replacement sensor
ready to quickly install so fluid loss is minimised.
5. Fit the replacement sensor into the “tee” and secure with the spring clip. Ensure the
clip retains the locating washer.
6. Complete reassembly in reverse order of above.
7. Restore electricity supply and check appliance operation.
TM024-001 Streamline (Closed Circuit) Service Instructions REV: A
D.O.I: 12/12/2007
This document is stored and maintained electronically by
47
Service. All printed copies not bearing this statement in RED are deemed “uncontrolled”
Hot Sensor (Procedure 13)
1. Isolate power supply to the water heater.
2. Remove the spring clip retaining the hot sensor in the collector connector and remove
the locating washer and hot sensor.
3. Fit the replacement sensor into the connector and secure with the spring clip. Ensure
the clip retains the locating washer.
4. Cut the wiring to the existing sensor and connect to the replacement sensor. Ideally
this connection should be made in the roof space. If the connection is to be made on
the roof, ensure the connection is water and UV proof.
5. Restore electricity supply and check appliance operation.
Pump (Procedure 14)
Ensure any escaping solar circuit fluid is contained and does not enter any
part of a rainwater tank system as entry will render the water undrinkable.
1. Remove the solar circuit relief valve by following steps 1 – 6 in procedure 2. This will
relieve the solar circuit pressure. Note: ensure all warnings in procedure 2 are
observed and adhered to.
2. Turn heat exchanger isolation valve off by rotating clockwise 90º.
3. Unplug pump plug from control board.
4. Disconnect pump wire from N/O terminal of pump relay.
5. Undo pump unions and remove pump. Note: a small amount of solar circuit fluid will
drain from the pump pipe work during this procedure. This fluid should be caught in a
clean container and added back into the system via the solar circuit relief valve
opening.
8. Complete reassembly in reverse order of above.
6. Restore electricity supply, check appliance operation and check for any leaks.
Heat Exchanger Drain Valve (Procedure 15)
Ensure any escaping solar circuit fluid is contained and does not enter any
part of a rainwater tank system as entry will render the water undrinkable.
1. Remove the solar circuit relief valve by following steps 1 – 6 in procedure 2. This will
relieve the solar circuit pressure. Note: ensure all warnings in procedure 2 are
observed and adhered to.
2. Attach one end of a ½” flexible hose to heat exchanger drain valve and insert the other
end into a clean container.
3. Open heat exchanger drain valve by rotating 90º in an anti clockwise direction. Solar
circuit fluid will now drain into the container. Note: approximately 16 litres of fluid will
drain out of the heat exchanger. When all fluid has been drained remove ½” hose.
4. Unscrew heat exchanger drain valve from pipe work.
5. Unscrew ½” nipple from drain valve and screw into replacement drain valve using
thread tape.
6. Screw replacement drain valve into heat exchanger pipe work using thread tape and
ensure drain valve is in closed position.
7. Pour solar circuit fluid into solar relief valve opening and complete solar circuit relief
valve reassembly in reverse order of procedure 2 steps 1 – 6.
8. Restore power and water supplies and check for leaks.
9. If fluid was lost, recommission appliance to check solar circuit fluid level (refer to
‘Commissioning Procedure’ on page 57).
TM024-001 Streamline (Closed Circuit) Service Instructions REV: A
D.O.I: 12/12/2007
This document is stored and maintained electronically by
48
Service. All printed copies not bearing this statement in RED are deemed “uncontrolled”
Pump Isolation Valve (Procedure 16)
Ensure any escaping solar circuit fluid is contained and does not enter any
part of a rainwater tank system as entry will render the water undrinkable.
1. Remove the solar circuit relief valve by following steps 1 – 6 in procedure 2. This will
relieve the solar circuit pressure. Note: ensure all warnings in procedure 2 are
observed and adhered to.
2. Attach one end of a ½” flexible hose to heat exchanger drain valve and insert the other
end into a clean container.
3. Open heat exchanger drain valve by rotating 90º in an anti clockwise direction. Solar
circuit fluid will now drain into the container. Note: approximately 16 litres of fluid will
drain out of the heat exchanger. When all fluid has been drained close drain valve by
rotating 90º in a clockwise direction and remove ½” hose.
4. Unscrew pump isolation valve nut and olive and pull out pump pipe work from valve.
Note: A small amount of solar circuit fluid will drain from heat exchanger pipe work.
5. Unscrew and remove pump isolation valve from heat exchanger pipe work.
6. Unscrew and remove male upper half of nut and olive connection from isolation valve
and screw into replacement isolation valve using thread tape.
7. Screw replacement isolation valve into heat exchanger pipe work and insert pump pipe
work into isolation valve and tighten nut and olive.
10. Open pump isolation valve (if closed) and pour solar circuit fluid into solar relief valve
opening and complete solar circuit relief valve reassembly in reverse order of
procedure 2 steps 1 – 6.
11. Restore power and water supplies and check for leaks.
12. If fluid was lost, recommission appliance to check solar circuit fluid level (refer to
‘Commissioning Procedure’ in ‘Owners Guide & Installation Instructions’).
Tempering Valve – Gas Boosted Models Only (Procedure 17)
A quantity of hot water may discharge from gas booster & hot pipe during this
procedure. Wear Personal Protective Equipment to prevent scalds or burns.
1.
2.
3.
4.
5.
6.
Isolate power and water supplies to the water heater.
Relieve pressure from the water heater through the T&PR valve or a hot tap.
Unscrew the tempered water pipe work union at the tempering valve elbow.
Unscrew the tempering valve hot and cold water unions and remove tempering valve.
Unscrew and remove elbow from tempering valve.
Complete reassembly in reverse order of above.
Removing or Replacing an J or KF Series Solar Collector (Procedure 18)
1. Remove the solar circuit relief valve by following steps 1 – 6 in procedure 2. This will
relieve the solar circuit pressure. Note: ensure all warnings in procedure 2 are
observed and adhered to.
2. Disconnect the hot and cold pipes at the collector(s) by unscrewing pipe unions at
collector(s) and pulling pipe work from collector(s).
3. Unscrew the collector inter-connector unions (if more than one collector) at the top and
bottom of the collectors. Do not stand on the collectors.
4. Remove the clamp screws retaining the collector to the angle bracket clamps,
disconnect the retaining strap at the top of the collector, slide the collector(s) out and
remove to ground level.
5. Complete collector and solar circuit relief valve assembly in reverse order of above.
6. Restore power and water supplies, check operation and check for leaks.
TM024-001 Streamline (Closed Circuit) Service Instructions REV: A
D.O.I: 12/12/2007
This document is stored and maintained electronically by
49
Service. All printed copies not bearing this statement in RED are deemed “uncontrolled”
Gas Booster – Gas Boosted Models Only (Procedure 19)
A quantity of hot water may discharge from the gas booster and tank and gas
booster hot pipes during this procedure. Wear Personal Protective Equipment
to prevent scalds or burns.
Wear Personal Protective Equipment when conducting step 3 of this
procedure to reduce the risk of electric shock. Refer to Rheem Safety
Procedure on electrical testing.
1. Isolate power, gas and water supplies to the water heater.
2. Relieve pressure from the water heater through the T&PR valve or a hot tap.
3. Remove the upper electrical access cover (refer to procedure 5) and confirm with a
multi-meter between the Active and Neutral, then Active and Earth, then Neutral
and Earth terminals of the terminal block that voltage is not present.
4. Disconnect the gas booster wiring at the terminal block.
5. Disconnect the gas booster gas supply line from the gas inlet connection of gas
booster.
6. Disconnect the gas booster cold water supply pipe from the cold-water inlet connection
of gas booster by unscrewing brass union.
7. Unscrew the gas booster water drain plug and relief valve and drain the gas booster.
8. Disconnect the gas booster hot water supply pipe from the gas booster hot water outlet
connection by unscrewing brass union.
9. Unscrew single screw retaining gas booster lower bracket to tank gas booster support
bracket.
10. To remove gas booster, lift gas booster up from tank approximately 50mm to unhinge
gas booster upper bracket and pull away from tank.
11. Remove upper half of brass unions removed in steps 6 & 8 from gas booster and
install in replacement gas booster using thread tape.
12. Unscrew and remove two screws on replacement gas booster upper bracket, rotate
bracket 180º and refix bracket to gas booster utilising the two screws removed
previously.
13. Complete reassembly by reversing steps 1 – 10 above.
14. When complete test gas booster operation and check for leaks.
Mechanical Thermostat – Electric Boosted Models Only (Procedure 20)
Wear Personal Protective Equipment when conducting step 2 of this
procedure to reduce the risk of electric shock. Refer to Rheem Safety
Procedure on electrical testing.
1. Isolate power to the water heater and remove the upper electrical access cover (refer
to procedure 5).
2. Confirm with a multi-meter between Active and Neutral, then Active and Earth,
then Neutral and Earth terminals of the terminal block that voltage is not present.
3. Disconnect the wiring to the thermostat.
4. Slide the thermostat out from under the retaining clamp.
5. Remove any scale from the cylinder surface.
6. Fit the replacement thermostat under the clamp.
7. Reconnect the wiring as per the circuit wiring diagram on page 6 or 7 depending upon
thermostat type (EWT or ST).
8. Conduct an electrical insulation test. Refer to page 42.
9. Refit the access cover and restore the power supply.
TM024-001 Streamline (Closed Circuit) Service Instructions REV: A
D.O.I: 12/12/2007
This document is stored and maintained electronically by
50
Service. All printed copies not bearing this statement in RED are deemed “uncontrolled”
Heating Unit – Electric Boosted Models Only (Procedure 21)
Wear Personal Protective Equipment when conducting step 1 of this
procedure to reduce the risk of electric shock. Refer to Rheem Safety
Procedure on electrical testing.
1. Drain the water heater. Refer to procedure 1.
2. Remove the upper electrical access cover (refer to procedure 5) and disconnect the
wiring from the terminal block. Disconnect the wiring to the heating unit from the
thermostat. Unclip the terminal block from the jacket and remove thermostat and
terminal block.
3. Remove the two screws retaining the thermostat clamp.
4. Loosen the two lower screws slightly. When water is below the heating unit level, refit
the cold water supply pipe.
5. Remove the two lower screws and withdraw the heating unit carefully making sure the
loop does not catch and open up inside the cylinder.
6. Clean around the cylinder fitting, fit gasket to replacement heating unit and insert into
water heater. Note: Ensure the element is installed in the same orientation.
7. Replace screws and thermostat clamp, and then tighten.
8. Close T&PR valve, and open all hot taps. Restore the cold water supply and purge air
through hot taps, close each hot tap as water runs freely.
9. Check heating unit for leaks.
10.Refit thermostat and terminal block and reconnect the wiring as per the circuit wiring
diagram on page 6 or 7 depending upon thermostat type (EWT or ST).
11.Refit the upper electrical access cover.
12.Restore power supply to the water heater.
TM024-001 Streamline (Closed Circuit) Service Instructions REV: A
D.O.I: 12/12/2007
This document is stored and maintained electronically by
51
Service. All printed copies not bearing this statement in RED are deemed “uncontrolled”
Exploded View 1 – Solar Preheat & Gas Boosted Models
TM024-001 Streamline (Closed Circuit) Service Instructions REV: A
D.O.I: 12/12/2007
This document is stored and maintained electronically by
52
Service. All printed copies not bearing this statement in RED are deemed “uncontrolled”
Replacement Parts List (Exploded View 1)
Item
1
2
2a
3
4
5
6
7
8
9
10
10a
11
12
13
14
15
16
17
18
19
20
21
22
23
24
25
26
27
28
29
Description
Closed Circuit Relief Valve 200kPa
Union ½”C x ½”M (pre 19/9/06)
Compression Nut 1/2”
Anode Cover
Jacket Top
Extension Fitting – Relief Valve
Pipe Seal – Solar Conn/Solar Relief valve
Foam Cover
Hand Grip
Spring Clip - Relief Valve
Rubber Disc – Transport item only
Kelvindale Plug – Transport item only
Compression Olive
Extension Fitting – Solar Hot Connection
O-ring
Hot Pipe – Pump to Outlet
Pipe Seal – T&PR Valve
T&PR Valve ½” x 1000kPa
Terminal Block
Hot sensor lead – PCB to Elec Enclosure
Mounting Panel
Gas Booster - Natural
Gas Booster – Propane
Name Strip
Anode – Black
Anode – Blue
Anode - Green
Dip Tube
Sensor Strip
Conduit
Strainer
Pipe Seal – Inlet/Outlet
Front Cover solar preheat models
Power Lead
Solar
Preheat
088077
088063
088119
221720-1
108370
088095
221229
221735
108243
088100
087035
221754
088027
088118
087034
N/A
221420
220641
051520
056007
108278
N/A
N/A
120712
221914
221924
222024
225601
053060
N/A
220520
221418
103614
053054
Gas
Boosted
088077
088063
088119
221720-1
108370
088095
221229
221735
108243
088100
087035
221754
088027
088118
087034
N/A
221420
220641
051520
056007
108278
This document is stored and maintained electronically by
Description
30
Fitting Liner ¾”
31a - Fitting Hot/Cold Connection ¾”C X ¾”M
31b – Elbow Brass ¾”M X 3/4” Screw
32a – Hot Pipe – Insul Copper
32b – Hot Pipe – Insul Flexible 440mm X ¾”
33a – Cold Pipe – Insul Copper
33b – Cold Pipe – Insul Flexible 450mm X ¾”
Jacket Bottom
Foot
Cover – Pump Access
Union
Brass Plug
Tempering Valve
Tee Brass ¾” Screw
41a – Union ¾”C x ¾”F
41b – Elbow Brass ¾”M X ¾”F Screw
Elbow Brass ¾”M x ¾” F Screw
43a – Union ¾”C x ¾”M
43b – Elbow Brass ¾”M X ¾”F Screw
Ball Valve
Pipe Cover
Hose Tail
Cold Sensor
Washer
Cold Pipe – Pump to Heat Exchanger
Bracket - Controller
Pump - Salmson HXE63/15P
PCB Support Post
Controller PCB
Solar Monitor
Brass Extension Fitting
Union ½”C X ½”M contite
Bracket – Plumbing Support
31
32
33
34
35
36
37
38
39
40
41
42
43
271026NF/M
271026PF/M
TM024-001 Streamline (Closed Circuit) Service Instructions REV: A
D.O.I: 12/12/2007
Item
120715
221914
221924
222024
225601
053060
N/A
220520
221418
103615
053054
44
45
46
47
48
49
50
51
52
53
54
55
56
57
53
Service. All printed copies not bearing this statement in RED are deemed “uncontrolled”
Solar
Preheat
221001
N/A
N/A
N/A
N/A
N/A
N/A
108377
108107
104634
N/A
N/A
N/A
N/A
N/A
N/A
N/A
N/A
N/A
088075
N/A
088115
056006
087033
088080
108277
088081
052120
053050
052133
088092
088124
N/A
Gas
Boosted
221001
NLA
087050
NLA
088137
NLA
088138
108377
108107
104634
088110
088111
224007
088073
NLA
088117
088117
NLA
088117
088075
103617
088115
056006
087033
088080
108277
088081
052120
053050
052133
088092
088124
140117
Exploded View 2 – Electric Boosted Models
TM024-001 Streamline (Closed Circuit) Service Instructions REV: A
D.O.I: 12/12/2007
This document is stored and maintained electronically by
54
Service. All printed copies not bearing this statement in RED are deemed “uncontrolled”
Replacement Parts List (Exploded View 2)
Item
1
2
2a
3
4
5
6
7
8
9
10
10a
11
12
13
14
15
16
17
18
19
20
21
22
23
24
25
26
27
28
29
30
31
32
33
34
35
36
37
38
39
40
41
42
43
44
45
46
47
Description
Closed Circuit Relief Valve 200kPa
Union ½”C x ½”M (pre 19/9/06)
Compression Nut ½”
Anode Cover
Jacket Top
Extension Fitting – Relief Valve
Pipe Seal – Solar Connections
Foam Cover
Hand Grip
Spring Clip - Relief Valve
Rubber Disc – Transport item only
Kelvindale Plug – Transport item only
Compression Olive
Extension Fitting – Solar Hot Connection
O-ring
Hot Pipe – Pump to Outlet
Pipe Seal – T&PR Valve
T&PR Valve ½” x 1000kPa
Terminal Block – 3 Way
Hot sensor lead – PCB to Electrical Enclosure
Heating Unit Gasket
Heating Unit 2.4kW
Heating Unit 3.6kW
Heating Unit 4.8kW
Name Band
Anode – Black
Anode – Blue
Anode - Green
Dip Tube
Sensor Strip
Conduit
Strainer
Pipe Seal – Inlet/Outlet
Front Cover
Thermostat
Fitting Liner ¾”
Thermostat Clamp
Element Bolts
Ball Valve
Jacket Bottom
Foot
Cover – Pump Access
Hose Tail
Bracket - Controller
PCB Support Post
Controller PCB
Cold Sensor
Cold Pipe – Pump to Heat Exchanger
Pump - Salmson HXE63/15P
Washer
Solar Monitor
Brass Extension Fitting
Union ½”C X ½”M contite
TM024-001 Streamline (Closed Circuit) Service Instructions REV: A
D.O.I: 12/12/2007
This document is stored and maintained electronically by
Electric Boosted
088077
088063
088119
221720-1
108370
088095
221229
221735
108243
088100
087035
221754
088027
088118
087034
N/A
221420
220641
051507
056007
050704
050212
050210
050209
120713
221914
221924
222024
225601
053060
N/A
220520
221418
103616
052012
221001
120501
051404
088075
108377
108107
104634
088115
108277
052120
053050
056006
088080
088081
087033
052133
088092
088124
55
Service. All printed copies not bearing this statement in RED are deemed “uncontrolled”
Exploded View Collectors
Replacement Parts List (Collectors)
Item
1
2
3
4
5
9
10
11
12
13
14
17
NI
Description
Rail – 1 Collector
Rail – 2 Collectors
Rail – Extension (3 Panels)
Strap
Union
Sensor Housing
End Plug
Hot Sensor
Connector
Compression Nut
Olive
Clamp
Cable Tie
J Collector
Kf Collector
Bolt
Washer
Nut
Part Number
331847
331846
331851
330847
337121
340440
337135
346080
340450
331655
331656
331928
348071
13103050
13103060
330350
330354
330806
Note: Collector glass is not replaceable.
TM024-001 Streamline (Closed Circuit) Service Instructions REV: A
D.O.I: 12/12/2007
This document is stored and maintained electronically by
56
Service. All printed copies not bearing this statement in RED are deemed “uncontrolled”
Commissioning Procedure
Solar Circuit
It is necessary to commission and check the operation of the solar circuit upon initial
installation and whenever closed circuit fluid is lost due to leakage or when performing a
closed circuit component replacement procedure i.e collector replacement. The
commissioning procedure includes:
•
Checking the circulation of closed circuit fluid through the solar circuit.
•
Checking the drain back function of the solar circuit.
•
Pressure testing the solar circuit to ensure there are no leaks.
•
Checking the level of the closed circuit fluid and adjusting if required.
The water heater is supplied charged with closed circuit fluid. The level of the closed circuit
fluid only needs to be checked if:
•
A third solar collector is installed.
•
There is a significant leak in the solar pipe work and closed circuit fluid has been
discharged.
•
The maximum recommended solar pipe length is exceeded.
•
A second solar pump is installed if the maximum height from the base of the solar
storage tank to the top of the solar collectors exceeds 9 m (refer to Maximum Total
Pipe Lengths table on page 12).
Additional Equipment
Additional equipment will be required for the commissioning and checking of the solar
circuit. This includes checking the closed circuit fluid level and conducting a drain back
test. The following equipment is required:
•
A 1500 mm long x 12 mm (½”) diameter clear hose (closed circuit fluid level hose).
•
One (1) ½” hose clamp.
•
A suitable plug for one end of the hose.
•
Suitable tape to affix the hose to the side of the solar storage tank.
•
A torch to illuminate the working area under the heat exchanger and storage tank
cylinder.
•
A non-permanent marker.
Closed Circuit Fluid
The water heater is supplied charged with closed circuit fluid and it is not necessary to add
further closed circuit fluid to the system. If the closed circuit fluid has been completely
drained or discharged from the solar circuit and needs to be replaced, then the amount to
be added is:
•
4.5 litres of concentrate, mixed with
•
11.5 litres of water.
It is necessary to undertake the solar circuit commissioning procedure if the closed circuit
fluid has been replaced.
TM024-001 Streamline (Closed Circuit) Service Instructions REV: A
D.O.I: 12/12/2007
This document is stored and maintained electronically by
57
Service. All printed copies not bearing this statement in RED are deemed “uncontrolled”
The closed circuit fluid contains food grade additives (rust inhibitor, anti-freeze agent,
colour) and is harmless to the environment. However, it is good practice to recover any
excess closed circuit fluid and remove from site for appropriate disposal.
Warning: Although non-toxic, the following first aid advice and procedures
should be followed if the closed circuit fluid concentrate comes into human
contact or is spilt:
•
Swallowed - give milk or water and seek medical attention.
•
Eyes - wash with running water.
•
Skin - remove contaminated clothing and wash skin with water and soap.
•
Inhaled - seek fresh air, rest and keep warm.
•
Spilt - immediately remove contaminated clothing, stop leak source, absorb with a
dry agent and eliminate any ignition sources nearby.
Pre-commissioning Warnings
It is recommended to conduct the solar circuit commissioning procedure with
the solar collectors covered, otherwise during the commissioning and
checking procedure of the solar circuit, the closed circuit fluid may
experience solar gain as it passes through the solar collectors. This will
increase both the temperature and pressure of the closed circuit fluid and
vapour inside of the solar circuit.
The electrical supply must be switched off before the solar circuit is opened
either at the solar circuit relief valve or at the compression nut on either of the
solar hot or solar cold pipes at the top of the solar storage tank.
If it is necessary to open the solar circuit at the solar circuit relief valve or at
the compression nut on either of the solar hot or solar cold pipes at the top of
the solar storage tank, then care must be taken so as not to be scalded by
either the closed circuit fluid or the vapour escaping from the solar circuit.
Pre-Commissioning Notes
1. Before commencing the solar circuit commissioning procedure, check the solar cold
and solar hot pipe work to ensure:
•
There is a continuous fall from the solar collectors to the solar storage tank of a
minimum 5° (1 in 10 grade).
•
The maximum recommended pipe length is not exceeded.
•
The maximum height from the base of the solar storage tank to the solar collector is
not exceeded.
Rectify the solar pipe work if there is either insufficient fall or not a continuous fall of
at least 5° from the solar collectors to the solar storage tank or if either of the
maximum pipe length or maximum height of the system has been exceeded, before
commencing the solar circuit commissioning procedure (refer to Maximum Total Pipe
Lengths table on page 12).
TM024-001 Streamline (Closed Circuit) Service Instructions REV: A
D.O.I: 12/12/2007
This document is stored and maintained electronically by
58
Service. All printed copies not bearing this statement in RED are deemed “uncontrolled”
2. The solar collectors will gain a high level of heat during periods of solar radiation. If the
solar pump is activated during a period of high solar radiation and the solar collectors
have not been covered, the initial flow of closed circuit fluid will absorb this heat and a
rumbling sound may be heard. This is normal and the solar circuit will achieve a stable
operating condition once full flow through the solar circuit is established.
3. The solar pump is set on speed setting 3. This speed setting must not be adjusted.
The solar control unit automatically controls and adjusts the speed of the pump to
maximise solar contribution. Manual adjustment of the speed dial setting may result in
the system not operating correctly or efficiently.
Commissioning the Solar Circuit
To commission and check the solar circuit:
1. Switch off the electrical supply at the isolating switch to the solar storage tank.
If the pump has been operating, wait five minutes to allow the drain back of the closed
circuit fluid in the solar circuit.
2. Cover the solar collectors with an opaque material to prevent solar gain during the
commissioning process.
3. Remove the lower and upper front covers from the solar storage tank.
The solar monitor located on the pump access cover is
connected to the solar control module by a ribbon cable. The
ribbon cable has sufficient length to enable the removal of the
pump access cover and for it to be set to one side of the
opening without disconnecting the ribbon cable from the solar
control module.
The ribbon cable can be disconnected from the solar control
module if it is necessary to remove the pump access cover
completely from the work area in front of the solar storage
tank.
4. Ensure the isolation valve in the pipe work between the outlet
of the heat exchanger and the solar pump, located behind the
pump access cover of the solar storage tank, is fully open.
Attach Closed Circuit Fluid Level Hose
5. Attach the clear hose to the solar circuit.
To attach the hose:
•
Ensure the heat exchanger drain valve is closed. The
heat exchanger drain valve is located adjacent to the
solar pump, behind the pump access cover of the solar
storage tank.
•
Attach one end of the hose to the hose tail connection. It
may be necessary to secure the hose with a hose clamp.
•
Plug the free end of the hose.
•
Affix the hose securely in a vertical orientation to the
front of the solar storage tank using tape, adjacent to the
text, “MINIMUM FLUID LEVEL WITH PUMP
OPERATING”.
TM024-001 Streamline (Closed Circuit) Service Instructions REV: A
D.O.I: 12/12/2007
This document is stored and maintained electronically by
59
Service. All printed copies not bearing this statement in RED are deemed “uncontrolled”
6. Disconnect the drain line from the solar circuit relief valve at
the top of the solar storage tank. Remove the spring clip from
the solar circuit relief valve and remove the valve.
Warning: The solar circuit may be under pressure.
Take care when removing the solar circuit relief valve,
as a sudden discharge of pressurised hot vapour may
be experienced. This discharge will create a sharp
sound of vapour being released.
7. Open the heat exchanger drain valve and remove the plug
from the end of the hose. The closed circuit fluid will flood the
hose to the static level of the closed circuit fluid inside of the
heat exchanger.
8. Mark the static level of the closed circuit fluid on the side of
the solar storage tank with a non permanent marker.
Solar Circuit Circulation
9. Disconnect the hot sensor lead from the connecting plug
located on the tab in the upper front cover opening.
It is important, at the end of this procedure when the
commissioning and checking of the solar circuit is complete,
to reconnect the hot sensor lead, otherwise when the
electrical supply is switched on, the solar pump will
deactivate after one hour and the solar control unit will then
enter a fault mode and no solar gain will be achieved.
10. Switch on the electrical supply at the isolating switch to the solar storage tank.
Warning: Take care not to enter the area inside the solar storage tank behind
the access covers whilst the power is on as the electrical circuit will be live.
The red LED on the solar monitor label will start flashing.
The pump will activate and commence pumping closed circuit fluid around the solar
circuit.
The level of the closed circuit fluid in the clear hose will slowly drop to the dynamic
operating level.
Allow the pump to operate for three (3) minutes (one and two collector systems) or for
five (5) minutes (3 collector system) to allow the solar circuit to fill with closed circuit
fluid and stabilise.
Note: The solar pump will operate for one hour with the hot sensor lead disconnected,
before automatically turning itself off (refer to step 13).
11. Check the closed circuit fluid is circulating around the solar circuit.
To check circulation:
•
Listen for the trickling sound of the closed circuit fluid returning into the heat
exchanger by placing your ear against the side toward the top of the solar storage
tank. If the fluid is circulating around the solar circuit, a trickling sound will be
heard as the fluid returns back into the heat exchanger.
If no trickling sound is heard, check:
TM024-001 Streamline (Closed Circuit) Service Instructions REV: A
D.O.I: 12/12/2007
This document is stored and maintained electronically by
60
Service. All printed copies not bearing this statement in RED are deemed “uncontrolled”
•
The hot sensor lead is disconnected at the solar storage tank.
If connected, disconnect the hot sensor lead at the solar storage tank (refer to step
9).
•
The isolation valve in the pipe work between the outlet of the heat exchanger and
the solar pump, located behind the pump access cover of the solar storage tank, is
fully open.
Warning: Switch off the electrical supply at the isolating switch to the solar
storage tank before entering the area inside the solar storage tank behind
the pump access cover.
If closed, open the isolation valve on the outlet of the heat exchanger (refer to step
4).
•
There is no leakage from the solar circuit. It is important to check all of the solar
circuit pipe work, including in the roof space and on the roof.
If leaking, rectify any leaks in the solar circuit.
•
The height from the base of the storage tank to the top of the collectors has not
exceeded the maximum allowable height.
•
The length of solar cold and solar hot pipe has not exceeded the maximum
recommended pipe length.
If the maximum allowable height or the maximum recommended pipe length has
been exceeded, it may be necessary to relocate the solar collectors to either a
lower level or closer to the solar storage tank, or install a second solar pump, or
relocate the solar storage tank closer to the solar collectors (refer to Maximum
Total Pipe Lengths table on page 12).
12. Mark the dynamic level of the closed circuit fluid in the hose
on the side of the solar storage tank with a non permanent
marker when satisfied the solar circuit circulation is operating
satisfactorily.
13. If the procedure to check the solar circuit circulation is not complete before the pump
has automatically turned off, then:
•
Switch off the electrical supply at the isolating switch to the solar storage tank.
•
Wait one (1) minute for the operating system to reset to its commissioning
sequence, otherwise the pump may not operate when the power supply is
switched on.
•
Recommence this procedure from step 10.
Drain Back Function
14. Switch off the electrical supply at the isolating switch to the solar storage tank.
The red LED on the solar monitor label will stop flashing.
The pump will deactivate.
The closed circuit fluid will drain back down to the heat exchanger and the level of the
closed circuit fluid in the clear hose will rise.
Wait five (5) minutes to allow the drain back of the closed circuit fluid in the solar
circuit.
TM024-001 Streamline (Closed Circuit) Service Instructions REV: A
D.O.I: 12/12/2007
This document is stored and maintained electronically by
61
Service. All printed copies not bearing this statement in RED are deemed “uncontrolled”
15. Note the level of the closed circuit fluid in the fluid level hose.
The closed circuit fluid should drain back to the original static level.
If the closed circuit fluid does not drain back completely to this level, then check:
•
There is a continuous fall of at least 5° (1 in 10 grade) in the solar pipe work from
the solar collectors to the solar storage tank.
•
The solar collectors have an inclination of not less than 10°.
•
The connectors on the inlet and outlet of the collectors are orientated downwards
to ensure complete drain back of the closed circuit fluid from the solar collectors.
If necessary, rectify the:
•
Solar pipe work if there is either insufficient fall or not a continuous fall in the pipe
work.
•
•
Solar collector inclination if it is less than 10°.
Orientation of the connectors downwards if they are not orientated correctly.
Recheck the drain back function of the solar circuit by repeating step 8 and
recommencing this procedure from step.
Closed Circuit Fluid Level
Note: Refer to diagrams on page 63 in conjunction with the following text.
16. Measure the distance from the text marking “MINIMUM FLUID LEVEL WITH PUMP
OPERATING” to the closed circuit fluid dynamic level marked on the side of the solar
storage tank during step 12.
The correct closed circuit fluid dynamic level for efficient operation of the system when
the pump is operating is between the “MINIMUM FLUID LEVEL WITH PUMP
OPERATING” text marking on the side of the solar storage tank and 150 mm above
this mark.
•
If the closed circuit fluid dynamic level marked on the side of the solar storage tank
during step 12 is greater than 150 mm above the text marking, it will be necessary
to DRAIN closed circuit fluid from the heat exchanger.
•
If the closed circuit fluid dynamic level is below the text marking, it will be
necessary to ADD water to the heat exchanger to top up the level of closed circuit
fluid.
There is sufficient closed circuit fluid concentrate in the solar circuit heat exchanger
such that only water needs to be added to the system if it is required to top up the
level of closed circuit fluid.
Note: The dynamic level of the closed circuit fluid, upon the completion of
commissioning, must not be less than the “MINIMUM FLUID LEVEL WITH PUMP
OPERATING” text marking on the side of the solar storage tank or greater than
150 mm above this mark.
TM024-001 Streamline (Closed Circuit) Service Instructions REV: A
D.O.I: 12/12/2007
This document is stored and maintained electronically by
62
Service. All printed copies not bearing this statement in RED are deemed “uncontrolled”
17. Determine the correct amount of water to be added to or closed circuit fluid to be
drained from the heat exchanger if the dynamic level is either below the text marking
“MINIMUM FLUID LEVEL WITH PUMP OPERATING” or more than 150 mm above
this mark.
Each 100 mm of fluid level height is equivalent to three (3) litres of closed circuit fluid.
20 mm
40 mm
60 mm
•
0.6 litres
1.2 litres
1.8 litres
80 mm
100 mm
120 mm
2.4 litres
3.0 litres
3.6 litres
140 mm
160 mm
180 mm
4.2 litres
4.8 litres
5.4 litres
Mark the required closed circuit fluid level to be obtained on the side of the solar
storage tank with a non permanent marker beside the clear hose, in relation to the
static level marked on the side of the solar storage tank during step 8.
e.g.: If the dynamic level is 30 mm below the text marking, then place a mark
30 mm above the static level marked on the side of the solar storage tank in
step 8. It would be necessary to add one litre of water to the heat exchanger.
e.g.: If the dynamic level is 180 mm above the text marking, then place a mark at
least 30 mm, but no more than 180 mm, below the static level marked on the side
of the solar storage tank. It would be necessary to drain between one litre and five
litres of closed circuit fluid from the heat exchanger.
TM024-001 Streamline (Closed Circuit) Service Instructions REV: A
D.O.I: 12/12/2007
This document is stored and maintained electronically by
63
Service. All printed copies not bearing this statement in RED are deemed “uncontrolled”
18. Add water to top up the level of the closed circuit fluid in the heat exchanger if
required.
To add water to the closed circuit fluid:
•
If not already removed, disconnect the drain line and remove the spring clip from
the solar circuit relief valve at the top of the solar storage tank and remove the
valve (refer to step 6).
Warning: The solar circuit may be under pressure. Take care when removing
the solar circuit relief valve, as a sudden discharge of pressurised hot vapour
may be experienced. This discharge will create a sharp sound of vapour
being released.
•
Place a funnel in the relief valve fitting.
•
Add water slowly through the funnel until the level of fluid in the hose is at the
desired level as marked on the solar storage tank.
Note: It may be necessary to undo the compression nut on the solar hot pipe at
the top of the solar storage tank and loosen the pipe work from the fitting to assist
the flow of water into the closed circuit through the funnel.
•
Remove the funnel from the relief valve fitting.
•
Position the solar hot pipe correctly in its fitting and tighten the compression nut if
this has been loosened.
19. Drain closed circuit fluid from the heat exchanger if required.
To drain closed circuit fluid:
•
If not already removed, disconnect the drain line and remove the spring clip from
the solar circuit relief valve at the top of the solar storage tank and remove the
valve refer to step 6).
Warning: The solar circuit may be under pressure. Take care when removing
the solar circuit relief valve, as a sudden discharge of pressurised hot
vapour may be experienced. This discharge will create a sharp sound of
vapour being released.
•
Place the end of the solar fluid hose into a graduated volumetric container and
drain closed circuit fluid until the level of fluid in the hose is at the desired level as
marked on the solar storage tank.
It may be necessary to drain off the closed circuit fluid in small amounts, raising
the hose back to the top of the solar storage tank and noting the level of the closed
circuit fluid in the clear hose each time, so as not to drain below the desired level.
Note: The closed circuit fluid contains food grade additives (rust inhibitor, antifreeze agent, colour) and is harmless to the environment. However, it is good
practice to recover any excess fluid and remove from site for appropriate disposal.
•
Re-affix the hose to the same location on the side of the solar storage tank.
20. If water has been added to or closed circuit fluid has been drained from the heat
exchanger, recommence this procedure from step 10.
TM024-001 Streamline (Closed Circuit) Service Instructions REV: A
D.O.I: 12/12/2007
This document is stored and maintained electronically by
64
Service. All printed copies not bearing this statement in RED are deemed “uncontrolled”
Pressure Testing the Solar Circuit
21. Close the heat exchanger drain valve.
22. Refit the solar circuit relief valve, orientating the valve outlet
to the rear of the solar storage tank. Secure with the spring
clip. Reconnect the drain pipe to the valve.
23. Switch on the electrical supply at the isolating switch to the
solar storage tank.
Warning: Take care not to enter the area inside the solar storage tank behind
the access covers whilst the power is on as the electrical circuit will be live.
The red LED on the solar monitor label will start flashing.
The pump will activate and commence pumping fluid around the solar circuit.
Note: The level of the closed circuit fluid in the clear hose will not change, as the heat
exchanger drain valve has been closed.
Allow the pump to operate for three (3) minutes (one and two collector systems) or for
five (5) minutes (3 collector system) to allow the solar circuit to stabilise and fill with
closed circuit fluid.
Note: The solar pump will operate for one hour with the hot sensor lead disconnected,
before automatically turning itself off. Refer to step 25.
24. Check the solar pipe work and collector unions for leaks whilst the pump is operating
and the solar circuit is at its working pressure. It is important to check all of the solar
circuit pipe work, including in the roof space and on the roof.
25. If the procedure to check the solar pipe work for leaks is not complete before the pump
has automatically turned off, then:
•
Switch off the electrical supply at the isolating switch to the solar storage tank.
•
Wait one (1) minute for the operating system to reset to its commissioning
sequence, otherwise the pump may not operate when the power supply is
switched on.
•
Recommence this procedure from step 23.
26. Switch off the electrical supply at the isolating switch to the solar storage tank.
The red LED on the solar monitor label will stop flashing.
The pump will deactivate.
The closed circuit fluid will drain back down to the heat exchanger.
27. Rectify any leaks in the solar pipe work and collector unions.
If brazing is required to fix any leaks, then it is necessary to remove the solar circuit
relief valve (refer to step 6).
Warning: The solar circuit may be under pressure. Take care when removing
the solar circuit relief valve, as a sudden discharge of pressurised hot
vapour may be experienced. This discharge will create a sharp sound of
vapour being released.
28. If minor leaks have been rectified, recommence this procedure from step 23. If a major
leak has been rectified, recommence this procedure from step 6.
TM024-001 Streamline (Closed Circuit) Service Instructions REV: A
D.O.I: 12/12/2007
This document is stored and maintained electronically by
65
Service. All printed copies not bearing this statement in RED are deemed “uncontrolled”
Remove Closed Circuit Fluid Level Hose
29. Remove the clear hose from the solar storage tank when satisfied the commissioning
procedure is complete. To remove the hose:
•
Ensure the heat exchanger drain valve is closed.
•
Remove the hose from the side of the storage tank and
place the end into a container to collect the closed circuit
fluid remaining in the hose.
•
Replace the plug into the free end of the hose and lay
the hose flat on the ground.
•
Loosen the hose clamp, if fitted, and carefully remove the hose and hose clamp
from the heat exchanger drain valve fitting, ensuring there is no spillage of the
closed circuit fluid.
Clean up any spillage of closed circuit fluid.
•
Place the open end of the hose into the container and recover the remainder of the
closed circuit fluid from the hose.
Note: The closed circuit fluid contains food grade additives (rust inhibitor, antifreeze agent, colour) and is harmless to the environment. However, it is good
practice to recover any excess closed circuit fluid and remove from site for
appropriate disposal.
Completing the Commissioning of the Solar Circuit
30. Reconnect the hot sensor lead to the connecting plug located
on the tab in the upper front cover opening.
It is important to reconnect the hot sensor lead, otherwise
when the electrical supply is switched on, the solar pump will
deactivate after one hour and the solar control unit will then
enter a fault mode, will not operate and no solar gain will be
achieved.
31. Replace the pump access and upper electrical covers of the solar storage tank.
•
If the ribbon cable from the solar monitor has been disconnected, reconnect it to
the solar control module prior to replacing the pump access cover.
Note: Care should be taken when reconnecting the ribbon cable to the solar
control module to ensure the side of the connecting plug with the yellow label is
facing toward the pump access opening. The connecting plug is non polarised
and if it is connected with the side of the connecting plug with the yellow label
facing away from the pump access opening, the functions of the green and red
LEDs will be reversed. This will result in the red LED flashing instead of the green
LED at solar pump start up.
32. Clean off the marks made on the side of the solar storage tank.
33. Remove the covers from the solar collectors.
34. Switch on the electrical supply at the isolating switch to the solar storage tank.
TM024-001 Streamline (Closed Circuit) Service Instructions REV: A
D.O.I: 12/12/2007
This document is stored and maintained electronically by
66
Service. All printed copies not bearing this statement in RED are deemed “uncontrolled”
Warranty
Solahart Streamline, Synergy, Gas Booster Solar Water Heater Warranty
Warranty conditions
1. This
warranty is applicable only to water heaters
premises and the installed site shall be the owner’s
manufactured from 1st July 2006.
responsibility.
2. The water heater must be installed in accordance with the 5. Where the water heater is installed in a position that does
Solahart water heater installation instructions, supplied with
not allow safe, ready access, the cost of accessing the site
the water heater, and in accordance with all relevant
safely, including the cost of additional materials handling
statutory and local requirements of the State in which the
and / or safety equipment, shall be the owner’s
water heater is installed.
responsibility.
3. Where a failed component or water heater is replaced under 6. The warranty only applies to the water heater and original or
warranty, the balance of the original warranty period will
genuine (company) component replacement parts and
remain effective. The replaced part or water heater does not
therefore does not cover any plumbing or electrical parts
carry a new warranty.
supplied by the installer and not an integral part of the water
4. Where the water heater is installed outside the boundaries of
heater, e.g. pressure limiting valve; isolation valves; nona metropolitan area as defined by Solahart or further than
return valves; electrical switches; pumps or fuse.
30 km from a regional Solahart Dealer from whom the water 7. The water heater must be sized to supply the hot water
demand in accordance with the guidelines in the Solahart
heater was purchased, the cost of transport, insurance and
water heater literature.
travelling costs between the nearest Solahart Dealers
Warranty Exclusions
1. REPAIR AND REPLACEMENT WORK WILL BE CARRIED OUT AS SET OUT IN THE SOLAHART WATER HEATER WARRANTY, HOWEVER THE
FOLLOWING EXCLUSIONS MAY CAUSE THE WATER HEATER WARRANTY TO BECOME VOID AND MAY INCUR A SERVICE CHARGE
AND / OR COST OF PARTS.
a) Accidental damage to the water heater or any component,
including: Acts of God; failure due to misuse; incorrect
installation; attempts to repair the water heater other than by
the Solahart Dealer.
b) Where it is found there is nothing wrong with the water
heater; where the complaint is related to excessive
discharge from the temperature and / or pressure relief valve
due to high water pressure; where the complaint is related to
insufficient or incorrect fall in the pipe work preventing
complete drain back of the closed circuit fluid of a Streamline
closed circuit system; where there is no flow of hot water
due to faulty plumbing; where water leaks are related to
plumbing and not the water heater or water heater
components; where there is a failure of gas, electricity or
water supplies; where the supply of gas, electricity or water
does not comply with relevant codes or acts.
c) Where the water heater or water heater component has
failed directly or indirectly as a result of: excessive water
pressure; excessive temperature and / or thermal input;
blocked overflow / vent drain; corrosive atmosphere; non
Solahart approved or incorrectly mixed closed circuit fluid
being used; incorrect or insufficient filling of the closed circuit
system with the closed circuit fluid; ice formation in the pipe
work to or from the water heater.
d) Where the solar water heater or solar water heater
component has failed directly or indirectly as a result of ice
formation in the water ways of a Streamline open circuit
system; a Streamline closed circuit system where the
system has not been installed in accordance with the water
heater installation instructions; a Streamline closed circuit
system due to non Solahart approved or incorrectly mixed
e)
f)
g)
h)
closed circuit fluid being used; a Streamline closed circuit
system where there is insufficient or incorrect fall in the pipe
work preventing complete drain back of the closed circuit
fluid.
Where the electronic instantaneous gas booster water
heater or electronic instantaneous gas booster water heater
component has failed directly or indirectly as a result of ice
formation in the water ways of a water heater: where the
water heater has not been installed in accordance with the
water heater installation instructions; where the electricity
has been switched off or has failed and the water heater has
not been drained in accordance with the instructions; due to
an ambient temperature below -20°C (including wind chill
factor).
Where the water heater is located in a position that does not
comply with the Solahart water heater installation
instructions or relevant statutory requirements, causing the
need for major dismantling or removal of cupboards, doors
or walls, or use of special equipment to bring the water
heater to floor or ground level or to a serviceable position.
Repair and / or replacement of the water heater due to scale
formation in the waterways or the effects of either corrosive
water or water with a high chloride or low pH level when the
water heater has been connected to a scaling or corrosive
water supply or a water supply with a high chloride or low pH
level as outlined in the Owner’s Guide and Installation
Instructions booklet.
Breakage of collector glass for any reason including hail
damage. (We suggest that the collector glass be covered by
your home insurance policy).
2. SUBJECT TO ANY STATUTORY PROVISIONS TO THE CONTRARY, THIS WARRANTY EXCLUDES ANY AND ALL
CLAIMS FOR DAMAGE TO FURNITURE, CARPETS, WALLS, FOUNDATIONS OR ANY OTHER CONSEQUENTIAL LOSS
EITHER DIRECTLY OR INDIRECTLY DUE TO LEAKAGE FROM THE WATER HEATER, OR DUE TO LEAKAGE FROM
FITTINGS AND / OR PIPE WORK OF METAL, PLASTIC OR OTHER MATERIALS CAUSED BY WATER TEMPERATURE,
WORKMANSHIP OR OTHER MODES OF FAILURE.
In addition to this warranty, the Trade Practices Act 1974 and similar laws in each state and territory provide the owner
under certain circumstances with certain minimum statutory rights in relation to your Solahart water heater. This warranty
must be read subject to that legislation and nothing in this warranty has the effect of excluding, restricting those rights.
NOTE: Every care has been taken to ensure accuracy in preparation of this publication. No liability can be accepted for
any consequences which may arise as a result of its application.
Solahart Industries Pty Ltd
TM024-001 Streamline (Closed Circuit) Service Instructions REV: A
D.O.I: 12/12/2007
This document is stored and maintained electronically by
ABN 45 064 945 848
67
Service. All printed copies not bearing this statement in RED are deemed “uncontrolled”
Document Revision History
Title: Streamline Closed Circuit Service Instructions
Revision
A
Document No:
TM024-001
Details of change
Service Manual Issued for Solahart Streamline Closed Circuit
TM024-001 Streamline (Closed Circuit) Service Instructions REV: A
D.O.I: 12/12/2007
This document is stored and maintained electronically by
D.O.I.
12/07
68
Service. All printed copies not bearing this statement in RED are deemed “uncontrolled”