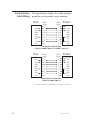
1
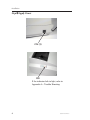
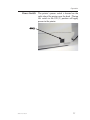
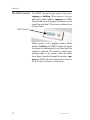
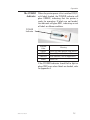
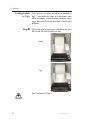
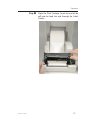
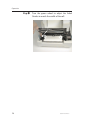
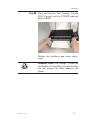
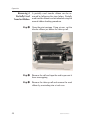
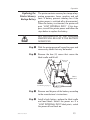
2642/3642 Series
Thermal Printers
User’s Manual
Models: LP2642 and TLP2642
LP3642 and TLP3642
User’s Manual No. 980101-001
Rev. A
FOREWORD
This manual provides installation and operation information for the LP2642, TLP2642, LP3642
and TLP3642 series printers, manufactured by Eltron International Incorporated, Simi Valley,
California.
RETURN MATERIALS AUTHORIZATION
Before returning any equipment to Eltron for in warranty or out of warranty repair, contact Repair
Administration for a Return Materials Authorization (RMA) number. Repack the equipment in the
original packing material and mark the RMA number clearly on the outside. Ship the equipment,
freight prepaid, to the address listed below:
Eltron Repair Administration, USA
41 Moreland Road
Simi Valley, CA. 93065
Phone: +1 (805) 579-1800
FAX: +1 (805) 579-1808
Label Printers:
Eltron International, Northern Europe
Unit 2, Rose Kiln Lane
Reading, Berkshire, RG2 OHP England
Phone: +44 (0) 118 975 2024
FAX: +44 (0) 118 975 2005
Card Printers:
Eltron International, Southern Europe
Zone Indutrielle, Rue d'Amsterdam
44370 Varades, France
Phone: +33 (0) 240 097 070
FAX: +33 (0) 240 834 745
COPYRIGHT NOTICE
This document contains information proprietary to Eltron International Incorporated. This document and the information contained within is copyrighted by Eltron International Incorporated and
may not be duplicated in full or in part by any person without written approval from Eltron. While
every effort has been made to keep the information contained within current and accurate as of the
date of publication, no guarantee is given or implied that the document is error-free or that it is accurate with regard to any specification. Eltron reserves the right to make changes, for the purpose of
product improvement, at any time.
TRADEMARKS
LP2642, TLP2642, LP3642 and TLP3642 are service marks and Eltron is a trademark of Eltron International Incorporated. Windows and MS-DOS are registered trademarks of Microsoft Corp. All
other marks are trademarks or registered trademarks of their respective holders.
980101-001 Rev. A
iii
WARRANTY INFORMATION
We Need To Hear From You!
To Establish Your Warranty Period And Provide Access To Technical Support,
Send Us Your Product Registration Card Today!
Eltron warrants the mechanism, control electronics and power supply, under normal use and service, to be free from defects in material and workmanship for a period of twelve (12) months from the
date of purchase by the end user. Eltron warrants the print head, under normal use and service, to
be free from defects in material and workmanship for a period of ninety (90) days or 30KM of printing (whichever occurs first) from the date of purchase by the end user. Proof of purchase or product
registration is required. If proof of purchase or product registration cannot be established, shipment
date to the original buyer (dealer or distributor) will be used to establish the warranty period.
Failure to exercise caution to protect the equipment from electrostatic discharge damage, adverse
temperature and humidity conditions or physical abuse may void the warranty. Failure to use only
Eltron approved media may void the warranty. Eltron will, at it’s option, repair or replace the
equipment or any parts which are determined to be defective within this warranty period, and
which are returned to Eltron F.O.B. factory of origin.
The warranty set forth above is exclusive and no other warranty, whether written or oral, is expressed or implied. Eltron specifically disclaims the implied warranties of merchantability and fitness for a particular purpose.
iv
980101-001 Rev. A
FCC NOTICE:
This equipment has been tested and found to comply with the limits of a Class B digital device, pursuant to Part 15 of the FCC Rules. These limits are designed to provide reasonable protection
against harmful interference when the equipment is operated in a commercial environment. This
equipment generates, uses and can radiate radio frequency energy and, if not installed and used in
accordance with the instructions, may cause harmful interference to radio communications. However, there is no guarantee that interference will not occur in a particular installation. Operation of
this equipment in a residential area is likely to cause harmful interference in which case the user will
be required to correct the interference at his own expense.
INDUSTRY CANADA NOTICE:
This device complies with Industry Canada ICS-003 class B requirements.
Cet equipement est conforme a l’ICS-003 classe B de la norm Industrielle Canadian
WARNING
CAUTION
HINT
WARNING
980101-001 Rev. A
The printer and power supply should never be operated in a
location where either one can get wet. Personal injury could
result.
Always use high quality Eltron approved labels, tags and
transfer ribbons. If adhesive backed labels are used that DO
NOT lay flat on the backing liner, the exposed edges may stick
to the label guides and rollers inside the printer, causing the
label to peel off from the liner and jam the printer. Eltron
approved supplies can be ordered from your ELTRON dealer.
For the name of a dealer in your area, call 1(800) 344-4003.
If you should run out of labels or ribbon while printing, DO NOT
turn the power switch OFF (0) while reloading or data loss may
result. The printer will automatically resume printing when a
new label roll is loaded.
There is danger of explosion if the battery is incorrectly
replaced. Replace batteries with the types listed here only.
Discard used batteries according to the instructions supplied
by the battery manufacturer. Do Not dispose of the battery in
fire. The battery may explode causing damage or injury.
v
TABLE OF CONTENTS
Installation
Installation . . . . . . . . . . . . . . . . . . . . . . . . . . . 3
Operation
Power Switch . . . . . . . . . . . . . . . . .
The FEED Control . . . . . . . . . . . . . . .
The POWER Indicator . . . . . . . . . . . . .
Loading Labels or Tags . . . . . . . . . . . .
Top Of Form Sensing . . . . . . . . . . . . .
AutoSense Gap Sensor Adjustment . . . . . .
Threading The Optional Label Dispenser . . .
Cleaning The Print Head . . . . . . . . . . .
Loading Transfer Ribbons . . . . . . . . . . .
Removing A Partially Used Transfer Ribbon . .
Replacing the Printer Memory Backup Battery .
.
.
.
.
.
.
.
.
.
.
.
.
.
.
.
.
.
.
.
.
.
.
.
.
.
.
.
.
.
.
.
.
.
.
.
.
.
.
.
.
.
.
.
.
.
.
.
.
.
.
.
.
.
.
.
.
.
.
.
.
.
.
.
.
.
.
.
.
.
.
.
.
.
.
.
.
.
.
.
.
.
.
.
.
.
.
.
.
11
12
13
14
18
19
20
21
22
28
29
Appendix A
Troubleshooting . . . . . . . . . . . . . . . . . . . . . . . . 31
Appendix B
Accessories . . . . . . . . . . . . . . . . . . . . . . . . . . 33
Appendix C
Using The Windows Printer Driver . . . . . . . . . . . . . . . 35
980101-001 Rev. A
vii
1
Installation
This section provides information on the
installation of the printer and software.
The LP2642 and LP3642 are low cost, desktop
direct thermal printers. The TLP2642 and
TLP3642 are low cost, desktop thermal
transfer and direct thermal printers. This family
of printers is specifically designed for printing
labels, tags or continuous receipts (with or
without bar codes) from any DOS™, Windows™or ASCII based compatible computer.
980101-001 Rev. A
1
Installation
Unpacking Your Printer
Printer
User's Manual,
Sample Roll, Spool
and Cleaning Pen.
2
Power Supply
Software
980101-001 Rev. A
Installation
Installation
The following steps will guide you through the
installation of the printer and software.
Step ➊ - Attach Power Supply
OFF (0)
Power
Check Voltage
WARNING
980101-001 Rev. A
Connect To Suitable Supply
See Warning on Page v.
3
Installation
Step ➋ Attach Interface Cable
Parallel Interface
Serial Interface
For additional information on serial cable wiring, refer to Appendix A.
4
980101-001 Rev. A
Installation
Step ➌ Memory Cartridge (Optional on 2642)
Remove Cover
Install Cartridge
Press To Seat
980101-001 Rev. A
5
Installation
Step ➍ Apply Power
ON (1)
ON
If the indicator fails to light, refer to
Appendix A - Trouble Shooting.
6
980101-001 Rev. A
Installation
Step ➍ Install Software
Start your computer. Follow the installation instructions on the diskette label to install the
software.
Refer to Section 2 - Operation, for information
on loading labels and using your printer.
980101-001 Rev. A
7
2
Operation
This section provides information on the operation of the LP2642, TLP2642, LP3642 and
TLP3642 printers.
980101-001 Rev. A
9
Operation
Using Your Printer
LP
A.
Roll Holder
B.
Feed Switch
C.
Power Indicator
D.
Print Head
E.
Label Guide Adjust
F.
Cover Release
G.
Carriage Release
H.
Gap Sensor
I.
Black Line Sensor
(optional)
J.
Dispenser Bar
(optional)
K.
Dispenser Feed Slot
L.
Label Guides
M.
Ribbon Drive
(TLP only)
10
TLP
980101-001 Rev. A
Operation
Power Switch
The printer’s power switch is located on the
right side of the printer near the back. Placing
this switch in the ON (1) position will apply
power to the printer.
ON(1)
980101-001 Rev. A
11
Operation
The FEED Control
FEED Switch
The FEED Control can be used in two ways,
tapping or holding. When power is first applied with labels loaded, tapping the FEED
Control will cause the paper to advance to the
top of the next label. This action is referred to as
a Form Feed.
When power is first applied without labels
loaded, holding the FEED Control will cause
the printer to continuously Line Feed until the
control is released. This mode is useful when
loading labels in the printer. After the labels
have been threaded through the printer, tapping the FEED Control 3 more times (for a total of 4 taps) will cause a Form Feed.
12
980101-001 Rev. A
Operation
The POWER
Indicator
When the printer power is first switched ON (1)
with labels loaded, the POWER indicator will
glow GREEN, indicating that the printer is
ready for operation. If labels are not loaded,
the indicator will glow RED, indicating an out
of labels or ribbon condition.
POWER
Indicator
Indicator
Color
Meaning
GREEN
Power ON, labels loaded, ready for use.
RED
ORANGE
DARK
Power ON, out of labels or ribbon.
Error condition, refer to Appendix A.
Power OFF.
If the POWER indicator should fail to light or
glows RED even when labels are loaded, refer
to Appendix A.
980101-001 Rev. A
13
Operation
Loading Labels
or Tags
Your printer can print on adhesive backed labels, non-adhesive tags or continuous nonadhesive paper. Loading either labels or tags is
easy, however the feed direction of each roll is
different.
Step ➊
Open the printer top cover and place the spindle inside the roll of labels or tags.
Labels
Tags
See Caution on Page v.
CAUTION
14
980101-001 Rev. A
Operation
Step ➋
980101-001 Rev. A
Open the Print Carriage. Insert the end of the
roll into the feed slot and through the Label
Guides.
15
Operation
Step ➌
Turn the green wheel to adjust the Label
Guides to match the width of the roll.
Turn
16
980101-001 Rev. A
Operation
Step ➍
Close and lock the Print Carriage. Tap the
FEED Control until the POWER indicator
glows GREEN.
Perform the AutoSense gap sensor adjustment.
HINT
980101-001 Rev. A
Windows Users! Use Settings / Printers on
the Windows 95 Start Menu to select the label
size that matches the labels loaded in the
printer.
17
Operation
Top Of Form
Sensing
To accommodate different size media, your
printer is equipped with a sensor capable of detecting the top of each label or tag. Two methods are used by the printer for top of form
sensing: Gap Sensing and Black Line Sensing.
The gap sensing feature depends on the ability
of the Gap Sensor to “see through” the label
liner between labels. Gap sensing is standard
on all printers.
An optional Black Line Sensor may also be installed in your printer. The Black Line Sensor is
used with special labels that have a black line
printed on the back of the label liner between
each label.
For proper operation, the printer needs to
measure the length of the labels. Also, due to
manufacturing differences in label stock, the
Gap Sensor may have difficulty distinguishing
the difference between labels and the liner.
When this occurs, the printer Power Indicator
will switch from GREEN to ORANGE or RED.
If this condition occurs, the AutoSense
feature should be activated to adjust the
sensitivity of the sensor and measure the label
length.
18
980101-001 Rev. A
Operation
AutoSense Gap
Sensor
Adjustment
To activate the AutoSense feature, first place
the power switch in the OFF (0) position. Load
labels into the printer (do not use the
dispenser), then press and hold the FEED
Control while placing the power switch
in the ON (1) position. Release the FEED
Control when the printer starts feeding labels.
The printer will advance 3-4 labels while
performing the adjustment. When the
adjustment is complete, a status summary label
will be printed and the printer will be placed in
Diagnostic Dump mode. Tap the FEED
Control once to switch the printer back to
normal operation. If the indicator continues to
glow ORANGE or switches to RED, refer to
Appendix A for troubleshooting information.
Dump Mode
Sample Printout
980101-001 Rev. A
19
Operation
Threading The
Optional Label
Dispenser
If your printer is equipped with the optional Label
Dispenser (PSAT or PSET) and you would like
the printer to automatically peel adhesive labels
from the backing, follow the steps below:
Step ➊
Perform steps 1-4 of the Loading Labels procedure.
Step ➋
Peel the first two labels off the backing.
Step ➌
While pressing the FEED switch, push the label
backing into the peeler slot.
Step ➍
Open the print carriage and pull the label backing
out the bottom slot until it is tight across the peeler
bar. Close and lock the print carriage.
Activate the Label Taken Sensor by pressing in
on the top of the sensor.
20
980101-001 Rev. A
Operation
Cleaning The
Print Head
As you use your printer, the print head may become dirty resulting in poor print quality.
Whenever new labels or transfer ribbon are
loaded into the printer, the print head should
be cleaned with a Cleaning Pen (p/n 800105001).
Step ➊
Remove the transfer ribbon.
Step ➋
Gently rub the Cleaning Pen across the dark
area of the print head.
Allow the print head to dry for 1 minute before
loading a transfer ribbon or labels.
980101-001 Rev. A
21
Operation
Loading Transfer
Ribbons
(TLP Models Only)
Step ➊
Transfer ribbons are used when printing on
thermal transfer adhesive labels or nonadhesive tags. Thermal transfer ribbons are
available in general purpose wax, general purpose resin and polyester resin.
Install an empty roll onto the front (take-up ribbon spool.
See Caution on Page v.
CAUTION
22
980101-001 Rev. A
Operation
Step ➋
980101-001 Rev. A
Loosen the tape that secures the leader on the
new transfer ribbon. Fold it over the end of the
leader and press in place. The tape will be used
to attach the leader to the take-up roll.
23
Operation
Step ➌
Install the ribbon on the rear (supply) spindle
so that the ribbon feeds from the top of the roll
into the ribbon feed slot.
The ribbon does not follow the same path as
the labels.
NOTE
24
980101-001 Rev. A
Operation
Step ➍
980101-001 Rev. A
Open the print carriage and pull the ribbon
leader forward towards the front of the print
carriage and attach to the take-up roll with adhesive tape.
25
Operation
Step ➎
26
Close the print carriage and press down firmly
at both arrows to lock.
980101-001 Rev. A
Operation
Step ➏
980101-001 Rev. A
Tap the feed control until the ribbon advances
to the black area.
27
Operation
Removing A
Partially Used
Transfer Ribbon
A partially used transfer ribbon can be removed by following the steps below. Partially
used transfer ribbons can be reloaded using the
normal ribbon loading procedure.
Step ➊
Open the print carriage. Using scissors, cut the
transfer ribbon just below the take-up roll.
Step ➋
Remove the roll and tape the end to prevent it
from unwrapping.
Step ➌
Remove the take-up roll and remove the used
ribbon by unwinding into a trash can.
28
980101-001 Rev. A
Operation
Replacing the
Printer Memory
Backup Battery
The printer contains memory for storage of operating parameters, forms, graphics and soft
fonts. A battery prevents memory loss if the
printer power is switched off or disconnected.
When the battery is exhausted, the printer will
print “LOST INTERNAL INFO”. If this happens, turn off the printer power and follow the
steps below to replace the battery.
ALL INFORMATION IN THE PRINTERS
MEMORY WILL BE LOST IF THE BATTERY
IS REMOVED.
CAUTION
Step ➊
With the printer power off, open the cover and
remove any labels that may be loaded.
Step ➋
Remove the four (4) screws that secure the
label cradle and lift off.
Remove 4
Screws
Battery
Location
WARNING
See Warning on page v.
980101-001 Rev. A
Step ➌
Remove and dispose of the battery according
to the manufacturer’s instructions.
Step ➍
Install a fresh battery, replace the label cradle
and load labels. Switch the power on. If a
“LOST INTERNAL INFO" label prints, switch
the power off and back on.
29
Appendix A - Troubleshooting
Problem
Solution or Reason
POWER indicator does not
light GREEN when power
switch is turned to ON (1)
position.
1. Check power connections from A.C.
Outlet to power supply to printer.
POWER indicator lights
GREEN, but printer will not
print.
1. Check interface cable connections from
computer to printer.
Printer appears to be
working, but nothing is
printed.
1. Verify that the labels are the correct
type (direct thermal or thermal transfer).
2. For LP models, check that the roll is
loaded with the direct thermal side facing up.
3. For TLP models, check that the ribbon
is properly installed.
4. Clean the print head with cleaning pen.
Printing is faded or poor
quality.
1. Clean the print head with cleaning pen.
2. Adjust print speed/darkness in software.
Prints only partial label or
skips a label.
1. Perform AutoSense gap sensor
adjustment.
2. Label caught on print head.
3. Print head is not properly latched.
4. Possible software problem. Check the
printer memory configuration. Refer to
the EPL Programming manual.
Printing stops and POWER
indicator lights ORANGE.
1. Perform AutoSense gap sensor adjustment.
2. Possible problem with label stock. Use
only Eltron approved labels and tags.
3. Possible label jam.
4. Insufficient memory for label size.
Check the printer memory configuration.
5. Possible software problem. Refer to the
EPL Programming manual.
980101-001 Rev. A
31
Other Support
Resources
The first troubleshooting reference source is
the table on the previous page. Next, contact
the dealer where you purchased your printer.
Eltron International also provides a variety of
information and user support services:
• Internet:
Web Address: http://www.eltron.com
ftp: //ftp.eltron.com
e-mail:
Label Printers: [email protected]
Card Printers: [email protected]
Europe: [email protected]
Singapore: [email protected]
Latin America: [email protected]
• BBS: +1 (805) 579 3445
The BBS supports data rates up to 28.8 BPS
with No Parity, 8 data bits, and 1 stop bit
(n,8,1). Communications software should
have an ANSI Terminal Mode (not MS Windows Terminal) such as Q-Modem.
• CompuServe e-mail: 102251,1164
• Customer Service: +1 (800) 344 4003
For the name of a dealer in your area.
• Technical Support FAX:
USA: +1 (805) 579 1808
Asia: +65 73 38 206
Northern Europe: +44 (0) 118 975 2005
Southern Europe: +33 (0) 240 097 070
Latin America: +1 (847) 584 2725
For your assistance and support with Eltron
printers and software.
32
980101-001 Rev. A
Part Number
LP3642
TLP2642
TLP3642
Accessories available for the LP2642,
TLP2642, LP3642 and TLP3642 printers are
listed below. Always refer to the ELTRON part
number when placing an order. For the name
of an Eltron dealer in your area, call:
1(800) 344-4003.
LP2642
Appendix B
Accessories
Parallel Interface Cable, 6’
Parallel Interface Cable, 10’
Serial Interface Cable, 6’ (DB-9 to DB-9)
Serial Interface Cable, 10’ (DB-9 to DB-9)
Serial Interface Cable, 6’ (DB-25 to DB-9)
300016-006
300016-010
300017-006
300017-010
300018-006
✔
✔
✔
✔
✔
✔
✔
✔
✔
✔
✔
✔
✔
✔
✔
✔
✔
✔
✔
✔
128K Memory Cartridge with Real Time Clock
256K Memory Cartridge with Real Time Clock
384K Memory Cartridge with Real Time Clock
103217-005
103217-006
103217-007
✔
✔
✔
✔
✔
✔
✔
✔
✔
✔
✔
✔
Black Line Sensor
128K Additional Memory
Real Time Clock Option
Battery, 3V Lithium
105101-001
100278-001
802033-001
808042-001
✔
✔
✔
✔
✔
✔
✔
✔
✔
✔
✔
✔
✔
✔
✔
✔
Power Rewinder, 120V
Power Rewinder, 220V
Create-A-Label 3 Software for DOS
Create-A-Label 3 Software for Windows
Battery Pack Kit
Keyboard Display Unit
TAB1 IBM Twinax Protocol Adapter Box
103284-001
103284-002
105506-001
105524-001
120187-001
120180-001
100070-001
✔
✔
✔
✔
✔
✔
✔
✔
✔
✔
✔
✔
✔
✔
✔
✔
✔
✔
✔
✔
✔
✔
✔
✔
✔
✔
✔
✔
✔
✔
✔
✔
User’s Manual
Programmers Manual
980101-001
980009-001
✔
✔
✔
✔
✔
✔
✔
✔
Description
980101-001 Rev. A
33
Serial Interface
Cable Wiring
The figure below displays the cable wiring required to use the printer's serial interface.
Host
N/C
RxD
TxD
DTR
GND
DSR
RTS
CTS
RI
DB-9
Pin #
1
2
3
4
5
6
7
8
9
DB-9
Pin #
1
2
3
4
5
6
7
8
9
Printer
+5 Volts*
TxD
RxD
N/C
GND
RDY
N/C
RDY
N/C
Female DB-9 to Male DB-9
Cable P/N 300017-006 (6') or 300017-010 (10')
Host
N/C
RxD
TxD
DTR
GND
DSR
RTS
CTS
RI
DB-25
Pin #
8
3
2
20
7
6
4
5
22
DB-9
Pin #
1
2
3
4
5
6
7
8
9
Printer
+5 Volts*
TxD
RxD
N/C
GND
RDY
N/C
RDY
N/C
Female DB-25 to Male DB-9
Cable P/N 300018-006 (6')
*+5 volts at 150 mA for external device (e.g. KDU or scanner)
34
980101-001 Rev. A
Appendix C
Using The
Windows Printer
Driver
The Windows printer driver provides control of
several printer features when printing from
Windows software applications. These features
are accessed through the “Settings / Printers”
window on the Windows 95 Start menu.
Paper (Label) Size
Before creating a label, the paper size for the
currently loaded labels must be selected in the
control panel.
Setting the proper label size allows the driver to
provide accurate printing limits and margin information to Windows applications.
Media Choice
Print Speed
The print speed can be adjusted to compensate
for manufacturing differences in label stock.
Selecting a slower print speed can improve the
appearance of lines and text on some label
stocks. When printing large labels or labels with
a lot of information near the right edge, a
slower print speed will avoid pauses while
printing caused by buffer under-run. To access
this menu, select the Paper tab from the printer
properties menu.
Print Quality,
Print Density
The print darkness or density can be changed
by using the Print Quality option. If print looks
faded when printing at high speed, select a
higher darkness number for the Print Quality
setting. If horizontal lines seem to run together,
select a lower darkness number.
To access this menu, select the Device Options
tab from the printer properties menu.
HINT
36
Print density is also affected by print speed.
Changing both Print Speed and Density may
be required to achieve the desired results.
980101-001 Rev. A
World Wide Offices:
Eltron International, Corporate Headquarters
41 Moreland Road
Simi Valley, CA 93065-1692 USA
Phone: +1 (805) 579 1800
FAX: +1 (805) 579 1808
e-mail: [email protected]
Eltron International, Northern Europe
Unit 2, Rose Kiln Lane
Reading, Berkshire, RG2 OHP England
Phone: +44 (0) 118 975 2024
FAX: +44 (0) 118 975 2005
e-mail: [email protected]
Eltron International, Southern Europe
Zone Indutrielle, Rue d'Amsterdam
44370 Varades, France
Phone: +33 (0) 240 097 070
FAX: +33 (0) 240 834 745
e-mail:[email protected]
Eltron International, Latin America
836 Arlington Heights Rd. #357
Elk Grove, IL 60007
Phone: +1 (847) 584 2714
FAX: +1 (847) 584 2725
e-mail: [email protected]
Eltron International, Singapore
#07-01 Trademart Singapore
60 Martin Road
Singapore 239067
Phone: +65 73 33 123
FAX: +65 73 38 206
e-mail: [email protected]