1
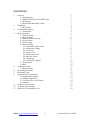
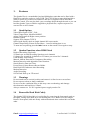
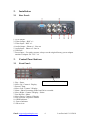
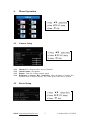
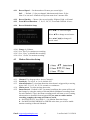
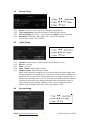
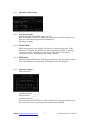
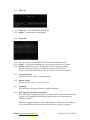
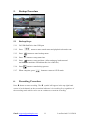
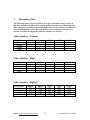
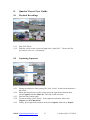
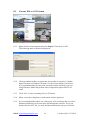
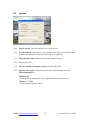
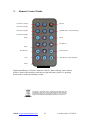
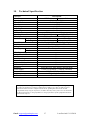
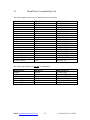
Email: [email protected]
Last Revised 05/11/2010
CONTENTS
1.
Features
1.1 Quad Options
1.2 Quadra Functions when HDD fitted
1.3 Warnings
1.4 Removable Hard Disk Caddy
2.
Installation
2.1 Rear Panel
3.
Control Panel buttons
3.1 Front Panel
4.
Menu Operation
4.1 Camera Setup
4.2 Record Setup
4.3 Motion Detection Setup
4.4 Screen Setup
4.5 Audio Setup
4.6 System Setup
4.6.1 Hard Drive Disk Setup
4.6.2 Password Change
4.6.3 Time Set
4.6.4 Event List
4.6.5 Password Check
4.6.6 Buzzer Alarm
4.6.7 Language
4.6.8 Firmware Upgrade
4.7 Time Search
4.8 Exit
5.
Backup Procedure
5.1 Backup Steps
6.
Recording Procedure
7.
Recording Time
8.
Quadra Viewer User Guide
8.1 Playback Recordings
8.2 Capture Sequences
8.3 Convert File to AVI Format
8.4 Options
9.
Remote Control Guide
10. Technical Specification
11. Hard Drive Compatibility List
Email: [email protected]
2
3
3
3
3
3
4
4
4
4
5
5
5
6
7
7
7
8
8
9
9
9
9
9
9
10
10
11
11
11
12
13
13
13
14
15
16
17
18
Last Revised 12/11/2010
1.
Features
The Quadra Plus is a remarkable Quad and Multiplexer unit that can be fitted with a
Hard Drive and also used as a 4 way DVR. The VPU101 has a removable hard drive
caddy to allow easy removal of hard drive and also is supplied with an Infra-Red
Remote Control. You can play back your recordings direct through the unit or you can
load the Quadra Viewer software supplied to playback files, capture sequences or
convert files to AVI format.
1.1
Quad Options
Video Input Signal: NTSC / PAL.
Video Compression: Modified MJPEG.
Adjust Up/Down/Left/Right screen position.
Remote Control
Support XGA Output.(TYPE1)
Select Quad display mode or single channel full screen mode.
Channel Sequencing: Ensure Screen Menu – Auto Switching time is set.
To start auto sequencing press the
button on the remote. Press again to stop.
1.2
Quadra Functions when HDD Fitted
Duplex (Recording, Playback).
50 frames per second Recording Speed across 4 channels
12 frames per second for 4 channels or 25 frames per second for 2 channels
USB memory stick backup.
Manual, Motion Detection & Continuous Recording.
Motion Detection with adjustable Time Duration.
Search Data by Date and Time.
Power Recover Auto Restore Record Mode.
Hard Disk LED Indicator when Recording.
Motion Detection.
Audio Recording.
SATA Hard Disk up to 2Tb tested.
1.3
Warnings
Do not install unit in vertical position and ensure it is fitted on an even surface.
Do not expose to heat or damp conditions.
Never cover the ventilation holes as this may cause overheating, and damage
the electronics and hard drive if fitted.
Always connect to a 12v DC regulated power supply rated at 5A.
1.4
Removable Hard Disk Caddy
The Quadra VPU101 hard drive is easily fitted by removing the front panel (push to
the right), sliding in the hard drive and refitting the cover. Removal is also simple.
Remove front panel, hold unit firmly with one hand and draw out hard drive with the
other.
Email: [email protected]
3
Last Revised 12/11/2010
2.
Installation
2.1
Rear Panel:
1. VGA Output.
2. Video Output BNC x 1.
3. Video Input BNC x 1.
4. Audio Output Phono x 1 Line out
5. Audio Input Phono x 2 Line in.
6. USB Port.
7. Power Input For safety reasons, always use the original factory power adaptor
attached. Adaptor: DC 12V / 3A.
3.
Control Panel buttons
3.1
Front Panel:
Removable Hard Disk Caddy
1. Play / Pause.
2. Move Up / Camera 1 Display.
3. Record / Stop.
4. Move Left / Camera 3 Display.
5. Menu / Show Percentage of the hard Drive recorded.
6. Move Right / Camera 4 Display / Select.
7. Fast Reverse / Mute.
8. Move Down / Camera 4 Display.
9. Fast Forward / Sequence Switch.
10. HDD Indicator.
11. Power Indicator.
12. IR receiver.
Email: [email protected]
4
Last Revised 12/11/2010
4.
Menu Operation
4.1
Camera Setup
4.1.1
4.1.2
4.1.3
4.1.4
Channel: The diagram above shows Channel 1.
Channel Name: Set channel.
Display: Turn On / Off the camera signal
Brightness / Contrast / Hue / Saturation: Adjust brightness, contrast, hue,
and saturation of channel display. The center point is the factory default.
4.2
Record Setup
Email: [email protected]
5
Last Revised 12/11/2010
4.2.1
Record Speed Set the number of frames per second (fps).
PAL
Default : 12 fps per channel. Maximum total frame: 50 fps.
Note: You can set 2 channels at 25fps but must clear 2 streams first.
4.2.2
4.2.3
Record Quality Choose video record quality: Highest, High, or Normal.
Event Record Duration 5, 10, 15, 20, 25, 30 seconds. Default: 10 secs
4.2.4
Record Schedule Setup
Press
to select left/right;
Select
to change record status
Press
record status.
to change all
4.2.4.1
4.2.4.2
4.2.4.3
4.2.4.4
Range: 0-24 hours.
Set “Red” for continuous recording.
Set “Grey” to disable the recording.
Set“Green” for motion recording.
4.3
Motion Detection Setup
4.3.1
4.3.2
4.3.3
Channel: The diagram above shows Channel 1.
Sensitivity: To set off, or 1 to 4, default: Off.
Alarm Duration: To set alarm duration when alarm is triggered by a moving
object: Off, 5, 10, 15, 20, 25, 30 seconds, or continuous.
Motion Area: To select motion detect area.
Smart Record Default is OFF. In normal condition, the system will record
the footage by using the setting of Normal Mode (Minimum recording frame
for each channel is 3fps); the smart recording mode will start as user’s setting
when motion or alarm has been triggered. If you want to enable motion
recording complete the setup procedure a and b.
a Set SENSITIVITY level from 1 ~ 4 in Motion Detection Setup.
b Set MOTION RECORDING to GREEN at the time you wish to enable
motion recording in Record Schedule.
4.3.4
4.3.5
Email: [email protected]
6
Last Revised 12/11/2010
4.4
Screen Setup
4.4.1
4.4.2
4.4.3
4.4.4
Border: Turn On / Off, or show divided lines in quad mode.
Video Adjustment: Adjust the position of screen display shown.
Auto Switching: Set: Off, 1 ~ 10 seconds. Press
to start sequencing.
Resolution: XGA 640 x 480 / 800 x 600 / 1024 x 768 (default) /
1280 x 1024 / 1440 x 900 (TYPE1).
4.5
Audio Setup
4.5.1
4.5.2
4.5.3
4.5.4
4.5.5
Channel: current source of audio input (choose channel 1 or 2)
Record On /Off
Mute On /Off
Input Volume: Adjust input volume.
Output Volume: Adjust Output volume.
Note: Audio inputs are designed to be set individually and audio outputs may
cause interference. If channel one is set on mute, it will not affect channel two
regardless if it is set on or off. Single channel live viewing on channel one or
channel two, choosing mute on or off, will only control that particular channel.
The mute icon located at the bottom left hand corner indicates the status of
audio setting for that channel. Channels 3 and 4 do not support the audio
feature. In quad display mode, the audio is on channel 1 only.
4.6
System Setup
Email: [email protected]
7
Last Revised 12/11/2010
4.6.1
Hard Drive Disk Setup
4.6.1.1 Overwrite Enable:
Enable overwrite when HDD capacity is full:
Yes: When HDD overwrite is taking place, the data is stored in duration of 4
hours per event and being recorded continuously.
No: Stop recording.
4.6.1.2 Format HDD
When choosing this item, Quadra will request a 6 number password. If the
password is accepted, the Quadra will start formatting the HDD. A message,
“wrong password” will appear on the screen if the password is entered
incorrectly. Factory default password setting: 111111
4.6.1.3 HDD Status :
Indicates current HDD status, including total capacity and percentage of space
used. The HDD must be formatted on installation or when changed.
4.6.2
Password Change
Password Setup
Current password ______
New Password ______
Confirm Password ______
If current password is incorrect, a “Wrong Password” message will appear on
the screen and exit. Factory default Password Setting: 111111
Email: [email protected]
8
Last Revised 12/11/2010
4.6.3
Time Set
4.6.3.1 Time Set YYYY/MM/DD HH:MM:SS
4.6.3.2 Apply Update and save all changes.
4.6.4
Event List
4.6.4.1 You may choose an individual event from the recorded event list.
4.6.4.2 TIME The Quadra automatically saves events in duration of 4 hours.
4.6.4.3 Motion: Motion event list. The symbols, 0 and X represent whether
the motion detected function is being activated on each channel.
O -area with motion detection set. X –area without motion detection set.
4.6.5
Password Check
Set password ON / OFF to enter main menu.
4.6.6
Buzzer Alarm
Set buzzer ON / OFF in case of video loss.
4.6.7
Language
You can choose between Chinese or English language.
4.6.8
F/W Upgrade (Firmware Upgrade)
Do not attempt to upgrade the firmware in this Quadra without assistance from
supplier. If the upgrade fails during the upgrade process it can render the
Quadra unusable.
Please save upgrade firmware on a USB flash drive. Plug drive into USB port.
The screen will show both current version and new version of firmware.
Email: [email protected]
9
Last Revised 12/11/2010
When upgrade is in progress, DO NOT operate the unit or remove the USB
flash drive to prevent a malfunction or system error occurring. After the
upgrade is complete, please restart the unit when “Reboot” message occurs.
IMPORTANT WARNING
Ensure that the HDD is installed before upgrading the firmware as the new
firmware is stored in a temporary section on the HDD.
4.7
Time Search
4.7.1
Set Search time, then press
4.7.2
Playback:
Play button to start playback.
Press
button for fast-forward. Press again for faster speed with three variable
speeds available.
Press
button for fast reverse. Press again for faster speed with three variable
speeds available.
Press
button to pause.
Press
button to stop playback.
Special Note: When entering the date and time you may find that you are unable to
enter certain numerics. This is because validation on the field is undertaken before a
value is entered. The field must always be valid on entering a character.
For example changing a date from 28 to 30 will not allow you to change the 2 to a 3
with the 8 still present, as this would be 38, so you must change the 8 to 0 first.
4.8
Exit
4.8.1
4.8.2
4.8.3
Save & Exit: Save and exit changes.
Exit without Saving: Exit without saving changes.
Load Setup Default: Load factory default setup.
Email: [email protected]
10
Last Revised 12/11/2010
5.
Backup Procedure
5.1
Backup Steps
5.1.1
Fit USB flash Drive into USB port
5.1.2
Press
5.1.3
Press
5.1.4
Press
5.1.5
Press
button to setup end time. (After setting up both start and
end time, the machine will indicate the size of the file.)
5.1.6
Press
5.1.7
When complete, press
6.
Recording Procedure
button to enter search menu and playback selected event.
button to enter backup menu.
button to setup start time.
button to start backup process.
button to return to LIVE mode.
Press button to start recording. The
symbol will appear in the top right hand
corner of each channel on the screen that indicates it is recording live, regardless of
the recording mode which can be set on continuous or motion recording.
Email: [email protected]
11
Last Revised 12/11/2010
7.
Recording Time
The following tables provide a guide to average record times using a range of
different hard drives, different resolution quality and different frame rates. The
times will vary according to the actual image sizes recorded and are a guide only.
Note that the timings are for the total frames across 4 streams. You can run 2
streams at 25FPS as long as the other two streams are cleared.
Video Quality Normal
Total Frames
50 FPS
25 FPS
12 FPS
3 FPS
500Gb
750Gb
1Tb
1.5Tb
2.0Tb
9dys
18dys
37dys
149dys
14dys
28dys
56dys
224dys
18dy
37dy
74dy
298dy
28dys
56dys
112dys
448dys
37dys
74dys
149dys
597dys
Video Quality High
Total Frames
50 FPS
25 FPS
12 FPS
3 FPS
500Gb
750Gb
1Tb
1.5Tb
2.0Tb
7dys
15dys
30dys
122dys
11dys
23dys
46dys
184dys
15dys
30dys
61dys
245dys
23dys
46dys
92dys
368dys
30dys
61dys
122dys
490dys
Video Quality Highest
Total Frames
50 FPS
25 FPS
12 FPS
3 FPS
500Gb
750Gb
1Tb
1.5Tb
2.0Tb
5dys
10dys
21dys
86dys
8dys
16dys
32dys
130dys
10dys
21dys
43dys
173dys
16dys
32dys
65dys
260dys
21dys
43dys
86dys
346dys
Email: [email protected]
12
Last Revised 12/11/2010
8.
Quadra Viewer User Guide
8.1
Playback Recordings
8.1.1
8.1.2
Start VVF Player
Point the cursor on the screen and right-click “Open File”. Choose the file
you want to view in (.vvf) and play.
8.2
Capturing Sequences
8.2.1
During the playback of the backup file, click “Pause” located at the bottom of
the screen.
When the image freezes on the screen, press the right mouse button, then
select Capture and then Mark In. This will set the start time.
Press the Play button again.
To end recording, click “Pause”. Press right mouse button, then select
Capture and then Mark Out.
Finally, press right mouse button, then select Capture followed by Export.
8.2.2
8.2.3
8.2.4
8.2.5
Email: [email protected]
13
Last Revised 12/11/2010
8.3
Convert File to AVI Format
8.3.1
Right click the mouse button and select Export. Then click on AVI.
The following menu will then be displayed:
8.3.2
Click on channel number to export and select audio as required. Complete
Input File name and Output File name. Use the browse button if necessary.
It is recommended that to reduce file size and creation time that if you are
using Windows Media Player then select Compression option DIVX5.0.3
codec.
8.3.3
Click “OK” to start converting file to AVI format.
8.3.4
When conversion completes a confirmation will be displayed.
8.3.5
It is recommended that when you wish to play AVI recordings that you select
Windows Media Player first and open file through the software. If you just
double click the AVI file, you may find that an alternative player is selected.
Email: [email protected]
14
Last Revised 12/11/2010
8.4
Options
8.4.1
Always on top: The sub window always stays on top.
8.4.2
Use DirectDraw: DirectDraw, a part of Microsoft's DirectX is used to render
graphics in applications where top performance is important.
8.4.3
Show playback time: Indicates the length of playback time.
8.4.4
Repeat playback.
8.4.5
On screen display date/time format: Indicates date/time.
8.4.6
Path for still capture: Indicates the directory and path name of the file.
The default path is:Windows XP
C:\Documents & Settings\All Users\Application Data\Quadra-Player
Windows 7 / Vista
C:\Program Data\Quadra-Player
Email: [email protected]
15
Last Revised 12/11/2010
9.
Remote Control Guide
Channel 1 Display
Record
Channel 2 Display
Quad Display / Auto Switching
Channel 3 Display
Channel 4 Display
Mute
Menu
Navigation
Enter
Fast Reverse
Fast Forward
Play
Stop Record / Stop Playback
Pause
Replacement Battery is Nickel Cadmium CR2025. When refitting, ensure battery
holder is fitted with retaining connector on right and battery positive is pointing
downwards as indicated on battery holder.
This symbol on the products and/or accompanying documents means that
used electronic equipment must not be mixed with general household waste.
For treatment, recovery and recycling please return this unit to your trade
supplier or local designated collection point as defined by your local council.
WEE/CG0783SS
Email: [email protected]
16
Last Revised 12/11/2010
10.
Technical Specification
Function
Video Format
Operating System
VGA Out
Video Input
Video Output
Audio Input
Audio Output
OSD Interface
Recording Frame Rate
Video Operation
Resolution
Display
Recording
Video Compression
Hard Drive
Backup Device
Searching
Mode
Full Screen
XGA Output (Type 1)
Motion Detection
Loss Detection
Auto Switching
Buzzer Output
Brightness Adjustable
Contrast Adjustable
Watchdog
Power Supply
Dimensions
Weight
Remote Controller
Description
NTSC
PAL
Embedded RTOS
D-Sub 15 pin VGA
4 x BNC
1 x BNC
2 x Phono
1 x Phono
GUI interface, Multi-Language
60 fps (4 x 15)
50 fps (4 x 12.5)
Duplex (Recording and Playback)
640 x 448
640 x 544
640 x 224
640 x 272
Modified MJPEG (Normal, High, Highest)
1 x SATA HDD (500Gb / 2Tb tested)
USB
Time/Date or Event List
Yes
640 x 480 / 800 x 600 / 1024 x 768 / 1280 x 1024 / 1440 x 900
Yes
Yes
Yes
Yes
Yes
Yes
Power Recover Auto Restore Record Mode
12vDC 3A (100vAC ~ 240vAC 50/60Hz)
225(W) x 212(D) x 50(H)mm
850g without hard drive
Yes
All specifications are approximate. Quadraplus.com reserves the right to change any
product specifications or features without notice. Whilst every effort is made to ensure
that these instructions are complete and accurate, quadraplus.com cannot be held
responsible in any way for any losses, no matter how they arise, from errors or omissions
in these instructions, or the performance or non-performance of the equipment that these
instructions refer to.
Email: [email protected]
17
Last Revised 12/11/2010
11.
Hard Drive Compatibility List
The following hard drives are recommended for the Quadra
Manufacturer
Maxtor
Maxtor
Maxtor
Maxtor
Maxtor
Seagate
Seagate
Seagate
Seagate
Seagate
Hitachi
Hitachi
Hitachi
Hitachi
Western Digital
Western Digital
Western Digital
Western Digital
Western Digital
HDD Size
250Gb
320Gb
500Gb
750Gb
1Tb
250Gb
320Gb
500Gb
750Gb
1Tb
250Gb
320Gb
500Gb
1Tb
250Gb
320Gb
500Gb
750Gb
1Tb
HDD Model No.
STM3250318AS
STM3320418AS
STM3500418AS
STM3750528AS
STM31000528AS
ST3250824AS
ST3320310CS
ST3500320SV
ST3750330SV
ST31000528AS
HDT725025VLA380
HDT725032VLA360
HDT725050GLA360
HDT721010SLA360
WD2500AVVS
WD3200AVVS
WD5000AVVS
WD7500AACS
WD10EVVS
The following Hard Drives are not recommended.
Manufacturer
Seagate
Seagate
Hitachi
Western Digital
Western Digital
Western Digital
HDD Size
250Gb
500Gb
750Gb
250Gb
320Gb
500Gb
Email: [email protected]
HDD Model No.
ST3250310SV
ST3500312CS
HDS721075KLA330
WD2500AAJS
WD32000AAKS
WD5000AAKS
18
Last Revised 12/11/2010