1
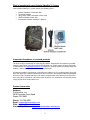
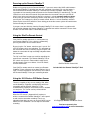
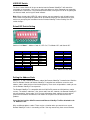
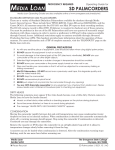
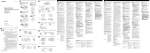
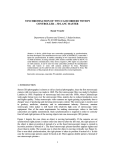
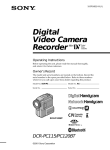
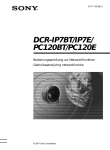
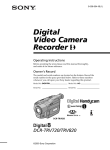
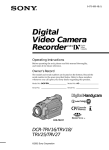
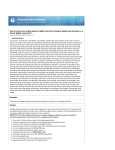
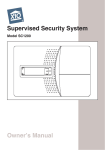
Remote VideoEye™ Instruction Manual
Introduction
The PixController Remote VideoEye™ is a wireless remote triggering device to control any Sony
or Canon camcorders with the LANC editing port. The Remote VideoEye™ consists of a small
waterproof box with a receiving antenna and LANC port for connecting your user supplied
compatible camcorder. Wireless commands to power “on” your camcorder and start “recording”
can be sent via the included handheld SlimFire remote control unit. Commands to stop the
camcorder recording and power it down are also sent via the SlimFire remote, and command for
controlling the camcorder zoom functions are also possible via remote wireless commands.
The Remote VideoEye™ is perfect for capturing video without needing another camera man.
Filming wildlife documentaries or hunting videos will now take on a whole new and exciting angle.
You can now film “never before seen” angles of your hunt or wildlife documentary. Imagine a
video camera setup from ground angle filming the shot from a tree stand all controlled from the
hunter or camera man in the tree stand? Remote VideoEye™ units are also addressable, which
means you can control several Remote VideoEye™ camcorders units independently in one
setup.
There is no limit to the number of Remote VideoEye™ camcorder unit that can be used at one
time. Several system can be setup at one time and will all set to record with a simple press of the
button with the included SlimFire remote control unit. Remote VideoEye™ can also be triggered
via the X10 wireless PIR motion sensor. Imaging capturing footage of a trophy buck walking into
your setup from angle never before possible. Adding this type of footage to your hunting video or
wildlife documentary will set you apart from others!
Copyright ©, PixController, Inc. http://www.pixcontroller.com, all rights reserved
1
What’s included with your Remote VideoEye™ System
Your Remote VideoEye™ system contains the following items:
•
•
•
•
•
Remote VideoEye™ Controller Box
Tilt-Swivel Antenna
Sony/Canon LANC camcorder 2.5mm cable
SlimFire Remote Control Unit
PixController Remote VideoEye™ Manual
Inspection/Acceptance of received products
The buyer shall be responsible for inspecting all products shipped prior to acceptance; provided,
however, that if Buyer shall not have given PixController, Inc. written notice via email of rejection
or shorted items to [email protected] within ten (10) days following receipt by Buyer, the
products shall be deemed to have been accepted by Buyer.
All electronic products sent back for a full refund are subject to a 15% restocking within thirty (30)
days from purchase. Products authorized for return must be in their original unopened packaging
to receive credit. Unauthorized returns will not be accepted. After thirty (30) days from purchase
items may not be returned for a full refund. Your electronics are covered for a full 6 month period
coving all part failure under normal use.
Contact Information
Address:
PixController, Inc.
2610 Haymaker Farm Road
Export, PA 15632
Phone: 724-733-0970
Email: [email protected]
Web: http://www.pixcontroller.com
Internet Help Forums: http://www.pixcontroller.com/forums
2
Remote VideoEye™ System Components
Remote VideoEye™ SlimFire Remote
Control Unit
Remote VideoEye™ Controller Box
Remote VideoEye™ Exterior Components
Remote VideoEye™User DIP Switch
Remote VideoEye™Power Switch
Remote VideoEye™ Interior Components
3
Connecting Remote VideoEye™ to your camcorder
Before powering up the Remote VideoEye™ unit
you will need to connect the LANC Cable to your
Camcorder unit. Your camcorder will need to be
either a Sony or Canon camcorder with a LANC
editing port. If you are unsure if your camcorder
has a LANC editing port please see the instruction
manual sold with your camcorder.
Note: Be sure to screw in the antenna into the
antenna port before using. The antenna may
be removed for transporting or storing the
Remote VideoEye™ unit.
Does my Camcorder have a LANC port?
If you have either a Sony or Canon camcorder it may have a LANC port. The LANC port is
, but older Sony models may be marked by a "REMOTE"
normally marked with this symbol:
in blue letters. Some models are marked by "Control-L".
What is a LANC Port?
LANC was developed by Sony, but Sony has licensed LANC to other manufactures of 8mm, Hi8,
MiniDV, DVD, and other recording media camcorders. LANC support is found many of the older
8mm and Hi8 Sony camcorders, and on most high end Sony/Canon camcorders. LANC
connectors are usually 2.5mm stereo mini plugs - about the size of a Walkman headphone. Some
devices use a circular 5-pin DIN jack.
LANC connectors are normally labeled LANC, Control-L, Remote, or designated with a special
LANC symbol that resembles an "L" inscribed in a circle (see photo above). To determine
whether or not your camcorder is LANC compatible check the camcorder users’ manual, ask your
dealer, or contact the manufacturer directly.
Camcorders with LANC Ports:
Below is a listing of LANC Compatible Camcorder Models compiled from data, but this list is not
totally complete, as new models are routinely being manufactured and some models have likely
been missed or mistakenly included, but it is a fairly accurate snap-shot of all LANC compatible
camcorders. Note that some of the LANC compatible models listed have had the LANC jack
removed in later years of production. For example, the 2006 models of the Sony HC26 are no
longer LANC compatible.
Note that many of these camcorders are no longer in production,however, many of these LANC
compatible camcorders can be found on http://www.eBay.com at very low prices.
4
Hi8 and 8mm Camcorders with LANC jacks:
Most 8mm and older Hi8 camcorders manufactured by the following:
Sony, Canon, Nikon, Ricoh, Hitachi, Yashika, Sanyo, Olympus, Blaupunkt, Grundig, Fujix,
Kyocera, Siemens, Fisher, and possibly other makes.
Current and recent Hi8 camcorder models generally do not have a LANC jack.
You should further verify if a particular 8mm or older Hi8 camcorder actually has a LANC jack
(most do - some don't).
Digital Camcorders with LANC (or Remote) jacks:
Please Note: The models listed represent the first year in production, and subsequent production
years of the same model may not be LANC compatible. You should always further verify the
actual presence of a LANC (Remote) jack.
Canon:
Elura, Elura 2 MC, Elura 40 MC, Elura 50
GL1, GL2
Optura, Optura 100 MC, Optura 200 MC, Optura PI
ZR10, ZR20, ZR25 MC, ZR30 MC, ZR40 MC, ZR45 MC, ZR50 MC
Sony DCR-Series:
DVD92, DVD100, DVD101, DVD103, DVD105, DVD200, DVD201, DVD203, DVD205, DVD300,
DVD301, DVD305, DVD308, DVD403, DVD405, DVD408, DVD505, DVD508
HC16, HC20, HC21, HC26, HC30, HC32, HC40, HC42, HC65, HC85, HC90, HC96, HC1000
IP45, IP55, IP210, IP220
PC1, PC2, PC3, PC4, PC5, PC6, PC7, PC8, PC9, PC10, PC100, PC101, PC105, PC109,
PC110, PC115, PC120BT, PC300, PC330, PC350, PC1000
SR62, SR80, SR82, SR100, SR200,SR300
TR7000
TRV6, TRV7, TRV8, TRV9, TRV10, TRV11, TRV15, TRV16, TRV17, TRV18, TRV19, TRV20,
TRV22, TRV25, TRV27, TRV30, TRV33, TRV38, TRV39, TRV40, TRV50, TRV80, TRV85,
TRV103, TRV110, TRV115, TRV230, TRV240, TRV310, TRV320, TRV330, TRV340, TRV350,
TRV350 D8, TRV530, TRV720, TRV740, TRV820, TRV900, TRV940, TRV950
VX700, VX7000
DVR-TRV-7 (DVR Series)
Sony HDR-Series:
HC1, HC3, HC5, HC7
SR1
UX1, UX5, UX7
Sony HVR-Series:
A1U
5
Powering up the Remote VideoEye™
Before turning power on to the Remote VideoEye™ you must connect the LANC cable between
the Remote VideoEye™ controller box and your camcorder (see above). Be sure that power is
turned off to both the Remote VideoEye™ controller box and the camcorder. Next turn your
camcorder on into recording mode and power on the Remote VideoEye™ controller box. The red
LED will turn on for about 10 seconds and power down the camcorder. Next, the red LED will
blink 5 times letting you know that the board is entering a 1 minute automatic walk-test phase.
At this point you can move around the camera setup and check out the range of your setup by
pressing the “On” button on the SlimFire remote control. After the 1 minute automatic walk-test
phase expires the red LED will blink 5 times letting you know the camera system will now become
active and ready for recording.
If you get a constant 10 blinks from the Remote VideoEye™ this means there is a problem with
the connection between the Remote VideoEye™ controller box and the camcorder. Please check
to make sure the LANC cable is connected correctly.
Using the SlimFire Remote Control
Your SlimFire remote control unit is used to power up
your Remote VideoEye™ via a wireless command by
pressing the buttons on the remote control.
By pressing the “On” button, note there are 2 sets of “On”
and “Off” buttons which are redundant. This will power up
the camcorder and start it recording. By pressing the “Off”
button the camcorder will stop recording and power down
the camcorder.
The “Up” and “Down” arrows are used for controlling the
zoom on our camcorder. The Remote VideoEye™ User
DIP switch must be set in Zoom mode in order for this
function to work. Please see below, “User DIP Switch”,
for more information.
Your SlimFire remote control can control your Remote
VideoEye™ from a distance up to about 180 feet “line of
sight”. For best reception be sure to have a clear view of
the Remote VideoEye™ from your controlling location.
SlimFire Remote Control Unit
Included with the Remote VideoEye™ Unit
Using the X10 Wireless PIR Motion Sensor
There are 3 models of this sensor made by X10, which
are the HawkEye, EagleEye, and ActiveEye which are
compatible with the Remote VideoEye™. We
recommend the EagleEye sensor because of it's outdoor
use and price. This sensor can be purchased from
www.pixcontroller.com
When the PIR sensor is triggered it will send out a
wireless command the Remote VideoEye™ will respond
to and start the camcorder recording. There is an
adjustable time delay you may set on the X10 PIR sensor
before the “Off” command is sent to stop the camcorder
recording.
6
X10 EagleEye Wireless PIR Motion Sensor
Purchase separately. See
www.pixcontroller.com for more information.
USER DIP Switch
The User Control Switch will let you customize how the Remote VideoEye™ will control the
camcorder, or camcorders. Here you can adjust the addresses of the camcorders to respond to
remote wireless commands, using camcorder zoom control, turning the LED on or off, putting the
unit into test mode, and using the sound indicator.
Note: When changing the USER DIP switch settings you must power the unit off and back on.
Please make sure you keep the power off for 30 seconds before you turn power back on. Also,
make sure you unplug the camcorder from the Remote VideoEye™ when making User DIP
switch changes.
Default DIP Switch Setting
Switches 1-8 “Down” – Address Code “A”, LED “On”, Test Mode “Off”, and Sound “Off”
Code
A
B
C
D
E
F
G
H
Zoom Control
Off
On
Switch 1
Down
Down
Down
Down
Up
Up
Up
Up
Switch 2
Down
Down
Up
Up
Down
Down
Up
Up
Switch 3
Down
Up
Down
Up
Down
Up
Down
Up
Switch 4
Down
Up
Red LED
On
Off
Switch 5
Down
Up
Test Mode
Off
On
Switch 6
Down
Up
Sound
Off
On
Switch 7
Down
Up
Note, Switch 8 is not used.
Setting the Address Code
Switches 1, 2, and 3 control the address code of the Remote VideoEye™ controller box. Both the
SlimFire Remote Control and Remote VideoEye™ controller box need to be set to the same
address code in order for the unit to function properly. There are 8 unique address codes you can
set the Remote VideoEye™ to respond to.
The Remote VideoEye™ is compatible with the X10 SlimFire remote and X10 wireless motion
sensors. The address code here is the “house code” from A-P, however, the Remote VideoEye™
only will recognize “house codes” A-H. For more information about setting the house code on
your SlimFire remote or X10 wireless PIR motion sensor please see the manual for these
products.
Out of the box both the SlimFire remote and Remote VideoEye™ will be defaulted to the
“A” Address Code.
Why set different address codes? There may be a situation when you want to have several
Remote VideoEye™ units in a recording session. You may want to only have several Remote
7
VideoEye™ units respond to SlimFire or X10 Wireless PIR motion sensors. For this you have the
ability to set the address between each of these devices. It is a good idea to use a marking pen
and write the address code on your SlimFire remote or X10 Wireless PIR motion sensor if not set
in the default “A” address code.
Zoom Control
Switch 4 controls the zoom of the camcorder. If this mode is turned on you can control the zoom
feature of your camcorder, however, we suggest that your camcorder is close enough so you can
view the camcorder LCD display screen.
Super Bright LED
Switch 5 controls the LED. This controls the LED
display. In most cases you would like to know if your
Remote VideoEye™ receives the wireless
commands. When the LED is turned on it will light up
upon the “On” command from your SlimFire remote
or X10 Wireless PIR motion sensor.
The default mode is in the “on” position.
Recording LED indicator can be seen from 200+
feet on the Remote VideoEye™ when recording.
Test Mode
Switch 6 controls Test Mode. When Test Mode is set to “On” it will let you test out the “line of
sight” distance between the triggering unit, i.e., the SlimFire remote control and the Remote
VideoEye™ unit. This is useful to be sure the camcorder units can see commands from the
triggering units.
Note: To put the Remote VideoEye back into “recording mode” when using Test Mode.
Sound
Switch 7 will let you control the sound indication. On the Remote VideoEye™ controller is a small
speaker that can send out sound commands. The default mode is having this turned off, but there
may be times when you would like a sound indication your unit is receiving the wireless
commands.
Note:
When changing switch setting you must re-boot your Remote VideoEye. When re-booting
you must wait approximately 30 seconds before turning power on again. Not doing so can
result in the controller not working properly. Please disconnect the LANC cable when
changing settings.
8
Remote VideoEye™ System Specs
•
•
•
•
•
•
•
•
•
•
Size: 6-3/8” Long, 4 3/4” Wide, 2-1/8” Tall
Case: Waterproof/Weather Proof ABS plastic, Mossy Oak Camo Dipped
Ports: Sony LANC compatible camcorder control port
Cables: 2.5mm stereo cable
Wireless RF Range: Up to ~180 feet Line of Sight (LOS)
Wireless RF Frequency: 310 MHz, X10 Wireless Protocol
Antenna: 4” Removable Tilt-Swivel Antenna
Triggering Devices: X10 SlimFire Remote, X10 Wireless PIR Motion Sensor
Battery: 4AA Batteries lasting 3-4 months of normal use
Recording Indicator: Super Bright LED
Typical Field Setups
Typical field setup using your Remote VideoEye™
system can include ground setup with a simple
camo face net with a hole cut for the camera lens
(shown upper right photo) to unmanned camcorders
in a hunting tree stand (shown lower right photo).
There are situations where you may want to use
both a tree stand and a ground Remote VideoEye™
units. In this case you may want to have the tree
stand unit respond to the zoom control where the
ground setup would not.
Ground Setup
Film angles in your hunting videos never before
possible using a ground setup
Tree Stand Setup
9
Film wildlife and hunting videos like never before possible using multiple video cameras
controlled via a wireless remote control. With the simple press of a button all of your video
cameras will start recording at one time. Press the button on your SlimFire remote as the subject
comes into range and let the Remote VideoEye™ do the rest.
Trouble Shooting
Q: My Remote VideoEye unit keeps blinking 10 times and will not power down my attached
camcorder.
A: Be sure to follow the correct steps in connecting your camcorder to the Remote VideoEye
controller box. Connect the LANC cable between the camcorder and the Remote VideoEye™. Be
sure that power is turned off to both the Remote VideoEye™ controller box and the camcorder
before connecting the LANC cable. Next turn your camcorder on into recording mode and power
on the Remote VideoEye™ controller box
Q: I do not see the red LED turn on when I power on the Remote VideoEye™
A: Replace the AA batteries in the Remote VideoEye™.
Q: My Remote VideoEye™ won’t trigger the camcorder from my recording location.
A: Be sure the Remote VideoEye™ unit is within the spec distance of 180 feet from your
recording location and the Remote VideoEye™ box is in clear view with no obstructions. Move
closer until you can trigger the unit.
Copyright ©, PixController, Inc. http://www.pixcontroller.com, all rights reserved.
PixController, Inc.
10