1
Operator'S Manual
CRi:IFTSNnN
2.2 cu. in./36cc 2-Cycle
GASOLINE CHAIN SAW
Model No.
358.351142 - 14 in. Bar
358.351062 - 16 in. Bar
@
Read and follow all Safety Rules and Operating
WARNING:
Instructions before first use of this product.
For answersto your questions aboutthis product:
Call 7 am_7 pm, Mon--Sat;Sun, 10 am-7 pm
1-800-235-5878
Sears, Roebuck and Co., Hoffman Estates, IL 60179 USA
530-084293 05/06/97
Warranty
Safety Rules
Assembly
•Operation
Maintenance
2
2
5
6
11
Service and Adjustments
Storage
TroubleShootingChad
Spanish ..
Parts& Or_edng
14
16
16
22
Back
FULL ONE YEAR WARRANTY ON CRAFTSMAN ® GAS
CHAIN SAW
For one year fromthe date of purchase,when this CraftsmanGas Chain Saw is
maintained,lubricated and tuned-upaccordingto the owner's manual,Sears will
repair,free of charge, any defectin material or workmanship.
Thiswarrantyexcludesthe bar, chain,sparkplug and air filter,whichare
expendableparts, and becomewornduringnormaluse.
If this Gas Chain Saw is usedfor commercialor rental purposes,thiswarranty
appliesfor 30 days from the dateof purchase.
WARRANTY SERVICE IS AVAILABLE BY RETURNING THIS CHAIN SAW TO
THE NEAREST SEARS SERVICE CENTER IN THE UNITED STATES.
Thiswarrantygivesyou specificlegal rights,and you may also have otherrights
whichvary from state to state.
Sears, Roebuck and Co., D/817 WA, Hoffman Estates, IL 60179
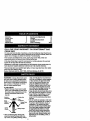
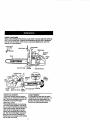
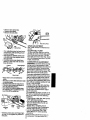
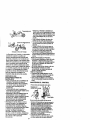
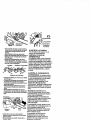
duty,non-slip gloves;eye protection
WARNING: Always disconnect spark
suchas non,fogging,vented goggles
plug wire when makingrepairs except
or face screen; an approvedsafety
for carburetoradjustments.Becausea
chainsaw is a high-speedwoodcutttng hard hat; and soundbarriers(ear
plugsor mufflers)to protectyour
tool,careless or improper use ofthis
hearing. Regularusers shouldhave
toolcan causeserious injury.
hearingchecked regularlyas chain
;PLAN AHEAD
saw noisecan damage hearing.Se• Restrictthe use of your saw to adult
cure hair above shoulderlength.
users who understandand can follow
• Keep all parts of your bodyaway from
the safety roles, precautions,and opthe chainwhen the engine is running.
erating instructions
found in this
• Keep children,bystanders,and animanual.
mals at least 30 feet (10 Meters)
away from the work area when startHearing
....
j
SafetyHat
ingsaw.
_rotecUon jh. 8-_ _
• Do not handle or operatea chainsaw =
Snug
"_' i'_l_""
_Y_ecfion
Fit',Jng
_
/
HeavyDuty when you are fatigued,ill,or upset,or
if you have taken alcohol,drugs,or
__Clothing
_
Gloves
medication.You must be in good
J
physicalconditionand mentallyalert.
if you have any condi_onthat mi_lht
SafetyChaps
be aggra,_atedbystr_huouswork,
checkwith doctor beforeoperating.
•
Do not startcuttinguntilyou have a
II_llllIB
clear work area, securefooting, and
• Wear protective gear. Alwaysuse
especiallyif you are felling a tree, a
retreatpath.
steel-toedsafetyfootwearwithnonslipsoles;snug-fittingclothing;heavy-
OPERATE
YOURSAWSAFELY
• Donotoperate
withone:hand.
Serf
ous injurytothe operator,helpers,or
bystandersmay resultfromonehandedoperation.A chainsaw is intended for two-handeduse.
• Operate the chin saw onlyin a wellventilatedoutdoorarea.
• Do not operatesaw from a ladder or
in a tree, unlessyou are specifically
trainedto do so.
- Make sure the chainwillnot make
contactwith any objectwhilestarling
the engine. Never try to startthe saw
when the guide bar is in a cut.
• Do not put pressureon the saw at the
end of the cuLApplyingpressurecan
causeyou to lose controlwhenthe
cut is completed. •
• Stop the engine beforesettingthe
saw down.
• Hand carry saw onlywhen engine is
stopped.Carry with muffler away from
body;gu!debar & chainprojectingbehindyou,guide bar preferablycovered witha scabbard.
leaves, straw,paper, etc. Slowlyremovefuel cap at_drefuelunit.
* Storethe unitand fuel in a cool, dry
well ventilatedspacewhere fuelvaporscannotreach sparksor open
flamesfromwater heaters, electdc
motors or switches,furnaces,etc.
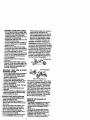
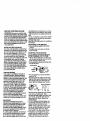
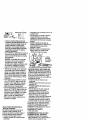
GUARD AGAINST KICKBACK
WARNING: RotationalKickbackcan
occurwhen the moving chaincontacts
an objectat the upper portionofthe tip
of the guide bar. Contactat the upper
portionof the tip of the guide bar can
causethe chainto dig intothe object,
whichstops the chainfor an instant.
The resultis a lightningfast, reverse
reactionwhich kicksthe guide bar up
and back towardthe operator.
"_
Kickback
Path
AvoidObstructions
MAINTAIN YOUR SAW IN GOOD
WORKING ORDER
, Have all chainsaw serviceperformed
by a qualifiedservice dealerexcept
the itemslistedin the maintenance
sectionof thismanual.
ClearTheWorking
Area
• Make certainthe saw chainstops
Pinch-Kickback
and
Pull*Inoccur
when
moving when the throttletriggeris released.For con'ection,refer to "Car- the chain issuddenlystopped by being
pinched,caught, or by contactinga forburetorAdjustments," ....
• Keep the handles dry;clean, and free eignobject in the wood. Thissudden
from oilor fuel mixture,!.: _:
stoppingof the chain resultsin a reversal of the chain force used to cut wood
• Keep capsand fastene_ securely
and causesthe saw to move in the optightened.
:
:i:_i_ .:_:.
osite directionof the chain rotation.
• Use only Craftsmana_C_=ssones
and
indn-Kickbackdrivesthe saw straight
replacementparts as Y_'ommended.
back towardthe operator. Pull-In pulls
Never modifyyour sa_
:
the saw away from the operator.
HANDLE FUE_W_,CAUTION
• Do not smokewhile haritllingfuel or
REDUCETHE CHANCE OF
whileoperatingthe saw;
.
KICKBACK
- Eliminateall sources ofsparks or
flame in the areas where fuel is mixed " Recognizethat kickbackcan happen,
With a basic understandingof kick-.
or poured.
" •
back, you can reducethe element of
• Mix and pour fuel in an outdoorarea
surpdsewhichcontributesto acciand usean approved,markedcondents.
tainerfor all fuel purposss.Wipe up
• Never let the movingchaincontact
all fuel spillsbeforastartingsaw.
° any objectat the tip of the guide bar.
• Move at least 10 feet (3 meters) from
Keep the wo_ing area free from obfuelingsite before starting,
structionsSUChas othertrees,
• Turn the engine offand let saw coolin
branches,rocks,fences, stumps,etc.
a non-combustlbiearea, not on dry
Eliminateor avoidany obstruction
3
k
4
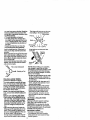
: that yoursaw chain could hit while
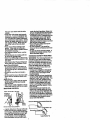
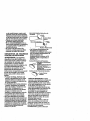
under thefront handlebar.Keep your
cutting.
.
.
leftarm straightwiththe elbowloh.,ked.
• Keep saw chainsharpano propeny
• PosPJon
yourleft handon the front
tensioned. A looseor dullchaincan
handlebarso it isIn a straightline with
increase the chance of kickback.FotYOUrright hand on the rear handle
low manufacturer' s chainsharpening
when makingbuckingcuts. Stand
and maintenanceinstructions.Check
slightlyto the lelt side ofthe saw to
tensionat regularintervals,but never
keep _our =.bodyfrom being in a direct
with engine running. Make sure the
line withth_ cuffing:chain.
bar clamp nutsare securelytight• Standwtth yourweightevenly baiened.
ancea on both feet.
• Begin and continuecuttingat full
• Do not overreach. You could be
speed. Ifthe chainis movingat a
_ drawnor thrown offbalance and lose
slowerspeed, there is=greaterchance
control;
of kickbackoccurring.
° Do not cut above shoulderheight. It
° Use extremecautionwhen re-enteris difficultto maintaincontrolof saw
ing a cut.
above shoulderheight.
• Do not attemptcutsstartingwith the
KICKBACK SAFETY FEATURES
tip of the bar (plungecuts).
• Watch for shiftinglogsor otherforces WARNING: The following features are
that could closea cutand pinchor fall
intochain.
includedon yoursaw to help reduce
hazard of kickback; however,such fea• Use the specifiedReduced-Kickback
Guide Bar and Low-KickbackChain. tureswill nottotallyeliminatethis danger.Do not rely onlyon safety devices.
Avoid Pinch-Kickback:
Followall safety rulesto help avoid
• Be extremelyaware of situationsor
kickbackand otherforces which can
obstructionsthat can cause material
resultin seriousinju_.
to pinch the top of or otherwisestop
• Handguard:designedto reduce the
the chain.
chance ofyour lefthand contacting
• Do not cut more than one log at a
the chain _your hand slipsoffthe
time.
° Do not twistthe saw as the bar aswith- fronthandlebar.
drawnfrom an undercutwhen buck- • Positionof front and rear handlebars,
designedwithdistancebetween hanin.
diesand "in-line"with each other. The
A,_n_€lPull-In:
spread and "in-line• position of the
• Alwaysbegin cuttingwith the engine
hands providedby this design work
at ful/speed and the saw housing
togetherto give balanceand resisagainstwood.
tance in controllingthe pivot ofthe
• Use wedges made of plasticor wood.
saw back towardthe operatorif kickNever use metal to hold the cutopen.
back occurs.
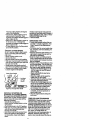
MAINTAIN CONTROL
• Reduced-KickbackGuide Bar,designed with a small radiustip which
reducesthe size ofthe kickback danStand to the left of the saw
get'zone
on the bar tip. This type bar
Thumb on
has been demonstratedto si_]nificantlyreducethe numberand senousness
of kickbackswhen tested in accordance withANSI B175.1.
=Elbow
locked
Never reversehand posiUons
• A good, firm grip on the saw with both
handswill heapyou maintaincontrol.
Don't let go. Gnp the rear handle with
your right hand whetheryou are dght
or left handed.Wrap the fingersof
your left hand overand aroundthe
front handlebar,and your leftthumb
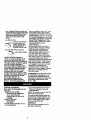
Reduced_3ckba,
c_metrica!
GuideBar
tk_
SymmetrlcallGuide___Ik
LargeRadiusTip
J
• Low-Kickback Chain, has met kickbackperformancerequirementswhen
testedon a representatives_ple of
chainsaws below 3.8 cubic inch
displacementspecifiedin ANSI
B175.1.
Low-Kickback
ChaJri
toolson a continualand _egut=;_asJs
mustcloselymonitortheirPhySical
conditionand the conditionofthistool;
CHAIN BRAKE If thissaw is to be used
for commerciallogging, you mustorder
and installa chainbrake to complywith
Federal OSHA Regulationsfor Com_.I" Co.to red
Dop a go: mercialLogging.ContactyourAuthorizedService Dealer or call
,€=_.,=---.
Elongated
GUardLink
1-800-235-5878.
-_
DeflectsKickback
Force
_
AndA/towsWoodTo
SPARK ARRESTOR: Yoursaw is
GradUally
RideIntoCutter equippedwith a temperaturelimiting
mufflerand spark arrestingscreen
ChainWithHighKickbackPoten_al
whichmeets the requirementsof
CanObstructMaterial CalifomiaCodes 4442 and 4443. All
U.S. forest land and the states of
California,Idaho, Maine, Minnesota,
New Jersey,Oregon, and Washington
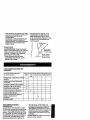
SAFETY NOTICE: Exposureto:
requireby lawthat many internal
vibrationsthroughprolongeduse of
combustionengines be equippedwitha
gasolinepoweredhand,t_IS could
causebloodvesselor newedamage in spark arrestorscreen; If you operatea
thefingers,hands,and j0ints ofpeople chain saw in a state or localewhere
suchregulationsexist, you are legally
pronetocirculationdisordersor
responsiblefor maintainingthe
abnormalswelling.Prolongeduse in
coldweatherhas been linkedto blood operatingconditionof these pads.
Failureto do so is a violationof the law.
vesseldamage in otherwisehealthy
Refer to the CUSTOMERRESPONpeople,if symptomsoccursuch as
SIBILITIESsection.
numbness,pa_n,loss of strength,
changein skin color or texture,or loss
STANDARDS: This chainsaw is listed
of feeling in the fingers,hands,or |oints,
discontinuethe use of this tooland
by UnderwritersLaboratories,lnc.in
accordancewith American National
seek medicalattention.An
Standardsfor Gasoline-PoweredChain
anti-vibrationsystem does no.t
Saws Safety Requirements(ANSI
guaranteethe avoidance ofthese
B175.1-1991),
:
:
CARTON coNTENTSI_..
Checkcartoncontentsag_iinstthefollowinglist.
_i
• Models 351142, 351062;
• Chain Saw (fullya_mbled)
• Chainadjustmentt_• 2-cycleengirteo11.(B_r oiln0t
included)
::
• Model 351062 only. _
° Carryingcase
• Extrachain
• Examinepartsfor damage. Do not
usedamagedparts.
• If you need assistance or findpads
missingor damaged, please call
t -800-235-5878.
NOTE: It is normalto hear the fuel filter
rattlein an empty fuel tank.
Yourunithas been factory testedand
the carburetor preciselyadjusted.As a
resultyou may smell gasolineor finda.
dropofoil/fuel residueon the muffler
when you unpackthe unit.
ASSEMBLY
Yoursaw is fully assembled, and no
assemblyis necessary.
5
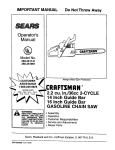
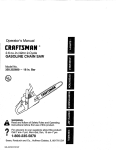
KNOWYOURSAW
READTHISOPERATOR'S
MANUAL
AND
SAFETY RULES BEFORE OPERATING YOUR CHAIN SAW. Comparethe illustrationswithyour unitto familiarize
yourselfwith the location of the variouscontrolsa_d a_justments.Save this
manualfor future reference.
ChainAdjustment Toot
FrontHandle
Hand
Starter Rope
ON/STOP
Switch
Chain
Pdmer
Bulb
CRRFTSHRN'
BarOil FillCap
CylinderCovern
Fast
idle\
Throt_eL k
_
.
L-z Ff
/j/
t/_
Housing
Fuel Mix RII Cap
I
,0Joo,o,
t WP
Screw
_
_
J
P"°
ulrecuon
G id
[!
Throttle Choke. _.
Chain BarClampNuts u e Bar
Tdgger Knob uaru_ampCatcher
THRO'I-I'LE LOCKOUT
The throttlelockout mustbepressed
beforeyou can squeezethe throttletrigget. This feature preventsyou from accidentallysqueezingthe trigger,
FAST IDLE LOCK
The fast idle lockholdsthe throttle trigger in the startingposition.Thisallows
you to hold the front handleand pull the
ropeduringstarting.Activatethe fast
idlelock by first pressingthethrottle
lockoutand squeezingthe throttletrigger. With the throttletdggersqueezed,
press the fast idlelock.Release the
throttle lockoutand triggerwhileholding
the fast idle lock button.
CHAIN TENSION
It is normalfor a new chainto stretch
duringfirst30 minutesofoperation.You
shouldcheckyourchaintensionfrequently.See Chain Tensionunder the
Service and Adjustmentssection.
R
BEFORE STARTING ENGINE
WARNING: Be sure to read the fuel
handlinginformationin the safetyrules
sectionof thismanualbefore you begin.
if you do not understandthe fuel ham
dlinginformationdo not attemptto fuel
yourunit. Seek help from someonethat
does understandthe informationor call
the customerassistance help lineat
1-800-235-5878.
GUIDE BAR AND CHAIN OIL
The chainoiler'providescontinuouslubricationto the chain and guidebar. Be
sure to figthe bar oiltank when you fill
the fuel tank (Capacity= 6:8 ft. oz.)
Formaximum guidebar and chainlife,
we recommendyou use Craftsman
chainsaw bar oil. If Craftsmanbar oilis
not available, you may use ago0d
grade SAE 30 oil untilyou areable to
obtainCraftsmanbrand. Theo!! output
is automatically metered during operation. Yoursaw wiUuse approximately
one tankof bar oilfor everytank of fuel
mix. Alwaysfillthe bar oil tankwhen
you fillthe fueltank.
the fuel linesand carburetorare empty_
Use fresh fuel next season. See STOR,
AGEinstructionsfor additionalinforma,
tion.•
Nevez'use engine or carburetorcleaner
productsin the fuel tank or permanent
damage may occur.
See the STORAGEsectionfor additional
information.
STOPPING YOUR ENGINE
• Move On/Stopswitchto the STOP
position.
• Ifengine does not stop, pullchoke
knoboutfully.
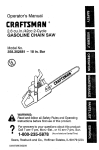
STARTING YOUR ENGINE
COLD ENGINE OR WARM ENGINE
AFTER RUNNING OUT OF FUEL
• Fillbar oiltank with bar oil. Yoursaw
willuse approximately one tank of bar
oilfor each tank of fuel mix.
• Prime engine by slowlypressingprimer bulb sixtimes.
Primer Bulb
Ignition _"_._//"
STOP--
V_
FUELING ENGINE
This engineis certifiedto operateon
Turn on ignitionby moving On/Stop
unleadedgasoline.Before operation,
switchto ON.
gasolinemustbe mixedwith a good
Actuatechokeby pulling choke knob
quality 2-cycleair-cooled engine oil. We
fullyout. Set saw on the ground.Grip
recommendCraftsmanbrand oil. Mix
front handlewith your lefthand and
gasoline and oi!at a ratioof 40:1 (A
place rightfoot throughrear handle.
40:1 ratiois obtainedby mixing3.2
ouncesof oilwith 1 gallon of unleaded
. ChokePositions
gasoline). DONOTUSEautomotiveoil
or boat oil.These oilswtl_cause engine
damage.When mixingfuel follow the
instructionsprintedon the container.
Full
Once oilis added to the gasoline,
•
Set
fast
idle
by
depressing
the
throttle
shake containermomentarilyto assure
lockwith your right hand. Then,
thatthefuel isthoroughlymixed.
squeezethrottletrigger and hold.With
Always readand followthe safety rules
your thumb, press the fast idle lock
relatingtofuel beforefueling yourunit.
down and hold. Next, release the .
throttle trigger.
IMPORTANT
• DONOTsqueeze throttle triggerdurExperience indicatesthat alcohol
ing starting;otherwise, it will be necblendedfuels (calledgasoholor using
essaryto resetthe fast idle lock.
ethanolor methanol)can attractmoisNOTE: When pullingthe starterrope,
ture whichleads to separationand
do not use the full extent of the rope.
formationof acids duringstorage;AcidDo not let starter rope snap back.
ic gascan damagethe fuel systemof
Holdhandle.Let rope rewindslowly.
an enginewhilein storage.
To avoidengineproblems,the fuel sys- • Pullstarter ropehandle firmly and
tem shouldbe emptiedbefore storage
quickly with your righthand untilthe
for 30 days or longer. Drain the gas
engineattempts to start or 5 pulls.
tank, startthe engine and let it run until
Thenpush the choke knobfully in.
Resume pullinghandle untilengine
starts.See Illustration.
• Above40°F, allowengineto runfor
approximately5 seconds.Then,
squeezeand release throttletdggerto
allowengineto idle.
• Below40°F, allowengineto warm up
for 30 secondsto 1 minute;then
squeeze and release throttletriggerto
allow engineto idle.
• To stop engine, moveOn/Stopswitch
to the STOP position.
/
Startingcould requiremanypullsdependingon how badlyunitis flooded.If
enginestillfalls to start,referto TROUBLESHOOTING chartor call
1-800-235-5878.
OPERATING TIPS
• Check chain tensionbeforefirstuse
and after 1 minute of operation.See
Chain Tensioninthe Maintenance
section.
• Cut wood only. Do notcut metal, plastics, masonry, non-woodbuildingmaSTARTING A WARM ENGINE
terials,etc.
DONOTuse the choketo starta warm
• Stop the saw ifthe chainstrikesa forengineor floodingand hardstarting
eignobject. Inspectthe saw and remay occur.
pair parts as necessary.
° Move On/Stop switchto ON.
• Keep the chain out of dirtand sand.
• Set fast idle lock.
Even a small amountof dirtwillquickly dull a chain and increasethe possiWithsaw on ground,gripfront handle bility of kickback.
withleft handand place yourrightfoot • Practicecuttinga few smalllogsusing
i throughrear
Be sure choke
is in the OFFposition.
handle.
the following steps.This willhelpyou
Grasp starter ropehandle and pull
get the =feel"of usingyoursaw before
ropefirmly and quickly to startengine.
you begin a major sawingoperation.
• Squeeze and release throttletrigger
Squeeze the throttletriggerand alto retum engineto idlespeed.
low the engine to reachfull speed
beforecutting.
• Begincuttingwith the saw frame
againstthe log.
• Keep the engine at full speed the
entiretime you are cutting.
LeftHand
•
Allowthe chainto cut for you.Exert
on Front
onlylight downwardpressure.
Handle
° Release the throttletdggeras soon
as the cut is completed,allowingthe
engine to idle. Ifyou runthe saw at
EIIRFt3_H"
full throttlewithouta cuttingload,
unnecessarywear can occur.
Rig FootThroughRear Handle
• To avoid losingcontrolwhen cut is
complete, do not put pressureon
saw at end ofcut.
DIFFICULT STARTING OR
•
Stop the engine beforesetting the
STARTING A FLOODED ENGINE
saw down.
The engine may be floodedif ithas not
started after 10 pulls.Floodedengines
TREE FELLING TECHNIQUES
can be clearedof excess fuel with the
WARNING: Check for brokenor dead
following procedure:
° Activatethe fast idle lock.
brancheswhichcan fall whilecutting
• Verifythatthe On/Stopswitchis in the causingseriousinjury.Do not cut near
ON position.
"
buildingsqlr_lectri_ wires if you do not
, Push choke knobto the OFF position, knowthe direotionof tree fall, nor cutat
• Withsaw on ground,gripfront handle nightsinceyou will not be able to see
well, nor duringbad weather suchas
with lefthand and place right foot
rain,snow, or strongwinds, etc.
throughrear handle.
• Grip starter ropehandle and pull rope Carefullyplan yoursawingoperationin
firmly and quicklyto startengine.If
advance.Clear the work area. You
need a clear area all aroundthe tree so
not successful,repeat untilengine
starts.
;v •
you can have secure footing. Study the
naturalconditionsthatcan cause the
tree to fall in a particulardirection,such
conditionsinclude:
"
: The winddirectionand speed.
The lean of the tree. The lean of a
tree mightnot be apparentdue to uneven or slopingterrain.Use a plumb
or levelto determine the directionof
tree lean.
Weight and br_nches 0none side.
: Surroundingtrees and obstacles.
Lookfor decayand rot. Ifthe trunkis
rotted,it can Stiap and fall towardthe
operator.
.'• ,,,, ,_
Make suretllere is enough room for the
tree to fall. Maintaina distanceof 2,112
tree lengthsfrom the near_stperson or
otherobjects.Engine no!s_=can drown
out a wamingcatl.
_. ,_
Removedirt, stones,loose bark, nails,
staples,and wire from the tree where
cutsare to be made.
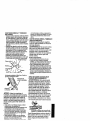
This hingewill helpprevent the tree
from falling in thewrong direction.
Finalcuthere
Firstcut
Notch...H_
Hingeholdstree on stumpand helps
controlfall
Opening
of felling
Closingof
notch
NOTE: Beforefelling cut iscomplete,
use wedgesto open the cut when
necessaryto controlthe directionof fall.
To avoid kickbackand chaindamage,
use woodor plasticwedges,but never
steel or ironwedges.
* Be alert tosignsthatthe tree is ready
to fall: crackingsounds,wideningof
the felling cut, or movementin the upFELLING LARGE TREES
per branches.
(6 inchesin diameterorllarger)
• As tree startsto fall, stop saw, put it
The notchmethodis used to,fell large
down, and get away quickly on your
trees.A notchts CUton tPieSide of the
plannedretreatpath.
tree in the desireddirectionof fall. After • Be extremelycautiouswith partially
a felling cut is made ontheopposite
fallen treesthat may be poorlysupside of tree, the tree willter_dtofall in
ported.When a tree doesn'tfall comthe direction of the notch;:ii!:i_;i
pletely,set the saw aside and pull
NOTE: Ifthe tree has larg_ b_ress"
downthe tree with a cable winch,
roots,removethem beforemaking the
blockand tackle, or tractor.Do not
notch.
: :,_ ,_:: ......:_ use your saw to cutdowna partially
fallen tree.
NOTCH CUT AND FEL_ING_TREE
• Make notchcut by cuttirlgth_ top of
CUTTING A FALLEN TREE
the notchfirst.Cut through1/3of the
{BUCKING)
diameterof the tree. Next complete
Bucking is the term usedfor cuttinga
the notchbycuffingthe bottom.See
fallentree to the desired logsize.
illustration.Once the notchis cut reWARNING: Do not stand on the log
movethe wedge ofwoodfromthe
beingcut. Any portioncan roll causing
tree.
toss of footing and control. Do not stand
* After removingthe wood, make the
fellingcut on the oppositeside of the downhill of the log being out.
IMPORTANT POINTS
notch.This is done by making a cut
abouttwoinches higherthan the cen- • Cut only one log at a time.
ter of the notch.This Willleave
• Cut shattered wood very carefully;
enoughuncutwoodbetween the fellsharppieces of wood could be flung
ingcut and the notchto form a hinge.
toward operator.
9
_X_
Pl:ana clearretreatpath
,....O
• Use a sawhorseto cut small10gs.
Never allowanotherperson to hold
the logwhile cuttingand never hold
the logwith yourleg Orfoot.
° Do notcut in an area where logs,
limbs,and rootsare tangled.Drag the
logsintoa clear area beforecutting
them.
Rrstcutonpreeeeeeeee_su[e
sideoflog
Secondcut
BUCKING TECHNIQUES
WARNING: If saw becomespinched
Orhung in a log, don'ttry to force itOut.
Youcan losecontrolofthe saw resultingin injuryand/ordamage to the saw.
Stopthe saw, drivea wedge of plastic
or wood intothe cut untilthe saw can
be removedeasily.Restartthe saw and
carefullyreenterthe cut. Do not use a
metalwedge. Do not attemptto restart
your saw when it ispinchedor hung in
a log.
Use a wedgpto remove pinchedsaw
Firstcut on pressureside of log
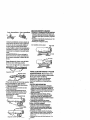
BUCKING WITHOUT A SUPPORT
• Overcutthrough1/3of the diameterof
the log.
• Roll thelog over and finishwitha secondovercut.
, Watch for logswith a pressureside.
See illustration above for cuttinglogs
witha pressureside.
Usinga log
for support
2ndCut,
Turn saw OFF and use a plasticor
woodenwedge to forcecutopen.
Overcutting beginson the top side of
the logwiththe bottomof the saw
againstthe log. When overcuttinguse
lightdownwardpressure.
Overcuttlng
Undercutting
Undercutting involvescuttingon the
underside ofthe logwith top ofsaw
againstthe log. When undercuttinguse
lightupwardpressure.Hold saw firmly
and maintaincontrol.The saw willtend
to push backtowardyou.
WARNING: Never turn saw upside
downto undercut.The saw cannotbe
controlledin thisposition.
Always make your firstcut on the pressure side of the log.
2rid
BUCKING USING A LOG OR
SUPPORT STAND
• Rememberyourfirstcut is always on
the pressureside of the log.
(Referto theillustrationbelow for your
firstand secondcut)
• Yourfirstcut shouldextend 1/3of the
diameterof the log,
• Finishwith yoursecondcut.
usl.g
•
2=cut
and limbs. Remove small limbs with
one cut.
• Keepthe tree betweenyou and the
chain.
• Remove larger,supportingbranches
with the 1/3,2/3 cuttingtechniquesdescribed inthe buckingsection.
, Always use an overcutto cutsmall
LIMBING AND PRUNING
WARNING: Never climbinto a tree to
limbor prune. Do not standon ladders,
platforms,a log, orin any position
whichcan cause you tolose yourbalance or controlofthe saw.
IMPORTANT POINTS
* Watchout for Spdngpoles:
Springpolesare smallsize limbs
whichcan whiptowardyou, or pull
you Offbalance. Use extremecaution
when cuttingsmallsize limbs.
:
. Be alert for springback.Watch outfor
branches_at are bent or underpressure.Avoidbeing struckbYthe
branchor the saw when the tensionin
the woodfibers is released.
, Frequentlyclear branchesout of the
way to avoid trippingover them.
LIMBING
•
• Limba tree 0fillyafter'it iSdut down.
• Leavethe larger limbsunderneaththe
felled tree to Supportthe tree as you
work.
_- __:
° start at the base of thefelled tree and
worktowardthe top,cuttingbranches
and freely
d cause
hanging
Undercuttingcoul
liml_mbs.
s tofall
and
pinchthe saw.
PRUNING
WARNING: Limitpruningto limbs
shoulderheighto_"below.Do not cut if
branchesare higherthan yourshoulder. Get a professionalto do the job.
° Make yourfirst cut 1/3of the way
throughthe bottomof the limb,
° Next make a secondcut all the way
through the limb. Then cuta third
overcutt to 2 inchesfrom thetrunkof
the tree.
ut
i/1
I _
/3 ofway
3rdcut1 to2 in.
from trunkoftree
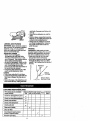
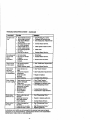
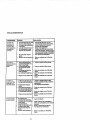
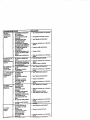
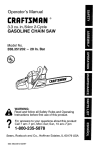
CUSTOMER RESPONSIBILfflES
.,
Fill in dates as you complete
regularservice• . ...... _ , - ii
Before After Every Every Yeady Service
Use Use 5hrs. 25 hrs,
Dates
Check for damaged/w0mparts
Ii
Check for loosefasteners/pads
Checkchain tension
/!
i!
Checkchainsharpness
p,,
Check guide bar
Cleanunit & labels
p*
Cleanair filter
/i
Clean/inspeCtsparkarrestor
screen& inspectmuffler
Replace spark plug
_......
!
GENERALRECOMMENDATIONS
• Handle Screws
Thewarranty
onthisunitdoesnotcov- • VibrationMounts
er itemsthathave been subjectedto
operatorabuse or negligence.To receivefull value from the warranty,the
operatormustmaintainunitas instructed in thismanual, Variousadjustments
will need to be madeperiodicallyto
propedy maintain your uniL
• Once a year, replacethe spark plug,
air filter element,and checkguide bar
and chainfor wear. A new sparkplug
_and air filter element assuresproper
air-fuelmixture and helpsyourengine
runbetter and last longer.
WARNING: Disconnectthe spark plug
beforeperformingmaintenanceexcept
for carburetoradjustments.
LUBRICATION
1 Bar
2 Bar Oil
Sprocket
Fill Cap
Lube
.=.
_
_
I
!
• StarterHousing
• Handguard
CHECK CHAIN TENSION
• Use thescrewdriverend of the chain
adjustmenttooJto movechainaround
guide bar to ensurekinksdo not exist,
The chainshouldrotatefreely.
Guide
Bar
BarClamp
Nuts
CHECK FOR LOOSE
FASTENERS AND PARTS
• Bar Clamp Nut
• Chain
• Muffler
• Cylinder Shield
Air Filter
• Clutch Drum/Sprocket
Chain
Adjustment
Tool
• Loosenbar clampnuts until theyare
fingertightagainstthe bar clamp.
• Turn adjustingscrewclockwiseuntil
chainbarelytouchesthe bottom of
guide bar.
• Rollchainaround guide bar to ensure
all linksare in bar groove.
I Sprocket lube
2 Craftsman chain saw bar oil
CHECK FOR DAMAGED OR
WORN PARTS
Replacementof damaged/wornparts
shouldbe referredto yourSears Service Center.
NOTE: It is normalfor a smallamount
of oil to appear underthe saw after engine stops.Do not confusethiswith a
leaking oiltank.
• On/Stop Switch - EnsureOn/Stop
switch functions properly by moving
the switch to the Stop" position.
Make sure engine stops; then restart
engine and continue.
• Fue! Tank- Discontinueuse of chain
saw if fuel tankshowssignsof damage or leaks.
• Oil Tank- Discontinueuse ofchain
saw if oil tankshowssignsof damage
or leaks.
_
Adjusting
_crsw
f-_-_"_j_
,,f.._.,_
A_USre
ling
/
BarClampNuts
GuideBar
• Lift up tip of guide bar to checkfor
sag. Release tip of guidebar, then
turn adjustingscrew1/4turn clockwise. Repeat this step until sag does
not exist.
• While lifting tip of guide bar, tighten
bar clamp nuts withthe chain adjustment tool. Torque to 10-15 ft-lbs.
Adjusting
Screw
Clamp
Nuts
tt4 Turn
• Use the screwdriverend of the chain
adjustmenttoolto movechainaround
the guidebar.
• if chain does notrotate,it is too tighL
Slightlyloosenbar clamp nuts and
.._#'t
turnadjusting=screw1/4turncounter• If chainis too loose, itwillsag below
the
guide bar. DO NOT operatethe
clockwise.Ret,ghtenbar
saw
ifthe chainis loose. c,amp nuts.
CHECK CHAIN SHARPNESS
A sharpchainmakes woodchips.A
dull chainmakes a sawdustPoWder
and cutsslowly.
_:
CHAIN SHARPENING. :,_ ._
Chain sharpeningrequires,special
tools.You canpurchasesharpening
toolsat Sears or go to a professional
chainsharpener.
:;
:
CHECK GUIDE BAR
Conditionswhichrequireguide bar
maintenance:
• Saw cutstoone side or at an angle.
• Saw has tobe forced throughthe cut.
• Inadequatesupplyof _il t0 thebar
and chain.
: . .....'= ,
= ,
Check the conditionof thegUide bar
each timethe chainis sharpen_ed.
A
worn guidebar willdamage the chain
and make cuttingdifficult.To rnaintain
guide bar:.
::
Move On/Stopswitchto "StoP."
Removebar and:chainfrom _aw.
• Clean all sawdustand ady o!her
debrisfrom the guidebar grooveand
sprocketholeafter eachUse:
RemoveSawdustFromGuic[e
"_
sp etHole
• Add lubricantto sprockethole after
each use.
• Burringof guidebar railsis a normal
processof railwear. Remove these
burrswith a fiatfile.
• When railtop is uneven, use a fiat file
to restoresquareedges and sides.
_
_L_
_1_._
Fi'U
Correct Worn
Groove Groove File Edgesandsides
,
Square
Replacethe guidebar when the groove
is worn, the guidebar is bent or
cracked,or when excess heating or
burringof the railsoccurs.If replacement is necessary, use only the guide
bar spei;ifiedfor your saw in the repair
parts list,also specified on the replacement bar and chaindecal locatedon
the chainsaw.
CLEAN UNIT & LABELS
• Clean the unitusinga damp clothwith
a milddetergent.
• Wipe offthe unitwitha clean dry
cloth.
CLEAN AIR FILTER
A dirtyair tilterdecreasesthe life and
performanceofthe engineand increasesfuel consumptionand harmful
emissions.Alwaysclean your air filter
after 15 tanksof fuel or 5 hoursof operation,whichevercomesfirst. Clean
more frequently in dustyconditions.A
used air tiltercan never be completely
cleaned. It is advisableto replaceyour
air filter with a new one after every 50
hoursof operation,or annually,whichever comesfirst.To clean filter:.
• Loosen3 screwson cylindercover.
• Remove cylindercover.
• Remove air filter.
• Clean the air filterusinghot soapy
water. Rinsewithclean coolwater.
Airdry completelybeforereinstalling.
• Lightlyoilair filterbeforeinstalling.
Use 2-cycleengineoil or motoroil
(SAE 30). Squeeze excess oilfrom
filter. This willimprove the efficiencyof
the air filter.
• Reinstallair filter.
• Reinstallcylindercoverand 3 screws
(15-20 in-lbs.).
13
Cylinder
Cover
Screws
, Remove mufflerdiffuserand spark
arrestorscreenassembly.Noticethe
orientationof these partsfor reassembling.
• Cleanthespark arrestorscreen witha
Cylinder
wire brush.Replacescreen if breaks
Cover
are found.
, Replaceany brokenor cracked muffler parts.
. Reinstalldiffuserand spark arrestor
screen assemblywith roundholes
facingup and towardsmufflercover.
INSPECT MUFFLER AND SPARK • Reinstallmufflercover and 2 screws
(7-8 ff-lbs.).
ARRESTOR SCREEN
As the unitis used, carbondeposits
REPLACE SPARK PLUG
.
build up on the mufflerand spark
The sparkplug shouldbe replaced
arrestor screen,and mustbe removed eachyear to ensurethe engine starts
to avoid creatinga fire hazard or affect- easier and runs better.Ignitiontimingis
ingengine performance.
fixedand nonadjustable.
Replace the spark arrestor screen if
, Loosenthe 3 screwson the cylinder
breaks occur.
cover.
_,_ _
• Removethe cylindercover.
,__,,.,__/Mu
filerDiffuser
Spark
Pulloffthe spark plugboot.
Arrestor
Removespark plugfrom cylinderand
P_="-,Y I],(_/_'f
Y / Screen
discard.
• Replacewith ChampionRCJ7Y spark
1___,/_
Cover
plug and tightenwith a 3/4 inchsocket
wrench(10-12 ff-tbs), Spark plug gap
shouldbe .025 in.
• Reinstallthe sparkplug boot.
° Reinstallthe cylindercover and 3
Body
_"=_ Muffler ''_.
screws(t5-20 in-lbs).
Cover
Screws
Cylinder
Cover
CLEANING THE SPARK
ARRESTOR SCREEN
Cleaningis requiredevery 25 hours of
operationor annually, whichevercomes
first.
• Loosenand removethe 2 mufflercover screws.
• Removethe mufflercover (cover
snaps offmufflerbody).
CHAIN REPLACEMENT
CAUTION:Wear
protective gloves
when handling chain. The chain is
sharp and can cut you even when it is
not moving,
It is normal for a new chain to stret_;h
during the first 30 minutes of operation.
You should recheck your chain tension
frequently and adjust the chain tension
as required. See Chain Tension section.
Plug
Boot
Spark
Plug
• Move On!Stopswitchto the Stop
position.
ReplaceDe old chainwhen it bei comes_qm.er damaged.
Use onlytheI_ow-Kickback replacementchainspecified in the repair
parts list.The corre_ replacementbar
and chain is alsospecified on a decal
locatedon the chainsaw.
, See yourSears Service Centerto replace and sharpen individualcutters
on yourchain.
1,1
• Remove bar clampnuts.
Removebar old
clamp.
Removethe
chain.
Clamp _"_,
Bar ClampNuts
-_- olamp NUtS
• Turn adjusting screwby hand counterclockwiseuntiladjustingpin just
touchestheStop.
• Slideguidebar behind clutchdrum
untilguide bar stopsagainstclutch
drumsprocket.
• Carefullyremove new chainfrom
package.Hold chainwiththe drive
linksas shown.
CHAIN ADJUSTMENT
See "ChainTension• in Maintenance
section.
CLEAN FUEL FILTER
To clean fuel filter, drain yourunitby .
runningdry offuel, removefuel caplre
tainer assemblyfrom tank. Pullfilter
from tankand removefrom line. Clean
with milddetergentand rinse.Dry thoroughly,reassemble.
CARBURETOR ADJUSTMENT
WARNING: The chainwillbe moving
dudngmostof thisprocedure.Wear
Cutters
DepthGauge
yourprotectiveequipmentand observe
alt safety precautions.Duringthe low
speed mixtureadjustmentrecheckidle
speed after each turnof the screw.The
chainmust not moveat idle speed.
Ca_uretor adjustmentis criticaland if
ortveLtnks,:.
doneimproperlycan permanentlydamage the engine as well as the carbure• Place chainover and.befiindthe
tor. If you requirefurther assistanceor
clutch.
_
• Fit bottomof drivelinksbehveen teeth are unsureaboutperformingthis procedure, call ourcustomerassistancehelp
in sprocketnose.
" :
line at !-800-235-5878.
Fit chaindrive links intobar groove.
Old fuel, a dirtyairfilter,dirtyfuel filter,
Pull guidebar forward untilchain is
or flooding may give the impressionof
snugin guide bar groove; _i:i
an improperlyadjustedcarburetor.
, Now,installbar clamp m_ildngsure
Check these conditionsbeforeadjustthe adjustingpin is posffi0neclin the
ing the carburetor.
lowerholetnthe guldebar.
The carburetorhas been carefullyset at
the factory. Adjustmentsmay be necessary ifyou noticeany of the following
conditions:
• Chain movesat idle.See "idleSpeed",
under adjustingprocedure.
• Saw will not idle. See "IdleSpeed"
and =LowSpeed Mixture'underad,s,
,_
justingprocedure.
Lower ..
• Enginedies or hesitateswhen it
Hole
Guide
shouldaccelerate.See •Acceleration
Adjusting
Bar
Check"under adjustingprocedure.
Pin
.,
• Lossof cuttingpower.See "High
Speed Mixture H" under adjusting
procedure.
• installbar clamp nuts and fingertighten only.Do not tightenany further at There are three adjustmentscrewson
the carburetor.They are labeled H, L,
thispoint.
15
and T. They are located in the areajust the_.engine
and note performance.If enabove the primerbulb.
ginehesitates,bogsdown, or smokes
duringacceleration,turn mixturescrew
CARBURETOR PRESETS
clockwise in 1/16-turnincrements until
When makingadjustments,do not force
performance!s
satisfactory.Repeat this
the plasticlimitercaps beyondthe
procedureas necessaryfor properadstopsor damage willoccur.
justmenLAfter completingadjustments,
If carburetorpresetsare not needed,
checkfo._accelerationand chainmoveproceed to "idle Adjustments."
ment at_idle. Reset if necessary.
• Turnboth mixture screws counterHigh Speed Mixture "H"
clockwise until they stop.
• Turn the idle speed screw clockwise DO NOT operateengine at fullthrottle
for prolongedperiodswhilemaking aduntil it stops. Now turn counterctockjustments.Damage to the enginecan
' wise4-1/2turns.
Start motor, let it run for 3 minutes, and occur.Make a test cut. Based on performanceof the saw while cutting,adproceed to the adjustment section,tf
just the highspeed mixturesettingin
engine does not start, refer to trouble1!16-turnincrementsas follows:
shooting chart or call 1-800-235-5878.
If engine performance is acceptable at • Clockwiseuntilthe saw has good
PDower
in the cutwith no hesitation.
the preset positions and there is no
o notadjustby soundor speed, but
chain movement at idle, no further adjudgeby howwell the saw performsin
justment is necessary.
the cut.
ADJUSTING PROCEDURE
• Counterclockwise if the saw has
Idle Speed "T"
speed, but dies in the cutor lacks
Allow engine to idle. Adjust speed until
power in the cut.
engine runswithoutchain movement or After completing adjustments,checkfor
acceleration and chainmovement at
stalling.
• Turn clockwise to increase engine
idle. Reset if necessary.
speed if engine stalls or dies.
Acceleration Check
• Turn counterclockwiseto decrease
Ifthe enginedies or hesitatesinsteadof
speed.
accelerating,turnthe low speed mixture
No further adjustments are necessaryif adjustment counterclockwiseuntil you
chain does not move at idle speed and havesmoothacceleration withno chain
if performance is satisfactory.
movementat idle. Recheckand adjust
Low Speed Mixture "L"
as necessaryfor acceptableperformance.
Allow engineto idle, Then accelerate
Prepare your unit for storage at the end
of the season or if it will not be used for
30 days or more.
WARNING:
• AUow the engine to cool, and secure
the unit before storing or transporting.
• Store chain saw and fuel in a well
ventilated area wherefuet vapors
cannot reach sparks or open flames
from water heaters, electric motors or
switches, furnaces, etc.
° Store chain saw with all guards in
place and position chain saw so that
any sharp object cannot accidentally
cause injury.
• Store chain saw well out of the reach
of children.
EXTERNAL SURFACES
if yourchain saw is to be storedfor a
pedod oftime, clean itthoroughlybefore storage.Store in a clean dry area.
• Lightly oil externalmetal Surfacesand
guidebar.
• Oil the chainand wrap it in heavypaper or cloth,
FUEL S_T.,_M !;
Under Fu_f_'_l:_gine in the Operating
Section0f_thiS:iitanual,
see message
labeled IMPOR'rANTregardingthe use
of gasohol in yourchain saw.
Fuel stabilizeris an acceptable alternative in minimizingthe formation of fuel
gum depositsduringstorage.Add stabilizerto the gasolinein the fuel tankor
fuel storagecontainer.Followthe mix
1R
""
i;
"
instructions
found on stabilizercontainers. Runengjne at least 5 minutesafter
addingstabilizer.;
CRAFTSMAN 40:1, 2-cycleengine oil
(air cooled)iS especiallyblendedwith
fuel stabilizer;!fyou do not usethis
Sears oil, you can add a fuel stabilizer
to yourfuel tank_
INTERNAL ENGINE
=
• Remove spark plug andpour 1 teaspoonof40:i, 2,cycle engine oil(air
cooled)throughthe spark plug opening. Slowly pul!the starter rope 8 to
10 timesto dist_bute oil.
• Replacespark plugwith new one of
recommendedtype and heat range,
• Clean air filter.
• Check entire unitfor loose screws,
nuts, and bolts. Replace any damaged,broken, or wornpads.
• At the beginning of the nextseason,
useonlyfresh fuel having the proper
gasolineto oil ratio.
OTHER
• Do not storegasolinefrom one season to another.
• Replaceyourgasolinecan if it stads
to rust.
TROUBLE SHOOTING CHART
TROUBLE
................
CAUSE
REMEDY
H
switch;..
Enginewillnot • Ignition
startorwill run • Engineflooded.
• Fuel tankempty.
onlya few
secondsafter • Spark plugnot firing.
starting.
• Fuel not reaching
carburetor.
: installnew spark plug.
Check for dirty fuel filter;clean.
Check for kinkedor splitfuel lin_
repairor replace.
• See "Carburetor Adjustments."
• Carburetorrequires
adju_t_er_t.
• N0ne
0f the
above.
• ContactSearsService,
i
= ii
• idle speed Set too high , See "CarburetorAdjustments."
or t00Jbv_.;....
• Low,.SpeedMixture
• See "CarburetorAdjustments."
requiresadjustment.
• Crariksh_lftseals wom.
ContactSears Service.
ContactSears Service.
• CompreSsionlow.
ContactSears Service.
• None of |! e above.
ii
Enginewillnot
idleproperly,
Enginewillnot
accelerate,
lackspower,
or dies under
a load.
• Move IgnitionswitchtO ON.
• See =Starting Instructions."
• Filltank with correctfuelmixture
: Airfilterdi_,
SparkiolUi=ifouled.
,_;__=-_,
• Carbd_eto_;requires
adjuStthe_{. °
fler 0_(eN_plugged.
i Coni_reSdonlow.
ExhauStporls or muf.....
, ...........
None bf.t_e above.
Engine smokes • Choke partiallyon.
excessively.
• Fuel mixtureincorrect.
° Air filterdirty.
• HighSpeed Mixture
requiresadjustment.
• Crankcaseleak;
................
L
• •
==
-:
17
o
Clean or replaceair filter.
Clean or replaceplug
and regap.
See =CarburetorAdjustments."
• Contact Seare Service.
• ContactSears Service.
• ContactSears Service.
,
J L
• Adjustchoke.
• Emptyfuel tank and refillwith
correctfuel mixture.
• Clean or replace air filter.
• See'CarburetorAdjustments."
ContactSears Service.
TROUBLE SHOOTING CHARTTROUBLE
Continued
CAUSE
REMEDY
• Fuel_'mixture
incorrect.
• Spark plugincorrect.
o High Speed Mixture
set too lean.
• Exhaustpodsor muffler outletsplugged.
• Carbon build-upon
muffler outletscreen.
• Fan housing!cylinder
fins dirty.
° Noneof the above.
Engine runs
hot.
• See uehngYourUnit."
• Replacewithcorrectplug.
See =CarburetorAdjustments.
• ContactSears Sendce.
° Clean spark arrestorscreen.
• Clean area.
• ContactSears Service.
!. Oil tankempty.
Oil inadequate
for bar and
°
chain
lubrication,
Chain moves •
at idlespeed,
. , •
Chain does
•
not move
when engine •
is accelerated,
•
•
[ Chainclatters •
Ior cutsroughly.°
_°
J•
•
•
° Fill oiltank.
• ContactSears Service.
Oil pumpor oilfilter
clogged,
Guidebar oilhole
blocked.
Idlespeed requires
adjustment.
Clutchrequiresrepair.
Chaintensiontoo
tight,
Carburetorrequires
adjustment.
Guidebar rails
pinched,
Clutchslipping.
Chain tensionincorrect,
Cuttersdamaged.
Chainworn.
Cuttersdull,improperly
sharpened,or depth
gaugestoo high.
Sprocketworn.
Chain installed
backwards.
• Remove bar and clean.
• See'CarburetorAdjustments_"
• ContactSearsService.
• See =ChainTension."
• See "CarburetorAdjustments."
=
° Repairor replace.
• ContactSearsService.
•
•
•
•
See'Chain Tension.•
ContactSearsService.
Resharpenor replacechain.
See =SharpeningChain;"
• ContactSears Service.
• Installchainin rightdirection.
Chain stops
° Chaincuttertops'n0t
withinthe cut.
tiled flat.
• Guidebar burredor
bent; railsuneven.
I° Clutchslipping
-
Chain cutsat •
an angle.
°
•
• See "Sharpening Chain."
f_::
• S_e"SharpeningChain.•
• ReplaCeguide bar.
Cuttersdamagedon
Oneside.
Chaindull on one side.
Guidebar bent or worn.
• See "SharpeningChain."
° Repair or replaceguidebar.
ContactSearsService,
if situationsoccur whichare not coveredin this manual, use carsand good
judgement.If you need assistance,contactSears Service or the CUSTOMER
ASSISTANCE HELPLINE at 1-800-235-5878.
"IR
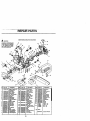
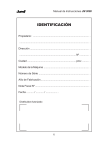
REPAIR PARTS
53
52
6I
1
47
3
19
42
15
44
Pert No.
_oo6_723
24,
530069788
(Ind. 28 & 31)
! Oil Gap Ass'y.
28, i 530049372 Oil PumpAss'y.
29.: 530016064 =Screw
Seal Block
5300192O6 Rffing- EIbow
.-'530049477
22. s_03_73
Pick-Up Tube
33. 5,,_03,'921
O_ R_er
Oil Filter
530026119
530037809
530037803
530015917
530047989
530038406
530047831
530094188
530047061
Ssoo_s_s Screw
3_.
530015611
530014949
530038227
530016149
530038264
530O15922
530029850
530015905
5,30015907
530016180
530069611
530038238
_o.
_t.
530O6¢J247 Fuel Une Kit
(Large O_,)
59_047192 Fuel Cap Ass'y.
w/Relainer
93oo_e_3Bott- Bar
530047663 Oi_-P|ckupAss'y,
42. "5300V6020
43. 5300_6132
44, 530315905
45. 530037820
48. 530019231
47. 530037799
"
t9
(Inc_.
32,33&34)
Screw
Bo_t
Screw
WormGear Sprk_g
Dust Seal
Front Handle
50.
51.
52.
53.
54.
55.
5_.
57_
58,
!59.
60,
6t,
62.
63,
530038224
530015940
530037485
530069232
E300ISB_
53OO49336
530027531
530037917
530039187
530400897
530001717
530016134
=530015920
530016O80
713617
713629
7136365
7'/36366
Not Shown
530084293
Opera(of
Manual
, ...................
,
J, =
......................
,
,
i
........
t4
,,,,,,,,,,,,_,,,,,,,
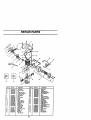
REPAIR:PARTS
,
,,
,,,,,,,,,,,
,,,,,",,
iii
t2
15
3
4
5
30
8
1
25
42
29
ReL
3.
4,
5.
6o
7.
9.
I0,
11,
_2.
13.
14.
1,5.
16o
17.
18.
t9.
21.
P_ul No.
530031163
530037793
530016101
,530O37804
530069703
53(X)1_17
530015810
53OO37806
5300_6094
530016102
53O037798
530038318
530038317
53OO3834O
53OO47566
53O069216
530019210
7185849
53O0192O8
53OO696O6
53006S604
Ref.
Bar Wrench
Foam-Air FJJter
Nut
Nr FitterHousir,g
CafOureto,"
ASS'_ Kit
(_nd. I2 & _3)
Cad). Ga_e_
_w
Ca_ Adapter
Screw
S_vew
Cylinder,,_hleld
Part No,
22,
23.
24_
25,
26.
27.
28,
29.
530015_7
5,,_047062
530047_-7
P_ton m-,g
Reta_er
Crankshaft Ass'y.
$_J & Bear_g/us'y.
,_300181_1
5300160_
530O696O8
0t_
_o
_,_o_7_
3t.
32.
,S_X)14_
S30037652
um_rCsp--H_
UmilerCap--Low
Grommet
PrUner_s_,
PrimerLine
(Small Dia)
Air Box Seal
Sped( Plug (CJ-7Y)
Gaskel
Cy_ar t_t
l_,sl_'_
Kll
(tncL22 & 23)
34.
5,300_7
"2._
37.
2O
e Hame_ Ass'_.
Fud Fitter
Heat tr_u_ator
Mutl_ Gasket
Muff',erBa¢_ Plate
Muff_rA=s'y.
'_
=.
39.
40.
41.
42.
Gasket _t
530039187:
53(;015905
530047442
95",_06606
M_er Diffuser
_j_k ArrestorScreen
Screw
IgnitionModule
S_sw
Gro=_ SWO
CI_ Brake_l
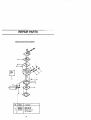
REPAIR PARTS
.....
:
.........
_!_
=
:,
-C:arbuFetor,&s_emblyKit Numbe r #_069703
KIT
i
Descrlptlon
1.
530038318
Llmiler
Cap--High
2,
530038317
Lfmiter
Cap-Low
3.
S3(X)353S9
Cafoutetot
(KIT
Repair
--=Contents)
21
Kit
ii
'iiii_'''''
.....
_
:
::
Garanffa
22
Regias de Seguridad
Montaje
Uso
Mantenimiento
22
26
27
33
Servido y Ajustes
Almacenamiento .
36
38
Tabla Diagn6stica
Repuestos y Encargos
40
Contratapa
GARANTIA COMPLETA DE UNAi_o PARA LA SIERRA
DE CADENA A GASOLINA CRAFTSMAN®
Por un afio a contarde la fecha decompra, siempreque esta Siena de Cadena a Gasolina
Craftsmanest_ mantenida, lubdcada y ajustadade acuerdoal manualde! usuado,Sears
reparardgratuitamentecualquierdefectode materialeso manodeobra.
Esta garant_'aexduye la barra, la cadena, la bujfa y el filtro de aim, quesonartfculos
fungibtes y se gastan durante el funcionamiento noffnaL
Si se usa esta Sierra de Cadena a Gasolina para prop6sitoscomercialeso de a/quiler,esta
garantia tendrd vaEdez de 30 dies contadosa partirde la fecha decompm.
EL SERVICIO BAJO GARANTIA ESTAA SU DISPOSICION CON SOLO DEVOLVER LA
SIERRA DE GADENA At. CENTRO DE SERVICIO SEARS MAS CERCANO EN LOS
ESTADOS UNIDOS.
Esta gamnlfa le confiera derechosjurfdicosespecificos;aderndsud. podrdtenerob'os
. derechosque vadan entre estados.
Sears, Roebuck and Co., D/'817WA, Hoffman Estates, IL 60179
ADVERTENCIA" Desconecte
siempreel cable de la bujia al reparar
el aparato, excepto en el casode
ajustesal carburador. Debido a que las
sierras de cadena son instrumentos
para cortarmadera a alta velocidad,el
uso descuidadoo indebido de esta
herramientapuede causar graves
heridas.
PIENSE ANTES DE PROCEDER
Pmtecci6nde Oidos
A"e"_
Casco Duro
Protecci6nde
Ropa
Aitmta_--"_ _
Guantesde
J_-ue;_o A!'=I_
usolndus_
Zapatosd_e#' _
"_4_f
INIlllll
• Limiteel usode la sierra a aquel/os
usuariosaduttos que comprendany
° Use equipoprotector.Siempreuse calzado
puedan implementartodas las
de se.gu".ndad
conpuntasde aceroy suelas
precauciones,raglas de seguridade
anti-deslizantes;ropaajustadaal cuerpo;
instruccionesde uso que se encuentranen
guantesgruesosde usoindustrial
este manual.
anti-deslizantes;protecd6nde ojostales
como
galas
deseguridad
quenosela
cara;
casco
duro
aprobado; y barrerade
MANTENGA
BUENAS
LA
SIERRA
CONDICIONES
EN
DE
sonido(taponesde ofdou orejeras
anti--sonldo)para protegerla audici6n.Los FUNClONAMIENTO
Ueve la sierra de cadena a un proveedor
que usansierrasde fuerza habibJalmente
de servicioautorizado para que hagatodo
deberdnhacerserevisarla audici6n
serviciomenos
aqueliosprocedimientos
frecuentemente Yaque el ruidode las
iistadosenla secci6nde mantenirnientode
sierrasde cadenapuede dafiar losofdos.
este manual.
Mantengael cabellopor encimadelnivel • Asegtlresede que la cadena se detenga
de loshombros,a.tdndolopara tal efectosi
por compietocuandose suelta el gat_flo.
fuere necesario,
Para hacercorrecciones,vea los =A_ustes
• Mantengatodaslas pades del cuerpo
-_ Carbur_dof'.
alejadasdela cadanasiemprequeel motor • Mantangalas manijas secas, limpiasy
est6 enfuncionarnlanto.
fibres de aceite o de mezcJade
• Mantengaa losniSos,espectadoresy
combustible.
animalesa una distanciam/nima de 10
• Mantenga las tapas y losfijadoresbien
metros(30 pies)del drea de trabajoo
tijos.
cuandoestdhaciendoarrancar etmotor.
• Use exclusivamentelos accesodos y
• No levante ni oper_ la_ssierrasde cadena
repuestosCraftsmanrecomendados.
cuandoestdfatigado,enfermo,ansioso osi
Nuncamodifiquela sierra.
hatornadoalcohol,drogaso remedios.Es
inprescindibte
que _Jd.est_ en buenas
MANEJE EL COMBUSTIBLE CON
condicionesfisicas y alerta mentaJmente.
EXTREMO CUIDADO
Si ud. suite de cualquiercondici6nque
• No fume mientrastrabajacon el
puedaempeorarconel trabajoarduo,
combustible ni cuandoestd haciendouso
ases6reseconsu mddico.
de la sierra.
• Noponga enmarcha la sierra sintenerun
drea de trabajodespejada, unasuper_cie • Eliminetodaslas posiblesfuentes de
estableparapararse y,si es_ derrubando chispaso llamas en las dreas donde se
mezcla o v_erteel combustib/e.
drboles,un carninopredeterminadode
• MezcJey viertael combustibleafuera y use
retroceso.
siempre recipientsaprobadopara
combustiblesy marcadocomotaL Limpie
USE LA SIERRA
OBSERVANDO
todoslos den-amesde combustibleantes
TODOS
LOS PROCEDIMIENTOS
de ponerel aparato en man:ha.
DE SEGURIDAD
* AJ_jesea por Io menos 3 metros (10 pies)
° Mantengatas dosmanos en las manijas
del lugarde abastecimientoantes de poner
siempreque el aparato est_ en marcha.El
elmotoren marcha.
usodel aparatoconuna _ola rnano puede • Apagueel motory deje que la sierra se
causargravesheridasal usuado,a los
enfrfeen un lugarlibrede substancias
a_sistentes
o a losespectadores.Las
combustiblesy no sobre hojassecas, paja,
Sierrasde cadenae_
diseSadaspara
papel,etc. Retire la tapa lentamentey
que selas usecon las dos rnanos entodo
reabastezcael aparato.
momanto.
. Guardeel aparato y el combustibleen un
• Haga usode la sierrahe cadena
espaciofresco, secoy bien vent_ado
r_nicamente
en lugaresexteriorasbien
dondelosvaporesdel combustible no
ventilados.
puedanentraren contactoconchispasni
• No hagausode la siena desde las
llamasabiertas provenientesde
escalerasportdtitesni losdrboles,a menos
termotangues,rnotoreso interruptores
quetengael entrenamientoespecfficopara ' el_ctricos, calefactorescentmles,etc.
hacerfo.
• Asegdresede que la c_dena noyaya a
PROTEJASE
CONTRA
LAS
hacercontactoconningdnobjetoantesde RECULADAS
porteren marchael motor.Nuncaintents
hacerarrancarla sierra conta barra gufa
ADVERTENCIA: La Reculada
dentrode uncode.
• No apliquepresi6na la sierra al finalde los
caderiaen movimientoentra en
cortes. Aplicarpresi6npuede hacer clue
pierdael controlal compietarseel corte.
contactocon algLinobjeto en ta en la
- Pare el motorantes de apoyarla sierraen parle superiorde la puntade la bara
ningdnlado.
gufa puedecausar que la cadena entre
, Cuandotrasladela sierra en la mano,
al material y se detengapor un
hdgalodnicamente conel motorparado.
Rotacionalpresultadoes
uede acontecercuando
la
instants.El
una reacci6n
Ll_velaconel silencladorapartadodel
cuerpoy la barray cadenahacia at_s, con inversa,a velocidadde reldmpago,que
hacerecular la barra gu_ahacia arribay
la barra depreferenciacubierta potuna
haciaatrdshacia el usuario.
funda.
Trayectoriade I_ • Empiecey efecttle la totalidad de
cada cortecod el aceleradora fond'o.
Si la Cadenase est&moviendoa una
vel0cidadmenor que la m_!ma, hay
rods probabilidadde que Ia sierra
recule.
, , _J_,:,._
° Use cuidadoextreme al entrarde
nuevo en un corte ya empezado.
Despejeel Area de Trab_o
La Reculada per Presi6ny la Impulsi6n
acontecencuando la cadena se
detienerepentinamenteporqueest&
apretada, atrapadao en contactocon
alg0n objetoextraSoa la madera. Esta
detenci6nrepentinade la cadena tiene
come resultadouna inversi6nde ia
fuerza de la cadena usada para cortar
madera y causa que la sierra se mueva
en sentidoopuestoal de la mtaci6n de
la cadena. La Reculada per Presi6n
proputsala sierra directamente hacia
arras en direcci6nal usuado.La
Imputsi6n aleja la sierradel usuario.
REDUZCA LAS
PROBABILIDADES DE
RECULADA
° Est_ conscientede la posibilidadde
reculada. Teniendouna buena
comprensi6nb_sica de la reculada,
ud. podr&reducirel elementode
sorpresa que contribuyea los
accidentes.
• Nunca permitaque la cadena en
movimientotoque ning0nobjetoen la
con la punia _e la barra (cortes de
i taladro),,
No:intente hater :_ii
Cortesempezando
: .-_ .....
Tenga cuidadocon troncos que se
desplazan y ¢0n las demds fuerzas
que podfian ce,i'rarun cortey apretar
ta cadena 0 bie_ncaer soSreella.
• Use la BarraGufa_Reducidorade
Reculadas y:la!CadenaMinimizadora
de Recula_la_iri_6mendadaspara su
sierra.
. ,,, ,.
Evite ia nec_ia_a per Presi6n:
Mant_ngase Si_mpreal tantode toda
situaci6nu obStrucci6nque pueda
apretar la cadena en la partesuperior
de la barra 0 detener la cadenade
cualquierfo_na_.;
..
No
corte m_sque uncon
tronco
a la vez.
AI seccionartron'€os
code
ascendiente,no ti.ierza la sierraai
sacar la ba_a:._el code.
Evite la impulsi6n° Empiece los cbrtessiemprecon el
motoracetemdOa rondo y la caja de
la sierraap0yadaen lamadera.
° Use cuSasde i01dstico0 de madera,
no de metal, p_Pa!mantenerabiertoel
code.
:_-:"_:"-_:_
"'
MANTENGA EL CONTROL
Pdresehaciala izquierda
delasierra
Elpulgarpot ' : •
debajodela manija
• punta de la barra guia.
Mantenga el drea de trabajolibre de
obstruccionescomo per ejemplo
otrosdrboles, ramas, piedras,cercas,
tocones,etc. Elimine o evite toda
obstrucci6n que la cadena pueda
Nunca invierta.!apbsici_nde las manes
tocar mientras est& cortando.
• Mantenga ta sierra afilada y con la
° Sostenerfirmement_con las dosmanesle
tensi6n correcta. Las cadenas con
ayudar& a mantener _elcontrolde la sierra.
Noafloje. Mahtengala manederecha
poco file o fiojas|ncrementan la
envolviendototalmentela man_atrasera,
probabilidadde reculada.Siga las
instrucciones del fabricante para afilar sea ud. derechoo zurdo.Sostengala
manijadelanteracon la mane izquierda,
y efectuar mantenimientode la
cotOcandoel pulgardebajodela rnanijay
cadena. Verifiquela tenst6na
rodeando la manijaconlos declos,
intervalosregulates conel motor
Mantengael braze izquierdototalmente
parade, nunca en marcha.Aseg0rese
extendidocon el Cod0fijo.. ; ' :
de que las tuercas de laabrazadera
• Coloque la mano izquierda en la de la barra est_n ajustadas
manija defantera, de mode que quede
tirmemente,
en Ifnea recta con la mane derecha
24
en la manilatrasera,cuandoest_
haciendocortesde seccionamiento.
Pdrese levemente haeia la izquierda
de la sierrapara evitarque el cuerpo
est6 en linea directacon lacadena.
BarraGufaSimdtrica
Reducidora
de
Reculadas.... J""'\zonade
....
'
I
_
____..._"=-----
"_
Peligto
PuntadeRadio
Pequeiio
_gualmenteewe
Ios_s
pies._
8arraGufaSirn_t_caI"'_zo.=_
: Pdrese
con el peso
distribuido
No se exfienda_::l_s.t_mente. La
sierra puede impuls_id_Oempujadoy
Po_m
ud. puede perd_r el equilibdoy el
controlde la sierra....
......
' _ _
PuntadeRadioGrande
° No corte arribadel nivelde los
• LasCadenas Minimizadorasde
hombros,puedstp_que.tpmadiffcil
Reculadashan satisfecholos
mantener el cont,'01de lb.siena.
requisitosde rendimientoen pruebas
con una muestra representativade
DISPOSITtVOS
DE SEGURIDAD
sierrasde cadena con
CONTRA LAS RECULADAS
desplazamientode menos de 3,8
ADVERTENCIA: Lossiguientes
pulgadas,como se especificaen
ANSI B175.1.
dispositivoshan si_lo_incluidos
en la
sierra para ayudara reducir el riesgo
CadenaMinimizadora
deReculadas
de reculadas;sin embargo,tales
,_/Marcedor
de Profundidad
Peffilado
implementosno pueden eliminar
_.,_p--Eslab6nProtector
Alargado
totaimenteesta reacct6npeligrosa.No
€,
_
Desviaia Fuerzade
se conffe exclusivamenteen los
_
Reacci6n
y Permitequela
dispositivosde seguridad.Ud. debe
MaderaEntre
seguirtodas iasprecaucionese
Gradua/mente
a laCuchilla
deReculada
instruccionesde seguddadpara ayudar CadenaconAltoPotencial
a evitar ias reculadasy las demds
"_a="
PuedeObstruir
fue_as que pueden causargraves
heddas.
Material
• Protectorde Mano, diseSadopara
reducirla probabilidadque su mano
AVISO DE SEGURIDAD: El estar
izquierdaentreen confactocon ia
expuestoa/as vibracioensa tray,s del
cadena, si la mano se desprendede usopmlongadode herramientasde
la maniladelantera.
fuerza a gasolinapuedecausar da5os
° La Posici6nde las manijasdelantera a los vasossangufneoso a los nervios
y trasera, disefiadascon distancia
de losdedos,las manos y las
entre las manijasy =enlfnea"la una
coyunturasen aquellaspersonasque
con la otra. La separaci6ny la
tienenpmpensidada los trastomosde
colocaci6nen ifnea que este disefio la circulacl6no alas hinchazones
provee se combinan para dar
anormales. El uso prolongado en
equilibdo y. resisten_ia para contmlar
tiempo ffio ha sido asociado con daRos
la propuls=6n de la Sierra hacia el
a los vasos sangufneos de personas
usuado si acontece una reculada,
que pot otra parte se encuentran en
• Barra Guia Reducidorade Recu/adas,
perfecto estado de salud. Si ocurren
disetiada conpuntade radiopequefio que s_ntomas tales como el
reduceel tama_o de Ib zona de peligro en entumecimiento, el dolor, la fatta de
la punta de la barra. Este tipo de barraha
fuerza, los cambios en el color o la .
demostradoque reduce significativamente
la cantidad y la seriedad de las recutadas textura de la piei o faffa de sentido en
cuandoha sidoe_inado de acuerdo con los dedos, las manos o/as coyunturas,
ANS! (AmericanNationalSt_hdards
pare de usar esta m_iquina
Institute, !nc.) B_75_ _
inmediatamente y procure atenci6n
m_dica. Los sistemas deanti-vibraci6n forestadas federales, rodslos estados
no garantizanque se eviten tales .
de Ca/ifomia, Idaho, Maine, Minnesota,
problemas. Los usuarios que hacen
Nueva Jersey, Oreg6n y Washington,
uso continuo y prolongando de las.
requiemnpor ley que muchosmotores
herramientas de fuerza deben fiscalizar de c0mbusti6nintema est6n equipados
alentamentesu estadoffsico y el
con rejillaantichispa Si usted usa una
estado del aparato.
sierra db cadena dondeexisten tales
FRENO DE CADENA Si esta sierra ha
reglamentos,usted tiene la
de usarsepara el tumbadocomercial
responsabilidadjuffdicade mantener
de drboles,ud. deber_ encargare
estaspiezas en correctoestsdo de
instalar un freno de cadena para
funcionamiento:De Io contrariO,estard
cumplir con los Regfamentos Federales
en infracci6nde la ley. Veals secci6n
del OSHA para el Tumbado Comercial
de RESPONSABILIDADES DEL
de Arbotes. Entre err contacto co'nsu
USUARIO.
't _ "
Concesionado de Servico Autorizado o
PADRONES:
Este
sierrade cadena
Ilame at 1-800-235-5878.
cottsta
en
la
!istade
Underwriters
REJILLA ANTICHtSPA: Su sierra
Labota{0ries;Inc., de acuei;d0a los
viene equipadacon silenciador
RequisitosNacionalesde Seguridad
lirnitadorde temperaturay con rejil!a
Estadounidensespara Sierras de
antichispa que curnplecon los
requisitos de los C6digosde California cadenaa Gasolina (ANS!
B175,1,199!): - _
4442 y 4443. Todaslastierras
,
CONTENIDO DE LA CAJA
• si necbsRa
ayudao sifaltanpiezas0
Use la siguientelista para verificarel
encuentra
ptdzaSdafiadas,
favorde Ilamar
contenido
al t_.800-235-5878
• Modelos 351142, 351062.
AVISO: Es n6miai oil.el goipeteo del
• Sierra de cadean (completamente filtro de combustibleen el tanque vacfo.
montada)
Su spamto ha sid0:puestoa pruebaen
• Herramienta de ajuste de Is Is fdbricay se teha ajustsdo con
cadena
precisi6n el catb0rador,c0mo
• Aceite para motores de 2 tiempos resultado,es p0sib!eque se sienta un
(No se incluye aceite lubricantede o!ora gasolinao que se encuentre una
barra )
gota deresiduo de aceiteo =:
• Modelo 351062 finicamente,
combustilbeeri el silenciadora I
• Estuche
desempacsr el aparato.
• Cadena de repuesto
MONTAJE
• Verifique
queno hayapiezasdafiadas.No El
aparato vier_ecompletamente
usepiezasdaSadas.
armado y no hay pecesidad de
m0ntaje
26
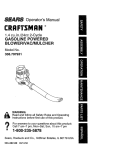
CONOZCA EL APARATO
LEA ESTE MANUAL DEL USUARIO Y LAS REGLA8 DE SEGUR1DADANTES
DE USAR LA SIERRA DE CADENA. Compare las ilustracion_s
consu aparato
para familiariza_e,cod|a ubicaci6nde losvarioscontmlesy ajustes.Guarde este
manual para uso f_ur_
Herramienta
de Ajuste
de laCadena
R
--_"
ManilaDelantera
Protector
deMano
S_
_/_ L_
Cadena• _
_
.
Interruptor
/ON/STOP
_Bombeador
TapaclefTanque
de
Lubricante
de Barra CajadetArranque TapadelTanquede
Combustible
TapadelCilindron
_
-r_k^
._^M_rck_
,!
/"
Mea_rc,_
ii_=_u_
=; -_
| ]
Bordesdeco_te protundidad_
LentaAcelerada_ _
J
f_
Trase
_-_,,/_#'--f--"===_,
"X_Tuercasdela
!
_!_
_o_il_
,_ i
!
"Abrazaderadela Barra Acelerador Cebador_aptad deCadena
BarraGu=a
Abrazadera
delaBarra
TRABA DELACELERADOR
aceleradory el gatillomientras
Es necesario apretarprimerola traba
manliene oprimidala trabade marcha
lenta acelerada.
del acelerador para poderaccionarel
ace|erador. Este dispositivoprevieneel TENSION DE LA CADENA
accionamiento accidentaldel
Es normal que lascadenasnuevas se
acelerador.
estirendurante los primeros30 minutos
de uso. Deberd verificarsela tensi6nde
TRABA DE _ MARCHA LENTA
la cadena freouentemente.Vea Tensi6n
ACELERADA
de la Cadena en la seccidnde Servicio
La traba de la mam_ lenta, acelerada
y Ajustes.
mantiene el gatiflo,e_.!_p_6_;ici6n
de
ANTES DE PONER EL MOTOR EN
arranque, permilie_doaSr:Sostener
la
MARCHA:
maniladelantera y tironearla soga
ADVERTENCIA: Lea toda la
durante el arranque. Accioneta traba
de marcha lenta aceleradade ia
informaci6nsobreel manejodel
siguente manera: Apretela tra_a del
combustibleen la secci6nde reglasde
acelerador y iuegoaprets el g'atillo
seguddadde este manualantes de
acelerador.Con el aceleradorapretado, empezar. Si no comprendela
optima la traba de marcha lenta
informaci0nsobreelmanejodel
enmhH_;tihl,=
nn irtf==n!'_ _h=_f=r,o_'_,
aparato. Procureayuda de alguienque la separaci6n y ia formaci6n de _cidos
durar=teel almacenamiento.La
comprenda la informaci6no/lame al
gasolineacfdica puede daSar el :
_
te_'_fono
de ayuda al consumidorai
1-800-235-5878.
sistema de combustibledel motor :
ACEITE PARA BARRA Y LA CADENA duranteel almacenamiento...
Pare evitar promblemascon elmotor,
El lubricadorde la c_.denaprovee
deber&vaciarse el sistema de i
lubrfcaci6ncontinua ala cadena y ala
combustibleantes de almacenar el
barra gufa. No se olvide de llenar el
aparato por30 dfas o m&s. Vacfe et
tanque de aceite para barra siempre
tanque de combustible,p0nga el motor
que lleneel tanque de combustible"
(Capacidad=6,8ft.oz.). Pare obtener la en marcha y d_jelo en marcha haste
que las lfneas de combustibley el
m_:ima prolongaci6n de la vida de la
carburadorquedenvacfos, Cuando
bara y la cedena, recomendamos que
vaya a usarel aparato nuevamente;
use el aceitepare barras de sierra de
use combustiblefresco. Vea las
cadena Craftsman. Si el aceite
instrucciones de ALMACENAMIENTO
Craftsmanno estd dispondible, puede
pare obtener m&s informaciones.
usarse un aceiteSAE 30 de buena
Nunca use productosde limp.iezade
calidad haste obtener el aceite marca
motor o carburaCforen el tanque de
Craftsman. La cantidad de lubdcaci6n
es medidaautomziticamente durante el combustible ya q_e haced0 puede
provocai"daSos permanentes.
funcionarnientode la sierra. La sierra
Vea la secci6nde ALMACENAMIENTO
user&m_s o menos un tanquede
para rods informaciones.
aceite pare la barra por cada tanque de
PARA PARAR EL MOTOR
combustible.Siempre Ilene el tanque
de aceffe de la barra cuando llene el
• Coloqueel interruptoren la posici6n
STOR
- "
tanque de combustible.
•
Si
e!
motorno
se detiene, fire la
ABASTECIMIENTO DEL MOTOR
pedtladel cebadora su mdxima
Este motor est_ habiiitadopare
extensi6n.
funcionar congasolinesin plomo.
PARA PONER EL MOTOR EN
Antes deuser,se deberd mezctar la
MARCHA _/
gasolinecon un aceite de buena
MOTOR FRI00 MOTOR CALIENTE
calidadpare motores de 2 tiempps
enfrfadosa aire. Recomendamosel =
DESPUES DE QUEDAR SIN
aceitemarcaCraftsman.Mezcle la
COMBUSTIBLE
gasofina con elaceite en la proporci6n • Llene el tanquede aceite de barra
de 40:1: (Se obtieneuna proporci6nde
usandoel _.ceitec0rrespondiente.La
40:t mezclando 3,2 onzasde aceite
sierra usardaproximadamenteun
con cadagal6n de gasolinasin plomo).
tanque de aceitede barra porcada
NO USE aceitepara autom6vilesni
tanque de ¢ombpstible.
pare barcos. Estos aceitesdaSar_n el
• Prepare el moto_apretando el
bombead0i"tentamente seis veces.
motor. AI mezclar el combustible, siga
las instrucciones impresasen el
i Bornbead0r
_L
recipiente. Una vez que haya aSadido
el aceite ala gasolina, agite el
recipiente brevemente pare asegurar
que el combustible est_ completamente
STOP "
i_/_j_
mezclado. Lea siempre y siga las
reglas:de seguridadque tienen que ver • conecte el encendidocolocandoel
con el combustible antes de abastecer
interruptorer_ON.=
el aparato.
• A_ive el cebador tirandola pedlla de!
cebador hastasu mdxima extensi6n.
IMPORTANTE
Cof0qUeia sierraen el suel0.
La experienciaindicaque los
combustiblesmezcladoscon alcohol
Sostei_gala manija delantera con la
mano izquierday coloqueet pie
(losItamados gasoholo los que
derechoatravesandoel interior de la
contienenetanolo metano!) pueden
manija trasera.
atraer humedad,Io que puede causar
En°end °!'
28
• AsegSreseque el cebadorest_ en la
pbsici6nOFF.
• Con la sierraen el suelo, sujetela
t
_
manija delanteracon la mano
izquierday coloqueel pie derecho
Furl
atravesando el interiorde la manija
• Active la marcha lenta acelerada
trasera.
apretando la traba del acelerador con • Sujete la manijade iasoga de
la mano derech_,LbegO;aprete el
arranque firmemente y tironee de la
soga r&pidamente para hacer
gatilloaceteradory mant6ngalo
arrancar el motor..
apretado.Con el pulgaroptimala
traba de ia marcha ienta acelerada y • Aprete y suelteel acelerador para
mant_ngala oprimida.Por dltimo,
dejar el motor en marcha lenta.
suelte et acelerador.
Manijadela Sogade Arranque
= NOAPRETEELACELERADOR
duranteel
arranque;
de ottomodo,ser_necesado
activarnuevamente
I_trabadela marcha
lentaacelerada.
AVISO: AI tiror_ar de la soga de
arranque, nuncause la extensi6n
completa de la soga. Tampoco
permitaque la soga se rebobinesola;
ai conttario,sostengala man|jay
haga que se rebobinelentamente.
• Tironee de la soga con ]a mano der- MOTOR DIFiOIL DE PONER EN
echa hasta que el motorintentearMARCHA O MOTOR AHOGADO
rancar o 5 veces. Luego empuje la
El motor puedeestar ahogado si no se
pedltadel cebador hasta ta posici6n pone en mamha despu_s de 10 tirones
Off. ContinUetJroneandode la soga
de la soga. Se puede librar et motor
ahogadodel exceso de combustible de
hasta que el motorarranque.Vea la
ilustraci6n.
la siguiente manera:
• Si ]a temperaturaambientees supe- • Active la traba de marcha lenta
acelerada_
rior a 5°C (40°F), deje el motoren
,
Verifique aue el interruptor est_ en la
marcha unos5 segundos;despu_s
posici6n ON.
aprete y suelte el acelerador para
• Coloque la periltadel cebadoren la
dejar el motoren marcha lenta.
posici6n OFF.
• Con ta temperaturaambiente pot de• Con la sierra en el suelo, sujete la
bajo de 5°C (40°F)',deje el motor en
manija delantera con ta mano
marcha entre 30 segundosy un miizquierday co!oque el pie derecho
nuto para que se c_iente. Pot _ltimo
por el intedor de ta manija trasera.
aprete y suelte el aceleradorpara
• Sujete la manija de la soga de '
dejar el motoren marcha lenta.
arranque y tironee la sogafirmemente
° Para parar el motoF',coloque el inpara hacer a_rancarel motor.Si no
terruptoren STOP?
consiquearrancarel motor,repitael
procesohastaque el motorarranque.
El arranquetalvez requiemmuncos
tirones de la soga, dependiendode la
cantidadde combustibleque estd
ahogando el motor.Si el motoraun asf
PARA PONER EN MARCHA EL
no a_anca, yea la TABLA
MOTOR CALIENTE
DIAGNOSTIGA o Uameal
NO USE el cebador para poner en
1-800-235-5878.
: mamha el motorcaliente;de Io_,
SUGERENCIAS PARA EL USO
contrarioel motorse puede ahogar o
CORRECTO DEL APARATO
p0nersediffcilde hacer arrancar.
• Verifiquela tensi6nde la cadena
. Coloque el interruptoren ON.
antes del primerusoy despu_sde un
• Accione ta traba de la marcha lenta
mir_utode funcionamiento. Vea
acelerada.
:.
" :
Palancadel
Cebador
Tensi6n de la Cadena en fa secci6n
de Mantenirneinto.
• CortemaderaOnicamente.No cortemetal,
pl_istico,ladriUos,cemento,otros " •
materiales deconstrucci6nque noseen de
madera, etc.
_
:_
firmeza entodo rcornento. Estudie/as
condiciones naturales que puedan
causer que el _rbol caiga en una
direcci6n determinada. Entre las
condiciones naturales que pueden
causer que el arbot caiga en una
objetoajeno. Inspeccionela sierray repare
i 1aspiezasseg_n
are la sierrasi _a¢adeha
la necesldad.
tocacualquier
° La direcci6n_flavelocidaddel
direcci6n
determinada, se encuentran:
viento.
Mantengata cadenafuera de la erena y la ° Eldngulo de mclinac_6n
deldrbol. Et dngulo
tierra,La menorcantidedde _erre desafila
de 10s_rboles a vecesnose i_otadebidoal
r_pidamente tas c_denes e incrementala
declive del terrei!oo a terrenodesparejo.
Useplaneo cordeldesondepare
posibilidad
dereculades.
""
determinerladfrecci6ndela inclinaci6n
del
* CortevariestroncospequeSoscomo .
zirboL
p_ca, usandola siguientet_cnica,pare
• EldrboJes rodsp_sadoo tienomuchorods
acostumbrarse
el manejode tasierra,
antesde empezar
un proyectode grandes remasdeun ledo.
dimensiones.
° Arbores
y obstdculo
sen derredor.
, Acetere el motor al rn_iximo antes
Vefifique si hay porciones
de empezar a cotter apretando el
descornpuestasiopodridas.Si el tronco
gatilto acelerador a fondo.
estdpodrido,puedepartirse
° Empiece el corte con el bastidor de repentinamenteSinaviso y caer sobre
el usuario. "= '
la sierra apoyada contra el tronco.
- Mantenga el motorcon acelerador a Aseg6rese de que haya suficiente
fondo constanternente mientras
espacio pare ia cafdadel _rboL
corta.
Mantenga una distancia equivalente a
• Deje que la cadena haga todo el
dos veces y rcedio del largo del _rbol
trabajo de cortar;no use rn_s que
que est&cortandoentre el _rbol y la
una muy ligerapresi6n hacia abajo. personarn_s cercana u otros objetos.
° Suelte el gatillo acelerador
El ruido dei motorpuede impedir que
inmediatarnente at terminarde
se escuchen las advedenciasgritadas.
codar, dejando que el motor
Retirela tierra,las piedras,la corteza
funcione a marcha lenta. Si
suelta,los clavos, tas grarnpasy el
mantienela sierraen marcha con
alambreque pueda haberen el drbol
acelerador a fondo sin ester
en el lugar del code.
codanclo,puede causardesgaste
innecesano.
_X_e#.
e
Plahlfiqueunarata
• Pare no perder el control cuando se
_e_ predeterminede
y despejada
haya completado el corte,no le
"f=%
de retroceso.
ponga presi6n ala sierraal final del
.... [
].-==.,._- Direcci6n
de
corte.
"
_
laCafda
45
°
,i
. Pare el motor antes de apoyar la
sierra al finalizar un corte.
TECNICAS PARA TUMBAR
ARBOLES
ADVERTENCIA:
Vea que no haya
ramas rotas o muertas que podrfan
caerle encima mientras coda,
causando heddas graves.No code
cerca de ed_cios ni cables el_ctdcos si
no sabe la direcci6n de turnbado del=
_rbol, ne de noche ya queno podr,_ ver
bien, ni durante mal tiemp0 Corno Iluvia,
nieve, o vientos fuertes, etc;
Planifique la operaci6n de code
cuidadosamente por adelantado.
Despeje a! &rea de trabajo. Ud. precise
un &rea despejada en todo el contomo
del &rbo! donde pueda pisar con
PARA TUMBAR ARBOLES
GRANDES `_
(con di_metrode I5 cm (6 pulgadas)o
m_s)
Se usa el m_todode cortede muesca
pare los _.rbo!esgra_des. La muesca
es un corte en el lado del _irbolhacia el
cual se desea que caiga.Despu_s de
hacer el corte de tumbadodel lado
opuesto_:el
_rbol tendr_ila tendenciade
caer hacia el lado en que se ha hecho
et cortede rnuesca;
AVISO: si ei _irboltiene rafces
grandesde apoyo, retfrelasantes de
hacer la rnuesca.
3O
CORTE
DEMUESCA
YTUMBADO unmontacargasa cable,un aparejode
DELARBOL
poleaso untractorpara bajado. No corte
ca_dosconla
- Haga
elcode
demuesca
cortando
primero losdrbolesparcialmente
laparte
superior
delamuesca.
Haga
que sierra.
el corteatravieseun terciodel anchodet
tronco.Luegocomplete el corte de muesca
cortandola partede abajo de la muesca.
Vea la ilustraci6n-Una!vez:completoel
corte de muesca,retire!a curia de madera
del _irbol.
"
o Despu_sde reflradala cuda de madera,
del lade opuestoal cortede muesca haga
el cortedetumbado. El cortede tumbado
debe quedar a 5 cm (2 pulgadas) mds
arribaque el centredel corte de muesca.
Esteprocedirniento
dejard suficiente
maderasin cortarentre el code de
tumbadoy la muescapara formar una
bisagra. Esta bisagraiayudar&a evitarque
el drbol caiga en la di_ecci6nequivocada.
Corte final aqui
Primertorte
Mues_
Segundg,S
La bisagrasostienee! _ool en el tcoSny
ayuda a controlarla cafda
Abertura det
corte de tumbado
Cierre de
la muesca
AVISO:
Antes de completar el
tumbado, use cu_as para abrir el corte,
cuando sea necesado, para controlar la
direcci6n de la cafda_ Use cuSas de
madera o de pldstico,_pero nunca de
acero o de hierro, para evitar que !a
sierra recule y para evitar da5os a la
cadena.
• Est_ alertaa losindiciosdeque el drbol
est_ percaer: los cm_dos_el_
ensanchamiantodelcortede tumbadoy los
movimientosde las ramas supedores.
° En et instanteenque el drbol comienzaa
caer, pare la sierra,ap6yela en el suelo y
retrocedardpidamente,per la traTectoria
de retrocesoprevfsta
_
• Tenga extremecuidadocon los _rboles
parciaJmente
tumbadosque tienen apoyo
precario.Cuandoel drbol no cae
CORTE DE UN ARBOL TUMBADO
(SECCIONAMIENTO)
El t_rmino seccionamiento significa
cortar un drbol tumbado en secciones
del largo d_seado.
ADVERTENCIA:
No se pare encima
del tronco que estd siendo codado.
Cualquier parte del tronco puede rodar
haciendo que el usuario pierda el
equilibrio y el control. No se posicione
cuesta abajo del tronco que est_
siendo cortado.
Puntosimportantes
• Cortednicarnente
un troncoa la vez.
• Code consumocuidadola madera
astiJlada.La sierrapuede arrojar pedazos
punteadudosy filosos hacia el usuario
• Use un cabaJletepara cortar troncos
pequeSos.Nuncapermitaaotra persona
quesostengael troncom_entrasud.corta
ni sostengael hence conla piema o el pie.
• No codeen lugaresdondehaya troncos,
rarnasy rafcesentrelazadas.Arrastrelos
troncosbasraun lugardespejadoantesde
cortar/os.
TIPOS DE CORTE QUE SE USAN
PARA EL SECCIONAMIENTO
ADVERTENCIA: Si la sierra queda
apretada o atascada dentro del tronco,
no intente sacada a la fuerza. Puede
perder el control de la sierra, causando
heridad o da_os al aparato. Pare la
sierra, martille una cuSa de pl_stico o
de madera en el corte hasta que la
sierra salga f&cilmente. Ponga la sierra
de nuevo en marcha y col6quela
cuidadosamente de nuevo en el code.
No use cuSa de matal. No intente poner
en matcha la sierra de nuevo cuando
est_i apretada o atascada en un tronco.
Use unacudapara sacarla sierra atascada.
APAGUEla sierra y use una cuSade
maderao de pl_st_co
para abrir el tajo.
Corte Descendiente empieza desde el
lade superior de! tronco con la parte de
abajo de la sierra apoyada contra el
tronco; haga una lave presi6n hacia
_h_i_
SECCIONAMIENTO
USANDO
Corte descendiente Corte ascendiente TRONCO O CABALLETE DEAPOYO
• RectJerdequeet primercorte siemprees
det !adOpresionado del troncoo(Vea en la
ilustraci6nquesigue.el primem y Segundo
code.)
"_
"
• B primercorted4ber_ extendersepor 113
del didrnetro del tronco.
• Terrninepot el seguncocode.
Corte Ascendiente empieza desde el
lado inferior del tronco con la parte de
Con caballetecomoapoyo
ardba de la sierra apoyada contra el
2do corte
tronco; haga una.leve fuerza hacia
arriba. Sujete la sierra firmemente para
F
mantener el control. La sierra tendrd la
tendenoia de empujar al usuario hacia
atr_s.
ADVERTENCIA:
Nunca invierta la
sierra para hacer codes ascendientes.
No se puede controlar la sierra de esa
. -_lercode
forma.
Haga siempre el primer corte del tado
del tronco que estzi bajopresi6n.
PrimerCOdedel ladodeitroncobajopresi6n
Segundo_de-___
PARA CORTAR RAMAS Y PODAR
ADVERTENCIA:
Nunce trepe a los
drboles para c0rtar ramas o para podar.
No se pare sobreescaleras,
plataformas, troncos ni en ninguna
posici6n que podrfa causade que
pierda el equitibrio o el control de ia
Primer cortedel lado deltroncobajopresi6n sierra.
SECCIONAMIE_O
SIN APOYO
• Haga el cortedescendienteatravesando
• Tenga cuidadocon!as ramasdelgadas
un terciodel ddmetro.
bajo presi6n El matedal de pocodi_metro
• Haga rodarel troncoy termineconotto
puede enredarse en I_ cadena; dandoun
cortedescendiente.
latigazoal usuari60 haciendocluepierdael
• Tengacuidadoespecialmenteconlos
equilibrio.Use extr_mo cuidadoal cortar
troncospresionadosde un laclo.Vea la
ramas pequeSas:.;..
. "
iIustraci6nanteriorpara cortar troncos
•
Est_
aleda
con.tra'los
rebotes.
Tenga
presfonadosde un lado.
cuidadoal corta[ramas dobiadaso bajo
Uso de tronco
SegundoCode
presi6npara evitat ser golpeadoporla
'
comoapoyo
rama o la siena cuandose sueitela tensi6n
en las fibras de madera.
.
• Despejelfrecuentementelas ramas
acumuladas para hole hagan _opezar.
PARA CORTAR RAMAS
• Code las ramas de! drbolLinicamente
despu_sde clues:eiohaya tumbadoo -:
" - _rirnerCorte
• Deje ias ramasrodsguresasdebajo det
drbol tumbadopara que apoyen el _rbo!,
mientras,ud. trabaja.
• Empiece por la base del drboltumbadoy
vaya trabajandohaciael tope,cortandolas
ramas. Corte las ramas pequeSasde un
# Segundo code
Pu os ,.,'o,,TAmES
doso
Segundo
corteo
• Mantenga el troncodel drbolentre ud. y !a
:cadena.
• Retire las rarnasm_s grandes y tas ramas • Despu_s haga un segundo corte
de apoyo con la t_cnicade un tercioy dos
atravesando completamente la
terciosdescrita en la secci6nde
rama. Finatmente haga un tercer
seccionamiento.
code, descendiente, dejando un toco
• Use siempre un code descendiente para
de 2,5 a 5 cm. sobresaliendo del
cortar ramas pequefiasy ramasque
tronco del drbol.
cuelganlibremente.Loscortesacendientes
podn'anhater quelas ra_as caJgany
apreten la sierra.
. :.
ge_ndo corte
PARA PODAR
ADVERTENCIA: Pode tlnicamente
hasta la altura del hombro.No corte las
ramasque queden mds altas que los
hombros.Consigaa un profesionat
para efecturar ese trabajo..
• Haga el primer c6rteen forrna
ascendiente atrave_ando1/3 del
didmetrode la rama.
RESPONSABILIDADES
USUARIO
..
i.---
2,5
a 5 crndel
Tercercortede
troncodeldrbol
DEL
! Anote las fechasal completar
e! se_cio de rutina
Antes de Despu_,,Cada _=
ICada2_Anual-Fechas d,
Usar
de
horas horasjment_ Servicio
Usar
Vedfique que no hayapiezas dafiad_
gastadas
vedfique que no haya fijadores/piezas sueltas
/"'
/J
Verifique la"tensiSn de, la cadena
Verifique el fi!o de la cadena
tl
InsPeccion e !a"barra gu[a
v'
,t
Limpie el aparato y tas placas ....
Limpie e inspeccioneta rejillaantichispase inspeccioneel
silenciador
i
Cambie la buj[a
.... '
J..............
• Una vez porafio, cambiela bujfa y el
RECOMENDACIONESL
,_
elemento del fiitrode airee inspeccionela
GENERALES
-;_._-.__=:;_i;_
barragu(a yla cadenapara vet queno
La garantfade esteapaf_t_'no cubre
est_n gastadas.El reemplazode la bujfa y
los artfculos que han sido sometidosal
del etementodel flltrode aireasegurauna
abuso o a la negligencia de parte del
mezctacorrectade aire y combustibley
usuario. Para poder recibir el valor total
ayuda a queel motormarche mejor y que
durerods.
de la garantfa, el usuario deber_ hater
el mantenimiento tal como se indicaen ADVERTENCIA:
Desconecte la bujfa
este manual. Hard falta hacer varios
antes de hacer cualquier
ajustes peri6dicospare mantenere!
mantenimiento, con la excepcJ6nde los
a]ustesal carburador.
Barra
Gufa
LUBRICACION
- •
2 Tapade! !/.._
•
Janqueoe v'L_f I
del engranaje
.....
_ ,_ ,.._._
Acelte oe 18 --_ !
1 Lubricadorde engranajes
2 Ace!repara barra de sierrade
cadena Craftsman
VERIFIQUE QUE NO HAYA
PIEZAS DA_'_ADAS O GASTADAS
El cambio de piezas daSadas o
gastadas deber_ set efectuado por el
Centro de Servicio Sears.:
Heh'amienta
Tuercasde ia'To'miIlo
de de Ajustede
Abrazadera
Ajuste
laCadena
de la Barra
• Afloje ias tuercas de la abrazaderade la
barra hasta que eskin tan ajustadascorno
s! se las hubiera ajustadocontm la barra
conIoS_ed0s ttni_mente.
.
• Gire.ettorniIIode ajustea la derecha (en el
sent!dodel reloj) hasta que la cadena
apenastoque la superficieinferiorde la
barra._,
gula. ......
• Haga rotarla Cadenapara asegurarseque
todoslos eslabofi_esest_n en la ranurade
la barra.
AVISO: Es normalque aparezcaUna
pequeSacantidadde aceitedebajo de
la sierra despu_s de parar el motor. No
confunda esto con pdrdidas del tanque
de aceite.
Interruptor-Aseg_rese queel tnterruptor
• _%.
estdfuncionando correctamente
Tuercasde laAbrazadera de la Barra
colocdndoloen la posici6nSTOP.
• Levantela punta dela barm para contmlar
Asegdresede que el motorse haya
la separaci6n entre la barra y la cadena.
detenidoporcompleto,luegopongael
Suelte la barra y gire el tomillode ajuste
motoren marchanuevamentey contintie.
1/4 de vuelte a la derecha(en el sent!dodel
, Tanquede CombuslJble--Deje
de usarla
reloj).Repita este pasohasta que no haya
sierrasi hay sefialesde dafioso fugas del
rndsseparaci6n. :
tanquede combustible.
° Tanquede Aceite--Dejede usar la sierrasi • Manteniendo.tapuntade ta barra
levantada,ajuste las tuercasde la
el tanquede aceiteda sefialesde dafio o
abrazaderaconla hermmientade aiustede
fugas.
la cadena. Apliquetorst6nde 10 a 15
VERIFIQUE
QUE NO HAYA
libra,s-pie..
.
j
FIJADORES
O PIEZAS SUELTAS
_". ;TorniIIo
de Ajuste
* Tuercade ta Abrazaderade ia Barra
.FL.,)ITue_-?n_",,--I
, Cadena
- Silenciador
i/_
Ab.razaderall4 de Vueltaz6"
_
, Protectordel CiIindm
, F_IITo
deAim
,:_l, ,, d, taBarm(';_.,
- Cilindro y dientesde engranajedel
embrague
....
, Tomillosde las Manijas
• FijadoresAnti--Vibraci6n
o Caja del Arranque
• Protectorde Mano
-.
tf
° Use la punta deslomilladorade la
herramtentapara ha_errotar la cadenapor
la barra.
: ° Si no puede hacer rotarla cadena, est_
demasiadoajustada. Aflojelevernente las
tuercasde la abrazadem y gire el tornillo
deajuste 114de vueffehacia la izquierda
(en contradel Sentidodel reloj);vuelva a
ajustar las tuercasdela abrazadera.
VERIFIQUE LA TENSION DE LA
CADENA
• Usela puntadest0rnilladorade ta
herramientade ajuste de ta cadena para
hacerrotarla cadena pot la bara gufa,
verificandoque no hayadoblecesen la
cadena. Lacadena deberd rotar
Iibremente.
_4
• Si la cadena est,_demasiadofloja, se la
verd separada de la parteinferiorde la
barra. NO HAGA FUNCIONAR la sierrasi
la cadena estdfloja.
• Si ia superficiesuperiordelrie!est&
desnivelada, use una lima planapara
restaurarla formacuadrada.
Ranura Ranura
correcta gastada Encuadrelos Bordes
conunaUma
Cambie la barra si la ranuraestd
gastada, si la barra estdtorcidao
resquebrajadao si hay calentarniento
Las cadenas afilad'as producen trocitos excesivo o formaci6nde
de madera. Las cadenas desafiladas
pretuberanciasen los deles. Si es
necesado cambiarla barra, use
producen polvo d%a_errfn y cortan
lentamente.
exclusivamentei_i barraguia
especificadapara su sierraen la lista
AFILACION DE LA CADENA
de repuestos,especificadatambi_nen
La afilaci6n de la cadena requiere
la caicomanfa de repuestode barra y =
herramientasespeciales.Se puede
cadena que se encuentraen la sierra.
comprar las herramientasen Sears o
L|MPIE EL APARATO Y LAS
Ilevar la cadena a un especialistade
PLACAS
afilaci6n.
VERIFIQUE
AFILADA
Si LA CADENA ESTA
INSPECCIONE
LA BARRA
Condiciones que reequierenque se
haga mantenimiento a la barra:
La sierra €ortapara un ladoo endngulo.
Hay que forzarlapara que atravieseel
corte.
• Cant!dad inadecuadade lubdcanteen la
barra y la cadena.
Verifique la condici6n de la barra cada
vez que haga afilar la Cadena. Las
barras gastadas dafian la cadena y
toman diffci! el trabajq de cortar. Para
mantener la barra guia:
Coloque el interruptoren "Stop'.
i Retire la barraY la cadenadel aparato.
Limpie todoel aserfin y cualquierotto
escombrode la ranura de la barra y del
odficiode! engranaje despudsdecada uso.
I
Retire el Aserrfnde la
Ranura de la_
• A_ada lubdcanteal orificiodel engranaje
despu_s de cada uso.
• Losdelesde la barra desarro]fan
protuberanciasal gastarse. Sdquelascon
una lima plana.
* Limpie el aparato usandoun_apo h_medo
condetergente suave.
o Seque el aparato conun trapolimpioy
SeCOo
LIMPIE EL FILTRO DE AIRE
Et filtro de aire sucio disminuird la vida
0til y el rendimiento del motor e
incrementard el consumo de
combustible y la producci6n de
contaminantes. Limpie siempre el filtro
de aire desl_u_s de 15 tanques de
combustible o 5 horas de uso, el que
acontezca primem. Limpielo con mds
frecuencia en condiciones muy
polvodentas. Los filtros usados nunca
quedan totalmente limpios. Se
aconseja reemplazar al filtrode aire pot
uno nuevo despu_s de cada 50 horas
de uso o anualmente, io que acontezca
pdmero. Para limpiar el flltro:
• Afiojelos 3 tomillosen la tapadet cilindrb.
° Retire la,tapa del cJlindro.
• Retire el filtrode ade.
° Limpie el filtrode aire conagua caJientey
jab6n. Enjuague bienconagua claray frla.
S_luelo a! airetotaimenteantes de
reinstalado_
• ColoqueunapequeSacantidadde aceiteal
filtroantes de instaiarlo.Useace!repara
motoresde 2 tiemposo aceitede motores
SAE 30. Escurtabien el excesode aceite
apretando el flltropara mejorarla eficiencia
det filtrode aire.
• Reinstale el filtrode ai[e.
* _i_aie fatapa_el cilindroy los 3
tomilfos(15--20libraspot pu/gada).
F_ttro
de Aire
Cilindro
Tapa del
Citindro
INSPECCIONE EL SILENCIADOR
Y LA REJILLA AI'_ICHISPAS
A roedida que se use el aparato, el
silenciador y la reji!laantichispas se
van carbonizando, Es necesario sacar
la carbonizaci6n para evitar el riesg0 de
incendio o afectar el rendimiento del
motor.
,, Retirela tapa del sltenciador(latapa estd
co|ocadaa presi6nen la caja del
silenciador).
• R_re eljuegode difusory rejilla
antichispas.Tomenora de la odentaci6nde
estaspiezaspara su reinstalaci6n.
• Limpiela rejillaantichispasconun cepillo
dea/ambre.Catnbiela rejilla'Siencuentra
mturas, .
• Carnbfetodaslas piezas det siienciador
que est_nrotas:oresquebrajadas.
• vuelvaa |nstalaretjuego de difusory rejitla
antichispasconlosodficiosredondoshacia
ardba,,haciala tapadel silenciador.
• Reinstalela tapa del silenciadory los2
tomillos(7 a 8 libtaspot pie):
CAMBIE LA BUJIA
,_
•
Deberd cambiarse la bujfa anualmente
para asegurar que el motorarranque
rods fdcilroente y mmhe mejor. La
cronometrizaci6n del encendido es fija
e inalterable.
,
° Aflojelostres tomillosen la tapa del
cilindro. : ....
_.
: Retirelatapadel cilindro.. =
'
8aque la cubiertade la bujfa_': _
• Retirela bujiadei cilindroy des_chela.
Toroilr0sde • Reempldcetacon unabujfa Champion
RCJ7Y ajOstela_n unaIlave de 314de
la Tapadel
Silenciador ° pulgada(10 a 12 libraspor p!e).
Reinstalela cubiertade ia bujfa.
° Reinstatela tap_ delcilindm y t0s tres
tomiltos('15a 20 libras por pulgada).
Rej_la -
Antichispas
Tapadel
Silenciador
PARA LIMPIAR LA REJILLA
ANTICHISPAS
Tomilios
Tapa del
de la
Bujfa
Se requiem la liropieza a cada 25 horas
de uso o anualroente, el que acontezca
pdmero.
, Aflojey retirelos2 toroillosde la tapa del
silenciador.
.
. ,*,
,'
.
PARA REEMPLAZAR
LA CADENA
• CoToque
el irl|e_ptor en lapOsici6nStop.
• Cambie la cadena usada cuandoeSt_
gastadao dafiada:
CUIDADO: Useguantesprotectores • Use exclusivamenteta cadena de repuesto
Minimizadomde Reculadas especificada
para tocar la cadena. La cadena es
enla lista de repuestos.La cadena y ban'a
rnuy filosa y puede cortar aun no
de repuestocorrectastambidne_
estando en movimiento.
esPec|ficadasenuna calcomaniaubicada
en la sierrade cadena. ' Es normal que las cadenas nuevas se
estiren durante los primeros 30 minutos • Entreen contactoconel Centrode Servicio
Searspara carnbiary afilar las cuchilfas
de uso. Ser_. necesario verificar la
individualesde fa cadena.
tensi6n de la cadena frecuentemente y ° Retirefas tuercasde la abrazadera de la
ajustar la tensiSn seg0n sea necesario.
barra.
Vea la secci6n sobre Tensi6n de la
• RetireTaabrazadera.
Cadena.
• RetireIa cadenausada.
36
Tuer_aS
dela
Abrazadera
t
• Gire el tomillode ajuste a mano hacia la
izquierda(en contradel sentidodel reloj)
hasta cluela davija deajuste toque el
:retentor.
• Haga deslizarla barra pordetrdsdel
_.lindmde!embraguebasraquela barra se
_etenga a! tocarel en_anaje del ciiindro
de! embmgue.
,
° Retiremuycuidadosamentela nueva
cadenadel paquete. 8ostenga la cadena
conion eslabonesde impulsi6norientados
comoseve en ia ilustmci6n.
Cuchillas
•
•
•
•
AJUSTE DE LA CADENA
Vea "Tensi6n de la Cadena"en la
secci6nde Mantenimiento.
LIMPIE EL FILTRO DE
COMBUSTIBLE
Para [im_iarel filtro,vac_eel aparato
haciendoque el motormarche hasta
quedar sin combustible,luego retireel
juego de tapa del filtrode combustibley
retentordel tanque. Saque el filtroclef
Medidorde Profundidad tanque y sepdrelode ia Iinea. L/tupelo
con un detergentesuave y enjudguelo.
S6quelo completamentey vueiva a
armado.
AJUSTES AL CARBURADOR
ADVERTENCIA:
La cadena estard
Estabonesde Propulsi6n
en movimientodurante la mayor parte
Cotoquela cadena por encimay por detrds de este prodecimiento.Use el equipo
del embrague.
protectory observetodas ias
Coloqueloseslabones de propulsi6nentre
precaucionesde segutidad.En el
los dientesde ta puntadel engranaje.
Coloqueloseslabonesde propulsi6nen la =Ajustede la Mezcla de Bajas
Revoluciones"verifiquela marcha lenta
ranurade la barr&
"iireta barra hac|aadelantehasta que la
despu_sde cada ajuste. La cadena no
debe moverse con el motoren marcha
cadenaquede tiranteen la ranurade la
barra.
lenta.
• Ahora instalela abraza_lerade la bana
asegurdndoseque la davija de ajuste est_ El ajustedel carburadores de
poslcionadaen el orific_
0 inferioren la barra primordialimpodancia.Si se Io hace
incorrectamente,puede dar3artanto el
guia.
motorcomo el carbrador
permanentemente.Si necesitamds
ayuda o no estdsegurode c6mo hacer
et procedimiento,flamea nuestro
tel_fonode ayuda al consumidor,al
1800-235-5878.
El combustiblevencido,el filtrode aire
sucio,el filtrode combustiblesucioo el
motorahogadopueden dar la
riot
Barra
impresi6nde carburaci6ndesajustada.
Ctavijade
Guia
Verifiqueestas condicionesantes de
Ajuste
hacer cualquierajuste.
El carburadorha sido ajustado
° Instalelastuercasdelaabrazade_a
y
cuidadosamenteen la fdbrica.
aj0stelasa manodniCamenteo
No10sajuste
Posiblementese hagan necesarios
m_sporahora.
ajustessi se nota cualquierade las
• Ahoraprocedaa lasecci6n=Ajustedela
,qi(1,1ip.ntP,
s enndiP, ion_._:
Mezcla pare Bajas RevoluCtones"L"
Deje el motoren marcha lenta. Luego
acelere el motory tome note del
funcionamiento. Si el motorse ahoga, o
acelera bien o largahumoal eceferar,
Revotuciones L:
° Elmotorse parao se ahogacuandodebe gireel tomHtode ajuste a la derecha
(en el sentidodel reloj)en incrementos
acelerar.Vea =Verificaci6n
de la
de 1116de vuettatfnicamentehaste
Aceleraci6n'.
• Bajade potenciadecode.Vea "Mezclade obtener un funcionamiento
/_t_ Revoluciones
W'bajoel
satisfactorio.Repitaeste procedimiento
procedimiento
de ajuste.
las veces que sea necesado.Repita
Hay tres tomillosde ajuste en el
este procedimientolasveces que sea
carburador.Estdnmarcados con =H',
necesariopara obtenerrendimiento
=L"y %'_.Estdn ubicadosardba del _
satisfactodo.Despu_sde completer
bombeador.
estosajustes,verrifiquela aceleraci6ny
el movimientode la cadena en marcha
PUNTOS DE PRECALIBRACION
lenta.Ajuste nuevamentesi es
A! hcer ajustes no fuerce tas tapes
limitadorasde pldsticomds alld de los necesado.
retentoreso puede haber dafios. Si no Mezcla pare Aires Revoluclones "H"
se necesitanlos puntosde
NO HAGA FUN_IONAR EL MOTOR
precalibraciSn,pase ala secciSn
con el aceleradora rondo por mucho
"Ajustesala Marcha Lenta'.
tiempo al hacer losajustesya que
• Girelos dostomfllos
deajustedernezdaa
puede dafter et motor.Haga un code de
la izquierda
(encontradelsen6dodelreloj)
prueba. Basadoen el funcionamiento
hastequese paren.
. Gireeltomiltodemarchalentaala derecha de ia sierra duranteel code, ajuste el
tomiliopare la mezclade altas
(enelsentidodel teloj)hastequese
detenga,Ahoragfrelohaciala izquierda
4 revolucionespot incrementosde s61o
1116de vuelta,como se detallaa
vueltasy media,.
Pongael motoren marchay d_jelo en continuaci6n:
mamha pot 3 minutos,luego procedaa • Ala derecha(enelsentidodelreloj)hasia
quelasierratengabuenapotenciaal cotter
la secciSnde ajustes.Si el motorno
sinhesitaciones.
Nohagalosajustesporel
armnca, yea la Tabla Diagn6sticao
sonidon|porlasrevoluc'_ones,
sinopotel
flameal 1-800-235-5878. Si el
buenfuncionamiento
at cortar.
funcionarnientodel motores aceptable • A ]aizqulerda
(encontradelsenUdo
del
con las posicionesantedoresy la
reioj)si lasierratienerevoluciones
altas
cadena no se mueve en marcha lenta,
peroseparaolefattapotendaalcorlar.
no hard falta hacer rods ajustes.
Despu6sde completarlosajustes,
PROCEDIMIENTO DE AJUSTE
verifiquela acelerac|6ny el movimiento
de lacadena en marcha lenta.Ajuste
Marcha Lenta "T"
Deje el motoren mamha lenta. Ajuste nuevamentesi es mecesado.
las revolucioneshastaque e[motor se Verificaci6n deia Aceleraci6n
mantenga en marcha sin que la cadena Si el motorse para.o hesita en vez de
se mueva o que el motorse ahogue.
acelerar, gireel tomiilode ajuste dela
• Gireeltomiltoala derecha(enelsentido mezcfa para bajas revolucionesala
de!reloj)pareaumentarlasrevoluciones
si izquierda(en contradel sentido del
elmotorse ahogao se pare.
• Gireel tomi!lo
ala izquierda(encontradel reloj) hasteconseguiruna aceleraci6n
pareja sinm0vimientode la cadena en
sentidodelreloj)parebajarlas
marcha lenta.Verifiquenuevamentey
revoluciones.
haga los ajustesnecesadospare
No hace falta ningdnotroajustesi la
cadena no se mueve en marcha lenta y conseguirun funcionamiento
si el rendimientoes satisfactorio.
aceptable.
,:ao;:f_a
se mueve
con el iT_o_ol'en
marchalenta.Vea °MarchaLentaT"bajo
prodecimiento
deajuste.
• Lasierranoanda a amrchalenta.Vea
"MarchaLentaT" y "Mezclade Bajas
38
Prepare el aparato para guardadoal
final de la temporada o si no se Iova a
usar I>orrods de 30 dfas o mds.
ADVERTENCIA:
__
• Dejeque el motorse enfrfey fije bien el
Afiada estabilizador a la gasolina en el
aparatoantes de g'uardarloo de
tanque de combustibleo en el
transportado.
recipiente de almacenado de
• Guards la sierra y el combusgbleen
combustible.Siga ias instnJccionesde
unlocalbtenventiladodonde los vapores
mezcla que se encuentran en los
de combu_'ble no puedan entraren
envasesde estabilizador. Ponga el
contactoconchispasni llamas abiertas
motor en marcha y d_jelo en msrcha
pmvenientesde lostermotanques,los
motoreso tntemJptoreseldctricos,
unos5 minutosdespu_sde ponede
caJefactorescentrales,etc.
, estsbilizador.
•Guarde el aparatocobtodos los
El aceiteCRAFTSMAN 40:1 para
pmtectoresen sulugary coloqueel
de 2 tiempos(enfriadosa aire)
aparatode modo q_Je'laspiezas fllosas no motores
viene mezclsdo con estabilizadorde
puedancausar heridaspor accidente.
combustible.Si no usa este sceite de
° Guardeel apamto bienfuera del alcance
de losni_os.
Sears, entoncespuedeafisdir un
estabilizadoral tsnquede combustible.
INTERIOR DEL MOTOR
SUPERRCIES EXTERNAS
• Retirela bujiay viertaunacucharadade
Si va a guardar el aparato durante
lasdet_deaceite40:1paremotoresde2
mucho tiempo, tfmpielo rigurosamente
t_empos
(enfdados
a airs)porla abedura
primero. Gudrdelo en un lugar limpio y
paraIs bujfa."i'ironee
lentamente
de ta
seco.
sogadearranque
8 a 10vecespara
• Apliqueuna pequefiacantidad de aceite a
dis_buirelaceite..
las superficiesextemas met_icas y a la
• Reemplace
fabujfaconotradeltipo y dela
barra gui'a.
gamadecalorrecomendados.
• Lubriquela cadena y envudtvataen papel ° Umpieelfiitrodesire.
gmesoo tela.
• Examine
t0doelapamtoparaver_ficar
que
nohayatomillos;
tuercasnipemossueltos.
SISTEMA DE COMBUSTIBLE
CambietodaslasptezasdaSadas,
Vea el mensaje mamado
quebradaso gastadas.
=IMPORTANTE", que se refiere al uso
* AI pdndpiodela prSxima
temporada,
use
de combustibles con mezcla de alcohol
exclusivamente
combustible
nuevoconla
en su aparato, en la secci6n de Uso,
proporciSn
correcta
degasolinaa sce_te.
bajo Abastecimiento del Motor.
OTRO
Los estabilizadores de combustible son • Noguardegasolina
deunatemporada
a aJ
una altemativa aceptable para
pr6xim_
minimizar la formaci6n de dep6sitos de • Cambieel recipients
degasolinasise
empieza
a oxidar.
goma durante el almacenamiento.
3.q
TAB_
,,
DIAGNOS1TCA
, ,j,,, ,,,,,,,,
,,,,,,
PROBLEMA
El motorno
alTanca
o se
mantiene en
marcha s61o
unos segundos
despu_sde
Elmotor no
anda en marcha
tenta como
debe.
SOLUCION
CAUSA
Cofoque'elinterrupioren ON,
El interruptorestdenOFF,
Vea tas lnstrucciones de Arranque.
E! motorestd ahogado.
Eltanque de combustible'• Llene el tanqueconlamezcla
estdvao[o.
correctade combustible.
° La bujfa no tracechfspa, • lnstale una bujl'a'nueva.
- El combustible no estd
* Vedfiquest e! filtro de combustible
estd sucio;/_pieto. Verifiquesi hay
llegandoal carburador.
dobleces en_fa linea de combustible
o si estd parttda:repddao cdrnbiela;
• Vea Ajuste_alCarburador'.
• El carburadorrequiera
ajuste.
t• Ningunode los anteriores • Entre en contactoconel SePAcio
Seam.
•
•
•
•
Las revotucionesde la
. Limpieo cambieel filtrode aire.
marchalenta estdnmuy
altos o muy bajas.
Utopia o cambieelfiltmde aira.
• La Mezcla para Bajes
Revotucionesrequier
ajuste.
• Entreen contactoconel Servido
° Las juntasdel cig0efiaf
Sears. :
estdngastadosb
, La compresi6neSt_baja. • Entre en contactocon el Servicio
Sears.
° Ningunode losantedores • Entre en contactocon el Se_cio
Seam.
El motor"no
". E! filtro de aim est_ sucio. •Umpie o cambieel filtrodeaire.
acelera, le faita
° La bujfa esld carbonizada • Umpie ocambte la bujfay calibrela
separackSn,
potenciao se
• Vea =Ajustesal Carburador".
_ara bajo carga. . El carbumdorrequiere
ajuste.
• Lospuertosde escapeo : • Entreen contactocon el Sewicio
Seam.
las abeduras de s_Jidade
silenciadorestdntapados.
• La compresi6nest_ baja. • Entreen co_acto con el Servicto
Sears.
: _.
° Ningunode losanteriores,• Entre en contac_oconel Servicio
Seam.
El motor humea
excesivamente.
•
El cebadorestd
• Ajusteel cebador.
parciaimenteaccionado.
° La mezcla de combustible• Vacfe el tanquedecombustibley
se ha hecho
lldnelode combustibleconla mezcla
incorrectamente.
correcta.
El filtro de aireestdsucio. • Umpie o cambieel tiltmde aire.
La Mezcla para Attas
• Vea "Ajustesai Carburador".
Revolucionesrequiem
ajuste.
• El cdder est6 perdiendo.
Entre en contactoconel Service
Sears.
40
I' PROMBLEMA
El motor
marchacon
temperatura
elvada.
SOLUCION
•
•
•
•
•
•
,
tnsuficienda de
Lamezdade combustible
se ha hecho
|ncormctamente.
Se ha inslaJadola bujfa
incorrecta.
La_MezcJa
pardAltas
Re_oJuciones
estd
dernasiadopobre.
Lospuedosde escape o
las aberturasde safidadei
silenciadorest_ tapados.
La rejillade escape del
silenciador est_
¢arbon[zada.
La caja de!ventiladoro Jas
rebabasdel cilindraest_
_ucias.
Nin_3uno
de los anteriores.
i, ,,,,u,
ii ,u
° Vea =Abastecimientodel Apamto"
•
Cdmbiela perla bujiacorrect.
• Vea =Ajustes al Carburador'.
•
Entre en contactoconel $ervido
Sears.
•
Umple la rejillaantichispas.
•
Umpie el drea.
•
Enke en contactoconel $ervfdo
Sears.
.
• Uene el tanquede aceite. ................
* _1tanquedeaceite _td
aceite para
• vacio.
lubdcarlabarmy
Elbombeadordeaceiteoel
• EntreencontactoconetSe_cio
cadena,
flltrode aceiteestdtapado.
Sears.
• Elodficiopara aceite en la
• Seque ta barray lirnpiela.
barraes_ tapado_
L_ cadena se
• Lamarchalentarequiere
• Vea "Ajustesal Carbumdor'.
mueveen
ajuste.
• Enlre en contacto con el Se_cio
marcha(enta.
• Elembraguerequiem
Sears.
reparaciones.
La cadena no se•
La cadena est_
• Vea =-lensi6nde la Cadean•.
demasiado
muevecuando
tensionada.
se acelera el
motor.
• Vea =Ajustesal Carburador'.
• El cad_uradorrequiera
ajuste.
• Losdelesde la barra
• Repare o reemplace.
gu(a est_ apretados.
• Enb'een contactocon el Servicio
• Et embragueest_
Sears.
paSenando.
:
•
La
cadean
est_
•
Yea
=Tensi6nde la C_dena".
Lacadena
incorrnctamente
golpeteao corta
te_onada.
desparejo.
:• Las cuchillasest_
• EntTeen contactoconel Se_cio
daRadas.
Sears.
• Afle o cambie lacadean.
• Lacadean est_gastada.
• Las cuchillasestdn
• Vea =Afitaci6nde laCadean".
desafiladaso rnalafiladas
o Io_smedidoresde
profundidadestdnmuy
altos.
• El engranajeest_ 9astado.
• Entre en contactoconel Servido
Seam.
• Lacadena est_ instalada
• lnstale la cadena en la direcck_n
rev_.
La cadena
coda en
dngulo.
• La_p_rtede_anibade
cu_iU_ no est_
planas.
° Labarra tlene
protuberancfaso est_
torcidao losdeles
estdndesparejos.
• El embragueestd
_atinandg;
•
Vea "Afilaci_ndela Cadena'_•
•
Repare o cambie labarm,
•
Entreen contactocon el Ser_icio
Seam.
For the repair or replacement paris you need delivered directly to
your home
Call 7 am - 7 pro, 7 days a week
1-800-366-PART
(1-800-,366-7278)
Para ordenar piezas con entrega a
dom|cil_o- 1-800-659-7084
For in-house major brand repair service
Call 24 hoursa day, 7 days a week
1-800-4-REPAIR
(1-800-473-7247)
Para pedir servicio de reparaci6n a
domicil_o- 1-800-676-5811
For the location of a Sears Parts and
Repair Center in your area
Call 24 hours a day, 7 days a week
1-800-488-1222
ForinformationOnpumhasinga Sears
Maintenance Agreementor to inquire .aboutan existingAgreement
Call9 am- 5 pm, Monday-Saturday
1-800-827-6655
Whenrequestingserviceor ordering parts, alwaysprovidethe
following informa_on:
• ProductType
• Model Number
• Part Number
• Part Description
S/ 8
America's Repair Specialists