1
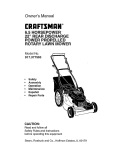
Owner's Manual
(:RAFTSMAN+
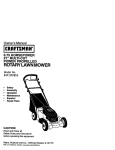
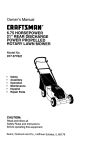
6.5 HORSEPOWER
22" REAR DISCHARGE
POWER PROPELLED
ROTARY LAWN MOWER
Model No.
917.377562
°
°
o
o
o
•
Safety
Assembly
Operation
Maintenance
EspaSol
Repair Parts
CAUTION:
Read and follow all
Safety Rules and Instructions
before operating this equipment
Sears, Roebuck and Co., Hoffman Estates, IL 60179
Warranty
Safety Rules
Assembly
Operation
Maintenance Schedule
Maintenance
2
2
4
6
10
10
Product Specifications
Service and Adjustments
Storage
Troubleshooting
Repair Parts
Parts Ordering
11
t4
15
t6
35
Back Cover
LIMITED TWO YEAR WARRANTY ON CRAFTSMAN
POWER MOWER
For two years from date of purchase, when this Craftsman Lawn Mower is maintained,
lubricated, and tuned up according to the operating and maintenance instructions in the
owner's manual, Sears wil! repatr free of charge any defect in material or workmanship°
If this Craftsman Lawn Mower is used for commercial or rental purposes, this warranty
applies for only 90 days from the date of purchase.
This Warranty does not cover:
• Expendable items which become worn during normal use, such as rotary mower
blades, blade adapters, belts, air cleaners and spark plug.
° Repairs necessary because of operator abuse or negligence, including bent crankshafts and the failure to maintain the equipment according to the instructions con-.
tained in the owner's manual.
Warranty service is available by returning the Craftsman power mower to the nearest
Sears Service Center/Department
in the United States. This warranty applies only while
this product is in use in the United States.
This Warranty gives you specific legal rights, and you may also have other rights which
vary from state to state.
SEARS, ROEBUCK AND CO. D/817 WA, HOFFMAN:ESTATES , ILLINOIS 60179
TRAINING:
lurer. Use of such attachments may be
hazardous.
, The blade turns when the engine is
running.
• Read this operator's manual carefully.
Become familiar with the controls and
know how to operate your mower
properly. Learn how to quickly stop
PREPARATION:
mower,
" Always thoroughly check the area to be
mowed and clear it of all stones, sticks,
wires, bones, and other foreign objects.
These objects will be thrown by the blade
and can cause severe iniuryo
• Always wear safety glasses or eye
shietds when starling and while using
your mower.
• Dress properly. Do not operate mower
when barefoot or wearing open sandals.
Wear only solid shoes with good traclion
when mowing.
• Check fuel tank before starting engine.
Do not fill gas tank indoors, when the
engine is running or when the engine is
• Do not allow children to use your mower.
Never allow adults to use mower without
proper instructions,
o Keep the area of operation clear of all
persons, especially small children and
pels.
• Use mower only as the manufacturer
intended and as descnbed in this manual
° Do not operate mower if it has been
dropped or damaged in any manner.
Always have damage repaired before
using your mower.
° Do not use accessory attachments that
are not recommended by the manufac2
hot.Allowtheenginetocoolforseveral
minutesbeforefillingthegastank.Ctean
off any spilled gasoline before stading the
engine.
° Always make wheel height adjustments
before starting your mower Never
attempt to do this while the engine is
running.
• Mow only in daylight or good artificial
lighL
OPERATION:
° Keep your eyes and mind on your mower
and the area befng cut Do not let other
interests distract you.
° Do not mow wet or slippery grass Never
run while operating your mower° Always
be sure of your footing -- keep a firm
hold on the handles and walk.
° Do not put hands or feet near or under
rotating parts_ Keep clear of the discharge
opening at all times.
° Always stop the engine whenever you
leave or are not using your mower, or
before crossing driveways, walks, roads,
and any gravel---covered areas.
,, Never direct discharge of matedal toward
bystanders nor allow anyone near the
mower while you are operating it.
° Before cleaning, inspecting, or repairing
your mower, stop the engine and make
absolutely sure the blade and all moving
parts have stopped. Then disconnect the
spark plug wire and keep it away from the
spark plug to prevent accidental starting
o Do net continue to run your mower if you
hit a foreign object. Follow the procedure
outlined above, then repair any damage
before restarting and operating you
mower.
° Do not change the govemor settings or
overspeed the engine. Engine damage or
personal injury may result.
• Do not operate your mower if it vibrates
abnorma!ly. Excessive vibration is an
indication of damage; stop the engine,
safely check for the cause of vibration
and repair as required.
° Do not run the engine indoors Exhaust
fumes are dangerous.
• Never cut grass by pulling the mower
towards you. Mow across the face of
slopes, never up and down or you might
lose your footing. Do not mow exces_
sivety steep slopes_ Use caution when
operating the mower on uneven terrain
or when changing directions -- maintain
good footing.
° Never operate your mower without
proper guards, plates, grass catcher or
other safety devices in place
MAINTENANCE
AND
STORAGE:
° Check the blade and the engine mounting bolts often to be sure they are
tighlened properly,
, Check all bolts, nuts and screws at
frequent intervals for proper tightness to
be sure mower is in safe working
condition
° Keep all safety devices in place and
working
• To reduce fire hazard, keep the engine
free of grass, leaves or excessive grease
and oil.
° Check grass catcher often for detedoralion and wear and replace worn bags
Use only replacement bags that are
recommended by and comply with
specifications of the manufacturer of your
mower.
- Always keep a sharp blade on your
mower.
o Allow engine to cool before storing in any
enclosure.
o Never store mower with fuel in lhe tank
inside a building where fumes may reach
an open flame or an ignition source such
as a hot water heater, space heater,
clothes dryer, elc.
CAUTION:
Always disconnect
spark
plug wire and place wire where it
cannot contact spark plug in order to
prevent accidental
starting when
setting up, transporting,
adjusting or
making repairs
WARNING
The engine exhaust from this product
contains chemicals
known to the State
of California to cause cancer, birth
defects,
or other reproductive
harm.
These accessories were available when this lawn mower was produced° They are also
available at most Sears retail outlets and service centers. Most Sears stores can also order
repair parts for you, when you provide the model number of your lawn mower_ Some of these
accessories may not apply to your lawn mowe_:.
LAWN MOWER PERFORMANCE
.........................................
.......
FOR REAR DISCHARGE LAWN MOWERS
, MULCHER KITS
GRASS CATCHERS
FOR
REAR DISCHARGE
LAWN MOWERS
, ,,,, _
.......................
GRASS CATCHERS
FOR
SIDE DISCHARGE
LAWN MOWERS
,
STABILIZER
_
"
GAS CANS
LAWN MOWER
......
MAINTENANCE
MUFFLERS
BELTS
BLADES
A!RFILTERS
BLADE ADAPTERS
Read these instruc_ns and this manual in its
entirety before you attempt to assemble or
operate your new lawn mower° Your new lawn
mower has been assembled at the factory with
the exception of those parts left unassembled
for shipping purposes. All parts such as nuts,
washers, bolts, etc°, necessary to cemptete the
assembly have been placed in the parts bag:
To ensure safe and proper operation of your
fawn mower, all paris and hardware you
assemble must be tightened securely_ Use the
correct tools as necessary to ensure proper
tightness.
TO REMOVE
CARTON
LAWN MOWER
FROM
• Remove Ioose parts included with mower.
• Cut down two end comers of carton and lay
end panet down fiat.
• Remove at_packing materials except
padding between upper and lower handle
and padding holding operator presence
control bar to upper handle.
*
...............
SPARKPLUGS
WHEELS
ENGINE OIL
• Roll lawn mower out of carton and check
carton thoroughly for additional loose parts_
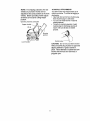
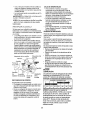
HOW TO SET UP YOUR
MOWER
LAWN
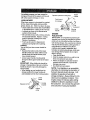
TO UNFOLD HANDLE
IMPORTANT: Unfold handles carefully so as
not to pinch or damage control cables.
. Raise handles until lower handle section
locks into place in mowing position.
. Remove protective padding, raise upper
hand{e section into place on lower handte
and tighten both handle knobs.
• Remove handle padding holding operator
presence control bar to upper handle.
• Your lawn mower handle can be adjusted
for your mowing comfort. Refer to "Adjust
Handle" in the Service and A_ustment
section of this manual.
NOTE: For shipping purposes, the rear
wheels on your lawn mower are not
adjusted to the same position as the front
wheels. Before operating mower adjust
all wheels to the same cutting height
pos_ono
Operalor presence
contrel bar
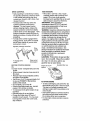
TO INSTALL ATTACHMENTS
Yourlawn mower was shipped readyto be
used as a mutcher. To convert to bagging or
discharging:
° Open rear door and remove mulcher plug,,
Store mulcherplug in a safe place.
• You can now install catcher or optional
dipping deflector,
, To retum to mulchingoperation,install
mulcher plug into discharge opening of
mower. Be sure all tabs are seated
properly.
Uppper handle
Lift up
Mowing
position
/.1
Mutcher plug __
Lowerhandle
CAUTION: Do not run your lawn mower
wi_out mufcher plug in place or approved
dipping deflector or grass catcher in
place. Never attempt to operate the lawn
mower with the rear door removed or
propped open.
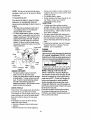
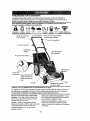
READ THIS OWNER'S MANUAL AND SAFETY RULES BEFORE OPERATING YOUR
LAWN MOWER. Compare the illustralions with your lawn mower to familiarize yourself
with the location of various controls and adjustments°
Save this manual for future
reference,
_
--
iiii II
iii
Ii
I
I
I
I
im
I
j!ll
iu
i
U,
i,
iii
i,i,
iiii1,11 i,i
iii1'1
,i
!1
I
[
i1',!11,1 i,
jl
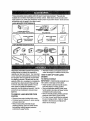
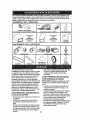
These symbols may appear on your lawn mower or in literature supplied with the product_
Loam and understand their meaning,
ORWAF_lf_l
III
I
ii
II
I
II
II
t3N
I
O_F
I
AN_ FE_ AWAY
,11
I
iiii
IIII
i
ii
I1'
III
II
ii I
I
I'
I
I1_
IIII1"111'1
I
I
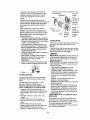
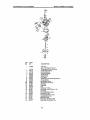
Engine zone control cable
presence control bar
Drive control lever
Srarler
handle
Handle knob
Grass catcher
Gasoline cap
Muleher plug
Housing
Drive cover
Engine oi! cap wtdipstick
Wheel adjuster
(on each wheel)
MEETS CPSC SAFETY'REQUiREMENTS
.................
.........
' .........
Sears rotary walk-behind power lawn mowers conform to the safety standards of the American
National Standards Institute and the tJ.S. Consumer Product Safety Commission. The blade
turns when the engine is running.
Operator presence control bar-
m,;"st''_""" ..... Starter handle - used for starting the engine,
held down to the handte to start the engine,
Drive control lever- used to engage powerpropelled forward motion of lawn mower.
Release to stop the engine_
Primer - pumps additional fuel from the
Mulcher plug - must be removed to convert to
bagging or discharging operation..
carburetor to the cylinder for use when starting
a cold engine.
I
Theoperationof anylawnmowercan
resultin foreignobjectsthrownintothe
eyes,whichcan resultin severe eye
damage. Always wear safety glasses or
eye shields while operating your lawn
mower or performing any adjustments or
repairs. We recommend a wide vision
safety mask over the spectacles or
standard safety glasses.
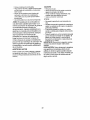
HOW TO USE YOUR LAWN MOWER
Piate Tab
Lower Wheets for High Cut
Lever
Raise Wheels for Low Cut
TO ATTACH
GRASS CATCHER
The engine speed was set at the factory
for optimum performance_ Speed is not
adjustable.
ENGINE ZONE CONTROL
o Close the flip lid. Flip lid must be closed
while operating lawn mower.
,, Uft the rear door on the mower housing and
place the grass catcher frame onto the
formed tabs on the rear door hinge brackeL
• The grass catcher is secured to the lawn
mower housing when the rear door is
lowered onto the grass catcher frame.
CAUTION:
Do not run your lawn mower
without clipping deflector or approved
grass catcher in place, Never attempt to
operate the lawn mower with the rear door
removed or propped open.
CAUTION;
Federal regulations require
an engine control to be installed on this
lawn mower in order to minimize the risk
Hinge
bracket
CAUTION:
Do not run your lawn mower
without mulcher plate in place and door
closed or without an approved clipping
deflector or grasscatcher in place. Never
attempt to operate the lawn mower with
the rear door removed or propped epen_
ENGINE SPEED
of blade contact injury. Do not under any
circumstances
attempt to defeat the
funclJon of the operator control. The blade
tums when the engine is nmning.
, Your lawn mower is equipped with an
operator presence control bar which
requires the operator to be positioned
behind the lawn mower handle to start and
operate the lawn mower,
TO ADJUST CUTTING HEIGHT
• Raise wheels for low cut and lower wheels
for high cut,
- Adjust cutting height to suit your require.
ments. Medium position is best for most
lawns_
° To change cutting height, squeeze adjuster
lever toward wheel Move wheel up or
down to suit your requirements_ Be sure all
wheels are in the same setting.
NOTE: Adjuster is properly positioned
when plate tab inserts into hole in lever.
Also, 9-position adjusters (if so equipped)
allow lever to be positioned between the
plate tabs.
Rear door
Formed
tabs
TO EMPTY GRASS CATCHER
• To remove grass catcher, release operator
presence control bar to stop engine,
, Uft up rear door and remove the grass
catcher by the handle.
o Do not drag the bag when emptying; it will
cause unnecessary wear.
DRIVECONTROL
° Self-propelling
is controlledby holding
theoperatorpresencecontrolbar down
to thehandleandpushingthe drive
controlleverforwarduntilit clicks;then
releasethe lever_
• Forwardmotionwill stopwhenthe
operatorpresencecontrolbar is
released,To stopforwardmotion
withoutstoppingengine, release the
operator presence control bar slightly
until the drive control disengages.
Hold
operator presence control bar down to
handle to continue mowing without selfpropelling.
', To keep drive control engaged when
turning comers, push down on handle
and lift front wheels off ground while
turning lawn mower.
Operator
presence
control bar
ADD GASOUNE
,, Fill fuel tank. Use fresh, clean, regular
unleaded gasoline with a minimum of 87
oc'u_qe. Do not mix oil with gasoline.
Purchase fuel in quantities that can be used
within 30 days to assure fuel freshness.
IMPORTANT: When operating in
temperatures below 32°F(0°C), use fresh,
clean winter grade gasoline to help insure
good cold weather starting°
WARNING: Experience indicates that alcohol
blended fuels (called gasohol or using ethanol
or methanol) can attract moisture which leads
to separation and formation of acids during
storage. Acidic gas can damage the fuel
system of an engine while in storage. To avoid
engine problems, the fuel system should be
emptied before storage of 30 days or longer.
Drain the gas tank, start the engine and let it
run until the fuet lines and carburetor are
empty. Use fresh fuel next season, See
Storage lnstrl._clJonsfor additional infon'nation°
Never use engine or carburetor cleaner
products in the fuel tank or permanent
damage may occur.
To engage
control
drive
Drive control
desengaged
BEFORE STARTING ENGINE
OIL
Your lawn mower is shipped without oil in the
engine,
• Be sure mower is level and area around oil
fill is clean.
° Remove engine oil cap widipstiok and fil! to
the full line on the dipstick.
,, Use 20 ozs, of oil. For type and grade of oil
to use, see "ENGINE" in Maintenance
sec_Jonof this manual.
° Pour of! slowly. Do not over fill.
• Check oil level before each use. Add oil if
needed, Fill to ful! line on dipstick.
• To read proper level, tighten engine oil cap
each time.
• Reinstall engine oil cap and tighten
° Change the oil after every 25 hours of
operation or each season, You may need
to change the oil more often under dusty,
dirty conditions.
CAUTION:
Fill to bottom of gas tank filler
neck. Do not overfill. Wipe off any spilled
oil or fuel. Do not store, spill or use
gasoline near an open flame.
Engine oil cap w/
dipstick
Gasoline filler cap
L
TO START ENGINE
, To start a cold engine, push primer five (5)
times before trying to start. Use a firm push.
This step is not usually necessary when
starting an engine which has already run for
a few minutes°
• Hold operator presence control bar down to
the handle and pull starter handle quickly.
Do not allow starter rope to snap back,
• To stop engine, release operator presence
control bar.
NOTE: Incoolerweatherit maybe
necessaryto repeatprimingsteps. In
wanTlerweatheroverpdmingmaycause
floodingandenginewillnot start. If you
do floodengine,waita few minutesbefore
attemptingtostartanddo not repeat
primingsteps.
MOWING
TIPS
• Under cedain conditions, such as very tall
grass, it may be necessary to raise the
height of cut to reduce pushing effort and to
keep from overloading the engine and
leaving clumps of grass clippings.
- For extremely heavy cutting, reduce the
width of cut and raise the rear of the lawn
mower housing one (1) wheel adjuster
setting higher than the front for better
discharge of grass,
• When using a rear discharge lawn mower in
moist, heavy grass, clumps of cut grass
may not enter the grass catcher° Reduce
ground speed (j:_Jshing speed) and/or run
the lawn mower over the area a second
time,
°ff a trail of grass clippings is left on _e dght
side of a rear discharge lawn mower, mow
in a clockwise direction with a small ovedap
to collect the clippings on the next pass.
- Keep top of engine around starter clear and
clean of grass clippings and chaff. This w_ll
help engine air flow and extend engine life.
° Pores in cloth grass catchers can become
filled with dirt and dust with use and
catchers will collect less grass. To prevent
this, regularly hose catchers off with water
and let dry before using.
Max 1/3
MULCHING
MOWING
TIPS
IMPORTANT_ For best performance, keep
mower housing free of built-up grass and
trash. See"Cleaning" in Maintenance section
o! this manual.
° The special mulching blade will recur the
grass clippings many times and reduce
them in size so that as they fall onto the
lawn they will disperse into the grass and
not be noticed_ Also, the mulched grass will
biodegrade quickly to provide nutrients for
the lawn. Always mulch with your highest
engine (blade) speed as this will provide the
best recutting action of the blades.
, Avoid cutting your lawn when it is wet. Wet
grass tends to form dumps and interferes
with the mulching action. The best time to
mow your lawn is the eady affemoon_ At
this time the grass has dried and the newly
cut area will not be exposed to the direct
sun.
• For best results, adjust the lawn mower
cutting height so that the lawn mower cuts
off only the top one*third of the grass blades.
If the lawn is overgrown it will be necessary
to raise the height of cut to reduce pushing
effort and to keep from overloading the
engine and leaving clumps of mulched
grass. For extremely heavy mulching,
reduce your width of cut by overlapping
previously cut path and mow slowly.
• Certain types of grass and grass conditions
may require that an area be mulched a
second time to comp{etely hide the
clippings_ When doing a second cut, mow
across or perpendicular to the first cut path.
• Change your cutting pattern from week to
week. Mow north to south one week then
change to east to west the next week. This
will help prevent matting and graining of the
lawn.
.........
..........
CleerJInspect
Check for Loose
Gr_l.ssCalchar
Fasteners
_
{itE,:lut_d!
"
!
J!___.l/__.]
_
......
M
IO Clean Under Onve Cover
(Power-Propel_d
Mowers)
Check drive belt/pulleys
ChecldSharperdReplace
____
Blade
,_
Lubdcatlon Chart
F'Claan Battery/Recharge
_
(Eiecl_ StartMowers)
G
I
Air._
clean
_tter
........
.
_
_
Spark P!ug
_
2 ° Setv{ce
morl
3o Replace
4 ° Ch_trge
GENERAL
ottol't wf,,en _:_Qling
U_r
..............
48 hou_
o{to_ wh_
m_g
, , __
D/
V'2
i
i hoa'-,'y load or tn high _mb_er_l lertay_,_'_,s,
often wh0n 0pe_atJn,g _n d_'y or d_f
b_ad_s m_e
I
_
Replace Air Filler Paper Cartridge
mats
V'4
__,!!__t.,L __
Inspect Muffler
1 ° Chin,_
J
....
0tl
N ,c!_an,,erReplace
E
!,/
f/
_
.....
E !Ched_ Er_tne Oil Level
N ,_
"_
.........
_/
cond_ons
in sandy li_l
e! er_d ol se_lon
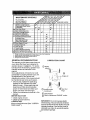
RECOMMENDATIONS
The warranty on this lawn mower does not
cover items that have been subjected to
operator abuse or negligence. To receive
lull value from the warranty, operator must
maintain mower as instructed in this
manual.
Some adjustments will need to be made
periodically to propedy maintain your uniL
All adjustments in the Service and
Adjustments section of this manual should
be checked at least once each season.
= Once a year, replace the spark plug,
replace air filter element and check
blade for wear. A hew spark plug and
clean!new air filter element assures
proper air-fuel mixture and helps your
engine run better and last longer,
• Follow the maintenance schedule in this
manual.
BEFORE EACH USE
• Check engine eli level
• Check for loose fasteners,
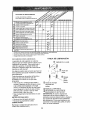
LUBRICATION
Keep unit well I_bt_cated (See "LUBRICAT!ON CHART'),
LUBRICATION
(_
CHART
Wheel
adjuster
Ii
f
' "I i
.....
....
.,'PF
0
.2,;
oil
i
_
\
14;
i'-{l _:L,._. !i
7
X
I
)
l _,--
j--
(_
Handle bracket
mounting
(_
pin
"
(_)Rear
door
hinge
Spray lubricant
(_) Referto
Maintenance 'ENGINE"
section
IMPORTANT: Do not oi! or grease plastic
wheel bearings. Viscous lubricants will attract
dust and dirt that will shoden the life of the self
lubricating bearings. If you feel they must be
lubricated, use only a dry, powdered graphite
1otypelubricanl sparingly_
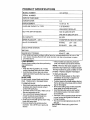
PRODUCT
,
SPECIFICATIONS
, ,
-
,=
MODEL NUMBER
SERIAL
g 17.377562
NUMBER
DATE OF PURCHASE
HORSEPOWER:
6.5
DISPLACEMENT:
12_56 CU
GASOLINE
CAPACITY!
TYPE:
1,25 QUARTS
UNLEADED
OIL'TYPE
IN,
(API-SF/SG/SH):
REGULAR
SAE 30 (ABOVE
32°F)
SAE 5W-30 (BELOW 32°F)
OIL CAPACITY:
SPARK PLUG(GAP:
20 OZS.
.030")
CHAMPION
VALVE CLEARANCE:
RJ19LM OR J19LM
INTAKE:
_004 - .008
EXHAUST:
,004-
.008
SOLID STATE IGNITION
AIR GAP:
.0125 IN.
BLADE BOLT TORQUE:
35-40 FT. LBS.
The model and serial numbers will be found on a decal attached to the rear of the
lawn mower housing,Record
both serial number and date of purchase in space
provided above.
LAWN
MOWER
Always observe safety rules when performing
any maintenance.
TIRES
• Keep tires free of gasoline, oil, or insect
control chemicals which can harm rubber.
• Avoid stumps, stones, deep ruts° sharp
objects and other hazards that may cause
tire damage,
BLADE CARE
For best results, mower blade must be kept
sharp. Replace bent or damaged blades_
TO REMOVE BLADE
• Disconnect spark plug wire from spark plug
and place wire where it cannot come in
contact with spark plug.
° Tum lawn mower on its side. Make sure air
filter and carburetor are upo
• Use a wood block between blade and
mower housing to prevent blade from
turning when removing blade bolt.
. Protect your hands with gloves and/or wrap
blade with heavy cloth.
• Remove blade bolt by turning counterclockwise. Use a 9/I6 ° box or open-end
wrench.
11
• Remove blade and attaching hardware
(bolt, lock washer and hardened washer)°
NOTE: Remove the blade adapter and
check the key inside hub of blade adapter.
The key must be in good condition to work
properly. Replace adapter if damaged.
TO REPLACE Bt,ADE
• Position the blade adapter on the engine
crankshaft. Be sure key in adapter and
crankshaft keyway are aligned.
° Position blade on the blade adapter aligning
the two (2) holes in the blade with the raised
lugs on the adapter,
° Be sure the trailing edge of blade (opposite
sharp edge) is up toward the engine,
• Install the blade bolt with the lock washer
and hardened washer into blade adapter
and crankshaft.
° Use block of wood between blade and lawn
mower housing and tighten the blade bolt,
turning clockwise.
• The recommended tightening torque is 3540 ft, Ibso
IMPORTANT: Blade bolt is grade 8 heat
treated.
NOTE: We do not recommend sharpening blade - but if you do, be sure the blade
is batanced.
TO SHARPEN BLADE
Care should be taken to keep the blade
balanced, An unbalanced blade will
cause eventual
damage
to lawn mower or
engine.
• The blade can be sharpened with a file or
on a gdnding wheel. Do not attempt to
sharpen while on the mower.
,' To check blade balance, drive a nail into a
beam or watt. Leave about one inch of the
straight nail exposed. Place center hole of
blade over the head of the nail. If blade is
balanced, it should remain in a horizontal
position, if either end of the blade moves
downward, sharpen the heavy end until the
blade is balanced.
, Remove any trash or grass cuttings from
inside the dust cover, pinion and/or drive
wheel gear teeth.
• Put wheels back in place.
° If after cleaning, the drive wheels do not
turn freely, contact your nearest
authorized service center.
GEAR CASE
• To keep your drive system working
properly, the gear case and area around
the drive should be kept clean and free
of trash build-up. Clean under the ddve
cover twice a season,
• The gear case is tilled with lubricant to
the proper level at the factory, ']he onty
time the lubricant needs attention is if
service has been performed on the gear
case
Blade
Crank shaft
ada
keyway
° if lubricant {s requ{red, use only Texaco
Starplex Premium ! Grease, Part No.
750355, Do not substitute,
ENGINE
LUBRICATION
Use only high qual_y detergentoil rated with
API service classification SF, SG, or SH.
Select the oil's SAE viscositygrade a_ordingto your expectedoperatingtemperature.
Blade
sAE VISCOSITY
GRADES
Crank
belt
shaft
Lock
washer
Blade
Hardened
edge
adapter
washer
GRASS CATCHER
- The grass catcher may be hosed with
water, but must be dry when used,
• Check your grass catcher often for damage
or deterioration Through normal use it will
wear. tf catcher needs repladng, replace
only with a manufacturer approved
replacement catcher. Gfve the lawn mower
model number when ordering.
T_MP'ERATURE RANGE ,_T_;_PATED
BEFORE h'EXl OIL CHi_NG£
NOTE: Although mu_-viscosity
oils
(5W30, 10W30 etc.) improve starting in
cold weather, these multiMscosity
oils will
result in increased oil consumption when
used above 32°F Check your engine oi!
level more frequently to avoid possible
engine damage from running low on oil
Change after the first 25 hours of operation at
least once a year if the lawn mower is not used
for 25 hours in one year.
Check the crankcase oil level before starting
the engine and after each frve (5) hours of
continuous use. Tighten oil plug securely each
time you check the oil level.
DRIVE WHEELS
Check front drive wheels each time before
you mow to be sure they move freely°
The wheels not turning freely means trash,
grass cuttings, etc. are in the drive wheel
area and must be cleaned to free drive
wheels°
If necessary to clean the drive wheels,
check both front wheels.
, Remove hubcaps, hairpin cotters and
washers.
• Remove wheels from wheel adjusters.
12
TO CHANGE ENGINE OIL
NOTE: Before tipping lawn mower to
drain oil, drain fuel tank by running engine
until fuel tank is empty.
• Disconnect spark plug wire from spark plug
and place wire where it cannot come in
contact with spark plug.
° Remove engine oil cap; lay aside on a dean
surface.
• Tip lawn mower on its side as shown and
drain oil into a suitable container. Rock lawn
mower back and forth to remove any oif
trapped inside of engine.
• V_,r_.i)e
off any spilled oil on lawn mower and
on side of engine.
• Flit engine with oil Fill only to the "FULL"
line on the dipstick. DO NOT overfill
,, Replace engine oil cap.
• Reconnect spark plug wire to spark plug.
CAUTION:
Petroleum solvents, such as
kerosene, are not to be used to clean
carLfidge. -Pney may cause deterioration
of the cartridge, Do not oil cartrtdge_ Do
not use pressurized
air to dean or dry
cartridge
MUFFLER
Inspect and replace corroded muffler as it
could create a fire hazard and/or damage,
SPARK PLUG
Change your spark plug each year to make
your engine start easier and run better: Set
spark plug gap at .030 inch.
CLEANING
IMPORTANT: For best performance, keep
mower housing free of built-up grass and
trash, Clean the underside of your mower after
each use,
CAUTION:
Disconnect spark plug wire
from spark plug and place wire where it
cannot come in contact with the spark
plug.
• Turn lawn mower on its sider Make sure air
filter and carburetor are upo Clean the
underside of your lawn mower by scraping
to remove build-up of grass and trash.
. Clean engine often to keep trash from
accumulating. A clogged engine runs hotter
and shortens engine life.
,, Keep finished surfaces and wheels free of
all gasoline, oil,etc.
° We do not recommend using a garden
hose to clean lawn mower unless the
electrical system, muffler, air filter and
carburetor are covered to keep water out.
Water in engine can result in shortened
engine life,
AIR FILTER
Your engine will not run properly and may
be damaged by using a dirty air filter,
Replace the air filter every year, more
often if you mow in very dusty, dirty
conditions.
Do not wash air filter,
TO CHANGE AIR FILZER
. Remove the air filter by turning clockwise to the stop and pull away from
collar,
• Remove filter from inside of cover,
• Clean the inside of the cover and the
collar to remove any dirt accumulation
• Insert new filter into cover,
• Put air filter cover and filter into collar
aligning the tab with the sloL
• Push in on cover and turn counterclockwise to tighten.
Collar
\
Clip
Turn
to
:temove
Slot
Air Filter
CLEAN UNDER DRIVE COVER
Clean under drive cover at least twice a
season° Scrape underside of cover wi_ putty
knife or similar toot to remove any build-up of
trash or grass on underside of drive cover.
Turn
Tab
Air Filter
Covar
Clockwise
to
Tighten
13
CAUTION:
BEFORE
PERFORMING
ANY SERVICE
OR ADJUSTMENTS:
Release control bar.
,'
Make sure the blade and all moving
parts have completely stopped,
*
Disconnect spark plug wire from spark
plug and place where it cannot come
in contact with plug.,
LAWN MOWER
TO ADJUST Cb'I'TING HEIGHT
See "TOAD JUST CUTTING HEIGHT" in the
Operation section of this manual.
REAR DEFLECTOR
The rear deflector, attached between the rear
wheels of your lawn mower, is provided to
minimize the possibility that objects wilt be
thrown out the rear of the lawn mower into the
operator's mowing position. If the rear
deflector becomes damaged, it should be
replaced°
TO REMOVE/REPLACE DRIVE BELT
. Remove drive cover, Remove belt by
pushing down on gear case pu]iey and roll
belt off°
o Turn lawn mower on its side with carburetor
and fuel cap up.
° Remove blade,
° Remove debris shield.
. Remove belt from engine pulley on
crankshaft.
, Install new belt by reversing above steps,
o AM,ays use factory approved belt to assure
lit and long lifeo
-
Remove the starter rope guide from the
lower handle,
• Remove hairpin cotters.
• Disconnect the lower handle from the
handle brackets,
, Turn the handle over and reassemble the
hairpin cotters that have been removed.
° Reassemble the starter rope guide,
• Reassemble the controls and the operator
presence control bar to the upper handle.
CAUTION:
The operator presence
control bar must pivot freely to permit
blade brake engagement when control
bar is released,
Do not over tighten Me
fasteners holding the controls to the upper
handle.
• To change from medium low to high
position only the upper handle section will
have to be turned over.
. To change from medium tow to bw position,
only the lower handle section will have to be
tumed over.
Shipping position
Medium low
um high
Drive
cover
High
Belt
Low
Push
down
TO ADJUST HANDLE
Your lawn mower handle can be _sed or
lowered for your mowing comfort. Four (4)
positions are available: high, medium high,
medium low and low. Handles are shipped
mounted in the medium low position,
° To change from medium low to medium
high position, the upper and lower handle
sections will have to be turned over.
• Remove cable dips.
• Remove the controls and operator presence
control bar from the upper handle.
\
Lower handle
Squeeze to
remove
Hairpin clip
14
Handle
bracket
Immedialely prepare your lawn mower for
storage at the end of the season or if the unit
will not be used for 30 days or more.
LAWN
O
.
peralor
presence
Fold !oward
lot storage
MOWER
When lawn mower is to be stored for a period
of lime, clean it thoroughly, remove all dirt,
grease, leaves, etc Store in a clean, dry area.
* Clean entire lawn mower (See "CLEANING"
in the Mainlenance section of this manual).
• Lubricate as shown in the Maintenance
section of this manual.
• Be sure that all nuts, bolts, screws, and pins
are securely fastened. Inspect moving
parts for damage, breakage and wear.
Replace ff necessary.
• Touch up all rusted or chipped paint
surfaces; sand lightly before painting.
HANDLE
You can fold your lawn mower handle for
storage.
- Squeeze the bottom ends of the lower
handle toward each other until the louver
handle clears the handle bracket, lhen
move handle forward.
* Loosen upper handle mounling bolt's
enough to allow upper handle to be folded
back.
IMPORTANT: When folding the handle for
storage or transportation, be sure to fold the
handle as shown or you amy damage lhe
control cables.
• When setUng up your handle from the
storage position, the lower handle will
automalically lock into the mowing position.
Upper
_ handle
,,"_J_"
"_ "I,
_.iSf
_,.... , _,
;i'l
Fola
Lower ...-__
handle
Mowing
position
ENGINE
FUEL SYSTEM
IMPORTANT: It is important to prevent gum
deposits from forming in essenlial fuel system
paris such as carburetor, fuel filter, fuel hose or
lank during storage. Also, experience indicates
that alcohol blended fuels ( called gasohol or
using ethanol or methanol) can attract
moisture which leads to separation and
formation of acids during storage. Acidic gas
can damage the fuel syslem of an engine
while in storage,
o Drain the fue! lank.
• Start the engine and let it run until the fuel
lines and carburetor are empty.
• Never use engine or carburetor cleaner
products in the fuel tank or permanent
damage may occur.
, Llse fresh fuel next season.
NOTE: Fuel stabilizer is an acceptable
altemative in minimizing the formation of
fuel gum deposits during storage. Add
stabilizer to gasoline in fuel tank or
storage container. Always follow the mix
raUo found on stabilizer cc_laJner. Run
Lower
handle
engine at least 10 minutes after adding
stabilizer to allow the stabilizer to reach
Handle
bracket
Squeeze to Iold
,,
control par
the carburetor.
and carburetor
Hairpin
cotter
t5
Do not drain the gas tank
if using fuel stabilizer.
ENGINE OIL
Drain oil (with engine warm) and replace with
dean engine elio (See "ENGINE" in the
MaintenarK::e section of this manual),
CYLINDER
• Remove spark plug,
, Pour one ounce (29 ml) of oil through spark
plug hole into cylinder,
• Purl starter handle slowly a few times to
distribute oil,
• Replace with new spark plug_
OTHER
• Do not store gasoline from one season to
another°
• Replace your gasoline can if your can starts
to rust, Rust and/or dirt in your gasoline will
cause problems,
• tf possJ_fe, store your unit indoors and cover
it to give protection from dust and dirt.
o Cover your unit with a suitable protective
cover that does not retain moisture. Do not
use pl_"tic. Plastic cannot breathe which
albws condensation to form and will cause
yourunittorust,
IMPORTANI'; Never cover mower while
engine and exhaust areas are still warm.
CAUTION"
Never store the lawn mower
with gasoline in the tank inside a building
where fumes may reach an open flame or
spark, Allow the engine to cool before
storing in any enclosure.
TROUBLESHOOTING
PROBLEM
Does not start
CHART
CAUSE
CORRECTION
• Dirty air filter.
• Out of fuel,
• Stale fuel,
• Clean/replace air filter,
• Flit fuel tanl_
• Drain tank and refill with
fresh clean fuel.
• Drain fuel tank and
carburetor and refill tank
• Water in fuel,
with fresh gasoline.
• Spark ptug wire is
disconnected,
• Connect wire to plugo
• Bad spark plug,
• Loose blade or broken blade
• Replace spark ptug.
• Tighten blade bolt or
replace blade adapter.
• Depress control bar to
handle.
adapter.
• Control bar in released
position,
• Control bar defective,
16
Replace control bar,
TROUBLESHOOTING
PROBLEM
Loss of power
CHART
CORRECTION
CAUSE
• Rear of lawn mower housing
• Set to "Higher Cut"
position.
or cutting blade dragging
in heavy grass.
o Cutting too much grass.
• Set to "Higher Cut"
position,
. Clear/replace air filler,
• Clean underside of mower
, Dirty air filter,
* Buildup of grass, leaves,
and trash under mower.
housing.
• Check oil level.,
= Too much oil in engine.
Walldng speed too fast,
° Cut at slower walking
speed.
Poor cut - uneven
• Worn, bent or loose blade
, Wheel heights uneven,
height
•CIean underside of
- Buildup of grass, leaves
and trash under mower
Excessive
vibration
• Replace blade, Tighten
blade boll.
• Set all wheels at same
mower housing_
- Worn, bent or loose blade
° Bent engine crankshafL
o Replace blade, ]ighten
blade bolt,
o Contact an authorized
service center,
,,,, _,JL_.
Starter rope hard
to pull
• Bent engine crankshaft,
o Depress control bar to
upper handle before
pulling starter rope,
. Contact an authorized
• Blade adapter broken.
,, Blade dragging in grass.
• Replace blade adapter,
,, Move fawn mower to ct_t
• Engine fly'Mleel brake is on
when control bar is released
service center,
grass or to hard surface
to slart engine.
. Raise cutting height,
not filling (if so
- Cutting height too low.
. Uft on blade worn oft.
equipped)
. Catcher not venting air.
• Replace blade.
• Clean grass catcher.
Hard to push
° Grass is too high or wheel
. Raise cutting height,
height is too low.
- Rear of lawn mower
• Raise rear of lawn mower
Grass catcher
housing or blade dragging
in grass.
° Grass catcher too _lL
• Handle height position not
right for you.
17
housing one (1) setting
higher.
° Empty grass catcher.
• Adjust handle height to
suit.
Garantla
Reales de Seguridad
Montaje
OperaciOn
Mantenimiento
Programa de Mantenimiento
18
18
20
22
26
26
Especificaciones
del Producto
Servicio y Adjustes
Almacenamiento
ldentificaci6n de pmblemas
Partes de repuesto
Orden de Partes
GARANT_
27
30
31
33
Vea el manual
ingles del duefio
Contratapa
LIMITADA DE DOS AJ<IOSPAPA LA SEGADORAA MOTOR CRAFTSMAN
Per dos (2} aries, a partir de la fecha de compra, cuando esta Segadora Cr_
se rnar_enga,lubdque
y aline seg_Jnlas instruc_onespare la operad6n y el mantenmnientoen el manual del duefio,Sears
mparar_ gratis rodedefecto en el material y la manede obrao
Si la Segadora Craftsman se usa pare fines comerc{a_s o de amende, esta garantfa s61ose apiece per
noventa (90) d{as a partlr de la fect_ de compra.
Esta Garant{a no cubre:
• Artfcubs que se desgastandurante el use normal tales come las cuchiltas segadoras rotatorias, los
adaptadores
de lacud_l_lascorreas,
losliltros
de aire
y lasbujias,
- Repemdones necesariasdebido al abu,_ o ala neg_gencla
del operador,incluyOndosea los
ck:_£'_es doblados y ala falta de manlenirr_entodel e_FJiposegt_nlas instmcoionesque se ir_wen
en el manual del dueSo.
EL SERVIClO DE GARANTfA ESTADISPONtBLE at devdver la segadpra a motor Craftsman al Cenlro/
Departmento de Servido Sears mas cercano en los EstadesUnides. Esta garantfa se aplica solarnente
mientras el producto esle an use en los F_'ladosUnities
Esta Gerantia le otorga derechos tegales especificos, y puede qu_ tarnbi_n tenga otros derechos que
vaffan de estado a estade.
Sears, Roebuckand
Co, D/817WA, Hoffman Estates, IL 60179 USA
Los estandraresde seguridadexigen la presenda
del operator en los controlespera redudr a un
minimo el r_esgode I_e.
Su unidad viene
equipada con dichos controles_Per ningun mo_o
Irate del e_irninarla func_n de los contro_esque
ex_genlapresendadeloperader.
ENTRENAMIENTO:
. Lea este manualdel opera(ira"
cuidedosamente. Farnitiadcesecon los
contro_esy aprendaa operarsu segadora en
ferma adecuade. Aprenda a parer su segadera
r&pkf_rnenleo
• No pe_
cluelos nifios usen su segadera.
Nunca perm_ qua los adultosoperen la
segadora sin con_,arcon las instrucclones
adecuadas.
• Mantenga el _rea de operackSndespejada
de genie, especialmentede nifios pequefio_
y de animales dorn_ticos.
, Use ta segaderasobmente pare los f=nes
propuestosper el fabdcantey seg3nlas
explicaciones
descfitas eneste manual.
, No opera_ segadora
sise ha cafdoo daY.doon
cualquiera
form,
a.Siemprereparelosdefies
antesde usada.
. No use accesoriosclueno hayan side
recomendados
per el fabdcante.El use de dichos
accesofios puedeset pe_roso.
• La cuchfflagira cuandoet motor est&
funcionande_
PREPARACK_N:
• Sfemprerevisecuk_adosamente
el _ea qua se
vaa segar y des_jela detodaslas piedras,
palos,aJambres,
huesosy otrosobjetos
extrar",OSo
Eslos objetos ser_n lanzados con la
cuchiltay puedenproductrtesienesgraves°
• Siempreuse anteojos de segurided o pmlectores
de ojos cuandearranquey duranteel tiempo
que use la segadora_
18
. V_stase en forma adecuad&, No opere la
segadora sin zapatos o con sar',dal_,s
mientras qua el motor est& fundonando.
,, Siegue siempre durante et dfa o con buena
hiz artificial.
•
OPERACI(_N:
•
Mantenga sue ojos y su mente en la
segadora yen el area que se est_ cortando.
No pen'nita que otros inlereses 1o distraigan
• No code c_sped mojado o resbaloso. Nunca
corra mientras estd operando su segadora.
Siempre asegurese de mantener el equilibrio
- rnantenga et mango agarrado firmemenle y
camine.
" No ponga las manes o los pies cerca odebajo
de las partes rotalodas. Mant_ngase
alejado de la abertura de descarga en lode
momenlo.
,, Stempre pare el motor cuando se vaya
ocuando no est_ usando su segadora, o
antes de atravesar las entradas para autos,
los senderos, caminos y &reas cubiertas de
ripio,
• Nunca dirija la descarga del mater_al hacia
los espectadoms ni permita a nadie cerca de
la segadora mientras la est_ operandoo
• Antes de limpiar, inspeccionar o de reparar I
a segadora, pare el motor y est_
completamente seguro de qua la cuchilla y
que todas las partes que se mueven se
hayan detenido. Luego, desconecte el
alambre de la bujia y mant_ngalo alej&do de
_sta para evitar el arranque per accidente
• No contint}e haciendo funcionar su segadora
sile pega a un objeto extra,So. Siga el
procadimiento descrito antedormenle, tuego
repare cualquier daF,o antes de volver a
arrancar y de operar su segadora_
• No cambie los ajustes det regulador o
hagaque el motor ande a una velocidad
excesiva. Se pueden producir da#,os en el
motor y I esiones personales.
,, No opere su segadora si vibra luera de Io
normal. La vibraci6n excesiva as una
indicaci6n de daSo; pare et motor, revise en
forma segura la causa de la vibraci6n y haga
las reparaciones seg_n sea necesario.
• No haga funcionar el motor en
recintoscerradoso Los gases de escape son
peligrosos.
• Nunca corte el c_sped tirando la segadora
hacia usted. Siegue a trav_s de la cam de
las pendientes, nunca hacia ardba o hacta
abajo pues puede perder el equilibdo. No
siegue pendientes demasiado empinadas
Tonga cuidado cuando opera la segadora en
lerreno disparejo o cuando cambie de
direcci6n - mantenga un buen equitibdo.
Nunca opera la segadora sin tas
protecciones adecuadas, las planchas, el
recogedor de c_sped y otros dispositivos de
seguridad en su lugar,
MANTENIMIENTO
Y ALMACENAMIEN-
TO:
•
•
•
•
,,
•
•
=
Revise ta cuchilla y los pemos de montaje
del motor a menudo, para asegurarse qua
esldn apretados en la forma adecuada_
Revise todos los pemos, tuercas y lomillos a
intervalos lrecuentes, para vedticar si esldn
aprelados en forma adecuada, y
asegurarseque la segadora se ancuentra en
condiciones de funcionamienlo seguro.
Mantenga todos los dispositJvos de seguridad
en su lugar y listos para funcionar,
Para reducir el peligro de incendio,
mantenga el motor sin cOsped, hojas y grasa
o aceite en excesoo
Revise el recogedor de c_sped a menudo
para verilicar si hay detedoro y desgaste y
cambie las bolsas desgastadas_ Use
solamente las bolsas de repuesto
recomendadas per el fabdcante de su
segadora o que complen con las
especificaciones de _ste.
Siempre mantenga una cuchi!la alilada en su
segadora.
Siempre permita que el motor se enlr[e
antes de guardada en cualquier recinto
cerrado.
Nunca guarde la segadora con combustible
en el eslanque denim de un edificio endonde
los gases pueden alcanzar una llama
expuesta o una fuente de ignici6n, ta! come el
calentador de agua, la estufa de
calefacci6n, la secadora de ropa, etc.
PRECAUCI6N:
Siempre descenecte el
alambre de la bujia y p6ngalodonde no pueda
entraren contacto con la buj/a, para evitar el
arranqua per accidente, durante la preparaciSn,
el transperte, e! ajuste o cuando se hacen
reparaciones.
PRECAUCI6N:
Es conocido per el Estado de
California qua los gases de escape del motor de
este productor contienen qu[micos los cuales a
ciertos niveles, pueden ocasionar, cdncer,
defectos de nacimiento, y olros daSos al sistema
reproductive.
lg
F_dos
accesodosestaban dispen_:_les
cuando se pmdujola segadora_Tarnbi&'__
_r_
en la
rnayorfade lastJendmsde Sears y enlos centrosde servicio. La mayoria de las _ndas Sears _
pueden mandar a pedir partes de repuesto para us'ted,si Ies propordonael r_mem del rnodetode su
segadora,Akjunos de estos acceso&_stal vez no se a#iquen a su segadora.
RENDIMIENTO
DE LA SEGADORA
.........................
lun .,.i
.
,
,,,,u
,.
,,
DESVtADOR DE RECORTES
PAPA SEGADORAS CON DESCARGA TRASERA
JUEGOS,,PARA
PARA
SEGADORAS
CON
DESCARGA
RECOREDOR
TRASERA
PARA
SEGADORAS
RECOREDOR
?_
1_
EI'tVASES
CONLATERAL
DESCARGA
...........................................
MANTENIMIENTO
ESTABIUZADORES
LA ACOLCHADORA
,
DE GASOUNA
DE LA SEGADORA
ADAPTAOORES
OE CUCHtLLA
Lea estas instruccionesy este rr,ar_el
completamente antes de tratarde montar u operar
su segadora nuev& Su segadora nueva ha sido
monlada en fa f#_bricacon b excepdSn de aquel_as
partesque se dejaron s_nmontar per razones de
env[o,Todas laspartes como las tuercas, las
arandelas, los pemos, etc., que son neoesarias
para.completarel mon_e hartside co!ocadasen
bolsa de pades,Para aseguraJ'seque su segadera
funcionaen Iorrna seguray adect_da, todeslas
partes y los articulos de ferreter_aque se monten
lienen
queser apretados seguramente.Usetas
herrarnienfasco_,
como sea necesarb, para
asegurar que se aprietenadecuadamente.
PAPA REMOVER
LA SEGADORA
DE
LA CAJA DE CARTON
• Remuevalas pades sueltascluese inclwen con
• Corte las dos esquinasde los extremos de la
caja de cartSny tienda etpanel de! extrerno
planoo
, Rernuevatodo el ma_er_lde empaque, excepto
la cu_ entre el mango superiory _1inferior, y la
que sujeta la ban-ade los control clueexige
la presenciadel operadorjuntocon elmango
superior.
20
Haga rodarla segadora hacia afuera de la caja
de cartSn y revl'selacuidadosamentepara
verificarsl todav[aquedenpartessueftas
adiciona_es.
COMO PREPARAR SU SEGADORA
PARA DESDOBLAR
EL MANGO
IMPORTANTE:Despfiegueel mangocon mucho
cuidado par'ano pel_r.._ o daSarloscablesde
control
. Levante los mangosbasracluela secd6ndeI
mangoinferiorse asegureen su lugar,en la
posk:_npara segar.
• Levantela secck_ del mangosuperiorbastssu
lugaren el mangoinferior,rernuevala cuSa
protectoray aprieteambas manillasdel mango.
• Remueva la cuba det mangoquesujeta la barra
de loscontrol que exige la preser,da. del
operador j_Ttocon el mango superior.
, E] mango de la segadorapuedeajustarse
segun
leacomode parasegar.
Refi_rase
a "AJUSTE
DEL MANGO" en la SecdSn de Servido y
Ajustes de este manual,
• Parapararel motor, suelte
la barra de control
que exige la presencia del operador.
AVISO: En climas m_.s fries puede que
sea necesario repetir los pasos del
cebadoo En climas m,_s calurosos el cebar
demasiado puede producir el ahogo y el
motor no va a arrancaro Si se ahoga et
motor espere unos cuantos minutes antes
de tratar de hacedo arrancar y no repita
los pasos del cebado.
CONSEJOS
PAPA SEGAR Y ACOLCHAR
IMPORTANTE: Paraobtenerel meier rencfrneinto
mantenga la cajade la segader a sin acum_don de
cesped y basur'&,Vea "LIMPIEZA"en section
de"Mantenimenio"
de este manual..
• La o._llaacok_hadomespecial va a volver a
cortar los recortesde cOspedmuchasveces, y
los reduce en ta_,
de re,ode que si se caen
en el c_sped se vana cf_spesarentre _ste y no
se van a notar.Tarnb_,n, el cesped ecolohadese
va a deshacer r_le
entre_
CONSEJOS PAPA SEGAR
substandas nutrit_as para el c_ped.Siempre
acolche con tavelo_ad del motor (cuchilta)rnas
• Bajo dertascondidones, taJcome c_sped muy
atta,puesas{ se obtendr_ la mejor acckSnde
alto, puede ser necesarb el elevarta altura del
recorte de las _ch_llas,
corte pacaredudrel esfuer'zonecesado para
• E_e cortar el c6sped cuandoest_ mojado El
empujar la segaderay para evitarsobrecargar el
c_sped mojado Uendea |ormar montonese
motor, dejandornontonesde recortesde c&sped.
inlerfiere con la acci6n de acoldlade. La rnejor
Puede que sea necesado redudr la velocidaddel
hera para segar el c_sped es tempranoen la
recorridoylo haga fundonar la segadorasobre el
tarde.A esa hera _sle se ha secade y el &tea
_rea per segunda vez,
reci_n cortada no quedar& expuesta al sol
. Para un codemuy pesado, reduzca etancho del
direclo.
corte pasandopardalmenteper endma del lugar
• Paraobtener los mejores resuttades,ajusle _a
anleriormente cortadoy slegue lentarnenle.
atturadel cortede la segadorade mode que _sta
• Para un meierensacadodel c_ped y para la
cedesolamente el terciosuperbrde las hojas de
mayon'ade las condlclonesde code, la veloddad
c6sped. En el case de que el c_sped haya
del motor debe ajustarsea la posid6n de r-'_pk_o.
creddo dernasiado,puede ser necesario et
, C.uandeuseuna segaderacon desca,-ga
trasera
elevarIa altura det corte pardredt_r el esfuerzo
en c_spedhOrnedoy peeado,los montones del
necesario para emptJjarla segacloray para ev?,ar
c_sped cortado puedeque no entren en el
sobrecargar
el motor, dejando montonesde
recogederdec_spedoReduzca la vetoddad del
recortesde c_sped, Para un acot_an_ento muy
recorfido (veloddad de empuje)y/o haga
pesado, reduzca el ancho del corte pasando per
{urcJonarla segadorasobre et _rea per segunda
encima del lugar anteriormente cortado y siegue
vez..
lentamente.
,, Si queda una huella de cortes en el tadoderecho
Ciertos tipos de c&sped y sus condidones
de una segadora con d_rga
trasera,siegue
pueden exigir que un _u'eatengaque set
en la direcd6n en que giran las manillasdel re_,
acold-_da per segunda vez para esconder
solapart,de unpoco para recaudarlos recedesen
completamente los recortes.Cuando se haga et
la pnSximapasada
segundo code, siegue atravesadeo en tom_
• Los pores en los tecogederesde c_sped de tela
perpendicular a la pasada del primer corte.
puedentlenarsecon mugre y po{vocon el use y
•
C.arnbiesupatr6n de code de semana a
los recogedores recaudar-&nmenos c_sped.
semana. Siegue de notre a sur una sernanay
Para evitar_sto, rocie el recogedorcon la
luego cambie de este a oestela pr6_ma
manguera de agua regularmentey d_je!o
semar,a. Esio evilar_clue elc_spedse enrede y
secarseanles de usarloo
carnbiede climcci6n_
, Mantenga la partesuperior de!motor, alrededor
del anancador, despejada y sin recortesde
c_spedy paja_Estoayudar_el tiujo del aJredet
Max. 1/3
motor y extender'&
su duraci6n.
21
FAMILIARICESE CON SU SEGADORA
LEA ESTE MANUALDELDUENO Y LAS REGLAS DE SEGURIDADANTES DE OPERAR SU
SEGADORA.Compare {as_lustrador_scon su segadora para faniliarizarse con la ubic_ck_nde !oa
5r,,ersoscontrdasy ajustes.Guarde este manual para referenclaen et future.
'Est_ s'{mbolospued_ ai:_teser sobre su'8egadora o en la titeratura proporcionada con el
producto. Aprenday comprenda sus significados.
A'r'rENCION
O
AOVEF]T_NCtA
MOTOR
MOTOR
ENCENDIIX)
RJ_PiOO
LENTo
ESTRANGU
LACf()N
APAGAOO
COMACEtTE
PELtGFIO_ GUARDE LAS
BUSTIBL E................
MANOS Y LOS P!ES U_JOS
control que exige la
presencia del operador
Control de impufsi6n
Cord6n
Manitla del
mango
Recogedor
Tapa del deposito
de la gasorina
del cSsped
Cubierta de Ia
Tapon de la
acolchadera
Tapa det deposito de
aceite del motor con
varilla indicadora de
nivet
Cebador
CUMPLE
CON
LOS REQ0iS
TOS
Ajustador de la rueda
(en cada nJeda)
DE SEGURIDAD
Caja
DE LA CPSC ................
Las segadoras a motor, que se conducen desde la pade de atr_s, rotatorias, Sears. cumplen con
los est&ndares de seguridad del American National Standards Institute y de ia UoS Consumer
Product Safety Commission, La cuchilla gira cuando el motor est_ funcionando.
_
i IIIII,IIIL
lit
.........
Barra de control que exige la prencia det
operador - fiene que sujetaPse abajo, junto
con el mango, para hacer arrancar el motor.
Suet{eta para parar ef motor.
Cebador - bombea combustible adicionai
desde el carburador al cilindro para uso cuando
se necesita hacer arrancar un motor fr(o.
i1_
..................................
•....
Palanca de control de la impulsl6n - se usa
para engancharla segadora para movimienlo
hacia adelante impulsada a motor_
Tapon de la acotchadera - situada en Ia
abertura de la descarga y debe ser quitada
cuandose conviede la operacci6nde ensacado
a descargao
Cord6n arrancador - se usa para hacer
arrancar el motor,
22
-:
La operad6n de cuatquier segadora puede
hacer que salten objetos extraSos dentro de sus
ojos, Io que puede producir da_os graves en
_stos, Siempre use anteojos de seguddad o
protecci6n para !os ojos mientras opere su
segadora o cuando haga ajusles o
reparaciones,
Recomendamos una mascara de
segundad de visi6n amp_ia, para use espeiuelos
o anteojos de seguddad estandade_
COMe
Para un code alto, baje las
ruedas
Para un corte bajo, tevante las ruedas
USAR SU SEGADORA
PARA MONTAR Y ADJUNTAR EL
RECOGEDOR DE CESPED
PRECAUCI6N: No haga funcionar su
segadora sin el desviador de recortes o sin el
recogedor de c_sped, aprobados, en su
lugar. Nunca trate de operar la segadora
cuando se ha removido la puerta trasera o
cuando est_ un poco abiert&
VELOClDAD
DEL MOTOR
• Cierre la tapa solrable La tapa sortable
debe estar cerrada cuando se esta
operando la segador&
. Levante la puerta trasera de la caja de la
segadora y ponga eI bastidor del recogedor
de c6sped en tas orejas formadas en el
puntal de bisagra de la puerta trasera.
o El recogedor de c_sped esta asegurado en
la caja de la segadera cuando se baja la
puerta trasera para descansar en el
bastidor del recogedor de c_sped
PRECAUCI_N:
No haga luncionar su
segadora sin el desviador de recortes o sin el
recogedor de c_sped, aprobados, en su
lugar. Nunca trate de operar la segadora
cuando se ha removido la puerta trasera o
cuando est& un poco abierta.
La velocidad del motor se estableci5 en la
l#,brica para un rendimienlo 5primo La
vefocidad no se puede ajustar
CONTROl.
DE ZONA DEL MOTOR
PRECAUClON: Las reguladones feclerales
exigen que se instale un control para et motor
en esta segadora para reducir a un m[nimo el
riesgo de lesionarse debido al contacto con la
cuchillao Per ning_Jn motive trate de eliminar
la funci6n del control del operador. La cuchflra
gira cuande el motor esta fundonandoo
•
Orejas de la
placa
Su segadora viene equipada con una barra de
control que ex_e la presencia de[ operador,b
que requlere que el operador est_ detr_s del
mango de la segadora para haceda ar_ncar y
Z_ ji-S_"
Puerta
trasera
Puntal de
eperarla.,
Baslidor
PARA AJUSTAR LA ALTURA DE CORTE
reogedor
o Levar_e lasr, Jedes para e! corte bajo y baje las
Orejas
ruedas para el corte alto,
• Ajuste la altum de code para qua se acomode a
sus requLsitos. La posici6n dot medb es la meier
para la rnayoda de los c_spedes,
• Para r_,ambiarla aJturade cotte, empuje la
palancadel ajustador hacia la rueda,Mueva la
ruedahada aniba o hacia abajode modo que
se acomode a sus requisitos,
Asegurese que
todas{as ruedasqueden k3ualmente ajustadas,
ATENCIQN: El ajustador esta correctamente
colocado cuando las orejas de la placa asian
inserladas en el agujero (tel mango,
Tambi_n, los ajustes de 9 posiciones (si
equipado) permiten que el mango pueda ser
movido entre ]as orejas de la placa,,
del
de!
cesped
VACU R
ELRECOGEDOR
DE
C SPEO
•
Para remover el reoogedor del c_sped suefte ta
barra de control del operador para pealer parar el
motor.
•
Levante la puerta de arras y remova el recogedor
del c_sped per el rnango_
AVlSO; No arrastre la bolsa cuando la vacfe;
se producir_ un desgaste innecesafio,
!
O
23
CONTROL
DE LA IMPULSION
La auloimpulsiOn se controla al suiefar la barra
de conlrol que e:,ogela presenaa det operador
hacla abajo en el mango y al empujar la palanca
de control de la impulsion hada adela_e basle
que suene "clic." luego se _elta la palanca
• El rnovimienlo hacia adelante parar_ cuando la
barra de control que exige fa presencia del
operador se sue_, Pare parer el movimiento
hacia adelante sin parar el motor, suelle la barra
de control que exige la presencia del operador un
poco haste que se desenganche el control de la
impulsion Sujete la barra de control que exige la
presencia de! operador abajo en contra del
mango pare continuar segando sin
auloimpulsiOn
• Pare mantener el control de la impulsiOn
enganchado cuando se de vuelta en las
esquires, empuje el mango hacia aba_o y 1evanle
las ruedas detanteras fuera del suelo a] girar la
segadora
Control de
,' Cambie el aceite despu_s de 25 horas de
operaciSn o una vez por lemporada Puede
necesitar cambiar el aceile m&s a menudo
cuando las condiciones son polvorosas o
sucias
,
\, \
la impulsion
_._, impulsion
Para enganchar
el
contro! de la
impulsion
ANTES
DE HACER
\'_
Conlml de la
impulsion
desenganchado
ARRANCAR
EL
MOTOR
ACEITE
Su segadora rue enviada sin aceite en el motor,
• AsegtJrese que la segadora est_ nivelada y
que el &rea alrededor del depOsito de acei/e
est0 limpia,
• Remueva la tapa del dep6sito de aceile del
motor con la varilla tndicadora de nivel y
rellene hasta la I/nea de lleno en _sta,
• Use 20 oz, de aceite. Para el lipo y la calidad
vea "MOTOR" en la secci6n de las
Manlenimenlo en este manual
° Vacle el acelte lentamente. No to Ilene
demasiado.
• Revise et nivet del aceite antes de cada uso.
Agregue aceile si es necesario. Llene hasta
fa linea de lleno en la varilla indicadora de
nivel.
"Para
leer el nivet adecuado, apriete la tapa
det depOsito de aceite del motor cada vez.
• Vuelva a instalar la tape del depdeito del
aceite y apri0tela
GASOLINA
• Lfene el estanque de combustible_ Use
gasolina regular, sin plomo, nueva y limpia
con el minimo de 87 octanos No mezcte et
aceite con ta gasolinao Para asegurar que la
gasolina utilizada sea fresea compre
eslanques los cuales puedan ser utilizados
durante los primeros 30 dies
ADVERTENCIA:
La experiencia ha
indicado que los combustibles mezctados
con alcohol (conocidos como gasohol, o el
uso de etanol o metanol) pueden atraer la
humedad, la que conduce a la separaci6n
y formaciOn de _cidos durante e!
almacenamiento
La gasolina acidica
puede daOar el sistema del combustible
de un motor durante el almacenamiento
Para evitar los problemas con el motor, se
debe vaciar el sistema del combustible
antes de guardaflo por un perfodo de 30
dias o m_s. Vacie e! estanque del
combustible, haga arrancar et motor y
h,_gafo funcionar hasla que las lineas det
combustible y el carburador queden
vacios. La prOxima temporada use
combustible nuevo. Vea las Instrucciones
Para El Almacenamiento
para m,_s
inforrnaci6n. Nunca use productos de
limpieza para el motor o para el
carburador en e! estanque del combustible
pues se pueden producir daRos
permanenteso
Tapa del
Tape del
deposito de
aceite del
motor con
\
varilla
indicadora de
nivef
PARA
•
HACER
..i/
ARRANCAR
deposito de
la gasolina
EL MOTOR
Pare hacer arrancar un motor trio, empuje el
cebador cinco (5) veces antes de tralarto,
Empuje firrnemenle. Este paso norrnalmente
no es necesado cuando se hace arrancar un
motor que ya ha estado tuncionando pot
unos cuantos minutos,
• Sujete la barra de control que exige la
presencia del operador abajo en el mango y
tire el mango del arrancador r&pidamente. No
permita que el cordon arrancador se
devuelva abruptamente
24
•
Para parar el motor, suelte la barra de control
que exlge ta presencia del operation
AVISO: En climas m_s fries puede que
sea necesafio repetir los pasos del
cebado. En ctimas m&s calurosos el cebar
demasiado puede producir el ahogo y e{
molor no va a arrancar, Si se ahoga el
motor espere unos cuantos minutos antes
de Iratar de hacerlo arrancar y no repita
los pasos del cebado,
CONSEJOS
.
•
los recogedotes recaudar_m_
•
c_sped.
Para ev_ar _sto, roche el recogedor con la
manguera de agua regularme_e y d6jelo
secaree antes de usarlo,
Mantenga la parte superior de_molor, alrededer
del arrencador, despejada y sin recortes de
c&sped y paja. Esto ayudar_ el llujo del aire del
motor y extendem su duraciSn.
SEGAR
Y ACOLCHAR
IMPORTANT'E: Para obtener el mejor rencfimeinto
rre_tencja la caja de la segador a sin acumladon de
cesped y basur& Vea "LIMPIEZA" en seccion
de'Manlen_mento" de este manual.,
CONSEJOS PAPA SEGAR
Bajo cierlas condiclones, _ come c_sped muy
aJlo, puede set necesario el elevar la altura de]
corte para redudr el esfuerzo necesafio para
empujar la segadora y para evitar sobrecargar el
motor, de_,do montones de recorles de c_sped.
Puede que sea necosarb redudr _avelocidad del
reco_do y/o haga fundonar la segadora sobre el
_rea por segunda vez.
. Para un c_r_e muy pesado, reduzca e! ancho del
corte pasando pardalrnente per encima del lugar
anterlormente cortade y siegue tentamente.
• Cuando use una segadora con descarga trasera
en c&sped ht.imedoy pesado, los montones del
c_sped cortado puede que no entmn en el
recogedor de c_sped. Reduzca la velocidad det
recorrido (ve4ocidad de ernpuje) y/o haga
funcionar la segadora sobre el _rea per segunda
vez,
° Si quede una huella de cortes en el lade derecho
de una segadera con descarga lresera, siegue
en la d_mcciSn en que giren las rnaniUas del reloj,
solapando un poco para recaudar los recortes en
la pnSximapasada.
, Los poros en los recogedores de c_sped de lela
pueden Ilenarse con mugre y polvo con el uso y
PARA
La cuch_!la acolchadora especial va a votver a
cor_ar los recortes de cesped muchas veces, y
los reduce en tamar_, de mode que si se caen
en ef c_sped se van a dispesar entre _ste y no
se van a notar, Tambien, el cesped acolohado se
va a deshacer r_pidamente entregande
substancias nutrftivas para el c_sped Siempre
acotche con la vetoddad del motor (cuchi!la) mAs
aJta,pups asi se obtendr& la rnejor acci6n de
re_orte de las cuchitfas
-
Evile cortar el c_sped cua.qdo est_ mojado El
c_sped mojado tiende a format rnontones e
inte_ere con la acc_n de acok:hado,, La mejor
hora para segar el c_sped es temprano en la
tarde, A esa hora _ste se ha secado y ef &rea
rec{_n cortada no queda_ expuesta al so!
directo
• Para obtener los mejores resullados, ajuste la
a_ura de! corle de la segadora de rnedo que esta
corte sofamente el torch superior de las hojas de
c_sped, En el caso de que el c_sped haya
crecido dernasiado, puede set necesarb el
e(evar la altura de! corte para redudr el esfuerzo
necesario para empujar la segadora y para ev#,ar
sobrecargar el motor, dejando montones de
recorles de c_sped. Para un acolohamiento muy
pesado, reduzca el ancho de/corle pasand_ per
endrna det lugar anterlormente cortado y siegue
lentamente.
- Ciertos _pes de c_sped y sus cond_ones
pueden exJgirque un &rea |enga que ser
acotchada por segunda vez para esoonder
comptetarnente los recortes. Cuande se haga el
segundo cone, s_eguea_ravesade o en forma
perpendicular a la pasada del pnmer code,
• Cambie su palr6n de corte de semana a
seman& Siegue de node a sur una semana y
fuego caml_e de es[e a oeste Ia pr6xima
sernar',a. Es_o ev_ar_ que el c6sped se enrede y
cambie de direc=i6n.
Max
25
1t3
L_mp_amnspocoonar
et tecogedor
de
!S _ed_0v,eneequ,p_do)
E ,L,mp!a
V"
iV'
'
G
L_mp_ar debalo de Ia cub_eda de I,_ lrans-,
J
m_s_6tl (segaderas
D
sadas
poder
ptopulsot)
Flewsar (segadoras
las cotreas ,':on
y tax
poleas
impull=lev_sar o,/afilarlcamb_ar la cuchdl a ................
R
J
........
con poder propulsor)
If
If
_
Table de lubrlcaci6n
L_mpfar Ia bateria./recm'gar
(segadoras
M
Rewsar
Cambla_r
con ar,anque,el_ct,[Ico)
el mveldel
el ace_{o
--
ace_le
dot
me!or
,,,,,,,,
_
;3
If
!/
if
V'4
.......
.........................
_
_-JI,2
LimPlar el 1'1IIto,de _q,re,,
O
....
I ___ I_
Cambmr el ca_lucho de papet del fittro
V_2
de aire
I .. Camt_at mt*s I_ menudo cusndo se opere ba_o catga pest_da o on arl_io,_les
con altas
2 -_D_ serwoo m&s a mertudo cualvJo _e opeto en cot_d_cim_@_ sucias o poh'otosas
4.
C_rgar
m_;
a me_qodo
len_otatuftls
cual_do s_egut_ ell t@rtotlo 8refuse
po_ 4@ bolas a_ hn de I_ lempo_ad_
RECOMENDACtONES
TABLA
GENERALES
La garanlia de esla segadora no cubre los
arUculos que han eslado sujelos al abuso o a fa
negligencia del operador Pare recibir lodo el
va{or de la garantia, el operador tiene que
mantener la segadora segQn las instrucciones
descdtas eneste manual.
Todos los ajustes en ia secei6n de Servicio y
Ajusles de este manual tienen que ser
revisados por to menos un vez por cada
lemporada,
• Una vez al afio, cambie la bujfa, limpie o
cambie el elemento del filtro de air° y revise
si la cuchilla esl& desgastada. Una buji'a
nueva y un el°menlo del lillro de aire limpio/
nuevo aseguran la mezda de aire-combuslibie adecuada y ayudan a que su motor
funcione mejor y que dure m,_s
. Siga el programa de mantenimiento eneste
manual
ANTES
DE CADA USO
.-,
I!
(_)ROCIE
de ;a rueda
motor
" __4",-
(D Clavija de montaje
del puntal del
mango
.
Bisagra
de la
puerta
Ires°re
EL LUBRICANTE
REFIERASE A LA SECCK_N DE
MANTENIMENTO
EN "MOTOR"
IMPORTANTE:
No acedt o engrase los
rodamientos de la rueda de plastice. Los
lubficantes viseosos atraeran polve y mugra, Io
que acortara la duracion de los rodamientos
auto lubdcantes
Si cree que lubdcarse, use
solamente un lubricanle tipo gralito_ de polve
seco, en forma moderadao
suettos
Manlenga la unidad bien lubficada
"TABLA DE LUBRICACION")
Ajusladpr
;
Revise el nivel del aceite del motor.
• Revise si hay sujeladores
LUBRICACION
DE LU,BRiCACION
(_)
Hay algunos ajusles que se tienen que hacer en
forma ped6dica para poder mantener su unidad
adecuadamente.
-
....
......
6_
Limpiar
Inspeccionar
oicambmr
et s_fen¢iador
la bulia
3 • C,3mb_@ I_s _uchlllas
'
(yea la
26
,:
ESPECIFICACIONES
NOMERO
DE MODELO
NOMERO
DE SERIE
FECHA
DEL PRODUCTO
917,377562
DE COMPRA
CABALLOS
DE FUERZA:
6.5
)ESPLAZAMIENTO:
12o56 CU
CAPAC1DAD
DE GASOLINA:
1 25 Cuartos
REGULAR SIN PLOMO
TIPO DE ACEITE:
(API-SF/SG/SH)
SAE 30 (sobre 32°F)
SAE 5W-30 (debajo 32°F)
Y TIPO
DE ACEITE:
"_'P_AD
SENCENDIDO
SOLIDO
20 oz, de capacidad
,:030")
CHAMPION
DE VALVULA:
ADMIStON:
°004 - .008
DESCARGA:
,004 - .008
BUJfA (ABERTURA:
TOLERANCIA
IN.
RJ19LM O J19LM
DE ESTADO
ABERTURA
DE AfRE:
.0125
IN.
35-40
FT. LBS.
TORS1ON DEL PERNO
DE LA CUCH1LLA:
E1 num_ro del nodelo y el de serie se encuentran
en la calcomania
trasera de la caja de la segadora, Debe registrar tanto el numero
fecha de compra y mantengalos en un lugar seguro para refencia
adjunta a la parte
de serie come la
en el futuro.
• Flemuevael pemo de la cochilla gin_ndoloen el
senlk_ contrario en que giran las manillas del
retoj,
• Remueva la cuchilla y los articulos de ferreteda
adjuntadores (e!pemo, la arandela de seguddad
y la arandela enduredda),
SEGADORA
Siempre observe las reglas de seguridad
cuando haga el mantenimiento.
LLANTAS
• Mantenga las llantas sin gasolina, aceite o
substancias qufmicas para control de insectos
que pueden da.,_arla gorna..
• Ev_e los tocones, las piedras, las gdetas
pmfundas, los objetos afilados y otros peligros
que pueden daY_r alas Itantas.
AVlSO: Remueva el adaptador de la cuchilla y
revise el cubo interior de la ranura det
adaptador de la cuchilla, La ranura tiene que
estar en buenas condiciones para que
funcione en forma adecuada. Cambie el
adaptador si est_ daf_ado,
CUIDADO DE LA CUCHILLA
Para obtener los mejores resultados, la cuchil_a de
ta segadera tiene que mantenerse alilad&
Carnbfe la cuchilta doblada o daf_da.
PARA CAMBtAR
•
LA CUCHILLA
Ponga el adaptador de la cuchilla en e! cigueCk&!
del motor. Aseg[Jrese que ta ranuradel
adaptador y que el chavetero de! ciguef_aI esl6n
atineades
• Ponga la cuchilla en el adaplador de _sta
atineando Ios dos (2) agujeros en la cuchilla con
las salientes elevadas en et adaptadot:,
• Asegt_rese de que el horde de satida de la
cuchilla (opuesto at borde afilade) es!_ hacia
arriba hacia el motor.
• Instale el pemo de la cuchilla con laarandela de
segurk:lad y la arandela endurecida en el
adeplador de la cuchilla y el cigt._ei'_al,,
PAPA REMOVER LA CUCHILLA
• Desconecte el aJambre de la bujia y p6ngalo en
deride no pueda entrar en contac!o con 6sla.
• Haga descansar la segadera en su lade,
Asegdrese que el 61trode aJrey que el
carburador queden mirandohacia arriba.
• Use un bbque de rnadera entre la cuchiIla y la
ca_ de la segadera para evitar que la cuchiIla
gire cuando se le quite el pemo.
• Proteja sus manos con guantes ylo envuelva la
cuchifla con una tela gruesa.
27
•
Use un bioque de madem entre la cuchilla y la
cala de ta segadera y apriele el pemo de la
cud,ilia gir_ndolo en el senlide en que giran Fas
maniltas del reloi
• La torsion para apretar recorrer,,dade es de 35 40 pies libras
IMPORTANTE: EL PERNO DE LA CUCHILLA ES
CLASE 8 TRATADO A CALQR
CAJA DE ENGRANAJES
- pero si Io hace, asegL)rese de que quede
balanceada
Rata mantener el sislema de impulsi6n
funcio,',ando en lorn-m adecuada, la caja de
engrar_es y el _rea alred_or de la impulsiSn
lienen que mantenerse limpias y sin acumulacion
de basura. Umpie debajo de la cubierta de la
impulSi6n dos veces por lemporada,
- La caja de engranajes se Ilena con lubdcante
hasla et rWel adecuado en la f,_bric&La _nica
vez que et lubricante necesiia atenci6n es
coando se le ha prestade servicio a la caja de
PARAAFILAR
•
AVISO: No recomendamos el afilar la cuchilla
m-,::jtanaies.
LA CUCHILLA
Se tiene que tenet cuidado de rnanteneda
balanceada Una cuchilla que no eslA balanceada
va a producir eventuaJmenle det_ en la segadora o
en el motor,
• La cuchilla puede alitarse con una lima o en una
ruede reclificadera No Irale de afila+ta mienlras
se encuenlra en la segadora
• Para revisar el balance de la cuchilla, clave un
clave en una viga o en la pared. Deje alrededer
de una puk:jada de un ctavo recto expueslo
Ponga el agujero central de la cochitla sobre la
cabeza del clave. Si ta cuchilta est_ balanceada
debe perrnanecer en la posici6n horizontal. Si
cualquiera de los extremes de la cuchilla so
mueve hacia abajo, alile el extreme pesade
hasta que _sla quede balanceada.
Adaplador
R
de la cuchilla
;,
anura ""7_-__
Cuchilla
_
Chaverlero
cigue6at
del
''_
_
•
/_
,acuo.i,,a
]
Si se necesila Iubdcante, use solarnente Grasa
Texaco Slarplex Premium 1, Parle No 750355.
No use substitutes
RUEDAS DE IMPULSION
Revise las ruedas de imputsi6n delanleras cada vez
antes de segar, para asegurarse de que se mueven
libremente
Si las tuedas no giran libremenle quiere decir que
hay basura, recedes de c_sped, etc en el _'ea de
las ruedas de impulsi6n y tienen clue limpiarse para
libetarlas+
Es necesado limpiar tas ruedas de impulsi6n; revise
ambas nJedas delanleres.
. Remueva los tapacubos, ]as clavijas de horquilla
y las arar_elas
- Remueva las lueclas de los ajustadores de las
ruedas.
• Remueva la basura y los recortes de c_sped de
denim de la c_abiertacontta el polvo, pi66n y/o de
los dientes de los engranajes de las ruedas de
impulsi6n.
• Ponga las ruedas de v-u_lla en su lugaro
. Si despu_s de limpiar las ruedas de impulsi6n no
giran libremente, p6ngase en conlaclo con su
cenlro/deparlamento de servicio autorizade rn&s
Ceit"_:_30,
MOTOR
LUBRICACl6N
segridad
Endurecida
RECOGEDOR
Borde de
salida
Use solamenle acelte de delergente de aJta caJklad
ciasificado con la clasifloaci6n SF, SG o SH de
seMcio APL Selecdone la calidad de viscosidad
de la
cuchilla
DE ClaSPED
{Si comprade come un accesorio)
• El recogedor de c_sped puede set rociado con el
agua de _ rn&qgueta pero tiene que eslar seco
cuande se vaya a usar.
• Revise su recogeder de c_sped a menude para
verificar si est#. dafado o detedoradoo Se va a
desgaslar con el use normaJ. Si se necesita
camblar el recogedor, c;,_rnbielosolamenle per
uno que sea aprobade [:)orel fabricante, D6 el
nOmero del modelo de la segadera cuando Io
ordeneo
AVISO" A pesar de que los aceites de
mulIMscosidad (5W30, 10W30, etc) mejoran
el arranque en clima fdo, estos aceites de
multiviscosidad van ha aumentar el consume
de aceite cuando se usan en temperaturas
sobre 32 ° F. Revise el nivel del aceite del
motor m_s a menudo, para evitar un posible
daSo en el motor, debido a que no tiene
stZ_ente aceite.
28
Cambie el aceite despu_s de 25 horas de
opetaci6n o una vez per temporada
Puede
necesitar cambiar e{ aceite rn_s a menudo
cuando las condiciones son polverosas o
sucias,
Revise el nk,el del ac64te del c_rter antes de
an-enter el motor y despu_s de cada cinco (5) bores
de use oonlJnuadO Apdete el tapen del aceile en
|erma segera cada vez que revise el r,_vetdot
el sentido contrario de las manilfas del r64oj
para apretarla
Gire en el
Abrazadera
sentido
Collar
Alas
manillas del
r64o1para
)retarla
Remover
aceite,
PARA CAMBIAR ELACEITE
DEL MOTOR
AMISO: Antes de inclinar la segadora para
drenar el aceite, drone el tanque de c0mbustible hacie_do cerrer el motor hasta que el
tanque est_ vacio,
•
Orela
•
Desconecle el alanYore de la bujfa y l_ngato de
mod_ u/as no pueda entrer en contac_o con _sta,
Rerr_Jeva la tapa del dep6sito get aceite; d_j64a a
un lade en una super_e timpia,
Incline la segadora y h&gala descansar en su
lade y drene el aceile an un envase adecuado,
Mueva I,! segadora de alr_ pare ad64anle pare
remover lode el aceite que se haya quedado
alrapado dentro del motor..
Umpie lode et aceite derramado en !a segadora
yen 64tado del motor°
Uane el motor con aceite. Uenelo sotamenle
,
•
haste fa tinea de Iteno (FULL) en la varilla
indicadora de nivel. NO LO LLENE
DEMASIADQ
Vuelva a poner la tapa en el depesi!o del aceite.
Vuelva a conectar el alambre de la bujia a _sta.
•
•
•
del liltero
de aire
Gire en el
senlido
contario las
manillas del
retojpara
aprelarl
SILENCIADOR
Inspeccione y cambie el sitenciador si est_ corroido
pues producir un petigro de incendio y/o defio
BUJIA
Cambie su bujia cada ar3o para hacer que su motor
arrar_ue _
f_ciimente y fur, done meio_ Ajuste la
abertura de la bujla en 0.030 pulgada,,
UMPIEZA
IMPORTANTE: Para obtener el meier redimientem,
manlenga lacajadelasgadorasin acumulacion de
cesped y gasura. Umpie la parle de su segadora
despues de cada use,
PRECAUCl0N;
Desconecte el afambre de la
buj_a y I:_ngalo en donde no pueda entrar en
contacto
Envaee
FILTRO DE AIRE
Su meier no luncionar_, en forma adecuada y
puede su,frir daF,os sise usa un |il_rode affe
sucio.,
Cambfe e! filtrode aire cada afio, y m&s a
menudo si siege en condlcionesmuy
po/vorosaso sucia& No lave el filtro de aire.
PARA CAMBIAR EL FILTRO DE AIRE
• Remueva el liltro de aire gir_ndolo en el
senlido on qua girela de ]as manillas del reloj
para apretada, haste el tope, y relirelo del
collar.
• Remueva el filtro de la parte intedor de ta
cubierta.
• Limpie la parte interior de la cubierta y el
collar pare remover toda acumulaci6n de
mugre.
• lnserle el lilb'o nuevo en la cubiertao
• Ponga la cubierta del filtro de aire denlro del
collar alineando la oreja con la ranura.
• Empuje la cubieria hacia adenlro y 9irela en
29
con _sta.
,, Haga descansar la segadora en su lade.
Aseg0rese qua el tiltre de aim y que el
carburador queden mkande hacla arriba. Limpie
la parte inle_or de su segadora rasp,_ndela pare
remover la aoJmulacldn de c_sped y basura
• Umpie el motor a menudo pare e',4tar que se
acumule
la basura, Un motor lapado funciona rn_s
caliente y se acorta su duraciOn.
• Mantenga fas supenfcies pulides y tas ruedas sin
gasoline, aceite, elc,
• No recornendamos el use de una rnanguera de
jard[n pare limpiarla segadora a menos que el
sistema elrJctrico, el silenciader, el fittro de aire y
el carburador esten lapades pare eviler que los
entre et agua.. El agua en el motor puede acortar
la durad6n de _steo
LIMPIE DEBAJO DE LA CUBIERTA
DE LA
IMPULSION
Umpie debaio de la cubierta de la impulsien per to
menos dos veces carla lemporada Raspe debaio
de la cubierta con un c_chi{lo pare masilla o con una
herrarnien_ parecida, para remover lode
acumulaci6n de c_sped o basura en la parle infenor
de la cubierta de la _mpulsien,
PRECAUCION:
ANTES DE DAR
CUALQUIER
SERVIClO O DE HACER
AJUSTES:
• Suelte la barra de control y pare el rr_tor
• Asegt_rese que la c_Jchiflay que todas tas paftes
movibtes se hayan deter,,klo oompletamente
• Desconecle el alambre de la bujia y 1:_rrK:jaJo
en
donde no pueda entrar en coniacio con _sia
SEGADORA
PAPA AJUSTAR
LA ALTURA
DE CORTE
Rerc_eva las abrazaderas del cab_e_
Rernueva los oonlroles y la barra de control que
exige la presenda del operader del mango
superior
• Remueva la gula del cordon arrancador det
intedof
• Remueva las da_4ias de horquilla
• Desconecle el mango inferior de los pentales del
Vea "PARAAJUSTAR LAALTURA DE CORTE" en
la secd6n de Operack_n de esle manual
DESVlADOR
TRASERO
•
•
Se proporciona un desviador trasero, adjunto enf,re
tas ruedas traseras de su segadora, para reducir a
un m[nirno la pes_bilidad que objelos sean lanzados
hada afuera de la parte trasera de la segadora, en
la posicion en donde se encuentra el operador Si
se da,ra el desviador debe cambiarse,
PARA REMOVERZOAMBIAR
LA CORREA
DE
IMPULSION
•
•
•
•
•
•
•
Remueva la cubieria de la impulsk_n Remueva
la correa empujando hada abajo en ia polea de
fa caja de engranajes
Haga descansar la segadora en su lado con el
filtrode aire y el carburader mirando hacia arrib&
Remueva la c_Jdqilta,
Remueva la delensa en conlra del desperdicio,,
Remueva la correa de fa polea del motor en et
cigue£'lal,
Insiale la correa nueva sigt,tiet_o lOSpasos
antedores en el orden inverso,
Siempre use la correa aprobada por la t&brica
para asegurarse que calce y dure
•
•
mango(
•
De ,,mleliael mango y vuelva a montar las davijas
de horquiIla que se hab_an removido
Vuelva a montar la guia del cordon a_dor.
Vueiva a montar los controles y la barra de
oonlrol que exkje la presencia del operador en el
mango superbr
PRECAUClON:
La barra de control que exige
la presencia del operador tiene que pivotear
libremente para permitir el enganche de la
cuchillMreno
cuando se suelta la barra de
control No apriete dem,_siado los sujetadores
que sujetan a bs controles al mango superior
• Para cambiar de la posk_n de med_',,a baja a
alia solarnenle se iandr_ que dar vuelta la
seccirn del mango superior
, Para cambiar de la posici6n mediana baja a baja,
selamente se lendr#,qua dar vuelta la secci6n
del mango interior
Posici6n de envio
Med}ana baja
Cubierla
de la
Mediana
alia
Baja
Alia
imputsion
Correa
Empujar
-7._
hacia
I-.-"
abajo
PARA
AJUSTAR
EL MANGO
Se puede levaniar o bajar el mango de su segadora
segtln Ie quede c6modo Hay cuatro (4) posiciones
disponibles: alla, mediana alia, mediana baja, bajao
Los mangos se envian moniados en la pos{ci6n
mediana baja
• Para cambiar de la posidSn mediana baja a
mediana alia, la secci6n superior y la inferior det
mango tendr&q que darse vuelta
Apriele para_
\
remover
_L/,,
Mango infedor
t_:
Punlal
del
mango
Abrazadera
3O
gorquilla
de
CARBURADOR
MOTOR
VELOCIDAD
DEL MOTOR
Su carburador no es ajustable Si su motor no
est& funcionando en forma adecuada debido a
problemas que se sospecha vienen del
carburador, Ileve su segadora a un centro de
servicio autorlzado para reparada y/o ajustada
IMPORTANTE:
Nunca manipulee el regulador
def motor, el que ha sldo ajustado en tafabrica
ara la velicidaddet motor adecuadao puede ser
peligroso hacer funcionar eI molor a una
velocaded pot sobre el ajuste de ata velocidad
alta regulada de! motor necesita ajuste,
pongase en contacto con su centro
departamento de serviclo autorazado mas
cerano, el que cuenta con el equipo adecuado y
la expedencia para haacer los ajustes
necesados.
La velocidad det motor ha sido ajustada en ta
f_brica. No irate de aumentar la velocidad del
motor pues se pueden producir lesiones
personales. S{ cree queet motor estd
|uncionando demasiado r&pido o demasiado
lento, tleve su segadora a un centro/
departamento de servicio autodzado para
repararla o ajustarla.
Inmediatamenteprepare su segaderapara el
afmacenamientoal final de cada lemporadao si la
unidad nose va a t_,ar por30 diaso m_.
SEGADORA
•
Cuando se va a guardar la segadorapot cierto
peffodo de tJempo,l_rnpiela cuidadesamente,
remueva toda la mugre, la grasa, las hojas, etc.
Gu_:_efa en un _,ea lirnt_a y seca.
• Umpie toda la segadora (Vea "LIMPIEZA" en ia
secciSn de Mantenimento de este rnanuaJ).
• Lubffquela seg'Jn se muestra en fa section de
Mantenimento de este manual
- Aseg,Jrese de que todas las tuercas y davijas y
todos los pemos y lomillos esten aprelados en
forna segura. Inspeccione las partes que se
mueven para ve_car si est&n dar3adas,
quebradas o desgastada& Cdmbielas s_es
necesa_.
• Retoque todas las superficies que est_n
oxJdadas o con la pinlura picada; use una lija
antes de pintar.
MANGO
Mango
Levantar
f
___
7
_-_
,/'_"
para segar
Mango inledor
.'_.r_
Cuande prepare sus mangos a pa_r de la
posiciSn de almacenarniento, el mar_jo infedor
autorn_tJcarnente se asegurar_ en la posick_n
para segar.
Barra de control que exige la
presencia del operado
Puede doblarel mangode su segadora para
almacenarl&
• Aprietelos extmmosinfedoresdel mango inferior
entreS(basra que e! mango inferiorquede
separado d_ puntal del mango, luego mu_valo
hada adetante
, Sueltelos pemosde rnontaje del mango superior
b sLrl'_entecomopara permitirque el mango
superiorse puedadoblar hacia aL_s,
'_
IMPORTANTE: Cuando doble el mango para et
alacenamiento o el traspode, asegurese clue !o
deb_e segun se muestra o puede danar los cables
de control.
Puntal del
ango
horqullla
3t
Mango
inlerior
MOTOR
SISTEMA DE COMBUSTIBLE
IMPORTANTE: Es imporlante evitar que se formen
depositos de partes fundamentWes de{ sisterr_ de
comuslible taies con_ el carburador, el filtro del
comb_bie, }a manguera del combustible o en e!
estar, que durante el aJmacenmiento La
experiencea tambien endica que los combustibles
mezdados con a_cohol (conoddo come gasohol o
que tienen etanol o metanol) pueden atraer
humedad, 1oque conduce a la separatien y a la
formaci_n de &cidos durante almacemamiento, la
gasolina &cideca puede nar3ar et sistema de
combustible de un motor durante el peddo de
alcamenmiento,
• Drene el estanque de combustible
. Haga a_reJ
molory d_ielo fur'_onarhasta
que las llneas de[ combust_bte y el ca_Jrador
eslen ratios
• Nunca use los productos pard Iimpieza de{
carburador odel rnotof en et estar.,que de
combustible pues se pueden producir da_Sras
perrnanenles
• Use corrbustibJe nuevo la pr6xima temporada
•
AVISO:
•
E! estabi3izador
de combustible
ClLINDRO
•
•
•
QTROS
es
una altemativa aceptable para reducir a un
minirno la lormaci6n de dep6sitos de goma en
el combustibte durante el penodo de
almacenamiento
Agregue estabilizador a ta
gasolina en el eslanque de combus#bte
o en
el envase para et almacenamienlo.
Siempre
siga la proporci6n de mezcla que se
encuentra en el envase del estabilizador
Haga funcionar el motor por 1o menos 10
minutos despu6s de agregar el estabitizador,
para permitir que esle Ilegue al carburador,
No
drene la gasolina del estanque de gasolina y
et carburador
si se estfi usando estabilizador
de combustible
ACEITE
Remueva la bujia
Vacie una onza (29 rr_) de ace_te a Irav_s del
agujero de Ia bujia en el c_lindm
Tire la rna_fia de arranque le_amente una.s
cuantas veces para dlstribu}r el ace_te_
Vuelva a _tar
la nueva bujla
DI=L MOTOR
Drene el aceite (con et motor ca_ienle) y c_mblelo
con aceite de motor limpio (Vea "MOTOR" en la
secci6n de Responsabilidades del Cliente de este
manual)
No guarde ta gas_lina de una {emt:x3radaa la
otra_
•
Cambie el envase de la gasolina si se ernpieza a
ozJdar, La oxJctac'_n y/o la mugro en su gaso/ina
prodt.,,cir_nproblemas
• Si es posible, guan:le su unidad en un rednto
cerrado y c0braJapara pretegerta con(ra et pok, o
y la mugre
• Cubra su unidad con un forro protector adecuado
clue no retenga fa humedad No use pl&slk:o E1
pfas'Jco no puede respirar, Io que perrnite la
fom',ac_6n de condensaci6n, lo que producir_ la
oxidad6n de su unidad
IMPORTANTE: Nunca cubra A segadora mJentras
el molor y las areas de escape lodav_ esta_
calienteso
PRECAUCI6N:
Nunca almacene la segadora
con gasoffna en et estanque dentro de un
edificio en donde los gases pueden alcanzar
una llama expuesta o una chispa, Permita que
se enfd'e el motor antes de almacenarla en
algt_n recinto cen'ado,
32
IDENTIFICACI(_N
PROB L 'EMA
No arranca
DE PROBLEMAS
CCION
....
CAUSA
• Filtro de aire sucio.
• Sin combustible.
• Limpie/cambie ei fiitro de aire.,
• Combustible
• Drene et estanque y vuelva a
Itenado con combustible limpio y
• Llene el estanque de combustible
rancio
nuevoo
• Agua en el combustible
• Drene el estanque de combustible
el carburador y vuelva a Ilenar el
estanque con gasotina nueva
• Alambre de la bujia
desconectado
• Conecte
• Bujla mala.
• Cambie la bujiao
• Cuchilla suelta o adaptador
de la cuchiIla quebrado,
• Apdete el pemo de ta cuchiila o
cambie el adaptador de la cuchifla
• Barra de control en la posici6n
sueltao
Fa)la de luer'za
Presione
mango,
el alambre
a la bujia,
la barra de control hacia el
• Barra de conlrol defectuosa,
• Parte trasera de la cajacuchilfa
de la segadora arrastr&ndose
on el c_sped pesado.
• Cambie la barra de control.
• Ajuste a la posicibn de "Corte m_s
alto,
• Est_ cortando
• Ajuste a la posicidn de =Corte m_s
alto,"
mucho c_sped,
• FJltro de aire sucio,
• Limpie/cambie
• Acumutaci6n de c_sped, hojas
y basura debajo de la segadora,r
• Limpie la parte intedor de la caja de
la segadora
• Demasiado
• Revise el nivel de{ aceile,
aceite en el motor,
33
y
e! filtro de aire
CS REcci6N
CAUSA
PROBLEMA
Mat core -disparejo
•
Cuchilla desgastada, dobtada o
suella
Allura de las ruedas dispareja.
° Cambie ta cuchill& Apriete et
pemo de la cuchi!la
i
Vibraci6n
excesiva
-
Acumulaci6n de cesped, hojas o
basura debajo de la segadera
•
Cuchi]ta desgastada, doblada o
suelta.
Ciguefat del motor deblado.
•
Cerd6n arrancador
dilicit de tirar
Dfficil de empuiar
• Altura de corle demasiado
bajao
• Levantamiente
de la cuchilla
desgaslade,
* Recogeder sin ventilaci6n
aire,
•
de
El c_sped est& demasiado alto
o la altura de la naeda demasiado baja.
. Parle trasera de la caja/cuchilla
de la segadora arraslr_ndese
en el c_spedr,
• Recogedor de c_sped demasiado Ileno.
• Posici6n de la allura del mange
no adecuada para usted,
34
Cambie la cuchilla,, Apdete el
pemo de la cuchilla.
P6ngase en contaelo cen su
centre de servicio autorizado
m_e cercane.
•
Presiene la barra de conlrel
hacia el mango superior antes de
tirar el cord6n arrancador.
• P6ngase en contacto con su
centro de servicio aulorizade
m_s cercano.
• Cambie el adaptador de la
cuchilla,,
,, El [reno del volante del metor
esla aplicado cuando se suetla
ta barra de centreL
• Cigue_al del motor doblado
i quebrado,,
daptader de la cuchilla
La cuchilla se arrastra en e!
c_sped.
Recogeder de c_sped
ne se llena (si viene
equipade)
ii
misma
allura. las ruedas a la
juste todas
Limpie la parle inferior de la caia
de la segadora.
•
Mueva la segadora a un lugar en
donde el c_sped ha sido corlado
o a una supedicie firme para
hacer arrancar el motor.
•
Eleve la altura de corle
• Cambie la cuchillas
•
Limpie et recogedor de c_sped°
•
Eteve la allura de code.
•
Eleve la parle Irasera de la caja d_
ta segadora (1) un lugar m_s alto.
•
Vacfe el recogeder de o_spe&
• Ajuste la allura def mange de
modo que ie acomod&
ROTARY
LAWN MOWER -- MODEL NO. 917.377562
GEAR CASE ASSEMBLY
PART NUMBER
702511
7
KEY
NO.
PART
NO.
17490416
2
3
4
6
137055X004
137053
57072
48373
77881
137051
KEY
NO.
DESCRIP_ON
Tapping Screw t/4-20 x
1_tt4
Engagement Bracket
Shifter
Seal
Gear Case Halves Kit
(includes Key Nes 4, 5,
and 7)
Bearing
Worm Shaft
9
t0
11
12
13
14
15
16
17
18
19
PART
NO.
137074
57079
131484
700343
86447
137050
750436X
750369
12000003
850848
81585X004
NOTE: All component dimensions
given in U,S, inches. 1 inch = 25,4 mm
35
DESCRIPTION
Drive Shalt
Hardened Washer
Clutch Yoke
Bushing
Plug
HelicaE Gear
Clu{ch Jaw
Grease
E,Ring
Hi-Pro Key
Spring Bracket
ROTARY
LAWN MOWER
MODEL NUMBER
917.377562
27
44
35
14
56
4
3_
35
2037
53
52
34
29
26
41
6_
ROTARY
KEY
NO.
",4
|
2
4
5
6
8
9
t0
11
12
13
14
15
16
17
20
22
23
25
26
27
28
29
30
3t
32
34
35
37
38
39
40
41
PART
NO.
145646X47g
156577
150425
66426
136376
145793
151023
128415
150050
STD512505
63601
156374X479
700365)<479
133190X479
140661X479
140540
85543
87677
83923
57143
151138
142748
61651
7509t3X004
701037
70033tX004
146630
700325X007
150078
88348
161814X479
!61812X479
150406
LAWN
MOWER
MODEL
DESCRIPTION
Upper HandIe
Engine Zone Control Cable
Mulcher Plug
Wire Tie
Handle Knob
Control Bar
Rear Door Kit
Pop R_vet
Self Tapping Screw #1024 x 5/8
Hex Tapping Screw wtSems 114-20 x 112
Nut 1/4-20
Back Plate
Side Baffle
Discharge Baffle
Rear Baffle
Rear Skirt
Engine Pulley
Hi-Pro Key #505
Hex Flange Nut
Wave Washer
Wheel
Shoulder Bolt 3/8-16 x t
Spnng Washer
Axle Arm Assembly
Setector Knob
Selector Spring
Spacer
Wheel Ad{usting Bracket
Thread Cut_ng Screw wtSems 5/16-18 x 3/4
Flat Washer 3/8
Handle Bracket Assembly (Left)
Handle Bracket Assembly (Right)
Hex Head Thread Rolling Screw 3/8-16 x 1-118
NUMBER
KEY
NO.
44
46
47
48
49
50
51
52
53
55
56
57
58
59
6!
62
64
69
---
917.377562
PART
NO.
161769
851514
157101
851074
850263
851084
700869)(479
65463
74760612
751592
88652
51793
157081x47g
131959
132001
134612
......
151440
161058
165463
Available accessories
- Z_L33303
-71 33623
- 7_!.33500
-71 33300
-7t 33417
-7! 33316
DESCRIPTION
Lawn Mower Housing (Incl. Key #14, 15, 51 & 52)
Blade Ad,Bpter
Blade 22"
Hardened Washer
Helica! Washer 3/8-24 x !-3/8 Gr. 8
Hex Head Machine Screw 3/8-24 x 1-3/8 Gr. 8
Front Ba_ffle
Danger Decal
Hex Bolt 3/8-t6 x 3/4
Locknut 3/8-16
Hinge Screw 114-20 x 1-1/4
Hairpin Cotter
Lower Handle
Handle Bolt
Rope Guide
Debns Shield
Engine - (See Breakdown)
Tecumseh
t43.986500
Hub caps
Warning Decal (Not Shown)
Owner's Manual (English/Spanish)
not included with lawn mower:
Clipping Deflector
Gas Can (2.5 gal.')
Fuel Stabilizer
SAE 30W Oil (20 oz.)
Dust Shield
Mower Cover
ROTARY
64
r_
Co
LAWN MOWER MODEL NUMBER
917.377562
ROTARY
O3
U3
KEY
NO,
PART
NO,
1
2
3
4
145755
48385
751152
! 58755
5
6
8
9
10
11
12
13
14
t5
16
18
146527
150495
150182
145212
88446
150340
12000058
137054
88080
88118
67725
701037
LAWN
MOWER
DESCRIPTION
Conlret Cable AssembR
Control Head Kit
Lecknut _t10-24
Pan Head Machine Screw
1t4 x 20
V-Bell
Spring Retainer
Hubcap
Flanged Nut
Nylon Bushing
Wheel & "Tire Assembly
E-Ring
Pinion
Dust Cave[
Felt Washer
Washer 1t2 x 1-1/2 x .134
Selector Knob
MODEL
KEY
NO.
26
28
31
32
33
35
36
37
38
40
4.1
53
54
55
57
NUMBER
917.377562
PART
NO.
DESCRIPT|ON
143603
154990
132010
137052
48386
151521
702511
137090
ST0541425
75192
151520
144747
154870
86012
144748
HexWasher Head Screw
Drive Cover
Hex Flange Nut
Drive Pulley
Dnve Controt Cable Kit
Wheel Adiuster Assembly
Gear Case Assembly
Spnng
Locknut 1/4-20
Spring
Wheel Adiuster Assembty
Frame Throat
Grassba9
Dr_veshaft Cover
Frame Tube
_10-24 x 3/4
{Left)
{Right)
CRAFTSMAN
4-CYCLE
ENGINE
MODEL NUMBER 143.98650G
120
I19
I4
416
125
17V_
275,,
48
4O
CRAFTSMAN
.
KEY
NO,
4-CYCLE
ENGINE
MODEL
..................
,,1111
PART
NOo
DESCRIPTION
36774
Cylinder (Ind 2 & 20)
2
6
7
26727
3.3734
36557
12
12A
36775
36558
12B
14
15
16
17
18
36694
28277
30589
34839A
31335
651018
Dowel Pin
Bnealher Elemen!
Breather Assay (Ind 6&
12A)
BreaLher Tube
BreaB*_erCover & Tube
(lnd.. 12B)
Breather Tube Elbow
Washer
Goverrv3r Rod (Ind 14)
Gove_
Lever
Governor Lever Cramp
Screw, Torx T- 15, 8-32 x
19t'64"
!9
2O
3O
40
36281
3260O
35801
40027
40
400_8
41
4OO25
41
40026
42
42
43
45
400O6
40(X)7
2O381
3677/
46
48
50
52
69
7O
32610A
27241
26778
29914
35261
36995
72
73
75
80
81
82
3O572
28833
27897
3O574A
30590A
30591
83
B6
89
9O
92
93
100
101
103
30568A
65O488
611004
6! 1112
650815
6.50816
344439
610118
651007
110
119
120
125
37047
36787
36825
36779
125
35780
126
36781
I26
36782
130
6021A
ii
ii
ii
,11,=
NUMBER
143.986500
........
KEY
NO.
PART
NO.
DESCRIPTION
135
35395
Resistor Spark Plug
!50
151
151A
169
172
!74
178
182
184
35991
31673
40017
38783
36784
30200
29"/52
620I
26756
185
t86
t89
191
36785
32653
650839
36559
195
207
216
223
224
238
239
24I
245
250
260
261
262
263A
275
277
285
287
290
292
298
300
610973
34336
35086
650451
36786
650932
36919
36905
36920
36980
30200
650831
36921
36790
650988
35(X_A
650926
29774
26460
28763
36916
301
305
306
307
309
310
313
347
370A
370(3
380
36246
35647
38996
35499
650562
35648
34080
651038
35261
36861
640069
390
400
59(}702
36792B
416
36085
417
650760
Exter_.<,on
Spr_ng
O4 Seal
Crankshaft
Piston, Pin & Ring Set
(Std)
piston, Pin & Ring Set
(.010" OS)
Piston & Pin Assay (Std)
(lndr 43)
P_on & Pin/_s'y.
(,01(7' OS) (_ncl 43)
Ring Set (Std.)
Ring Set (.0tO" OS)
Piston pin Retaining Ring
Connec-.tif_ Rod Ass'y.
[Ind. 46)
_c_ng
Rod Bolt
Valve L;'fler
Camshaft (MCR)
Oil Pump Ass'y
* Mounting Range Gasket
Mounting Flange (Incl. 72
thru 83)
Oi1Drain Ptug (It',d. 73)
Drai_ Plug Gasket
Oil Se_l
Governor Shaft
Washer
Governor Gear Assay
(Ind. 8t)
Governor Spool
Screw, 1/4-20 x I-t/4"
Flywheel Key
Flywheel
Be_leviIIe
Washer
iii
....
(FU19LM)
Valve Spring
va_e_ing c._p
Intake Vak*e Seal
• ValveCover Casket
VaJve Cover
Screw, 10-24 x 9/16"
Nut& Lock Washer, 1t4-28
Screw, 1t4-28 x 718"
• Carburetor To Intake Pipe
Gasket
retake
Pipe
Governor L_qk
Screw, 1t4-2O x 3,,8"
S E. Brake Bracket
(Include, 195)
Terrnfre!
Throttle Link
RP M Adjus_ng Lever
Screw, 1t4-20 x 1"
• In_ke Pipe Gasket
Screw, t0-32 x 49/64"
" Air Cleaner Gasket
Air Cleaner Collar
Air Cleaner Filter
Ai_ Cleaner Cover
Blower Hotlsir_g
Screw, 10-24 x 9/16"
Screw, 1/4-20 x 1_*
S_rter Grill
Muffler
Screw. 1/4-20 x 2-5/16"
Starter Cup
Soew, 8--32 x 21;64"
Fuel Line
Fue! Life Clamp
Screw, I0-32 x 35/64"
Fuet Tank (Include 292 &
301)
_1
Nut
SoFd SLa_ Ignition
Spark PlugC,over
Screw, Torx T-15, 10-24 x
15/16"
Ground W_re
• Cy_nder Head Gaskel
Cylinder Head
ExhaustValve (Sld) (ind,
151)
Ex;_usI Valve (1.r32" OS)
(Incl.. 151)
Intake Valve (Std) (lnc!
900---900
151)
-- --
FuelCap
O_ FalTube
' "C/',.Ring
-cr.a_
Screw, 10-32 x 1r2"
Dipstick
Spacer
Screw, 10-32 x 51164"
Lubrication Decal
Primer Decal
Carburetor (Ir_d. 184)
Rewind Stealer
Gaske! Sel
(lr,d Items Marked" )
Spark Arrestor Kit
(Incl417)(OpSonal)
Screw. 8-32 x 3,'8"
(Ogtione0
Replacement Engine
NONE
Replacement S_ 750832,
order from 71-999)
RPM High 2900 Io 3200
NOTE: This engine couid have been buil_ wf_h590739
star_er..
Intake Valve (t/32" OS)
(lad,151)
Screw, 5/t6-18 x Hi2"
NOTE: AF,componenl dimensions given _ U S _"_ches
lir_=254mm
41
CRAFTSMAN
............
i
4-CYCLE
,i
iiii
ENGINE
MODEL
iii
KEY
NOo
PART
NOo
--
640O69
1
2
4
5
6
7
16
17
!8
20
20A
25
27
28
29
30
31
35
36
37
40
44
47
48
631615
631767
631184
631183
640070
65O506
632527
651025
630766
640027
640053
631867
631024
632019
631028
631021
631022
36045A
632735
632547
64O030
27110
630748
631027
NUMBER
DESCRIPTION
Carburetor
(Incl, 184 el Engine Parts List
Throttle Shaft & Lever Assembly'
ThrotUe Return Spring
Dust Seal Washer
DustSeal(Throttle)
ThmlJJg Shutter
Shutter Screw
Fuel F_
Throttle Crock Screw/k_le Speed Screw
Tension Spring
Idle Reslriclor Screw
Idle Reslf,cto_Screw Cap
Float Bowl
Float Shaft
Float
Float Bowl ff3t' Ring
Inlet Needle, Seat, & Clip (lr,,ct 31)
spr_ a_
Primer Bulb/Retainer Ring
Main Nozzle Tube
"O" Ring, Main Nozzle Tube
High Speed Bowl Nut
Bow_Nut Washer
Welch Plug, Idle Mixture Well
Welch Pk._g,Atmospheric Vent
42
.! 43.986500
CRAFTSMAN
s:_
..................
4-CYCLE
ENGINE
H,.Hm n
I,I1,,
MODEL
I II
.......
KEY
NOo
_t_
PART
NO,
NUMBER
I IIII
II
143,986500
..................
DESCRIPTION
-1
2
3
4
5
6
7
8
590702
590599A
590600
590696
590601
590697
590698
590699
590700
11
590703
12
590535
13
590701
Recoit Slarlet
Spring Pin {lncl 4)
Washer
Retainer
Washer
Brake Spring
Starter Dog
Dog Spring
Pulley & Rewind Spring
Ass'y
Starter Housing Ass'y
(40 degree grommet)
Starter Rope ( 98" X 9/
64" dia )
Starter Handle
PART
NO.
DESCRIPTION
590739
590740
590616
590617
590618A
Rewind Starter
Retainer
Starter Dog
Dog Spring
Pulley & Rewind Spring
O_t
KEY
NO_
3
6
7
B
Assty
43
t1
590638
12
590535
13
14
590701
590741
Starter Housing Assly
(40 degree grommet)
Starter Rope
(Length 98" x 9t64" dia )
Starter Handle
Locking Tab
Forthe repairor replacement
partsyouneed
delivereddirectlytoyourhome
Call 7 am - 7 pro,7 daysa week
1-800-366-PART
(1-800-366-7278)
Paraordenar piezascon entregaa
domicilio - 1-800-659-7084
Forin-housemajorbrandrepairservice
Call 24 hoursa day,7 daysa week
1-800-4-REPAIR
(I -800-473-7274)
Para pedir servicio de reparaci6n a
domicilio
- 1_800_676-5811
For the location of a Sears Parts and
Repair Center in your area
Call 24 hours a day, 7 days a week
1-800-488-t222
For information on purchasing a Sears
Maintenance Agreement or to inquire
about an existing Agreement
Call 9 am - 5 pro, Monday-Saturday
1-800-827-6655
When requesting service or ordering
parts, always provide the following
information:
- Product Type
• Part Number
- Model Number
• Part Description
Arnertca .'; Ftepa_r SpecJalzsts
165463
05,12.98
VB
Printed
in U,S°Ao