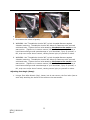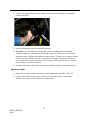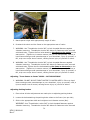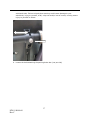
1
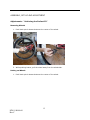
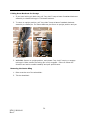
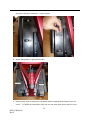
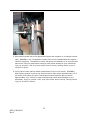
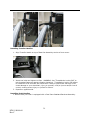
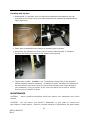
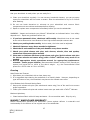
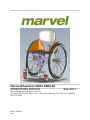
Marvel Wheelchair MV01-5000-00
OPERATIONS MANUAL
Sep 2011
Marvel Wheelchairs Customer Service
200 North Service Rd. West, Unit 1, Suite 623, Oakville, ON L6M 2Y1 CANADA
800-733-0265
MV01-94000-00
Rev C
Table of Contents
INTRODUCTION ________________________________________ 1
Specifications & Materials _______________________________ 1
Read Before Assembly or Use ____________________________ 2
Read This Manual Often ________________________________ 3
Warning/Caution/Note Definition_________________________ 3
General Warnings _____________________________________ 4
Warnings: Falls & Tip-Overs _____________________________ 8
Warnings: For Proper Use _____________________________ 11
Warnings: Components and Options ______________________ 12
ASSEMBLY, SET-UP AND ADJUSTMENT______________________ 15
Adjustments ________________________________________ 15
MAINTENANCE ________________________________________ 42
Cleaning ___________________________________________ 43
MARVEL™ WHEELCHAIR WARRANTY _______________________ 43
MV01-94000-00
Rev C
Introduction
INTRODUCTION
Thank you for choosing the Marvel™ Wheelchair MV01-5000-00.
This manual is designed to assist you with the operation of the Marvel™ Wheelchair. Before
operating this wheelchair, it is important to read and understand all information in this
manual in order to be able to use and operate the Marvel™Wheelchair safely and effectively.
The illustration below shows a drawing of the Marvel™ Wheelchair and points out the major
components. More comprehensive information about the wheelchair and its components is
detailed in the sections following. Please cross-reference those sections to the specifications
of the Marvel™ Wheelchair below.
Seatback Backrest Assembly
Sideguards
Wheels
Push rims
Seat Panel
Transfer Handles
Shock
Frame
Quick
85mm
Release
Axle
Pins
Quick Release Axle Pin 99mm
(Caster Wing)
Caster Wing
Footrest
Caster Fork
Casters
1
MV01-94000-00
Rev C
Introduction
Specifications & Materials
Maximum Weight Capacity
Seat Width
Seat Depth
Rear Seat to Floor Height
Front Seat to Floor Height
Rear Wheels
Device Component
250 lbs.
12”-16” or 14”-18”
14”, 15”, 16”, 17”, 18” or 19”
16.5” to 22.5””
16.5” to 21.5”
24”, 25”
Seat Post
Fenders
Transfer Handles
Anti-tip bars
Parking brakes
Push Handles
Caster Wheel
Material Composition
(Standard Offering)
Aluminium
Air Shock & Torsion Bushing
Carbon Fiber
Carbon Fiber with Foam
Cushion
Titanium or Aluminum
Carbon Fiber
Aluminum
Aluminum
Aluminum
Aluminum
Elastomer Tire on Plastic Hub
Caster Fork
Rims
Push rims
Spokes
Tires
Quick Release
Aluminium
Aluminium
Aluminium
Steel
Kevlar beaded
Steel
Main Frame
Suspension
Seat Pan Assembly
Seatback Backrest Assembly
Available Material Options
(if applicable)
N/A
N/A
N/A
N/A
N/A
N/A
N/A
N/A
N/A
N/A
Elastomer Tire on Aluminum
Hub
N/A
N/A
N/A
N/A
N/A
N/A
Read Before Assembly or Use
Choose the Correct Wheelchair and Safety Options
The selection of your wheelchair, its options, and its adjustments rests solely with you and
your health care professional. Making decisions in absence of guidance from a trained
health care professional is inadvisable. Choosing the best wheelchair and set-up for your
comfort and safety depends on a variety of issues, such as:
•
•
•
Your disability, strength, balance, coordination
The types of hazards you must overcome in daily use, such as where you live and work
and other places you are likely to use your wheelchair
The need for options for your comfort and safety, such as anti-tip bars, positioning belts,
or special seating systems
2
MV01-94000-00
Rev C
Introduction
Read This Manual Often
Before using the Marvel™ Wheelchair, you and those who may assist you should read this
entire manual and make sure to follow all instructions. Review the warnings often.
Warning/Caution/Note Definition
The words WARNING, CAUTION and NOTE carry special meanings and should be carefully
reviewed.
WARNING
The personal safety of the patient or user may be involved. Disregarding this information
could result in injury.
CAUTION
These instructions point out special procedures or precautions that must be followed to
avoid damaging the equipment.
NOTE
This provides special information to make maintenance easier or important instructions
clearer.
3
MV01-94000-00
Rev C
General Warnings
Here you will find safety checklist and summary of risks you and those individuals who
assist you need to be aware of before you ride this wheelchair. The word "WARNING" refers
to a hazard or unsafe practice that may cause severe injury or death to you or to other
persons. The "WARNINGS" are in main sections, as follows:
Weight Limit
WARNING: NEVER exceed the weight limit of 250 pounds (113.6 kilograms) for combined
weight of rider and items carried. Failure to heed these warnings could cause damage to
your wheelchair, injury to yourself, a fall, a tip-over and/or loss of control, causing severe
injury to yourself or others.
Weight Training
WARNING: NEVER use this wheelchair for weight training if total weight (rider plus
equipment) exceeds 250 pounds (113.6 kg.). Failure to heed these warnings could cause
damage to your wheelchair, injury to yourself, a fall, a tip-over and/or loss of control,
causing severe injury to yourself or others.
Additional Riders
WARNING: NEVER allow more than one person to sit on or ride on the Marvel™ Wheelchair,
even if the additional rider would still keep you under the 250 pound (113.6 kg.) weight
limit. Failure to heed these warnings could cause damage to your wheelchair, injury to
yourself, a fall, a tip-over and/or loss of control, causing severe injury to yourself or others.
Integral Components of Your Wheelchair
WARNING: The footrest is an integral component of your wheelchair and is to be fully
engaged when the wheelchair is in use. Failure to heed these warnings could cause damage
to your wheelchair, injury to yourself, a fall, a tip-over and/or loss of control, causing severe
injury to yourself or others.
Getting to Know Your Wheelchair
WARNING: Every wheelchair is different. With your healthcare professional, please take the
time to learn the feel of this wheelchair before you begin riding. Start slowly, with easy,
smooth strokes. If you are accustomed to a different wheelchair, you may use too much
force and tip over and/or lose control, which may cause severe injury to yourself or others.
Failure to heed these warnings could cause damage to your wheelchair, injury to yourself, a
fall, a tip-over and/or loss of control, causing severe injury to yourself or others.
To Reduce the Risk of an Accident or Injury
WARNING:
1. BEFORE riding, you should be trained in the proper and safe use of this wheelchair by
your health care professional.
2. Practice bending, reaching and transfers until you know the limit of your ability. Have
someone help you until you know what can cause a fall or tip-over and how to avoid
doing so; practice on different surfaces and on even and uneven surfaces.
3. Together with your health care professional, you must MUST analyze your level of
function and ability and identify and/or develop your own methods for use that are best
4
MV01-94000-00
Rev C
suited to your level of function and ability.
4. Together with your health care professional, you MUST analyze your medical condition to
determine whether you are capable of using this chair safely and/or what options or
accessories you will require in order to use this chair safely (e.g., pressure-relief
cushions, seat belts).
5. NEVER try a new maneuver on your own unless and until you are sure you can do it
safely.
6. Get to know the areas where you plan to use your wheelchair. Look for hazards and
learn how to avoid them.
7. Anti-tip bars MUST be used with your wheelchair at all times. Because anti-tips are an
option on this wheelchair, Marvel Wheelchairs strongly recommends you order the antitip bars as they are an important safeguard for the wheelchair user.
8. Never place fingers or objects near moving parts of the suspension. The seat on some
models articulates about a pivot point; obstructing the movement may cause injury or
damage.
9. Marvel Wheelchair seat pan assemblies are not designed for the relief of pressure. You
MUST use a properly sized and fitted cushion with the Marvel Wheelchair. Please consult
with your healthcare professional to determine the appropriate cushion for your specific
medical needs. If you have pressure sores, or are at risk to get them, you may need a
special pressure-relieving cushion or other seating system. If you have pressure sores,
consult with your doctor immediately. If you are at risk to develop pressure sores or do
not know if you are at risk, consult with your doctor as to the most appropriate seating
system for you. Marvel Wheelchairs has NO information about your medical condition
and assumes no responsibility should you choose the wrong seating system for your
medical needs.
10. Users must continue to practice regular pressure relief activities and skin integrity
checks, not only where this product contacts the user, but also in primary pressurebearing areas such as the sacrum, legs, ankles, back and buttocks. If increased skin
redness or irritation occurs, discontinue use and consult your doctor, and seating
specialist. Failure to do so may result in serious injury, such as pressure ulcers.
Failure to heed these warnings could cause damage to your wheelchair, injury to yourself, a
fall, a tip-over and/or loss of control, causing severe injury to yourself or others.
Safety Checklist
WARNING: Before Each Use of Your Wheelchair:
1. Make sure the wheelchair rolls easily and that all parts work smoothly. Check for noise,
vibration, or a change in ease of use. (They may indicate low tire pressure, loose
fasteners, or damage to your wheelchair).
5
MV01-94000-00
Rev C
2. Repair any problem. If you are unable to find the problem call or email for assistance or
you can contact your health care professional. Do not continue to use the wheelchair
until any problems have been identified and corrected.
3. Check to see that all three (two rear wheels & Caster Wing) quick release axle pins are
locked. When locked, the quick release axle pin button will "pop out" fully. If not locked,
a wheel or caster wing may come off and cause you to fall.
4. If your wheelchair has anti-tip bars, lock them in place.
5. Before using the wheelchair, make sure the solid seat is fully engaged. When fully
engaged the seat is completely flat and totally unfolded.
Failure to heed these warnings could cause damage to your wheelchair, injury to yourself, a
fall, a tip-over and/or loss of control, causing severe injury to yourself or others.
Changes and Adjustments
WARNING:
1. If you modify or adjust this wheelchair, it may increase the risk of damage to your
wheelchair, injury to yourself, a fall, a tip-over and/or loss of control and may cause
injury to yourself and/or others.
2. We recommend that you use anti-tip bars.
3. Unauthorized modifications or use of parts not supplied or approved by Marvel™
Wheelchairs will change the wheelchair structure. This will void any and all warranties
associated with the wheelchair.
Failure to heed these warnings could cause damage to your wheelchair, injury to yourself, a
fall, a tip-over and/or loss of control, causing severe injury to yourself or others.
Environmental Conditions
WARNING: Use extra care if you must ride your wheelchair on a wet or slick surface or
inclines or declines. If you are in doubt, ask for help or avoid the surface.
Failure to heed these warnings could cause damage to your wheelchair, injury to yourself, a
fall, a tip-over and/or loss of control, causing severe injury to yourself or others.
Terrain
WARNING:
1. Your wheelchair is designed for use on firm, even surfaces such as concrete, asphalt and
indoor floors and carpeting.
2. Do not operate your wheelchair in sand, loose soil or over rough terrain. This may
damage wheels, quick release axle pins or fasteners of your wheelchair.
Failure to heed these warnings could cause damage to your wheelchair, injury to yourself, a
fall, a tip-over and/or loss of control, causing severe injury to yourself or others.
Street Use
WARNING: In most jurisdictions it is illegal to use wheelchairs on public roads. Be alert to
the danger of motor vehicles on roads or in parking lots.
6
MV01-94000-00
Rev C
1. At night, or when lighting is poor, use reflective tape on your wheelchair and clothing.
2. Due to your low position, it may be hard for drivers to see you. Make eye contact with
drivers before you go forward. When in doubt, yield until you are sure it is safe.
Failure to heed these warnings could cause damage to your wheelchair, injury to yourself, a
fall, a tip-over and/or loss of control, causing severe injury to yourself or others.
Motor Vehicle Safety
WARNING: wheelchairs do not meet federal standards for motor vehicle seating.
1. NEVER let anyone sit in this wheelchair while in a moving vehicle.
a. ALWAYS move the rider to an approved vehicle seat.
b. ALWAYS secure the rider with proper motor vehicle restraints.
2. In an accident or sudden stop the rider may be thrown from the wheelchair. Wheelchair
seat belts will not prevent this, and further injury may result from the belts or straps.
3. NEVER transport this wheelchair in the front seat of a vehicle. It may shift and interfere
with the driver.
4. ALWAYS secure this wheelchair so that it cannot roll or shift.
5. Do not use any wheelchair that has been involved in a motor accident.
Failure to heed these warnings could cause damage to your wheelchair, injury to yourself, a
fall, a tip-over and/or loss of control, causing severe injury to yourself or others.
When You Need Help
WARNING:
For The Rider
Ensure that all those who help you read and follow all warnings and instructions.
For The Attendant
1. Work with the rider's doctor, nurse, or therapist to identify and learn methods best
suited to your abilities and those of the rider.
2. Tell the rider what you plan to do, and explain what you expect the rider to do. This will
put the rider at ease and reduce the risk of accident.
3. To prevent injury to your back, use good posture and proper body mechanics. When you
lift or support the rider or tilt the wheelchair, bend your knees slightly and keep your
back as straight as you can.
4. Remind the rider to gently lean back when you tilt the wheelchair backward.
5. When you descend a curb or single step, slowly lower the wheelchair in one easy
movement. Do not let the wheelchair drop the last few inches to the ground. This may
damage the wheelchair or injure the rider.
6. Always lock the rear wheels and lock anti-tip bars in place if you must leave the rider
alone, even for a moment. This will reduce the risk of a tip over and/or loss of control of
the wheelchair.
Failure to heed these warnings could cause damage to your wheelchair, injury to yourself, a
fall, a tip-over and/or loss of control, causing severe injury to yourself or others.
7
MV01-94000-00
Rev C
Warnings: Falls & Tip-Overs
Center of Gravity
WARNING: The point where this wheelchair will tip forward, back or to the side depends on
its center of gravity and stability. How your wheelchair is set up, the options you select and
the changes you make may affect the risk of a fall or tipover.
1. The most important adjustment is the position of the rear wheels. The more you move
the rear wheels forward, the more likely your wheelchair will tip over backward.
2. The center of gravity is also affected by:
a. A change in the set-up of your wheelchair, including the seat height, and/or the seat
angle and/or the backrest angle
b. A change in your body position, posture or weight distribution.
c. Riding you wheelchair on a ramp or slope.
d. The use of a backpack and/or other options, and the amount of added weight.
3. To Reduce the Risk of An Accident:
a. Consult your doctor, nurse or therapist to find out what axle and caster position is
best for you.
b. Call Marvel Wheelchairs BEFORE you modify or adjust this wheelchair in any way that
is not described in this Manual. Be aware, that based on the foregoing factors, you
may need to make other changes to correct the center of gravity.
c. Have someone help you until you know the balance points of your wheelchair and
how to avoid a tipover.
d. If you have anti-tip bars, use them.
Failure to heed these warnings could cause damage to your wheelchair, injury to yourself, a
fall, a tip-over and/or loss of control, causing severe injury to yourself or others.
Dressing or Changing Clothes
WARNING: Your weight may shift if you dress or change clothes while seated in this
wheelchair.
To reduce the risk of a fall or tip-over:
1. Rotate the front casters until they are as far forward as possible. This makes the
wheelchair more stable.
2. If you have anti-tip bars, lock them in place. If your wheelchair does not have anti-tip
bars then back your wheelchair up against a wall and lock both rear wheels.
Failure to heed these warnings could cause damage to your wheelchair, injury to yourself, a
fall, a tip-over and/or loss of control, causing severe injury to yourself or others.
Wheelies
WARNING: Doing a "wheelie" means balancing on the rear wheels of your wheelchair while
the front casters are in the air. It is dangerous to do a "wheelie" as a fall or tip-over may
occur.
Failure to heed these warnings could result in damage to your wheelchair, injury to yourself,
a fall, a tip-over and/or loss of control, causing severe injury to yourself or others.
8
MV01-94000-00
Rev C
Obstacles
WARNING: Obstacles and road hazards (such as potholes and broken pavement) can
damage your wheelchair and may cause a fall, tip-over and/or loss of control.
To avoid these risks:
1. Keep a lookout for danger; periodically scan the area well ahead of your wheelchair as
you ride.
2. Make sure the floor areas where you live and work are level and free of obstacles.
3. Remove the cover threshold strips between rooms.
4. Install a ramp to avoid steps or drop offs. Make sure there is not a drop off at the end of
the ramp.
5. To help correct your center of gravity:
a. Lean your upper body FORWARD slightly as you go UP over an obstacle.
b. Press your upper body BACKWARD as you go DOWN from a higher to a lower level.
6. If your wheelchair has anti-tip bars, lock then in place as you go over an obstacle.
7. Keep both hands on the wheel push rims as you go over the obstacle.
8. Never push or pull on an object (such as furniture or a door) to propel your wheelchair.
Failure to heed these warnings could result in damage to your wheelchair, injury to yourself,
a fall, a tip-over and/or loss of control, causing severe injury to yourself or others.
Reaching or Leaning
WARNING: If you reach or lean, it will affect the center of gravity of your wheelchair. This
may cause you to fall or tip over. When in doubt, ask for help or use a device to extend
your reach.
1. NEVER reach or lean if you must shift your weight sideways or rise up off the seat.
2. NEVER reach or lean if you must move forward in your seat to do so. Always keep your
buttocks in contact with the backrest.
3. NEVER reach with both hands because you may not be able to catch yourself to prevent
a fall if the wheelchair should tip.
4. NEVER reach or lean to the rear unless your wheelchair has anti-tip bars locked into
place.
5. NEVER reach or lean over the top of the seat back. This may damage or destroy the
backrest and cause you to fall.
6. If you must reach or lean forward, do not put pressure on the footrests because leaning
forward already puts pressure on the footrests and may cause the wheelchair to tip if
you lean too far.
Moving Backwards
WARNING: You must exert extra care when propelling backwards. If the rear wheels hit an
obstacle or catch on any protrusion, your wheelchair could tip backwards if one or more of
the rear wheels stops moving.
1. Move slowly and smoothly when pushing backwards.
2. If you have anti-tip bars, lock them in place.
3. Make certain the area is clear behind you.
Failure to heed these warnings could result in damage to your wheelchair, injury to yourself,
a fall, a tip-over and/or loss of control, causing severe injury to yourself or others.
9
MV01-94000-00
Rev C
Ramps, Slopes and Side Hills
WARNING: Riding on a slope, which includes a ramp or side hill, will change the center of
gravity of your wheelchair. Your wheelchair is less stable when it is at an angle. Anti-tip
bars may not prevent a fall or tip-over.
1. Do not use your wheelchair on a slope steeper than 10%. (A 10% slope means: one
foot in elevation for every ten feet of slope length.)
2. Always go as straight up and as straight down as you can. Do not cut the corner on a
slope or ramp.
3. Do not turn or change direction on a slope.
4. Always stay in the center of the ramp. Make sure the ramp is wide enough that you are
not at risk of a wheel going over the edge.
5. Do not stop on a steep slope. Stopping may cause you to lose control of your wheelchair.
6. NEVER use rear wheel locks to try to slow or stop your wheelchair. Your wheelchair
might veer out of control.
7. BEWARE OF:
a. Wet or slippery surfaces.
b. A change in grade on a slope, or a bump, a depression, or a lip. Any of those may
cause a fall or tip-over.
c. A drop-off at the bottom of a slope. Even small obstacles can stop your front caster
and cause the wheelchair to tip forward.
8. TO REDUCE THE RISK OF A FALL OR TIP-OVER:
a. Lean or press your body UPHILL. This will help adjust for the change in the center of
gravity caused by the slope or side hill.
b. Keep pressure on the push rims to control your speed on the down slope. IF YOU GO
TOO FAST YOU MAY LOSE CONTROL.
c. Ask for help any time you are in doubt.
9. Ramps at home and work must meet all legal requirements for your jurisdiction.
Failure to heed these warnings could result in damage to your wheelchair, injury to yourself,
a fall, a tip-over and/or loss of control, causing severe injury to yourself or others.
Transfer
WARNING: It is dangerous to transfer on your own. It requires good balance and agility.
Be aware that there is a point during every transfer when the wheelchair seat is not below
you.
TO AVOID A FALL
1. Work with your health care professional to learn safe methods.
a. Learn how to position your body and how to support yourself during a transfer.
b. Have someone help you until you know how to do a safe transfer on your own.
2. Lock the rear wheels before you transfer. Although this will prevent the rear wheels from
turning, this does not guarantee that your wheelchair will not slide away from you or tip
over.
3. Make sure to keep pneumatic tires properly inflated. Low tire pressure may cause the
rear wheel locks to slip.
4. Move your wheelchair as close as you can to the seat you are transferring to or from the
wheelchair. Use a transfer board, if one is available.
5. Rotate the front casters until they are forward.
10
MV01-94000-00
Rev C
6. Avoid putting weight on the footrests as this may cause the wheelchair to tip.
Failure to heed these warnings could result in damage to your wheelchair, injury to yourself,
a fall, a tip-over and/or loss of control, causing severe injury to yourself or others.
Curbs and Steps
WARNING:
1. Do not try to climb or descend a curb or step alone.
2. If you have anti-tip bars, unlock and rotate them out of the way so that they will not
interfere.
3. Do not try to climb a high curb or step more than 4 inches high.
4. Go straight up and straight down a curb or step. If you climb or descend at an angle, it
is likely that you will fall or tip-over
5. Be aware that the impact of dropping down from a curb or step may damage parts of
your wheelchair.
Failure to heed these warnings could result in damage to your wheelchair, injury to yourself,
a fall, a tip-over and/or loss of control, causing severe injury to yourself or others.
Stairs
WARNING:
1. NEVER use this wheelchair on stairs UNLESS you have someone to help you. Doing so is
likely to cause a fall or tip-over.
2. Persons who help you should read and follow the warnings "FOR ATTENDANTS" on page
7 and the "FOR PROPER USE" section on page 11.
If you fail to heed these warnings, damage to your wheelchair, injury to yourself, a fall, a
tip-over, and/or loss of control may occur and may cause severe injury to yourself or
others.
Escalators
WARNING: NEVER use this wheelchair on an escalator, even with an attendant. If you do, a
fall or tip-over is likely. This is extremely dangerous.
Failure to heed these warnings could result in damage to your wheelchair, injury to yourself,
a fall, a tip-over and/or loss of control, causing severe injury to you or others.
Warnings: For Proper Use
WARNING: Before you assist a rider, be sure to read the warnings "For Attendants" on p.7
and follow all instructions that apply. Be aware that you will need to learn methods for use
of this wheelchair that are best suited to your abilities.
Descending A Curb Or Single Step
WARNING: Follow these steps to help a rider descend a curb or single step going backward:
1. Stay at the rear of the wheelchair.
2. Several feet before you reach the edge of the curb or step, turn the wheelchair around
and pull it backward.
11
MV01-94000-00
Rev C
3. While looking over your shoulder, carefully step back until you are off the curb or stair
and standing on the lower level.
4. Pull the wheelchair toward you until the rear wheels reach the edge of the curb or step.
Then allow the rear wheels to slowly roll down onto the lower level.
5. When the rear wheels are safely on the lower level, tilt the wheelchair back to its
balance point. This will lift the front casters off the curb or step.
6. Keep the wheelchair in balance and take small steps backward. Gently lower front
casters to the ground.
Failure to heed these warnings could result in damage to the wheelchair, a fall, a tip-over
and/or loss of control, causing severe injury to the rider, you or others.
Climbing a Curb or Single Step
WARNING: Follow these steps to help the rider climb a curb or single step going forward.
1. Stay behind the wheelchair.
2. Face the curb and tilt the wheelchair up on the rear wheels so that the front casters clear
the curb or step.
3. Move forward, placing the front casters on the upper level as soon as you are sure they
are past the edge.
4. Continue forward until the rear wheels contact the face of the curb or step. Lift and roll
the rear wheels to the upper level.
Failure to heed these warnings could result in damage to the wheelchair, a fall, a tip-over
and/or loss of control, causing severe injury to the rider, you or others.
Maintenance
WARNING:
1. Inspect and maintain this wheelchair strictly per the schedule on page 43.
2. If you detect a problem, contact Marvel™ Wheelchairs by phone immediately.
Failure to heed these warnings could result in damage to your wheelchair, injury to yourself,
a fall, a tip-over and/or loss of control, causing severe injury to yourself or others.
Warnings: Components and Options
Push Handles
WARNING: Push handles will not bear the weight of this wheelchair.
1. Never lift this wheelchair by its push handles. They may come loose or break and the
wheelchair will fall.
2. Lift this wheelchair only by the non-detachable parts of the main frame.
Failure to heed these warnings could result in damage to your wheelchair, injury to yourself,
a fall, a tip-over and/or loss of control, causing severe injury to yourself or others.
Fasteners
WARNING: USE ONLY THE FASTENERS SUPPLIED WITH THIS WHEELCHAIR.
12
MV01-94000-00
Rev C
1. If a bolt becomes loose, the associated nut may be defective. Use Threadlocker Loctite
242 on each bolt prior to re-tightening.
Failure to heed these warnings could result in damage to your wheelchair, injury to yourself,
a fall, a tip-over and/or loss of control, causing severe injury to yourself or others.
Footrests
WARNING:
1. At the lowest point, the footrest should be AT LEAST 2 inches (64mm) off the ground. If
set too low, it may catch on obstacles during normal use. This may cause the
wheelchair to stop suddenly and tip forward.
2. The footrest posts must never extend more than 1/2” above the caster wing and must
always be capped.
3. To avoid a trip or fall when you transfer
a. Make sure your feet do not get caught in the footrest.
b. Avoid putting weight on the footrests. The wheelchair may tip forward as a result of
doing so.
Failure to heed these warnings could result in damage to your wheelchair, injury to yourself,
a fall, a tip-over and/or loss of control, causing severe injury to yourself or others.
Positioning Belts
WARNING: Use positioning belts only to help support the rider's posture. Improper use of
these belts may cause severe injury to the rider.
1. Make sure the rider does not slide down in the wheelchair seat. If this occurs, the rider
may suffer chest compression or suffocation due to pressure from the belts.
2. The belts must be snug, but must not be so tight that they interfere with breathing. You
should be able to slide your open hand, flat, between the belt and the rider.
3. A pelvic wedge or a similar device can help keep the rider from sliding down in the seat.
Consult with the rider's doctor, nurse or therapist to find out if the rider needs such a
device.
4. Use positioning belts only with a rider who can cooperate. Make sure the rider can easily
remove the belts in an emergency.
5. NEVER USE POSITIONING BELTS:
a. as a patient restraint without a doctors orders.
b. on a rider who is comatose or agitated.
c. as a motor vehicle restraint. In an accident or sudden stop the rider may be thrown
from the wheelchair. Wheelchair seat belts will not prevent this, and further injury
may result from the belts or straps.
Failure to heed these warnings could result in damage to your wheelchair, injury to yourself,
a fall, a tip-over and/or loss of control, causing severe injury to yourself or others.
Power Drive
WARNING: Do not install a power drive on the Marvel™ Wheelchair. Doing so will:
1. Affect the center of gravity of your wheelchair and may cause a fall or tip-over.
13
MV01-94000-00
Rev C
2. Alter the frame.
3. Void the warranty.
Failure to heed these warnings could result in damage to your wheelchair, injury to yourself,
a fall, a tip-over and/or loss of control, causing severe injury to yourself or others.
Rear Wheels
WARNING: A change in set-up of the rear wheels will affect the center of gravity of your
wheelchair.
1. The farther you move the rear axles forward, the more likely it is that your wheelchair
will tip over backward.
2. Consult with your doctor, nurse or therapist to find the best rear axle set-up for your
wheelchair. Do not change the set-up unless you are SURE that you are not at risk to tip
over.
3. Adjust the rear wheel parking brakes after you make any change to the rear axles. Align
the parking brakes in such a way that the locking face covers approximately 2/3 of the
width of the wheel for side to side alignment and interferes with the wheel approximately
1/8” (3mm). Failure to do so may cause the parking brakes not to work.
Failure to heed these warnings could result in damage to your wheelchair, injury to yourself,
a fall, a tip-over and/or loss of control, causing severe injury to yourself or others.
Rear Wheel Locks
WARNING: Rear wheel parking brakes are NOT designed to slow or stop a moving
wheelchair. Use them only to keep the rear wheels from rolling when your wheelchair is at a
complete stop.
1. NEVER use the rear wheel parking brakes to try to slow or stop your chair when it is
moving. Doing so may cause you to veer out of control.
2. To keep the rear wheels from rolling, always set both rear wheel locks when you transfer
to or from your wheelchair.
3. Low pressure in a rear tire may cause the parking brakes on that side to slip and may
allow the wheel to turn when you do not expect it.
4. Make sure the Parking brakes embed in the tires at least 1/8 inch (3 mm) and align
Parking brakes in such a way that the locking face covers approximately 2/3 of the width
of the wheel for side to side alignment. If you fail to do so, the locks may not work.
Failure to heed these warnings could result in damage to your chair, injury to yourself, a
fall, a tip-over and/or loss of control, causing severe injury to yourself or others.
14
MV01-94000-00
Rev C
ASSEMBLY, SET-UP AND ADJUSTMENT
Adjustments - “Achieving the Perfect Fit”
Removing Wheels
1. Push black quick release button at the center of the wheel.
2. While pushing button, pull the wheel away from the wheelchair.
Putting on Wheels
1. Push black quick release button at the center of the wheel.
15
MV01-94000-00
Rev C
2. While pushing button, insert quick release axle pin into the wheelchairs until you
contact the wheel with the wheelchair
3. Release button. Quick release axle pin button will pop-out completely if locked.
4. IMPORTANT: Test to ensure wheel is locked onto the wheelchair by pulling the wheel.
Failure to follow this direction can lead to unsafe instability and poor performance.
16
MV01-94000-00
Rev C
Micro-Adjusting Backrest Angle for Comfort and Performance
1. For adjustment of the backrest, rider must be out of the wheelchair.
2. Insert 6mm Allen Wrench (Key) into Backrest Angle Adjuster if you have a Single
Post Seatback Backrest Assembly. Insert 5mm Allen Wrench (Key) into Backrest
Angle Adjuster if you have a Double Post Seatback Backrest Assembly.
3. Turn counterclockwise for forward adjustment. Turn clockwise to recline.
4. WARNING: Ensure that at least 1/4” of the backrest adjustment bolt protrudes from
the backrest adjustment clamp. Failure to heed these warnings could cause damage
to your wheelchair, injury to yourself, a fall, a tip-over and/or loss of control, causing
severe injury to yourself or others.
Macro-Adjusting Backrest Angle
1. For adjustment of the backrest, rider must be out of the wheelchair. Insert 4mm
17
MV01-94000-00
Rev C
Allen Wrench (Key) into Macro Backrest Adjuster bolts.
2. Loosen both Macro Backrest Adjuster bolts by turning counterclockwise
3. Slide bracket to appropriate position.
4. WARNING: Use “Threadlocker Loctite 242” to lock threaded fasteners against
vibration loosening. Threadlocker Loctite 242 allows for fasteners to be removed
with hand tools. Tighten both Macro Backrest Adjuster bolts by turning clockwise.
(Tighten to six newton meters (Nm) or five foot pounds). Failure to heed these
warnings could cause damage to your wheelchair, injury to yourself, a fall, a tip-over
and/or loss of control, causing severe injury to yourself or others.
Adjusting Backrest Height
1. Insert 4mm Allen Wrench (Key) into Backrest Height Adjusters.
18
MV01-94000-00
Rev C
2. Loosen all four (4) Backrest Height Adjusters by turning counterclockwise.
3. Adjust Backrest to desired position.
4. IMPORTANT: Make sure the Backrest Height Adjuster Clamp is fully engaged with the
Backrest Post.
5. WARNING: Use “Threadlocker Loctite 242” to lock threaded fasteners against
vibration loosening. Threadlocker Loctite 242 allows for fasteners to be removed
with hand tools. Tighten all four (4) Backrest Height Adjusters by turning clockwise.
(Tighten to six newton meters (Nm) or five foot pounds). Failure to heed these
warnings could cause damage to your wheelchair, injury to yourself, a fall, a tip-over
and/or loss of control, causing severe injury to yourself or others.
19
MV01-94000-00
Rev C
Folding Down Backrest for Storage
1. If you have locking pin back rest, pull “key chain” hoop at base of seatback backrest
assembly to release locking pin. Fold down backrest.
2. To return to upright position, pull “key chain” hoop at base of seatback backrest
assembly to release pin. For detent backrest just return to upright position and you
are complete.
3. WARNING: Return to upright position, and release “key chain” hoop to re-engage
locking pin. Make certain the locking pin is fully engaged. Failure to follow this
direction can lead to unsafe instability and poor performance.
Removing the Caster Wing
1. Rider must be out of the wheelchair.
2. Tilt the wheelchair.
20
MV01-94000-00
Rev C
3. Push black quick release button at the center of the Caster Wing.
4. While pushing button, wiggle and pull Caster Wing away from the wheelchair.
Putting on the Caster Wing
1. Push and hold black quick release button at the center of the Caster Wing and insert
21
MV01-94000-00
Rev C
quick release axle pin 99mm into the Torsion Bushing until contact.
2. Release black button.
3. WARNING: Test to ensure Caster Wing is locked by pulling Caster Wing away from
the wheelchair. Failure to heed these warnings could cause damage to your
wheelchair, injury to yourself, a fall, a tip-over and/or loss of control, causing severe
injury to yourself or others.
4. IMPORTANT: There is a Safety Groove to protect against unwanted release.
5. WARNING: Make certain the Caster Wing is fully engaged and not in the Safety
Groove. Failure to follow this direction can lead to unsafe instability and poor
performance. Failure to heed these warnings could cause damage to your
wheelchair, injury to yourself, a fall, a tip-over and/or loss of control, causing severe
injury to yourself or others.
Adjusting Footrest Height
1. Rider must be out of the wheelchair.
2. Insert 4mm Allen Wrench (Key) into Footrest Adjusters.
22
MV01-94000-00
Rev C
3. Loosen left and right Footrest Adjusters by turning counterclockwise.
4. Adjust Footrest to desired height by sliding Footrest through Footrest Adjuster
Clamps. If required, use a mallet to gently tap the Footrest into position.
5. WARNING: Make sure the Footrest Adjuster Clamp is fully engaged with the Footrest
Posts. Failure to heed these warnings could cause damage to your wheelchair, injury
to yourself, a fall, a tip-over and/or loss of control, causing severe injury to yourself
or others.
6. WARNING: Use “Threadlocker Loctite 242” to lock threaded fasteners against
vibration loosening. Threadlocker Loctite 242 allows for fasteners to be removed
with hand tools. Tighten both (2) Footrest Adjusters by turning clockwise. (Tighten
to six newton meters (Nm) or five foot pounds). Failure to heed these warnings could
cause damage to your wheelchair, injury to yourself, a fall, a tip-over and/or loss of
control, causing severe injury to yourself or others.
7. WARNING: Ensure the footrest posts are no more than 1.2 cm (0.5”) above the
caster wing. Using a pipe cutter, carefully cut excess tube, and replace caps in the
top of the footrest tubes. Failure to heed these warnings could cause damage to
your wheelchair, injury to yourself, a fall, a tip-over and/or loss of control, causing
severe injury to yourself or others.
23
MV01-94000-00
Rev C
Adjusting the Shock
1. A good starting for point is to set the air pressure equal to the 80% to 100% of
rider’s weight. For example, if the rider weight is 135 pounds, set the air pressure to
between 108 and 135 PSI. You will need a shock adjustment pump to change
pressure. Our wheelchairs will come pre-set to 150 PSI if not specified.
2. WARNING: Always maintain pressure in shock within 20% PSI of rider’s weight.
Failure to heed these warnings could cause damage to your wheelchair, injury to
yourself, a fall, a tip-over and/or loss of control, causing severe injury to yourself or
others.
3. To lockout the shock, toggle the Blue Power Valve lever to the “closed” position. To
engage the shock, toggle the Blue Power Valve lever to the “open” position. Any
position in between “open” and “close” provides an infinite range of options.
4. Refer to appropriate Shock adjustment user’s manual for all other adjustments .
Adjusting and/or tapering the wheelchair width and extending camber tube
1. Rider must be out of the wheelchair.
24
MV01-94000-00
Rev C
2. Turn the wheelchair upside down.
3. Remove the wheels. (See instructions entitled “Removing Wheels”)
4. Insert 4mm Allen Wrench (Key) into Seat Width Adjusters.
5. Loosen all six (6) Seat Width Adjusters by turning counterclockwise.
6. Adjust Sideguards to the appropriate width.
7. For additional adjustment, remove the Seat Width Adjusters and insert into
25
MV01-94000-00
Rev C
alternative Adjuster Receptors. Lightly tighten.
8. Adjust Sideguards to appropriate width.
9. Measure each side to make sure the Sideguards are appropriately spaced from the
center. To TAPER the wheelchair width set the rear seat width wider than the front
26
MV01-94000-00
Rev C
seat width.
10. WARNING: Use “Threadlocker Loctite 242” to lock threaded fasteners against
vibration loosening. Threadlocker Loctite 242 allows for fasteners to be removed
with hand tools. Tighten all six (6) Seat Width Adjusters by turning clockwise.
(Tighten to six newton meters (Nm) or five foot pounds). Failure to heed these
warnings could cause damage to your wheelchair, injury to yourself, a fall, a tip-over
and/or loss of control, causing severe injury to yourself or others.
11. Insert 5mm Allen Wrench (Key) into Camber Tube Collar.
27
MV01-94000-00
Rev C
12. Loosen both Camber Tubes Collars.
13. Extend Camber tube to a maximum of 12 cm (4.75”).
14. WARNING: 12 cm (4.75””) is the maximum Camber Tube extension that can be
safely used. Always ensure at least 3.75 cm (1.5”) of the Camber Tube is inside the
wheelchair frame. Failure to heed these warnings could cause damage to your
wheelchair, injury to yourself, a fall, a tip-over and/or loss of control, causing severe
injury to yourself or others.
15. Put the Wheels on. (See instruction entitled Putting on Wheels”)
16. Slide the wheels and camber tubes to the desired position. Maintain a minimum gap
between Sideguard and Wheel of 24mm (1.0”) or greater (approximately the width
of an two average fingers).
28
MV01-94000-00
Rev C
17. For 2, 4, and 6 degrees camber tubes, use a carpenter’s square to ensure the milled
edge (flat section) on the camber tube is perpendicular to the floor. This will assure
equivalent camber on both wheels.
18. WARNING: Use “Threadlocker Loctite 242” to lock threaded fasteners against
vibration loosening. Threadlocker Loctite 242 allows for fasteners to be removed
with hand tools. Tighten both Camber Tube Collars. (Tighten to six newton meters
(Nm) or five foot pounds). Failure to heed these warnings could cause damage to
your wheelchair, injury to yourself, a fall, a tip-over and/or loss of control, causing
severe injury to yourself or others.
29
MV01-94000-00
Rev C
Adjusting Center of Gravity
1. Rider must be out of the wheelchair.
2. Turn the wheelchair upside down.
3. Remove the wheels. (See instructions entitled “Removing Wheels”) Measure Center
of Gravity (CG) with a Square. Center of gravity is measured from the centerline of
the rear axle, to the front edge of the Seat Back Post. Positive CG is when the Seat
Back Post extends rearwards of the rear axle. Negative CG is when the Seat Back
Post extends forward of the rear axle.
4. Using a 5mm Allen Wrench (Key), loosen, but do not remove, the four bolts (two on
each side) attaching the shock to the tracks on the seat section.
5. AND using a 5mm Allen Wrench (Key), loosen, but do not remove, the four bolts
30
MV01-94000-00
Rev C
(two on each side) attaching the frame to the tracks on the seat section.
6. Slide the seat section along both sets of tracks to the desired position.
a.
31
MV01-94000-00
Rev C
b.
7. Re-measure the center of gravity.
8. WARNING: Use “Threadlocker Loctite 242” to lock threaded fasteners against
vibration loosening. Threadlocker Loctite 242 allows for fasteners to be removed
with hand tools. Tighten the four bolts attaching the shock to the tracks on the
seat section. (Tighten to six newton meters (Nm) or five foot pounds). Failure to
heed these warnings could cause damage to your wheelchair, injury to yourself, a
fall, a tip-over and/or loss of control, causing severe injury to yourself or others.
9. WARNING: Use “Threadlocker Loctite 242” to lock threaded fasteners against
vibration loosening. Threadlocker Loctite 242 allows for fasteners to be removed
with hand tools. Tighten the four bolts attaching the frame to the tracks on the
seat section. (Tighten to six newton meters (Nm) or five foot pounds). Failure to
heed these warnings could cause damage to your wheelchair, injury to yourself, a
fall, a tip-over and/or loss of control, causing severe injury to yourself or others.
Adjusting Seat Angle (Dump)
1. Using a 5mm Allen Wrench (Key), loosen, but do not remove, the four bolts (two on
each side) attaching the shock to the tracks on the seat section.
32
MV01-94000-00
Rev C
2. Slide the frame along the seat section to the desired seat angle.
3. WARNING: Use “Threadlocker Loctite 242” to lock threaded fasteners against
vibration loosening. Threadlocker Loctite 242 allows for fasteners to be removed
with hand tools. Tighten the four bolts attaching the shock to the tracks on the
seat section. (Tighten to six newton meters (Nm) or five foot pounds). Failure to
heed these warnings could cause damage to your wheelchair, injury to yourself, a
fall, a tip-over and/or loss of control, causing severe injury to yourself or others.
Adjusting the Length of the Caster Wing
1. Remove the Caster Wing (See instructions entitled “Removing the Caster Wing”)
33
MV01-94000-00
Rev C
2. Using a 3mm Allen Wrench (Key), loosen the three bolts attaching the hexagonal
tube to the frame.
3. Slide the hexagonal tube to the desired position.
4. WARNING: Use “Threadlocker Loctite 242” to lock threaded fasteners against
vibration loosening. Threadlocker Loctite 242 allows for fasteners to be removed
with hand tools. Replace and tighten the three bolts. (Tighten to six newton meters
(Nm) or five foot pounds). Failure to heed these warnings could cause damage to
your wheelchair, injury to yourself, a fall, a tip-over and/or loss of control, causing
severe injury to yourself or others.
5. Re-attach the Caster Wing (See instructions entitled “Putting on the Caster Wing”)
Adjusting Height
1. Make sure you have a Marvel Wheelchair Seat Attachment Kit (Part # FM-1-5)
2. Using a 5mm Allen Wrench (Key), remove, the four bolts (two on each side)
attaching the shock to the tracks on the seat section.
34
MV01-94000-00
Rev C
3. Using a 5mm Allen Wrench (Key), remove the four bolts (two on each side) attaching
the frame to the tracks on the seat section.
4. Add appropriate sized spacer(s) in all four locations (Shock and Frame) to achieve
desired height.
35
MV01-94000-00
Rev C
5. Match spacer height with appropriately length of bolts.
6. Re-attach the shock and the frame to the appropriate sets of tracks.
7. WARNING: Use “Threadlocker Loctite 242” to lock threaded fasteners against
vibration loosening. Threadlocker Loctite 242 allows for fasteners to be removed
with hand tools. Tighten the four bolts attaching the shock to the tracks on the
seat section. (Tighten to six newton meters (Nm) or five foot pounds). Failure to
heed these warnings could cause damage to your wheelchair, injury to yourself, a
fall, a tip-over and/or loss of control, causing severe injury to yourself or others.
8. WARNING: Use “Threadlocker Loctite 242” to lock threaded fasteners against
vibration loosening. Threadlocker Loctite 242 allows for fasteners to be removed
with hand tools. Tighten the four bolts attaching the frame to the tracks on the
seat section. (Tighten to six newton meters (Nm) or five foot pounds). Failure to
heed these warnings could cause damage to your wheelchair, injury to yourself, a
fall, a tip-over and/or loss of control, causing severe injury to yourself or others.
Adjusting “Front Caster to Caster” Width – NOT ADJUSTABLE
1. WARNING: DO NOT ADJUST FRONT CASTER TO CASTER WIDTH. Failure to heed
these warnings could cause damage to your wheelchair, injury to yourself, a fall, a
tip-over and/or loss of control, causing severe injury to yourself or others.
Adjusting Parking brakes
1. Ensure that all other adjustments are made prior to adjusting parking brakes.
2. Loosen the bolts attaching the parking brake tubes to the frame (one per side)
3. Slide to the appropriate width and retighten to six Newton meters (Nm).
WARNING: Use “Threadlocker Loctite 242” to lock threaded fasteners against
vibration loosening. Threadlocker Loctite 242 allows for fasteners to be removed
36
MV01-94000-00
Rev C
with hand tools. Failure to heed these warnings could cause damage to your
wheelchair, injury to yourself, a fall, a tip-over and/or loss of control, causing severe
injury to yourself or others.
4. Loosen the bolts attaching the parking brake bar (one per side)
37
MV01-94000-00
Rev C
5. Slide parking brake bar to the appropriate length and retighten to six Newton meters
(Nm). WARNING: Use “Threadlocker Loctite 242” to lock threaded fasteners against
vibration loosening. Threadlocker Loctite 242 allows for fasteners to be removed with
hand tools. Failure to heed these warnings could cause damage to your wheelchair,
injury to yourself, a fall, a tip-over and/or loss of control, causing severe injury to
yourself or others.
6. Verify that the each parking brake clamps down firmly on the wheels. WARNING:
Align Parking brakes in such a way that the locking face covers approximately 2/3 of
the width of the wheel for side to side alignment and interferes with the wheel
approximately 1/8”. Failure to heed these warnings could cause damage to your
wheelchair, injury to yourself, a fall, a tip-over and/or loss of control, causing severe
injury to yourself or others.
38
MV01-94000-00
Rev C
Installing Transfer Handles
1. Align Transfer Handle on top of Seat Pan Assembly at slot at front corner.
2. Insert two bolts and tighten to 6Nm. WARNING: Use “Threadlocker Loctite 242” to
lock threaded fasteners against vibration loosening. Threadlocker Loctite 242 allows
for fasteners to be removed with hand tools. Failure to heed these warnings could
cause damage to your wheelchair, injury to yourself, a fall, a tip-over and/or loss of
control, causing severe injury to yourself or others.
3. Repeat on opposite side.
Installing Push Handles
1. Be sure that your chair is equipped with a Dual Cane Seatback Backrest Assembly.
39
MV01-94000-00
Rev C
2. Acquire the Push Handles for assembly.
3. Be sure that the fastener is loose enough that there is some play between the
cylindrical pieces at the bottom of the Push Handle.
4. Remove the plastic plugs from the Dual Cane posts.
40
MV01-94000-00
Rev C
5. Insert the Push Handle into the back post to the desired depth and rotate handle to a
comfortable angle.
6. Locate the fastener inside the Push Handle through the oval slot in the bend of the
handle. Tighten to 6-8Nm.
7. Repeat for second Push Handle.
41
MV01-94000-00
Rev C
Installing Anti-Tip Bars
1. Disassemble (if necessary) Anti-tip Clamp and reassemble encompassing the rear
most tube on the Frame. Be sure to slide brackets as far outboard as possible before
lightly tightening.
2. Insert Anti-tip assemblies into Clamps by depressing spring button.
3. Rotate Anti-tip Clamp around Frame tube to achieve approximately 2” clearance
between the bottom of the Anti-tip bar wheel and the ground.
4. Tighten bolts to 6Nm. WARNING: Use “Threadlocker Loctite 242” to lock threaded
fasteners against vibration loosening. Threadlocker Loctite 242 allows for fasteners to
be removed with hand tools. Failure to heed these warnings could cause damage to
your wheelchair, injury to yourself, a fall, a tip-over and/or loss of control, causing
severe injury to yourself or others.
MAINTENANCE
CAUTION:
months.
Have a qualified wheelchair technician inspect your wheelchair every three
CAUTION: You can expect your Marvel™ Wheelchair to give years of trouble free
performance if used properly. However a regular schedule of maintenance will make certain
42
MV01-94000-00
Rev C
that your wheelchair is ready when you are ready for it.
A. Clean your wheelchair regularly. You can use any household cleaners; you can not spray
clean your wheelchair with hot water or steam. Allow the wheelchair to dry for 3-6 hours
after washing.
B. Do not use harsh abrasives or solvents on your wheelchair and remove fabric
components such as cushions and straps before cleaning.
C. Repair or replace worn components immediately before you use the wheelchair.
WARNING: Inspect and maintain your Marvel™ Wheelchair as indicated below. Your safety
depends on it. Repair any problems before use.
A. If you have pneumatic tires, check and refill weekly. Wheelchair tires do not retain
air as well as automotive tires because of their high surface area/air content ratio
B. Check your parking brakes weekly. As tires wear, the locks must be adjusted.
C. Check all fasteners every three months for tightness.
D. Check the fit and condition of the push handles every three months.
E. Check your quick release axle pins, axle sleeves, wheels, tires and spokes,
casters and frame every three months.
F. Clean and re-lubricate all three quick release axle pins (Quick release axle pins
for the two wheels and caster wing) with a Teflon® lubricant every week or as
needed.
G. Review appropriate shock operations manual for appropriate maintenance
schedule. Insure proper inflation (Recommended inflation setting of PSI (Pounds per
square inch) equal 0% to 100% of the rider’s weight - e.g. the recommended initial
preset for a 163 lb rider is 130 to 163 PSI.)
Cleaning
Main Frame and Footrest
1. Wipe down your wheelchair with a clean, damp rag
2. It is suggested that cleaning be conducted on a monthly basis. However, depending on
type and extent of use, the wheelchair may have to be cleaned more often.
Quick Release Axle Pins and Moving Parts
1. Keep quick release axle pins (two wheels and caster wing) free of dirt and lint to ensure
proper operations.
2. Clean quick release axle pins and camber inserts once per week with a Teflon® lubricant.
Backrest Upholstery
1. Clean backrest fabric with mild soap and water. Do not machine wash. Drip dry only.
MARVEL™ WHEELCHAIR WARRANTY
Marvel Wheelchairs warrants the wheelchair frame against defects in materials and
workmanship for the lifetime of the original user of the wheelchair.
43
MV01-94000-00
Rev C
Marvel Wheelchairs warrants all Marvel Wheelchairs–made wheelchair components
(including, but not limited to, footrests, seat pan assemblies, seatback backrest assembly,
caster forks, and shocks) against defects in materials and workmanship for one (1) year
from the date of purchase, except as provided below.
1. This warranty does not cover:
a. tires and tubes for rear wheels, upholstery (including cushions, backrest upholstery
and push-handle grips; or
b. any labor or shipping charges incurred in replacement part installation or repair of this
product; or
2. This warranty is VOID if Marvel Wheelchairs, in its sole discretion, determines that:
a. the original Marvel Wheelchair’s serial number tag has been removed, altered or
defaced; or
b. the wheelchair has been subjected to negligence, accident, improper maintenance,
storage or operation as required by your Marvel Wheelchairs Owners Manual,
commercial or institutional use, misuse or abuse, including, but not limited to, exceeding
the maximum weight limit of 250 pounds or using the wheelchair with tie downs or
locking, clamping or other restraint systems related to the use of the wheelchair in a
motor vehicle; or
c. the wheelchair has been damaged by improper repairs or repairs made to any
component without the express written consent of Marvel Wheelchairs; or
d. the wheelchair has been modified without Marvel Wheelchairs’ express written
consent, including, but not limited to, modification through the use of unauthorized parts
or attachments.
3. This warranty applies only to the original intended user of the wheelchair.
4. Marvel™ Wheelchairs does not warrant against any damage from neglect, misuse or
damage incidental to any automobile or conveyance incident or accident.
5. Marvel™ Wheelchairs only warrants the Marvel™ Wheelchair in connection with use in
the United States of America and Canada.
Marvel Wheelchairs’ sole responsibility is to repair or replace, in our sole discretion, the
covered components of the wheelchair.
If your wheelchair requires warranty service, please contact an authorized Marvel
Wheelchairs Dealer in Canada or the USA or an authorized international distributor. In the
event of a defect in material or workmanship, the Dealer or Distributor must obtain a return
authorization (RA) number from Marvel Wheelchairs, and Marvel Wheelchairs issues RA
numbers authorizations only to authorized Marvel Wheelchairs’ Dealers and Distributors. If
you do not receive satisfactory service, please write to Marvel Wheelchairs Customer
Service at 200 North Service Rd. West, Unit 1, Suite 623, Oakville, ON L6M 2Y1 CANADA
or call 800-733-0265. Do not return products to our factory without our prior consent.
Returns must be shipped with freight pre-paid, and we recommend that you insure the
returned product for its full replacement cost.
The foregoing express warranty is exclusive and in lieu of all other warranties whatsoever,
whether written or oral, express or implied, including the implied warranties of
merchantability and fitness for a particular purpose. Marvel Wheelchairs shall not be liable
for any direct, indirect, consequential or incidental damages whatsoever. No person is
authorized to alter or extend the foregoing express warranty or to waive any of the
limitations or exclusions. The warranty shall be extended to comply with State or Provincial
laws and requirements.
44
MV01-94000-00
Rev C
Date Purchased:
Serial Number:
(located on the Frame near
the front pivot attachment)
45
MV01-94000-00
Rev C