1
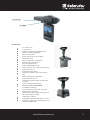
Trifles make perfection
Operation Manual
Defender Car Vision 2020 HD
Car DVR
www.defender-global.com
1
1
Trifles make perfection
Thank you for buying Defender Car Vision 2020 HD car DVR. Before using the device read carefully
this manual.
mini-USB connector
HDMI connector
Function buttons
“POWER” - switching the device on or off
“OK” – confirmation of the selected mode
“UP” – upward or zoom control
“DOWN” – downward or zoom control
“MODE” shifting the modes: photo/ audio/ playback/
video record
"MENU" - activation of configuration menu
2
www.defender-global.com
2
Trifles make perfection
Specifications
2.5" LCD screen
1.3 MP sensor
Output to connect to TV, HDMI output
Night vision (IR-highlighting)
Four layer glass lens
Focus range: from 12 cm to infinity
(Automatic focus)
Wide viewing angle: 145 degrees.
Rotation angle: 270 degrees.
Four times digital zoom
Video format: MJPEG (AVI)
Video resolution: up to 1280*720 (HD 720p)
Video frame rate: 30
Still image format: JPEG
Still image resolution: up to 2592*1944 (5
MP)
Built-in microphone and speaker:
Motion detection sensor
Autostart upon power supply to mini-USB
connector
Video recording while charging
Built-in memory: 4х16М SDRAM
(unavailable to the user)
External memory: SD-card up to 32 GB
Built-in battery: 600 mAh
Operation time from storage battery up to 70
min of interrupted recording
Connectivity: USB 2.0
Compatible to Windows XP/VBTA/7, MAC OS
Accessories in package: windshield mount, car charger,
USB cable, HDMI cable
3
www.defender-global.com
3
Trifles make perfection
Using of Micro SD/ SD memory card
1. Insert the card (not included) into SD slot until its clicking position (if you use MicroSD card,
you need an adaptor). The device is ready to be used.
To remove SD card, slightly press it, it is partially pulled out now and you may remove it.
If no card is in the slot the message “No Card” will appear on the screen. Note: Check that you
insert SD card by the correct side, otherwise you may damage the device and the memory card.
Amount of images and video recording time:
SD Card
1280*720
(720р)
848*480
(D1)
2048*1536
(ЗМ)
16G
128 min
128 min
10960
(images)
8G
64 min
64 min
5530
(images)
4G
32 min
32 min
2760
(images)
2G
16 min
16 min
1380
(images)
1G
8 min
8 min
690(images
)
Note: the amount of images to be saved will differ depending the device configuration, photo
shooting and used memory card.
640*480
(640)
256 MIN
128 MIN
64 min
32 min
16 min
1280*1024
(1.3М)
12160(image
6080 s)
(images)
3040
(images)
1520
(images)
760
(images)
1600*1200
(2М)
11520(image
5760 s)
(images)
2880
(images)
1440
(images)
720
(images)
2592*1944
(ЗМ)
9440
(images)
4720
(images)
2360
(images)
1180
(images)
590
(images)
Device charging:
Charging variants:
1) by means of computer / notebook via mini-USB cable.
2) by means of car charger.
Warning: If low charging, the car video recorder will switch to energy saving mode. Please charge the
battery before switching the device on.
Operation Manual
On/Off and mode switching
1) Press “POWER” button to switch the device on.
2) After switching on, the device is in the video recording mode. Press “OK” button to start recording.
Press “OK” button again to pause recording and save the files in the automatic mode.
3) Press “MODE ” button to select the mode of photo, audio recording, playback or video recording.
4) Press and hold down “POWER” button for three seconds to switch the device off when video
recording is stopped.
Modes
Video recording mode
1. Press “POWER” button to switch the device on. After switching on, the device is in the video
recording mode.
www.defender-global.com
4
4
Trifles make perfection
The video camera icon is in the upper left corner.
2. Press “OK” button to start video recording. After starting recording the indicator in the upper right corner
will start counting recording time.
Recording cycle: The device makes records by files of 2, 5 or 10 minutes duration (at the user's option).
When the SD memory card is full, the device automatically removes the oldest files and records new ones
instead of them.
IR sensors and highlighting switch on automatically under low light conditions, if the relevant option is
activated in the configuration.
Photo mode
1. Switch the device on. Press “MODE” button unless enter the photo mode. After
that the photo camera icon appears in the upper left corner of the screen.
2. Press “OK” button to shoot a photo..
Audio recording mode
1. Switch the device on. Press “MODE” button unless enter the audio recording mode. After that the
microphone icon and blue illumination with microphone and recording time appear in the upper left corner
of the screen.
2. Press “OK” button to start audio recording.
3. Press “OK” button again to stop recording and save the audio file.
Playback mode
1. Switch the device on. Press “MODE” button unless enter the playback mode. After that the triangle icon
appears in the upper left corner of the screen. In the bottom left corner you can see the file type - Video
(video camera icon), Photo (without ant icon) or Audio recording (microphone icon). In the upper right
corner you can see the file number / the total amount of files recorded.
2. Press “DOWN / UP” button to select the file.
3. Press “OK” button to playback.
Configurations
Video configuration
Switch the device on. In the video recording mode press “MENU” button to enter the configuration menu.
Then on the first tab (Video recording configuration) shift the cursor by the “UP” and “DOWN” buttons. To
enter the sub-menu press “OK” button and select the required sub-menu, then press “OK” button. To go to
the previous window press “MENU”.
1. Video resolution: 1280 * 720 / 848 * 480 / 640 * 480.
2. Date and time (to show date and time in the recorded video: On/Off
3. Motion detection sensor: On/Off
The device makes records files of 2 minutes duration. If there is no motion in the shot while saving the file,
the device turns to standby mode and starts recording again when detecting the motion rerecording old files
by new ones when the memory card is full.
4. Repeated recording: On/Off
The device makes video records uninterruptedly rerecording old files by new ones when the memory card is
full.
www.defender-global.com
5
5
Trifles make perfection
5. Segment time (duration of saved files): 2 minutes/ 5 minutes/ 10 minutes.
6. Duration (recording): Off / 10 minutes/ 20 minutes
This function allows configuring the operation time of drive video recorder after switching the motor off (to
switch off simultaneously, in 10 or 20 minutes)
7.
Video recording sound: On/Off - to switch on or off the record of the sound while video recording
To exit the configuration menu press “MENU” button.
Photo configuration
Switch the device on. In the photo mode press “MENU” button to enter the configuration menu. Then on the
first tab (Photo configuration) shift the cursor by the “UP” and “DOWN” buttons. To enter the sub-menu
press “OK” button and select the required sub-menu, then press “OK” button. To go to the previous window
press “MENU”.
1. Resolution: 2592x1944 / 2048x1536 / 1600x1200 / 1280x1024.
2. Quality: Very high/ high/standard
3. Exposition: exposition configuration.
4. Timer: Off/ 2 sec/ 10 sec/ Multi
While selecting “Off”, the shot is made immediately after pressing the button. While selecting the “2 sec” or
“10sec”, the shot is made with delay of 2 or 10 seconds after pressing the button. While selecting “Multi”,
upon pressing the button 3 shots are made consequently.
5.
Date and time: Switch off / Date and time (to show date and time on the photo).
Upon selection press “OK” button to confirm, the configuration is complete. Then press “MENU” button to
exit.
Playback configuration
Switch the device on. In the playback mode press “MENU” button to enter the configuration menu. Then on
the first tab (Playback configuration) shift the cursor by the “UP” and “DOWN” buttons. To enter the submenu press “OK” button and select the required sub-menu, then press “OK” button. To go to the previous
window press “MENU”.
1.
Security (file locking from removing): File security / File locking / Relock
This function allows securing the file from manual removing (the function below) the secured file is marked
by key icon.
Warning! While repeated recording the saved file will be removewd and changed by a new one after full
completion of the memory card despite of locking.
2.
To remove: Current / All
This function allows removing the current file while playing which it was selected. The navigation between
the files is not available (to do this you need to exit the menu, select the required file) but if you remove the
current file, the next file by order will be available for removing in this menu.
Note that you won't remove the secured file unless you lock it priorly.
www.defender-global.com
6
defender
Trifles make perfection
! The following configuration sub-menus are available only for photo!
3. Sideshow: Start / Interval / Repeat
You can configure the slide show
4. Sound reminder: Add/ Remove.
You can add a sound reminder to the shot photo.
5. Backdrop: Set (to apply this photo as a backdrop) / Cancel.
Upon selection press “OK” button to confirm, the configuration is complete. Then press “MENU” button to exit.
System configuration
Switch the device on. Press “MODE” button to enter the configuration menu (in video recording mode). Then
press “MODE” button to navigate to the system configuration menu. Shift the cursor by the “UP” and “DOWN”
buttons. To enter the sub-menu press “OK” button and select the required sub-menu, then press “OK” button.
1. Sounds.
Flash sound: On / Off.
On sound: select the sound by pressing “MODE” button.
Button sound: On / Off.
Button volume: 0,1,2,3.
2. Power supply frequency: 50Hz, 60Hz (on default power supply frequency is set to 50Hz).
3. Energy saving: 1 min, 3 min, 5 min, Off.
Switching the device off if no motion detection within the set time interval.
4. Switching the screen off: 30 seconds, 1 min, 2 min, Off.
Switching the screen off in the set time interval. To switch the screen press any button.
5. Date and time: month / day / year hour / minute.
6. Language: English, Chinese (simplified), Chinese (traditional), Spanish, French, Portuguese, German,
Japanese, Russian.
7. TV output: NTSC / PAL (PAL on default).
8. Screen backdrop: Off / Standard / My photos (user's backdrop).
9. Formate the card: Yes / No.
10. IR highlighting: On/Off
11. Menu rotation: Yes / No.
While rotating the menu, the recorded image rotates as well!
12. Configuration reset: Yes / No.
13. Version: The information on the software is shown.
Press “DOWN / UP” button to select and press “OK” button to confirm. Press “MENU” button to exit the menu
after completing the configuration.
Recording while charging and connection to PC
Connect the switched off device to the computer or car charger. The device will switch on in the video recording
mode or in the mode selection menu. Press “MENU” button to enter themode selection menu or to exit the menu.
To select the mode shift the cursor by the “UP” and “DOWN” buttons. To activate
www.defender-global.com
7
7
Trifles make perfection
the selected mode press “OK” button. The following modes are available:
1.
Memory card.
In this mode the device operates as card-reader.
2.
PC camera.
In this mode the device operates as web camera. For this mode it is required to install the driver. The driver
can be downloaded from the manufacturer's site www.defender-global.com
3.
Video recording.
To switch video recording on.
Notes:
!! While making video record the device will automatically save the video file and switch off in 5 minutes
after the power supply to mini-USB plug is cut off.
TV-OUT
Connect the device to TV via AV cable.
HD TV-OUT
Connect the device to TV of high resolution via HDMI cable.
Troubleshooting
Problem:
а) I can't make photo / video.
Check the spare place on the memory card. Change photo or video resolution.
b)
What to do if the image is displayed incorrectly on TV?
Connect the device to TV via AV cable. Check the AV plug is promptly inserted into TV video terminal and
also that the relevant TV input and the chromatic system are selected.
c)
The image is out of focus.
Use clean, soft fibreless wipe to clean the camera lenses with special optics cleaner and accurately wipe the
lenses. Recommended cleaners: Defender ЕСО CLN 30591, Defender CLN 30604, Defender CLN 30593.
d)
If the device fails to operate (not responding), disconnect the power supply source and remove the
accumulator to reboot the system.
e) If the device is broken down, disconnect the power supply source and refer to the customer care.
www.defender-global.com
8