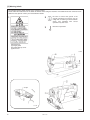
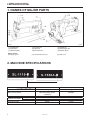
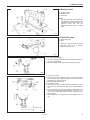
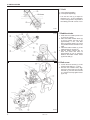
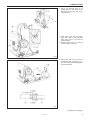
1
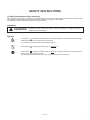
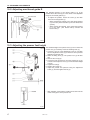
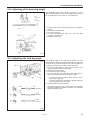
SL-1110 S-7550A INSTRUCTION MANUAL HIGH SPEED SINGLE NEEDLE STRAIGHT LOCK STITCHER Please read this manual before using the machine. Please keep this manual within easy reach for quick reference. Thank you very much for buying a BROTHER sewing machine. Before using your new machine, please read the safety instructions and the explanations given in the instruction manual. With industrial sewing machines, it is normal to carry out work while positioned directly in front of moving parts such as the needle and thread take-up, and consequently there is always a danger of injury that can be caused by these parts. Follow the instructions from training personnel and instructors regarding safe and correct operation before operating the machine so that you will know how to use it correctly. SL-1110 SAFETY INSTRUCTIONS [1] Safety indications and their meanings This instruction manual and the indications and symbols that are used on the machine itself are provided in order to ensure safe operation of this machine and to prevent accidents and injury to yourself or other people. The meanings of these indications and symbols are given below. Indications CAUTION The instructions which follow this term indicate situations where failure to follow the instructions could cause injury when using the machine or physical damage to equipment and surroundings. ····· This symbol ( ) indicates something that you should be careful of. The picture inside the triangle indicates the nature of the caution that must be taken. (For example, the symbol at left means “beware of injury”.) ····· This symbol ( ····· This symbol ( ) indicates something that you must do. The picture inside the circle indicates the nature of the thing that must be done. (For example, the symbol at left means “you must make the ground connection”.) ENGLISH Symbols ) indicates something that you must not do. SL-1110 i [2] Notes on safety CAUTION Environmental requirements Use the sewing machine in an area which is free from sources of strong electrical noise such as electrical line noise or static electric noise. Sources of strong electrical noise may cause problems with correct operation. Any fluctuations in the power supply voltage should be within r10% of the rated voltage for the machine. Voltage fluctuations which are greater than this may cause problems with correct operation. The power supply capacity should be greater than the requirements for the sewing machine's power consumption. Insufficient power supply capacity may cause problems with correct operation. The ambient temperature should be within the range of 5qC to 35qC during use. Temperatures which are lower or higher than this may cause problems with correct operation. The relative humidity should be within the range of 45% to 85% during use, and no dew formation should occur in any devices. Excessively dry or humid environments and dew formation may cause problems with correct operation. In the event of an electrical storm, turn off the power and disconnect the power cord from the wall outlet. Lightning may cause problems with correct operation. Installation Machine installation should only be carried out by a qualified technician. Contact your Brother dealer or a qualified electrician for any electrical work that may need to be done. The sewing machine weighs approximately 30 kg. The installation should be carried out by two or more people. Do not connent the power cord until installation is complete. The machine may operate if the treadle is depressed by mistake, which could result in injury. Be sure to connect the ground. If the ground connection is not secure, you run a high risk of receiving a serious electric shock, and problems with correct operation may also occur. Secure the table so that it will not move when tilting back the machine head. If the table moves, it may crush your feet or cause other injuries. ii SL-1110 All cords should be secured at least 25 mm away from any moving parts. Furthermore, do not excessively bend the cords or secure them too firmly with staples, otherwise there is the danger that fire or electric shocks could occur. Install the beltcovers to the machine head and motor. If using a work table which has casters, the casters should be secured in such a way so that they cannot move. Be sure to wear protective goggles and gloves when handling the lubricating oil, so that it does not get into your eyes or onto your skin. If care is not taken, inflammation can result. Furthermore, do not drink the lubricating oil. Diarrhea or vomiting may result. Keep the oil out of the reach of children. CAUTION Sewing This sewing machine should only be used by operators who have received the necessary training in safe use beforehand. If using a work table which has casters, the casters should be secured in such a way so that they cannot move. The sewing machine should not be used for any applications other than sewing. Attach all safety devices before using the sewing machine. If the machine is used without these devices attached, injury may result. Be sure to wear protective goggles when using the machine. If goggles are not worn, there is the danger that if a needle breaks, parts of the broken needle may enter your eyes and injury may result. Turn off the power switch at the following times. The motor will keep turning even after the power is switched off as a result of the motor’s inertia. Wait until the motor stops fully before starting work. The machine may operate if the treadle is depressed by mistake, which could result in injury. yWhen threading the needle yWhen replacing the bobbin and needle yWhen not using the machine and when leaving the machine unattended Do not touch any of the moving parts or press any objects against the machine while sewing, as this may result in personal injury or damage to the machine. If an error occurs in machine, or if abnormal noises or smells are noticed, immediately turn off the power switch. Then contact your nearest Brother dealer or a qualified technician. If the machine develops a problem, contact your nearest Brother dealer or a qualified technician. Cleaning Turn off the power switch before carrying out cleaning. The motor will keep turning even after the power is switched off as a result of the motor’s inertia. Wait until the motor stops fully before starting work. The machine may operate if the treadle is depressed by mistake, which could result in injury. Be sure to wear protective goggles and gloves when handling the lubricating oil, so that it does not get into your eyes or onto your skin. If care is not taken, inflammation can result. Furthermore, do not drink the lubricating oil. Diarrhea or vomiting may result. Keep the oil out of the reach of children. Use only the proper replacement parts as specified by Brother. Maintenance and inspection Maintenance and inspection of the sewing machine should only be carried out by a qualified technician. Ask your Brother dealer or a qualified electrician to carry out any maintenance and inspection of the electrical system. Turn off the power switch and disconnect the power cord from the wall outlet at the following times. The motor will keep turning even after the power is switched off as a result of the motor’s inertia. Wait until the motor stops fully before starting work. The machine may operate if the treadle is depressed by mistake, which could result in injury. yWhen carrying out inspection, adjustment and maintenance yWhen replacing consumable parts such as the rotary hook SL-1110 If the power switch needs to be left on when carrying out some adjustment, be extremely careful to observe all safety precautions. Secure the table so that it will not move when tilting back the machine head. If the table moves, it may crush your feet or cause other injuries. Use only the proper replacement parts as specified by Brother. If any safety devices have been removed, be absolutely sure to re-install them to their original positions and check that they operate correctly before using the machine. Any problems in machine operation which result from unauthorized modifications to the machine will not be covered by the warranty. iii [3] Warning labels The following warning labels appear on the sewing machine. Please follow the instructions on the labels at all times when using the machine. If the labels have been removed or are difficult to read, please contact your nearest Brother dealer. 1 2 Be sure to connect the ground. If the ground connection is not secure, you run a high risk of receiving a serious electric shock, and problems with correct operation may also occur. 3 Direction of operation Safety devices: (A) Finger guard (B) Thread take-up cover (C) Belt cover 3824M Oil pan 3871M 3825M iv SL-1110 CONTENTS 1. NAMES OF MAJOR PARTS................ 1 10. STANDARD ADJUSTMENTS............ 16 10-1. Adjusting the thread take-up spring ............... 16 2. MACHINE SPECIFICATIONS.............. 1 10-2. Adjusting arm thread guide R ........................ 17 10-3. Adjusting the presser foot height ................... 17 3. TABLE .................................................. 2 10-4. Adjusting of the feed dog height .................... 18 10-5. Adjusting the feed dog angle ......................... 18 4. MOTOR ................................................ 2 10-6. Adjusting the needle bar height ..................... 19 5. INSTALLATION ................................... 3 10-7. Adjusting the needle and feed mechanism timing ............................................................. 19 5-1. Installation ..................................................... 3 5-2. Ground wire connections .............................. 8 5-3. Lubrication .................................................... 8 10-8. Adjusting the needle and rotary hook timing ............................................................. 20 8 10-9. Adjusting the rotary hook lubrication amount........................................................... 21 6. PREPARATION BEFORE SEWING .... 9 11. TROUBLESHOOTING ...................... 22 5-4. Checking the machine pulley rotating direction ........................................................ 6-1. Installing the needle ...................................... 9 6-2. Removing the bobbin case............................ 9 6-3. Winding the lower thread .............................. 10 6-4. Installing the bobbin case.............................. 10 6-5. Threading the upper thread........................... 11 6-6. Adjusting the stitch length ............................. 11 7. SEWING ............................................... 12 7-1. Sewing .......................................................... 12 7-2. Backtacking................................................... 12 8. THREAD TENSION.............................. 13 8-1. Adjusting the thread tension.......................... 13 8-2. Adjusting the presser foot pressure .............. 14 9. CLEANING ........................................... 14 SL-1110 1. NAMES OF MAJOR PARTS 2. MACHINE SPECIFICATIONS 1. NAMES OF MAJOR PARTS 3826M 3827M (1) Needle plate (4) Pretension (7) Machine pulley (2) Presser foot (5) Spool pin (8) Reverse lever Safety devices (10) Finger guard (3) Needle bar (6) Stitch length dial (9) Bobbin winder (11) Thread take-up cover (12) Belt cover 2. MACHINE SPECIFICATIONS -3 For medium-weight materials 5,500rpm (Normal sewing speed: 5,000rpm) 4.2mm Use Max. sewing speed Max. stitch length Presser foot height Lifting lever Knee lifter Feed dog height Needle (DB x 1, DP x 5) 1 -5 For heavy-weight materials 4,000rpm 5mm 6mm 13mm 0.8mm #11 - #18 SL-1110 1.2mm #19 - #22 3. TABLE 4. MOTOR 3. TABLE Table processing diagram yThe top of the table should be 40 mm in thickness and should be strong enough to hold the weight and with-stand the vibration of the sewing machine. yDrill holes as indicated in the illustration below. Head rest hole Ground wire hole Motor mounting holes Cotton stand hole 3828M 4. MOTOR CAUTION All cords should be secured at least 25 mm away from any moving parts. Furthermore, do not excessively bend the cords or secure them too firmly with staples, otherwise there is the danger that fire or electric shocks could occur. Install the correct belt cover which corresponds to the motor being used. < Motor > Use one of the clutch motors given in the table at right as the motor. Refer to the instruction manual for the motor for details on installing and using the motor. Power Single-phase Three-phase Motor 2-pole, 400 W motor 2-pole, 400 W motor < Motor pulley and V-belt > Select the correct motor pulley and V-belt by referring to the table below to suit the power frequency of your area. 50Hz Sewing speed 5,000rpm 4,000rpm Motor pulley (Outer diameter) 130 110 60Hz V-belt 45 44 SL-1110 Motor pulley (Outer diameter) 115 90 V-belt 44 43 2 5. INSTALLATION 5. INSTALLATION CAUTION Machine installation should only be carried out by a qualified technician. Contact your Brother dealer or a qualified electrician for any electrical work that may need to be done. The sewing machine weighs approximately 30 kg. The installation should be carried out by two or more people. Secure the table so that it will not move when tilting back the machine head. If the table moves, it may crush your feet or cause other injuries. Do not connect the power cord until installation is complete. The machine may operate if the treadle is depressed by mistake, which could result in injury. Be sure to connect the ground. If the ground connection is not secure, you run a high risk of receiving a serious electric shock, and problems with correct operation may also occur. Install the belt cover to the machine head. 5-1. Installation Left side: White 1. Oil pan Right side: Black Operator (1) (2) (3) (4) Head cushions (left) [2 pcs] Head cushions (right) [2 pcs] Oil pan Magnet 4065M 2. Rubber cushions (1) Rubber cushions [2 pcs] (2) Nails [4 pcs] 3. Knee lifter complying bar (3) Knee lifter complying bar 3830M 3 SL-1110 5. INSTALLATION 4. Machine head (1) Hinges [2 pcs] (2) Machine head (3) Head rest NOTE: Tap the head rest (3) securely into the table hole. If the head rest (3) is not pushed in as far as it will go, the machine head will not be sufficiently stable when it is tilted back. 3831M 5. Knee lifter plate (1) Knee lifter plate (2) Bolt * Loosen the bolt (2) and move the knee lifter plate (1) to a position where it is easy to use. 3832M <Knee lifter adjustment> 1. Turn the machine pulley so that the feed dog is below the top of the needle plate. 2. Lower the presser foot (5) by using the lifting lever (4). 3833M 3834M 3. Loosen the nut (6). 4. Turn the screw (8) to adjust so that the amount of play in the knee lifter (7) is approximately 2 mm when the knee lifter plate (1) is gently pressed. 5. Securely tighten the nut (6). 6. Loosen the nut (9). 7. Turn the screw (10) until the distance between the end of the screw (10) and the knee lifter (7) is approximately 8 mm. 8. Turn the adjusting screw (10) to adjust so that the presser foot (5) is at the desired position within a distance of 13 mm of the needle plate when the knee liter plate (1) is fully pressed. 9. After adjustment is completed, securely tighten the nut (9). Within 13 mm 3835M SL-1110 4 5. INSTALLATION 6. V-belt (1) motor (Sold separately) (2) V-belt (Sold separately) * Turn the two nuts (3) to adjust so that there is 10 - 14 mm of deflection in the V-belt (2) when it is pressed at the midway point with a force of 5 N. 3836M 3837M 7. Bobbin winder 1. Push down the bobbin presser arm (1) as far as it will go. 2. Place the bobbin winder wheel (2) so that it pushes the belt (3) by approximately 5 mm, and then place the bobbin winder (4) so that it is parallel with the belt hole in the table. 3. Install the bobbin winder (4) to the table with the two screws (5). 4. Pull the bobbin presser arm (1) back and check that there is approximately 8 mm of clearance between the bobbin winder wheel (2) and the belt (3). 8. Belt cover 1. Loosen the three screws (1) on the machine side plate by 4 - 5 turns. 2. Tilt back the machine head, align the groove in the belt cover (2) with the stud (3) and the three screws (1), and then securely tighten screw (1)-A only. 3838M 5 SL-1110 5. INSTALLATION 3. Return the machine head to its original position, and then remove the screw (4) from the rear of the machine head. 4. Align screw (1)-B with the groove (6) in belt cover U (5), and then place belt cover U (5) onto the machine pulley. 5. Tighten screws (1)-B, (1)-C and (4) to secure belt cover U (5). 3839M 3840M 6. Place belt cover D (7) so that it overlaps the belt cover (2) by 2 - 3 mm, and then provisionally tighten the two screws (8). 3841M (Continued on next page) SL-1110 6 5. INSTALLATION 7. Insert the cover (9) of belt cover D (7) in between the belt cover (2) and belt cover D (7), and then place it into the groove of belt cover D (7). 8. Slide the cover (9) down along the groove of belt cover D (7) as far as it will go. 3842M 9. Pull belt cover D (7) toward you until there is no clearance between the belt cover (2) and the cover (9) of belt cover D (7). 10. Fully tighten the two screws (8). (Refer to step 6.) 3843M 9. Cotton stand (1) Cotton stand NOTE: Securely tighten the nut (4) so that the two rubber cushions (2) and the washer (3) are securely clamped and so that the cotton stand (1) does not move. 3844M 7 SL-1110 5. INSTALLATION 5-2. Ground wire connections Use the correct type of ground wire. (Be sure to read the instruction manual for the motor together with this instruction manual.) 1. Connect the ground wire (1) to the sewing machine head and motor. (The attachment location is indicated by a ground symbol (2).) 2. Connect the ground wire (3) to the oil pan (4) and motor. (The attachment location is indicated by a ground symbol (5).) Motor Motor 3845M 5-3. Lubrication CAUTION Do not connect the power cord until lubrication has been completed, otherwise the machine may operate if the treadle is depressed by mistake, which could result in injury. Be sure to wear protective goggles and gloves when handling the lubricating oil, so that it does not get into your eyes or onto your skin. If care is not taken, inflammation can result. Furthermore, do not drink the lubricating oil. Diarrhea or vomiting may result. Keep the oil out of the reach of children. yThe sewing machine should always be lubricated and the oil supply replenished before it is used for the first time, and also after long periods of non-use. yUse only the lubricating oil (Nisseki Mitsubishi Sewing Lube 10N; VG10) specified by Brother. * If this type of lubricating oil is difficult to obtain, the recommended oil to use is <Exxon Mobil Essotex SM10; VG10>. 3846M 1. Tilt back the machine head. 2. Slowly pour in lubricating oil until the oil level reaches the HIGH mark. * If the oil level drops below the LOW mark, add more lubricating oil. 5-4. Checking the machine pulley rotating direction CAUTION Do not touch any of the moving parts or press any objects against the machine while sewing, as this may result in personal injury or damage to the machine. 1. Insert the power cord plug into the wall outlet, and then turn on the power switch. 2. Depress the treadle slightly and check that the machine pulley starts to turn in the direction of the arrow (1). * If the direction of rotation is reversed, change the direction of rotation to the correct direction while referring to the instruction manual for the motor. 3847M SL-1110 8 6. PREPARATION BEFORE SEWING 6. PREPARATION BEFORE SEWING 6-1. Installing the needle CAUTION Turn off the power switch before installing the needle. The motor will keep turning even after the power is switched off as a result of the motor’s inertia. Wait until the motor stops fully before starting work. The machine may operate if the treadle is depressed by mistake, which could result in injury. 1. Turn the machine pulley to move the needle bar (1) to its highest position. 2. Loosen the screw (2). 3. Insert the needle (3) in a straight line as far as it will go, making sure that the long groove on the needle is at the left, and then securely tighten the screw (2). Front Long groove 0795M 3848M 6-2. Removing the bobbin case CAUTION Turn off the power switch before removing the bobbin case. The motor will keep turning even after the power is switched off as a result of the motor’s inertia. Wait until the motor stops fully before starting work. The machine may operate if the treadle is depressed by mistake, which could result in injury. 2119M 2120M 1. Turn the machine pulley to raise the needle until it is above the needle plate. 2. Pull the latch (1) of the bobbin case upward and then remove the bobbin case. 3. The bobbin (2) will come out when the latch (1) is released. For thick materials 9 0798M SL-1110 6. PREPARATION BEFORE SEWING 6-3. Winding the lower thread CAUTION Do not touch any of the moving parts or press any objects against the machine while winding the lower thread, as this may result in personal injury or damage to the machine. 1. Turn on the power switch. 2. Place the bobbin (1) onto the bobbin winder shaft (2). 3. Wind the thread several times around the bobbin (1) in the direction indicated by the arrow. 4. Push down the bobbin presser arm (3). 5. Raise the presser foot with the lifting lever. 6. Depress the treadle. Lower thread winding will then start. 7. Once winding of the lower thread is completed, the bobbin presser arm (3) will return automatically. 8. After the thread has been wound on, remove the bobbin and cut the thread with the knife (4). Thread winding amount * If the thread cannot be wound on evenly, loosen the screw (5) and move the bobbin winder guide (6) to the side where there is less thread. * Turn the adjustment screw (7) to adjust the bobbin winding amount. To increase the winding amount: Tighten the screw. To decrease the winding amount: Loosen the screw. NOTE: The amount of thread wound onto the bobbin should be a maximum of 80 % of the bobbin capacity. 3849M 6-4. Installing the bobbin case CAUTION Turn off the power switch before installing the bobbin case. The motor will keep turning even after the power is switched off as a result of the motor’s inertia. Wait until the motor stops fully before starting work. The machine may operate if the treadle is depressed by mistake, which could result in injury. 0802M 2125M 1. Turn the machine pulley to raise the needle until it is above the needle plate. 2. While holding the bobbin so that the thread winds to the right, insert the bobbin into the bobbin case. 3. Pass the thread through the slot (1) and under the tension spring (2), and then pull it out from the thread guide (3). 4. Check that the bobbin turns clockwise when the thread is pulled. 5. Hold the latch (4) on the bobbin case and insert the bobbin case into the rotary hook. 2126M SL-1110 10 6. PREPARATION BEFORE SEWING 6-5. Threading the upper thread CAUTION Turn off the power switch before threading the upper thread. The motor will keep turning even after the power is switched off as a result of the motor’s inertia. Wait until the motor stops fully before starting work. The machine may operate if the treadle is depressed by mistake, which could result in injury. Turn the machine pulley and raise the thread take-up (1) before threading the upper thread. This will make threading easier and it will prevent the thread from coming out at the sewing start. 3850M 6-6. Adjusting the stitch length Turn the stitch length dial (1) until the desired stitch length number is aligned with the pin (2) above the dial. yThe larger the number, the longer the stitch length will be. (The numbers on the dial are for use as a guide. The length of the finished stitches may vary depending on the type and thickness of material being sewn. Adjust while looking at the finished stitches.) yWhen turning the stitch length dial (1) from a larger setting to a smaller setting, it will be easier to turn the dial if the reverse lever (3) is pushed to the halfwaydown position. 3851M 11 SL-1110 7. SEWING 7. SEWING CAUTION Attach all safety devices before using the sewing machine. If the machine is used without these devices attached, injury may result. Turn off the power switch at the following times. The motor will keep turning even after the power is switched off as a result of the motor’s inertia. Wait until the motor stops fully before starting work. The machine may operate if the treadle is depressed by mistake, which could result in injury. yWhen threading the needle yWhen replacing the bobbin and needle yWhen not using the machine and when leaving the machine unattended Do not touch any of the moving parts or press any objects against the machine while sewing, as this may result in personal injury or damage to the machine. 7-1. Sewing 1. Turn on the power switch. 2. Depress the treadle to start sewing. 7-2. Backtacking When the reverse lever (1) is pressed during sewing, the feed direction will be reversed. When it is released, the feed direction will return to normal. 3852M SL-1110 12 8. THREAD TENSION 8. THREAD TENSION 8-1. Adjusting the thread tension CAUTION Turn off the power switch before removing or inserting the bobbin case. The motor will keep turning even after the power is switched off as a result of the motor’s inertia. Wait until the motor stops fully before starting work. The machine may operate if the treadle is depressed by mistake, which could result in injury. Good even stitches Upper thread Lower thread 0572M Upper thread tension too weak or lower thread tension too strong Increase the upper thread tension. Decrease the lower thread tension. Upper thread tension too strong or lower thread tension too weak Decrease the upper thread tension. Increase the lower thread tension. 0573M 0574M <Lower thread tension> Adjust by turning the adjustment screw (1) until the bobbin case drops gently by its own weight while the thread end coming out of the bobbin case is held. Becomes weaker Becomes stronger 2177M <Upper thread tension> After the lower thread tension has been adjusted, adjust the upper thread tension so that a good, even stitch is obtained. 1. Lower the presser foot. 2. Adjust by turning the tension nut (2). Becomes weaker Becomes stronger 3853M 13 SL-1110 8. THREAD TENSION 9. CLEANING 8-2. Adjusting the presser foot pressure Correct stitches 0894M 0895M Upper thread Skipped stitches occur Increase the pressure. 0896M Uneven stitch length Decrease the pressure. Stitches are puckered 0897M The presser foot pressure should be as weak as possible, but strong enough so that the material does not slip. Becomes weaker 1. Loosen the adjusting nut (1). 2. Turn the presser adjusting screw (2) to adjust the presser foot pressure. 3. Tighten the adjusting nut (1). Becomes stronger 3854M 9. CLEANING CAUTION Turn off the power switch before carrying out cleaning. The motor will keep turning even after the power is switched off as a result of the motor’s inertia. Wait until the motor stops fully before starting work. The machine may operate if the treadle is depressed by mistake, which could result in injury. Be sure to wear protective goggles and gloves when handling the lubricating oil, so that it does not get into your eyes or onto your skin. If care is not taken, inflammation can result. Furthermore, do not drink the lubricating oil. Diarrhea or vomiting may result. Keep the oil out of the reach of children. The following cleaning operations should be carried out each day in order to maintain the performance of this machine and to ensure a long service life. Furthermore, if the sewing machine has not been used for a long period of time, carry out the following cleaning procedures before using it again. 1. Raise the presser foot. 2. Remove the two screws (1), and then remove the needle plate (2). 3. Use a soft wire brush to clean any dust from the feed dog (3). 4. Install the needle plate (2) with the two screws (1). 2182M SL-1110 Continued on next page 14 9. CLEANING 2126M 2183M 5. Tilt back the machine head. 6. Remove the bobbin case (4). 7. Wipe off any dust from the rotary hook (5) with a soft cloth, and check that there is no damage to the rotary hook (5). 8. Remove the bobbin from the bobbin case (4) and clean the bobbin case (4) with a cloth. 9. Insert the bobbin into the bobbin case (4), and then place the bobbin case (4) back into the machine. 2184M 10. Clean the oil sump (6) with a cloth. 11. If the oil level drops below the LOW mark, add more lubricating oil. (Refer to page 8.) Use only the lubricating oil (Nisseki Mitsubishi Sewing Lube 10N; VG10) specified by Brother. * If this type of lubricating oil is difficult to obtain, the recommended oil to use is <Exxon Mobil Essotex SM10; VG10>. If the lubricating oil is contaminated, remove the oil cap screw (7) and drain the oil. Clean off any dirt on the collection magnet (8) and in the oil pan (9). 3855M 12. Return the machine head to its original position. 13. Replace the needle if it is bent or if the tip is broken. 14. Check that the upper threads have been threaded correctly. (Refer to page 11.) 15. Carry out a test sewing. 3856M 15 SL-1110 10. STANDARD ADJUSTMENTS 10. STANDARD ADJUSTMENTS CAUTION Maintenance and inspection of the sewing machine should only be carried out by a qualified technician. Turn off the power switch and disconnect the power cord from the wall outlet at the following times. The motor will keep turning even after the power is switched off as a result of the motor’s inertia. Wait until the motor stops fully before starting work. The machine may operate if the treadle is depressed by mistake, which could result in injury. Ask your Brother dealer or a qualified electrician to carry out any maintenance and inspection of the electrical system. If any safety devices have been removed, be absolutely sure to re-install them to their original positions and check that they operate correctly before using the machine. yWhen carrying out inspection, adjustment and maintenance yWhen replacing consumable parts such as the Secure the table so that it will not move when tilting back the machine head. If the table moves, it may crush your feet or cause other injuries. rotary hook If the power switch needs to be left on when carrying out some adjustment, be extremely careful to observe all safety precautions. 10-1. Adjusting the thread take-up spring <Thread take-up spring position> The standard position of the thread take-up spring (1) is 6-8 mm [4-6 mm for -5 specifications] above the surface of the thread guide (3) when the presser foot (2) is lowered. <-3> 6 - 8 mm <-5> 4 - 6 mm 1. Lower the presser foot (2). 2. Loosen the set screw (4). 3. Turn the thread tension bracket (5) to adjust the spring position. 4. Securely tighten the set screw (4). 3857M 3858M <Thread take-up spring tension> The standard tension of the thread take-up spring (1) varies in accordance with the machine specifications as shown in the table. -3 specifications -5 specifications 0.25 - 0.35N 0.30 - 0.5N 1. Push the needle thread with your finger until it is slightly higher than the thread tension bracket (5) and so that the upper thread is not pulled out. 2. Pull the upper thread down until the thread take-up spring (1) is at the same height as the base of the thread guide (3), and then measure the tension of the thread take-up spring (1). 3. Insert a screwdriver into the slot of the tension stud (6), and turn the screwdriver to adjust the tension of the thread take-up spring (1). <-3> 0.25 - 0.35 N <-5> 0.3 - 0.5 N 3859M SL-1110 16 10. STANDARD ADJUSTMENTS 10-2. Adjusting arm thread guide R Becomes greater The standard position of arm thread guide R (1) is the position where the screw (2) is in the center of the adjustable range for arm thread guide R (1). Becomes less * To adjust the position, loosen the screw (2) and then move arm thread guide R (1). When sewing thick material, move arm thread guide R (1) to the left. (The thread take-up amount will become greater.) When sewing thin material, move arm thread guide R (1) to the right. (The thread take-up amount will become less.) 3860M 10-3. Adjusting the presser foot height 3861M The standard height of the presser foot (1) is 6 mm when the presser foot (1) is raised by means of the lifting lever (2). 1. Loosen the nut (3) of the adjustment screw (4), and then turn the adjustment screw (4) so that there is no pressure applied to the presser foot. 2. Raise the lifting lever (2). The presser foot (1) will also rise. 3. Remove the oil cap (5). 4. Loosen the bolt (6) and then move the presser bar (7) up or down until the presser foot (1) is at the standard height of 6 mm. 5. Tighten the bolt (6). 6. Replace the oil cap (5). 7. Adjust the presser foot pressure using the adjustment screw (4), and then tighten the nut (3). Needle * After adjusting, check that the needle moves down into the center of the groove in the presser foot. 1257M 17 SL-1110 10. STANDARD ADJUSTMENTS 10-4. Adjusting of the feed dog height 3862M The standard height of the feed dog (1) when it is at its maximum height above the top of the needle plate is 0.8 mm for -3 specifications, and 1.2 mm for -5 specifications. <-3> 0.8 mm <-5> 1.2 mm 1. Turn the pulley until the feed dog (1) rises to the highest position. 2. Tilt back the machine head. 3. Loosen the screw (2). 4. Turn the feed lifting shaft crank (3) to move the feed bracket (4) up and down. 5. Tighten the screw (2). Becomes lower Becomes higher 3863M 10-5. Adjusting the feed dog angle 3864M The standard angle for the feed dog (1) when it is at its highest position above the needle plate is when the “ ” mark on the shaft (2) is aligned with the feed rocker bracket arm (3) and the feed dog (1) is parallel to the needle plate. 1. Turn the machine pulley to move the feed dog (1) to its highest position above the needle plate. 2. Tilt back the machine head. 3. Loosen the two set screws (4). 4. Turn the shaft (2) in the direction of the arrow within a range of 90° with respect to the standard position. In order to prevent puckering, lower the front of the feed dog (1). (Fig. [A]) In order to prevent the material from slipping, raise the front of the feed dog (1). (Fig. [B]) 5. Securely tighten the set screws (4). * The height of the feed dog (1) will change after the angle has been adjusted, so it will be necessary to re-adjust the height of the feed dog (1). Standard Lower the front Raise The front 3865M SL-1110 18 10. STANDARD ADJUSTMENTS 10-6. Adjusting the needle bar height 2286M Reference line (a), which is the second line from the bottom of the needle bar (1)(fourth line from the bottom when using a DA x 1 needle) should be aligned with the lower edge of the needle bar bush D (2) as shown in the illustration when the needle bar (1) is at its lowest position. 1. Turn the machine pulley to set the needle bar (1) to its lowest position. 2. Remove the oil cap (3). 3. Loosen the screw (4) and then move the needle bar (1) up or down to adjust its position. 4. Securely tighten the screw (4). 5. Replace the oil cap (3). 3866M 10-7. Adjusting the needle and feed mechanism timing <-3> <-5> Approx. 1 mm 2288M The illustration at left shows the standard position for the needle tip when the feed dog (1) is lowered from its highest position until it is flush with the top of the needle plate (2). Approx. 3 mm 3867M 1. Remove the rear cover. 2. Loosen the two set screws (4) of the vertical cam (3) and the two set screws (6) of the horizontal cam (5), and then turn the vertical cam (3) and the horizontal cam (5) slightly to adjust the timing. (The vertical cam (3) and horizontal cam (5) are linked by a pin, so that if either one is turned the other will turn with it.) To advance the needle timing, turn in the direction of <A>. To retard the needle timing, turn in the direction of <B>. To prevent material slippage from occurring, retard the needle timing. (Fig. [B]) To improve thread tightening, advance the needle timing. (Fig. [A]) Note: If the vertical cam (3) and horizontal cam (5) are turned too far in the direction of <A>, it may cause the needle to break. 3. After adjusting, securely tighten the set screws (4) and (6). Needle timing is advanced 㧔Standard㧕 Needle timing is retarded 3868M 19 SL-1110 10. STANDARD ADJUSTMENTS 10-8. Adjusting the needle and rotary hook timing 2290M 2291M 0.5 - 0.7mm The tip of the rotary hook (3) should be aligned with the center of the needle (4) when the needle bar (1) moves up from its lowest position to the position where reference line (b), which is the line at the bottom of the needle bar (1)(third line from the bottom when using a DA x 1 needle), is aligned with the lower edge of the needle bar bush D (2) as shown in the illustration. 1. Turn the machine pulley to raise the needle bar (1) from its lowest position until reference line (b) is aligned with the lower edge of the needle bar bush D (2) as shown in the illustration. (The needle should rise by 1.8 mm [2.2 mm for -5 specifications] and the distance from the needle hole to the tip of the rotary hook should be 0.5 - 0.7 mm.) 2. Loosen the set screws (5), and then align the tip of the rotary hook (3) with the center of the needle (4). The distance between the tip of the rotary hook (3) and the needle (4) should be approximately 0 - 0.05 mm. 3. Securely tighten the set screws (5). <-3> 1.8mm <-5> 2.2mm 3869M SL-1110 20 10. STANDARD ADJUSTMENTS 10-9. Adjusting the rotary hook lubrication amount CAUTION Be careful not to touch your fingers or the lubrication amount check sheet against moving parts such as the rotary hook or the feed mechanism when checking the amount of oil supplied to the rotary hook, otherwise injury may result. Use the following procedure to check the amount of oil being supplied to the rotary hook when replacing the rotary hook or when changing the sewing speed. 2303M Approx. 25mm Approx. 70mm <Checking the lubrication amount> 1. Remove the thread from all points from the thread take-up to the needle. 2. Use the lifting lever to lift the presser foot. 3. Run the machine at the normal sewing speed for approximately 1 minute without sewing any material (following the same start/stop pattern as when actually sewing). 4. Place the lubrication amount check sheet (1) underneath the rotary hook (2) and hold it there. Then run the sewing machine at the normal sewing speed for 8 seconds. (Any type of paper can be used as the lubrication amount check sheet (1).) 5. Check the amount of oil which has spattered onto the sheet. Bed 5 - 10mm 2304M If adjustment is necessary, carry out the following operations in “Adjusting the lubrication amount”. Spattered oil Too much Correct Too little 0935M <Adjusting the lubrication amount> 1. Tilt back the machine head. 2. Turn the adjusting screw (3) to adjust the lubrication amount. More oil Less oil 3870M 21 If the rotary hook adjusting screw (3) is turned clockwise, the lubrication amount becomes greater. If the rotary hook adjusting screw (3) is turned counterclockwise, the lubrication amount becomes smaller. 3. Check the lubrication amount again according to the procedure given in “Checking the lubrication amount” above. * Turn the adjusting screw (3) and check the lubrication amount repeatedly until the lubrication amount is correct. 4. Check the lubrication amount again after the sewing machine has been used for approximately two hours. SL-1110 11. TROUBLESHOOTING 11. TROUBLESHOOTING yPlease check the following points before calling for repairs or service. yIf the following remedies do not fix the problem, turn off the power switch and consult a qualified technician or the place of purchase. CAUTION Turn off the power switch and disconnect the power cord before carrying out troubleshooting. The motor will keep turning even after the power is switched off as a result of the motor’s inertia. Wait until the motor stops fully before starting work. The machine may operate if the treadle is depressed by mistake, which could result in injury. Items with a “*” in the “Page” column should only be checked by a qualified technician. Problem 1 Upper thread is not tight. Possible cause Page yIs the upper thread tension too weak, or is the lower thread tension too strong? Adjust the upper thread tension or lower thread tension. yIs the needle and feed timing correct? Advance the needle timing. 13 19* yIs the lower thread tension too weak, or is the upper thread tension too strong? Adjust the lower thread tension or upper thread tension. 13 0573M 2 Lower thread is not tight. 0574M 3 Loops appear in seam. yIs the thread path not smooth enough? Use a file with a fine grain or sandpaper to polish smooth the thread path. yIs the bobbin not turning smoothly? Pull out the lower thread to check that there is no slackness in the thread tension, or replace the bobbin or bobbin case. 0977M 4 Skipped stitches while sewing occur 0470M yIs the needle tip bent? Is the needle tip blunt? If the needle tip is bent or broken, replace the needle. yIs the needle properly installed? If it is incorrect, install the needle correctly. yIs the machine properly threaded? If it is incorrect, thread the thread correctly. yIs the presser foot pressure too weak? Adjust the presser foot pressure. yIs the needle too thin? Replace the needle with a needle that is one rank thicker. yIs the presser foot too high? Adjust the height of the presser foot. yIs the thread take-up spring too weak? Adjust the tension of the thread take-up spring. yIs the needle and rotary hook timing correct? Adjust the height of the needle bar. Adjust the clearance between the needle and the tip of the rotary hook. SL-1110 9 11 14 17* 16* 19* 20* 22 11. TROUBLESHOOTING Problem 5 Possible cause Skipped stitches at sewing start Thread unravelling at sewing start 0749M 6 yIs the thread take-up lever at its highest position at the sewing start? Set the thread take-up lever to its highest position at the sewing start. yIs the length of the upper thread trailing from the needle hole too short? Pull about 50 mm of thread through the needle hole at the sewing start. yIs the thread take-up spring tension too strong? Reduce the tension of the thread take-up spring. yIs the thread take-up spring operating range too large? Lower the position of the thread take-up spring. yIs the needle too wide? Try using a needle with a count that is one lower than the current needle. yIs the presser foot pressure too weak? Adjust the presser foot pressure. yIs the feed dog too low? Adjust the feed dog height. yIs the bobbin scratched? If the bobbin is damaged, smooth it with an oiled grindstone or replace it. Uneven seam Page 11 11 16* 16* 14 18* * 0473M 7 Large degree of puckering (excess tension) 0978M 8 yIs the upper thread tension too strong? Make the upper thread tension as weak as possible. yIs the lower thread tension too strong? Make the lower thread tension as weak as possible. yIs the needle tip blunt? Replace the needle if it is blunt. yIs the needle too thick? Replace with as thin a needle as possible. yAre the thread take-up spring tensions too strong? Make the thread take-up spring tension as weak as possible. yIs the thread take-up spring operating range too large? Lower the position of the thread take-up spring to as low a position as possible. yIs the presser foot pressure too strong? Adjust the presser foot pressure. yIs the sewing speed too fast? Reduce the sewing speed slightly. yIs the angle of the feed dog correct? Tilt the front of the feed dog down slightly. yIs the presser foot pressure too strong? Adjust the presser foot pressure. Material slippage 0750M 23 SL-1110 13 13 16* 16* 14 18* 14 11. TROUBLESHOOTING Problem 9 Possible cause Lower thread is tangled at the sewing start. Lower thread 10 Page yIs the bobbin spinning direction correct when the lower thread is being pulled? Set the bobbin so that it turns in the opposite direction to the rotary hook. yIs there too much thread wound onto the bobbin? The bobbin winding amount should not be more that 80 %. yIs the bobbin turning smoothly? If the bobbin is not turning smoothly, replace the bobbin. 0751M 2124M Upper and lower threads are breaking. yIs the needle bent or is the needle tip broken? Replace the needle if it is bent or broken. yIs the needle properly installed? If it is incorrect, install the needle correctly. yIs the machine properly threaded? If it is incorrect, thread the thread correctly. yIs the upper or lower thread tension too weak or too strong? Adjust the upper thread or lower thread tension. yIs the upper thread may be loose because the thread take-up spring operating range is too small? Adjust the position of the thread take-up spring. yIs the rotary hook, feed dog or other part damaged? If they are damaged, smooth them with an oiled grindstone or replace the damaged parts. yIs the thread path damaged? If the thread path is damaged, smooth it with sandpaper or replace the damaged part. 10 10 9 11 13 16* * * 0471M 11 yIs the material being pushed or pulled with excessive force during sewing? yIs the needle properly installed? If it is incorrect, install the needle correctly. yIs the needle bent, is the needle tip broken, or is the needle hole blocked? Replace the needle. yIs the needle and rotary hook timing correct? Adjust the height of the needle bar. Adjust the clearance between the needle and the tip of the rotary hook. yIs the needle timing too advanced with respect to the feed dog? Retard the needle timing. Broken needles 9 19* 20* 19* Caution 0469M yIt is extremely dangerous to leave any pieces of broken needle sticking in the material. If the needle breaks, search for all pieces until the whole of the needle is found again. yFurthermore, we recommend we recommend that through steps be taken to account for such needles to comply with product liability regulations. SL-1110 24 INSTRUCTION MANUAL http://www.brother.com/ SL-1110, S-7550A SA8760-101 2007.06.BC(1)