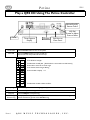
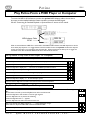
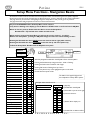
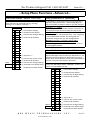
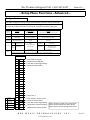
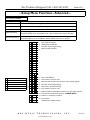
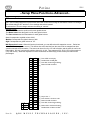
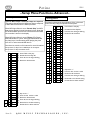
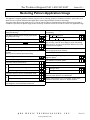
1
Petine
O w n e r ’s M a n u a l
Manual #990021
Application Version 58
•
•
•
•
•
•
•
•
Internal Source - Preloaded Music
CD Drive
CompactFlash Card Reader
MP3 Music File Playback
Complete Control From the Front Panel’s Rotary Dial
Recording Capabilities - Optional Record System Required
NetPiano Playback Capability - Subscription Service Required
Internal Soundcard - Optional
QRS Music Technologies, Inc.
Warnings
FCC INFORMATION
1.
2.
3.
IMPORTANT NOTICE: DO NOT MODIFY THIS UNIT!
This product, when installed as indicated in the Installation Manual, meets FCC requirements. Modifications not expressly
approved by QRS Music Technologies, Inc. may void your authority, granted by the FCC, to use this product.
IMPORTANT: When connecting this product to accessories and/or another product use only high quality shielded cables.
Cables supplied with this product MUST be used. Follow all installation instructions. Failure to follow instructions could
void your FCC authorization to use this product in the United States of America.
NOTE: This product has been tested and found to comply with the requirements listed in the FCC Regulations, Part 15 for
Class “B” digital devices. Compliance with these requirements provides a reasonable level of assurance that your use of this
product in a residential environment will not result in harmful interference with other electronic devices. This equipment
generates/uses radio frequencies and, if not installed and used according to the instructions found in the Installation Manual,
may cause interference harmful to the operation of other electronic devices. Compliance with FCC regulations does not
guarantee that interference will not occur in all installations. If this product is found to be the source of interference, which
can be determined by turning the unit “OFF” and “ON”, please try to eliminate the problem by using one of the following
measures:
•
Relocate either this product or the device that is being affected by the interference.
•
Utilize power outlets that are on different circuits (circuit breaker or fuse) or install AC line filters.
If these corrective measures do not produce satisfactory results, please contact the local authorized distributor, or contact
QRS Music Technologies, Inc. 2011 Seward Ave. Naples, FL 34109.
INSTRUCTIONS PERTAINING TO A RISK OF FIRE, ELECTRIC SHOCK, OR INJURY
TO PERSONS
The lightning flash with arrowhead symbol, within an equilateral triangle, is intended to alert the user to the presence of uninsulated “dangerous voltage” within the product’s enclosure that may be of sufficient magnitude to constitute a risk of
electric shock to persons.
The exclamation point within an equilateral triangle is intended to alert the user to the presence of important operating and
maintenance (servicing) instructions in the literature accompanying the product.
GROUNDING INSTRUCTIONS: This product must be grounded. If it should malfunction or breakdown, grounding
provides a path of least resistance for electric current to reduce the risk of electric shock. This product is equipped with a
cord having an equipment-grounding conductor and a grounding plug. The plug must be plugged into an appropriate outlet
that is properly installed and grounded in accordance with all local codes and ordinances.
DANGER - Improper connection of the equipment-grounding conductor can result in a risk of electric shock. Check
with a qualified electrician or serviceman if you are in doubt as to whether the product is properly grounded. Do not
modify the plug provided with the product. If it will not fit the outlet, have a proper outlet installed by a qualified electrician.
Q R S
M U S I C
T E C H N O L O G I E S ,
I N C .
Table Of Contents
Power ON Sequence - Locating the Serial and Application Versions
4
Play the Internal Pre-installed Music [24 Songs]
Play a QRS CD Using the Petine Controller
5
6
Play a QRS CD Using the Remote Control
How to Properly Adjust the Piano, Audio and Master Volume Levels
Play a QRS SyncAlong Series CD
Update SyncAlong CompactFlash Music From CDROM
Update SyncAlong Music Index [Demo Image File]
7
8
9
Setup Menu Functions - Advanced Controlling Petine at Front Panel
Source Selection / File Types Recognized
Audio Volume Level
Piano Volume Level
Tempo [Setting the Music’s Speed - MIDI Files ONLY!]
Transpose [Setting the Music’s “Key” - MIDI Files ONLY!]
Microphone Volume Level
Stereo Balance [Two Speaker Installation]
Bass Volume Level
Remote Control Features
10
24
Metronome Volume - Record “Click-Track”
Delay [Pianomation vs. Synthesizer]
PAUSE
How to Use Petine as a Stand-Alone MIDI Controller
STOP
Configure Pianomation
25
All Pianos
MUTE
MASTER Volume
11
PIANO Volume
AUDIO Volume
Piano Channel 1
All Instruments
26
All MIDI
BASS Volume
Test 2 Currently Not Available
TREBLE Volume
How to set the Minimum Key Force / Alignment / Test 11
TRANSPOSE
Configure Audio
Standard
Karaoke (Sing Along)
Silent Piano
Barcus Berry Pickup (Piano Microphone)
Mixed Output
CompactFlash Utilities
Update: Demo / System / Application / Key List
PROGRAM
REPEAT
12
RANDOM
TEMPO
<<TRACK and TRACK>>
Number Buttons - Selecting specific songs.
13
STEREO BALANCE
Set Up Petine To Play From a MIDI Player Or Computer
Play Petine From a MIDI Player Or Computer
Set Up Petine To Play Soundcard Voices- Requires Optional PNOscan
Play a Soundcard Voice Using the Piano Keyboard. Optional Soundcard
Record Using The Remote Control. Requires Optional PNOscan
How Individual Recordings are Saved to CompactFlash
14
15
17
Front Panel Features
18
Back Panel Features
19
Navigating Through the Setup Menu
Format
Copy Record Memory [How Songs Are Named]
20
21
27
28
Erase Record Memory
CD Drive Utilities
Update: Demo / System / Application / Key List
16
Record Using The Petine Controller. Requires Optional PNOscan
Setup Menu Functions - Table
23
Treble Volume Level
POWER
SOURCE
PLAY
Setup Menu Functions - Basics
22
29
Copy SyncAlong MIDI To CFLASH
F-Curves - Activate / Change
MIDI Input Select
Metronome: Time Signature (Record Click-Track)
Mixed Output Level - Soundcard Piano
Soundcard Output
Main Audio Output
Exit the Setup Menu
30-31
32
33
34
Auto-Update Utility - Application Versions V0.38 or Later
35
Updating Petine’s Application Image
36
Updating Petine’s Demo Image For SyncAlong Music
37
Restoring Petine’ Application Image
38
Restoring Factory Default Settings
Pianomation Two Year Limited Warranty
Connecting for Standard Playback or Optional Record
39
40-41
42
Mounting Bracket / Updating Pianomation
43
Parts Included / Petine Accessories & Options
44
Pianomation Accessories
45
General MIDI Sounds List
46
Petine
V58.1
Power ON Sequence
Locating the Serial and Application Versions
0 2 4
P o n
Power On
P o n
P o n
P o n
C
Petine’s Serial Number
Petine’s Application Version Number “Operating System“
Call QRS Technical Support
if 1.51 does not display.
1 5 1
Pianomation Processor’s EPROM Version Number
Total number of song on the media or name of other selected source.
If Petine’s “power-on” display sequence is different than what is shown here,
see the “Restoring Petine’s Operating System” section of this manual.
The Petine controllers will power on to the last played source. If the last played source was the CD Drive,
CompactFlash Reader or the Internal Source the total number of songs currently on that media will be displayed.
Press Play on the remote control or the ADJ/SEL dial on the controller to begin playing the first song. If the last
played source was either the CD Drive or the CompactFlash Reader and the drive or reader is
empty, then the system will go to the Internal Source and display the total number of songs. If the
last played source was Auxiliary, Record or MIDI Input the Petine controller will power on to that source ready
for an external input signal or a command from user.
PAGE 4
Q R S
M U S I C
T E C H N O L O G I E S ,
I N C .
For Technical Support Call 1-800-247-6557
Petine V58.1
Play the Internal Pre-installed Music [24 Songs]
If Petine has powered on and the display reads “024” you are
ready to play solo piano music from the internal source.
Just press the PLAY button.
Otherwise...
1
3B
Press Stop
Press the STOP button to halt play.
3B
Select the
Internal
Source
Tap the Source button and then the number 2
button to select the Internal Source, “2in”.
Wait for “024” to display.
1
Play Song
Press the PLAY and the first song begins to play.
4
Adjust
Volume
Use these six buttons to adjust the volume levels.
Piano adjusts the piano only.
Audio adjusts the speaker volume.
Master adjusts the Piano and Audio together.
2
Stop play
Press the STOP button to stop the song.
2
3A
5A
2
5A
1
4
5A
3A
3A
5B
1
5B
5A
2
3B
Pressing the TRACK >> will advance to the Next
song.
4
Next Song
Previous Song Pressing the << TRACK will go to the Previous
song.
Internal Source Music List (Solo Piano)
#
Name
Type
#
Name
Type
#
Name
Type
001 Georgia On My Mind
MIDI 010 Sweet And Low Down
MIDI 019 Music Of The Night
MIDI
002 Candle In The Wind
MIDI 011 Angel Eyes
MIDI 020 Amazing Grace
MIDI
003 Feelings
MIDI 012 Yes! We Have No Bananas
MIDI 021 On The Beautiful Blue Danube MIDI
004 Greensleeves
MIDI 013 Perfidia
MIDI 022 Ave Maria
MIDI
005 Danny Boy
MIDI 014 Crazy
MIDI 023 Meditation and Intermezzo
MIDI
006 Mack The Knife
MIDI 015 Night And Day
MIDI 024 Liebesleid
MIDI
007 Burt Bacharach Medley
MIDI 016 Someone To Watch Over Me MIDI
008 Ain’t Misbehavin’
MIDI 017 Something
009 Nice Work If You Can Get It MIDI 018 Stars Fell On Alabama
Q R S
M U S I C
MIDI
MIDI
T E C H N O L O G I E S ,
www.qrsmusic.com
I N C .
PAGE 5
Petine
V58.1
Play a QRS CD Using The Petine Controller
Infrared Eye (IR)
Remote Control
ADJ Dial
Rotate to Adjust
Press to Select
Power
Three Segment
Display
CD Eject
Power ON
Press the Power button to turn on the system.
Insert CD
Press the CD Eject button to open the CD tray.
Snap the CD onto the spindle and close the tray.
Push Here to
Close Door!
Display
Play Song
Adjust Volume
Stop play
Next song
Previous Song
PAGE 6
0
S
2 4
i n
Press STOP to halt play.
S
i n
Rotate dial to move dot to the far right.
S
i n
Press the dial, the dot begins flashing.
S
c d
Rotate the dial to display “cd”.
S
S
S
S
S
C
i
c
A
n
r
1
Double-Click the dial to Select and Exit.
n
F
v
i
c
2
Double-Click the ADJ dial. [ Double-Click = twice within one-half second]
Press the ADJ Dial and the first song begins to play.
Rotate the ADJ Dial to change the Master Volume level.
Press the ADJ Dial to stop the song.
While playback is stopped, rotate the ADJ Dial clockwise to advance to the Next song or
counter-clockwise to go back to the Previous song.
Q R S
M U S I C
T E C H N O L O G I E S ,
I N C .
For Technical Support Call 1-800-247-6557
Petine V58.1
Play a QRS CD Using The Remote Control
1
1
Power ON
Press the Power button to turn on the system.
2
Press Stop
Press the STOP button to stop any flashing dots.
3B
3A
3B
6B
2
3A
Tap the Source button and then the number 1 button
to select the CD Source. “1cd” displays.
You can also repeatedly tap the Source button
Select the CD to cycle through all of the sources.
Source
Stop tapping when “1cd” displays.
Wait for Petine to scan the CD.
6A
6B
4
6B
2
3B
A “C” and the total number of songs will display.
4
4
5A
5B
Play Song
5C
5A
B2
6A
Press the PLAY and the first song begins to play.
Adjust
Volume
Use these six buttons to adjust the volume levels.
Piano [5A] adjusts only the piano volume.
Audio [5B] adjusts only the speaker volume.
Master [5C] adjusts the Piano and Audio together.
Stop play
Press the STOP button to stop the song.
5C
3A
5B
1
Press the CD Eject button to open the CD tray.
Snap the CD onto the spindle and close the tray.
Pressing the TRACK >> will advance to the Next
Next Song song.
Previous Song
Pressing the << TRACK will go to the Previous song.
5B
5C
5A
How to Properly Adjust the Piano, Audio and Master Volume Levels
Select a QRS Concert or SyncAlong Series CD.
1
3A 3B Follow steps 1 through 3B above.
2
5A
Tap the Piano Volume buttons until “P 0” displays.
The piano volume ranges from “P-9” to “P 9”. This sets the piano volume in the center of it’s range.
5B
Tap the Audio Volume buttons until “A 0” displays.
The Audio volume ranges from “A-9” to “A 9”. This sets the audio volume in the center of it’s range.
4
Press the PLAY button to play a song.
5C
While listening to the acoustic piano, tap the Master Volume buttons to set the piano volume at a comfortable
listening level.
It is normal for the piano to stop playing when the Piano Volume is set to “P 0” AND the Master Volume is
turned down to “000”. The piano is playing at it’s softest level when the Piano Volume is set to “P 0” AND the
Notes: Master Volume is turned down to “001”. Pianomation can only play as softly as the individual instrument will allow
and is also affected by the room’s acoustics. If you feel that the piano is playing too loudly, try asking someone to
play the piano as softly as possible and compare that volume to Pianomation.
If you feel that the piano is playing too loudly, see How to set the Minimum Key Force / Alignment / Test 11 in the advanced
Advanced: section of this manual.
5B
Listen, and tap the Audio volume buttons to match the music from the speaker with the acoustic piano. You may want to
adjust the volume controls on the speaker itself.
5C
You can now use the Master Volume controls to adjust the overall volume, the audio and piano will follow together.
Advanced: You can affect how the audio and piano volume levels “follow” the master volume by adjusting the “curves”. See the F-Curves Activate / Change section in the advanced section of this manual for details.
Q R S
M U S I C
T E C H N O L O G I E S ,
www.qrsmusic.com
I N C .
PAGE 7
Petine
V58.1
Play a QRS SyncAlong Series CD
Y
T
Press STOP to halt play.
s
Insert the CompactFlash card containing the SyncAlong piano files into Petine’s CompactFlash card reader.
P
Press the CD Eject button to open the door and snap the QRS SyncAlong series CD onto the spindle.
o
L
Using the remote control, tap the SOURCE button and then the number 1 button. “1cd” momentarily displays.
If the access code for this CD has already been entered and saved , wait for “SAL” to display three times.
J
S A L
I
S A L
H
S A L
0
Press PLAY when “C” and the total number of tracks displays.
C 1 8
If the access code has not been entered “SAL” should display and hold.
S A L
If “SAL” does not display Update the SyncAlong Music Index [Demo Image]. See next page..
C 1 8
F Y
E T
d s
Y c P
Find the hand written access code located on the yellow QRS PICK TICKET that came with your order.
T b o
Use the six volume buttons at the bottom of the remote control to display the three character access code.
The two Audio buttons change the left display character.
The two Master/Volume buttons change the center display character.
The two Piano buttons change the right display character.
s a L
Press PLAY to save the access code to memory.
SAL displays to acknowledge the CD is recognized by the Demo Image index as SyncAlong.
S A L
SAL displays a second time to acknowledge the access code has been found in memory.
S A L
If “SAL” does not display a second time then verify the access code.
C 1 8
Open and close the door to rescan the CD.
If “SAL” displays and holds then enter the correct code.
S A L
Update the SyncAlong Files From CDROM to CompactFlash. See next page..
Press PLAY again to play the CD.
S
A
L
S
A
L
o 8 I
L 7 H
J 6 0
I 5 F
H 4 E
0 3 d
F 2 c
E 1 b
d 0 a
SAL displays a third time to acknowledge the piano files have been located on the CompactFlash card.
If “SAL does not display a third time confirm the flash card is properly inserted. If it is then...
P 9 J
C 1 8
c
9
b
8
a
7
9
6
8
5
7
4
6
3
5
2
4
1
3
0
2
1
0
QRS Remote
PAGE 8
Q R S
M U S I C
T E C H N O L O G I E S ,
I N C .
For Technical Support Call 1-800-247-6557
Petine V58.1
Update SyncAlong CompactFlash Music From CDROM
Download the current update files from [http://www.qrsmusic.com/support_pa.asp]
Press STOP to halt play. Press the Petine’s ADJ Dial twice within one-half second to enter the Setup Menu.
Petine will open to the source section of the Setup Menu and display the current source.
S i n
Press the ADJ Dial once so that the dot begins to flash.
S i n
Rotate the ADJ Dial to display a large “C” and access the CD Drive’s Utility functions.
C D e
Press the ADJ Dial to stop the flashing.
C d E
Rotate the ADJ Dial to move the dot to the center display segment.
C d E
Press the ADJ Dial so the dot flashes.
C D E
Rotate the ADJ Dial to display the a small “c” in the center display segment.
C c E
Press the ADJ Dial to stop flashing.
C c E
Rotate the ADJ Dial to move the dot to the far right display segment.
C c E
Insert the update CDROM and the CompactFlash. Press the ADJ Dial to execute the copy function.
Petine will read a group of files from the CDROM...
1 4 1
...and then copy the group to the CompactFlash card. Groups of files will be read and copied until the
all files are copied. This will take several minutes.
1 4 1
A countdown to 1 will begin to verify that the files are copied.
0 0 1
Press the ADJ Dial when “Scc” displays.
S c c
Press the Petine’s ADJ Dial twice within one-half second to exit the Setup Menu.
C c E
Update SyncAlong Music Index [Demo Image File]
UPDATE FROM CDROM
UPDATE FROM COMPACTFLASH
Press STOP to halt play.
0 2 3
Press STOP to halt play.
0 2 3
Insert the CD containing the demo.ima file.
Insert the CompactFlash card containing the demo.ima file.
Press the ADJ Dial twice within one-half second to enter Setup.
Press the ADJ Dial twice within one-half second to enter Setup.
Petine will display the display the current source.
S i n
Petine will display the display the current source.
S i n
Press the ADJ Dial so that the dot begins to flash.
s i N
Press the ADJ Dial so that the dot begins to flash.
s i N
Rotate the ADJ Dial to display a large “C”.
C A E
Rotate the ADJ Dial to display a large “F”.
F A E
Press the ADJ Dial to stop the dot from flashing.
C A E
Press the ADJ Dial to stop the dot from flashing.
F A E
Rotate Dial to move dot to middle display segment.
C A E
Rotate Dial to move dot to middle display segment.
F A E
Press the ADJ Dial so the dot flashes and then rotate
the ADJ Dial to display a “D” for demo update.
C d E
Press the ADJ Dial so the dot flashes and then rotate
the ADJ Dial to display a “D” for demo update.
F d E
Press the ADJ Dial to stop the flashing.
C d E
Press the ADJ Dial to stop the flashing.
F d E
Rotate the ADJ Dial to move the dot to the far right
display segment. Press the ADJ Dial to Execute.
C d E
Rotate the ADJ Dial to move the dot to the far right
display segment. Press the ADJ Dial to Execute.
F d E
Update “U” countdown to zero will begin.
U 0 0
Update “U” countdown to zero will begin.
U 0 0
Successful update! Press the ADJ Dial once.
S c c
Successful update! Press the ADJ Dial once.
S c c
Press the Dial twice within one-half second to exit.
0 2 3
Press the Dial twice within one-half second to exit.
0 2 3
Q R S
M U S I C
T E C H N O L O G I E S ,
www.qrsmusic.com
I N C .
PAGE 9
Petine
V58.1
Remote Control Features
Page
1
POWER the system ON and OFF.
18
2
MUTE the piano and audio.
19
3
NUMBER buttons select specific song tracks.
21
4
PROGRAM Up “PVP" exits from within a source folder.
20
5
Tap REPEAT during playback to select a repeat play mode.
20
6
Return to a PREVIOUS TRACK or PROGRAM.
21
7
Advance to the NEXT TRACK or PROGRAM.
21
8
Tap RANDOM to select a random play mode.
20
9
PAUSE play.
19
10
STOP play.
19
11
Begin PLAY.
19
12
Press BASS and then the master volume up and down buttons to
adjust the bass audio volume.
19
13
Press TREBLE and then the master volume up and down buttons
to adjust the treble audio volume.
19
14
Press TRANSPOSE and then the master volume up and down
buttons to change the key of the music, except when playing a CD.
19
15
Press TEMPO and then the master volume up and down buttons
to change the tempo of the music, except when playing a CD.
20
16
PIANO VOLUME UP and DOWN (piano only).
19
17
MASTER VOLUME UP and DOWN (piano and audio).
19
18
AUDIO VOLUME UP and DOWN (background only).
19
19
Press the STEREO BALANCE and then one of the <<track>>
buttons to adjust the left and right audio. Two speakers required.
21
20
In stop mode, tap the SOURCE button and then the number
button assigned to the desired source. See SOURCE below.
18
2
1
1
3
2
20
5
14
15
9
4
6
7
5
8
10
11
9
12
13
15
14
18
17
16
19
6
8
11
10
7
4
3
20
12
13
19
18
17
16
1 POWER
Press the POWER button to turn the Petine controller and Pianomation ON and OFF.
20 SOURCE
Press STOP to halt play. The source cannot be changed if the unit is in play mode.
1
Repeatedly tap the SOURCE button to cycle through the source list.
Stop tapping when the desired source displays.
2
Tap the SOURCE button and then immediately tap the number button associated with the desired
source.
3
Tap the SOURCE button and then immediately tap the <<TRACK>> buttons, repeatedly, until the
desired source displays
PAGE 10
Q R S
M U S I C
T E C H N O L O G I E S ,
I N C .
1 cd = CD Drive
2iN = Internal Music
3cF = CompactFlash
4Av = Auxiliary Input
5Ni = MIDI IN
6rc = Record
For Technical Support Call 1-800-247-6557
Petine V58.1
...Remote Control Features...
11 PLAY
Press PLAY to begin or resume play.
0 1 8
Slowly Flashing
0 1 8
Alternately Flashing
9 PAUSE
Press PAUSE to suspend play.
10 STOP
Press STOP to halt play.
0 1 8
No Dot!
2 MUTE
Headphone Volume Level
0 6 3
Press the MUTE button to toggle the piano and audio ON & OFF.
The headphone volume is displayed and can be adjusted using the Data Dial on Petine or the Master Volume buttons on
the remote. The optional Soundcard is required to hear the piano melody.
17 MASTER VOLUME
Press the MASTER VOLUME UP or DOWN button to display the current master volume level setting.
0 6 7
Within two seconds after pressing the MASTER VOLUME UP or DOWN button , press again or press and hold to
adjust the volume of both the Piano and the Audio together. Range = 000 to 127
16 PIANO VOLUME
Press the PIANO VOLUME UP or DOWN button to display the current piano volume level setting.
P - 1
Within two seconds after pressing the PIANO VOLUME UP or DOWN button , press again or press and hold to adjust
the volume of the Piano only! Range = -9 to +9
18 AUDIO VOLUME
Press the AUDIO VOLUME UP or DOWN button to display the current audio volume level setting.
A
4
b
1
t
0
Within two seconds after pressing the AUDIO VOLUME UP or DOWN button , press again or press and hold to adjust
the volume of the Audio only! Range = -9 to +9.
12 BASS VOLUME
Press the BASS button to display the current Bass audio volume setting.
Within two seconds after pressing the BASS button, press the MASTER VOLUME buttons to adjust the Bass volume
setting. Range = -12 to +12
13 TREBLE VOLUME
Press the TREBLE button to display the current Treble audio volume setting.
Within two seconds after pressing the TREBLE button, press the MASTER VOLUME buttons to adjust the Treble
volume setting. Range = -12 to +12
14 TRANSPOSE
Press the TRANSPOSE button to display the current playback “key”.
The key of the music on a CD or music from an MP3 file cannot be changed!
K 0 5
Within two seconds after pressing the TRANSPOSE button, press the MASTER VOLUME buttons to adjust the playback “key”.
Range = Up 12 to Down 12in half-step increments from middle “C”.
Q R S
M U S I C
T E C H N O L O G I E S ,
www.qrsmusic.com
I N C .
PAGE 11
Petine
V58.1
...Remote Control Features...
4 PROGRAM
After gaining access to the songs within a program (subdirectory), pressing the PROGRAM button exits from the program.
When Pxx is displayed, where xx is a number between 00 and 99, it’s an indication that there are Programs
(subdirectories) on the selected media. Unlike files on the root of the media, where the total number of songs on the
media are displayed after the initial scan, media with programs display the first program after the initial scan.
P 0 1
Press the <<TRACK or TRACK>> buttons to go to the available PROGRAMS.
P X X
Press the PLAY button to “drill down” into an available PROGRAM.
The first song number will be displayed. Press PLAY again to play this song or...
0 0 1
Press the <<TRACK, TRACK>> or the Number buttons to go to a song within the PROGRAM.
0 5 6
Press and Hold the <<TRACK button until “PuP” (Program Up) is displayed.
P u P
Pressing PLAY will then return to display the list of available PROGRAMS.
P 0 1
58 REPEAT
There are two repeat modes: Repeat Song and Repeat Program. REPEAT mode is accessed during song playback.
Select a song an press PLAY
Press PLAY and then REPEAT repeatedly
to cycle through PLAY and the two
REPEAT options.
8
One Flash
Per Second
Flashing
PLAY
0 0 3
REPEAT Song. Repeats selected song.
0 0 3
REPEAT Program. Repeats all songs within selected Program or Root
0 0 3
RANDOM
There are three RANDOM modes: One Song, Program, and Source
The RANDOM mode can be changed during STOP or PLAY.
Press RANDOM repeatedly to cycle
through the PLAY mode and the three
RANDOM option modes.
Flashing
Normal PLAY mode.
0 0 3
Though the random modes may be changed while play is stopped, the
random mode is only confirmed, by the flashing dots, during playback.
Four Flashes
Per Second
Rapidly
Flashing
RANDOM Song (one).
Plays one random song within the selected program.
0 0 3
RANDOM Program. Plays songs randomly within the selected program.
0 0 3
RANDOM Source. Plays songs randomly within the selected source.
0 0 3
15 TEMPO
Press the TEMPO button to display the current tempo.
The tempo of the music on a CD or music from an MP3 file cannot be changed! Only Standard MIDI files.
Within two seconds after pressing the TEMPO button, press the MASTER VOLUME buttons to adjust the speed of the
playback. Range = -50 (Displays “nI”) to +100 (Displays “nA”)
PAGE 12
Q R S
M U S I C
T E C H N O L O G I E S ,
I N C .
K 0 5
For Technical Support Call 1-800-247-6557
Petine V58.1
...Remote Control Features
6
7
Previous <<TRACK & Next TRACK >>
Press the <<TRACK>> buttons to go to the Previous or Next Program.
P 0 1
Press the <<TRACK>> buttons to go to the Previous or Next Song.
0 0 1
Within two seconds after pressing the STEREO BALANCE button, press the <<TRACK>> buttons to balance the volume of the
Left and Right speakers.
The <<TRACK button balances the volume to the Left speaker.
v 0 5
The TRACK>> button balances the volume to the Right speaker.
v 0 9
3
Number Buttons - Selecting specific song tracks.
Playing songs from the Root directory
Root Directory: Files on a CDROM or CompactFlash that are not within a Program directory
Press the Number buttons to select a specific song by track number:
5
Press the +10 or +20 button to enter a 1- or 2- (10 or 20) to the display.
2 -
Then, press a single digit number from 0-9 to complete the song number selection.
2 3
Press and HOLD the +10 or +20 button to increment the display by 10 or 20. The display will advance until the button
is released or until the maximum number of songs available on the selected media has been reached.
Maximum: CFLASH=50- and CDROM=99-).
6 2 -
Then, press a single digit number from 0-9 to complete the song number selection.
Maximum: CFLASH=509 and CDROM=999.
6 2 5
Playing songs from a Program directory
The first Program is displayed after the initial media scan.
The following examples assume that there are a total of 4 Programs on the media.
P 0 1
The 0, +10 and +20 buttons are not functional when Pxx is displayed.
Pressing one of these buttons at this time does not change the display.
P x x
Pressing a Number (N) button drills down to the first song of Program (N).
Example: Pressing 2 displays song 1 of Program 2.
0 0 1
Then, press PLAY to play song 1 or the Number (N) button to play song (N).
See the section directly above to enter numbers greater than 9.
If the Number (N) is greater than the total number of Programs on the media the last Program will be displayed.
Example: Pressing 9 displays P04 because it is the last Program on the media.
P 0 4
19 STEREO BALANCE
Press the STEREO BALANCE button to display the current Left/Right audio balance setting.
Range = Left 20 to Right 20
Display setting shown indicates equal balance between left and right speaker.
_ 0 0
Within two seconds after pressing the STEREO BALANCE button, press the one of the <<TRACK>> buttons to balance the
volume of the Left and Right speakers.
The <<TRACK button increases the volume of the Left speaker as it decreases the volume of the Right speaker.
v 0 5
The TRACK>> button increases the volume of the Right speaker as it decreases the volume of the Left speaker.
v 0 9
Q R S
M U S I C
T E C H N O L O G I E S ,
www.qrsmusic.com
I N C .
PAGE 13
Petine
V58.1
Play Petine From a MIDI Player or Computer
To access the MIDI In & Out features connect the optional MIDI Adapter cable as shown above.
A jumper must be installed inside the Petine controller to activate the MIDI signals.
See the “Connecting for Standard Playback or Optional Record” section of this manual.
To Processor
MIDI Adapter Cable
99140
MIDI IN
MIDI OUT
When an external device’s MIDI Out is connected to the MIDI IN cable of Petine, the MIDI Input Source can be
set to either play the piano or to trigger Petine’s internal soundcard voices. An optional soundcard is required
to hear the voices but is not required to hear the piano play. Petine comes from the factory set to trigger the
soundcard voices. See the General MIDI Sounds List at the end of this manual.
Set Up Petine To Play From a MIDI Player Or Computer.
Press STOP to halt play. Press the Petine’s ADJ Dial twice within one-half second to enter the Setup Menu.
Petine will open to the source section of the Setup Menu and display the current source.
S i n
Press the ADJ Dial once so that the dot begins to flash.
S i n
Rotate the ADJ Dial to display the “J ” and access to the MIDI Input Select function.
J r c
Press the ADJ Dial to stop the flashing.
J r c
Rotate the ADJ Dial to move the dot to the right display segment.
J r c
Press the ADJ Dial so the dot flashes.
J r c
Rotate the ADJ Dial to display “FP” for the File Player option.
J F p
Press the Petine’s ADJ Dial twice within one-half second to exit the Setup Menu.
Play Petine From a MIDI Player Or Computer.
Press STOP to halt play. Press the remote control’s SOURCE button and then the number 5 button. “5ni” displays.
Or...
On the Petine controller, press the ADJ Dial twice within one-half second.
Rotate the ADJ Dial so that the dot is in the far right segment.
Press the ADJ Dial once so that the dot is flashing.
Rotate the ADJ Dial until “Sni” appears.
Press the ADJ Dial twice within one-half second to exit.
S n i
S n i
After a few seconds the display changes to “---” with a flashing dot at right.
Petine will now respond to MIDI data received into MIDI IN cable.
- - -
Rotate the ADJ Dial to adjust the volume.
0 2 0
Press STOP on the remote or Press the ADJ Dial on Petine to halt playback.
S n i
PAGE 14
Q R S
M U S I C
T E C H N O L O G I E S ,
I N C .
For Technical Support Call 1-800-247-6557
Petine V58.1
Play a Soundcard Voice Using the Piano Keyboard
Set Up Petine To Play a Soundcard Voice.
Requires Optional PNOscan and Soundcard
Press STOP to halt play. Press the Petine’s ADJ Dial twice within one-half second to enter the Setup Menu.
Petine will open to the source section of the Setup Menu and display the current source.
S I N
Press the ADJ Dial once so that the dot begins to flash.
S I n
Rotate the ADJ Dial to display an “J ” and access to the MIDI Input Select function.
J f p
Press the ADJ Dial to stop the flashing.
J f p
Rotate the ADJ Dial to move the dot to the right display segment.
J f p
Press the ADJ Dial so the dot flashes.
J f p
Rotate the ADJ Dial to display “rc” for the Record option.
J r c
Press the Petine’s ADJ Dial twice within one-half second to exit the Setup Menu.
Play a Soundcard Voice From The Piano Keyboard.
Press STOP to halt play. Press the remote control’s SOURCE button and then the number 5 button. “5ni” displays.
Or...
On the Petine controller, press the ADJ Dial twice within one-half second.
Rotate the ADJ Dial so that the dot is in the far right segment.
Press the ADJ Dial once so that the dot is flashing.
Rotate the ADJ Dial until “Sni” appears.
Press the ADJ Dial twice within one-half second to exit.
S n i
S n i
After a few seconds the display changes to “001” with a flashing dot at right to indicate “play” mode.
“001” represents Patch 1, the Acoustic Grand Piano voice in the General MIDI Sound List.
The Acoustic Grand Piano voice will sound through the speaker when triggered by MIDI data.
0 0 1
Rotate the ADJ Dial to adjust the volume.
0 2 0
Press STOP on the remote control. Rotate the ADJ Dial on the Petine controller or push the <<TRACK>> buttons on
the remote control to select another voice from the General MIDI Sound List.
0 0 8
See the “General MIDI Sounds - List” in the
back of this manual for the numbers
associated with each of the soundcard voices.
Q R S
M U S I C
T E C H N O L O G I E S ,
www.qrsmusic.com
I N C .
PAGE 15
Petine
V58.1
Record Using the Remote Control - Requires Optional PNOscan
•
•
•
•
•
•
•
Recording directly from the piano keys requires the installation of an optional record system.
Recording also requires the optional MIDI Adapter Cable and jumper.
• See the “Connecting for Standard Playback or Optional Record” section of this manual for instructions.
You can record to Petine from any MIDI device. To hear all MIDI voices the optional soundcard must be installed.
Recordings can be stored to 9 internal memory locations for a total record time of over 400 minutes.
Individual songs may be re-recorded or erased.
A new recording may also be saved to and stored directly to a CompactFlash card.
All 9 songs can be saved to CompactFlash, as a group, so that 9 new songs can be recorded.
Record Using The
Remote Control
1 Press the STOP button to halt play.
0 0 1
2 Tap the SOURCE button and then the Number 6 button to select the
3 record source “6rc”.
The first record source’s playback location “rP1” displays.
If you go to a different source before saving a recording and then return to the
record source “rEC” will display to remind you to save your last recording.
3
4 Repeatedly tap the TRACK>> button to display record “rEC”.
r P 1
r E C
Press PLAY to enter the record session. Three dots will begin to flash at 60
0 6 0
beats per minute. Rotating the ADJ Dial will change the metronome rate..
Play the piano or send MIDI data to start. Recording begins when MIDI data is
5
received by Petine via the MIDI Input cable.
Alternately flashing dots appear in the left and center display segments to
0 6 0
acknowledge that MIDI data is being received.
4
1
6 R c
5
1
Press the STOP button when finished. The recording is now stored in the
temporary memory location “rPn”.
r P n
You now have several options to choose from:
Listen to the recording by pressing PLAY. Or listen to a song
recorded in any one of the 9 record source locations by repeatedly
tapping the <<TRACK>> buttons to select “rPx” and press PLAY.
r P x r P x
Record Over an existing recording or Save to an empty location
by repeatedly tapping the <<TRACK>> button to select one of the
or
9 record locations “rcx” and then pressing the PLAY button to
replace what’s currently stored in “rPx”.
r c x r S A
2
2
4
5
4
1
3
or
Save the recording to a CompactFlash card by repeatedly tapping
the <<TRACK>> button to select “rcF” then pressing PLAY.
r c f r S A
or
Re-record by repeatedly tapping the <<TRACK>> button to
select “rEC” and then pressing PLAY to repeat the process.
r E C 0 6 0
or
Erase an existing recording by going through the record procedure but, do not send
MIDI data to Petine. Then “save” this empty song to the desired record location.
How Individual Recordings are Saved to CompactFlash
The very first time that an individual recording is saved directly to the CompactFlash card Petine creates a folder
named “RECSES99” and saves the individual recording as “RECSN001. All subsequent recordings saved to “rcF”, on
the same CompactFlash card, are placed in the same folder and named “RECSN002...RECSN###” up to RECSN999.
Note: If there are ANY music files on the “root” of the CFLASH card Petine will not recognize the files in the “RECSES99” folder.
PAGE 16
Q R S
M U S I C
T E C H N O L O G I E S ,
I N C .
For Technical Support Call 1-800-247-6557
Petine V58.1
Record Using the Petine Controller - Requires Optional PNOscan
When upgrading from Standard Playback to Record, a certified
Pianomation technician must install a jumper inside the Petine
controller and add the MIDI Adapter Cable shown below.
Optional Record System
must be installed.
Processor Cable
MIDI Adapter Cable
99140
Optional QRS PNOscan
Record System Interface
MIDI IN
MIDI OUT
MIDI
OUT
Record Using The Petine Controller
MIDI
IN
The optional MIDI Adapter cable must be used and a jumper installed inside Petine.
See the “Connecting for Standard Playback or Optional Record” section of this manual for instructions.
To record from the piano an optional record strip must be installed under the keys.
If a song is playing, indicated by a flashing dot in the far right display segment, press the ADJ Dial once so that no dots
appear in the display.
0 0 1
Tap the ADJ Dial twice, quickly, within one-half second to enter the Setup Menu.
S i n
Rotate the ADJ Dial clockwise to move the dot to the far right display segment.
S I n
Press the ADJ Dial once so that the dot begins to flash.
S I n
Rotate the ADJ Dial until “Src” appears in the display.
S R c
Tap the ADJ Dial twice, quickly, within one-half second to select the record source and exit the Setup Menu. The first
record playback location “rP1” displays. If you go to a different source before saving a recording and then return to the record
source “rEC” will display to remind you save your last recording.
r P 1
Rotate the ADJ Dial clockwise to display “rEC” for the record location.
r E C
Press the ADJ Dial to enter the record session.
Three dots will begin to flash at 60 beats per minute. Rotate the dial to change this metronome rate.
0 6 0
Play the piano or send MIDI data to start. Recording begins when MIDI data is received by the MIDI Input cable.
Alternately flashing dots appear in the left and center display segments to acknowledge that MIDI data is being received.
0 6 0
Press the ADJ Dial once when finished. The recording is now stored in a temporary memory location.
r P n
You now have several options to choose from:
Listen to the recording by pressing PLAY. Or listen to a song recorded in any one of the 9 record source
locations by repeatedly tapping the <<TRACK>> buttons to select “rPx” and press PLAY.
r P x r P x
or
Record Over an existing recording or Save to an empty location by rotating the ADJ Dial to one of the 9
r c x r S A
record locations “rcx” and pressing the ADJ Dial to replace what’s in “rPx”.
or
Save the recording to a CompactFlash card by rotate the ADJ Dial to “rcF” then pressing the ADJ Dial.
r c f r S A
or
Re-record by rotating the ADJ Dial to “rEC” and pressing the ADJ Dial to repeat the process.
r E C 0 6 0
or
Erase an existing recording by going through the record procedure but, do not send MIDI data to Petine.
Then “save” this empty song to the desired record location.
Q R S
M U S I C
T E C H N O L O G I E S ,
www.qrsmusic.com
I N C .
PAGE 17
Petine
V58.1
Front Panel Features
1
11
2
10
3
4
1
5
Power Button
6
7
8
9
Turns the system ON and OFF.
2
Display Screen
3
CompactFlash Eject
Button
Press to eject a CompactFlash card.
4
CompactFlash Card
Reader
The CompactFlash card reader replaces the traditional floppy disk drive.
Make certain to format a blank and unused CompactFlash card using
the Petine controller before copying music files to it.
See the CompactFlash sections at the beginning of this manual for brand
name cards known to work with Petine.
5
DVD ROM Drive
6
CD Busy LED
7
CD Eject Button
8
Emergency CD Eject
Hole
9
ADJ Dial
10
Headphone Jack
11
Infra-Red (IR) Sensor
PAGE 18
Q R S
Three segment LED display.
Plays the following formats: QRS CD; MIDI files on CDROM & DVDROM.
This LED illuminates whenever the CD is being accessed.
Press to eject a CD.
Use to open the CD door when power is removed from the Petine CD
controller. Straighten the open end of a small paper clip and gently insert it
into the hole to open.
Used to access all of the functions of Petine.
Press & Hold to shut down if Petine stops responding.
Headphone output.
See Setup Menu-Advanced to change settings.
3.5mm (1/8”) Stereo Jack
Point the remote toward the IR sensor to control Petine.
M U S I C
T E C H N O L O G I E S ,
I N C .
For Technical Support Call 1-800-247-6557
Petine V58.1
Back Panel Features
9
1
8
2
3
1
4
Power Input
5
6
7
Input from the AC to 5 Volt DC Power Adapter.
Microphone Input /
Line Out 2
Microphone input or “Mixed” output.
The “mixed” output sends the synthesized piano melody to the speakers (Optional
Sound card is required.).
See Setup Menu-Advanced to change settings.
3.5mm (1/8”) Stereo Jack
3
Analog MIDI Output
Record to an analog source or transmit the MIDI signal wirelessly.
RCA Jack
Sends the analog MIDI signal out of the AMI Output jack only when playing from
the CD source. Except SyncAlong
4
Auxiliary Input
“Line In”
Stereo input for connection to an external computer or CD/DVD changer.
3.5mm (1/8”) Stereo Jack
5
Line Output
6
S-Video Output
7
Output to the Pianomation
Processor
8
Universal Serial Bus A
Currently Not Used
9
Universal Serial Bus B
Currently Not Used
2
Q R S
Stereo output to powered speakers).
3.5mm (1/8”) Stereo Jack
Currently Not Used
Connector for the Standard Pianomation Processor Cable or for the RecordMIDI IN /MIDI OUT cable.
DB15 Socket
M U S I C
T E C H N O L O G I E S ,
www.qrsmusic.com
I N C .
PAGE 19
Petine
V58.1
Setup Menu Functions - Navigation Basics
All of Petine’s functions can be controlled from the Setup Menu which is accessed using the front panel’s ADJ Dial.
Some functions that can also be changed using the Remote Control - shown in bold type in the Function table below.
This page will show you the basics of navigating through the Setup Menu so that you can get to any function.
The pages that follow will give specific instructions on each of the functions.
Play must be STOPPED before the Setup Menu can be entered.
If any dots are flashing in the display, press the Remote’s STOP button or the Front Panel’s ADJ Dial.
When no dots are present, Double-Click the Dial to access the Setup Menu.
Double-Click = Tap the Dial twice within one-half second.
When you have entered the Setup Menu you will see the current “Source”. See below.
While in the Setup Menu, pressing the ADJ Dial changes the dot from solid to flashing to solid…
Rotating the Dial while the dot is SOLID moves the dot from left to right (table column).
Rotating the Dial while the dot is FLASHING moves the dot up and down (table row).
To Exit the Setup Menu: Double-Click the ADJ Dial at any time.
Solid Dot
Setup Menu Function
Source
Audio Volume
Piano Volume
Tempo
Transpose
Microphone
Stereo Balance
Bass Volume
Treble Volume
Metronome Volume
Delay
Configure Pianomation
Test 2
Alignment / Test 11
Configure Audio
CompactFlash Utilities
CD ROM Utilities
F-Curves
Midi Input Select
Time Signature
Mixed Out Level Piano
Soundcard Output
Main Audio Output
Exit
PAGE 20
Q R S
ADJ Dial
Display
Flashing Dot
Display
S
A
P
v
\
_
b
t
U
d
n
2
"
c
F
C
/
J
n
P
S
o
E
c d
0
0
0 0
0 0
0
0 0
0 0
0 0
o 0
P n
N 1
E =
e =
S t
d E
d e
o F
r c
4 4
8 0
n A
n o
n d
M U S I C
With Play Stopped: Double-Click the ADJ dial to Enter the Setup Menu.
Pressing the Dial alternately changes the Dot: - Solid or Flashing.
Rotating the Dial moves a Solid Dot: Left / Right.
Rotating Dial moves a Flashing Dot: Up / Down.
Dots can be placed in any of the highlighted squares in this table.
Double-Click at anytime to Exit.
The table on the opposite page shows
the complete list of Setup Menu options.
Example: Select the CD Source.
Setup Menu Function
Source
Display
1] Stop Play
S
i n
2] Double-Click the ADJ dial.
S
i n
3] Rotate dial to put dot at far right.
S
i n
4] Press the dial once.
S
c d
S
i n
S
c F
S
A v
S
n i
S
r c
C
1 4
T E C H N O L O G I E S ,
5] Rotate dial to display “cd“.
6] Double-Click to Select and Exit.
I N C .
Setup Menu Functions - Table
Function
Source
Display
Options & Ranges
cd
in
cF
Compact Disk Drive
Internal
CompactFlash
Settings below are not seen when in the Setup Menu.
Auxiliary AnI Analog MIDI (Default)
StE Stereo
General MIDI Sound number when MIDI Input
001 Select is set to Record Strip “rc”.
MIDI
--- Plays from MIDI IN cable when MIDI Input Select is set to File Player “FP”.
Record & Save [rc1-rc9; rEC; rcF] Playback [rP1-rP9; rPn]
Audio Offset Volume
Range: -9 to +9
Piano Offset Volume
Range: -9 to +9
S
Av
ni
rc
Audio Volume
Piano Volume
Tempo
Transpose
Microphone
Stereo Balance
Bass Volume
Treble Volume
Metronome Volume
A
P
v
\
_
b
t
U
Delay
d
Configure
Pianomation
n
Test 2
Test 11
2
"
Configure Audio
c
CompactFlash
Utilities
F
0
0
00
00
0
00
00
00
o0
Pn
Sy
m1
m2
m3
m4
E=
e=
St
SA
SL
bb
2o
d
S
A
L E
F
c
E
d
S
A
E
L
c
C
oF
AU
nA
rc
Fp
CD ROM Utilities
C
F-Curves
/
Midi Input Select
J
Time Signature
n 44
Mixed Out Level
P 80
nA
S
St
no
o
St
E nd
Soundcard Output
Main Audio Output
Exit
Default Remote
in
Yes
0
0
-00
v00
0
_00
00
00
0
Yes
Yes
Yes
Yes
No
Yes
Yes
Yes
No
Pianomation = 500ms Delay
Synthesis = No Delay
Pn
No
All Pianos
Piano Channel 1
All Instruments
All MIDI
m1
No
Playback Speed
Playback Key
Microphone Volume
Left / Right Audio Balance
Bass Volume Offset
Treble Volume Offset
Click Track Volume Level
Range: “nI” for Min=50 nA” for Max=100
Range: 00 = no change to Plus or Minus 12
Range: 0 to 9
Range: L20 to R20
Range: -12 to +12
Range: -12 to +12
Range: 0 to 9
Not Yet Available
Sets the Minimum Force of the Keys and the Pedal Solenoid
Standard
Karaoke (Sing Along)
Silent Piano
Barcus Berry Pickup
Mixed Output
No
No
St
No
Demo Update
System Update
Application Update
Key List Update
Format
Copy Record
Erase Record Memory
d
No
Demo Update
System Update
Application Update
L=Key List Update
Copy - SyncAlong (Will not overwrite existing CompactFlash card SAL files)
Copy - SyncAlong (Overwrites existing CompactFlash card SAL files)
d
No
of
Yes
rc
No
Metronome Click-track
Soundcard Piano Volume on Line Output 2
44
80
No
No
Maximum
Dynamic
na
No
Mono
Stereo
no
No
Off
Automatic
Manual
Record Strip
F-Player
Exit Setup Menu (“double-click” the ADJ Dial)
No
PAGE 21
Petine
V58.1
Setup Menu Functions - Advanced...
Source Selection
Selects the source that Petine will use to play the piano.
The desired Source is easily selected using the remote control
Display
S
2 4
i n
S
i n
1] Press STOP to halt play.
2] Double-Click the ADJ dial.
3] Rotate dial to far right.
4] Press dial, the dot begins flashing.
0
CompactFlash cards known to work in the
Petine controller.
2Gb Max
S
i n
CD
S
c d
Sandisk CF
Internal
S
i n
Samsung Extreme Memory
CompactFlash
Auxiliary
MIDI
Record
S
S
S
S
C
c F
A v
n i
r c
12
5] Rotate dial to the desired Source.
IBM Microdrive
Sandisk Ultra II
Kingston
6] Double-Click to Select and Exit.
Kodak
File Types Recognized
Source
CD
Internal
CompactFlash
File Name
Extension
File Types Recognized
cda
Stereo Audio and QRS Pianomation
mid
General MIDI
mp3
MP3 (Audio Only)
mpe
MP3 Pianomation with Audio
mpm
QRS Secured MIDI with MP3
mid
General MIDI
mid
General MIDI
mp3
MP3 (Audio Only)
mpe
MP3 Pianomation with Audio
mpm
QRS Secured MIDI with MP3
Maximum Number of Songs & Programs
CDROM Root
000 - 999
CFLASH Root
000 - 509
Programs On CFLASH or CDROM
P01 - P99
CDROM & CFLASH Program Pxx
000 - 999
Internal Music Demo Disk
cda
QRS Pianomation CD via an external CD player.
wma
QRS Pianomation music downloaded from NetPiano.com.
MIDI
mid
MIDI IN - Optional MIDI adapter cable and jumper required.
Record
mid
MIDI - Optional PNOscan Record System; MIDI adapter cable and jumper required.
Auxiliary
PAGE 22
Q R S
M U S I C
T E C H N O L O G I E S ,
I N C .
1.44MB
For Technical Support Call 1-800-247-6557
Petine V58.1
...Setup Menu Functions - Advanced...
Audio Volume Level
Piano Volume Level
Increases and decreases the audio volume without affecting the
master volume or the piano volume levels.
Increases and decreases the piano volume without affecting the
master volume or the audio volume levels.
This function is easily adjusted using the remote control
This function is easily adjusted using the remote control
Display
Range
-9 to 9
C
S
S
0 1
A
0
A
0
A
-2
A
-2
A
0
C
01
Display
Press STOP to halt play.
Double-Click the ADJ dial.
Press dial, the dot begins flashing.
Rotate the dial clockwise.
C
S
S
A
0 1
Stop at the “A”
6] Press the dial, the dot is solid.
7] Rotate the dial clockwise.
8] Press dial, the dot begins flashing.
P
0
1]
2]
3]
4]
5]
9] Rotate dial to the desired setting.
Double-Click to Select and Exit.
Range
-9 to 9
P
0
P
-2
P
-2
P
0
C
01
1] Press STOP to halt play.
2] Double-Click the ADJ dial.
3] Press dial, the dot begins flashing.
4] Rotate the dial clockwise.
5] Stop at the “P”
6] Press the dial, the dot is solid.
7] Rotate the dial clockwise.
8] Press dial, the dot begins flashing.
9] Rotate dial to the desired setting.
Double-Click to Select and Exit.
Tempo [Music’s Speed]
Transpose [Music’s “Key”]
Increases or decreases the music’s speed. MIDI Files ONLY!
The tempo of the music on a CD or music from an MP3 file
cannot be changed!
Changes the “key” of the music. MIDI Files ONLY!
The key of the music on a CD or music from an MP3 file
cannot be changed!
This function is easily adjusted using the remote control
This function is easily adjusted using the remote control
Display
Display
2 4
i n
i n
1] Press STOP to halt play.
2] Double-Click the ADJ dial.
3] Press dial, the dot begins flashing.
4] Rotate the dial clockwise.
0
S
S
A
P
-
0 0
-
-
0 0
-
0 0
5] Stop at the “-”
6] Press the dial, the dot is solid.
7] Rotate the dial clockwise.
0
S
S
A
P
Range
-
-50 to +100
R
1 0
0
2 4
0 0
8] Press dial, the dot begins flashing.
9] Rotate dial to the desired setting.
Double-Click to Select and Exit.
Q R S
M U S I C
2 4
i n
i n
v
v
0 0
v
0 0
Range
v
0 0
-12 to +12
n
0 2
0
2 4
T E C H N O L O G I E S ,
www.qrsmusic.com
1] Press STOP to halt play.
2] Double-Click the ADJ dial.
3] Press dial, the dot begins flashing.
4] Rotate the dial clockwise.
5] Stop at the “v”
6] Press the dial, the dot is solid.
7] Rotate the dial clockwise.
8] Press dial, the dot begins flashing.
9] Rotate dial to the desired setting.
Double-Click to Select and Exit.
I N C .
PAGE 23
V58.1
Petine
...Setup Menu Functions - Advanced...
Microphone Volume Level
Bass Volume
Increases the audio output for a microphone connected to the
Mic Input/Line Out 2 socket on the back panel.
This function is easily adjusted using the remote control
Display
C
S
S
A
P
0 1
c d
c d
Increases or decreases the low frequency audio coming out of
the speaker system.
1] Press STOP to halt play.
2] Double-Click the ADJ dial.
3] Press dial, the dot begins flashing.
4] Rotate the dial clockwise.
Display
C
S
S
A
P
v
Range
0 to 9
0
\
0
\
0
\
0
\
9
C
0 1
v
8] Press dial, the dot begins flashing.
9] Rotate dial to the desired setting.
Double-Click to Select and Exit.
b
0 0
b
0 0
b
0 0
Range
b
0 0
-12 to 12
b
0 6
\
_
C
This function is easily adjusted using the remote control
Increases one of the audio channels as it decreases the other.
This is useful ONLY if the player system is connected to two
speakers AND a two-channel audio (SyncAlong) music is being
played.
0 1
c d
c d
0 1
8] Press dial, the dot begins flashing.
9] Rotate dial to the desired setting.
Double-Click to Select and Exit.
Treble Volume
This function is easily adjusted using the remote control
Increases or decreases the high frequency audio coming out of
the speaker system.
Display
Display
1] Press STOP to halt play.
2] Double-Click the ADJ dial.
3] Press dial, the dot begins flashing.
4] Rotate the dial clockwise.
C
S
S
A
P
-
-
v
v
\
0 1
c d
c d
1] Press STOP to halt play.
2] Double-Click the ADJ dial.
3] Press dial, the dot begins flashing.
4] Rotate the dial clockwise.
\
_
0 0
_
0 0
_
0 0
Range
_
0 0
L20 to R20
l
0 4
PAGE 24
5] Stop at the “b”
6] Press the dial, the dot is solid.
7] Rotate the dial clockwise.
5] Stop at the “\”
6] Press the dial, the dot is solid.
7] Rotate the dial clockwise.
Stereo Balance
C
1] Press STOP to halt play.
2] Double-Click the ADJ dial.
3] Press dial, the dot begins flashing.
4] Rotate the dial clockwise.
-
\
C
S
S
A
P
0 1
c d
c d
0 1
5] Stop at the “_”
6] Press the dial, the dot is solid.
7] Rotate the dial clockwise.
8] Press dial, the dot begins flashing.
9] Rotate dial to the desired setting.
Double-Click to Select and Exit.
_
b
t
t
0 0
t
0 0
Range
t
0 0
-12 to 12
t
0 3
C
0 1
5] Stop at the “t”
6] Press the dial, the dot is solid.
7] Rotate the dial clockwise.
8] Press dial, the dot begins flashing.
9] Rotate dial to the desired setting.
Double-Click to Select and Exit.
For Technical Support Call 1-800-247-6557
Petine V58.1
...Setup Menu Functions - Advanced...
Metronome Volume - Record “Click-Track”
Delay [Pianomation vs. Synthesizer]
Adjusts the audible click-track, at the selected time signature
below, heard through the speakers during recording.
A setting of “0” mutes the “click-track”.
It takes 500ms for the mechanics of the acoustic piano keys to
respond to data sent from Petine. Petine actually delays the
audio to the speaker by 500ms to keep it in sync with the piano.
Display
r
S
S
A
P
p 1
r c
r c
1] Press STOP to halt play.
2] Double-Click the ADJ dial.
3] Press dial, the dot begins flashing.
4] Rotate the dial clockwise.
v
\
Pianomation “Pn” - Default
Keep the delay set to “Pn” whenever Petine is connected to an
acoustic piano and you want the acoustic piano keys to play.
Synthesizer “Sy”
Set the Delay to “Sy”, No Synthesizer Delay, when using Petine
as a Stand-Alone MIDI controller. This setting keeps the
“synthesized” background in-sync with the digital device.
Warning: If the piano is connected to Petine’s DB15
Pianomation cable the keys will play at full volume.
The “Sy” setting should only be used when Petine is used as a
stand-along MIDI controller.
_
How to Use Petine as a Stand-Alone MIDI Controller
b
5] Stop at the “U”
6] Press the dial, the dot is solid.
7] Rotate the dial clockwise.
Connect a MIDI adapter cable and jumper as instructed in the
“Optional MIDI Adapter Cable Connections for MIDI IN/OUT” in the
“Connecting for Standard Playback or Optional Record” section at
the back of this manual. Do NOT connect the Standard Cable to
the piano or the piano keys will play at full volume.
8] Press dial, the dot begins flashing.
9] Rotate dial to the desired setting.
Double-Click to Select and Exit.
Follow the instructions below to set the Delay to “Sy”.
Connect the MIDI Adapter Cable’s “MIDI OUT” socket to use
Petine as a standard MIDI controller.
t
U
o 0
U
o 0
U
o 0
Range
U
o 0
0 to 9
U
r
o 6
p 1
- m i
m i
1] Press STOP to halt play.
2] Double-Click the ADJ dial.
3] Press dial, the dot begins flashing.
4] Rotate the dial clockwise.
d
P M
d
P M
5] Stop at the “d”
6] Press the dial, the dot is solid.
7] Rotate the dial clockwise.
S
S
A
P
v
\
_
b
t
U
d
P M
Options
d
P M
Pm or sy
D
S Y
-
Q R S
M U S I C
- -
8] Press dial, the dot begins flashing.
9] Rotate dial to the desired setting.
Double-Click to Select and Exit.
T E C H N O L O G I E S ,
www.qrsmusic.com
I N C .
PAGE 25
Petine
V58.1
...Setup Menu Functions - Advanced...
Configure Pianomation
Sets Minimum Key Force / Alignment Test 11
The Pianomation Configuration settings determine how
Petine and the piano will respond to MIDI data.
The Test Alignment 11 function allows you to set the minimum
force for each of the keys and the pedal solenoid. The standard
Pianomation system will play keys 5 through 84, the first and last
four keys are not connected. This eliminates the need to cut into
the bass and treble legs. Note: Not all system use a Pedal Solenoid.
See the “General MIDI Sounds List” section of this manual for the list of General MIDI sounds.
All Pianos
General MIDI Piano Sounds 1-6 on channels 1-16 (except 10-drums).
When the Pianomation Configuration is set to “All Pianos” the acoustic
piano keys will play when the MIDI file is written for any of the first six piano
voices.
2
Piano Channel 1
General MIDI Sound 1 (Grand Piano) on Channel 1
When the Pianomation Configuration is set to “Piano Channel 1” the
acoustic piano keys will play when the MIDI music is written for the Grand
Piano, sound patch 1.
3
All Instruments
Piano plays full orchestration except drums and special effects.
When the Pianomation Configuration is set to “All Instruments” the acoustic
piano keys will play when the MIDI file is written for ALL voices.
4
All MIDI
General MIDI Piano Sounds 1-6 are sent to Pianomation, the acoustic piano,
and ALL MIDI data is sent to the MIDI Out socket of the options MIDI
Adapter Cable.
1
Display
C
S
S
A
P
0 1
c d
c d
1] Press STOP to halt play.
2] Double-Click the ADJ dial.
3] Press dial, the dot begins flashing.
4] Rotate the dial clockwise.
5] Stop at the “11”.
6] Press the dial, the dot is solid.
7] Rotate the dial clockwise.
v
\
Display
0
S
S
A
P
0 1
c F
c F
_
1] Press STOP to halt play.
2] Double-Click the ADJ dial.
3] Press dial, the dot begins flashing.
4] Rotate the dial clockwise.
b
t
U
d
n
-
2
v
11
e =
11
e =
11
e =
\
_
b
t
-
0 1
U
-
-
0
8
7
0
-
0 6
d
2
n
m 1
n
m 1
n
m 1
Range
n
m 1
1 to 4
n
n 3
0
0 1
5] Stop at the “n”
6] Press the dial, the dot is solid.
7] Rotate the dial clockwise.
8] Press dial, the dot begins flashing.
9] Rotate dial to the desired setting.
Double-Click to Select and Exit.
Test 2
This function is not yet available.
PAGE 26
Q R S
M U S I C
2
5
5
3
5
8] Press the dial to execute. Please Wait!
9] This represents piano key #1.
10] Rotate the dial clockwise to display “05”.
11] Press the dial do display the key’s force setting.
12] Rotate dial so key sounds as soft as possible.
13] Press the dial.
14] Rotate the dial to select the next, or any, key #.
15] Repeat steps 11-14 for keys 5-84.
-
P d
16] When finished, rotate past key 88 to display “Pd”.
2
7 3
17] Press the dial.
2
5 0
16] Rotate dial for a smooth lift of sustain dampers.
S
t o
17] Press dial to STORE new settings to processor.
11
e =
New settings aren’t saved unless “Sto” is displayed!
C
0 1
Double-Click to Store and Exit.
T E C H N O L O G I E S ,
I N C .
For Technical Support Call 1-800-247-6557
Petine V58.1
...Setup Menu Functions - Advanced...
Configure Audio
The Audio Configuration setting changes the functionality of the front and rear panel jacks.
A “mixed” output includes a synthesized piano sound along with the background audio.
See the Front and Rear Panel Features sections of the manual for the locations of these jacks.
Configuratio
n Option
Front Panel
Headphone
Rear Panel Input
Mic Input / Line Out 2
Rear Panel
Line Out
Usually connected to the speaker under the piano.
Standard
Unmixed
Disabled
Unmixed
Karaoke
(Sing Along)
Unmixed
No Microphone
Microphone Input:
On both L & R channels
Microphone With Unmixed Audio
Silent Piano
Mixed
Sound card required
Disabled
Muted Audio
Barcus Berry
Mixed
Output
Right
Channel
Audio Mixed with
Mic Input/Line Out 2
Left
Channel
Unmixed Audio
Input:
Barcus Berry Planer Wave
or
Piano Microphone
Mixed Output
Sound card required
Disabled
Right Channel
Unmixed Audio
To Piano Speaker
Left Channel
Audio Mixed with
Mic Input/Line Out 2
To Home Audio System
Mixed Output
Sound card required
Mixed audio output includes the background audio from the CD plus the piano part from the optional soundcard.
Display
0 1
c d
c d
1] Press STOP to halt play.
2] Double-Click the ADJ dial.
3] Press dial, the dot begins flashing.
4] Rotate the dial clockwise.
c
S t
5] Stop at the “c”
6] Press the dial, the dot is solid.
7] Rotate the dial clockwise.
C
S
S
A
P
v
\
_
b
t
U
d
n
2
11
sT
Standard
c
S t
Sa
Karaoke
(Sing Along)
c
S t
sL
Silent Piano
c
S t
bb
Barcus Berry
c
2o
Mixed Output
C
2 o
0 1
Q R S
8] Press dial, the dot begins flashing.
9] Rotate dial to the desired setting.
Double-Click to Select and Exit.
M U S I C
When changes are made to this configuration
Petine will automatically shut down. Power
Petine ON and the new settings will be active.
T E C H N O L O G I E S ,
www.qrsmusic.com
I N C .
PAGE 27
Petine
V58.1
...Setup Menu Functions - Advanced...
CompactFlash Utilities
Demo Update
Updates the Internal Source and the SyncAlong series index.
System Update
Restores Petine’s Application Image file.
Application Update
Updates or restores Petine’s Application Image.
Key List Update
Unavailable
Format
Formats a CompactFlash card.
Copy Record Memory Copies the nine record source locations to a CFLASH card.
Erase Record Memory Erases songs in all 9 record source locations.
C
S
S
1 4
c d
c d
A
1]
2]
3]
Press STOP to halt play.
Double-Click the ADJ dial.
Press dial, the dot begins flashing.
4]
Rotate the dial clockwise.
Stop at the “F”
Press the dial, the dot is solid.
Rotate the dial clockwise. Put the dot in center display segment.
P
v
\
_
b
t
U
d
n
2
11
c
d Demo Update
F
d
E
5]
F
d
E
F
d
E
6]
7]
F
d
E
c Copy Record Memory
F
A
E
e Erase Record Memory
F
A
E
F
A
E
S System Update
A Application Update
L Key List Update
f Format CFLASH
S
c c
F
A E
C
1 4
8] Press dial, the dot begins flashing.
9] Rotate dial to the desired setting.
10] Press the dial, the dot is solid.
11] Rotate the dial clockwise. Move the dot to far right display segment.
12] Press the dial to execute the function. PLEASE WAIT!
13] Indicates a “successful” procedure.
14] Press the dial
Double-Click to Select and Exit.
Copy Record Memory - How Songs Are Named
Each “group-save” creates a folder on the CompactFlash and then saves the contents from ALL 9 record source
locations in this folder. Empty record locations ARE saved. The first folder is named “RECSES01” and you can
perform a total of 98 of these group saves (RECSES01 through RECSES98).
The “RECSES99” folder name is reserved for individual saves to CFLASH during the record process.
The names assigned to the songs within these “group-saves” are “RECSNG01 through RECSNG09”
PAGE 28
Q R S
M U S I C
T E C H N O L O G I E S ,
I N C .
For Technical Support Call 1-800-247-6557
Petine V58.1
...Setup Menu Functions - Advanced...
CD Drive Utilities
Demo Update
Updates the Internal Source and the SyncAlong series index.
System Update
Restores Petine’s Application Image file.
Application Update
Updates or restores Petine’s Application Image.
Key List Update
Unavailable
Append SyncAlong
Copies SyncAlong music files from a CDROM to a CompactFlash card. Will NOT overwrite
files that are already on the CompactFlash card. Will not delete other music or data files.
Overwrite SyncAlong
Copies SyncAlong music files from a CDROM to a CompactFlash card. Will copy and
overwrite ALL files on CF from CDROM. Will not delete other music or data files.
C
S
S
1 4
c d
c d
A
1]
2]
3]
Press STOP to halt play.
Double-Click the ADJ dial.
Press dial, the dot begins flashing.
4]
Rotate the dial clockwise.
Stop at the LARGE “C”
Press the dial, the dot is solid.
Rotate the dial clockwise. Put the dot in center display segment.
P
v
\
_
b
t
U
d
n
2
11
c
F
C
d
E
5]
C
d
E
A Application Update
C
d
E
6]
7]
L Key List Update
C
d
E
c Append SyncAlong - CDROM to Compact Flash
C
A
E
C Overwrite SyncAlong - CDROM to Compact Flash
C
A
E
C
A
E
d Demo Update
S System Update
Q R S
S
c c
F
A E
C
1 4
M U S I C
8] Press dial, the dot begins flashing.
9] Rotate dial to the desired setting.
10] Press the dial, the dot is solid.
11] Rotate the dial clockwise. Move the dot to far right display segment.
12] Press the dial to execute the function. PLEASE WAIT!
13] Indicates a “successful” procedure.
14] Press the dial
Double-Click to Select and Exit.
T E C H N O L O G I E S ,
www.qrsmusic.com
I N C .
PAGE 29
Petine
V58.1
...Setup Menu Functions- Advanced...
F-Curves - Activate
The F-Curve settings determine how the Audio and Piano volume levels change as the Master volume level changes.
The default setting is OFF and the F-Curve settings cannot be accessed.
To activate the F-Curves change and save the setting to “manual”.
Volume Curves:
The Audio button sets the audio level for each global volume.
The Master button sets the Synth level for each global volume.
The Piano volume sets the Pianomation for each global volume.
Low: Corresponds to a global volume of 001.
Medium: Corresponds to a global volume of 064.
High: Corresponds to a global volume of 127.
Midi Expression Curves: When this function is selected, you can define the midi expression curves... Petine has
1000000 different expression curves. This defines how midi velocities from the source file are mapped into other
velocities towards the Pianomation. The source can have from 0 to 127 midi velocities, and the same is true for the
Pianomation. We use 3 typical midi velocities, being 32, 64, 96. They represent 25%, 50% & 75% of the maximum
(127) midi velocity. When this expression function is selected, the Audio keys (remote control) will define those
percentages.
1 5
c d
c d
1] Press STOP to halt play.
2] Double-Click the ADJ dial.
3] Press dial, the dot begins flashing.
4] Rotate the dial clockwise.
/
o F
/
o F
/
o F
5] Stop at the “/”
6] Press the dial, the dot is solid.
7] Rotate the dial clockwise.
C
S
S
A
P
v
\
_
b
t
U
d
n
2
11
c
F
C
PAGE 30
o F
Off
/
o F
A U
Automatic
/
n A
n A
Manual
C
1 5
Q R S
M U S I C
8] Press dial, the dot begins flashing.
9] Rotate dial to the desired setting.
Double-Click to Select and Exit.
T E C H N O L O G I E S ,
I N C .
For Technical Support Call 1-800-247-6557
Petine V58.1
...Setup Menu Functions- Advanced...
F-Curves - Change
With the F-Curves set to “manual” you may now change the volume curves.
Insert a QRS CD, select the CD Source and press PLAY. Use the remote control’s volume buttons to set the following:
Adjust the Master Volume level to “001”; the Audio Volume to “A 0” and the Piano Volume to “P 0”.
Tap the SOURCE button on the Remote control once to access the “low” audio offset level.
P 0 1
Adjust the Audio Volume so that the music from the speaker sounds balanced with the acoustic piano.
A 2 0
Tap the SOURCE button 4 times to exit the F-Curves.
C 0 1
Adjust the Master Volume level to “063”.
0 6 3
Tap the SOURCE button twice to access the “middle” audio offset adjust.
P 5 0
Adjust the Audio Volume so that the music from the speaker sounds balanced with the acoustic piano.
A 8 0
Tap the SOURCE button three times to exit.
C 0 1
Adjust the Master Volume level to “127”.
1 2 7
Tap the SOURCE button three times to access the “high” audio offset adjust.
P 9 9
Adjust the Audio Volume so that the music from the speaker sounds balanced with the acoustic piano.
a 9 9
Tap the SOURCE button twice to exit.
C 0 1
Adjust the Master Volume to a comfortable listening level.
0 1 9
See the previous page to reset the F-Curve activation to “OFF”
F-Curves: Default Settings
Audio
Master
Piano
Source - 1st tap
40
99
01
Source - 2nd tap
95
99
50
Source - 3rd tap
99
99
99
Source - 4th tap
or
Li
Li
Li
Audio UP
Dy
Dy
Dy
Audio UP
Ex
Ex
Ex
50
75
Audio UP
F1
Audio UP
U1
Audio UP
U2
Audio UP
U3
Audio UP
U4
Audio UP
G1
Audio UP
G2
Audio UP
G3
Audio UP
G4
00
Source - 5th tap
Exit the F-Curve mode
Q R S
M U S I C
T E C H N O L O G I E S ,
www.qrsmusic.com
I N C .
PAGE 31
Petine
V58.1
...Setup Menu Functions- Advanced...
MIDI Input Select
Time Signature
Optional MIDI Adapter cable and Jumper are required.
This setting changes how the MIDI Input Source responds
to MIDI data received into the MIDI Input cable.
When MIDI Input Select is set to “Record Strip” the MIDI
data triggers Petine’s internal soundcard voices. Note that
the when the MIDI Input Source is selected the soundcard
voice number is active in the display.
this function changes the time signature of the “click-track”
when recording using the optional record system.
Options
r
S
S
E C
R c
R c
1] Press STOP to halt play.
2] Double-Click the ADJ dial.
3] Press dial, the dot begins flashing.
4] Rotate the dial clockwise.
5] Stop at the “n”
6] Press the dial, the dot is solid.
7] Rotate the dial clockwise.
A
1
1
1
2
2
2
3
2
1
4
2
4
t
3
4
U
4
4
5
4
2
6
4
11
1
8
P
2
8
-
3
8
v
\
4
8
_
5
8
N
4 4
b
6
8
N
4 4
7
8
N
4 4
8
8
N
4 4
9
8
N
2 2
8
r
E C
When MIDI Input Select is set to F-Player (File Player)
MIDI data written for “piano” will trigger Pianomation and
the piano keys. Use this setting when playing the piano
from a PC or other external MIDI device.
See these two sections of this manual for more information:
Set Up Petine To Play From a MIDI Player Or Computer
Set Up Petine To Play Soundcard Voices
S
S
- m i
m i
A
1] Press STOP to halt play.
2] Double-Click the ADJ dial.
3] Press dial, the dot begins flashing.
4] Rotate the dial clockwise.
t
U
d
n
2
12
11
P
v
\
_
b
d
n
c
F
C
/
J
8] Press dial, the dot begins flashing.
9] Rotate dial to the desired setting.
Double-Click to Select and Exit.
c
F
C
rc
FP
/
J
r c
J
r c
J
r c
J
r c
J
F P
-
- -
PAGE 32
5] Stop at the “J”
6] Press the dial, the dot is solid.
7] Rotate the dial clockwise.
8] Press dial, the dot begins flashing.
9] Rotate dial to the desired setting.
Double-Click to Select and Exit.
Q R S
M U S I C
T E C H N O L O G I E S ,
I N C .
For Technical Support Call 1-800-247-6557
Petine V58.1
...Setup Menu Functions- Advanced...
Mixed Output Level
Soundcard Output
This function setting adjusts the volume level of the
synthesized piano voice that is sent to a powered speakers
along with the audio background.
Optional Soundcard is required.
These settings only apply when the optional Soundcard is
installed. The default Maximum (nA) setting is used for
most applications. Use the Dynamic (dY) option to hear the
best dynamic response from the soundcard when playing
MIDI files with orchestration.
C
S
S
1 5
c d
c d
A
1] Press STOP to halt play.
2] Double-Click the ADJ dial.
3] Press dial, the dot begins flashing.
4] Rotate the dial clockwise.
P
1] Press STOP to halt play.
2] Double-Click the ADJ dial.
3] Press dial, the dot begins flashing.
4] Rotate the dial clockwise.
S
n A
S
n A
5] Stop at the “S”
6] Press the dial, the dot is solid.
7] Rotate the dial clockwise.
-
A
v
\
P
-
_
v
\
b
_
t
b
U
t
d
U
n
d
2
n
11
2
c
11
F
c
C
F
/
J
C
/
J
N
P
8 0
P
8 0
P
8 0
P
8 0
0 to 99 P
9 9
C
1 5
Range
1 5
c d
c d
C
S
S
5] Stop at the “P”
6] Press the dial, the dot is solid.
7] Rotate the dial clockwise.
8] Press dial, the dot begins flashing.
9] Rotate dial to the desired setting.
Double-Click to Select and Exit.
Q R S
M U S I C
N
P
S
n A
Options
S
n A
nA or dY
S
d Y
C
1 5
T E C H N O L O G I E S ,
www.qrsmusic.com
8] Press dial, the dot begins flashing.
9] Rotate dial to the desired setting.
Double-Click to Select and Exit.
I N C .
PAGE 33
Petine
V58.1
...Setup Menu Functions- Advanced
Exit the Setup Menu
Main Out
Mono [n o] or Stereo [s t]
Set to Stereo when playing Sync Along music with two
speakers connected to Pianomation.
C
S
S
1 5
c d
c d
A
1] Press STOP to halt play.
2] Double-Click the ADJ dial.
3] Press dial, the dot begins flashing.
4] Rotate the dial clockwise.
To exit while in the Setup Menu.
With a flashing dot in the first
display segment...
Rotate the dial clockwise.
S
A
P
v
\
P
_
-
b
v
\
t
_
d
b
n
U
t
2
U
11
d
c
n
F
2
C
11
/
J
c
F
To Exit at any time:
Double-Click the dial.
N
C
P
/
J
S
o
N
P
S
o
n o
o
n o
o
n o
Options
o
n o
no or st
o
s t
C
1 5
PAGE 34
Exit the Setup Menu to save settings and return to Petine’s
playback mode.
Q R S
5] Stop at the “o”
6] Press the dial, the dot is solid.
7] Rotate the dial clockwise.
E
n d
E
n d
E
n d
Stop at the “E”
Press the dial, the dot is solid.
Rotate the dial clockwise.
C
1 5
Press the dial to exit.
8] Press dial, the dot begins flashing.
9] Rotate dial to the desired setting.
Double-Click to Select and Exit.
M U S I C
T E C H N O L O G I E S ,
I N C .
For Technical Support Call 1-800-247-6557
Petine V58.1
Auto-Update Utility - Application Versions V0.38 or Later
To update the images on Petine units with Application versions before V0.38 use the instructions in the “Update Petine’s Application
Image” section of this manual.
To see what version is currently installed, go to the “Petine’s Power ON Sequence” section of this manual.
Download the current Application and/or Demo images from the QRS website.
http://www.qrsmusic.com/support_pa.asp
Copy the files to a CompactFlash card or a CDROM disc.
Power Petine ON
Insert the CDROM disc or CompactFlash card containing the image files.
If updating from a CDROM be certain to REMOVE the CompactFlash card!!
Power Petine OFF
Press and Hold the ADJ Dial while powering Petine ON.
When “PoN” appears Count 2 Seconds and then release the ADJ Dial button.
P o n
S...Y...S will display to confirm that the system setup menu has been activated.
S Y S
“SyS” displays while Petine looks for the image files on CD or CompactFlash.
S y S
If the Application image is found Petine “APL” flashes.
A P L
Petine will begin the update process and a countdown to zero.
U 0 1
“Scc” displays when the update is successful. Press the ADJ Dial to continue.
S c c
If the Demo image is found Petine “dno” flashes.
d n o
Petine will begin to update the SyncAlong index file and a countdown to zero.
U 0 1
“Scc” displays when the update is successful. Press the ADJ Dial to continue.
S c c
Petine automatically powers OFF to complete the process.
o F F
Q R S
M U S I C
T E C H N O L O G I E S ,
www.qrsmusic.com
I N C .
PAGE 35
Petine
V58.1
Update Petine’s Application Image
The current Application Image, or operating system, version displays each time Petine is turned on.
See the “When Petine Is First Turned On” section of this manual.
Download the new appl.ima image file from the QRS Music website and copy to a CFLASH or CDROM.
http://www.qrsmusic.com/support_pa.asp
Update from a CDROM
Press STOP to halt play.
Update from a CompactFlash
0 2 3
Press STOP to halt play.
0 2 3
Insert the CD containing the appl.ima file.
Insert the CompactFlash card containing the appl.ima file.
Press the ADJ Dial twice within one-half second to enter the
Setup Menu.
Press the ADJ Dial twice within one-half second to enter the
Setup Menu.
Petine will open to the source section of the Setup
Menu and display the current source.
S i n
Petine will open to the source section of the Setup
Menu and display the current source.
S i n
Press the ADJ Dial so that the dot begins to flash.
s i N
Press the ADJ Dial once so that the dot begins to flash.
s i N
Rotate the ADJ Dial to display a large “C”.
C d E
Rotate the ADJ Dial to display a large “F”.
F d E
Press the ADJ Dial to stop the dot from flashing.
C d E
Press the ADJ Dial to stop the dot from flashing.
F d E
Rotate the ADJ Dial to move the dot to the middle
display segment.
C d E
Rotate the ADJ Dial to move the dot to the middle
display segment.
F d E
Press the ADJ Dial so the dot flashes and then rotate
the ADJ Dial to display a “A” for Application update.
C A E
Press ADJ so the dot flashes and then rotate the ADJ
Dial to display a “A” for Application update.
F A E
Press the ADJ Dial to stop the flashing.
C A E
Press the ADJ Dial to stop the flashing.
F A E
Rotate the ADJ Dial to move the dot to the far right
display segment.
Press the ADJ Dial to Execute.
C A E
Rotate the ADJ Dial to move the dot to the far right
display segment.
Press the ADJ Dial to Execute.
F A E
A “U” will display and the update countdown to zero
will begin.
U 0 0
A “U” will display and the update countdown to zero
will begin.
U 0 0
Successful update!
S c c
Successful update!
S c c
Press the ADJ Dial once.
C A E
Press the ADJ Dial once.
F A E
Press the ADJ Dial twice within one-half second to exit.
Press the ADJ Dial twice within one-half second to exit.
0 2 3
PAGE 36
Q R S
M U S I C
T E C H N O L O G I E S ,
0 2 3
I N C .
For Technical Support Call 1-800-247-6557
Petine V58.1
Update Petine’s Demo Image - SyncAlong Music Index
The demo image file contains the pre-programmed music located in the Internal Source of Petine.
It also contains a hidden index file used to synchronize the SyncAlong series music.
Download the new demo.ima image file from the QRS Music website and copy to a CFLASH or CDROM.
http://www.qrsmusic.com/support_pa.asp
Update from CDROM
Update from CompactFlash
Press STOP to halt play.
0 2 3
Press STOP to halt play.
0 2 3
Insert the CD containing the demo.ima file.
Insert the CompactFlash card containing the demo.ima file.
Press the ADJ Dial twice within one-half second to enter the
Setup Menu.
Press the ADJ Dial twice within one-half second to enter the
Setup Menu.
Petine will open to the source section of the Setup
Menu and display the current source.
S i n
Petine will open to the source section of the Setup
Menu and display the current source.
S i n
Press the ADJ Dial so that the dot begins to flash.
s i N
Press the ADJ Dial once so that the dot begins to flash.
s i N
Rotate the ADJ Dial to display a large “C”.
C A E
Rotate the ADJ Dial to display a large “F”.
F A E
Press the ADJ Dial to stop the dot from flashing.
C A E
Press the ADJ Dial to stop the dot from flashing.
F A E
Rotate the ADJ Dial to move the dot to the middle
display segment.
C A E
Rotate the ADJ Dial to move the dot to the middle
display segment.
F A E
Press the ADJ Dial so the dot flashes and then rotate
the ADJ Dial to display a “D” for demo update.
C d E
Press ADJ so the dot flashes and then rotate the ADJ
Dial to display a “D” for demo update.
F d E
Press the ADJ Dial to stop the flashing.
C d E
Press the ADJ Dial to stop the flashing.
F d E
Rotate the ADJ Dial to move the dot to the far right
display segment.
Press the ADJ Dial to Execute.
C d E
Rotate the ADJ Dial to move the dot to the far right
display segment.
Press the ADJ Dial to Execute.
F d E
A “U” will display and the update countdown to zero
will begin.
U 0 0
A “U” will display and the update countdown to zero
will begin.
U 0 0
Successful update!
S c c
Successful update!
S c c
Press the ADJ Dial once.
C d E
Press the ADJ Dial once.
F d E
Press the ADJ Dial twice within one-half second to exit.
Press the ADJ Dial twice within one-half second to exit.
0 2 3
Q R S
M U S I C
T E C H N O L O G I E S ,
www.qrsmusic.com
0 2 3
I N C .
PAGE 37
Petine
V58.1
Restoring Factory Default Settings
ADJ Dial
Power
Remove the CDROM disc and CompactFlash card from Petine before continuing.
Begin with Petine’s power turned OFF.
Press and hold the ADJ Dial then press and release the power button.
Continue to hold the ADJ Dial and when you see “Pon” count 2 seconds then release the Dial.
If the ADJ Dial is held too long the Petine will power off. Try again.
P o n
If done properly “SyS” will flash 3 times to confirm that the special system setup menu is available.
S Y s
Petine will then display last played source.
Press STOP to halt play.
0 2 4
Press the ADJ Dial twice within one-half second to enter the system setup menu.
Petine will open to the special system mode.
s d e
If there is already a “d” in the second display segment skip the “indented” steps below.
Rotate the ADJ Dial to place the dot between the second and third display segments.
s L e
Press the ADJ Dial so that the dot begins to flash.
s L e
Rotate the ADJ Dial until “d” displays.
s d e
Press the ADJ Dial so that the dot stops flashing.
s d e
Rotate the ADJ Dial to place the dot after the “E”.
s d e
Press the ADJ Dial execute the Default reset.
While the Reset is being performed the characters ‘Dft” will be displayed.
d F t
If the Reset was successful the LED will display “SCC”
S c c
Press the ADJ Dial once.
Petine will automatically power OFF.
When the Petine is Powered on the Defaults will be applied.
O F F
PAGE 38
Q R S
M U S I C
T E C H N O L O G I E S ,
I N C .
For Technical Support Call 1-800-247-6557
Petine V58.1
Restoring Petine’s Application Image
The Application Image file (appl.ima) holds the program code, or operating system, for the Petine controller’s user function set. It
allows the user to operate the Pianomation player piano system using all of Petine’s functions and settings.
The System Image file (syst.ima) holds the “core” program code for Petine. If the Application Image ever becomes corrupted or
unusable for any reason, the System Image serves as a “backup” and allows the user to re-load or “restore” the Application Image.
If the Application Image is damaged Petine will turn on to
display the following...
After the initial scanning process, the system will display one of
the following:
This display indicates that the unit has powered ON
using the system image.
S Y S
Or
Indicates that user action is needed.
U s r
The system will look for the optional Disk-On-Chip
Or
Installed
e 0 0
Not Installed
e 8 0
Download a copy of the appl.ima file, copy it to a CDROM or
CFLASH.
[www.qrsmusic.com/Pianomation/downloads]
CD Update Application
C U A
CompactFlash Update Application
F U A
These settings will change if the ADJ dial is accidentally rotated. If
they do change, rotate the dial to display one of the initial settings
shown above. See the CD and CompactFlash Utilities section of this
manual for the list of options.
Insert the CDROM or CompactFlash, with the Appl.ima file,
into the appropriate drive of Petine.
Press the ADJ Dial...
Press the ADJ Dial and wait for this display.
If the correct image file type is present Petine will
begin the update.
u 2 3
Press the ADJ Dial again...
This indicates a successful update!
s c c
The system will scan the CD drive.
No CD in drive.
Or CD detected without an image file
CD with image file present.
If unsuccessful and error code is displayed.
C d n
Press the ADJ Dial once.
C d A
C d P
The system will then scan the CompactFlash reader.
Or
C d
C F
No CompactFlash card in reader.
C F n
CompactFlash card present.
C F P
If a CDROM disk and a CompactFlash card are present, both
with image files, the CompactFlash will be used.
Q R S
M U S I C
Or
Nothing in drive.
E R 1
No image files found.
E R 2
Press AND Hold the ADJ Dial until Petine powers OFF. Then
Press the power button to turn Petine ON.
See the “When Petine is First Turned ON” section of this
manual for the proper “power-on” display sequence.
T E C H N O L O G I E S ,
www.qrsmusic.com
I N C .
PAGE 39
Pianomation®
Electronics/Electromechanical System
Limited Warranty
PIANOMATION ELECTRONICS LIMITED WARRANTY
QRS Music Technologies, Inc. (“QRS”) warrants to you for the Warranty Period that there are no defects in the materials
of this Product (as identified at the end of this warranty certificate). The “Warranty Period” expires (except as explained
below) Two (2) years from the date of your purchase of the Product. In order to determine the date of your purchase of
the Product, you will need to provide to us a credit card receipt, a purchase agreement, a sales slip, a warranty
registration or some other form of proof that you are the original purchaser and the date of your purchase of the Product.
If you are not able to provide us with some form of proof of purchase date, the Warranty Period will be a shorter period
(the “Shorter Warranty Period”) which is two years from the date that your dealer purchased the Product from QRS. If
you cannot provide a proof of purchase date, you may contact us in the manner described below and we will assist you in
determining the date that your dealer purchased the Product from us and determining the Shorter Warranty Period. This
is a warranty for parts only and does not include shipping or labor.
This warranty does not apply to any accessories you may have purchased with the Product and does not apply to any
piano or components of the piano with which the Product is used or any Piano in which the Product is installed. In
addition, this warranty does not cover scratches, dents or other defects in the cosmetic finish of the Product.
The warranty is issued solely to the original purchaser of the Product. THIS WARRANTY IS NOT TRANSFERABLE.
If, during the Warranty Period, parts incorporated in this Product are found to be defective in material or workmanship,
and the original purchaser provides Purchase Documents to QRS, then QRS or its authorized dealer will provide
replacement parts without charge. We may, at our discretion, provide reconditioned parts or assemblies as warranty
replacements. You as the original purchaser will be responsible to pay labor costs incurred in connection with any repair.
LIMITATION IN CONNECTION WITH OBSOLETE PRODUCTS
If at the time you make a claim pursuant to this warranty, we no longer manufacture or sell the same model of Product,
we may, at our discretion, rather than repair or replace defective parts in the Product, offer to sell you a more current
version of a similar Product. If we offer to sell you a more current model of the Product, you will be responsible to pay
the difference between the Manufacture’s Suggested Retail Price (“MSRP”) of the more current version of a similar
Product and the price you paid for the Product you purchased. If you choose not to accept such offer, we will have no
further obligations pursuant to this warranty.
THIS WARRANTY IS IN LIEU OF ANY OTHER WARRANTY, EXPRESS OR IMPLIED, MADE BY THE
MANUFACTURER IN CONNECTION WITH THIS PRODUCT. INCLUDING, BUT NOT LIMITED TO,
WARRANTIES OR MERCHANTABILITY OR FITNESS FOR A PARTICULAR PURPOSE. TO THE EXTENT
ALLOWED BY THE LAW, QRS SHALL NOT BE RESPONSIBLE FOR LOSS OF THE PRODUCT, LOSS OF
TIME, INCONVENIENCE, COMMERCIAL LOSS, SPECIAL OR CONSEQUENTIAL DAMAGES, EVEN IF THE
MANUFACTURER HAS BEEN ADVISED OF THE POSSIBILITY OF SUCH DAMAGES.
This warranty gives you specific legal rights. Some states provide other rights, and some states do not allow excluding or
limiting liability for incidental or consequential damage. Consequently, the limitations and exclusions in this warranty
may not apply to you. In addition, some jurisdictions have consumer protection rules, regulations and statutes that may
apply to you.
Exclusions
There is no express warranty on the Product and this warranty is void if:
1) You did not purchase this Product from an authorized Pianomation reseller
2) This Product has been serviced, modified or tampered with by anyone other than an QRS Authorized Service
Representative
3) The name, trademark or serial number has been modified, defaced or removed from the product,
4) This Product has been damaged as a result of abuse, abnormal force or strain, failure to reasonably maintain and
protect, modification, accident or exposure to extreme temperature or humidity,
5) Parts, supplies or other accessories which have not been approved by QRS have been used with this Product,
6) Radio frequency interference is generated by uncertified and/or illegal equipment,
7) This Product has been moved or delivered without reasonable preparation and packaging or
8) QRS reasonably determines, after inspection that there has been modification of this Product which adversely affects
the reliability of the product or component.
Owner’s Responsibility
In order to have rights under this warranty, you have the following responsibilities:
1) Retain your proof of purchase and purchase date and send in your Warranty Registration Card
2) Notify QRS or any authorized dealer of any warranty claim within ten (10) days after discovery and provide a
detailed explanation of the problem.
General
If any provision herein shall be unlawful, void or for any reason unenforceable, then that provision shall be deemed
severable from this warranty certificate and shall not affect the validity of and enforceability of the remaining provisions.
QRS reserves the right to make changes in design and/or improvements to its products without any obligation to retrofit
products previously manufactured.
INSTRUCTIONS FOR OBTAINING WARRANTY SERVICE
1) If you cannot provide proof of purchase, contact QRS at 800-247-6557 and we will attempt to determine the date on
which your dealer purchased the Product and assist you in determining the Shorter Warranty Period. For warranty
service, contact the dealer from whom you purchased the product, or your nearest dealer.
2) If no dealer is near you, contact QRS by phone at 800-247-6557.
3) Do not ship the product without prior written Return Authorization from QRS. Do not attempt to repair or
disassemble the product yourself.
4) Please record your model number and serial number and your date of purchase below for your records. Keep this
information with your proof of purchase in case your product requires service. Do not dispose of the warranty after
it expires. In the event your product ever requires service, these instructions should be helpful in enabling you to
obtain proper service.
Product Model #______________________
Product Serial #_______________________
Date of purchase_______________
Petine
V58.1
Connecting for Standard Playback or Optional Record
Standard Playback Connections
To Driver Boards
Pianomation
Processor
To Power Supply
Powered Adapter #990522
Specify Petine
MIDI In
Standard Cable
#70329
To User Interface
Cable: 3.5mm stereo to dual RCA male
#990026 - Connect to Line Out
To Test Box
“Y” Cable - 1M to 2FM
#70213
Powered Speaker
#70040
Optional MIDI Adapter Cable Connections for MIDI IN/OUT - RECORD or MIDI File Player
To avoid damage to the Petine controller a jumper must be installed
inside the Petine controller whenever the MIDI Adapter cable is used. If
this cable is ever disconnected the jumper must be removed.
To Power Supply
MIDI In
Standard Cable
#70329
Male
To Driver Boards
Pianomation
Processor
To User Interface
MIDI
IN
Short MIDI
Cable
PAGE 42
2
Q R S
Add or remove jumper
on the second set of
pins from the CD
drive’s ribbon cable.
M U S I C
MIDI Adapter
Cable #99140
T E C H N O L O G I E S ,
I N C .
Pedals
1
7
QRS Music Technologies, Inc.
MIDI IN
Keyboard
OUT
Male
“To Pianomation”
socket on Petine’s
Back Panel
5 VDC, 1A
Serial #
Model # 79017
MIDI OUT
Female
To Test Box
DVD Drive
Ribbon Cable
PNOscan
Sensor Interface
Female
Optional
QRS PNOscan
Record System
Transition Box
For Technical Support Call 1-800-247-6557
Petine V58.1
Mounting Bracket
Updating Pianomation
If you are upgrading from a previous version of Pianomation MIDI you will need to update the EPROM to version 1.51K. The
version 1.51K EPROM requires a 256 processor, located in processors similar to the ones shown below. The EPROM version
is written on the EPROM which is located on the processor board. Dip switch #3 must be set to the ON position.
Use this notch to
orient the EPROM in
the correct position.
PLAY.ASM ©1993
Piano Automation
Ver 1.51K
1.30 SN: ****
EPROM version 1.51K is
required in systems using the
QRS Petine controller. This
goes into the processor located under the piano.
Description
Part Number
Processor with 1.51K EPROM
60108
EPROM 1.51K
70570
Current version
Released in the year 2000
Note: After installing Petine on the piano flip switch #3 ON.
Dip switches are located on the side of the Year 2000 processor
and inside the enclosure on the previous years enclosures.
Q R S
M U S I C
T E C H N O L O G I E S ,
www.qrsmusic.com
I N C .
PAGE 43
Petine
V58.1
Parts Included
Description
QRS #
QTY
99100A
Petine CD Controller
1
990522
Power Adapter - Specify Petine - [Input: AC 100-240V] [Output: DC 5V - Center Positive]
1
71398
Remote Control
1
70388
Batteries AAA
4
990026
Audio Cable: 3.5mm Stereo Plug to Dual RCA Plugs (Connection to Speakers)
1
990107
Universal Mounting Brackets
2
70213
“Y” Cable: 1Male RCA to 2 Female RCA
1
990009
Screws M3 Length 6mm, Philips Pan-Head Black (Petine to Bracket)
4
70592
Screws (Bracket to Piano)
4
990021
Owners Manual
1
Quick Guide
1
99004
Shipping Carton
1
99003
Bottom Foam Pad—Shipping Carton
1
99005
Top Foam Pad—Shipping Carton
1
99009
Spacer Pad—Shipping Carton
2
OM99002
Petine Accessories & Options
Description
QRS #
79017
QRS #
QRS PNOscan Record System
Available Summer 2006
Description
970000 NetPiano 2 year subscription
981007 Soundcard
970002 NetPiano 4 year subscription
99140 MIDI Adapter Cable:
970004 NetPiano Lifetime subscription
990044 Jumper - Activates record option
50030 Q-Touch Tablet - Ideal for Net Piano
990024 CompactFlash Card 256MB - Type II
PAGE 44
Q R S
M U S I C
T E C H N O L O G I E S ,
I N C .
For Technical Support Call 1-800-247-6557
Petine V58.1
Pianomation Accessories
Catalog #
Price
Description
71398
Remote control
$53.00
Self-Powered Speaker
USE: This speaker mounts under
the piano and amplifies the
orchestrated music.
Mounting Bracket included.
$350.00
Orchestrated Cable Pack
USE: This pack is used for
home hookups. It allows the
customer to select between
audio CDs and QRS CDs on
their stereo amplifier.
70046
$450.00
Piano / Audio Mixer
USE: Mixes the background music
with the piano (with Barcus Berry).
The output of the mixer is then sent
to a sound system.
Grand Stop Rail
The Grand piano stop rail is a
physical device that blocks the
hammers from striking the strings.
Use: In conjunction with the Petine’s
sound module and headphones so
that you can practice without
disturbing others.
Wireless Transmitter/Receiver
USE: This unit is used for home
hookups using the customer’s CD
player to send the signal to either the
piano or the powered speaker.
One PG14 Shure 50101 unit is
needed for each channel used.
Smart Switch
USE: This device will automatically
switch from several different sources
(i.e., CD player, VCR, PC). Will also
switch between audio CDs and
Pianomation CDs.
PC/Windows MIDI Interface USE:
Connects to the USB of a PC and
provides MIDI IN and MIDI OUT
capabilities.
70530
$150.00
56022
70133
$560.00
78000
$320.00
50123
$220.00
M U S I C
$20.00
$6.00
6ft
70131
$6.00
12ft
70134
$6.00
20ft
70135
$6.00
Audio cables Twin Male RCA
to RCA
USE: For connecting CD,
Video & DVD Players to QRS
Player System. This is for
both left and right channels.
70209
$6.00
Audio Cable Splitter 1 Male to
2 Females: USE: For splitting
the outputs of CD, Video &
DVD players.
70213
Mini Stereo cable to Left &
Right Male RCA USE: Plugs
into a portable CD player and
splits the cable into left & right
male RCA connectors.
70367
$240.00
Shure
50101
70207
Audio Cables Male to Male RCA
USE: For connecting CD, Video & DVD
Players to the QRS Player System.
3ft
Barcus Berry Piano Transducer
USE: Picks up and amplifies the
soundboard vibrations so that the
piano can be heard through a
speaker system.
Q R S
76040
Catalog #
Price
Description
RCA Barrel Connector
USE: Joins 2 male audio
cables together.
$6.00
$8.00
70166
$6.00
MIDI Barrel Connector
USE: Joins 2 MIDI cables
together. This pack is used
for home hookups. It allows
the customer to select
between audio CDs and QRS
CDs on their stereo amplifier.
70158
$6.00
MIDI Cables
USE: Generally used to connect PCs/
Floppy disk players to QRS Player
System or Directly to the Pianomation
MIDI Processor.
1ft
3ft
5ft
10ft
20ft
100ft
T E C H N O L O G I E S ,
www.qrsmusic.com
70150
70151
70371
70152
70153
70155
$17.50
$17.50
$17.50
$23.40
$28.80
$72.00
I N C .
PAGE 45
Petine
V58.1
General MIDI Sound List
This is the list of voices available from the optional soundcard. The soundcard is used when playing MIDI files, written with
orchestration, from a CompactFlash card or CDROM.
These voices can also be triggered from the optional record system.
General MIDI Sounds
Patch
Nam e
Patch
Name
Patch
Nam e
Patch
Nam e
1 Acoustic Grand Piano
33 Acoustic Bass
65 Soprano Sax
97 FX 1 (rain)
2 Bright Acoustic Piano
34 Electric Bass (finger)
66 Alto Sax
98 FX 2 (soundtrack)
3 Electric Grand Piano
35 Electric Bass (pick)
67 Tenor Sax
99 FX 3 (crystal)
4 Honky-tonk Piano
36 Fretless Bass
68 Baritone Sax
100 FX 4 (atmosphere)
5 Electric Piano 1
37 Slap Bass 1
69 Oboe
101 FX 5 (brightness)
6 Electric Piano 2
38 Slap Bass 2
70 English Horn
102 FX 6 (goblins)
7 Harpsichord
39 Synth Bass 1
71 Bassoon
103 FX 7 (echoes)
8 Clavi
40 Synth Bass 2
72 Clarinet
104 FX 8 (sci-fi)
41 Violin
73 Piccolo
105 Sitar
10 Glockenspiel
9 Celesta
42 Viola
74 Flute
106 Banjo
11 Music Box
43 Cello
75 Recorder
107 Shamisen
12 Vibraphone
44 Contrabass
76 Pan Flute
108 Koto
13 Marimba
45 Tremolo Strings
77 Blow n Bottle
109 Kalimba
14 Xylophone
46 Pizzicato Strings
78 Shakuhachi
110 Bag pipe
15 Tubular Bells
47 Orchestral Harp
79 Whistle
111 Fiddle
16 Dulcimer
48 Timpani
80 Ocarina
112 Shanai
17 Draw bar Organ
49 String Ensemble 1
81 Lead 1 (square)
113 Tinkle Bell
18 Percussive Organ
50 String Ensemble 2
82 Lead 2 (saw tooth)
114 Agogo
19 Rock Organ
51 SynthStrings 1
83 Lead 3 (calliope)
115 Steel Drums
20 Church Organ
52 SynthStrings 2
84 Lead 4 (chiff)
116 Woodblock
21 Reed Organ
53 Choir Aahs
85 Lead 5 (charang)
117 Taiko Drum
22 Accordion
54 Voice Oohs
86 Lead 6 (voice)
118 Melodic Tom
23 Harmonica
55 Synth Voice
87 Lead 7 (fifths)
(
119 Synth Drum
24 Tango Accordion
56 Orchestra Hit
88 lead)
120 Reverse Cymbal
25 Acoustic Guitar (nylon)
57 Trumpet
89 Pad 1 (new age)
121 Guitar Fret Noise
26 Acoustic Guitar (steel)
58 Trombone
90 Pad 2 (w arm)
122 Breath Noise
27 Electric Guitar (jazz)
59 Tuba
91 Pad 3 (polysynth)
123 Seashore
28 Electric Guitar (clean)
60 Muted Trumpet
92 Pad 4 (choir)
124 Bird Tw eet
29 Electric Guitar (muted)
61 French Horn
93 Pad 5 (bow ed)
125 Telephone Ring
30 Overdriven Guitar
62 Brass Section
94 Pad 6 (metallic)
126 Helicopter
31 Distortion Guitar
63 SynthBrass 1
95 Pad 7 (halo)
127 Applause
32 Guitar harmonics
64 SynthBrass 2
96 Pad 8 (sw eep)
128 Gunshot
PAGE 46
Q R S
M U S I C
T E C H N O L O G I E S ,
I N C .
QRS Music Technologies, Inc.
For Technical Support Call 1-800-247-6557