1
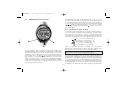
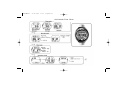
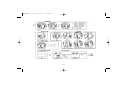
Cressi Copertina2
28-09-2005
14:25
Pagina 1
Manuale d’istruzioni
Notice d’instructions
Gebrauchsanweisung
Manual de instrucciones
User’s Manual
27-09-2005
16:17
Pagina 127
User’s Manual
ENGLISH
ARCHIMEDE 1
27-09-2005
16:17
Pagina 129
TABLE OF CONTENTS
3.6.
- PO2 Alarms (
) . . . . . . . . . . . . . . . . . . . . . . . . . .pag. 145
4. - ON SURFACE AFTER DIVE . . . . . . . . . . . . . . . . .pag. 146
4.1. - Data Management . . . . . . . . . . . . . . . . . . . . . . . . . .pag. 147
4.1.1. - Surface Interval Time ( SURF.T, DESAT,
) . . . . . . . .pag. 147
4.1.2. - Dive Logbook (
) . . . . . . . . . . . . . . . . . . . . . . . .pag. 147
4.1.3. - Dive History (
) . . . . . . . . . . . . . . . . . . . . . . . . . .pag. 149
4.1.4. - Dive profile (
) . . . . . . . . . . . . . . . . . . . . . . . . . . .pag. 149
4.1.5. - Data transfer to PC:
PC-Interface compatible (
) . . . . . . . . . . . . . . . .pag. 150
4.1.6. - Dive Computer Reset . . . . . . . . . . . . . . . . . . . . . . . .pag. 150
4.2. - Simulator . . . . . . . . . . . . . . . . . . . . . . . . . . . . . . . . . . .pag. 151
4.2.1. - Dive Simulator (
) . . . . . . . . . . . . . . . . . . . . . . .pag. 151
4.2.2. - Dive Simulator with Surface
Interval Time (
) . . . . . . . . . . . . . . . . . . . . . . . . .pag. 151
1. - INTRODUCTION . . . . . . . . . . . . . . . . . . . . . . . . . . . . .pag. 130
1.1.
- Main features . . . . . . . . . . . . . . . . . . . . . . . . . . . . . . .pag. 130
1.2. - Safety rules . . . . . . . . . . . . . . . . . . . . . . . . . . . . . . . .pag. 130
1.2.1. - Definition of Danger, Important, and Note . . . . . .pag. 130
1.2.2. - General Warning and Safety Rules.pag. . . . . . . . .pag. 130
1.3. - Introduction . . . . . . . . . . . . . . . . . . . . . . . . . . . . . . . .pag. 132
2. - BEFORE DIVE . . . . . . . . . . . . . . . . . . . . . . . . . . . . . . .pag. 133
2.1. - UFDS Display and Controls . . . . . . . . . . . . . . . . . . .pag. 134
2.2. - On Surface, before Dive . . . . . . . . . . . . . . . . . . . . . .pag. 134
2.3. - Parameter Setting . . . . . . . . . . . . . . . . . . . . . . . . . . .pag. 135
2.3.1. - Dive Parameter Setting (
) . . . . . . . . . . . . . . . .pag. 135
2.3.2. - Max Depth Alarm . . . . . . . . . . . . . . . . . . . . . . . . . . .pag. 136
2.3.3. - Time and Date Adjustment (
) . . . . . . . . . . . . .pag. 136
2.3.4. - Unit of Measure Setting . . . . . . . . . . . . . . . . . . . . . .pag. 137
2.4. - Dive Planning (
) . . . . . . . . . . . . . . . . . . . . . . .pag. 137
2.5. - Quick Display of Set Data (
) . . . . . . . . . . . . .pag. 137
5. - CARE AND MAINTENANCE . . . . . . . . . . . . . . . . .pag. 152
5.1. - Battery Replacement . . . . . . . . . . . . . . . . . . . . . . . . . .pag. 152
6. - TECHNICAL FEATURES . . . . . . . . . . . . . . . . . . . . .pag. 153
6.1. - No decompression limits
for the first dive in a series . . . . . . . . . . . . . . . . . . . . .pag. 154
6.1.1.- Non Decompression tables
for the first dive in a series. . . . . . . . . . . . . . . . . . . . . .pag. 154
3. - DURING DIVE . . . . . . . . . . . . . . . . . . . . . . . . . .pag. 138
3.1. - DIVE WITH AIR (
) . . . . . . . . . . . . . . . . . . . . . . .pag. 139
3.1.1. - No Decompression Dive . . . . . . . . . . . . . . . . . . . . .pag. 139
3.1.2. - Ascent Rate (
) . . . . . . . . . . . . . . . . . . . . . . . . .pag. 139
3.1.3. - Safety Stop (
) . . . . . . . . . . . . . . . . . . . . . . . . .pag. 140
3.2. - Decompression Warning Alarm (
) . . . . . . . . .pag. 140
3.2.1. - Decompression Dive (
) . . . . . . . . . . . . . . . . .pag. 140
3.2.2. - Violated Decompression Stop Alarm . . . . . . . . . .pag. 141
3.3. - DIVE WITH NITROX ( Nitrox ) . . . . . . . . . . . . . . . .pag. 142
3.3.1. - Before a Nitrox Dive . . . . . . . . . . . . . . . . . . . . . . . . .pag. 142
3.4. - Nitrox Parameter Setting: . . . . . . . . . . . . . . . . . . . .pag. 142
3.4.1. - Partial Pressure Setting PO2 (
) . . . . . . . . . . . .pag. 142
3.4.2. - Oxygen Fraction Setting FO2 (
) in Nitrox . . .pag. 143
3.5. - CNS Toxicity Display (
) . . . . . . . . . . . . . . . . . . .pag. 144
7. - WARRANTY . . . . . . . . . . . . . . . . . . . . . . . . . . . . . . . . .pag. 155
129
ENGLISH
ARCHIMEDE 1
ARCHIMEDE 1
27-09-2005
16:17
Pagina 130
1. - INTRODUCTION.
1.2. - SAFETY RULES.
Congratulations on your purchase of an Archimede Cressisub dive computer. It is a sophisticated and comprehensive
device designed to offer you utmost safety, efficiency, and
reliability over time.
1.2.1. - Definition of Danger, Important, and Note.
This manual highlights certain points of particular importance.
Before reading these instructions, it is essential to properly
understand the following definitions:
1.1. - Main Features.
DANGER: means a situation of serious danger or even
possible death for the diver.
• Full dive data processor (also applicable
decompression status, if any)
• Battery replacement by the user
• UFDS display for understanding and easy
reading of displayed data;
• Full Nitrox capabilities
• Total Reset Function of Nitrox parameters (FO2 and PO2)
with PO2 setting capability from 1.0 bar to 1.6 bar
• Nitrox dive possibility after dive with air (even with
desaturation under way);
• Manual Planning (Scrolling);
• Unit of measure can be changed by the user
from Metric (m-°C) to Imperial System (ft-°F)
• Audible and visual alarms
• Nitrogen saturation graph
• CNS oxygen toxicity graph
• Enhanced display back light
• Dive simulator (with Surface Interval Time setting
for following dive)
• Built-in calendar clock
• Full dive profile logbook (30hr )
• Dive History
• Total Reset Function.
• PC interface (optional).
IMPORTANT: means a situation that may become dangerous for the diver or that can damage the equipment.
NOTE: means important information is being provided .
1.2.2. - General Warning and Safety Rules.
IMPORTANT: Read these instructions! Carefully read this
User’s Manual, including the section on safety rules. Be
sure that you have fully understood the use, functions, and
limits of your dive computer before using it!
DANGER: No dive computer can guarantee full protection against Decompression Sickness (DCS). You need to
understand that there is no procedure in place nor dive
computer that fully eliminates the risk of DCS. No dive computer can determine parameters, such as physiological variations between individuals, which are also subject to daily
changes. It is advisable to consult a doctor and check your
physical condition before every dive. You should also
remember that several factors may affect susceptibility to
decompression sickness, such as exposure to cold (less
than 50 °F temperature), physical fitness below the norm,
repetitive dives in the same day or in consecutive days, diver
130
27-09-2005
16:17
Pagina 131
fatigue, and dehydration. All these conditions and all those
that can jeopardize your safety should be avoided.
IMPORTANT: The use of this dive computer is strictly personal. The information it provides exclusively refers to the
diver who has used it during the single or repetitive dives.
IMPORTANT: this device should be used by certified
divers only. No dive computer can actually replace proper
training. Do remember that dive safety can be ensured by
proper training only.
DANGER: Cressi-sub advises you against using this
dive computer for decompression dives. However, should
you exceed the safety curve limits, Archimede CressiSub dive computer can supply you with all the information
you need for decompression, ascent, as well as proper
surface interval time.
IMPORTANT: The Archimede Cressi-sub dive computer
has been designed for recreational diving and not for professional applications requiring prolonged immersion time
with subsequently increased DCS risk.
DANGER: Never dive with a Nitrox cylinder without
having personally checked its content and the proper O2
percentage. You should then input this value in the computer. Remember that the dive computer does not accept
FO2 decimal figures. Always round down the figure
(example 35.8% must be rounded down to 35%).
IMPORTANT: check your dive computer before use, by
checking battery power and that all LCD segments are
properly displayed. DO NOT dive, if the dive computer
instructions are unclear and, above all, if the low battery
icon is displayed.
DANGER: for safety reasons, in your Archimede dive
computer, PO2 default value is set at 1.4 bar also for dives
with air. If you need to further raise the safety margin, PO2
can be set at lower values, down to 1.0 bar, with 0.1bar
decreases at a time.
IMPORTANT: for your dive, you also need a depth
gauge, a pressure gauge, a timer or a clock, and decompression tables. Always check that the cylinder pressure is
appropriate for the planned dive and, during the dive, use
the pressure gauge to regularly check the amount of air
remaining in your cylinders.
DANGER: : avoid all high risk profile dives, such as the
so called “yo-yo” dives, reversed profile dives, or repetitive
dives in the same day or in consecutive days. They are
potentially risky and involve a high risk of DCS!
DANGER: Never start your altitude dive, before the
dive computer has automatically set the proper program
for altitude calculation. Check the altitude level on the display. Remember that in case of dives at more than 9843 ft
above sea level, the risk of DCS is significantly higher.
IMPORTANT: Turn on the safety factor whenever you
realize that there are factors likely to increase your DCS
risk. You will thus perform a more conservative dive.
DANGER: Before any flight travel, wait for the “No Fly
Time” Icon to disappear from the dive computer display.
NOTE: When flying, it is recommended to keep the dive
computer with you in the pressurized cabin.
131
ENGLISH
ARCHIMEDE 1
ARCHIMEDE 1
27-09-2005
16:17
Pagina 132
Cressi-sub reminds you that sport dives must always be kept
within the safety limits and at maximum 131 ft depth, which is
the standard maximum depth for recreational diving: if you
exceed these limits, you significantly increase your DCS risk.
It is extremely important that you carefully read and understand this User’s Manual. Otherwise,decompression sickness or death may occur. Therefore, the goal is to guide you
to fully understand all the computer functions before you dive
with it.
1.3. - Introduction.
The time and date function of the Archimede Cressi-sub dive
computer (fig. 1) is always on, with very little battery consumption.
The Archimede Cressi-sub dive computer is a multifunctional
computer for recreational diving, providing you with information on depth, dive times, the need for decompression, if any,
as well as on nitrogen absorption and elimination during all
dive phases, including ascent, surface interval times, and
subsequent dives.
All the various functions are easily turned on with the M
(Mode), A and B buttons. As we will see below, they also turn
on when the contacts get wet during a dive. The dive program is turned on at a depth greater than 5ft. All the functions
are clearly illustrated by the figures on the large display.
All this information is displayed on the large UFDS (acronym
for User Friendly Display System) display, allowing for a simple
and direct ‘dialogue’ between the diver and the computer,
and ensuring a clear understanding of what is being done
and easy reading of displayed information.
This User’s Manual has been divided into 5 main topics, for a
better understanding of all dive computer functions and their
meaning:
•
•
•
•
•
The dive computer features a calendar clock, a versatile
memory of past dives, as well as a powerful dive simulator.
A mathematical model is also included, for use with air and
Nitrox. In this latter case, you can set all parameters required
for a Nitrox dive, from FO2 oxygen percentage, to the maximum allowable PO2 value (from 1.0 bar to 1.6 bar).
1) 2) 3) 4) 5) -
Introduction and Safety Rules;
Before Dive;
During Dive;
On surface, after Dive;
Care and Maintenance.
They deal with all the different dive stages. You will also find
out how easy it is to use and interpret Archimede: each display screen displays only the data your are interested in,
which refers to that particular situation.
The dive computer can also be set by the user by adjusting
the unit of measure with either metric (m -°C) or Imperial system (ft -°F).
Also, the Archimede Cressi-sub dive computer can be connected with a compatible personal computer through the
Cressi-sub Interface (optional) and related software (optional).
132
ARCHIMEDE 1
27-09-2005
16:17
Pagina 133
Photo Ghisotti
ENGLISH
2) Before dive
ARCHIMEDE 1
27-09-2005
16:17
Pagina 134
2.1. - UFDS Display and Controls.
By repeatedly pressing the M (Mode) button, you can scroll
through all Archimede’s programs, and clearly display them
on the alphanumeric UFDS display. Some of the programs
also have sub-menus that can be accessed with the A and B
( , , i ) buttons. With these buttons you can also change
surface data settings and with the B ( ) button, you turn on
the display light.
2.2. - On Surface, prior to Dive.
As already mentioned, the dive computer is always ready for
use. It is however important that altitude be correctly set by
the computer. This function is done automatically by the
computer, which updates atmospheric pressure values every
10 minutes and displays the various altitude levels as follows:
no (
A
B
M
) icon - from 0 to 2624 ft (fig. 1);
- from 2624 to 5249 ft (fig. 1 - a);
- from 5249 to 7544 ft (fig. 1 - b);
- from 7544 to 19680 ft (fig. 1 - c);
- above 19680 ft—out of range.
Each icon indicates that the computer has automatically
adjusted its mathematical model to the new altitude, thus
providing shorter curve times with increasing altitude.
The Archimede dive computer is fitted with UFDS (User
Friendly Display System) display ‘accompanying’ the diver during every operation. Icons on the display advises you various
operations you are allowed to perform at that particular time.
For example, the icon “light”( ) on the bottom right of the display, advises you that by pressing the B button, you turn on the
display back light, and so on. In this way, a straightforward ‘dialogue’ is in place allowing for an easy understanding of all dive
computer functions.Each icon indicates the function you want
to enter at that particular time.
DANGER: For dives at an altitude of more than 9843 ft
above sea level, DCS risk is significantly higher.
You should remember that if you travel to higher altitudes, the
nitrogen balance between your body and the environment can
be altered. It is advisable that after your arrival to higher altitudes
you wait at least three hours before diving, thus allowing for partial nitrogen elimination from your body. Atmospheric pressure
at higher altitudes is lower than at sea level. When going to higher altitudes, the diver will have extra nitrogen in his/her body
134
27-09-2005
16:17
Pagina 135
than the balanced condition he/she had at the original altitude.
This extra nitrogen is gradually eliminated and the balance
resumed after a couple of days.
where :
• PO2 is the maximum partial oxygen pressure. It can be set
by the diver with values from 1.0 bar to 1.6 bar (both values
included), with changes of 0.1 bar, whenever you press the
B ( ). button;
At this point you need to carry out a general check to see
that:
• the low battery voltage indicator is not on or blinking (fig. 2);
NOTE: When you change the max PO2 value setting (fig.
3), the computer tells you the maximum depth you can
reach with Nitrox (MAX).
• the dive computer works and all the LCD segments on the
display are visible.
IMPORTANT: PO2 default setting by the manufacturer is
1.4 bar for both dives with air and Nitrox. In this way, a safe
dive is ensured in compliance with most recently recommended parameters for recreational dives. However, you
can also change the PO2 as indicated in Chapter 3.4.1.
The new setting will be kept until the next reset by the
diver.
IMPORTANT: if the battery symbol is displayed (fig. 2),
the computer MUST NOT be used. If you see the same
symbol while diving, you have to stop and ascend to the
surface. The battery must be changed by the user, as indicated in the relevant chapter (Chapter 5.1.) .
2.3. - PARAMETER SETTING.
2.3.1. - Dive Parameter Setting (
• FO2 is the oxygen percentage present in your Nitrox supply.
).
In order to set the parameters of your dive, simply press the
central M (Mode) button repeatedly, until you see the (
)
icon on the UFDS display, as indicated in Figure 3 (max PO2
value setting is blinking). In order to change dive parameters
keep to the following procedure:
NOTE: by keeping the B ( ) button pressed, the dive
computer will automatically stop on the standard Nitrox 1
(EAN1 32) setting - which corresponds to 32% of O2 in the
Nitrox supply - or on the (
)setting. Obviously, any other
FO2 value from 21% to 50 % can also be set, with 1%
increases at a time.
By pressing the button A ( i ) button, you select, in the following order, dive parameters for:
NOTE: when changing the oxygen percentage in your
Nitrox supply, the dive computer also tells you the maximum depth that you can reach with that specific supply
(MAX).
• Safety factor (0/1) A safety
135
factor is provided;
ENGLISH
ARCHIMEDE 1
ARCHIMEDE 1
27-09-2005
16:17
Pagina 136
Once you get to the Max Depth (fig. 4 a) screen, press the
A ( i ) button and select either the ON or OFF function with
the B (
) button. If you select ON, you can set the maximum depth in advance from 0 ft to 325ft, using the A and
B ( i and ) buttons.
IMPORTANT: Turn on the safety factor whenever you
realize that there are factors likely to increase your DCS
risk. You will thus perform a more conservative dive.
• Max Depth is the maximum depth alarm (fig. 4 a-b) as we
will see in the next paragraph.
Press the M (Mode) button to go back to the main screen
(fig. 1).
Press the M (Mode) button to go back to the main screen
(fig. 1).Related topics:
Related topics:
Related topics:
• 2.3.2. - Max Depth Alarm
• 3.1. - DIVE WITH AIR.
• 3.3. - DIVE WITH NITROX.
• 2.3.1. - Dive Parameter Setting.
2.3.3. - Time and Date Adjustment (
).
In order to adjust the time and date you have to press the M
(Mode) button repeatedly until you see the (
) icon on the
UFDS display. At this point the display of seconds is blinking
(fig. 5).
2.3.2. - Max Depth Alarm.
The Archimede dive computer is fitted with a maximum
depth alarm set by the manufacturer (fig. 4a) and activated
when the diver reaches a depth of 131 ft, which is the limit for
recreational diving. At this point, an audible alarm and a 3 second blinking of the display warns you that the set depth has
been reached.
Keep the A ( i ) button pressed in order to adjust (fig. 5):
1)seconds;2) minutes,3) hours, 4) 12/24h; and (fig. 6): 5)
year;6) month;7) day. Press the A ( i ) button, until the function you want to change begins to blink on the display and
change it by pressing the B ( ) button.
You can always turn it off or change the default value by
keeping to the following procedure:
Press the M (Mode) button to go back to the main screen
(fig. 1).
Keep the A ( i ) button pressed and you will highlight the following dive parameters for:
NOTE: always check the right setting of the time and
date, in order to have proper records in the computer logbook.
Related topics:
• 4.1.2. - Dive Logbook.
136
27-09-2005
16:17
Pagina 137
2.3.4. - Unit of Measure Setting.
Related topics:
The Archimede Cressi-sub dive computer can calculate and
give you the values in metric units (depth values expressed in
meters and temperature expressed in °C), or in Imperial units
(depth in feet and temperature in °F).
• 3.1.1. - No Decompression Dive.
• 4.1.1. - Surface Interval Time.
If you want to change the unit of measure, press the M
(Mode) button to access the (
) screen (fig. 3).Then press
the A+B buttons simultaneously and keep them pressed for
about 15 seconds. At this point the new unit of measure that
you have just set will be displayed.
With the INFO ( ) icon on the UFDS display of Archimede
Cressi-sub dive computer, when on the surface, you can display all set parameters for your dive in a quick and easy way
(fig. 8). By pressing the A ( ) button, your dive computer will
display the maximum PO2 value and the corresponding maximum depth (expressed either in m or ft); the safety factor, if
any has been set, (SF0/1); the Nitrox percentage and the
corresponding ( Nitrox ) icon or the (
) icon if you are going
to take a dive with air.
2.5. - Quick Display of set data (
Press the M (Mode) button to go back to the main screen
(fig. 1).
2.4. - Dive Planning (
).
).
Related topics:
On surface, you can enter the (
) function, to get a
quick idea of the diving time allowed at the various depths,
using the set Nitrox supply and without having to stop for
decompression. In the case of repeated dives, residual
nitrogen levels are considered, therefore lower time values
are set. By pressing the M (Mode) button twice, you enter
the (
) function, as indicated on the alphanumeric display. The screen will show (fig. 7, air; fig.7.1., Nitrox, both with
desaturation under way) the safety curve (no decompression) limits displayed for the various depths, starting from
30ft, with manual depth increases of 10ft each, every time
you press the B. ( )button, or with manual depth decreases of 10ft each, every time you press the A ( ) button.
• 3.1.
• 3.3.
Press the M (Mode) button to go back to the main screen
(fig. 1).
137
- DIVE WITH AIR
- DIVE WITH NITROX.
ENGLISH
ARCHIMEDE 1
ARCHIMEDE 1
27-09-2005
16:17
Pagina 138
3) During dive
Photo Olmi
27-09-2005
16:17
Pagina 139
3.1. - DIVE WITH AIR.
The UFDS display shows (
).
Related topics:
The “Dive” program is automatically turned on by the Archimede
dive computer at a depth of more than 5ft. During a no-decompression dive, the following information is displayed (fig. 9):
2 elapsed dive time, indicated with “DIVE T”
•
•
•
•
3 maximum depth expressed in meters (m) or in feet (ft)
3.1.1. - No Decompression Dive.
1 present depth, in meters (m) or in feet (ft);
represented by the “MAX” icon;
2.3.
3.1.2.
3.5.
3.6.
-
Parameter Setting.
Ascent Rate.
CNS Toxicity Display.
PO2 Alarms.
3.1.2. - Ascent Rate.
4 no-decompression time still available, indicated by “NDL”
The algorithm used in the Archimede Cressi-sub dive computer uses different ascent rates depending on the depth.
The ascent rate is shown on the display by a segmented indicator located on the display bottom right (fig. 9). The indicator works according to the following table:
(No Decompression Limit);
5 ascent rate indicator in segments;
6 bar graph showing the amount of nitrogen absorbed
during the dive;
Depth
7 pixel graph display showing CNS O2 Toxicity
0ft
(see chapter. 3.5.);
8 Automatic altitude indicator;
19,7ft
9 Nitrox dive indicator, if available;
59ft
10 ( ) and ( ) icons, or “Info” (button A) and display light (button B).During the dive, if you keep the A ( ) button pressed,
you can also get the following important information (fig. 10 ):
No segment
19.3ft 0.0 ft
12.8 f/min
58.7ft 0.0 ft
19.3 ft/min
5ft 0.0 m
25.9 ft/min
1 segment
- 13.1 ft/min
19.3 ft/min
- 19.7 ft/min
25.9 ft/min
- 26.2 ft/min
36 ft/min
2 segments
- 19.7 ft/min
25.9 ft/min
- 26.2 ft/min
39 ft/min
- 39.4 ft/min
52.1 ft/min
3 segments
- 26.2 ft/min
(
)
- 39.4 ft/min
(
)
- 52.4 ft/min
(
)
If, during the ascent, you exceed the maximum allowed
speed, you will see three full segments on the display, you
will hear an audible alarm and, at the same time, the blinking
(
) icon will be displayed (fig. 11), and the segment indicator with the ascent rate will also be blinking.
1 present PO2;
2 safety factor, if any has been set;
3 current temperature, expressed in °C or °F;
Under these conditions, you must stop your ascent until the
word (
) disappears and the display is back to normal
status.
4 the (
) icon if you are taking a dive with air (or the FO2%
percentage in your Nitrox) .
139
ENGLISH
ARCHIMEDE 1
ARCHIMEDE 1
27-09-2005
16:17
Pagina 140
DANGER: when you ascend too fast, the risk of accident increases! Cressi-sub recommends to have a 3-5
min. safety stop at 10ft-20ft, at the end of every dive, which
will be assisted by your dive computer (see chapter 3.1.3.)
Related topics:
• 2.3.4. - Unit of Measure Setting.
• 3.1.2. - Ascent Rate.
3.2. - Decompression Warning Alarm.
IMPORTANT: Never dive after a surface interval time
during which the (
) word was displayed! Computation
for the following dive may be invalidated by excessive
ascent rate during the previous dive.
Whenever the no decompression limit indicated on the display by the NDL icon reaches 3 minutes (fig. 13), Archimede
will warn you with an audible alarm while the display will be
blinking for 6 seconds (three of which with flashing light). This
is to warn you that you have exceeded the safety curve and
that you are entering a decompression dive.
Related topics:
• 3.1.3. - Safety Stop.
• 4.1.2. - Dive Logbook.
3.1.3. - Safety Stop (
Related topics:
).
• 3.2.1. - Decompression Dive.
Archimede is programmed to automatically warn the diver
about the need for a safety stop, whenever diving below 30ft,
as also recommended by the most recent studies on diving
physiology. This stop shall be made at a depth from 20 to 10ft,
for the time indicated by the dive computer.
3.2.1. - Decompression Dive (
).
DANGER: Never use this dive computer for dives outside the safety limit! Cressi-sub advises you not to use this
dive computer for decompression dives.
Should you exceed the safety limits during your dive, your
Archimede Cressi-sub dive computer can give you all
decompression information required for a correct ascent and
related decompression stops. If you exceed the safety curve,
an audible alarm will be released for 3 seconds, and the
screen on the display will change to look as indicated in
Figure 14. The following information will be provided to the
diver:
NOTA: Cressi-sub recommends to have a 3-5 min. safety stop at 10-20 ft at every dive.
The safety stop is indicated on the UFDS display with the
(
) icon (fig. 12). The display here clearly indicates the time
required for the stop in minutes and the depth expressed
either in m or in ft.
Although not compulsory, safety stops are strongly recommended, especially when the maximum ascent rate has
been repeatedly violated. At this point, Archimede requires a
particularly long safety stop, which Cressi-sub advises you to
fully comply with, in order to avoid safety risks.
1
140
The (
) icon on the UFDS display will be replacing the
“NDL” one, which advises that you have exceeded the
safety limits and you now have to stop for decompression;
27-09-2005
16:17
Pagina 141
2 Depth of the first decompression stop, indicated in
meters (m) or in feet (ft); it may range from 100ft to a minimum of 10ft, with decreases of 10ft at a time;
case, stop time will be automatically adjusted by your
Archimede dive computer.
Related topics:
3 Duration of first decompression stop (the one deepest
down) in minutes;
•
•
•
•
•
•
•
4 “TOTAL” icon indicating total ascent time, namely the
time necessary to ascend up to the first decompression
stop in compliance with the ascent rate (calculated at
26.2ft/min), PLUS the time you need to stop at that
depth, and at the other subsequent depths, if any, PLUS
the time necessary to reach the surface after desaturation completion;
2.3.4. 3.1. 3.3. 3.1.2. 3.5. 3.6. 4.1.2. -
Unit of Measure Setting.
DIVE WITH AIR.
DIVE WITH NITROX.
Ascent Rate.
CNS Toxicity Display.
PO2 Alarms.
Dive Logbook.
3.2.2. - Violated Decompression Stop Alarm.
If a the decompression stop is “violated”, and you have
ascended to a depth that exceeds the decompression stop
indicated in the dive computer, an audible alarm will be
released and at the same time the display will start to blink
until you go back to the ceiling depth or even below (fig. 15).
5 “DIVE. T” icon, indicating total dive time.
6 Bar graph showing the amount of nitrogen absorbed during the dive. In this case it will be fully illuminated until the
next “DECO” icon.
DANGER: Never ascend beyond the decompression
stop depth.
You have 3 minutes to correct this dangerous situation. After
this time, Archimede will automatically enter the “Error” program and the icon ( ) (fig. 16) will be displayed. You will not be
able to use the dive computer for the next 48 hours.
In order to avoid this situation, during decompression, always
stay at a depth slightly below the recommended decompression stop depth.
(at least not as a dive computer, but only as a depth gauge or
dive-timer).
Please remember that under these conditions, the amount of
air you need to complete your dive increases.
DANGER: under these conditions, you cannot dive
again during the following 48 hours.
In rough sea conditions, it may be difficult to keep to the recommended decompression stop without violating it. Cressisub therefore recommends to take your last stop - the one
closest to the sea surface - at approximately 12 - 15ft, even if
this will imply a slightly longer decompression stop. In any
Carefully monitor yourself for the onset of any DCC related
symptoms, by contacting DAN and a hyperbaric center and
giving them as much information as possible about your dive.
141
ENGLISH
ARCHIMEDE 1
ARCHIMEDE 1
27-09-2005
16:17
Pagina 142
Related topics:
•
•
•
•
•
•
3.1.
3.3.
3.2.1.
3.5.
3.6.
4.1.2.
-
Related topics:
DIVE WITH AIR.
DIVE WITH NITROX.
Decompression Dive.
CNS Toxicity Display.
PO2 Alarms.
Dive Logbook.
•
•
•
•
•
2.3.1.
2.5.
3.4.
3.5.
3.6.
-
Dive Parameter Setting
Quick Display of Set Data.
Nitrox Parameter Setting.
CNS Toxicity Display.
PO2 Alarms.
3.3. - DIVE WITH NITROX .
3.4. - Nitrox Parameter Setting.
3.3.1. - Prior to a Nitrox Dive.
3.4.1. - Partial Pressure Setting (PO2).
DANGER: this dive computer can be used for Nitrox
dives only by divers who have completed a full training
course on Nitrox diving.
Archimede comes with a default PO2 value of 1.4 bar, for
both dives with Nitrox and with air. This ensures max safety
for every type of dive.
The Archimede Cressi-sub dive computer can be used for
dives with air, as indicated on the UFDS display with the word
(
) (fig. 3), as well as for dives with Nitrox (EAN=Enriched Air
Nitrox). In this second case, the icon ( Nitrox ) will be displayed (fig. 10), which will remain visible throughout your dive
and until the parameters for Nitrox dive are set.
However, you can change the PO2 setting to values ranging
from 1.0 bar to 1.6 bar. If you need to raise the safety margin
of your dive, you can set PO2 at lower values up to a minimum of 1.0 bar. In paragraph 2.3.1 we have already seen how
you can select the various values. Simply press the central
M(Mode) button until the (
) screen is displayed as illustrated in figure 3 and you can then change the parameters
according to the following procedure:
IMPORTANT: the computer, when used for AIR dives
(
) will keep this setting until it is reset by the diver for use
in dives with Nitrox (chapter 2.3.1. - Dive Parameter Setting)
by pressing the A ( i ) button, you select the dive parameters
in the following order for::
DANGER: Do not make any dive with a Nitrox cylinder
without having personally checked its oxygen content !!
IMPORTANT: Before every dive, always check the oxygen percentage set in your dive computer. You can do so
while still on the surface by pressing the A ( ) button, in
order to get a quick look at the previously set parameters.
142
27-09-2005
16:17
Pagina 143
NOTE: by keeping the B (
) button pressed, the dive
computer will automatically stop on the standard Nitrox 1
percentage (EAN32), or on the (
) setting.
where PO2 stands for maximum partial Oxygen pressure
which, as we have already seen, can be set by the diver to
values ranging from 1.0 bar to 1.6 bar, with 0.1 bar increases/decreases at a time by pressing the B ( ) button.
NOTE: when the oxygen percentage is changed, the dive
computer also tells you the maximum depth you can
reach with your Nitrox supply (MAX).
By pressing the A ( i ) button, you confirm the selected setting.
Press the M (Mode) to go back to the main screen (fig. 1).
Press the B (
) button, to manually set other oxygen fractions different from the standard one. With Archimede you can
set O2 fractions ranging from 21% (
) to 50 %, with
increases of 1% at a time.
Finally, press the A ( i ) button to confirm the oxygen fraction
you want to set which will be displayed on the screen.
Press the M (Mode) button to go back to the main screen (fig.1).
IMPORTANT: the PO2 setting is kept until it is manually
reset by the diver on other values.
Related topics:
• 2.3.1. - Dive Parameter Setting.
• 3.5. - CNS Toxicity Display.
• 3.6. - PO2 Alarms.
NOTE: you can also change the Nitrox setting even during surface interval time (with desaturation under way).
3.4.2. - Oxygen Fraction Setting (FO2) in Nitrox.
IMPORTANT: Before every dive, always check the FO2
setting in your dive computer!
This is a very important feature, specially for those who take
repeated dives in a day (e.g. instructors). You can change
your Nitrox supply, after a first dive with air, without having to
wait for desaturation to be completed.
In order to set the exact Oxygen fraction contained in your
Nitrox, press the M (Mode) button until the (
) screen is
displayed, as indicated in figure 3. At this point, parameters
can be changed according to the following procedure:
by pressing the A ( i ) button, you select the dive parameters in the following order for:
It is important that you follow and understand the following:
1
the Oxygen fraction setting is stored for the first 10 minutes of surface interval time from the end of the dive. Any
other dive within this interval will be interpreted by the
computer as a continuation of the previous dive, thus
assumed to be using the same cylinder and hence the
same Nitrox supply.
NOTE: FO2 CANNOT be changed within the first 10
minutes of surface interval from the end of the dive.
where FO2 is the oxygen percentage of our Nitrox supply.
143
ENGLISH
ARCHIMEDE 1
ARCHIMEDE 1
27-09-2005
16:17
Pagina 144
Within the first 10 minutes of surface interval, you cannot
enter the (
) screen to change the parameter settings,
hence you cannot change the previously set oxygen fraction
3.5. - CNS Toxicity Display
The Archimede Cressi Sub dive computer gives you a graphic display of the degree of Central Nervous System oxygen
poisoning, which is linked to Partial Oxygen Pressure as well
as to the diver’s exposure time to high Partial Oxygen
Pressure (PO2). Figure 19 shows the column formed by 8 pixels on the UFDS display indicating the accumulated oxygen
amount. When all eight pixels are illuminated on the display, it
means that the maximum admissible CNS tolerance has
been reached and that you are in serious danger of oxygen
poisoning (hyperoxia).
2 After a 10 minute surface interval, the computer resets
the FO2 fraction at a safety value of 99%, until the diver
resets the correct fraction value for the new Nitrox supply.
“--” will be displayed as in (fig. 17). Obviously, the new
Nitrox supply will have to be checked by the diver before
setting the proper Oxygen fraction in the dive computer.
This situation is indicated on the UFDS display by the ( Nitrox )
icon, which blinks on the main screen in order to draw your
attention to the need to reset the parameters before diving.
This is a very simple procedure, as previously explained in
Chapter 2.3.
It is important that constant monitoring of this information is
extremely important. Being a function of Partial Oxygen
Pressure and of exposure time, it requires constantly monitored when diving.
If you happen to forget to reset the new FO2 value, owing to
the automatic reset at 99%, when reaching a depth of just
12ft (with 1.4 P02), the PO2 alarm will warn you accordingly
(fig. 18). The diver could then return to the surface and reset
the correct value. Conversely, if he/she decides to continue
the dive, a second PO2 alarm will be released at 1.6 bar (e.g.
at 19.7ft).
In order to lower the risk of hyperoxia, Archimede considers
all relevant data keeping into account the time and intensity
of exposure to oxygen. When the oxygen level reaches
threshold values, close to maximum admissible toxicity (e.g.
when 7 out of 8 pixels are illuminated), the graph bar begins
to blink and an audible alarm will be released for 15 seconds,
thus warning the diver about the high risk of CNS intoxication
(70% alarm).
3 Should you set the FO2 value and then take no dive computer will store this value until midnight of the same day,
and will then reset the default value (F02=99%).
When also the 8th pixel is turned on, a second (100%) audible
alarm will be triggered and the graph bar will start to blink until
you start your ascent in order to reduce Partial Oxygen
Pressure. The graph bar will stop blinking only when the 8th pixel
turns off. The alarm will in any case be recorded in the Logbook.
Related topics:
•
•
•
•
2.3.1.
3.5.
3.6.
4.1.1.
-
Dive Parameter Setting.
CNS Toxicity Display.
PO2 Alarms.
Surface Interval Time.
NOTA: Exposure calculation result is rounded to the higher percentage value.
144
ARCHIMEDE 1
27-09-2005
16:17
Pagina 145
Related topics:
•
•
•
•
•
•
3.1. 3.3. 3.4.1. 3.4.2. 3.6. 4.1.2. -
2
DIVE WITH AIR.
DIVE WITH NITROX.
Partial Pressure Setting (PO2) page.
Oxygen Fraction Setting FO2.
PO2 Alarms.
Dive Logbook.
A second alarm will sound in any case whenever a depth
corresponding to a PO2 value of 1.6 bar is reached. The
display will blink for 15 seconds until you ascend above
the depth limit again.
Both alarms will be recorded in the Logbook.
Related topics:
•
•
•
•
3.6. - PO2 Alarm.
The Archimede Cressi-sub dive computer is capable of monitoring another fundamental Oxygen parameter: e.g. O2
Partial Oxygen Pressure (PO2).). As we have already seen,
this parameter can easily be set by the diver (Chapter3.4.1.)
with values ranging between 1.0 and 1.6 bar. The maximum
admissible Partial Oxygen Pressure is assumed to be 1.6 bar.
Depending on the type of Nytrox supply employed, it will
automatically tell you what is the maximum depth reachable.
You should never forget that even when diving with air, you
can get intoxicated with oxygen. This limit changes depending on PO2 setting. Archimede’s default value is 1.4 bar, corresponding to a max depth with air of 183.6ft. Obviously,
other PO2 values can be set, up to a maximum of 1.6 bar.
3.1.
3.3.
3.4.1.
4.1.2.
-
DIVE WITH AIR.
DIVE WITH NITROX.
Partial Pressure Setting PO2.
Dive Logbook.
1
As soon as you reach the maximum depth limit corresponding to the set PO2 value ( from 1.0 bar to 1.6 bar), an
audible alarm will be sent off for 15 seconds and the
(
) icon (fig. 20) will start to blink, while the reached limit
for the PO2 setting will be blinking on the top left of the
display.
145
ENGLISH
Therefore, there are two types of PO2 alarms with your
Archimede dive computer:
ARCHIMEDE 1
27-09-2005
16:17
Pagina 146
4) On surface after dive
Photo Ghisotti
27-09-2005
16:17
Pagina 147
4.1. - Data Management.
and dive time calculation will be resumed from where they
have last stopped.
This chapter deals with “surface” functions, namely data
management after a dive. By repeatedly pressing the M
(Mode) button , you can enter the following functions: (
)
- Dive Logbook (chapter 4.1.2.); (
) - Dive History (chapter 4.1.3.); (
)- Dive Profile (chapter 4.1.4.); Data transfer
to PC with interface (optional) (chapter 4.1.5.).
NOTE: Dives taken after more than 10 minutes are considered as subsequent dives.
By pressing the M (Mode) button twice, you enter the dive
planning program that has already been described in Chapter
2.4 and represented by the (
) icon on the UFDS display
(fig. 22). It takes account of tissue nitrogen left following the
previous dives, thus changing no-compression times which
will obviously be shorter than for the first dive.
4.1.1. - Surface Interval Time.
When you ascend back to less than 5ft depth, the UFDS display gives the following information (fig. 21):
Once saturation time has elapsed, the bar representing residual absorbed nitrogen (fig. 23) will be blank, meaning that all
the nitrogen has been eliminated and this factor is no longer
affecting subsequent dives.
1
Desaturation time, expressed in hours and minutes, and
indicated by the ( DESAT ) icon;
2 “Don’t Fly” ( ) icon.
Related topics:
When displayed, you should not fly or go to any altitude higher
than the diving site until this icon disappears from the screen.
• 2.4.
• 3.1.
• 3.3.
IMPORTANT: DAN (Divers Alert Network) and UHMS
(Undersea and Hyperbaric Medical Society), before any flight
after a no-decompression dive, recommend a 12 to 24 hour
surface interval time, and a 48 hour interval after a decompression dive or several particularly demanding dives;
- Dive Planning.
- DIVE WITH AIR.
- DIVE WITH NITROX.
4.1.2. - Dive Logbook (
).
3 surface interval time, expressed in hours and minutes, indicating the current surface interval time and shown with the
( SURF.T ) icon;
The Archimede Cressi-sub dive computer stores the last 30
hours of diving (or the last 60 dives). Data are recorded in the
Logbook every 30 seconds. You can turn on the Logbook
while on surface by pressing the M (Mode) button repeatedly until the (
) icon is displayed (fig. 24).
4 bar graph representing residual tissue nitrogen after the
just ended dive;
NOTE: Dives shorter than the recording time interval (30
seconds) will not be recorded.
NOTE: if you start a new dive after less than 10 minutes surface interval, the Archimede dive computer interpret this new
dive as the continuation of the previous one: dive number,
Archimede’s Logbook is an exceptional tool allowing you to
view data from past dives, listed in a chronological order
starting from the most recent dive.
147
ENGLISH
ARCHIMEDE 1
ARCHIMEDE 1
27-09-2005
16:17
Pagina 148
(
On the main display screen (fig. 24), UFDS display indicates that
the (
) function is on, displaying the following information:
1
PO2
)(PO2 alarm); (
SLOW
) (maximum ascent rate alarm) etc.
In order to display the second Logbook screen, simply press
the button corresponding to the ( ) icon on the UFDS display. The (
) icon, which represents the first screen, is
replaced by the dive number followed by the “2/3” digit,
which means that you are looking at the second of the three
Logbook screens. The following data are displayed in this
second screen (fig. 25):
year of dive;
2 Dive date (month and day) - in brackets the number of
dive in a daily series of repeated dives;
NOTE: the first dive in a daily series is indicated in brackets
with 1 (meaning dive 1), the second one with 2 (dive 2), and
so on.
3 Maximum depth reached during the dive, expressed in m
or in ft;
1
Time of dive start, namely the time when the dive computer was brought below 5ft, thus turning on the “DIVE”
function;
4 Dive number: data on the latest dive are first
indicated.After the first 60 dives, the oldest ones are progressively erased;
2 Time of dive end, namely the time when the dive computer was brought above 5ft, thus turning on the ( SURF.T )
function;
5 Bar graph indicating residual nitrogen in the diver’s tissues
at the end of the dive: if this value falls within the “green”
area, it means that a no decompression dive was performed (within the safety curve). Conversely, if the graph
falls into the “red” band, it means that a decompression
dive was performed (outside the safety curve);
3 Average dive depth (AVE) in m or in ft;
4 Total dive time in minutes and indicated with the”DIVE T.”
icon.
To go back to the first screen (1/3), press the A button corresponding to the ( ) icon, whereas to move on to the third
Logbook screen, just press the B button correponding to the
( ) button of the UFDS display. The dive number followed by
(2/3) representing the second screen is then replaced by the
dive number followed by “3/3” representing the third of the
three Logbook screens. The following data are displayed in
this third screen (fig. 26):
6 Altitude at which the dive was undertaken (see chapter
2.2.);
7 An icon with the word ( Nitrox ) on it is displayed if you have
performed a Nitrox dive;
8 Graph indicating CNS toxicity level at the end of the dive
(see chapter.3.5.).
1
In all the three screens, icons will also be displayed of the
alarms, if any, that have been set off during your dive, such as:
148
type of air/Nitrox supply used during the dive: if it is a dive
with air, the word (
) will be displayed; if you are using
Nitrox, the Oxygen fraction employed will be shown;
27-09-2005
16:17
Pagina 149
2 Water temperature recorded during the dive at maximum
depth and expressed in °C or in °F.
3 total number of previous dives indicated with the “DIVE”
icon.
3 Surface interval time expressed in hours and minutes;
The (
) function can store information up to 599 dives.
After this total number of dives, the counter will be reset to
zero. This default value can be changed with a proper interface software program (optional).
4 Use of any safety factor.
To recall previous dives recorded in the Logbook, press the
B. (
) button: you will immediately enter the first Logbook
screen referred to the immediately preceding dive.
Related topics:
•
•
•
•
Similarly, by pressing the A ( ) button, you enter the first
Logbook screen with data on the first next dive.
Related topics:
•
•
•
•
•
•
•
•
•
2.3.1. - Dive Parameter Setting.
2.3.3. - Time and Date Adjustment.
2.3.4. - Unit of Measure Setting.
3.1. - DIVE WITH AIR.
3.1.2. - Ascent Rate.
3.3. - DIVE WITH NITROX.
3.5. - CNS Toxicity Display.
3.6. - PO2 Alarms.
v4.1.1. - Surface Interval Time.
4.1.3. - Dive History (
NOTE: All icons of any alarm that may have been set off
during your dive will also be displayed, such as:
( PO2 ) (PO2 alarm); ( SLOW ) (ascent rate alarm) etc.
total diving time, in hours;
during
previous
).
You can display a detailed profile of the dives stored in the
Logbook by pressing the M (Mode) button, repeatedly until
the (
) icon is displayed on the UFDS display (fig. 28). This
screen automatically shows you all information about depth,
time and date of the latest dive stored in the computer
Logbook. A full, point by point, dive profile reconstruction is
possible even without the appropriate (optional) interface. You
can automatically scroll through the whole dive profile.
Between one piece of data and the next there is a 30 second
interval. In order to read the dive profile of the immediately preceding dive, just press the B ( ) button, whereas to read the
profile of the very next dive press the A ( ) button.
).
2 maximum depth reached
(expressed in m or in ft);
Unit of Measure Setting.
DIVE WITH AIR.
DIVE WITH NITROX.
Data transfer to PC: PC-Interface compatible.
4.1.4. - Dive profile (
Archimede Cressi-sub dive computer also offers a dive history (
) function. To enter this function, press the M (Mode)
repeatedly until the (
) icon is displayed on the UFDS display (fig. 27). The following information will be displayed:
1
2.3.4. 3.1. 3.3. 4.1.5. -
dives
149
ENGLISH
ARCHIMEDE 1
ARCHIMEDE 1
27-09-2005
16:17
Pagina 150
Related topics:
•
•
•
•
•
•
4.1.6. - Dive Computer Reset.
2.3.3. - Time and Date Adjustment.
2.3.4. - Unit of Measure Setting.
3.1. - DIVE WITH AIR.
3.3. - DIVE WITH NITROX.
4.1.2. - Dive Logbook.
4.1.5. - Data transfer to PC: PC-Interface compatible
4.1.5. - Data transfer to PC: PC-Interface compatible (
You can fully reset your dive computer, by pressing the small
button with the “RESET” word on it (fig. 30) at the back of the
dive computer with a pointed tool. In this way, you have
erased all data about nitrogen absorption, and time/date
from the computer memory.
).
The Archimede Cressi-sub dive computer can be connected
with an compatible personal computer through the Cressi
interface (optional) and related software (also optional). With
this interface, all data can thus be transferred from the dive
computer to the PC, by connecting the interface with the
computer and following the sotware instructions for data
unloading. In order to do so, first enter the “PC” program of
your dive computer, by pressing the M (Mode) button, repeatedly until the ( ) icon is displayed (fig. 29).
fig. 30
If you follow the instructions, it is quite easy to unload your
dive profile and then have it reproduced, printed or changed
with the appropriate interface (optional). The latter can also
be used for training purposes, with the use of the dive simulator contained in the PC interface software (optional).
IMPORTANT: with the reset function, you erase all calculations about current desaturation!! Never reset your dive
computer if it has to be used underwater to calculate subsequent dives!
Related topics:
NOTE: Logbook, dive profile and history are stored also
after computer reset.
• 4.1.2. - Dive Logbook.
• 4.1.3. - Dive History.
• 4.1.4. - Dive profile.
All default values set by the manufacturer will in this case be
resumed (e.g. FO2=21% and PO2=1.4 bar).
This can also be a particularly useful function when the dive
computer is rented out by Diving Centers.
150
27-09-2005
16:17
Pagina 151
NOTE: Simulation speed is 6 times higher than in real life.
In other words, 10 seconds in simulation mode correspond to 1 min. in a real life dive, with depth variations of
0.65ft at a time.
Related topics:
•
•
•
•
•
•
2.3. - Parameter Setting.
2.3.3. - Time and Date Adjustment.
4.1.1. - Surface Interval Time.
4.1.2. - Dive Logbook.
4.1.3. - Dive History.
4.1.4. - Dive profile.
Related topics:
•
•
•
•
•
•
•
•
•
•
4.2. - Simulator.
4.2.1. - Dive Simulator (
)
Archimede Cressi-sub dive computer is equipped with a dive
simulation (
), program which is useful in order to become
familiar with all dive computer functions. With the simulation
program, you can plan different dives; it is also highly useful for
training.
2.3. - Parameter Setting.
2.4. - Dive Planning.
3.1. - DIVE WITH AIR.
3.1.1. - No Decompression Dive.
3.2.1. - Decompression Dive.
3.3. - DIVE WITH NITROX.
3.5. - CNS Toxicity Display.
3.6. - PO2 Alarms.
4.1.1. - Surface Interval Time.
4.2.2. - Dive Simulator with Surface Interval Time.
4.2.2. - Dive Simulator with Surface Interval Time.
You enter the program by pressing the M (Mode) button,
repeatedly until the (
) icon is displayed on the UFDS display (fig. 31).With this program, you can simulate a multilevel
dive by pressing the B ( ) button to increase depth, or the A
( ) button to ascend. In this way, you can have a real time
check of what is displayed under different diving conditions,
including all audible and visual alarms. When the simulated dive
is over, the dive computer will provide you with information
about surface interval and desaturation time and you can then
conduct a simulation of the next dive. By pressing the B ( )
button, you enter the simulation screen for the next dive, with
desaturation under way.
If the dive computer is still recording some residual nitrogen, or
if you are still within desaturation time, Archimede will allow you
to change the surface time interval in order to simulate another dive. As already described in the previous chapter, you
enter the simulation program by pressing the M (Mode) button, repeatedly until the (
) icon is displayed on the UFDS
display (fig. 32): in this case however the icon will be different
from the previous one, because the dive computer before
starting simulation asks you to set a new surface interval time,
by using the icons of the UFDS display: by pressing the B ( )
button, you increase the surface interval time, whereas with
the A ( i - Enter) button, you confirm the selected value. After
this reset, Archimede automatically enters the simulation
screen again (fig. 31), as described in the previous chapter. In
this way we can simulate the next dive.
NOTE: Simulation is conducted with dive parameters set
in the (
) function (see chapter 2.3.).
151
ENGLISH
ARCHIMEDE 1
ARCHIMEDE 1
27-09-2005
16:17
Pagina 152
NOTE: Visually check the battery housing through its
look-through cover. If you detect some signs of humidity
inside, have the computer checked by a Service Center
authorized by Cressi-sub.
Related topics:
•
•
•
•
•
•
•
•
•
•
2.3. - Parameter Setting.
2.4. - Dive Planning
3.1. - DIVE WITH AIR.
3.1.1. - No Decompression Dive.
3.2.1. - Decompression Dive.
3.3. - DIVE WITH NITROX.
3.5. - CNS Toxicity Display.
3.6. - PO2 Alarms.
4.1.1. - Surface Interval Time.
4.2.1. - Dive Simulator.
In case of operation failure, do not use the computer during
your dive and contact a Service Center authorized by Cressisub to fix it.
Related topics:
• 5.1. - Battery Replacement.
• 7
- Warranty.
5. - CARE AND MAINTENANCE.
5.1. - Battery Replacement.
The Archimede Cressi-sub dive computer is constructed to
withstand the most demanding diving conditions. It is, however, a high precision tool, which requires proper care. You
should avoid violent impacts, keep the device away from
heat and humidity, avoid storing it when still wet, avoid
impacts and contact with heavy equipment such as cylinders.
Battery replacement is a very easy operation that can be
done by the user, since it requires no particular skills to perform it. The battery must be replaced whenever the low
power battery symbol (fixed or blinking) is displayed, as
already described above in this manual (fig. 2).
IMPORTANT: When you replace the battery, all data
regarding desaturation, time and date will be lost. Reset
the time and date again to have the right data stored in the
computer Logbook. Never replace the battery when
desaturation is under way, since all data for desaturation
calculation would be lost. If necessary, take note of the
desaturation hours indicated in the computer and, after
battery replacement, do not take more dives for the same
time interval. After battery replacement, all default settings
by the manufacturer will be resumed (for example
F02=21% and PO2=1.4 bar)
IMPORTANT: Your dive computer should not come in
contact with solvents or any type of chemical substances;
do not use compressed air to dry the dive computer; do
not use in hyperbaric chambers if the device is not fully
submerged.
NOTE: Always rinse the computer with freshwater after
use
The computer buttons need no special care; never lubricate
them with oil or any type of spray substances.
In order to replace the battery, remove its look-through cover,
unscrewing it, with the aid of a coin, in the direction indicated
152
ARCHIMEDE 1
27-09-2005
16:17
Pagina 153
by the arrows (fig. 33). Remove the cover and examine the
battery and battery housing status: if you see signs of corrosion due to water infiltration, contact an Authorized Cressi-sub
Service Center to check the computer.
NOTE: Screw the battery cover back in place, Do not
over tighten! Excessive tightening could break the cover
or make it difficult to open again.
NOTE: Check that the dive computer is properly watertight! The battery has a look-through cover so that you can
easily check for any water leakage into the battery housing.
If everything appears OK, simply remove the battery, keeping
the computer downward, thus allowing the battery to slide
out of its housing. When placing the new battery, check that
the polarity is right (if improperly placed, all calibration and
memory data may be lost!). Also replace the OR of the battery housing closing cap. (fig. 34). The battery housing is
watertight and does not communicate with the core of the
device. However, before closing the cover again, check that
there is no dirt in the housing and place a thin layer of silicone
grease along the OR seal of the battery cover (fig. 35 a-b).
IMPORTANT: warranty does not cover computer failures
or leakages due to inadequate battery replacement.
Related topics:
• 5 - Care and Maintenance.
• 7 - Warranty.
6. - TECHNICAL FEATURES.
Algorithm: Buhlmann ZH-L16;
Sample tissues: 9;
Tissue half-lives: from 5 to 640 minutes;
fig. 33
fig. 34
fig. 35 a
fig. 35 b
Depth sensor:
- Sea water calibration (in fresh water indicated depths are
about 3% lower);
- Measuring range: 0-325ft, measured every second
- Accuracy: +/- 3%+1.64ft;
- Measuring range: 0-325ft;
- Resolution:0.328ft;
- Surface interval time: from 0 to 48 hrs;
- Altitude function monitoring: from 0 to 19680ft,
measured every 10 minutes;
- Diving time: from 0 to 599min
153
ENGLISH
Size and weight:
Diameter: 62 mm - Height: 24 mm - Weight: 115 g
ARCHIMEDE 1
27-09-2005
16:17
Pagina 154
THERMOMETER:
- Resolution: 3.38°F;
- Measuring range: 23 °F-104 °F;
- Accuracy: +/- 35.6 °F.
6.1.1. - Non Decompression tables for the first dive
in a series.
Depth
(m)
CLOCK:
Accuracy:+/- 30 sec on average per month;
24 hour display.
Depth
(ft)
AIR
EAN1 (32%) EAN2 (36%)
(PO2=1.4bar) (PO2=1.4bar)
9
30
200
200
200
12
40
104
200
200
15
50
66
117
182
6.1. - DECOMPRESSION TABLES.
18
60
47
74
92
At the end of every dive, the computer continues to calculate
the safety curve data for the next dive. This is possible
because nitrogen absorption and elimination in “sample” tissues, taken as reference, are constantly recorded by the dive
computer. Nitrogen absorption and elimination rate, referred
to as “tissue half-lives” - namely the time required to reach
50% saturation in any tissue - differs in each of these tissues.
The Archimede Cressi-sub dive computer uses 9 sample tissues, on which the mathematical model is applied during all
dive phases, on surface and during the next dive.
21
70
35
55
65
24
80
25
41
50
27
90
19
32
38
30
100
16
24
--
33
110
13
19
--
36
120
11
--
--
39
130
9
--
--
42
140
8
--
--
45
150
7
--
--
48
160
7
--
--
BATTERY:
Li/MnO2 CR 2032 3V button battery; average battery life 3
years (50 dives/year).
154
ARCHIMEDE 1
27-09-2005
16:17
Pagina 155
7. - WARRANTY.
The manufacturer guarantees Archimede Cressi-sub dive
computer to be free from defects in materials and workmanship for a period of one year from the date in which it was first
purchased.
Damage deriving from improper use of the dive computer,
failure to comply with maintenance provisions, negligence or
adjustments/repairs carried out by service personnel not duly
authorized by the manufacturer shall NOT be covered by the
guarantee. Also, failure to properly carry out preventative
maintenance as recommended in this manual shall cause the
guarantee to automatically expire.
The guarantee cannot be transferred by the initial owner of
the dive computer to third parties. The guarantee period
begins on the date of purchase (as indicated in the invoice or
purchase receipt).
All repair works not covered by this guarantee shall be at the
expense of the owner of the dive computer.
The guarantee does not cover any document or other guarantee issued by the retailer or by agents beyond the terms
covered by the guarantee.
In case of a claim, send the product, shipping paid, to your
Cressi-sub retailer or to an authorized Service Centre. Write
down your full name, address, and enclose the purchase
receipt or invoice.
Always keep this user’s manual with your Archimede dive
computer.
155
ENGLISH
No retailer or agent shall be authorized to change this guarantee or to provide for an additional one.
ARCHIMEDE 1
27-09-2005
16:17
Pagina 158
Archimede Flow Chart
158
ARCHIMEDE 1
27-09-2005
16:17
Pagina 159
159
Fig. 1
4
Fig. 1.a
1
5
2
Fig. 1.b
Fig. 2
Fig. 1.c
6
1
3
7
2
6
7
4
1
3
Fig. 5
Fig. 6
Fig. 7
3
2
Fig. 7.1
Fig. 8
Fig. 15
Fig. 16
10
9
8
Fig. 4.b
Fig. 4a
Fig. 3
2
4
3
5
Fig. 9
Fig. 10
Fig. 11
Fig. 17
Fig. 18
Fig. 19
Fig. 22
Fig. 23
5
4
6
Fig. 12
Fig. 13
1
Fig. 14
3
1
4
2
Fig. 21
Fig. 20
1
2
8
5
1
7
4
Fig. 24
Fig. 25
Fig. 28
Fig. 29
1
1
3
2
2
3
6
3
4
4
3
2
Fig. 26
Fig. 31
Fig. 27
Fig. 32
Cressi Copertina2
28-09-2005
14:25
Pagina 1
Manuale d’istruzioni
Notice d’instructions
Gebrauchsanweisung
Manual de instrucciones
User’s Manual