1
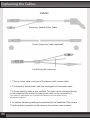
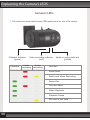
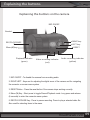
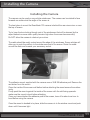
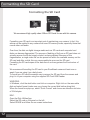
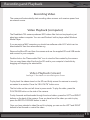
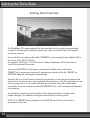
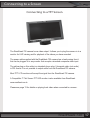
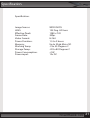
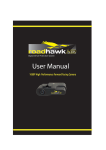
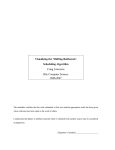
720
DIGITAL DRIVER PROTECTION CAMERA
MIC ON/OFF
Bracket
Forward key
REC
Backward key
Menu key
RESET
Playback indicator
Video recording indicator
Audio recording indicator
(green)
(red)
(yellow)
720p in-car black box camera system
USER MANUAL
Contents
Contents
Contents . . . . . . . . . . . . . . . . . . . . . . . . . . . . . . . . . 02
Introduction . . . . . . . . . . . . . . . . . . . . . . . . . . . . . . . 03
Features . . . . . . . . . . . . . . . . . . . . . . . . . . . . . . . . . 04
In the Box . . . . . . . . . . . . . . . . . . . . . . . . . . . . . . . . 04
Warning . . . . . . . . . . . . . . . . . . . . . . . . . . . . . . . . . 05
Explaining the Cables. . . . . . . . . . . . . . . . . . . . . . . . 06
Explaining the LEDs on the camera . . . . . . . . . . . . . 08
Explaining the buttons on the camera . . . . . . . . . . . . . . . . . 09
Installing the SD Card . . . . . . . . . . . . . . . . . . . . . . . 10
Installing the camera. . . . . . . . . . . . . . . . . . . 11
Formatting the SD Card. . . . . . . . . . . . . . . . . . . . . . . . 12
Video playback . . . . . . . . . . . . . . . . . . . . . . . . . . . . 13
Setting the Time/Date . . . . . . . . . . . . . . . . . . . . . . 14
Using the on screen menu . . . . . . . . . . . . . . . . . . . . 15
Connecting to on screen . . . . . . . . . . . . . . . . . . . . 17
Notes . . . . . . . . . . . . . . . . . . . . . . . . . . 18
Warranty . . . . . . . . . . . . . . . . . . . . 19
Camera Specification. . . . . . . . . . . . . . . . . . . . . . . . . . 21
02
Introduction
Introduction
Thank you for purchasing the RoadHawk 720 In-Car Camera system.
This camera has been designed to record your journey capturing both video and
audio that can be used as evidence in the event of a road traffic accident.
The RoadHawk 720 is a windscreen mounted camera system that records on a
constant loop in 5 minute segments. At the end of each 5 minute file, the camera saves
the file to the SD card and starts to record the next file without any gap in between.
Once the SD card is full, the camera will start to erase the earliest files and continue to
record new files. It will do this until the camera is powered down.
The RoadHawk 720 uses around 4gb of memory for every hour of video recorded
and so the 8GB card supplied will always hold approximately the last 2 hours of your
journey. The camera is compatible with MicroSD cards up to 32gb (min Class 4) for
holding more video. We recommend high quality, branded Class 6 cards for optimum
stability of the system.
Because the camera records on a constant LOOP, it is not necessary to keep
deleting your video files from the memory card. It is recommended though that you
regularly format the SD card to keep it in good condition.
A guide to formatting your SD card can be found on page 12.
The camera is designed to work automatically. As soon as it receives power from an
external power source it will turn on and start recording. Once the power is removed,
the camera will stop recording and turn off. This allows the user to connect the camera
either to a vehicle’s accessory socket or an ignition LIVE 12-24v supply and the
camera will act as a black box when you start the vehicle.
For hardwiring the RoadHawk 720 camera to your vehicle’s electrical system, a
hardwiring kit is available. Please consult a professional auto electrician to have this
work carried out.
www.roadhawk.co.uk
RoadHawk 720 03
Features / Box Contents
Features
●
●
●
●
●
●
●
●
●
●
●
●
720p High definition video and audio
Wide angled 135 degree lens
Windscreen Mountable
Loop recording
Time/Date Stamp
Auto-Record
Internal RTC (real time clock)
External Power Input
Accessory socket Supplied
8GB MicroSD Card Supplied
12v to 24v Hard Wiring Kit (optional)
Extension Cable (optional)
Box Contents
●
●
●
●
●
●
04
RoadHawk 720 Camera
8GB MicroSD Card and adapter
Camera Window Mount
Camera Cable
Car Power Supply
User Manual
WARNING
WARNING
The RoadHawk 720 camera always records video on a constant loop. It records video
and audio in 5 minute segments. When the SD card becomes FULL the camera will
start to record over the earliest files. If you are involved in an accident or you capture
some footage that you want to keep then you must be prepared to turn the camera
OFF by unplugging its power supply.
Failing to do this will result in the camera eventually overwriting the video you want to
keep. It is a good idea to carry spare SD memory cards with you for such an occasion.
The 8GB Micro SD card supplied with this camera will typically hold around 2 hours of
video before it starts to loop.
Formatting the SD Card: Although the camera will record on a constant loop, we
recommend formatting the SD card from time to time depending on how much you use
the camera. For instance; if you use the camera for 3 hours a day then you should aim
to format the SD card on a weekly basis. Formatting the SD card will wipe everything
from the card. It is important to do this to ensure the file system does not become too
fragmented. A guide on how to format your SD card can be found on page 12
NOTE: Never insert or remove an SD card whilst the camera is powered up. Always
remove the power from the camera and wait for the camera to fully shut down first.
RoadHawk 720 05
Explaining the Cables
Cables
Accessory Socket Power Cable
Power Extension Cable (optional)
Hard Wiring Kit (optional)
1. There is a short cable coming out of the camera itself. (camera cable)
2. The Accessory socket power cable can be plugged in to the camera cable.
3. A Power extension cable is also available. This cable can be connected directly
to the camera and the accessory socket power cable can be connected to it.
This extension cable allows you to position the camera in the rear window facing
backwards if required.
4. An optional hardwiring cable can be purchased for the RoadHawk 720p camera.
This allows direct connection of the camera to the vehicle’s power systems.
06
Explaining the Cables
Explaining the Cables
The RoadHawk 720 camera can be powered from your car’s accessory socket using
the supplied cable or can be hardwired in to the vehicle’s ignition circuit using the
optional hard wiring kit. You should make sure this connection is only LIVE when the
keys are in the ignition. Please avoid connecting the RoadHawk 720 to a permanent
live power source.
Powering From Accessory Socket
1: Connect the power cable to the camera cable (short cable attached to the camera)
Plug the camera in to the car’s accessory socket.
Powering from hardwiring kit
1: Connect the hard wiring cable (optional) to the short camera cable and connect to an
ignition LIVE circuit. Must be 24v maximum.
The hard wiring cable is a fused, bare wire harness for connecting the camera in to any
12v supply. Use this configuration to hard wire the camera to a vehicle’s 12v power
supply. Ensure you use the correct polarity before making the connection. The wire
with the fuse should be connected to igniton LIVE.
When using the hard wiring kit you should connect it to the ignition LIVE rather than a
permanent LIVE. This way the camera will only turn on and start recording when you
turn the vehicle’s ignition on. If you connect it to a permanent LIVE then the camera will
be running 24/7. This will draw power from your vehicle’s battery, reduce the life
expectancy of your SD card and will increase the risk of the camera erasing footage
you might want to keep.
RoadHawk 720 07
Explaining the Camera’s LEDS
Camera’s LEDs
1. The camera has three small coloured LEDs positioned at the rear of the camera.
Playback indicator
Video recording indicator
Audio recording indicator
(green)
(red)
(yellow)
Playback
Video
recording
Audio
recording
Function
Mute Audio
Audio and Video Recording
Pause Rec
Corrupt Video
Video Playback
Playback Pause
SD card is not valid
08
Explaining the buttons
Explaining the buttons on the camera
MIC ON/OFF
Bracket
RIGHT key
REC/PLAY/PAUSE
LEFT key
Menu(M)key
RESET
Playback indicator
Video recording indicator
Audio recording indicator
(green)
(red)
(yellow)
1. MIC ON/OFF - To disable the camera from recording audio.
2. RIGHT/LEFT - Keys are for adjusting the digital zoom of the camera and for navigating
the camera’s on screen menu system.
3. RESET Button - Press the reset button if the camera stops working correctly.
4. Menu (M) Key - Short press to toggle Record/Playback mode. Long press and release
(6 seconds) to enter the camera’s menu system.
5. REC/PLAY/PAUSE Key - Press to pause recording. Press to play a selected video file.
Also used for selecting items in the menu.
RoadHawk 720 09
Installing the SD Card
Installing the SD Card
1. Insert the Micro SD card with the text on the card facing DOWN and the electrical contacts
facing upwards and inwards.
2. Do not force the Micro SD card in to place. Gently push it with your finger nail.
3. Push the Micro SD card in to the camera until it clicks in to position.
4. The Micro SD card will be flush with the camera when it is fully inserted.
5. The Micro SD card will not protrude from the rear of the camera when fully inserted.
6. Never insert or remove the SD card when the camera is powered on.
10
Installing the Camera
Installing the Camera
The camera can be used on any vehicle windscreen. The camera can be rotated to face
forwards no matter what the angle of the screen is.
The best place to mount the RoadHawk 720 camera is behind the rear view mirror or near
the top of screen.
Try to have the lens looking through part of the windscreen that will be cleaned by the
wiper blades to ensure video quality remains high when the screen becomes dirty.
Do NOT allow the camera to obstruct your vision.
The cable should be neatly routed around the edge of the windcreen. Some vehicles will
allow you to push the cable in to the rubber surround of the screen. Route the cable
around the dash and towards your accessory socket.
The adhesive mount supplied with the camera uses a VHB 3M adhesive pad. Remove the
red sticker from this mount.
Clean the inside of the screen well before before attaching the mount ensure the surface
is dry.
Firmly push the mount against the inside of the screen with the slot facing upwards.
make sure the mount is level before attaching.
Once you have attached the adhesive pad to the screen, leave it for about one hour to
bond before using the camera.
Once the mount is bonded in to place, slide the camera in to the window mount and push
down until it becomes tight.
RoadHawk 720 11
Formatting the SD Card
Formatting the SD Card
We recommend high quality class 6 Micro SD Cards for use with this camera.
Formatting your SD card is an important part of maintaining your camera. In fact, this
advice can be applied to any camera that uses SD memory cards, especially those that
record video and audio.
Over time, the data on digital storage media such as SD cards and computer hard
disks can become fragmented. The process of deleting a file from an SD card does not
actually remove the file but simply marks it as being deleted. Because of this
fragmentation, a single video file can be spread out within the available memory on the
SD card and after a while this can cause read/write errors on the SD card.
Formatting the SD card wipes all the data from it and reorganises the file structure of
the card.
We recommend formatting the SD card in your RoadHawk camera at least once a
week if you are using it on a daily basis.
To format your SD card the easiest way is remove the SD card from the camera and
plug it in to your computer using the supplied SD Card USB Reader.
WINDOWS:
In Windows, click the start button and click on computer. Right click on the removable
disk and select format (make sure you choose the correct disk before doing this)
When the format box pops up, select “Quick Format” and choose an allocation unit size
of 32 kilobytes.
MAC:
Open the Disk Utilities App.
Select the SD card on the panel on the left.
Select ERASE and follow the on screen instructions.
12
Recording and Playback
Recording Video
The camera will automatically start recording video as soon as it receives power from
an external source.
Video Playback (computer)
The RoadHawk 720 camera produces .MP4 videos files that can be played on just
about any modern computer. You can use Windows’ built-in player called Windows
Media Player.
If you are using a MAC computer you should use software called VLC which can be
downloaded for free from www.videolan.org.
Remove the MicroSD card from the camera and use the supplied SD card USB reader
and connect to your computer.
Double click on the “Removeable DIsk” icon to view the files created by the camera.
You can copy these video files from the SD card to your computer’s hard disk by
dragging and dropping the selected file.
Video Playback (screen)
See Page 17 for details on connecting to a screen
To play back the videos stored on the SD card firstly ensure the camera is correctly
connected to a monitor. Press the YELLOW “M” button once.
The first video on the card will show in pause mode. To play the video, press the
PLAY/PAUSE button on the side of the camera.
To skip forwards and backwards through the stored videos, press the LEFT and RIGHT
buttons on the back of the camera. Once you have found the video you wish to play
press the REC/PLAY/PAUSE button to view it.
Once you have selected a video file and it is playing you can use the LEFT and RIGHT
buttons to fast forward or rewind the video.
RoadHawk 720 13
Setting the Time/Date
Setting the Time/Date
The RoadHawk 720 camera embeds the time and date on to any video being recorded.
In order to set the time and date you need to put a file on to the SD card so the camera
can be set correctly.
You can do this by creating a file called “TIMESET.txt” and putting this text inside the file in
this format: 2012-09-27 13:50:00
For example: 2012-09-27 13:50:00 is the 27nd day of September 2012 at the time of
1pm 50 minutes and 00 seconds.
You can use NOTEPAD on Windows to make this file. Make sure to call the file
TIMESET.txt (in more recent versions of windows you should call the file TIMESET as
NOTEPAD adds the .txt extension automatically)
Once this file is on the SD card and you turn the camera on it will read the file and set the
internal clock. As soon as you have created this file and put it on the SD card make sure you
turn the camera on so it can read the file and set it’s internal clock with as little delay
as possible. Once the camera has read the TIMESET.txt file, it will be deleted automatically
by the camera.
It is possible to also set the time and date of the camera using the on-screen menu.
Please see page 15 for details on using the camera’s built-in menu system.
NOTE: The TIMESET.txt file should go on a BLANK SD card. Do not put the file in
any folders on the card.
14
Using the Menu
Using the MENU
The RoadHawk 720 camera has a built-in menu system. To access this menu
the camera is required to be plugged in to a suitable monitor. (See Page 17)
PLEASE NOTE: It is not necessary to access the camera’s menu in order for the camera
to operate. The standard factory settings of the camera will allow you to make full use of
the system without having to access the on-screen display menu.
To access the MENU. Press and hold the “M” button for 6 seconds and then release. You
will see the menu appear on the connected monitor.
Use the LEFT and RIGHT button to select the sub menu. Press the PLAY/PAUSE button
to select the menu.
MENU FUNCTION
Resolution (720p or 480p)
This changes the resolution of the recordings being made by the camera. Use 480p mode
for smaller file sizes. Use 720p mode for higher quality video.
(default setting is 720p)
Loop Recording (Off, 1 minute, 2 minutes, 5 minutes)
Determines the file size before the camera makes a new file.
Setting this to “OFF” will stop the camera from loop recording. The camera will stop
recording when the SD card becomes full.
(default setting is 5 min)
Date Stamp (On or Off)
Toggle the video overlay time and date stamp function.
(default setting is on)
Date and Time
Select this menu option to set the time and date of the camera.
Use the LEFT button to select and the RIGHT button to adjust.
Press PLAY/PAUSE to save the settings.
RoadHawk 720 15
Using the Menu
Using the Menu
(continued)
Language (various available)
Use this menu section to change the on-screen display language used by the
RoadHawk 720p Camera.
(default: English)
Frequency (50Hz, 60Hz)
If you find that traffic lights and street lighting causes a strobing effect on the video
then change this setting. Outside of the USA should use 50Hz for the best results.
(default: 50Hz)
Format (OK, Cancel)
Use this function to FORMAT the SD memory card.
Formatting the SD card will permanently erase all of the DATA on the SD Card.
Only perform this function if you do NOT have important video files on the memory
card you wish to keep. Please see page 12 for more info on formatting the SD card.
Date and Time
Select this menu option to set the time and date of the camera.
Use the LEFT button to select and the RIGHT button to adjust.
Press PLAY/PAUSE to save the settings.
Default Setting
Use this function to set the camera back to factory default settings.
Version
Use this function to display the current firmware version installed on the camera.
16
Connecting to a Screen
Connecting to a TFT Screen
The RoadHawk 720 camera has a video output. It allows you to plug the camera in to a
monitor for LIVE viewing and for playback of the videos you have recorded.
The power cable supplied with the RoadHawk 720 camera has a lead coming from it
that can be plugged in to any monitor that accepts a standard composite video input.
The yellow plug on this cable is a standard phono plug. It transmits video (not audio)
in PAL format. It is not possible to output audio from the RoadHawk 720 camera.
Most TFT LCD monitors will accept the signal from the RoadHawk 720 camera.
A Compatible 7” Flat Screen TFT LED monitor is also available from RoadHawk.
www.roadhawk.co.uk
Please see page 13 for details on playing back video when connected to a screen.
RoadHawk 720 17
NOTES
NOTES
18
Limited Warranty
Limited Warranty Statement
This Limited Warranty shall apply to the Roadhawk 720 Product including all accessories as contained within
the original 720 box “the Product” . Roadhawk warrants the product from its authorized distributor and will
meet the applicable product specifications and be free from all defects in material and workmanship for an
applicable period herein “Limited Warranty”). This Limited Warranty is subjected to the following terms and
conditions:
1.
This Limited Warranty is given only to the original purchaser of the Product “Customer” it shall
neither exclude nor limit a) any statutory rights of the Customer or b) any of the Customer’s rights against the s
ellers of the Product.
2.
The Limited Warranty shall be restricted to the country/region of Product purchase this is to avoid
excessive import or exportation of the Product throughout the supported countries.
3.
This Limited Warranty is only valid and enforceable in countries where the Product is sold.
Outside of the country of purchase, any repairs performed by Roadhawk’s Authorized Service Centre are subject to
charge to the purchaser at normal repair rates.
4.
The Limited Warranty entitles the Customer to a Product replacement or a full refund of the
purchase price for any defects relating to the performance and / or functioning of the Product which result from
normal use of the Product, provided that such a defect arises within ten (10) days of the original date of purchase
of the Product and cannot be otherwise repaired. Roadhawk will provide a replacement or repair of the Product at
Roadhawk’s own expense for any such defect arising after ten (10) days but within two (2) month of the original
date of purchase. This Limited Warranty may not be sold – on, assigned, transferred or given to any subsequent
purchaser or acquirer of the Product.
5.
This Limited Warranty shall last for two (1) year from the date of original purchase “Warranty Period”.
A valid original invoice “Proof of Purchase” is required.
6.
This Limited Warranty covers expenses for inspecting and repairing the product during the term of
the Limited Warranty. Customer shall deliver the defective Product to the Roadhawk - designated premises together
with the proof of purchase, and proof of identity of the Customer. Products shipped by the Customer missing any
one of these documents may render this Limited Warranty invalid. If the defect was the result of the Customer’s own
mishandling of the Product, force majeure, or the result of a repair by an unauthorized service provider, the Customer
shall bear all expenses relating to shipping such a defective Product.
7.
Roadhawk will return the repaired Product or another Product to the Customer in good working
condition. All replaced faulty Products or components thereof will become the property of Roadhawk.
8.
This Limited Warranty applies only to the original hardware components of the Product and does
not apply to any software or other equipment.
9.
If Roadhawk repairs or replaces the Product, the repaired or replaced Product shall continue to be
warranted for the remaining term of the Limited Warranty period or for three (3) months from the date of repair or
replacement, whichever is longer.
RoadHawk 720 19
Limited Warranty
Limited Warranty Statement
(continued)
10.
Before returning any units for service, the Customer is solely responsible for backing up data and
removing any confidential, proprietary, or personal information from the Product. Roadhawk is not responsible for
damage to or loss of any programs, data, or removal storage media.
11.
This Warranty does NOT cover recovery from any software updates, installation and removal of the
application software, or any loss of data storage.
12.
Roadhawk reserves the right to add, delete or amend the terms and conditions of this Limited Liability
and any such change will be made available to the purchasers of the Product either Roadhawk’s Web site
(http://www.roadhawk.co.uk) or by other means.
13.
THIS LIMITED WARRANTY SHALL NOT APPLY IF THE DEFECT WAS CAUSED THROUGH
ANY OF THE FOLLOWING:
(a)
The Product serial number, the accessory date code has been removed, erased, defaced, altered or is
illegible; or
(b)
The defect is resulting from the use of the product in a manner other than their normal and customary
manner, e.g, in excess of their minimum specification of operating instructions, or malfunction or failure resulting from
use of un calibrated voltages; or
(c)
Deterioration of the Product due to normal wear and tear. All plastic surfaces and other natural wear of
externally exposed parts of the product are scratched or damaged under normal usage; or
(d)
The defect is arising from improper installation, unauthorized repair, alteration or modification to the
Product by third parties; or
(e)
The defect is arising from operating with components or accessories (ancillary or peripheral
equipment) not officially authorized or provided by Roadhawk or used in other than its intended use; or
(f)
The defect or damage are arising from unauthorized modification: or
(g)
The defect or damage is arising from misuse, mishandling, accidental lost, abuse, accident,
negligence and damage caused directly or indirectly by Customer, including but not limited to improper testing,
installation, alteration or modification or any kind, or spillage of food or liquid, or build up of dirt or dust, or mains supply
problem, thunderstorm activities, or infestation by insects or vermin, or exposure to abnormally corrosive conditions, or
operation with extreme heat or humidity; or
14.
WHERE A DEFECT WAS UNDETECTABLE BY THEN-AVAILABLE TECHNOLOGY OR WAS THE
RESULT OF COMPLYING WITH THE APPLICABLE REGULATORY STANDARDS OF WHERE THE DEFECT WAS
THE RESULT OF THE CHANGE IN THE DESIGN OF THE PRODUCT COMPONENTS SUPPLIED BY A THIRD
PARTY, MOBITECH WILL NOT BE LIABLE FOR ANY LOSSES OR DAMAGES OF ANY NATURE, INCLUDING BUT
NOT LIMITED TO LOST PROFITS OR COMMERCIAL LOSS OF THE CUSTOMER.
15.
This Limited Warranty does not affect the Customer’s statutory rights in law specific to the country of
purchase, and such rights remain protected. Some countries do not allow the exclusion or limitation of incidental or
consequential loss or damage, or limitation of the implied warranties, in which case the preceding limitation of
exclusions may not apply to such Customers. Please not Warranty service availability and response times may vary
from country to country and may also be subject to registration requirement in the country of purchase. If you require
assistance regarding warranty conditions, or have any other inquiries, please contact the Roadhawk Customer Care
Center or via the official website.
20
Specification
Specification:
Image Sensor:
LENS:
Effective Pixels:
Frame Rate:
Video Format:
Power Duration:
Memory:
Working Temp:
Storage Temp:
Power Consumption:
Power input:
WDR CMOS
135 Deg. HD Lens
1280 x 720
30fps
H.264
1.5 to 2 hours
Up to 32gb Micro SD
-5 to 40 Degrees C
-20 to 80 Degrees C
<1W
12v DC
RoadHawk 720 21