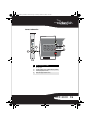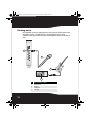
1
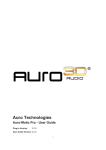
RF-51SDCD_09-0960 V3 ENG.fm Page 1 Friday, October 30, 2009 7:05 AM
5.1 Sound Card
RF-51SDCD
User Guide
RF-51SDCD_09-0960 V3 ENG.fm Page 2 Friday, October 30, 2009 7:05 AM
Rocketfish RF-51SDCD
5.1 Sound Card
Contents
Introduction........................................................................................2
Sound card components................................................................3
Setting up the sound card.............................................................4
Connecting the speakers ...............................................................7
Connecting peripherals............................................................... 13
Software suite ................................................................................. 17
Specifications .................................................................................. 17
Troubleshooting............................................................................. 19
Legal notices.................................................................................... 20
One-Year Limited Warranty........................................................ 23
Introduction
Congratulations on your purchase of the RF-51SDCD sound card. This
sound card provides better quality surround audio for your games,
movies, and music than basic motherboard audio.
Minimum system requirements
• Intel® Pentium® 4 1.6 GHz, AMD® Athlon™ XP 2000+ processor or faster
(Pentium 4 2.2 GHz, AMD Athlon XP 2400+ processor or faster
recommended)
• Intel, AMD, or 100% compatible motherboard chipset
• Microsoft® Windows® 7, 32-bit and 64-bit, Microsoft® Windows Vista®
32-bit and 64-bit with Service Pack 1 or higher, Windows XP Professional
x64 Edition and Windows XP Service Pack 3
• 1 GB RAM (2 GB for Windows 7 64-bit recommended)
2
RF-51SDCD_09-0960 V3 ENG.fm Page 3 Friday, October 30, 2009 7:05 AM
•
•
•
•
600 MB of free hard disk space
Available PCI 2.1 or higher compliant slot
Amplified speakers (available separately)
CD/DVD-ROM drive required for software installation
Sound card components
1
2
3
4
5
Item
Description
Function
1
Optical S/PDIF Out jack
Connects to recording devices with optical connectors (for example, digital audio tape
recorders, minidisc recorders, or external hard disk recorders).
2
Line In/Mic In jack
Connects to an external microphone for voice input. Also connects to analog devices like
music synthesizers and other line-level sources.
3
Line Out 1 jack
Connects to front left and front right inputs on powered analog speakers or a
multichannel home theater receiver for audio output.
4
Line Out 2 jack
Connects to rear left and rear right inputs on powered analog speakers or a multichannel
home theater receiver for audio output.
5
Line Out 3 jack
Connects to center and subwoofer inputs on powered analog speakers or a multichannel
home theater receiver for audio output.
RF-51SDCD
3
RF-51SDCD_09-0960 V3 ENG.fm Page 4 Friday, October 30, 2009 7:05 AM
Setting up the sound card
Installing the sound card
To make sure you install your sound card correctly, check your
motherboard manual.
To install your sound card:
1 Turn off your computer, then unplug the power cord from your power
supply.
2 Open your computer case following the directions provided in your case
manual.
3 Find an open PCI slot and remove the slot cover for that slot from the
back of your computer.
4 Insert the sound card in the PCI slot and secure with the screw you
removed from the slot cover.
5 Close your computer case and connect the AC power cord to the power
supply.
Installing the drivers
Note: Install the drivers and applications before using the sound card.
To install the Windows drivers:
1 After you have installed your audio card, Windows automatically detects
your audio card and searches for device drivers.
2 Insert the Installation CD into your CD/DVD drive. If it does not run
automatically, do the following:
Click Start, then My Computer (XP).
- OR Click Start, then Computer (Vista).
- OR Click the Windows Explorer icon on the task bar, then click Computer
(Windows 7).
- THEN Right-click the CD/DVD drive icon, and then click Open AutoPlay or Autoplay.
3 Follow the instructions on the screen to complete the installation.
4 When prompted, restart your computer.
4
RF-51SDCD_09-0960 V3 ENG.fm Page 5 Friday, October 30, 2009 7:05 AM
Reinstalling drivers and applications
You may need to reinstall some or all of the audio applications and
device drivers to correct problems, change configurations, or
upgrade outdated drivers or applications.
To reinstall drivers and applications in Windows 7 or Windows Vista:
Click Start, Control Panel, then Uninstall a program.
Select your audio card's entry.
Click Uninstall/Change.
In the InstallShield Wizard dialog box, select the Repair option.
If prompted, insert the installation CD into your CD/DVD drive, then click
OK.
6 To repair an application or driver, select the respective check box, then
click Next.
7 Restart your computer when prompted.
1
2
3
4
5
To reinstall drivers in Windows XP:
1 Click Start, Settings, Control Panel or Start, Control Panel.
2 Double-click the Add/Remove Programs icon, then click the Change or Remove
Programs tab.
Select your audio card's entry.
Click Change/Remove.
In the InstallShield Wizard dialog box, select the Repair option.
If prompted, insert the Installation CD into your CD/DVD drive, then click
OK.
7 To repair an application or driver, select the respective check box, then
click Next.
8 Restart your computer when prompted.
3
4
5
6
You can now check if the reinstalled software works properly.
Uninstalling Drivers and Applications
You may need to uninstall some or all of the audio applications and
device drivers to correct problems, change configurations, or
upgrade outdated drivers or applications.
Before you begin, close all the audio applications. Applications that
are still running during the uninstallation will not be removed.
RF-51SDCD
5
RF-51SDCD_09-0960 V3 ENG.fm Page 6 Friday, October 30, 2009 7:05 AM
Uninstalling drivers and applications in Windows 7 or Windows Vista:
Click Start, Control Panel, then Uninstall a program.
Select your audio card's entry.
Click Uninstall/Change.
To remove all drivers and applications;
In the InstallShield Wizard dialog box, select the Remove All option, then
click Yes.
- OR To remove selected drivers or applications;
In the InstallShield Wizard dialog box, click Remove, then select the check
box of the application or driver you want to uninstall, then click Next.
5 Restart your computer when prompted.
1
2
3
4
Uninstalling drivers and applications in Windows XP:
1 Click Start, Settings, Control Panel or Start, Control Panel.
2 Double-click the Add/Remove Programs icon, then click the Change or Remove
3
4
5
6
Programs tab.
Select your audio card's entry.
Click Change/Remove.
To remove all drivers and applications;
In the InstallShield Wizard dialog box, select the Remove All option, then
click Yes.
- OR To remove selected drivers or applications;
In the InstallShield Wizard dialog box, click Remove, then select the check
box of the application or driver you want to uninstall, then click Next.
Restart your computer when prompted.
You can now install the original or updated device drivers or
applications. For more information, see “Installing selected drivers or
applications” on page 7.
6
RF-51SDCD_09-0960 V3 ENG.fm Page 7 Friday, October 30, 2009 7:05 AM
Installing selected drivers or applications
Installing selected drivers or applications in Windows 7 or Windows Vista:
Click Start, Control Panel, then Uninstall a program.
Select your audio card's entry.
Click Uninstall/Change.
In the InstallShield Wizard dialog box, select the Add option to add new
software components to your existing installation.
If prompted, insert the Installation CD into your CD/DVD drive, then click
OK.
5 Select the application or driver check box, then click Next.
6 Restart your computer when prompted.
1
2
3
4
Installing selected drivers or applications in Windows XP:
1 Click Start, Settings, Control Panel or Start, Control Panel.
2 Double-click the Add/Remove Programs icon, then click the Change or Remove
3
4
5
6
7
Programs tab.
Select your audio card's entry.
Click Change/Remove.
In the InstallShield Wizard dialog box, select the Add option to add new
software components to your existing installation.
If prompted, insert the Installation CD into your CD/DVD drive, then click
OK.
Select the application or driver check box, then click Next.
Restart your computer when prompted.
Connecting the speakers
The connectors and associated components shown here may be
different from that of your speaker system. Consult the User's Guide
of your speaker system to identify similar input connectors. The
cables shown here are available separately.
RF-51SDCD
7
RF-51SDCD_09-0960 V3 ENG.fm Page 8 Friday, October 30, 2009 7:05 AM
Connecting analog speakers
You can connect analog speaker systems for up to 5.1 channels. For
more information on the appropriate jacks and cables to use for your
speaker system, refer to the following speaker configurations.
2.1 channel analog speakers
OPTICAL
2
1
3
#
Jack, connector, or cable
1
2
3
Line Out 1 jack
2-channel audio cable
Speaker system audio input jack
Note: You can use the speaker cables that were bundled with your speakers.
8
RF-51SDCD_09-0960 V3 ENG.fm Page 9 Friday, October 30, 2009 7:05 AM
4.1 channel analog speakers
OPTICAL
3
1
2
4
#
Jack, connector, or cable
1
2
3
4
Line Out 1 jack
Line Out 2 jack
4-channel audio cable
Speaker system audio input jacks (front and rear)
Note: You can use the speaker cables that were bundled with your speakers.
RF-51SDCD
9
RF-51SDCD_09-0960 V3 ENG.fm Page 10 Friday, October 30, 2009 7:05 AM
5.1 channel analog speakers
OPTICAL
1
2
3
4
5
#
Jack, connector, or cable
1
2
3
4
5
Line Out 1 jack
Line Out 2 jack
Line Out 3 jack
5.1-channel audio cable
Speaker system audio input jacks (front, rear, and
center/subwoofer)
Note: You can use the speaker cables that were bundled with your speakers.
10
RF-51SDCD_09-0960 V3 ENG.fm Page 11 Friday, October 30, 2009 7:05 AM
Connecting digital speakers
2
1
3
optical in
#
Jack, connector, or cable
1
2
3
Optical S/PDIF out jack
Optical audio cable
Speaker system optical audio input jack
digital in
Note: You can use the speaker cables that were bundled with your speakers. The
optical cable is available separately.
RF-51SDCD 11
RF-51SDCD_09-0960 V3 ENG.fm Page 12 Friday, October 30, 2009 7:05 AM
Positioning your speakers
Good speaker placement can enhance your listening experience,
while careless placement can make good audio systems sound bad.
For detailed speaker placement tips, refer to your speaker system’s
User's Guide.
1
3
12
2
4
6
5
#
Speaker component
1
2
3
4
5
6
Subwoofer
Left front speaker
Center speaker
Right front speaker
Right rear speaker
Left rear speaker
RF-51SDCD_09-0960 V3 ENG.fm Page 13 Friday, October 30, 2009 7:05 AM
Connecting peripherals
Your audio card works seamlessly with many external devices. To
connect these peripherals, refer to their relevant sections below.
Watching DVDs
Connecting a multichannel home theater receiver
If you have a multichannel home theater or A/V receiver, connect it
directly to the audio card's Line Out 1, Line Out 2, and Line Out 3 jacks
as shown below. For more information on multichannel home
theater receiver speaker connections, consult the User's Guide of
your multichannel home theater receiver.
Front
2
3
1
4
#
Jack, connector, or cable
1
2
3
4
Line out 1 jack
3.50 mm (1/8 inch) stereo-to-RCA cable (not provided)
Left front input jack (A/V receiver)
Right front input jack (A/V receiver)
RF-51SDCD 13
RF-51SDCD_09-0960 V3 ENG.fm Page 14 Friday, October 30, 2009 7:05 AM
Rear
2
1
14
3
4
#
Jack, connector, or cable
1
2
3
4
Line out 2 jack
3.50 mm (1/8 inch) stereo-to-RCA cable (not provided)
Left rear input jack (A/V receiver)
Right rear input jack (A/V receiver)
RF-51SDCD_09-0960 V3 ENG.fm Page 15 Friday, October 30, 2009 7:05 AM
Center/subwoofer
3
2
4
1
#
Jack, connector, or cable
1
2
3
4
Line out 3 jack
3.50 mm (1/8 inch) stereo-to-RCA cable (not provided)
Center input jack (A/V receiver)
Subwoofer input jack (A/V receiver)
RF-51SDCD 15
RF-51SDCD_09-0960 V3 ENG.fm Page 16 Friday, October 30, 2009 7:05 AM
Creating music
Put together your own compositions consisting of audio inputs from
an electric guitar, a synthesizer or a microphone. You can also
connect a pre-amp FX box for your electric guitar to the Line In/Mic In
jack.
1
2
4
3
16
#
Jack, connector, or cable
1
2
3
4
Line in/Mic in jack
Microphone
Pre-amp FX box
Electric guitar
RF-51SDCD_09-0960 V3 ENG.fm Page 17 Friday, October 30, 2009 7:05 AM
Software suite
The following software lets you access the rich features of your audio
card.
To learn more about each application, refer to its online Help.
Depending on the application, you can do this by clicking the
question mark on the toolbar of the application, or selecting Help
Topics from the Help menu.
For Windows 7 or Windows Vista only
• Audio Control Panel
• Audio Center
• Volume Panel
For Windows XP only
•
•
•
•
Device Control
Surround Mixer
Speaker Settings
EAX Settings
Notes
- The applications included with your audio device may differ from those described
here. Your audio card may also come with third party applications.
- Some applications are available for certain operating systems only.
Specifications
Rocketfish 5.1 Audio Card
• PCI Specification Version 2.1 compliant
• Professional quality digital mixing and equalization
Flexible Mixer Control
• Selectable input source or mixing of various audio sources for recording
• Adjustable master volume control
RF-51SDCD 17
RF-51SDCD_09-0960 V3 ENG.fm Page 18 Friday, October 30, 2009 7:05 AM
• Front and rear balance control
• Separate bass and treble control
EAX Audio Technology
• Creative EAX® Audio Technology redefines your gaming and music
experience with true-to-life 5.1 audio and different environment settings
for realistic and immersive 3D positional audio experience.
CMSS
• CMSS® upmixes ordinary stereo sources (CDs, VCDs, WAVs, or MP3s) to
virtual 5.1 channels
Connectivity
Audio Inputs
• One 3.5 mm (1/8") stereo jack for analog Line In or Microphone In
Audio Outputs
• One Optical S/PDIF connector for digital output
• Three 3.5mm (1/8") stereo Line Out jacks for analog output:
• Front left/Front right
• Rear left/Rear right
• Center/Subwoofer channel
18
RF-51SDCD_09-0960 V3 ENG.fm Page 19 Friday, October 30, 2009 7:05 AM
Troubleshooting
This section provides solutions to problems you may encounter
during installation or normal use.
Problem
Suggestion
No sound from the speakers
• Make sure that the speakers are connected to your sound card’s output.
• Make sure that you have selected the correct speaker configuration in the
application.
No audio output when playing
• Make sure that the speakers’ volume control is set to mid-range.
digital files (WAV, MIDI, or AVI clips) • Make sure that your powered speakers or home theater receiver are connected
to the Line Out jacks.
• Make sure that you have selected the correct speaker configuration in the
application.
By default, digital CD playback is already enabled in Windows 7 and Windows Vista.
There is no audio output when
playing audio CDs or games that To solve this problem in Windows XP, enable digital CD playback:
• Click Start, Settings, Control Panel. The Control Panel window opens
require a CD
• Double-click the System icon. The System Properties dialog box opens.
• Click the Hardware tab, then click Device Manager.
• Double-click the DVD/CD drives icon. Your computer drives appear.
• Right-click the disk drive icon. A menu appears.
• Click Properties.
• In the Digital CD Playback box of the next dialog box, click the Enable digital
CD audio for this CD-ROM device check box to select it.
Problems with multiple audio devices
The other installed audio card is not
working well
The onboard audio chipset is not
working well
• You may have an existing audio device installed in your computer. The audio
device may be an audio card or an onboard audio chipset. Before you install your
Rocketfish 5.1 audio card, we recommend that you completely uninstall and
remove your existing audio device. Operating multiple audio devices in your
computer may introduce usability issues.
- OR • If your computer detects an installed audio card during the installation of your
Rocketfish 5.1 audio card, a message box recommending that you completely
uninstall and remove the older audio device will appear. Click Yes to continue
with the installation of the Rocketfish 5.1 audio card. After the installation is
complete, uninstall the existing card and remove the audio card from your
computer.
Disable your computer's onboard audio chipset. See your computer's motherboard
documentation for details.
RF-51SDCD 19
RF-51SDCD_09-0960 V3 ENG.fm Page 20 Friday, October 30, 2009 7:05 AM
Legal notices
License and Copyright
Information in this document is subject to change without notice and
does not represent a commitment on the part of Creative Technology
Ltd. No part of this manual may be reproduced or transmitted in any
form or by any means, electronic or mechanical, including
photocopying and recording, for any purpose without the written
permission of Creative Technology Ltd.
The Software License Agreement is found in a separate folder on the
Installation CD.
EAX and CMSS are registered trademarks of Creative Technology Ltd.
in the United States and/or other countries. Intel and Pentium are
registered trademarks of Intel Corporation. AMD and AMD Athlon are
trademarks of Advanced Micro Devices, Inc. Microsoft, Windows
Vista, Windows and the Windows logo are trademarks or registered
trademarks of Microsoft Corporation. All other products are
trademarks or registered trademarks of their respective owners.
Version 1.0
October 2008
FCC statement:
United States Regulatory Information
This device complies with part 15 of the FCC Rules. Operation is
subject to the following two conditions: (1) This device may not cause
harmful interference, and (2) this device must accept any interference
received, including interference that may cause undesired operation.
ICES-003 Statement:
This Class B digital apparatus complies with Canadian ICES-003. Cet
appareil numérique de la classe B est conforme à la norme NMB-003
du Canada.
20
RF-51SDCD_09-0960 V3 ENG.fm Page 21 Friday, October 30, 2009 7:05 AM
Copyright
© 2010 Rocketfish. Rocketfish and the Rocketfish logo are trademarks
of Best Buy Enterprise Services, Inc. Other brands and product names
are trademarks or registered trademarks of their respective holders.
Specifications and features are subject to change without notice or
obligation.
For service and support call 1-800-620-2790.
RF-51SDCD 21
RF-51SDCD_09-0960 V3 ENG.fm Page 22 Friday, October 30, 2009 7:05 AM
22
RF-51SDCD_09-0960 V3 ENG.fm Page 23 Friday, October 30, 2009 7:05 AM
One-Year Limited Warranty
Rocketfish Products (“Rocketfish”) warrants to you, the original purchaser of this new
RF-51SDCD (“Product”), that the Product shall be free of defects in the original manufacture of
the material or workmanship for one (1) year from the purchase of the Product (“Warranty
Period”). This Product must be purchased from an authorized dealer of Rocketfish brand
products and packaged with this warranty statement. This warranty does not cover refurbished
Product. If you notify Rocketfish during the Warranty Period of a defect covered by this
warranty that requires service, terms of this warranty apply.
How long does the coverage last?
The Warranty Period lasts for one year (365 days), beginning on the date you purchased the
Product. The purchase date is printed on the receipt you received with the product.
What does this warranty cover?
During the Warranty Period, if the original manufacture of the material or workmanship of the
Product is determined to be defective by an authorized Rocketfish repair center or store
personnel, Rocketfish will (at its sole option): (1) repair the Product with new or rebuilt parts; or
(2) replace the Product at no charge with new or rebuilt comparable products or parts. Products
and parts replaced under this warranty become the property of Rocketfish and are not returned
to you. If service of Products and parts are required after the Warranty Period expires, you must
pay all labor and parts charges. This warranty lasts as long as you own your Rocketfish Product
during the Warranty Period. Warranty coverage terminates if you sell or otherwise transfer the
Product.
How to obtain warranty service?
If you purchased the Product at a retail store location, take your original receipt and the Product
to the store you purchased it from. Make sure that you place the Product in its original
packaging or packaging that provides the same amount of protection as the original
packaging. If you purchased the Product from an online web site, mail your original receipt and
the Product to the address listed on the web site. Make sure that you put the Product in its
original packaging or packaging that provides the same amount of protection as the original
packaging.
Where is the warranty valid?
This warranty is valid only to the original purchaser of the Product in the United States, Canada,
and Mexico.
What does the warranty not cover?
This warranty does not cover:
• Customer instruction
• Installation
• Set up adjustments
• Cosmetic damage
RF-51SDCD 23
RF-51SDCD_09-0960 V3 ENG.fm Page 24 Friday, October 30, 2009 7:05 AM
• Damage due to acts of God, such as lightning strikes
• Accident
• Misuse
• Abuse
• Negligence
• Commercial use
• Modification of any part of the Product, including the antenna
This warranty also does not cover:
• Damage due to incorrect operation or maintenance
• Connection to an incorrect voltage supply
• Attempted repair by anyone other than a facility authorized by Rocketfish to service the
Product
• Products sold as is or with all faults
• Consumables, such as fuses or batteries
• Products where the factory applied serial number has been altered or removed
REPAIR REPLACEMENT AS PROVIDED UNDER THIS WARRANTY IS YOUR EXCLUSIVE REMEDY.
ROCKETFISH SHALL NOT BE LIABLE FOR ANY INCIDENTAL OR CONSEQUENTIAL DAMAGES FOR
THE BREACH OF ANY EXPRESS OR IMPLIED WARRANTY ON THIS PRODUCT, INCLUDING, BUT
NOT LIMITED TO, LOST DATA, LOSS OF USE OF YOUR PRODUCT, LOST BUSINESS OR LOST
PROFITS. ROCKETFISH PRODUCTS MAKES NO OTHER EXPRESS WARRANTIES WITH RESPECT TO
THE PRODUCT, ALL EXPRESS AND IMPLIED WARRANTIES FOR THE PRODUCT, INCLUDING, BUT
NOT LIMITED TO, ANY IMPLIED WARRANTIES OF AND CONDITIONS OF MERCHANTABILITY AND
FITNESS FOR A PARTICULAR PURPOSE, ARE LIMITED IN DURATION TO THE WARRANTY PERIOD
SET FORTH ABOVE AND NO WARRANTIES, WHETHER EXPRESS OR IMPLIED, WILL APPLY AFTER
THE WARRANTY PERIOD. SOME STATES, PROVINCES AND JURISDICTIONS DO NOT ALLOW
LIMITATIONS ON HOW LONG AN IMPLIED WARRANTY LASTS, SO THE ABOVE LIMITATION MAY
NOT APPLY TO YOU. THIS WARRANTY GIVES YOU SPECIFIC LEGAL RIGHTS, AND YOU MAY ALSO
HAVE OTHER RIGHTS, WHICH VARY FROM STATE TO STATE OR PROVINCE TO PROVINCE.
Contact Rocketfish:
For customer service please call 1-800-620-2790
www.rocketfishproducts.com
Distributed by Best Buy Purchasing, LLC
7601 Penn Avenue South, Richfield, Minnesota, U.S.A. 55423-3645
© 2010 Best Buy Enterprise Services, Inc.
All rights reserved. ROCKETFISH is a trademark of Best Buy Enterprise Services, Inc. Registered in
some countries. All other products and brand names are trademarks of their respective owners.
24
RF-51SDCD_09-0960 V3 ENG.fm Page 28 Friday, October 30, 2009 7:05 AM
www.rocketfishproducts.com
(800) 620-2790
Distributed by Best Buy Purchasing, LLC
7601 Penn Avenue South, Richfield, MN 55423-3645 USA
© 2010 Best Buy Enterprise Services, Inc.
All rights reserved. ROCKETFISH is a trademark of Best Buy Enterprise Services, Inc.
All other products and brand names are trademarks of their respective owners.
09-0960 ENGLISH