1
smartSTREAM - BOX2IP
HDTV Satellite Receiver
User Manual
Version: 26.08.2013 - English
Introduction
Introduction
Dear customer,
Thank you for buying a mirage HDTV satellite receiver.
This user manual provides information on
•
placement
•
installation,
•
adjustment
•
operation,
•
cleaning and disposal of the receiver.
Please carefully read the user manual before operating the receiver.
We hope you enjoy your mirage receiver.
smart electronic GmbH
Industriestraße 29
78112 St. Georgen
Germany
© smart electronic GmbH 2013
All rights, technical changes, errors as well as printing mistakes reserved. Any reproducing or copying of
the contents requires prior written permission from smart.
2
Table of Contents
Table of Contents
Introduction .............................................................................................................................. 2
Table of Contents ..................................................................................................................... 3
1
2
3
4
5
User Information ............................................................................................................. 6
1.1
Use of this Manual ............................................................................................ 6
1.2
Signs, Symbols, Layout .................................................................................... 6
Product Description ....................................................................................................... 6
2.1
Scope of Delivery ............................................................................................. 6
2.2
Receiver ............................................................................................................ 7
2.3
Remote Control ................................................................................................ 9
2.4
Save Energy.................................................................................................... 11
2.5
Guarantee ....................................................................................................... 11
Safety Instructions ....................................................................................................... 11
3.1
Intended Use .................................................................................................. 11
3.2
Risks in Case of Intended Use ....................................................................... 11
3.3
Grounding ....................................................................................................... 12
3.4
Location .......................................................................................................... 12
3.5
Handling of Batteries ...................................................................................... 12
3.6
Notes on Product Liability .............................................................................. 12
Installation of the Receiver .......................................................................................... 13
4.1
Connection Scheme ....................................................................................... 13
4.2
Connecting Satellite Antenna ......................................................................... 13
4.3
Connecting TV Set.......................................................................................... 13
4.4
Connecting a Home Cinema System ............................................................. 14
4.5
Connecting Data Storage ............................................................................... 15
4.6
Connecting a Home Network ......................................................................... 15
4.7
Inserting the Batteries of the RCU .................................................................. 15
Basic Operation ............................................................................................................ 15
5.1
Switching on Receiver .................................................................................... 15
5.2
Software Update............................................................................................. 15
5.3
Commissioning ............................................................................................... 17
5.4
Language ........................................................................................................ 17
5.5
RAPS Parameters ........................................................................................... 18
5.6
Satellite List .................................................................................................... 19
5.7
Select Operation Mode................................................................................... 20
5.8
Call/Leave Menu ............................................................................................. 21
5.9
Menu Navigation............................................................................................. 21
5.10
Parental Lock .................................................................................................. 21
3
Table of Contents
6
7
8
9
10
5.11
Set Time ......................................................................................................... 22
5.12
TV ................................................................................................................... 23
Media Player ................................................................................................................. 33
6.1
Music.............................................................................................................. 33
6.2
Images ........................................................................................................... 35
6.3
Video .............................................................................................................. 36
IP Functions .................................................................................................................. 36
7.1
YouTube ......................................................................................................... 36
7.2
Web Radio ..................................................................................................... 36
7.3
Web News ...................................................................................................... 36
7.4
Weather Forecast ........................................................................................... 36
smartSTREAM - BOX2IP ............................................................................................. 36
8.1
Preparation of the Devices............................................................................. 37
8.2
Operation ....................................................................................................... 38
Extended Settings and Functions .............................................................................. 39
9.1
Installation ...................................................................................................... 39
9.2
TV Channel List / Radio Channel List ............................................................ 44
9.3
Rename Favorite Lists ................................................................................... 47
9.4
Timer .............................................................................................................. 47
9.5
OSD Setting ................................................................................................... 49
9.6
Automatic Standby Function ......................................................................... 49
9.7
Display Setting ............................................................................................... 49
9.8
Format of the Video Signal at the SCART Output ......................................... 50
9.9
Digital Audio Out ............................................................................................ 50
9.10
Simultaneous Playback of Picture and Sound .............................................. 50
9.11
LNB IN / OUT Loop Through (Loop Standby) ................................................ 50
9.12
SmartLink (CEC)............................................................................................. 51
9.13
Software Version ............................................................................................ 51
9.14
Factory Settings ............................................................................................. 51
Operation in a Unicable System ................................................................................. 51
10.1
About Unicable .............................................................................................. 51
10.2
Allocation of IF channels and frequencies ..................................................... 52
10.3
Installation ...................................................................................................... 52
11
Cleaning ........................................................................................................................ 53
12
Transport and Decommissioning ............................................................................... 54
13
Troubleshooting ........................................................................................................... 54
14
Disposal ........................................................................................................................ 55
4
Table of Contents
15
Technical Data .............................................................................................................. 56
15.1
General Information ........................................................................................ 56
15.2
Remote Control .............................................................................................. 56
15.3
Mains Adapter ................................................................................................ 56
15.4
Connections ................................................................................................... 57
15.5
Temperature ................................................................................................... 57
15.6
Dimensions and Weight .................................................................................. 57
Index ........................................................................................................................................ 57
5
User Information
1
1.1
User Information
Use of this Manual
•
Please carefully read this user manual before operating the device for the first time.
•
Please note all warnings and notes included in this user manual.
•
Consider this user manual to be an integral part of the product, and store it at a well
accessible location.
•
This user manual should also be enclosed when handing over the device to a third party.
•
In case of loss, the current version of the user manual can be downloaded at the support
center on our website www.smart-electronic.de.
•
The software is still being further developed even after your purchase of the device.
Thus, it may be possible that certain operation steps do not fully correspond to the user
manual.
1.2
Signs, Symbols, Layout
Symbol/layout
Meaning
WARNING
Danger due to electric shock with possible severe bodily injury
CAUTION
Warning of possible physical damage
2
2.1
Useful information and hints
You are requested to perform an action.
1.
2.
Perform these steps in the stated order.
List
Italics
The various possibilities of settings as well as image captions
are stated in Italics.
bold
Menu windows and menu items (that often include further hidden menu items or direct settings) as well as the designations of
keys are printed in bold letters.
Product Description
Scope of Delivery
•
HDTV satellite receiver
•
remote control
6
NOTE
Product Description
•
2 batteries (AAA) for remote control
•
user manual
2.2
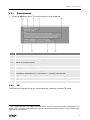
Receiver
There are two versions of the mirage receivers I and II. Please select the description fitting to
your set. Differences are noted respectively.
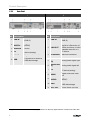
2.2.1
Front Panel
I
No.
Description
1
LED (indicating “good reception”)
The green LED (light emitting
diode) on the receiver front
panel does not light immediately after connecting the device to
the power supply ("power
LED"), but only after the installation of programs is completed
(either via RAPS or via program
scan), and a video signal is
routed to the TV set.
If you plug the power cord for
the first time, the LED lights up
only after installation. During
later operation the receiver’s
program list already exists; it
takes just a few seconds from
inserting the power plug until
you see the green LED.
II
No. Description
1
Display
4-digit display
2
LED red
Indicates, that the receiver
is in Standby mode.
3
STANDBY
Switch between standby /
normal operation
4
PR-
Channel down / downnavigation in menu
5
PR+
Channel up / up-navigation
in menu
6
LED green
Indicates that a valid video
signal is routed to the TV
set.
7
Product Description
2.2.2
Rear Panel
I
No. Description
1 LNB IN
2
II
No. Description
Connection for LNB
(DVB-S)
LNB IN
Connection for LNB
(DVB-S)
2
LNB OUT
Loop-through satellite
signal for connection of
further receivers, a video
cassette recorder or a
TV device
3
ETHERNET Network connection
4
SERVICE
5
AUDIO OUT
Analog audio signal right
(R)
6
AUDIO OUT
Analog audio signal left
(L)
7
TV
SCART connection for
TV device (analog)
8
HDMI
Digital audio and video
out
9
DIGITAL
AUDIO
Digital RCA audio out
(SPDIF)
1
AUDIO OUT Digital RCA audio out
DIGITAL
(SPDIF)
3 SERVICE
RS232
4 TV
SCART connection for TV
device (analog)
5 HDMI 1
Digital audio and video out
6 USB
Connection for external
USB data storage
0F
7 ETHERNET Network connection
1
RS 232
10 USB
Connection for external
USB data storage
11 ON / OFF
Power switch (On/Off)
High Definition Multimedia Interface (engl.), interface for the fully digital transfer of audio and video data.
8
Product Description
2.3
Remote Control
I
No.
Key
Description
Switch between operational and standby mode
1
II
No.
Key
1
V-MODE
Description
Switch aspect mode
Switch between operational
and standby mode.
2
2
1-9
Direct channel selection
3
FIND
Call of channel search
function
3
AUDIO
Selection of audio format
MENU
4
IPTV
Not Used
Call main menu
5
1-9
Direct channel selection
PR+
Channel + or upnavigation in menu
6
0
PR-
Channel - or downnavigation in menu
Select playback format of
media player
7
FIND
Call of channel search
function
PR+
Channel + or up-navigation
in menu
PR-
Channel - or downnavigation in menu
4
Volume + or menu navigation to the right
5
Volume - or menu navigation to the left
OK/LIST
Display channel list /
confirm menu item
8
9
Product Description
I
6
INFO
Display information on
current channel
7
TXT
Display / hide teletext
8
9
II
Red function key
PR
Volume + or menu navigation to the right
Volume - or menu navigation to the left
OK/LIST
Display channel list / confirm
menu item
EPG
Call of EPG (Electronic
Program Guide)
10 INFO
Display information on
current channel
11
Not used
Switch of previously
selected channels
10
Yellow function key
11 AUDIO
Selection of audio format
12 TV/RADIO
Switch between TV and
radio mode
13
Not used
14
Play (media player)
12
Play (media player)
15
Fast rewinding
13
Fast rewinding
16
Fast forwarding
14
Fast forwarding
17
Mute
15
Red function key
18 0
Select playback format of
media player
16
Green function key
19 FAV
17
Mute
Call list of favorites
20 EPG
Call of EPG (Electronic
Program Guide)
18 BOX2IP
Switch between TV and
radio mode
21 EXIT
Exit menu or menu item
19 TV/RADIO
10 entries up in menu /
channel list
22
Green function key
23
20 PAGE+
Blue function key
10 entries down in menu /
channel list
24 V-MODE
Switch aspect mode
21 PAGE-
25 PAGE+
10 entries up in menu /
channel list
Switch of previously selected channels
22 PR
Call list of favorites
23 FAV
Call main menu
24 MENU
Exit menu or menu item
9
26 PAGE-
10 entries down in menu /
channel list
27
Stop playback
25 EXIT
Display / hide teletext
28
Pause playback
26 TXT
Stop playback
29
Slow forwarding – slow
motion
27
Pause playback
30
Slow rewinding
28
Slow forwarding – slow
motion
29
Slow rewinding
30
Blue function key
31
Yellow function key
32
Display information on
current channel
10
Safety Instructions
2.4
Save Energy
The receiver is equipped with particularly energy-saving electric and electronic components.
Furthermore, a sophisticated energy management helps to save energy:
Thus, energy consumption during Save Energy Standby Mode is reduced to less than
0.5 Watt!
2.5
Guarantee
The warranty of the mirage HDTV satellite receiver corresponds to the legal regulations at the
time of purchase.
3
Safety Instructions
3.1
Intended Use
The HDTV satellite receiver is intended for private receiving of digital satellite television (DVBS/S2). It is exclusively intended for such purpose and must be used exclusively for such
purpose.
Any other use is deemed to be unintended use.
3.2
Risks in Case of Intended Use
Humidity, wrong mains voltage and/or wrong mains frequency,
lightning stroke or mechanical overload may cause malfunction
of or damage to the device.
Ensure that the receiver (in particular the mains plug) and the remote
control are not exposed to any humidity. Example: Do not place filled
flower vases or similar onto the receiver.
CAUTION!
Only connect the receiver to 175…250 V ~, 50/60 Hz.
Disconnect mains plug in case of thunderstorms or malfunction.
Do not place heavy items onto the receiver.
Do not bend or squeeze the cable.
Risk of electric shock when contacting mains voltage.
Damage to housing, mains cable or improper repair may result in contact to mains voltage.
Do not place heavy items onto the receiver.
WARNING!
Do not bend or squeeze the cable.
Repairs of plug, cable or receiver should only be performed by qualified specialists.
11
Safety Instructions
3.3
Grounding
The satellite antenna must be grounded properly. Note the relevant VDE 2 regulations 3.
1F
3.4
2F
Es wird empfohlen, zumindest die Außeneinheit der Satellitenanlage von
einem Fachmann installieren zu lassen!
Location
Place the receiver onto a solid and level surface.
Protect the receiver from humidity, heat, dust and dirt.
Do not place items filled with liquid, e.g. flower vases, onto the receiver.
Protect the receiver from dripping and splash water.
Do not place burning items, e.g. burning candles, onto the receiver.
Ensure sufficient ventilation (ventilation slots must not be blocked): the receiver should
have a distance of at least five centimeters to its surrounding elements on all sides.
Ensure that the ventilation openings are not covered by objects such as newspapers,
table cloths, curtains etc.
Only operate the receiver in moderate climate (not in tropical climate).
Place the receiver so that the mains plug can be disconnected at any time, correspondingly disconnecting the device from the mains.
3.5
If the device is transported from cold to hot environment, then condensing humidity may build up in the device.
Do not connect the device, but leave it switched-off for some hours.
Handling of Batteries
•
Batteries should always be out of children's reach.
•
Leaking batteries cause damage to the environment and the remote control.
•
Batteries should not be exposed to extreme heat, e.g. sunlight, fire etc.
Dispose of the batteries in accordance with the applicable legal regulations (see chapter
Disposal, page Fehler! Textmarke nicht definiert.).
3.6
Notes on Product Liability
In the following cases, the intended protection of the device may be limited. Then, liability
regarding function of the device correspondingly passes over to the operator:
•
The device is not used in accordance with the user manual.
•
The device is used out of the field of application as described above.
•
The operator performs unauthorized changes of the device.
VDE = Verband der Elektrotechnik, Elektronik, Informationstechnik (German) = Association for Electrical,
Electronic & Information Technologies
DIN EN 60728-11 VDE 0855-1:2011-06: Cable networks for television signals, sound signals and interactive services, Part 11: Safety
2
3
12
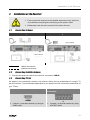
Installation of the Receiver
4
Installation of the Receiver
First connect the receiver to the satellite antenna and any other devices before connecting the mains plug to the power outlet.
CAUTION!
4.1
Please also note the user manuals of the other devices.
Connection Scheme
I
II
Home network
Home network
default connection
optional connection
4.2
Connecting Satellite Antenna
Connect the antenna cable to the receiver connection LNB IN.
4.3
Connecting TV Set
As stated in the connection scheme, the receiver offers various possibilities to connect TV
set and receiver. The possibilities applicable to you depend on the connection possibilities of
your TV set.
The TV set provides of an HDMI connection: The TV set does not provide of an HDMI
connection:
Connect TV set and receiver by using an
HDMI cable.
Connect TV set and receiver by using
a SCART cable.
13
Installation of the Receiver
4.4
If your TV set offers both possibilities then always choose connection via HDMI cable.
This ensures best possible audio and video quality with digital
signals.
Connecting a Home Cinema System
To improve audio playback, you can connect to the receiver - additionally to the TV set - also
a multichannel home cinema system or a hi-fi system. There are various possibilities for
connection. Your type of connection depends on the connection possibilities of your home
cinema system.
a.
Your home cinema system is able to loop through an HDMI signal, i.e. HDMI connection for receiver and HDMI connection for
TV set.
Connect the home cinema system and the receiver by using an
HDMI cable as well as home cinema system and TV set by using
an HDMI cable.
Receiver
TV set
b.
Your home cinema system can process digital audio data –
connection for digital data is present.
DIGITAL AUDIO
Connect the home cinema system and the receiver by using a
RCA cable.
c.
Your home cinema system cannot process digital audio data –
no connections for digital data present
Connect the home cinema system and the receiver by using a 2pole RCA cable (stereo) 4.
3F
4
If your home cinema system (hi-fi system) supports HDMI connection, then use such connection.
This ensures best possible audio and video quality with digital
signals.
The analog audio outputs AUDIO (L) and AUDIO (R) are not available with all mirage receivers.
14
Basic Operation
4.5
Connecting Data Storage
Connect a data storage (USB stick or hard drive with USB connection) at the USB connector to be able to access MPEG, MP3, JPG or other media data files.
4.6
Connecting a Home Network
In order to connect the receiver to the internet (www) or to a home network, connect the
receiver’s ETHERNET socket with a network cable to the appropriate interface of your
home network.
4.7
See section 8.1.1.1 on page 37 to learn how to configure a wired LAN.
Inserting the Batteries of the RCU
This is the procedure to insert new RCU batteries or to replace empty batteries:
Open the battery cover at the bottom of the RCU.
Insert two batteries 1.5 V (Type: AAA). Take care of the right polarity!
Replace batteries when the range of the remote control is decreasing or when the receiver no longer reacts to all commands.
When not used for prolonged periods of time, batteries may leak.
Remove batteries from the remote control if it is not used for long
periods of time (> 1.5 years).
When replacing batteries, always replace all batteries.
5
Basic Operation
This chapter describes the necessary steps to use easily the radio and television programs
broadcasted via satellite.
5.1
Switching on Receiver
1. Switch on all connected devices.
2. Ensure that the correct AV input is selected at the TV set (i.e. that the signals from the
receiver are displayed).
3. Connect the mains plug to the power outlet to switch on the receiver
or
Switch on the receiver by using the power switch (on the rear panel of housing) (I, ON) 5.
4F
5.2
Software Update
5
Once you have put your receiver into operation, you should first
update the operating software of your receiver!
Depends on your receiver type.
15
Basic Operation
5.2.1
Update via USB
If you have Internet access, you should update your receiver via the USB interface.
1. Search for the upgrade file on the internet page www.avanit.tv (menu item Support).
2. If the version number of the update file matches with the version number of the software
of the receiver, which is displayed in the submenu Information of the menu Tools, you
do not need to do anything else. Your receiver is up to date. Otherwise continue with
step 3.
3. Save the update file to a USB data storage.
4. Unpack the file with the ending .abs.
Please note that the upgrade file (*.abs) is copied directly to the root
directory of the USB data storage (no subdirectory)!
5. Connect the data storage to your receiver.
6. In the menu Tools, select the sub-menu Upgrade by USB and press the OK key.
7. At Upgrade Mode, select the upgrade mode Allcode by using the keys
und
.
8. At Upgrade File, select the file copied in step 2.
9. Select the Start button and confirm by pressing OK.
A message saying that you will lose all personal settings will be displayed.
The upgrade will be performed after selecting Yes by using the keys
pressing OK. Then, the receiver will automatically perform new start.
5.2.2
und
and
Software Update via Satellite
smart can also upload the update file on the satellite Astra 19.2° E. You can then perform a
so-called OTA 6 update:
5F
1. In the menu Tools, select the submenu OTA Upgrade.
2. Leave all settings unchanged (factory settings).
The option of software update via satellite is only possible via Astra
19.2°E. Correspondingly, all settings should be left unchanged in the
status as preset:
6
Line
Target value
Satellite
(1/1) Astra 19.2°E
Transponder
(61/84) 12604 H 22000
Frequency
12604
Symbol rate
22000
Polarization
H
Download PID
343
OTA = Over The Air = via Satellite
16
Basic Operation
3. Mark the button Start by using the keys PR+ and PR-, and confirm by pressing the OK
key.
Now it is being checked if the software currently installed on the receiver is up-to-date. If
it is not up-to-date, then the current software version will be downloaded via satellite and
installed onto the receiver. After end of installation you will be asked if the update should
be saved.
4. Select the option Yes to accept the update. The satellite update may take up to one
hour. Do not switch off the receiver during such period!
5.3
Commissioning
After first switching-on or after resetting the receivers, various windows will open:
5.4
Language
By default, the language is preset to Deutsch [German].
Please ensure that the setting is correct; you may
change your settings by correspondingly pressing
the keys PR+ and PR-.
Confirm by pressing OK to go to the next window.
5.4.1
The submenu Language can be
accessed anytime via the menu
System Setup.
RAPS Start
Your receiver is equipped with RAPS. RAPS means Receiver Automatic Programming System. RAPS can automatically update the channel lists of your receiver.
What is RAPS?
Currently, the satellites Astra 19.2° and 23.5°, Eutelsat Hot Bird 13° East, Eurobird 9° and
Turksat 42° offer a four-digit number of digital TV and radio channels.
At delivery, state-of-the-art satellite receivers have all important channels already stored. But
what happens after that? New and interesting channels are added almost weekly, and there
are channel changes time and again.
Updating the channel list with a present receiver is not quite easy for most users. When
performing a channel search, invalid data are not deleted, and usually the new channels are
just added at the end of the list; this requires time-consuming reprogramming of the channel
list.
The RAPS system of your receiver automatically performs such programming work.
The window RAPS Automatic Installation is the second window of the installation process.
Every time you switch off your receiver, RAPS checks whether there are any changes with
the channel lists (RAPS scan). This only takes a few seconds.
In case of changes, the new data are automatically included into the new channel list (RAPS
download) and displayed in a table. If a channel changes the receive parameters, then this is
17
Basic Operation
automatically updated by RAPS. In case of new channels, such channels are added. If channels are permanently discontinued, then the corresponding channel number is deleted.
However, new channels are not only added, but allocated to logic blocks, correspondingly
enabling easier finding. That is why certain areas may remain free. Example: For Germany,
there is the basic list as well as the areas Third Channels, Info + Sports, Special Interest,
Local TV, as well as News starting at channel number 100 and many Music Channels starting
at channel number 123.
You can cancel RAPS installation by pressing the key EXIT whilst the countdown of
RAPS installation is running (and also at a
later point in time during installation).
The then displayed channel list is a preprogrammed factory list. However, such list is not
updated via satellite due to cancelled RAPS installation!
The respective up-to-date RAPS lists are available via the satellite Astra 19.2°. Correspondingly, RAPS can only be used within the footprint of the satellite Astra 19.2°; furthermore,
your system should be suitable for digital Astra receiving.
5.5
RAPS Parameters
During installation, the
third installation window
Automatic Programming
displays various parameters:
18
Basic Operation
No.
Meaning
1
Date of the RAPS file stored in the receiver
2
Date of the RAPS file currently available on the satellite
3
Number of available RAPS lists
4
Number of satellites included in the RAPS file:
Astra 19.2° East 7
Hotbird 13° East
Turksat 42° East
Astra 23.5° East
Eurobird 9A 9° East
6F
5
Number of transponders included in the RAPS file
6
Number of all channels in the RAPS lists
7
Progress bar: informs on progress of download of the RAPS file
5.6
Satellite List
After completion of RAPS download and
completed satellite scan (RAPS DiSEqC 8
scan), the window Satellite List will be
opened.
7F
The window displays the satellites included in the RAPS file. As the RAPS lists are
available via the satellite Astra 19.2°, Astra 19.2° is already marked (and cannot be
deselected!).
Select a satellite by pressing the keys PR+ and PR-.
Press OK to select a non-marked satellite.
Press OK to deselect a marked satellite.
Press
to go to the next window RAPS select raps file.
Examples:
•
Your antenna system is designed for receiving Astra 19.2°E and Hotbird 13°E. These
satellites are found and marked in the list. You are planning to soon extend your antenna
system for receiving of Eurobird 9A 9°E. You can additionally mark Eurobird 9A 9°E already now to avoid repeated installation in the future.
•
Your antenna system is designed for receiving Astra 19.2°E and Türksat 42°E. However,
the receiver in the children's room should only receive the German channels. For this,
manually deselect Türksat 42°E (found by RAPS-DiSEqC scan).
East, often abbreviated "E"
DiSEqC = Digital Satellite Equipment Control, a digital control signal technology with satellite receiving
systems
7
8
19
Basic Operation
5.6.1
Country
Select the country in which you want to
use the receiver - and correspondingly
also the RAPS list - by pressing the
keys PR+ and PR-. The selectable
countries are based on your satellite selection as per section “Satellite List”.
Press OK to go to the next window Your regional channel.
5.6.2
Regional Channel
Select your preferred regional channel
(which will be stored at number three in
the channel list) by pressing the keys
PR+ and PR-.
Press OK to go to the next window Channel-Filter; here you can select if you want to
include erotic channels and call TV (channels that may incur quite high telephone costs
due to telephone calls to the channel) into the channel list.
5.6.3
Channel Filter
Select Erotic and/or Call TV by pressing
the keys PR+ and PR-, and select the
option (Yes) to include such channels
into the channel list or (No) to not include such channels by respectively
pressing
/
.
Press OK to store your settings and to finish installation of the RAPS channel list. After
this, TV operation will automatically start.
5.7
Select Operation Mode
TV is the operation mode after first switching-on of the receiver (or after restoration of factory settings).
You can select between the operation modes TV (TV channels) and RADIO (radio channels) as follows:
Press the key TV/RADIO on the remote control.
Press again the key TV/RADIO to return to the previous operation mode.
20
Basic Operation
5.8
Call/Leave Menu
To call the menu, press the key MENU
(of the remote control or at the receiver).
The menu is called.
The following is displayed in the headline of the various menu windows:
1.
Name of menu window
2.
Current date
3.
Current time
Press the EXIT key to leave the menu or to go back one step.
5.9
It could be possible that you have to press EXIT several times to go
back to TV mode.
Menu Navigation
The menu items with the settings for TV and radio can be respectively accessed in the two
operation modes TV and Radio.
Press PR+ to select the menu item above.
Press PR- to select the menu item below.
Press
to change resp. increase the selected value.
Press
to change resp. decrease the selected value.
Instead of changing a value by using the keys
/
, with
many menu items you can also press the OK key, select a new value
from the list, and confirm such value by again pressing the OK key.
Active menu items are color-marked.
Although most settings for TV operation are made, you can also make some further settings
via the menu.
5.10
Parental Lock
In the sub-menu Parental Lock you can lock access to certain menus by using a PIN (e.g.
for protection of your settings) or block selection of certain channels by using a PIN.
Access the sub-menu Parental Lock as follows:
1. Press the MENU key.
2. Select the menu System Setup.
3. Select Parental Lock and confirm by pressing OK.
21
Basic Operation
After entry of password, you may
−
set if access to the sub-menus is protected by password,
by selecting the Menu Lock and selecting Off or On by using the keys
−
;
set if certain channels are to be locked by a PIN,
by selecting PIN and selecting Off or On by using the keys
−
/
/
; or
change the password:
Select the field New Password.
Enter a new password.
Go to the field Confirm Password.
Again enter the new password.
4. Press OK to save your changes and to leave the sub-menu.
5.11
Set Time
Reasonable operation of the receiver requires setting of system time. By default, the receiver
is set to GMT 9 Usage, i. e. date and time are taken from the received signal. Time zone is set
to GMT + 1 hour (+ 1:00) by default. Required changes can be made in the sub-menu Time:
8F
1. Select the menu System Setup (see above).
2. Select the sub-menu Time and confirm by pressing OK.
3. Select the item GMT Usage and switch on or off GMT Usage by using the keys
/
.
On = automatic time setting via satellite signal is activated.
Off = automatic time setting via satellite signal is deactivated.
It’s recommended to keep the presetting (GMT Usage On).
4. Select the item GMT and select your time zone by using the keys
/
example, the time zone of Germany, Austria and Switzerland is GMT +1:00.
; for
5. Select the item Summer Time and switch Summer Time Off or On by using the keys
/
.
Please verify the presetting and correct them, if required. Please also
consider corresponding change of those settings.
6. If automatic time setting (GMT Usage) is switched off, then date and time should be
manually entered:
For this, select the item Date, select the position to be changed by using the keys
/
, and enter the current date by using the numeric keys. Then, select the
item Time, select the position to be changed by using the keys
the current time by using the numeric keys.
9
GMT = Greenwich Mean Time
22
/
, and enter
Basic Operation
7. Leave the menu by pressing EXIT until the screen shows the TV picture.
5.12
TV
You have several possibilities to select a channel:
•
Direct channel selection;
•
Channel selection via selection window; and
•
Channel selection via search function;
as explained in the following sections.
5.12.1
Direct Channel Selection
Select the desired channel by using the keys PR+ and PR-.
With each change of channel, an information window with information on the current channel
will be displayed:
No.
Description
1
Channel number of current channel in current channel list
2
Channel name of current channel
3
Date
4
Time
5
Name of next program
6
Name of current program
Press the INFO key to call this window at any time.
Set display time at OSD Timeout (see section 9.5.1, page 49).
Press EXIT two times to close the information window.
23
Basic Operation
5.12.2
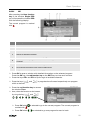
Channel Selection via Selection Window
1. Press the OK key to display a selection
window with all available channels (3).
2. Select the channel list with the desired
channel by using the keys
or
(1)
or
Press the FAV key to select from your
favorite lists (see p. 44).
3. Select the channel to be displayed (2) by using the keys PR+ and PR- for single steps or
P+ and P- for steps of ten, and confirm your selection by pressing OK.
The channel will be correspondingly switched.
4. Press OK or EXIT to close the selection window.
Channel selection window:
No.
Description
1
Display of current channel list
2
Marked channel
3
Channels included in the current channel list
4
Frequency of current channel (example: 33800 is 338.00 MHz)
5
Symbol rate of current channel (in megasymbols/second)
6
Polarization of current channel
7
Scroll bar – shows position of current channel in channel list
5.12.3
Channel Selection via Search Function
The channel lists can be quite comprehensive; correspondingly, the receiver offers various
possibilities to filter the list, search for channels in the list, or sort the list:
24
Basic Operation
Press the FIND key to open the window Find.
Select one of the offered options by using the
keys PR+ and PR-, and confirm by pressing OK.
5.12.3.1
HDTV Filter
Select HDTV to only show HDTV channels in the channel selection window.
Use the steps as described in 5.12.2 to select a channel.
5.12.3.2
Genre Filter
Select GENRE to show the genre selection window (1).
1
2
Select the desired genre
by using the keys PR+
and PR-, and confirm by
pressing OK. The channel selection window will
open as second window; this window only
shows channels with the
selected genre.
Press EXIT to close the channel selection window. Now you can choose another genre.
5.12.3.3
Find Channels (by Alphabet)
1. Press the FIND key, to open the window Find.
2. Select a character by using the keys
and
as well as PR+ and PR- and respectively
confirm by pressing OK to accept such character in
the field for the name or part of the name of the desired channel.
Additionally to letters and numbers, there are also special buttons:
25
Basic Operation
Button
Meaning
CAPS
(yellow function key)
Changes between upper-case and lower case
(only effective with letters).
DEL
(red function key) or <-
Deletes the last entered character.
OK
(blue function key)
Closes the windows.
SP
Enters a space character.
?
The question mark as first character has a wildcard function.
Example: "?R" searches for all channel names that include
an "R".
2
1
As soon as the first selected
character has been confirmed by pressing OK, a
second window will open,
showing all channels starting with this character (in
most cases, the first character is a letter).
Press EXIT to close window 1, provided that selection is sufficiently arranged for your
purposes. Now, you can select the desired channel in window 2 by using the keys PR+
and PR-, and confirm by pressing OK.
Return to entry of characters (see above) to further limit channel selection.
5.12.3.4
Sort Channel List (by Alphabet)
Select Sort (A-Z) or Sort (Z-A) to sort the displayed channels in ascending or descending
alphabetical order in the channel selection window.
26
With all of the functions as described in 5.12.3, the made selection or
sorting is deleted as soon as a channel is selected by pressing OK,
i.e. if you are then pressing the OK key to show the channel selection
window, the channel selection list is displayed in its previous original
state.
Basic Operation
5.12.4
Channel Information
Press the INFO key twice. The window below will be displayed:
No.
Description
1
Genre
2
Start time and end time of current program
3
Name of current channel
4
Name of current program
5
Language of current program
6
Detailed information on current program
7
Frequency, Polarization (H = horizontal, V = vertical), Symbol rate
8
Signal strength
9
Signal quality
10
5.12.5
DVB PIDs for video, audio, PCR 10
9F
EPG
The Electronic Program Guide is a comfortable tool, replacing a printed TV guide.
PID = Packet IDentifier, each table or each elementary stream in a transport stream is identified by a 13bit PID. PCR = Program Clock Reference; required to enable the decoder to perform correct presentation
regarding time and speed.
10
27
Basic Operation
5.12.5.1
Single EPG
Press the EPG key of the
remote control.
The window Single EPG
(information on one channel)
will open.
No.
Description
1
All programs during a day, with start and end time; the selected program is colormarked.
2
Date of day to which display applies.
3
Duration of current program (start time ~ end time).
4
Name of current program.
5
Illustration of the colored function keys and their functions.
6
Detailed information on the current program.
Press the keys PR+ and PR- to display a later or earlier program (1).
Press the keys
and
to page forward/back respectively one day (2).
Press the yellow function key to scroll down in the information section (6).
Press the red function key to scroll up in the function area (6).
Press the green function key to include channel, date, switch-on time and duration of
the marked program into a timer. The Timer Mode is set to Once by default; Timer Service is set to Channel. You may change the settings.
Press the blue function key to go to the window EPG.
Press the EXIT key to close the window Single EPG and return to TV operation.
28
Basic Operation
5.12.5.2
EPG
After pressing the blue function
key in the window Single EPG
you will access the window EPG
with the following display:
The current program is marked
with .
No.
Description
1
Thumbnail of selected channel.
2
Channel number of selected channel.
3
Name of selected channel.
4
Name of selected program.
5
Start time and end time of selected program.
6
Current and next program with a timeframe of approx. 1.5 hours for the marked
channel.
7
Illustration of the colored function keys and their functions.
8
All channels included in the current channel list.
9
Day to which the displayed data apply.
Press OK to open a window with detailed information on the selected program.
Press the OK key, the red function key or the EXIT key to close such window.
Press the keys PR+ and PR- to flip through all available channels.
Press the keys
within a channel.
and
to page back and forward respectively one program
Press the red function key to access
the window Time:
Here, select the function on the bottom
by using the keys
and
Press OK when
marked with .
is selected to go to the current program. The current program is
Press OK when
:
is selected to go one program forward or back.
29
Basic Operation
Press OK when
is selected to go two hours forward or back.
Press OK when
is selected to go one day forward or back.
Press OK when
is selected or press EXIT to close the window Time and to return
to the EPG window.
Press the green function key to include channel, date, switch-on time and duration of
the marked program into a timer. The Timer Mode is set to Once by default; Timer Service is set to Channel. You may change the settings.
Press the blue function key to leave the EPG window and return to the window Single
EPG.
Press the EXIT key to leave the EPG window and return to the TV program.
5.12.6
Audio Settings
1. Press the key AUDIO.
2. Select the audio mode by using the keys
and
.
Depending on the selected channel and the current program, the following modes are
available: Left - Right - Stereo - Mono.
3. Press the keys PR+ or PR- to select another language or Dolby AC3 (Dolby Digital) as far
as provided by the TV station.
4. After selecting the desired audio mode, leave the menu by pressing the EXIT key.
5.12.7
Teletext
Teletext is an information system displayed on your TV set. Teletext is only possible if the
selected channel supports such function. The information is organized in the main pages and
subpages.
5.12.7.1
Switching 0n Teletext
Press the key TXT.
If subtitles are offered for the program in the selected channel, a selection window appears.
Press the keys
and
to select Teletext
Press OK to switch on teletext. The first teletext page no. 100 is displayed.
5.12.7.2
If subtitles are offered for the program in the selected channel, immediately after pressing TXT the first teletext page no. 100 is displayed.
Navigating inside Teletext
To navigate inside teletext proceed as follows:
key
function
Keys 0 ... 9 of the remote control
Direct input of a page number
Next main page
Previous main page
30
Basic Operation
key
function
(if there are subpages)
Next sub page
(if there are subpages)
Previous subpage or AUTO: automatic switch
from one subpage to another
5.12.7.3
Setting the Transparency During Teletext-View
Drücken Sie mehrmals OK, um die Transparenz der Videotextdarstellung in vier Stufen
(von nicht transparent bis vollständig transparent) einzustellen.
5.12.7.4
Switching Off Teletext
Press the EXIT or TXT key to deactivate teletext.
5.12.8
Subtitles
If subtitles are offered for the program in the selected channel, these can be activated
as follows:
1. Press the keys TXT to open the selection window Subtitles/Teletext.
2. Press the keys
and
Subtitle Language appears.
to select Subtitle and confirm with OK. Another window
3. With the keys PR+ or PR- select a line Subtitle language and confirm your selection with
OK to activate subtitles. Only if several subtitle languages are being sent there will appear several lines Subtitle language. If for example only German subtitles are sent, deu(D)
is preset as subtitle language.
To switch off the subtitles proceed as follows:
1. Press the key TXT to open the selection window Subtitles/Teletext.
2. Press the keys
and
Subtitle Language appears.
to select Subtitle and confirm with OK. Another window
3. With the keys PR+ or PR- select the line SUB OFF and confirm your selection with OK to
deactivate the subtitles.
5.12.9
5.12.9.1
Aspect Mode
Setting the Aspect Mode with the V-MODE key
Press the V-MODE key several times to set the aspect ratio. Possible values:
Auto, 4:3PS, 4:3LB, 16:9LB (see below table).
31
Basic Operation
5.12.9.2
Setting the Aspect Mode via the Menu
Select Aspect Mode to set the aspect ratio by using the keys
and
.
Value
Meaning
Auto
Default setting: the receiver selects optimum value
4:3PS
For playback with a 4:3 screen, PS = Pan & Scan:
• 4:3 program: picture is optimally displayed.
• 16:9 program: picture height is adjusted to screen; picture information
on the right and left are missing.
4:3LB
For playback with a 4:3 screen, LB = Letterbox
• 4:3 program: picture is optimally displayed.
• 16:9 program: picture width is adjusted to screen; lacking height is filled
up by black bars.
16:9
For playback with a 16:9 TV set
5.12.10
Video Resolution
5.12.10.1
Switching the Video Resolution via the Menu
In the menu System Setup, select the submenu TV System and confirm by pressing
OK.
1. Select the Video Resolution.
2. Press OK to display a list with the selectable values.
3. Select the value appropriate to your TV set by using the keys PR+ and PR-.
Example: If your TV set is capable of displaying a resolution of 720p 11 then you should
also set 720p at the receiver (720p is the factory setting).
10F
5.12.10.2
If receiver and your TV set are connected via a SCART cable, then
max. resolution is 576i (PAL format).
Switching the Video Resolution via the green function key
Drücken Sie die grüne Funktionstaste, um sich die aktuelle Videoauflösung anzeigen zu
lassen.
Drücken Sie (solange die Videoauflösung angezeigt wird) erneut die grüne
Funktionstaste, um die Videoauflösung auf den nächsten Wert umzuschalten. Sie haben
die Wahl zwischen 576i, 576p, 720p, 1080i und 1080p.
5.12.11
Recall
Press the PR key to go to the last viewed channel.
p = progressive scan: progressive scan images are transmitted, e.g. 720p means that 50 progressive
scan images with a resolution of 1280 pixel/line and 720 lines/image are transmitted per second. i =
interlaced video: odd and even lines are transmitted alternatingly.
11
32
Media Player
5.12.12
Sleep Timer
The receiver comprises of a Sleep-Timer that enables an automatic change of the device
from the operating mode to the standby mode:
1. Select the submenu Local Time Setting in the menu System and press OK.
2. Using the buttons PR+ and PR- select the menu item Sleep-Timer.
3. Press the buttons
und
to activate the Sleep Timer and define a time between 10 and 120 minutes after which the receiver automatically switches over to the
standby mode.
4. Press two times EXIT to return to the TV program.
6
Media Player
The Media Player can be used to play MPEG, MP3 and JPG files available on the data storage.
1. Open the Media Player by selecting the
item Media Player in the menu Media
and confirming by pressing OK
or
by pressing the yellow function key.
2. Press the key 0 until the upper line states the desired file on the very left.
The folder structure now only displays the files corresponding to the desired file type.
Only after selecting e.g. music, this will display available music files.
3. Press
/ PR- to select the connected data storage, and confirm by pressing OK.
The present directories (and files as far as they correspond to the selected file type) will
be displayed.
4. Select the file to be played (press OK to open a directory).
5. Press OK to start playback (or press the key
6. Use the keys
,
,
,
,
and
).
to control playback.
The buttons on the bottom edge of the Media Player window provide further functions. Such
functions depend on the selected file type (music, images, videos).
6.1
6.1.1
Music
Playback
1. Select the track to be played by using the keys PR+ und PR-.
2. Press OK to start playback.
3. Use the keys
,
,
and
to control playback.
33
Media Player
6.1.2
6.1.2.1
Playlist
Creating a Playlist
Select a track by using the keys PR+ and PR- and press the green function key to add
this to the playlist (favorite list). The respective track is marked with a heart symbol.
You can repeat this procedure for all tracks to be added to the playlist.
Press the yellow function key to add all tracks from the current directory to the playlist.
If pressing the yellow function key again, the playlist will be completely deleted.
Press the red function key (SHIFT) to display the favorite list (playlist). A new window
Show Playlist will be displayed. Now you can move or remove files in/from the list.
6.1.2.2
Moving files within the Playlist
1. Select a track to be moved by using the keys PR+ and PR-.
2. Press the red function key (SHIFT) to mark the selected track for moving
.
3. Select the new position of the selected track by using the keys PR+ and PR-.
4. Leave the Move function by pressing the red function key (SHIFT) again.
Now you can close the window Show Playlist by pressing EXIT, or move another track
by starting again with step 1, or you may use the
6.1.2.3
Delete files from the Playlist
1. Select a track to be deleted by using the keys PR+ and PR-.
2. Press the green function key to remove the selected track from the playlist.
3. Press EXIT to end deletion, or go back to step 1 to remove further tracks from the
playlist.
6.1.2.4
Delete all files from the Playlist:
1. Press the yellow function key to remove all tracks from the playlist.
You will be asked if you really want to delete all entries.
2. Select Yes or No by using the keys
and
, and confirm by pressing OK.
When stating No, you will be directed back to the play list. When stating Yes, the play list
will be completely deleted and you will be directed to the start window of the Media
Player.
6.1.3
Edit Audio Files
Press the blue function key to go to the Edit mode. Here you can
−
rename tracks by pressing the red function key;
−
copy tracks by pressing the green function key;
−
and delete tracks by pressing the yellow function key;
−
as well as create new folders by pressing the blue function key.
Press the EXIT key twice to leave the Edit mode. You will be directed back to the initial
window of the Media Player.
34
Media Player
6.1.4
Sort Audio Files
Press key 1 to sort the displayed tracks by name, play time, file size or favorites. Favorites are the tracks that are included in the current play list.
6.1.5
Playback Mode
Press key 2 to change the playback mode:
Symbol in Media Playerwindow
Meaning
Single track is played and repeated.
All tracks in the current directory are played and repeated in
the displayed order.
All tracks in the current directory are played in random order
and are then repeated.
Press the EXIT key to close the Media Player and to return to the menu Media.
6.2
Images
The basic steps with image files only slightly differ from the steps with music files (automatic
playback of a number of images). The differences are included in the functions available by
pressing the keys 2 and 3.
6.2.1
Configure a Slide Show
Press the key 2 to configure a slide show
1. Select Slide Show Time by using the keys PR+ and PR-.
2. Using the keys
and
, select the time period between displaying of two
subsequent images (1 to 9 seconds). When selecting Off, the first selected image will
be continuously displayed on the screen.
3. Select Slide Show Repeat by using the keys PR+ and PR- to determine by using
the keys
and
if the slide show should start again from the beginning after displaying the last image.
4. Select the line Save – Cancel by using the keys PR+ and PR-, and then use the keys
and
to determine if the settings should be saved or discarded, and confirm by pressing OK. You will be directed back to the image list.
6.2.2
Showing all Images in the Current Directory
Press key 3 to display all images in the current directory.
You can also have images being displayed whilst music is being
played, e.g. by changing the file type during playback of music (using
key 0) and then starting a slide show.
35
IP Functions
6.3
Video
6.3.1
Playback Video
1. Select the file to be played using the keys PR+ und PR-. In left half of the screen you see
a thumbnail and you can watch the video in preview mode. Use the keys
to control playback.
,
, and
2. Press OK to start playback in full screen mode.
3. Use the keys
6.3.2
,
,
,
,
,
and
to control playback.
Edit Video Files
Press the blue function key to go to the Edit mode. Here you can
−
rename tracks by pressing the red function key;
−
copy tracks by pressing the green function key;
−
and delete tracks by pressing the yellow function key;
−
as well as create new folders by pressing the blue function key.
Press the EXIT key twice to leave the Edit mode. You will be directed back to the initial
window of the Media Player.
6.3.3
Sorting Videos
Press key 1 to sort the displayed videos by name, play time or file size.
7
IP Functions
In the menu Media there are several menu items, you can call, if the receiver is connected to
the internet.
7.1
YouTube
Select the menu item YouTube and press OK to access directly selected clips of the
internet video portal YouTube.
7.2
Web Radio
Select the menu item Web Radio and press OK to access selected web radio channels.
7.3
Web News
Select the menu item Web News and press OK to access selected web news services.
7.4
Weather Forecast
Select the menu item Weather Forecast and press OK, to access web weather forecast
services.
8
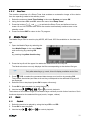
smartSTREAM - BOX2IP
Your receiver is equipped with smartSTREAM, that means it can deliver picture and sound
not only to the TV, but to stream to a mobile device via the local Wi-Fi. That means you can
transfer the current TV program from the receiver via a wireless router to mobile devices.
36
smartSTREAM - BOX2IP
Thus you can watch the TV program on your smartphone or tablet. You are not bound to a
cable and not to your TV set to enjoy the program. To use this feature on your tablet or
smartphone, the installation of an APP is required.
smartphone
or
tablet PC
TV
WLAN connection
WLAN router
HDMI connection
8888
8.1
Preparation of the Devices
8.1.1
Receiver
8.1.1.1
LAN connection
Mirage
Connecting a Home Network
1. Connect the receiver (socket ETHERNET) and your router with an Ethernet cable (wired
LAN connection).
2. Go in the menu Tools to the menu item Network Setting and press OK. The window
Network Setting opens.
3. Select DHCP 12
On to set automatically via DHCP (automatic LAN configuration) or
Off to set that the network must be configured manually (manual LAN configuration).
11F
Automatic LAN configuration
Go in the window Network Setting to the button Apply and press OK to connect the
receiver to the network.
Manual LAN configuration
1. Insert in the window Network Setting the network parameters:
IP-Address, Subnet Mask, Gateway, DNS preferred and DNS alternate by selecting
each parameter, inserting the right value with the numeric keys and pressing OK.
2. Go to the button Apply and press OK to connect the receiver to the network.
12
DHCP = Dynamic Host Configuration Protocol, a server (DHCP server included in the router) allocates a
network configuration to the clients (e. g. receiver).
37
smartSTREAM - BOX2IP
8.1.1.2
Setting up the BOX2IP Server
1. Go in the menu Installation to the menu item BOX2IP and press OK. The window
BOX2IP server setting opens.
2. Set under
Satellite 1, Satellite 2, Satellite 3 and Satellite 4 the satellites broadcasting the channels which should be available for the transfer to a mobile device.
8.1.2
To use the smartSTREAM function, it is absolutely necessary to make these
settings.
Mobile Device
1. Connect your mobile device via WLAN with the router in your home network. For this,
pay attention to the respective notes in the manual of the mobile device.
2. Install the Elgato SAT>IP App on your mobile device:
- for the operating system iOS from the Apple App Store and
- for the operating system Android from the Google Play Store.
3. Run the Elgato SAT>IP-App. Receiver and mobile device will be connected with each
other via LAN / WLAN. If the connections are ok, you will see the receiver as Sat>IP
server in the Elgato app menu Settings at the menu item Devices.
4. If you do not see it, check the LAN / WLAN connections. If there are several reachable
Sat>IP servers, they are shown respectively. Select the desired device.
5. Start channel search. You will get to the menu window satellite setup, where you will
see the satellites you selected (see section 8.1.1.2, page 38).
6. Confirm the satellites by starting the automatic detection or by pressing the button
Search on selected satellites.
7. Confirm also the next two windows.
8.2
Operation
There are two possibilities to use the smartSTREAM function.
As soon as the Sat>IP-App is started, the current TV program will be transferred to the mobile device.
8.2.1
Live-TV on your TV Set
Simultaneously with the start of the Sat>IP app the receiver channel list will be reduced. It
now contains only those channels broadcasted via the same transponder as the current TV
channel.
In between this channel list you can switch channels with the remote control of your
receiver.
8.2.2
smartSTREAM Mode (BOX2IP Mode)
Press the key BOX2IP or go in the menu Media to the menu item BOX2IP an press OK,
to set the receiver into smartSTREAM mode. On the TV screen you see now the
"BOX2IP" OSD screen instead of the TV image.
On your mobile device you have now a complete channel list, containing all channels which
are broadcasted via the satellites you set in section 8.1.1.
38
Extended Settings and Functions
Switch the channel directly on your mobile device.
9
During smartSTREAM mode (BOX2IP mode) you can switch off your TV set.
Extended Settings and Functions
9.1
Installation
The default settings apply to a standard satellite system. Any further system functions (e.g.
unicable system or motor antenna) should be manually set in the menu Installation:
In case of doubt, have those settings being made by an expert. Usually, there are no required settings within scope of normal use of the
system.
CAUTION!
9.1.1
Antenna Connection
1. In the menu Installation, select the submenu Antenna Connection and confirm by
pressing OK.
2. Select by using the keys
connected to the receiver.
and
if a Fixed Antenna or a Motor Antenna is
3. Press EXIT to leave the submenu Antenna Connection.
4. Press EXIT again to leave the menu Installation and to return to TV operation, or go to
another submenu
9.1.2
If you selected a Motor Antenna, then such antenna should be further
configured at the menu item Antenna Setup.
Satellite List
The submenu Satellite List states a preset list of possible satellites. Depending on your
antenna system you can select the satellites used for receiving channels:
1. In the menu Installation, select the submenu Satellite List and confirm by pressing OK
2. Select the satellite you want to receive by pressing the keys PR+ and PR-, and confirm
by pressing OK.
The selected satellite will be correspondingly marked ( ).
You may also edit the satellite list by selecting
one of the buttons on the right edge of the
menu window.
To change an entry:
1. Press the red function key (SHIFT).
39
Extended Settings and Functions
2. Select by pressing the keys PR+ and PR- if you want to change name or longitude (position).
3. Select the text position to be changed by pressing the keys
−
and
:
Enter the numbers and letters using the numeric keys of the remote control.
−
Press the red function key (SHIFT) to switch between upper case and lower case.
−
Press the green function key to delete the currently selected position.
−
Press the yellow function key to confirm your changes and to return to the satellite
list.
−
Press the blue function key (L/R) to cancel changes and to return to the satellite list.
To add an entry:
1. Press the green function key.
2. Enter name and longitude (entering of text as described in the section Change).
To delete an entry:
1. Select the satellite to be deleted by using the keys PR+ and PR-.
2. Press the blue function key (L/R). A window will open, stating the question if you really
want to delete the entry.
and
3. Select OK or No by using the keys
pressing OK.
You will be directed back to the satellite list.
, and confirm your selection by
Press EXIT to leave the submenu Satellite List.
Press EXIT to leave the menu Installation and to return to TV operation.
9.1.3
Antenna Setup
The submenu Antenna Setup states several entries depending on your selection of
Fixed Antenna
or
Motor Antenna
at Antenna Connection.
9.1.3.1
Fixed Antenna
At Satellite, select the satellite to which the following settings should apply.
The options are limited to such satellites that are marked in the Satellite List as such satellites from which you want to receive channels.
At LNB Freq, select the value corresponding to the used LNB. Alternatively, press OK,
select the corresponding value from the list, and confirm by pressing OK.
40
Extended Settings and Functions
Possible values LNB frequency (MHz)
5150
10600
Universal (9750 - 10550)
5750
10700
Universal (9750 - 10600)
5950
10750
Universal (9750 - 10700)
9750
11250
Universal (9750 - 10750)
10000
11300
Universal (9750 - 10600)
10050
5150 - 5750
Unicable (9750 - 10600)
10450
5750 - 5150
Unicable (10200)
A universal LNB with 9750 - 10600 MHz is the default value.
You can set signal strength and signal quality for receiving of a certain transponder:
At Transponder, select the transponder for
which signal strength and signal quality should
be displayed at the lower window edge by using the keys
and
(or select Transponder, press OK, select the desired transponder from the list und confirm by pressing
OK).
No.
Meaning
1
Sequential number of selected transponder
2
Total number of receivable transponders
3
Frequency (MHz)
4
Polarization, H = horizontal, V = vertical
5
Symbol rate (MS/s)
Orientation of your antenna is optimal with maximum signal strength.
When using a multi-feed antenna, select the port for the respectively selected satellite at
DiSEqC 131.0 14.
12F
13F
If you want to receive signals from more than four satellites, select the port for the respectively selected satellite at DiSEqC1.1 15. This is set to Disable by default.
14F
13
DiSEqC = Digital Satellite Equipment Control, a digital control signal technology with satellite receiving
systems
14
DiSEqC1.0 supports four satellite positions
15
DiSEqC1.1 supports 16 satellite positions
41
Extended Settings and Functions
Select the menu item 22K to permanently switch on or off the 22 kHz control voltage for
high-low band switching (this is required e.g. for certain antenna systems or to avoid disturbances). In most cases, Auto is to be selected (factory setting).
At Polarity, select the correct value for the selected channel. Possible settings are H
(horizontal), V (vertical) and Auto. Factory setting is made to Auto.
9.1.3.2
Motor Antenna
At LNB Freq, select the value corresponding to the used LNB. Default
value is a universal LNB with 9750 10600 MHz.
At Motor Type, select the used control signal technology. Select between DiSEqC 1.2
and USALS 16 (depending on the used motor). The submenu item Motor Setting states
different settings depending on your previous selection.
15F
9.1.3.2.1
DiSEqC 1.2
Select Delete All to delete all previously set satellite positions.
Select Motor Setting and press OK to open the submenu Motor Setting:
To set various antenna positions:
1. Select Satellite to select the satellite
to which the following settings should
apply.
2. Select Transponder to select the
transponder that should be decisive
for the antenna position (usually the
transponder that is used to send your
preferred channel).
3. Select Pos No. & Save to determine a position number at which the respective satellite
(i.e. the respective antenna position) should be saved.
4. Select Go to X to call a position from which you want to make the selection (the value
Reference is the zero position).
5. Select Save and turn the antenna to the west or east by using the keys
and
Search for maximum values of signal strength and signal quality (are displayed at the
lower screen edge).
6. Then press OK to save the found position. A query will be displayed.
7. Confirm change of position by pressing Yes or discard such change by pressing No.
8. Repeat the steps 1 to 6 for any further satellites/transponders, if applicable.
16
As compared to 1.0 and 1.1, DiSEqC1.2 offers the additional possibility of rotor control, USALS =
Universal Satellites Automatic Location System (particularly simple motor antenna control)
42
.
Extended Settings and Functions
Select Recalculation and press OK to discard any previous settings and to again determine antenna position.
Press EXIT to return to the submenu Antenna Setup.
Select Limit setup and press OK to
open the window Limit setup.
1. Select Limit setup to switch between Disable Limit, West Limit and East Limit.
2. Mark the button Limit setup and move the limit - as defined in the previous step - to the
east or west by using the keys
and
.
3. Mark the button Go to Reference and then press OK to move the motor antenna to its
starting position.
4. Press EXIT to return to the submenu Antenna Setup.
9.1.3.2.2
USALS
A satellite position is defined as reference, and the data provided for latitude and longitude
are then used together with such basic values to calculate the rotary movement for all remaining satellites.
Select Local Longitude to enter the longitude of the position of your antenna by using
the numeric keys of your remote control.
Select Local Latitude to enter the latitude of the position of your antenna by using the
numeric keys of your remote control.
Select Motor Setting and press OK to
open the submenu Motor Setting.
1. Select Satellite to select the satellite
that should be used as reference for
USALS control of the antenna.
2. Select Transponder to select the transponder that should be decisive for the antenna
position (usually the transponder that is used to send your preferred channel).
3. Align your motor antenna so that signal strength and signal quality (are displayed at the
lower screen edge) reach maximum values.
4. Press EXIT to return to the submenu Antenna Setup.
In the submenu Antenna Setup, select the item Limit Setup and press OK to open the
window Limit Setup. Proceed as described above.
9.1.4
Single Satellite
Here you can scan individual satellites for receivable channels.
At Satellite, select the satellite for which the scan should be performed.
43
Extended Settings and Functions
Also here, options are limited to the satellites that are marked in the
Satellite List as such satellites from which you want to receive channels.
Select Only FTA 17 to determine if scan should be made only for FTA channels or for all
channels.
16F
At Scan Channel, select if you want to perform scan only for TV channels, only for radio
channels or for TV + radio channels.
At Network Search, select if you want to search for an individual channel (No) or all
channels of a channel network (Yes), e.g. PRO7, SAT1, KABEL1, SIXX. The item Network Search will only be active after selecting the scan mode Preset Scan (i.e. Standard Scan).
At Scan Mode, select the scan mode:
−
Preset Scan (Standard Scan): In such mode, only the frequencies included in the
TP list are regarded.
−
Auto Scan (Blind Scan): Here, all frequencies are scanned, whether they are included in the TP list or not.
At Tuner, select the LNB to process the signals (if only one LNB is present, then this item
will not be active).
Start channel search by selecting Search and confirm by pressing OK.
9.1.5
Multi Satellite
Multi Satellite differs from Single Satellite by the fact that all satellites marked in the satellite list are scanned for receivable channels.
9.2
TV Channel List / Radio Channel List
You can individually customize the channel lists. There are various available possibilities for
editing. For reasons of simplification, only editing of TV lists will be explained in the following.
Editing of radio channel lists will be performed corresponding to editing of TV channel lists.
1. In the menu Edit Channel, go to the
sub-menu TV Channel List.
2. Press OK to open the window TV
Channel List.
17
FTA = Free To Air = unencrypted channels
44
Extended Settings and Functions
With the editing processes described in
the following you will be respectively
asked - when leaving the Edit Channel
menu (or when changing the channel list
or when selecting another function) - if
you want to
overwrite the factory-set channel program list, i.e. you may accept the performed changes
(OK - then the channel list will be correspondingly changed) or discard them (No - then the
original channel list will not be changed).
9.2.1
Add a Channel to Favorites
1. Mark the corresponding channel by using the keys PR+ and PR-.
2. Press the key FAV and confirm by pressing OK.
A selection window with the eight available favorite lists will open.
3. Select the favorite list to which the channel is to be allocated by using the keys PR+ and
PR-, and confirm by pressing OK. The respective favorite list is correspondingly marked
( ).
4. The channels allocated to a group of favorites will be marked in the channel lists
.
5. Press the key FAV once again or the key EXIT to leave the function Favorite.
9.2.2
Provide Channels with Password Protection (Lock Against Unauthorized Access)
1. Mark the corresponding channel by using the keys PR+ and PR-.
2. Press the red function key (SHIFT).
3. Confirm by pressing OK. You will be requested to enter a password.
4. Enter a password. Locked channels are marked in the channel lists
.
5. Again press the red function key (SHIFT) to leave the function Lock.
9.2.3
From now on, first the password has to be entered to be able to
watch such a locked channel.
Skipping Channels when Switching from Channel to Channel (Zapping)
1. Mark the corresponding channel by using the keys PR+ and PR-.
2. Press the green function key.
3. Confirm by pressing OK. Channels to be skipped are marked in the channel lists.
4. Again press the green function key to leave the function Lock.
From now on, the channel is skipped when switching from one channel to the next (zapping).
45
Extended Settings and Functions
9.2.4
Move Channels to Another Channel Position
1. Press the yellow function key to activate the function Move.
2. Mark the channel to be moved by using the keys PR+ and PR-, and confirm by pressing
OK. The channel to be moved is marked in the channel list
.
If you want to move more than one channel, then mark further channels by using the
keys PR+ and PR-, and respectively confirm by pressing OK. The channels to be moved
should not be necessarily in an uninterrupted sequence.
Example:
Before moving – three channels
are marked
After moving
3. Select the channel number to which the channel/channels are to be moved to by using
the keys PR+ and PR-, and again press the yellow function key.
4. Press the EXIT key to leave the function Move.
9.2.5
Rename Channels
1. In the sub-menu Edit Channel – TV Channel List, press the blue function key (L/R).
2. Press the green function key to activate the renaming process.
3. Mark the channel to be renamed by using the keys PR+ and PR-, and confirm by pressing OK.
4. The window Rename will be displayed.
−
Select the character to be changed
by using the keys
and
.
−
Enter the new character respectively by using the numeric keys of the remote control.
−
Press the red function key (CAPS) to switch between upper case and lower case.
−
Press the green function key (DEL) to delete the respectively selected character.
−
Press the yellow function key (OK) to accept the changes made so far and to close
the window Rename.
−
Press the blue function key (CANCEL) to discard the changes made so far and to
close the window Rename.
5. Press the green function key to leave the rename mode.
46
Extended Settings and Functions
9.2.6
Delete Individual Channels from Channel List
1. In the sub-menu Edit Channel – TV Channel List, press the blue function key (Edit).
2. Again press the blue function key (Delete) to access the delete mode.
3. Mark the channel to be deleted by using the keys PR+ and PR-, and confirm by pressing
OK. The respective channel is correspondingly marked
.
Repeat step 3 as long as all channels to be deleted are marked.
4. Again press the blue function key (Delete) or the EXIT key to leave the Delete mode.
5. If you agree to overwrite the factory-set channel list when leaving the menu (see above),
the marked channels will be deleted.
9.2.7
Delete All
To delete all channels
1. Select Delete All in the menu Edit Channel.
2. Press OK. You will be asked if you want to delete all channels.
3. Select the answer Yes or No by using the keys
ing OK.
9.3
and
, and confirm by press-
After deletion of all channels, all channel lists will be empty and
should be newly created!
Rename Favorite Lists
In the submenu Favorite of the menu Edit Channel you can rename favorite lists.
1. Select the favorite list to be edited by using the keys PR+ and PR-, and confirm by
pressing OK.
2. An on-screen keyboard will be displayed.
3. Select letters/numbers by using the keys PR+ and PR- as well as the keys
, and confirm by pressing OK.
and
Switch between upper case and lower case by pressing the yellow
function key.
Delete individual letters/numbers by pressing the red function key
(SHIFT).
Repeat this until the desired favorite name is entered.
Press the blue L/R key to return to the sub-menu Favorite and press EXIT to leave the
sub-menu.
9.4
Timer
In the sub-menu Timer of the receiver you can program, edit and delete up to eight different
events (channel switch).
1. In the sub-menu Timer Setting, mark a timer by using the keys PR+ and PR-.
2. Press the OK key to open the timer.
47
Extended Settings and Functions
3. Mark the line Timer Mode by using the keys PR+ and PR-.
4. You can select from the following possibilities by using the keys
and
:
Value
Meaning
Off
The timer is deactivated.
Once
Single event (only once).
Daily
Event occurs every day at the same time (e.g. the news program every
day)
Weekly
Event always at the same weekday
Monthly
Event occurs every month at the same day (e.g. every 20th)
Monday to Friday
Event Monday to Friday at the same time.
5. In line Timer Service the option Channel is selected. There is not any possibility to
change this.
6. Mark the line Wakeup Channel by using the keys PR+ and PR-, and select the channel
to be displayed by using the keys
and
.
7. Mark the line Wakeup Date by using the keys PR+ and PR-, and enter the date by using
the numeric keys.
8. Mark the line On Time by using the keys PR+ and PR-, and enter the on time by using
the numeric keys.
9. Mark the line Duration by using the keys PR+ and PR-, and enter duration of the program by using the numeric keys.
You can go from letter to letter (position to position) in the date and
time fields by pressing the keys
and
.
10. Mark the key Save by using the keys PR+ and PR-, and confirm by pressing OK (or
select Cancel and confirm by pressing OK if you want to cancel programming – then you
will return to the sub-menu Timer Setting).
48
You can directly add programs marked in EPG to the
timers. This significantly facilitates programming as you do not have
to make settings for channel, date and time.
Extended Settings and Functions
9.5
OSD Setting
Select in the menu System Setup the submenu OSD 18 Setting and press OK.
17F
9.5.1
Hide OSD
Using the keys
and
, set the number of seconds after which the OSD should
be hidden. You may set values from 1 to 10 seconds.
Default value is 5s (factory setting).
9.5.2
OSD Transparency
Select transparency of the on-screen menu by using the keys
and
.
You may set values from 0% (OFF) (no transparency) to 40% (almost transparent). Default value is OFF.
9.6
Automatic Standby Function
Based on current EC regulations, this receiver is equipped with an
energy saving system. After three hours, the receiver will automatically switch to energy save mode (energy consumption of less than 1 W)
unless a function is triggered via remote control during such period
(e.g. volume change or switching of channels). You can deactivate the
automatic standby function via the menu.
1. Select in the menu System Setup the submenu Other and press OK.
2. Select Auto Standby to switch on or switch off the automatic standby function, using the
keys
9.7
(factory setting is Auto Standby On).
and
Display Setting
Select in the menu Tools the submenu Display setting and press OK to edit various display
settings:
Select Brightness to change the brightness value from 0 to 100 (default value is 50) by
using the keys
and
.
Select Contrast to change the contrast value from 0 to 100 (default value is 50) by using
the keys
and
.
Select Saturation to change the saturation value from 0 to 100 (default value is 50) by
using the keys
and
.
Select Hue to change the hue value from 0 to 100 (default value is 50) by using the keys
and
.
Select Sharpness to change the sharpness value from 0 to 10 (default value is 5) by
using the keys
18
and
.
OSD = On Screen Display
49
Extended Settings and Functions
9.8
Format of the Video Signal at the SCART Output
1. In the window TV system move highlight on Scart Out item and press OK.
2. Press the keys PR+/PR- to select from the list the format of the video signal at the
SCART output and press OK. Possible values are YUV and RGB. Default is YUV.
9.9
Due to the internal signal processing it’s not anymore possible to select
higher resolutions than 576i even at the HDMI if RGB is selected
Digital Audio Out
Select in the menu System Setup the submenu TV System and press OK.
Select Digital Audio Out to set the format of the digital audio signal by using the keys
and
:
PCM – Pulse Code Modulation (default),
DD – Dolby Digital (multi-channel audio).
For programs broadcasted in DD format, select DD if you have a connected DD-compatible multi-channel amplifier or a DD-compatible
home cinema system, or if your TV set is capable of processing DD
signals.
9.10
Simultaneous Playback of Picture and Sound
Asynchrony between the image and the sound signals might for example occur in your home
cinema system due to the use of long cables. Your receiver offers the possibility to balance
this by slightly shifting the audio against the video signal.
1. Select in the menu System Setup the submenu Other and press OK.
2. Select AV Sync Value and set a value of shift between -500ms and +500ms using the
keys
9.11
und
(factory default is AV Sync Value 0 ms).
LNB IN / OUT Loop Through (Loop Standby)
(only with version II, see section “Receiver”, page 7)
Basically, after turning off the receiver it switches to power saving mode ("Deep Standby",
red LED lights up). At the LNB OUT terminal there is no or only a highly attenuated signal. If
you want to use LNB OUT anyway, you can set that in the submenu Other of the System
Setup menu:
Select Loop Standby to switch on and off the possibility of looping through the satellite
signal, using the buttons
CAUTION!
50
und
(factory default is Loop Standby off).
If you select Loop Standby On, the receiver goes into standby mode after
switching off, but not into the power saving mode. The display shows the
current time.
Operation in a Unicable System
9.12
SmartLink (CEC)
If you have a CEC 19-compatible TV set, and receiver and TV set are connected via HDMI you
can switch on and off (standby mode) both sets with the remote control of your receiver:
18F
1. Select in the menu System the submenu TV System and press OK.
2. Select SmartLink and use the keys
on and off.
9.13
und
to switch the SmartLink function
Software Version
The submenu Information of the menu Tools displays the current version number of the
receiver software.
9.14
Factory Settings
If you erroneously saved wrong settings or if you want to pass on the receiver without your
settings, then you can reset the receiver to the factory settings (reset):
To reset the receiver:
1. In the menu Tools, select the submenu Factory Settings.
2. Press the OK key. You will be asked if you want to reset the receiver and delete individual settings.
3. Select Yes or No by using the keys
und
, and then press OK. After resetting
your receiver, the language selection menu will be displayed.
10 Operation in a Unicable System
10.1
About Unicable
The HDTV receiver allows for changing the receiving mode to the unicable standard. This
makes it possible to connect several independent receivers (up to 12 - depending on the
used system) to only one main line.
For this, an own IF channel and a corresponding frequency should be set for each receiver
via the settings menu.
Allocation of channels and frequencies depends on the used LNBs and/or multi-switches.
The data sheet and the technical documentation of your LNB and/or multi-switch include an
allocation table similar to the following table.
CEC = Consumer Electronics Control = HDMI feature for entertainment units, provides via HDMI various
control functions, e. g. "one touch recording" or "system standby". The TV set is the control center and
the TV remote control becomes the remote control of the whole system.
19
51
Operation in a Unicable System
10.2
Allocation of IF channels and frequencies
Receiver
IF channel
Exemp. frequency (MHz)
Receiver 1
1
1284
Receiver 2
2
1400
Receiver 3
3
1516
Receiver 4
4
1632
Receiver 5
5
1748
Receiver 6
6
1864
Receiver 7
7
1980
Receiver 8
8
2096
10.3
Enter the frequencies of your receiving system into the last column of
the table so that all relevant information is quickly available. Rule of
thumb: highest frequency shortest cable path.
Installation
If the receiver is connected to a unicable
system, then RAPS installation will automatically cancel. The window to the right
will open.
1. Press the red function key (SHIFT) to
open the submenu Antenna Setup.
2. Select the menu item LNB Freq to set
Unicable(9750-10600).
3. Press the green function key to open
the window Antenna Setup Unicable
Setting.
4. Select the menu item IF Channel and
set the IF channels (start with channel
1; respectively allocate one of the IF
channels - in ascending order - to the
connected receivers).
52
Frequency (MHz)
Cleaning
5. Select the menu item Center Freq to set the frequency corresponding to the IF channel
(see allocation table).
6. Select the menu item Sat Position to set the respective satellite position.
7. Mark the button Save and press OK to save your entries and to return to the first window
Antenna Setup
or
mark the button Cancel and press OK to discard any previous entries in this window and
to return to the first window Antenna Setup without saving.
8. Press the red function key to open the
window Antenna Setup Center Freq.
9. Select the channels using the keys PR+ and PR- (up to 12, depending on your system)
and insert for each the frequency (according to the table above) using the keys
or numeric keys of the remote control.
or
10. Mark the button Save and press OK to save your entries and to return to the first window
Antenna Setup or mark the button Cancel and press OK to discard any previous entries
in this window and to return to the first window Antenna Setup without saving.
11. Leave the menu by pressing EXIT (settings will be saved). RAPS installation will be continued automatically.
11 Cleaning
There is the risk of electric shock when cleaning the receiver!
Always disconnect mains plug from power outlet before cleaning.
Never clean the receiver using a damp cloth.
WARNING!
Always ensure that no liquid enters the receiver.
There is the risk of damaging the receiver when cleaning the receiver!
Do not use solvent-containing cleaning agents like petroleum ether or
thinner.
CAUTION!
Clean the housing of the receiver using a dry cloth.
53
Transport and Decommissioning
12 Transport and Decommissioning
Proceed as follows if you want to transport the receiver of if you do not want to use the
receiver any more:
1. Disconnect the receiver and all connected devices from power supply.
2. Disconnect any cables connected to the receiver.
3. Remove the batteries from the remote control.
4. Put receiver, cables and remote control into the original packaging.
5. Store the receiver and the accessory parts at a dry and dust-free location.
6. Protect the receiver from freeze.
13 Troubleshooting
This section includes a list of general errors that could occur with operation of the receiver.
Each error states a possible cause and solutions.
Symptom
The display does not
light.
Possible cause(s)
Solution
The power cord is not connected.
Connect the power cord to the power
outlet.
The power switch is not
switched on.
Switch on the power switch.
No audio or video;
the receiver states
"OFF" and the red
LED lights up.
The receiver is in standby
mode.
Press the POWER key to switch on
the receiver.
No audio or video.
No signal or only weak signal.
Check the cable connections to the
receiver and from the receiver to the
connected devices; fasten cables, if
required.
The TV set does not
show a picture.
The system is not correctly
connected.
Verify connection of cable and fasten
cable, if required.
Picture only in black
and white and/or
incorrect synchronization.
The video format of your
receiver is not correctly set.
Adapt broadcast television system of
the receiver to the broadcast television system of the TV set.
The remote control
does not operate.
The batteries are empty.
Replace empty batteries with new
batteries.
The remote control shows
into wrong direction.
Direct the remote control towards the
front panel of the receiver.
54
Disposal
Symptom
Possible cause(s)
Display flashes
Short circuit at antenna in.
Solution
Pull off antenna plug from LNB IN and
check the same.
Verify that your cable installation is
properly installed.
• Receiver switches
on and off continuously
or
• Display: „LNBP“
and screen message: "Attention,
LNB short-cut!",
no TV image.
Short-cut at the connection
from the LNB to the receiver
or the LNB itself
•
•
•
Disconnect the connection LNB
- Receiver.
Check the LNB cable, the plug
and / or the LNB on any shortcut (e.g. water in the LNB) and
remove them.
Reconnect the units
New operating software for the receiver will be published, if required. This can be easily
downloaded at the website www.smart-electronic.de.
If the malfunction still cannot be remedied, then please contact your specialist dealer.
Service Hotline
In case of technical problems, connection problems or general questions on settings:
Service Hotline:
Fax:
E-mail:
+49 (0) 7724 9478-555
+49 (0) 7724 9478-333
[email protected]
14 Disposal
Do not dispose of the receiver and the batteries in normal household
refuse!
CAUTION!
Please ask your municipal administration on possibilities for environmentally friendly and proper disposal of the receiver.
Please take the batteries to a collecting point.
55
Technical Data
The WEEE 20 symbol on the product and its packaging states that this
product is an electrics or electronic device. Do not dispose of such device
in the household refuse, but take it to your local municipal collecting point
(collection station).
19F
15 Technical Data
15.1
General Information
•
HDTV 1080p
•
RAPS
•
Unicable compatible
•
Favorite lists
•
Standby Save Energy mode
•
EPG
•
Channel sorting:
Alpha / Num. / Genre / HDTV / Sat
•
JPEG and MP3 playback
Input frequency range
950 ~ 2150 MHz
Input impedance
75Ω
Input level
-25 ~ -65 dBm
15.2
Remote Control
Range
up to 7 m
Batteries
2 x type AAA
15.3
Mains Adapter
Power consumption in standby
less than 0.5 W
Mains voltage
175 - 250 V ~, 50/60 Hz
WEEE = Waste Electrical and Electronic Equipment. The WEEE directive is the EC directive 2002/96/EC
on reduction of the increasing amount of waste from electrical and electronic equipment not used any
more. Its objective is prevention, reduction and environmentally friendly disposal of the increasing
amounts of electronic waste.
20
56
Index
15.4
Connections
Data storage interface
USB 2.0
LNB in
F-socket
Service
RS232
Audio out
1 x RCA digital audio
Audio / Video out
1 x HDMI
1 x SCART connector (EURO AV)
15.5
Temperature
Operating temperature
+5° C to +40° C
Storage temperature
-40° C to +65° C
15.6
Dimensions and Weight
Width
220 mm
Height
40 mm
Version1
Version 2
Depth
130 mm
155 mm
Weight
approx. 0.6 kg
approx. 0.8 kg
Index
A
Add a Channel to Favorites.................. 45
Antenna Setup ..................................... 40
Antenna type ........................................ 39
Aspect Mode ........................................ 31
Asynchrony .......................................... 50
Automatic Standby Function ............... 49
B
Batteries ............................................... 12
BOX2IP ................................................. 36
BOX2IP Mode ...................................... 38
BOX2IP Server ..................................... 38
C
CEC ...................................................... 51
Channel Lists........................................ 44
Cleaning ................................................53
Connecting
Data Storage .....................................15
Home Cinema System ......................14
Home Network ..................................15
Satellite Antenna ...............................13
TV Set ................................................13
Connection Scheme .............................13
D
Decommissioning .................................54
Delete All Channels ...............................47
Delete Individual Channels from Channel
List .....................................................47
Delivery ...................................................6
Digital Audio Out ...................................50
DiSEqC 1.2 ............................................42
Display Setting ......................................49
Disposal ................................................55
57
Index
E
Editing Channel Lists ............................ 44
Add a Channel to Favorites .............. 45
Delete All Channels ........................... 47
Delete Individual Channels ............... 47
Move Channels ................................. 46
Provide Channels with Password
Protection ...................................... 45
Rename Channels ............................. 46
Skipping Channels ............................ 45
Elgato SAT>IP App ............................... 38
Energy-saving ....................................... 11
F
Factory Settings ................................... 51
Favorite Lists
Add a Channel .................................. 45
Rename ............................................. 47
Fixed Antenna....................................... 40
Format of the Video Signal ................... 50
Front Panel ............................................. 7
G
Grounding ............................................. 12
Guarantee ............................................. 11
H
Handling of Batteries ............................ 12
Home Network................................ 15, 37
I
Inserting the Batteries of the RCU........ 15
Installation ...................................... 13, 39
Antenna Setup .................................. 40
DiSEqC 1.2........................................ 42
Fixed Antenna ................................... 40
Motor Antenna .................................. 42
Multi Satellite .................................... 44
Satellite List....................................... 39
Single Satellite .................................. 43
USALS............................................... 43
Intended Use ........................................ 11
Internet ................................................. 15
IP functions ........................................... 36
L
LAN ....................................................... 15
Last viewed channel ............................. 32
Liability.................................................. 12
58
LNB IN / OUT Loop Through ................ 50
LNB OUT terminal ................................ 50
Location ................................................ 12
Loop Standby ....................................... 50
M
Media Player ......................................... 33
Mobile Device ....................................... 38
Motor Antenna ...................................... 42
Move Channels to Another Channel
Position ............................................. 46
Multi Satellite ........................................ 44
N
Network ................................................ 15
O
Operation in a Unicable System ........... 51
OSD Setting.......................................... 49
P
Preparation of the Devices ................... 37
Product Description ............................... 6
Product Liability.................................... 12
Provide Channels with Password
Protection ......................................... 45
R
RCU Batteries....................................... 15
Rear Panel .............................................. 8
Recall .................................................... 32
Receiver.................................................. 7
Remote Control ...................................... 9
Rename Channels ................................ 46
Rename Favorite Lists .......................... 47
Risks ..................................................... 11
S
Safety Instructions................................ 11
SAT>IP App .......................................... 38
Satellite List
Installation ......................................... 39
Save Energy ......................................... 11
Scanning all Satellites
Multi Satellite .................................... 44
Scanning Individual Satellites............... 43
Scope of Delivery ................................... 6
Selecting antenna type ......................... 39
Service Hotline ..................................... 55
Index
Setting the Aspect Mode ..................... 31
Setting up the BOX2IP Server .............. 38
Signs, Symbols, Layout ......................... 6
Simultaneous Playback ........................ 50
Single Satellite...................................... 43
Skipping Channels ............................... 45
Sleep Timer .......................................... 33
SmartLink ............................................. 51
smartSTREAM ...................................... 36
smartSTREAM Mode ........................... 38
smartSTREAM Operation ..................... 38
Software Version .................................. 51
Standby ................................................ 49
Switching the Video Resolution ........... 32
Switching to the last viewed channel ... 32
T
Technical Data ..................................... 56
Teletext................................................. 30
Terminal LNB OUT ............................... 50
Timer .................................................... 47
Transport .............................................. 54
Troubleshooting ....................................54
U
Unicable ................................................51
USALS...................................................43
Use of the Device ..................................11
Use of this Manual ..................................6
User Information .....................................6
V
Video Resolution ...................................32
Video Signal at the SCART Output .......50
W
Weather Forecast ..................................36
Web News .............................................36
Web Radio ............................................36
Y
YouTube ................................................36
59