1
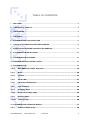
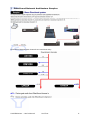
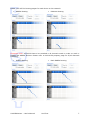
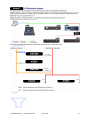
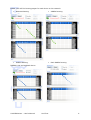
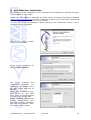
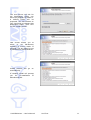
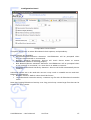
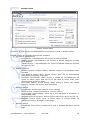
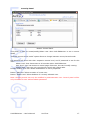
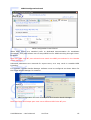
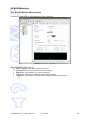
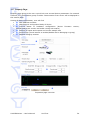
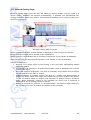
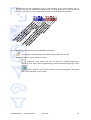
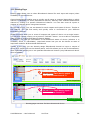
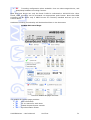
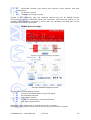
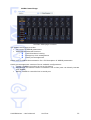
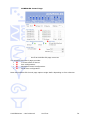
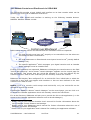
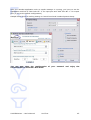
Version 3.2 2008
AVS-ESMonitor
USER’S MANUAL
AVS-ESMonitor – User’s Manual
AuviTran
1
TABLE OF CONTENTS
1
WELCOME ! .................................................................................................................................... 4
2
LIMITATION OF LIABILITY ............................................................................................................ 4
3
TRADEMARKS................................................................................................................................ 4
4
COPYRIGHT.................................................................................................................................... 4
5
AVS-ESMONITOR FUNCTIONALITIES ......................................................................................... 5
6
TYPICAL SOFTWARE ARCHITECTURE SAMPLES .................................................................... 5
7
ETHERSOUND NETWORK ARCHITECTURE SAMPLES ............................................................ 6
8
AVS-ESMONITOR INSTALLATION ............................................................................................. 10
9
AVS-ESMONITOR SOFTWARE ................................................................................................... 13
10 AUVITRAN SERVICE CONTROL PANEL.................................................................................... 14
11 AVS-ESMONITOR......................................................................................................................... 19
11-1
AVS-ESMonitor Main Interface ............................................................ 19
11-2
Menu ................................................................................................... 20
11-3
Toolbar................................................................................................ 21
11-4
Status Bar ........................................................................................... 21
11-5
EtherSound Networks ......................................................................... 22
11-6
Tab selection ....................................................................................... 23
11-7
Property Page ..................................................................................... 24
11-8
Network Routing Page ........................................................................ 26
11-9
Routing Page....................................................................................... 28
11-10
Control Page ....................................................................................... 30
12 AVS-ESMONITOR OPERATING MODES .................................................................................... 35
12-1
Online/Offline mode............................................................................ 35
AVS-ESMonitor – User’s Manual
AuviTran
2
12-2
Configuration files............................................................................... 35
12-3
Exporting a configuration to a file ....................................................... 35
12-4
Importing a configuration from a file .................................................. 35
13 ES-EDITOR.................................................................................................................................... 37
13-1
Main interface ..................................................................................... 37
13-2
Menu ................................................................................................... 38
13-3
How to build a new configuration........................................................ 38
13-4
How to edit a configuration ................................................................. 38
13-5
How to use generated configuration ................................................... 38
14 TUNNELING ON ETHERSOUND ................................................................................................. 39
14-1
“Hardware RS232 Tunneling” function................................................ 39
14-2
Remote Control over EtherSound via YGDAI Midi ................................ 41
15 IMPORTANT NOTES TO USE SEVERAL ESMONITOR............................................................. 43
16 FREQUENTLY ASKED QUESTIONS........................................................................................... 43
17 AUVITRAN WEBSITE / MORE INFORMATION........................................................................... 43
AVS-ESMonitor – User’s Manual
AuviTran
3
1
Welcome !
AVS-ESMonitor software provides control and monitor functions over EtherSound
networks.
2
Limitation of Liability
In no case and in no way, the provider of this software (Auvitran, the distributor or
reseller, or any other party acting as provider) shall be liable and sued to court for
damage, either direct or indirect, caused to the user of the software and which would
result from an improper installation or misuse of the software. “Misuse” and “improper
installation” mean installation and use not corresponding to the instructions of this
manual.
Please note that graphics given in this manual (drawings and schemes) are only
examples and shall not be taken for a real vision of your own equipment configuration.
Auvitran is constantly working on the improvement of the products. For that purpose, the
products functionalities are bound to change and be upgraded without notice. Please read
carefully the User’s manual as the new functionalities will be described therein.
3
Trademarks
All trademarks listed in this manual are the exclusive property of their respective owners.
They are respected “as is” by Auvitran. Any use of these trademarks must receive prior
approval of their respective owners. For any question, please contact the trademark’s
owner directly.
4
Copyright
The information in this manual is protected by copyright. Therefore, reproduction,
distribution of whole or part of this manual is strictly forbidden without the prior written
agreement of Auvitran.
AVS-ESMonitor – User’s Manual
AuviTran
4
5
AVS-ESMonitor Functionalities
AVS-ESMonitor:
• Provides graphical user interface to EtherSound device and network
• Provides quick information on EtherSound networks and devices
• Provides hierarchical view of each EtherSound networks
• Provides full access to dedicated devices such as AVY16-ES board
• Enables user to build his own audio routing
• Provides group management of devices
• Manages bi-directional audio routing for compatible devices
• Provides smart routing of all devices
AVS-ESMonitor is based upon a service managing one or more EtherSound networks.
Therefore, AVS-ESMonitor can be used with a distant service (running on another
computer), and several AVS-ESMonitor can use the same service. Service parameters
can be set via its dedicated control panel.
Group functionality allows user to set together several devices that share same network
and same type. Thanks to graphical interface, user will be able to interact with these
groups and send several orders via one action only (muting all inputs for instance).
6
Typical Software Architecture Samples
Here is a sketch of typical use of AVS-ESMonitor running on the same computer as the
service managing two EtherSound networks.
PC
Primary
Master
Ethersound
Network #1
Primary
Master
Ethersound
Network #2
AVS-ESMonitor
ESService
One computer manages two EtherSound networks
This sketch presents several AVS-ESMonitor on different PC using one service to control
several EtherSound networks.
PC-1
AVS-ESMonitor
Primary
Master
Ethersound
Network #1
Primary
Master
EtherSound
Network #2
ESService
PC-2
AVS-ESMonitor
PC-3
AVS-ESMonitor
One computer manages two EtherSound networks
AVS-ESMonitor – User’s Manual
AuviTran
5
7
EtherSound Network Architecture Samples
EtherSound downstream channels are used that way:
AVS-ESMonitor – User’s Manual
AuviTran
6
Below, you will find routing pages for each device in this network:
•
AD824 Routing
•
DM1000 Routing
Important note: AVY16-ES has to be switched to 8 channels mode in order to work in
DA824 and AD824 devices. Please refer to AVY16-ES property page for 8/16 channels
switching.
•
DME64 Routing
AVS-ESMonitor – User’s Manual
•
AuviTran
Both DA824 Routing
7
EtherSound downstream and upstream channels are used that way:
AVS-ESMonitor – User’s Manual
AuviTran
8
Below, you will find routing pages for each device in this network:
•
DM1000 Routing
•
AD824 Routing
•
DME64 Routing
•
Both DA824 Routing
DME64 is set as loopback device
AVS-ESMonitor – User’s Manual
AuviTran
9
8
AVS-ESMonitor Installation
The software will be installed on the PC connected to the EtherSound network through a
crossed cable or via a switch.
Please visit our website to download the latest version of EtherSound Monitor Software
(http://www.auvitran.com/) and save installation program on your hard disk. EtherSound
Monitor requires Windows 2000 or XP to function.
You are now ready for installation. When clicking on the EtherSound Monitor icon, a
welcome screen will appear:
Click on the « Next » button
to start the installation.
Accept license agreement to
carry on with installation.
The screen presents the
components
available
for
installation. By default, they
are both ticked and will be
installed.
Select MIDI Tunneling to copy
MIDI drivers on your hard
drive. Refer to documentation
to install these drivers after.
Before installing EtherSound
Monitor, please check your
hard disk has the necessary
space for the operation. Then,
click on the “next” button.
AVS-ESMonitor – User’s Manual
AuviTran
10
The next screen will ask for
the destination folder you
want the program to install in.
A default folder will be
proposed. You can browse on
your hard disk to change that
destination folder. Then click
on the “install” button.
Last screen allows you to
select
to
set
ES-Monitor
software to secure mode. If
selected, you are asked to set
a password for administration.
Install process
automatically.
will
go
on
If needed, install will prompt
you for re-installation of
EtherSound API.
AVS-ESMonitor – User’s Manual
AuviTran
11
Click on “Finish” to complete
the installation.
Automatic reboot will be done
if needed.
EtherSound Monitor is now installed and ready for use.
AVS-ESMonitor – User’s Manual
AuviTran
12
9
AVS-ESMonitor Software
AVS-ESMonitor comes with several software allowing user to configure, use and manage
day by day his EtherSound networks and devices.
All these software are accessible using shortcuts located in menu All Programs, AuviTran,
EtherSound Monitor as shown here:
Software shortcuts
Shortcuts provide access to:
• ES-Control Panel: To configure AVS-ESMonitor software
• ES-Editor: To build and edit offline EtherSound configuration
• ES-Monitor: To manage EtherSound networks and devices
• Uninstall: To uninstall AVS-ESMonitor software
• User’s Manual: This manual
• VirtualCAI: Tool to manage CAI Communication protocol
A complete description of ES-Control Panel, ES-Monitor and ES-Editor software can be
found in the following chapters.
AVS-ESMonitor – User’s Manual
AuviTran
13
10 AuviTran Service Control Panel
Thanks to AuviTran Service Control Panel, user can modify software parameters at any
time, as well as start and stop AuviTran Service.
In top of the windows, both software version and EtherSound API version can be found.
Service Panel
Service Control Panel
This panel shows current service status via a Red/Green bullet. It can also stop/start
service using the Turn OFF/ON button.
If Digigram service is installed, status is also displayed beneath the AuviTran Service
information.
Thanks to this panel, user can also affect the different adapters present on the computer.
• EtherSound adapter: is the adapter connected to the EtherSound networks
• Software client Adapter: is the adapter used for external communication with
AVS-ESMonitor applications
Note that EtherSound Adapter and Software client Adapter can be identical if only one
adapter is present.
AVS-ESMonitor – User’s Manual
AuviTran
14
Configuration Panel
Configuration Control Panel
This panel allows user to select EtherSound check options, and periodicity.
Several options are available:
• Disconnection/Reconnection detection: AVS-ESMonitor will be prompted when
device is disconnected or reconnected.
• Network Integrity Monitoring: Service will check device status to ensure
EtherSound network is working properly.
• New Network/Device automatic detection: AVS-ESMonitor will be prompted when
a new network is connected, or a new device is added to network.
• Automatic EtherSound Hierarchy detection: Service will build automatically device
hierarchy.
Advanced options are to be used with care as it may result in unstable service and AVSESMonitor applications.
• Network timeout: default value should be 5msec.
• Log EtherSound networks activity: creates a log file with all EtherSound networks
event.
Note that logging EtherSound activity over long period may create large files that can be
harmful for your system.
AVS-ESMonitor – User’s Manual
AuviTran
15
Monitor Panel
Monitor Control Panel
This panel is to be used to set AVS-ESMonitor connection to local or distant service.
Several options are available through this interface:
• Connection management
o Local service: AVS-ESMonitor will connect to local computer
o Distant service: AVS-ESMonitor will connect to distant computer knowing
its IP address
o Distant service: : AVS-ESMonitor will connect to distant computer knowing
its network name
•
Software options
o Activate network integrity display: Network integrity only displayed when
checked
o Auto Refresh Control Page: Device control page will be automatically
refreshed automatically if checked
o Automatic reconnection: When service is turned off, AVS-ESMonitor will
switch to offline mode, and will try to get back to online mode when
service will be turned on again
o Nonvolatile Memory secure saving: When saving to device non volatile
memory, software will ensure what was saved
•
Routing options
o Source Alias: Default alias used for source naming
o Receiver Alias: Default alias used for receiver naming
o Routing page control display: Allow use of only Net Patch or I/O Patch, or
both Routing page
o NetPatch Channel Grouping: Allow to group channel per device by 8 or 16
o NetPatch Control Mode: Allow to select space or mouse button for
assigning routing in NetPatch control page
•
Specific options
o AVM500-ES Color: Allow to select color used in AVM500-ES Matrix control
page
AVS-ESMonitor – User’s Manual
AuviTran
16
Security Panel
Monitor Control Panel
This panel is used to create/modify/delete user when AVS-ESMonitor is set to secure
mode.
“Activate secure server mode” option allows to change between secure/normal mode.
List presents all users with their respective access level, and if password is set for this
user.
Admin level: User has access to all controls within AVS-ESMonitor.
User level: User has access to control page of devices, but can’t modify routing.
Viewer level: User can only view device control and routing tabs.
Double-clicking on a user allows modification of user’s properties.
Button “Add user” allows creation of a new user.
Button “Delete user” allows deletion of currently selected user.
Note: Security access can only be modified by administration user. Control panel will be
only viewable for user without admin password.
AVS-ESMonitor – User’s Manual
AuviTran
17
MIDI Configuration Panel
MIDI Configuration Control Panel
When MIDI drivers are installed (refer to dedicated documentation for installation
procedure), this panel allows user to setup MIDI Port for MIDI tunneling through AVY16ES board.
Note that MIDI Yoke NT port selected must match the MIDI port selected in the Yamaha
Studio Manager.
Advanced parameters are reserved for expert users, as it may result in unstable MIDI
tunneling.
For instance, Yamaha Studio Manager software must be configured as shown below for
the 01V96 Studio Manager for instance:
MIDI Configuration for both control panel and Yamaha Studio Manager
Note that Input and Output port must use a different MIDI Yoke NT port.
AVS-ESMonitor – User’s Manual
AuviTran
18
11 AVS-ESMonitor
11-1 AVS-ESMonitor Main Interface
This screen presents the AVS-ESMonitor main interface:
Overview of main interface
Main interface is composed of:
• Menu: Configuration and network functions
• Toolbar: Allows quick access to useful functions
• Status Bar: Information on current selection
• Tree Views: Selection of EtherSound network/device
• Tab pages: Information, Control and Routing of EtherSound device
AVS-ESMonitor – User’s Manual
AuviTran
19
11-2 Menu
Menu is organized that way:
Menu
Submenu
File
Load…
Save as…
Save
Restore from Non Volatile Memory
Write to Non Volatile Memory
Edit
Exit
Hide/Show left view
Show log window
Launch ES Editor
Preferences
Command
Help
Logout from server
Login to server
Switch offline mode
Reset networks
Reset groups
Check for updates
About
AVS-ESMonitor – User’s Manual
AuviTran
Function
Load a configuration previously saved
to a file
Save current configuration to a
selected file
Save current configuration to opened
file
Restore configuration from device Non
Volatile Memory
Write configuration to device Non
Volatile Memory
Exit AVS-ESMonitor
Hide/Show
EtherSound
networks
display
Show AVS-ESMonitor log window with
occurred events
Launch
ES-Editor
with
current
configuration by default
Launch ES-Control Panel directly from
AVS-ESMonitor
Disconnect from current server
Connect to current server
Switch between offline/online mode
Ask server for a complete reset of
current configuration
Delete all current groups
Check if a newer version of AVSESMonitor
is
available
on
www.auvitran.com
Display AVS-ESMonitor version
20
11-3 Toolbar
Main toolbar dialog
Main toolbar from AVS-ESMonitor allows user to:
• Reset networks
• Load configuration from a file
• Save configuration to a file
• Save all parameters from current network to devices Non Volatile Memory
• Save all parameters from current device to its Non Volatile Memory
• Connect/Disconnect from current server
• Launch a manual detection of EtherSound hierarchy
• Launch a refresh of current control page
• Mute all EtherSound channels from all devices on current network
• Switch to online/offline mode
• Show About dialog
11-4 Status Bar
Status bar
On bottom of window, status bar provides quick information on:
• Device/Group alias
• Device/Group type
• Current service version
• Current ESMonitor version
AVS-ESMonitor – User’s Manual
AuviTran
21
11-5 EtherSound Networks
Tree Views tab selector allows user to select device from three different representations
of EtherSound networks:
• List: Classic display of all EtherSound networks and devices
• Tree: Display devices in hierarchy view, only when hierarchy was found or built
• Group: Display devices in group view as defined by user
EtherSound network Tree Views available
By right clicking either on a network or a device, a popup menu will be displayed for user
to set several parameters. Note that available options depend on network/device
selection.
Menu
Network
Device
Submenu
Reset all
Build all hierarchy
Remove network
Clear all routing
Force to mono dir
Force to ring mode OFF
Rename
Rename
Start of BiDir Loop
End of BiDir Loop
Write to Nonvolatile Memory
Restore from Nonvolatile Memory
Reset device
Group
Ring
Group Name
Ring Active
Preferred PMaster
Function
Reset all networks
Build hierarchy for selected network
Remove network from offline mode
Mute all EtherSound channels
Force all devices to mono dir mode
Force all devices to be in normal mode
Rename network
Rename device
Set device as start of Bi-Dir loop
Set device as end of Bi-Dir loop
Write all device parameters to its
Nonvolatile memory (Write to all
devices when network is selected).
Write all device parameters to its
Nonvolatile memory (Restore from all
devices when network is selected).
Reset device to restore default
parameters
Add/Remove device to/from group
Checked if device is in ring mode
Set device as Preferred Primary
Master
When a group is selected, dedicated popup menu is displayed.
Menu
Remove all groups
Add group
Rename group
Remove group
Function
Remove all defined groups
Add a new group
Rename selected group
Remove selected group
AVS-ESMonitor – User’s Manual
AuviTran
22
List and Tree view uses icon representation for devices that allows user to quickly see
current device status. Device status icons are:
Network is connected
•
•
Network is disconnected
Network if in ring mode, but ring is open
•
Network is in ring mode, ring is closed
•
•
Device is connected
•
Device is disconnected
•
Device is hardware configured (Routing can’t be changed via ESMonitor)
•
Device is connected, set to Bi-Directional mode and within a loop
•
Device is connected, set to Bi-Directional mode and is last in the loop
•
Device is connected, set to Bi-Directional mode and is first in the loop
•
Device is connected, but parameters are still unknown
Note about ring mode:
When network is set in ring mode, Preferred Primary Master device is identified by being
the device in bold. In the following sample, Device B is the Preferred Primary Master
EtherSound network in ring mode sample
11-6 Tab selection
On right side of interface, user is able to select property page, routing page or control
page if available. All pages are described in documentation herein after.
Tab pages button
•
•
•
•
Properties: quick summary of device global information
Net Patch: grid control for smart EtherSound Channel assignment
I/O Patch: EtherSound Channel assignment for selected device
Control: displays advanced properties for selected device if available
AVS-ESMonitor – User’s Manual
AuviTran
23
11-7 Property Page
Property page gives to the user a quick look over several device parameters. On network
selection, only Information group is visible. Disconnection from server will be displayed in
this control page.
Among all device information, user will find:
MAC address and alias
•
•
Manufacturer and product family of device
•
Current status of hardware configuration (device firmware version,
EtherSound kernel version and audio routing lock status)
Number of inputs and outputs and current sample rate
•
•
Group setup (check buttons to enable/disable device belonging to group)
•
Network integrity monitor
Properties page overview
AVS-ESMonitor – User’s Manual
AuviTran
24
Note on Network integrity monitor: Graph displays uses two colors to present EtherSound
integrity for device. This graph must be at 100.0 all time. Any drop means that errors
were encountered.
Integrity checking sample for device B:
A
B
C
Green drops means that errors occurred between devices B and C.
Blue drops means that errors occurred between devices A and B.
AVS-ESMonitor – User’s Manual
AuviTran
25
11-8 Network Routing Page
Network routing page gives the user the ability to directly assign a device input to a
device output. Software will perform automatically, if possible, the EtherSound subrouting needed to match user desire. If required and available, bi-dir mode will be set on
devices by software.
Global Collapse/Expand button
Collapse button
SRC2 is routed to RCV6
No routing done
Current selection
Expand button
ES Channel summary icons
Routing not available
Network Routing page overview
When routing is available, a white square is displayed in front of input and output.
When routing is already done, a black cross is displayed.
When routing is not available due to hierarchy constraints, a grey square is displayed.
Note that all grids can be grayed if hierarchy is not known, or not yet detected.
Actions available are:
• Routing: It is simply done by left clicking in the grid while highlighting desired
input and output.
• Un-routing: Left clicking on a square where black cross is displayed will un-route
output from input.
• Direct ES Channel assignment: Left click on summary icons allows user to directly
set ES Channel to an input or output.
• Expand/Collapse: To simplify viewing, left-click on “-“ button near device name, or
directly on device name if too short, will collapse all inputs or outputs from device.
To see full device inputs or outputs, just left click on device name to expand it
again. When collapsed, routing is not available for device but a summary is
displayed to see if routing is done on device.
• Setting a new alias for a device, or an input/output: It is done by right-clicking on
the correct row or line. A window will appear to set new alias.
AVS-ESMonitor – User’s Manual
AuviTran
26
•
Simplified icons are displayed next to input/output alias. Icons allows user to
quickly view current EtherSound assignment. To directly assign a new EtherSound
channel, left click on icon to popup a window to set EtherSound Channel.
3 4 2 3 M 3 4 3 4 M
Two options are available through the NetPatch interface:
•
•
Clean patch: Automatically mute EtherSound channels unused
Keyboard/Mouse: Input selection mode
Keyboard: Only space bar will be used for routing assignment,
direction keys allow cursor displacement, mouse clicking set directly cursor
position.
Mouse: Only left click will be used for routing assignment. Keyboard
has no functionality in this mode
AVS-ESMonitor – User’s Manual
AuviTran
27
11-9 Routing Page
Routing page allows user to select EtherSound channel for each input and output (when
available) of selected device.
Channel assignment enables user to quickly set all inputs or outputs (depending on which
channel is selected) to same EtherSound channel, starting from selected EtherSound
channel or ending to a specific EtherSound channel. You can also mute all inputs or
outputs of selected device using Mute buttons.
On left side of grid, you can set aliases for each outputs and inputs of device. Thanks to
this feature, you will find easily and quickly what is connected to your different
EtherSound devices.
Global functions allow you to mute all outputs and inputs of device via a single button.
You can also refresh routing via a press on “Refresh” button. You are able to hide/show
alias column to enlarge EtherSound channel display.
In addition, you can get information on Bi-Directional status of device (whether it is
available, active or unavailable). Loop-back button lets you set the device as start of
loop-back mode for Bi-Directional EtherSound.
Thanks to the grid, you can directly assign EtherSound channel to input or output of
device by a simple click on the desired patch. Left click allows you to set for downstream,
while right click allows you to set upstream EtherSound channel (only bidirectional device
when available).
On left Click: Patch device output 5
from downstream channel 13
Output
Number
Device Output Patch
On left Click: Patch device Input 4
to downstream channel 28
Input
Number
Device Input Patch
Routing page overview for Mono directional device
AVS-ESMonitor – User’s Manual
AuviTran
28
When Bi-Directional is available, global functions display:
• Bi-Directional status icon
o
•
Device is within a bi-directional loop
Device is last of bi-directional loop
o
“Loop back” check box lets user enable/disable device to become bi-directional
end of loop
Warning: Bi-directional loop may not contain any switches. Bi-directional is only usable
within a daisy chained devices. As well as inserting a mono directional device (without bidirectional capability) within a bi-directional loop may result in unpredictable behavior of
device and software.
On right Click: Patch device output 5
from upstream channel 13
Output
Number
Device Output Patch
On right Click: Patch device Input 6
to upstream channel 26
Input
Number
Device Input Patch
Routing page overview for Bi directional device
AVS-ESMonitor – User’s Manual
AuviTran
29
11-10 Control Page
Control page aspect depends on selected device. When available, user gets access to
dedicated functionality of device. Refer to the specific user’s manual device for more info
about dedicated function features and behavior. Control pages for AuviTran products are
summarized herein the document. For complete documentation, or other manufacturer
products, please refer to dedicated product User’s Manual.
AVY16-ES Control Page
AuviTran AVY16-ES page overview
The AVY16-ES Control page provides:
32 Vu-meters for each of 16 outputs and 16 inputs
•
•
Host device for AVY16-ES
•
Synchronization status with the host Console or Mixing-Engine.
But it also allows user to select
•
YGDAI Mode: Switch AVY16-ES in 8 or 16 channels bus mode for Yamaha
compatibility.
•
Lock routing: Use to lock current EtherSound audio routing.
•
Emergency clock: When checked, host won’t mute audio channels when
cable will be unplugged.
Serial Port configuration.
•
AVS-ESMonitor – User’s Manual
AuviTran
30
•
Tunneling configuration when available: User can select target device, and
Start/Stop hardware tunneling function.
Note that host device can only be found if MIDI is redirected to AVY16-ES slot. Once
found, MIDI tunneling can be activated via appropriate push button. Note that MIDI
tunneling will be active only if MIDI Drivers are correctly installed and set up in the
Control Panel.
Hardware tunneling functionality will be described later in the document.
AVB32-ES Control Page
AuviTran AVB32-ES page overview
The AVB32-ES Control page provides:
Slot information
•
•
32 Vu-meters for each slots
•
Global Purpose Inputs controls
•
Synchronization status
AVS-ESMonitor – User’s Manual
AuviTran
31
•
•
•
AVB32-ES controls (Fan status and controls, panel dimmer and rack
temperature)
Serial port controls
Hardware tunneling controls
Thanks to the AVB32-ES, user can remotely control from the PC AD8HR devices
connected through the AVB32-ES serial port connector. Note that this feature is not
available when hardware tunneling is set to ON. See hardware tunneling part of this
document for detailed information.
AVRed-ES Control Page
AuviTran AVRed-ES page overview
The AVY16-ES Control page provides:
Overview of AVRed status using a LED panel
•
•
Bi-Directional controls
•
User relays controls
•
AVRed fan and dimmer controls and status
•
Link status and controls
Swap link button allows user to change active link if possible.
If available, priority link allows user to set Link A to be used prior to link B.
AVS-ESMonitor – User’s Manual
AuviTran
32
AVKit Control Page
AuviTran AVKit page overview
The AVKit Control page provides:
• Full control of AD8HR parameters
• Additional EtherSound functions
Lock EtherSound routing
o
o
Emergency clock management
o
Serial port management
Please refer to AD8HR documentation for a full description of AD8HR parameters.
Serial port management consists of three available configurations:
• Tunnel: Hardware tunneling is set on this device
• EtherSound: PC Remote control of AD8HR is set to ON (user can directly interact
with AD8HR)
• RS232: AD8HR is controlled via its serial port
AVS-ESMonitor – User’s Manual
AuviTran
33
AVM500-ES Control Page
AuviTran AVM500-ES page overview
The AVM500-ES Control page provides:
Current status of device.
•
•
Port configuration.
•
Advanced control configuration.
•
Serial Port configuration.
Note that AVM500-ES Control page options might defer depending on Port selection.
AVS-ESMonitor – User’s Manual
AuviTran
34
12 AVS-ESMonitor Operating modes
12-1 Online/Offline mode
AVS-ESMonitor has two different operating modes:
• Online mode: based on connected devices
• Offline mode: based on virtual devices
Offline mode uses virtual devices. These virtual devices can be directly generated from
your connected devices by switching to offline mode thanks to the appropriate icon, or
generated using the offline editor which will be described later in this document.
While in Online mode, each action performed on device is done immediately, such as
routing, or parameter change.
While in Offline mode, AVS-ESMonitor simulates each action performed on devices. When
all actions are done, user can save configuration into file for future use such as applying
on an existing EtherSound network.
12-2 Configuration files
AVS-ESMonitor allows user to export/import configuration files from his current network
architecture. Exporting configuration allows user to send his configuration for applying on
similar networks, offline editing, or analysis for instance.
Generated files contains all devices EtherSound information, as well as, enhanced
information such as hierarchy (when available), and software version and parameters.
12-3 Exporting a configuration to a file
To export a configuration, user has to select “Save” or “Save as…” option from File menu.
A Dialog box will prompt user for naming the file which will contains all information.
If hierarchy is unknown when exporting, a dialog box will prompt user to build manually
the network hierarchy and redo the file export.
12-4 Importing a configuration from a file
To import a configuration, user has to select “Load” option from File menu. A Dialog box
will prompt user for selecting the file which will contains all information.
In Offline mode, AVS-ESMonitor will import all devices contained within the configuration
file. Thus, allowing user to interact with the virtually created network and devices as if all
were connected.
In Online mode, AVS-ESMonitor will try to perform an automatic assignment between
information contained within the file and currently discovered devices. A window will
popup after allowing user to make modifications to current AVS-ESMonitor proposal.
AVS-ESMonitor – User’s Manual
AuviTran
35
Selection dialog after file import
On the previous sample, 3 devices were detected by AVS-ESMonitor.
Dev1 has been found to match Tmpl1 from configuration file (Same product)
Dev2 has been found to perfectly match Dev2 from configuration file (Same product and
MAC Address)
Dev3 has not been found in configuration file, and user has to select manually a device to
assign.
At any time, user can:
• Clear current assignment
• Redo an automatic assignment (erasing previous manual selection done)
User can also choose to import group saved within the configuration file. If not,
previously created group will be kept without any modification.
When done, user has to click OK to apply configuration from file to targeted devices.
Clicking on cancel will perform nothing and devices will remain unchanged.
AVS-ESMonitor – User’s Manual
AuviTran
36
13 ES-Editor
ES-Editor is part of the AVS-ESMonitor software. This software allows user to build new
EtherSound configuration and edit previously saved configuration.
13-1 Main interface
This is the control interface of ES-Editor.
ES-Editor control interface
Main interface is composed of:
• Menu: Configuration and network functions
• Device selector: All available devices for editing configuration
• Network building: Current configuration
• Information module: Information on currently selected device
AVS-ESMonitor – User’s Manual
AuviTran
37
13-2 Menu
Menu is organized that way:
Menu
Submenu
File
New
Function
Erase current configuration from
memory, and start new session
Load a configuration previously saved
to a file
Save current configuration to opened
file
Exit ES-Editor
Display ES-Editor version
Load…
Save
Help
Exit
About
13-3 How to build a new configuration
Building a configuration is done via drag and drop. User selects which device to add to
your configuration from Device selector, and drags it to right place on the Network
building side. Device will be automatically added to the configuration.
If device is dragged over an empty place, a new network will be created with device set
as Primary Master.
In the bottom part of the interface, user can:
• Change device MAC Address
• Change device alias
13-4 How to edit a configuration
Editing a configuration is done by right clicking on devices, and using drag and drop.
After successful loading a previously created file, Network building will be updated with
data contained within the file.
Using drag and drop, user can move part of created EtherSound network from one place
to another.
Right clicking on device will allow user to delete selected device, or delete selected device
and whole its child.
13-5 How to use generated configuration
After successful building or editing configuration, user has to save it into a file by using
the command “Save” from the file menu.
Afterwards, this configuration can be imported in AVS-ESMonitor both in online or offline
mode.
AVS-ESMonitor – User’s Manual
AuviTran
38
14 Tunneling on EtherSound
14-1 “Hardware RS232 Tunneling” function
The “Hardware RS232 tunneling” is disable by default.
If the AVY16-ES is the primary master (i.e. it is the first device of an EtherSound
network), hardware RS232 tunneling can be set from this AVY16-ES to another remote
device of the network. When started an internal hardware process will automatically
transmit the data received from the local AVY16-ES RS232 to the remote device RS232
and will receive the incoming data from the remote RS232 to the local RS232.
This function is very useful to remotely control from a digital mixing console, using only
EtherSound connection, a set of AD8HR connected to EtherSound by AVB32-ES or by
AVKit-ES for AD8HR. The digital mixers that can manage AD8HR from a remote serial
connector are: PM5D, M7CL, DM2000, DM1000 and DME64N/24N.
The procedure to create a Hardware tunneling is the following:
1. Set the speed and configuration of the remote device RS232 (if it is an AVKit-ES
for AD8HR, it is done automatically).
2. Press the “Stop” button of the “Hardware RS232 tunneling” area to stop the
tunneling on your Primary Master AVY16-ES if it is working.
3. Select the remote device in the combo box of the “Hardware RS232 tunneling”
area on your Primary Master AVY16-ES.
4. Press the “Start” button of “the Hardware RS232 tunneling area”.
5. The red light on the left of “Start” button becomes Green to specify that the
tunneling is working and the “Start” Button becomes a “Stop” Button.
Notices:
•
Hardware RS232 tunneling means that the tunneling between the 2 RS232
(local-remote) is performed even when the controlling PC with ESMonitor is
disconnected (i.e. It is the AVY16-ES hardware which manages the tunneling
not the PC software).
•
Due to specific and intensive EtherSound hardware management, only AVY16ES, AVKit-ES for AD8HR and AVB32-ES devices and compatible AuviTran
devices can be used for hardware RS232 tunneling.
•
AVY16-ES must have a firmware greater than or equal to 0x101. Upgrade it if
it is not the case (check for new firmware on AuviTran web site
www.auviTran.com).
•
AVKit-ES must have a firmware greater than or equal to 0x201. Upgrade it if it
is not the case (check for new firmware on AuviTran web site
www.auviTran.com).
AVS-ESMonitor – User’s Manual
AuviTran
39
Example of use: Remotely control 4xAD8HR connected to an AVB32-ES from a
M7CL-32 desk fader.
Example of use: Remotely control AD8HR+AVkit-ES from PM5D desk fader.
Notices:
Yamaha mixing console remote port must be linked to AVY16-ES board serial port using
serial cable following this schematic (pins 1, 7, 8 and 9 must not be connected!)
AVY16-ES
Serial
Port
2
2
3
3
4
6
6
4
5
5
Remote
console
Serial link schematic
AVS-ESMonitor – User’s Manual
AuviTran
40
14-2 Remote Control over EtherSound via YGDAI Midi
The AVY16-ES provides a local YGDAI midi interface to its host console which can be
remotely link to a build-in ESMonitor midi driver.
Today, the local YGDAI midi interface is working on the following Yamaha devices:
DM2000, DM1000, 02R96, 01V96.
DM2000
AVY16-ES
EtherSound
Network
Control over EtherSound
Before using remote control over EtherSound few conditions must be respected:
1. The host console must been set1 properly to be controlled via a slot where an
AVY16-ES has been connected to.
2. The midi parameters in EtherSound control panel must be set2 (usually default
setting is ok).
3. The specific application3 which manages your digital console such as Yamaha
Studio manager must be installed first.
If the 2 first conditions are respected, ESMonitor will display the console name in the field
“AVY16-ES hosted by” and a button “Launch Manager” appears on the control page for
the AVY16-ES. This means that the AVY16-ES selected is in the slot defined by the
console to be the “midi to host” and that you can remotely control the console.
ESMonitor will display “Not configured” for an AVY16-ES if the YGDAI slot in which the
AVY16-ES is put, does not support midi interface or has not been defined in the host
console to be “midi to host”.
Notice: Even if a console could accept multi AVY16-ES, only one AVY16-ES can be
defined to control the console
If ESMonitor displays a button “Launch Manager” on the control page, you can click on it
to launch the Yamaha application which will remotely control the host device.
If it is the first time, ESMonitor will ask you to provide the link to the application (i.e. the
access to the Yamaha application software such as Studio Manager).
1
2
3
Please refer to your Yamaha Console User’s manual for further information about the
use of Yamaha console features and settings.
Please refer to your ESMonitor User’s manual for further information about the use of
ESMonitor functions and settings
Please refer to your application User’s Manual for installing the application software.
AVS-ESMonitor – User’s Manual
AuviTran
41
After the Yamaha application such as studio manager is running, you have to set the
Application midi link to “Midi Yoke NT: 2” for input port and “Midi Yoke NT: 1” for output
port (if you let the default configuration).
Sample below shows a working setting in Control Panel and Yamaha System Setup:
You can now start the configuration
functionalities of AuviTran’s AVY16-ES.
AVS-ESMonitor – User’s Manual
of
AuviTran
your
network
and
enjoy
the
42
15 Important Notes to use several ESMonitor
•
To use multiple AVS-ESMonitor on more than one PC on same Ethernet LAN, the
AuviTran (EtherSound) service must run on only one of the machine and must be
disabled on the other one.
o On the machine where the AuviTran service is running the Local service
button must be selected.
o On the distant machine, the distant service must be selected with The IP
address of the machine where the service is running.
•
Due to today limitation of the EtherSound API provided by Digigram, Only one
service AuviTran or Digigram could work at a time on a same Ethernet network
(LAN).
16 Frequently Asked Questions
• Why my AuviTran EtherSound Service refuses to start on Control Panel?
⇒ Ensure that EtherSound Protocol is installed on your network adapter.
• New devices are not discovered by AVS-ESMonitor?
⇒ Ensure that automatic network/device detection is activated in the Control Panel.
• Why my hierarchy is modified after a manual selection from AVS-ESMonitor?
⇒ If automatic hierarchy option is activated for the service, and old device are
present in the network, manual hierarchy detection will be overwritten at next
hierarchy automatic check.
•
MIDI Yoke driver does not appear in the MIDI configuration page in the Control
Panel?
⇒ Be sure that MIDI Yoke driver were installed on your computer.
• AVY16-ES host device is not recognized?
⇒ Ensure that Host is redirected to the AVY16-ES slot in your Yamaha device.
• Why only one AVY16-ES recognized Yamaha host where I plugged two AVY16-ES?
⇒ Only one AVY16-ES card can be used for MIDI tunneling and therefore only one
card will know in what Yamaha host it is plugged.
• Why Yamaha Studio Manager works only in one direction?
⇒ Ensure that MIDI Yoke port selected for Input and Output are different.
• Why hardware tunneling is not automatically reconfigured?
⇒ Ensure that once configured, all device configurations are written to memory via
network popup menu.
•
•
Why network routing page displays only grey squares?
Hierarchy has not been yet discovered. Use manual discovery to enable network
routing use (Build hierarchy on main toolbar).
17 AuviTran Website / More Information
Please visit our website for any question of further inquiry concerning our product range.
Updates will also be posted when available.
http://www.auvitran.com
AVS-ESMonitor – User’s Manual
AuviTran
43