1
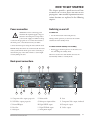
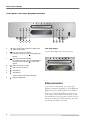
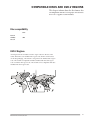
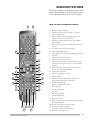
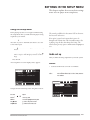
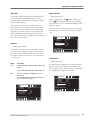
D V D 26 DVD AND CD PLAYER
PREFACE
Copyright and acknowledgements
Copyright © 2004 Primare Systems AB. All rights reserved.
Primare Systems AB
Renvägen 1
SE-352 45 Växjö
Sweden
Issue: DVD26
The information in this guide is believed to be correct as
of the date of publication. However, our policy is one of
continuous development and so the information is subject
to change without notice, and does not represent a commitment on the part of Primare Systems AB.
Primare is a trademark of Primare Systems AB. Manufactured under license from Dolby Laboratories Dolby, Pro
Logic, and the double-D symbol are trademarks of Dolby
Laboratories. Confidential Unpublished Works. Copyright
1992-1997 Dolby Laboratories, Inc. All rights reserved.
All other product names are trademarks or registered
trademarks of their respective owners.
FCC Warning: This equipment generates and can radiate radio frequency energy and if not installed and used
correctly in accordance with our instructions may cause
interference to radio communications or radio and television reception. It has been type-tested and complies with
the limits set out in Subpart J, Part 15 of FCC rules for
a Class B computing device. These limits are intended to
provide reasonable protection against such interference in
home installations.
EEC: This product has been designed and type-tested
to comply with the limits set out in EN55013 and
EN55020.
This guide was produced by Condesign Ljungby AB.
www.condesign.se
200443
II
DVD26 DVD AND CD PLAYER USER GUIDE
CONTENTS
INTRODUCTION
SETTINGS IN THE setup MENU
Welcome to the DVD26 DVD and CD Player ............1
Audio set up...............................................................13
Technical specification..................................................2
Video setup ................................................................14
Language....................................................................16
HOW TO GET STARTED
General ......................................................................17
Power connection.........................................................3
Progressive mode ........................................................19
Back panel connections ................................................3
Switching on and off ...................................................3
PLAYING MP3's
Front panel- and basic playback controls ......................4
MP3 compatibility information .................................21
Playing a disc ...............................................................5
Using the Smart Navigator for MP3's.........................22
Locating a position on the disc .....................................5
Displaying MP3 information .....................................22
Making a program list of MP3 tracks .........................23
COMPATIBILE DISCS AND DVD-V REGIONS
Disc compatibility........................................................7
PLAYING JPEG's
DVD-V Regions ..........................................................7
JPEG compatibility information ................................25
Using the Smart Navigator for JPEG's........................26
ADVANCED FEATURES
Displaying JEPG information ....................................26
How to use the remote control ...................................10
Displaying a 9-picture overview..................................26
Switching camera angles .............................................10
Zoom .........................................................................26
Switching subtitles......................................................10
Rotating .....................................................................26
Switching audio language ...........................................10
Mirror ........................................................................26
Making a program list ................................................10
Making a program list of JPEG-files ...........................27
Using repeat play........................................................11
Displaying disc information .......................................11
Using the Setup Menu ...............................................13
DVD26 DVD AND CD PLAYER USER GUIDE
III
IV
DVD26 DVD AND CD PLAYER USER GUIDE
INTRODUCTION
Welcome to the Primare DVD26 DVD and CD
Player! This chapter introduces you to its key features, and explains how you can take advantage of
its configurability to create a system perfectly suited
to your requirements.
Welcome to the DVD26 DVD and CD Player
The DVD26 is endowed with the very latest video and audio processing technology to deliver the best performance
from any disc that you choose. Its universal capabilities
will ensure ultimate convenience and ease of use.
Video Performance Features
The DVD26’s twin-wave laser pickup for CD and Video
allows you to play CD/CD-R/CD-RW/MP3/ JPEG and
DVD-V/DVD-R discs for true multi-media compatibility.
Flexible outputs
The DVD 26 provides a wide range of video and audio
outputs to embrace numerous system-building options.
Video outputs
Audio outputs
2
Component
1
2-ch analog RCA
1
VGA
1
Digital coax
1
S-video
1
Digital TOSlink
1
Composite
1
Scart
Audio Performance Features
Mulitmedia inputs
Through the use of a Burr-Brown PCM1738 Audio Dac,
and our own cicuitry solution, the now so well known
Primare sound has been assured once again.
To allow the DVD26 to perform in specialised automated
multi-room applications, it is equipped with RS232 control capability, and offers data and IR inputs.
The clear, undistorted (0.009% at 1kHz) sound is the first
one notices and one of the features that makes this player
so unique.
Easy navigation
The DVD26 is easy to use. All the parameters are adjusted using simple but comprehensive On Screen Display
menus.
DVD26 DVD AND CD PLAYER USER GUIDE
1
INTRODUCTION
Technical specification
Video Performance
Features
Video Dac: Analog devices ADV7300A
Output Terminals
Video
108MHz/12bit
Component Video (Y, Cr, Cb) Output x 1 (Gold
Plated), interlaced
Component Video (Y, Cr, Cb) Output x 1 (Gold
Plated), progressive
DVS Ultra Silent
Twin-Wave Laser Pickup for CD/Video CD/CD-R/
CD-RW/DVD-R/RW (DVD Video Format)
S-Video x 1 (Gold Plated)
Slow Motion Playback (Except VCD Reverse)
Composite Video Output x 1 (Gold Plated)
JPEG Playback
21-pin Scart x 1, RGB compatible
VGA x 1, progressive
Audio Performance
Features
Audio Dac: Burr-Brown PCM1738
24bit/192kHz
Output Terminals
Audio
Dolby® Digital/dts®/LPCM Coaxial Output x 1
MP3 Playback Capability
Dolby® Digital/dts®/LPCM Optical Output x 1
THD + Noise, 0.009% at 1 kHz
Analog Output x 1 (2 x RCA) (Gold Plated)
Dynamic range, 100dB
Signal-to-noise Ratio, 100dB
Channel separation, 100 dB
Output Terminals
Others
Data input,
Output Level, 2.0V
RS232 input
Dolby® Digital and dts® Digital Outputs
Dolby® Digital and dts® Downmixing -> 2-ch
Convenience
Features
Resume Function (DVD)
Repeat Mode
Program Play (CD's only)
Construction
2mm Heavy Duty chassis.
Power Consumption
Operating: 35 W, Standby: 10 W
Dimensions (WxHxD) 430 x 100 x 380 mm
Weight
2
IR input, 3,5 mm
10,5 kg
DVD26 DVD AND CD PLAYER USER GUIDE
HOW TO GET STARTED
This chapter provides a quick overview of how
to connect the DVD26 player and how to start
playing discs. More detailed explanations of all the
various functions are explained in the following
chapters.
Power connection
Switching on and off
WARNING: Before connecting power
check that the required supply voltage, indicated on the back panel, corresponds to
your local AC supply. If a different voltage
is stated on the type plate do not connect the DVD26 to
the mains power, and seek advice from your dealer.
To switch on
Connect the mains power using the enclosed mains cable.
To switch on from standby or to standby
• Use the main switch on the back panel.(F).
During normal operation you can leave the DVD26
switched on and in standby mode.
NOTE: Always disconnect the DVD26 and all other units
in the system from the mains power before connecting or
disconnecting any of the cables. Failure to do this might
seriously damage the unit.
• Pressing
on the front panel or on the remote control, will change the standby mode.
When not used for more than 60 min, the DVD 26
automatically switches to standby mode.
Back panel connections
A
B
C
D
F
E
L
N
M
K
J
I
G
H
A. Component video output, progressive
F. Mains switch
K. Scart
B. VGA Video output, progressive
G. Main power input and fuse
L. Component Video output, interlaced
C. External IR/input
H. Digital SPDIF output
M.Composite output
D. Data Port
I. Digital TOSlink output
N. S-video output
E. RS232 port
J. Analog RCA outputs
DVD26 DVD AND CD PLAYER USER GUIDE
3
HOW TO GET STARTED
Front panel- and basic playback controls
A
B
C
D
A
Skips to the start of the current track or chapter, then to
previous tracks/chapters.
B
Press once to start reverse scannning.
Press again to increase the scan speed. (CD, DVD and Video
CD have four scan speeds). Press
to resume normal
playback.
C
Press once to start forward scannning.
Press again to increase the scan speed (CD, DVD and Video
CD have four scan speeds). Press
to resume normal
playback.
D
Skips to the next track or chapter.
E
Opens/ and closes the disc tray.
F
Stops playback.
G
Starts playback.
DVD and Video CD: if the OSD shows "Press play to
continue", playback starts from the resume point.
H
Changes the standby mode.
E
F
G
H
Front panel display
The front panel display shows what’s in progress:
Safety instructions
To prevent fire or shock hazard, do not expose this
appliance to dripping or splashing. No objects filled with
liquids, such as vases, should be placed on the DVD26.
If you want to build in the DVD26 you need to be sure
to allow space of at least 20 cm behind, 10 cm on both
sides and 30 cm above the top panel of the unit. This is to
prevent fire or damage caused by overheating. Also make
sure that the main switch is accessable.
4
DVD26 DVD AND CD PLAYER USER GUIDE
HOW TO GET STARTED
Playing a disc
To pause a CD
To insert a disc
• Press the button on the front panel or the
ton on the remote control.
• Hold down the button on the front panel, or the
button on the remote control, to open the tray.
• Place the CD in the tray with the label facing upwards.
• Press the button on the front panel or the
ton on the remote control to close the tray.
but-
The front panel display shows the total number of tracks
on the disc, the total duration of the disc, and the tracklist.
but-
The symbol will disappear from the display but the
track number in the tracklist will still be flashing
You can then resume play by pressing the button on the
front panel or the
button on the remote control.
Locating a position on the disc
You can step between tracks to locate a particular track on
the disc, or you can scan forwards or backwards to locate a
position within a track.
To step between tracks
To play a disc
• Press the or buttons on the front panel or the
remote control.
• Press the button on the front panel, or the
button on the remote control.
• Alternatively press one of the buttons 1-9 and, if required, +10 on the remote control to start playing a specific
track.
For example: To play track 16; press the +10 button followed by the 6 button. To play track 22; press the +10
button twice, followed by the 2 button.
The front panel display shows the number of the track as
you step.
To scan through the disc
• Press once the
button to reverse scanning or the
button to start forward scanning. You can use the button
on the front panel or the remote control
You can increase the scanning by pressing the
button
(reverse) or the
button (forward) again. DVD, CD and
Video CD have four scan speeds.
As you scan the disc, the front panel display shows the current track and the and position within the track.
While a disc is playing the front panel display shows the
current track number and the elapsed time of the current
track. The track number is flashing in the tracking list.
Release the button to start playing from the position you
have located.
To stop play
• Press the button on the front panel or the
ton on the remote control.
DVD26 DVD AND CD PLAYER USER GUIDE
but-
5
6
DVD26 DVD AND CD PLAYER USER GUIDE
COMPATIBILE DISCS AND DVD-V REGIONS
This chapter informs about the disc formats that
are compatible with the DVD26 player. An overview
of DVD-V regions is also included.
Disc compatibility
DVD-V
SVCD
DVD-R
MP3
Audio CD
DVD+R
CD-RW/R
JPEG
Video CD
DVD-V Regions
The map shown below indicates DVD-V region codes for all areas of the
world. All DVD-Vs are marked with a region code, which is often located
on the disc packaging. The DVD26 ’s rear panel is also marked with a region
code. The DVD26 is compatible with discs marked with this same region
code or with the ALL region code. The DVD26 is not compatible with discs
marked with other region codes.
DVD26 DVD AND CD PLAYER USER GUIDE
7
8
DVD26 DVD AND CD PLAYER USER GUIDE
ADVANCED FEATURES
This chapter explains the function buttons of the
remote control which are needed to give you acces
to the advanced features of the DVD26 player.
A
How to use the remote control
B
A
B
C
D
E
C
AD
F
G
H
I
D
J
K
L
E
F
G
G
F
H
AC
M
I
J
AB
K
AA
Z
L
Y
M
X
N
V
O
U
S
T
DVD26 DVD AND CD PLAYER USER GUIDE
R
P
Q
N
O
P
Q
R
S
T
U
V
X
Y
Z
AA
AB
AC
AD
Dims the front panel display
Switches the selected unit to standby or to operate
Selects a specific track
Selects a numbered menu option 10 and over. (For
example, for 24, press +10, +10 and 4.)
Changes the volume of the last used option: PROC,
PRE, or AMP.
Moves the cursor up/down to highlight the requested
option
Goes back-/ forward to the last/next issue
Selects the highlighted option
Starts playing a disc. When pressed during play, the disc
is paused
Shows the DVD menu on screen
Skips to the next track or chapter
Scans forward. Press once to scan forward. Press again
to increase the scan speed. Press ”I” to resume normal
playback.
Scans reverse. Press again to increase the scan speed.
Press ”I” to resume normal playback.
Displays disc information
Shows the setup menu on screen
Changes subtitle
Takes you to the very beginning of the disc. Used
during replay will interrupt resume mode.
Switches audio language
Browse to specific parts of a disc
Uses repeat play
Switches camera angle
Note used
Makes a program list
Slow motion forward
Slow motion reverse
Skips to the start of the current track or chapter, then to
previous track/chapters
Returns to the previous step in the menu
A short press stops the playback
A long press opens/closes the disc tray
Deletes the selected option
9
ADVANCED FEATURES
Switching camera angles
Making a program list
DVD
Video CD - CD
Some DVD Video discs feature scenes shot from two or
more angles- check the disc box for details: it should be
marked with an icon if it contains multi-angle scenes.
This feature lets you program the play order of titles/
groups/chapters/tracks on a disc. You make a programlist
using the numeric buttons on the remote control.
• To switch the camera angle, press ANG. If the disc was
paused, playback starts again with the new angle.
• Insert the disc. If the disc starts playing, stop it by pressing the button on the front panel or the
button
on the remote control.
• To hide the TV angle indicator, choose Angle
Indicator -> Off from the Video set-up menu
(see page 14).
• Press the PROG button on the remote control.
The front panel shows PROGRAM.
• Select titles by means of buttons 1-9 and +10.
Switching subtitles
DVD
Many DVD Video discs have subtitles in one or more
languages- the disc box will usually tell you which subtitle
languages are available. You can switch subtitle language
anytime during playback.
• To display/switch the subtitle language, press BAL/ST
repeatedly.
The current subtitle language is shown on-screen.
• To switch off subtitles, press BAL/ST until OFF
appears on-screen.
• To set subtitle preferences, see page 16.
Switching audio language
DVD-Video
As you select tracks the front panel display shows the
number of the track you are programming, the number of
the step in the program and the duration of the track.
A selected track numbered higher than 15 will be indicated by a flashing 15+ symbol on the front panel display
The track number also flashes in the track list on the
right-hand side of the display.
• Press SELECT and start replay.
The tracks are played in the same order as they are
selected.The currently played track always flashes in the
tracklist on the front panel display.
To exit your program list press
twice.
. Then press PROG
Note! It is not possible to create program lists for
DVDs.
When playing a DVD Video disc recorded with dialog
in two or more languages, you can switch audio language
anytime during playback.
• To display/switch the audio language, press MODE
repeatedly.
The current audio language is shown on-screen.
• To set audio language preferences, see page 16.
10
DVD26 DVD AND CD PLAYER USER GUIDE
ADVANCED FEATURES
Using repeat play
DVD - Video CD - CD - Photo CD
You can set the player to repeat individual tracks on CDs
or Video CDs, chapters/tracks or titles/group on DVD
discs, or the whole disc.
You can use the repeat together with the programming
mode to repeat the tracks/chapters in the program list.
Displaying disc information
DVD - Video CD - CD
Various track, chapter and title information, as well as the
video transmission rate for DVD discs, can be displayed
on-screen while a disc is playing.
The information varies depending on type of disc (DVD,
Video CD, CD).
TITLE 01/08
00:00:55
CHAPTER
001/030
• To show/switch the information displayed, press DISP.
When a disc is playing, the information appears at the
top of the screen. Keep pressing DISP to change the
displayed information.
Note! Features not supported by the DVD26 Player are
displayed as
on the OSD.
DVD26 DVD AND CD PLAYER USER GUIDE
11
12
DVD26 DVD AND CD PLAYER USER GUIDE
SETTINGS IN THE SETUP MENU
This chapter explains the necessary basic settings
of the DVD26 player in the setup menu.
Using the Setup Menu
Before playing any discs, we strongly recommend using
the Setup Menu. Here you make all DVD-player setting
required for your benefit.
• Press the
button to switch on.
Also turn on your TV and make sure that it is set to the
correct video input.
– The button switches the player between standby
and on.
– If a disc that’s already loaded starts to play, press
twice to stop it. This will give you access to all settings.
The control possibilities for the current OSD are shown at
the bottom of each screen.
If an option is grayed out it means that it cannot be
changed at the current time. This is usually because a disc
is playing. Stop the disc, then change the setting. The
current setting for any option is marked with a highlighted
box.
Audio set up
Here you make all settings required for your audio system.
• Press SETUP.
The Setup menu on-screen display (OSD) appears:
Downmix
• Set the downmix mode to LT/RT or STEREO.
AUDIO SETUP VIDEO LAN GEN PROG
DOWN MIX
DIGITAL OUT
LINEAR PCM OUT
STEREO
ON
DOWN SAMP OFF
AUDIO RELATED
MOVE
LT/RT
According to Dolby Laboratories standard.
Stereo
Pure 2-channel without any concern to Dolby Laboratories standard
AUDIO SETUP VIDEO LAN GEN PROG
SETUP : Exit
DOWN MIX
DIGITAL OUT
LINEAR PCM OUT
LT/RT
STEREO
DOWN SAMP OFF
Navigate all of the following OSDs using these controls:
Selection
Pressing the
buttons
Option
or
SET DOWNMIX MODE
MOVE
SETUP : Exit
cursor up/down
SELECT
select the highlighted menu option
The
button
go back to the previous issue.
The
button
go forward to the next issue.
DVD26 DVD AND CD PLAYER USER GUIDE
13
SETTINGS IN THE SETUP MENU
Video setup
Digital out
• Default setting: ON
If at any time you need to switch off the digital audio
output, set this to OFF, otherwise leave it ON.Note that
you cannot switch on/off the optical and coaxial otputs
individually.
AUDIO SETUP VIDEO LAN GEN PROG
DOWN MIX
DIGITAL OUT
LINEAR PCM OUT
STEREO
OFF
ON
SET DIGITAL OUT
MOVE
SETUP : Exit
TV Screen
• Default setting: 4:3/LB
If you have a widescreen TV, select the ‘16:9’ setting
widescreen DVD software is then shown using the full
screen area. When playing software recorded in conventional (4:3) format, the settings on your TV will determine how the material is presented—see the manual
that came with your TV for details on what options are
available.
If you have a conventional TV, choose either ‘4:3 (Letter Box)’ or ‘4:3 (Pan & Scan)’. In Letter Box mode,
widescreen software is shown with black bars at the top
and bottom of the screen. Pan & Scan chops the sides off
widescreen material to make it fit the 4:3 screen (so even
though the picture looks larger on the screen, you’re actually seeing less of the movie).
Linear PCM out
AUDIO VIDEO SETUP LAN GEN PROG
• Default setting: DOWNSAMP ON
You only need to make this setting if you connected the
player to another component (AV amplifier, etc.) using
one of the digital outputs.
• If your AV amplifier (or other connected component)
is compatible with high sampling rates (96 kHz), set
this to ’Down Sample Off ’, otherwise set it to ’Down
Sample On’ (96 kHz audio is converted to a more compatible 48 kHz). Check the manual that came with the
other component if you’re unsure whether it is 96 kHz
compatible.
AUDIO SETUP VIDEO LAN GEN PROG
DOWN MIX
DIGITAL OUT
LINEAR PCM OUT
STEREO
ON
DOWNSAMP ON
DOWNSAMP OFF
TV-SCREEN
TV-SYSTEM
VIDEO OUT
ANGLE INDICATOR
SCREEN SAVER
BACKGROUND
4:3 / PS
4:3 / LB
16:9
ON
ON
BLACK
SET TV SCREEN MODE
MOVE
SETUP : Exit
Set TV standard
• Default setting: AUTO
Unless you notice that the picture is distorted when playing some discs, the setting should remain. If you experience picture distortion with some discs, set the TV system
to match your country or region's system.
AUDIO VIDEO SETUP LAN GEN PROG
SET LINEAR PCM OUTPUT TO 48 OR 96 K
MOVE
SETUP : Exit
TV-SCREEN
TV-SYSTEM
VIDEO OUT
ANGLE INDICATOR
SCREEN SAVER
BACKGROUND
4:3 / LB
AUTO
NTSC
PAL
ON
BLACK
SET TV STANDARD
MOVE
14
SETUP : Exit
DVD26 DVD AND CD PLAYER USER GUIDE
SETTINGS IN THE SETUP MENU
About PAL
Angle Indicator
Most models of the newly developed countdown PAL TV
system detect 50 Hz (PAL)/60 Hz (NTSC) and automatically switch vertical amplitude, resulting in a display
without vertical shrinkage.
• Default setting: ON
If your PAL TV does not have a V-Hold control, you
may not be able to view NTSC disc because the picture
may roll. If the TV has a V-Hold control, adjust it until
the picture stops rolling. On some TVs, the picture may
shrink vertically, leaving black bands at the top and bottom of the screen.This is not a malfunction; it is caused by
the NTSC -> PAL conversion.
Activates and deactivates the indicator. When set to
On, the indicator appears on the front panel display
when playback of a scene recorded from multiple camera
angles is in progress.
If you prefer not to see the camera icon on-screen during
multiangle scenes on DVD discs, change this setting to
‘Off ’.
AUDIO VIDEO SETUP LAN GEN PROG
TV-SCREEN
TV-SYSTEM
VIDEO OUT
ANGLE INDICATOR
SCREEN SAVER
BACKGROUND
Video out
• Default setting: VIDEO
If you make a setting here that is incompatible with your
TV, the TV may not display any picture at all. If this happens either switch everything off and reconnect to the TV
using either a composite video cable, or an S-Video cable,
or reset the unit.
4:3 / LB
PAL
VIDEO
ON
OFF
BLACK
ANGLE MARK ON/OFF
MOVE
SETUP : Exit
Screen Saver
• Default setting: ON
Option
Description
Video
Compatible with all TVs, but lowest quality of the three AV
settings.
YUV
Almost the same quality as RGB, but can give better results.
For use with the 21-pin SCART and Component Video out.
(See pos. K and L in illustr. page 3)
RGB
If your TV is compatible, this setting gives the best
picture quality.
For use with the 21-pin SCART and Component Video out.
(See pos. K and L in illustr. page 3)
AUDIO VIDEO SETUP LAN GEN PROG
TV-SCREEN
TV-SYSTEM
VIDEO OUT
ANGLE INDICATOR
SCREEN SAVER
BACKGROUND
If a constant image is displayed on a conventional CRTtype TV, it can “burn in” leaving a ghost image on the
screen. Switch to ‘On’ to make sure that a constant image
is not displayed for a dangerously long time.
AUDIO VIDEO SETUP
LAN GEN PROG
TV-SCREEN
TV-SYSTEM
VIDEO OUT
ANGLE INDICATOR
SCREEN SAVER
BACKGROUND
4:3 / LB
PAL
VIDEO
ON
ON
OFF
SCREEN SAVER SETTING
4:3 / LB
PAL
VIDEO
YUV
RGB
BLACK
MOVE
SETUP : Exit
VIDEO OUTPUT SETUP
MOVE
DVD26 DVD AND CD PLAYER USER GUIDE
SETUP : Exit
15
SETTINGS IN THE SETUP MENU
Background
Language
• Default setting: PICTURE
Audio language
Determines the background of the setup menu screens
when resume or stop mode is activated. The video output
signal appears behind the setup menu screens when playback or pause mode is activated.
• Default setting: ENGLISH
AUDIO VIDEO SETUP
TV-SCREEN
TV-SYSTEM
VIDEO OUT
ANGLE INDICATOR
SCREEN SAVER
BACKGROUND
This setting is your preferred audio language for DVD
discs. If the language you specify here is recorded on a
disc, the system automatically plays the disc in that language
LAN GEN PROG
4:3 / LB
PAL
VIDEO
ON
ON
BLACK
PICTURE
AUDIO VIDEO
LANGUAGE GEN PROG
AUDIO LANGUAGE
SUBTITLE LANG
DVD LANGUAGE
CAPTIONS
SET BACKGROUND
MOVE
SETUP : Exit
ENGLISH
FRENCH
SPANISH
CHINESE
JAPANESE
OTHERS...
PREFERRED AUDIO LANGUAGE
MOVE
SETUP : Exit
Subtitle language
• Default setting: OFF
This setting is your preferred subtitle language for DVD
discs. If the language you specify here is recorded on a
disc, the system automatically plays the disc with those
subtitles.
AUDIO VIDEO
LANGUAGE GEN PROG
AUDIO LANGUAGE
SUBTITLE LANG
DVD LANGUAGE
CAPTIONS
ENGLISH
FRENCH
SPANISH
CHINESE
JAPANESE
OTHERS...
OFF
PREFERRED SUBTITLE LANGUAGE
MOVE
16
SETUP : Exit
DVD26 DVD AND CD PLAYER USER GUIDE
SETTINGS IN THE SETUP MENU
DVD language
General
• Default setting: ENGLISH
Parantel lock
Some multilingual discs have disc menus in several
languages. This setting specifies in which language the
disc menus should appear. Leave on the default setting
for menus to appear in the same language as your Subtitle
Language.
• Default level: NO PARENTAL
AUDIO VIDEO
LANGUAGE GEN PROG
AUDIO LANGUAGE
SUBTITLE LANG
DVD LANGUAGE
CAPTIONS
ENGLISH
ENGLISH
FRENCH
SPANISH
CHINESE
JAPANESE
OTHERS..
PREFERRED MENU LANGUAGE
MOVE
• Default password: 3308
Some DVD Video discs feature a ‘Parental Lock’ level.
If your player is set to a lower level than the disc, it will
require you to enter a password before the disc will play.
This gives you some control about what your children
watch on your DVD player. Before you can set the
‘Parental Lock’ level you must register a password. As the
password owner, you can change the ‘Parental Lock’ level
or ‘Country Code’ whenever you like. You can also change
the password.
SETUP : Exit
AUDIO VIDEO
Other language
If the desired language is not presented in the lists, you
can select: OTHER.
Use the number buttons to enter your Country Code and
press SELECT.
AUDIO VIDEO
LAN
GENERAL
PARANTAL LOCK
PARANTAL PWD
FACTORY SETTINGS
REMOTE IR
RESUME MODE
PROG
3 PG
4 PG
5
6 PG-R
7 NC-17
8 ADULT
NO PARANTEL
SET PARANTAL CONTROL
MOVE
SETUP : Exit
LANGUAGE GEN PROG
Registering a new password
NEW LANG.CODE :
Yuo must register a password before you can change the
Parantal lock level.
• Select CHANGE.
PLEASE ENTER LANGUAGE CODE
MOVE
SETUP : Exit
AUDIO VIDEO
Captions
• Default setting: OFF
Captioning is primarily intended for those who are unable
or have great difficulties to hear the spoken word, but is
also helpful for those who may not be fluent in the language in which the audio is being presented.
AUDIO VIDEO
LAN
GENERAL
PARANTAL LOCK
PARANTAL PWD
FACTORY SETTINGS
REMOTE IR
RESUME MODE
PROG
NO PARANTEL
CHANGE
RESET
FRONT REMOTE
OFF
CHANGE PASSWORD
MOVE
SETUP : Exit
LANGUAGE GEN PROG
AUDIO LANGUAGE
SUBTITLE LANG
DVD LANGUAGE
CAPTIONS
ENGLISH
ENGLISH
ENGLISH
ON
OFF
CLOSED CAPTIONS
MOVE
DVD26 DVD AND CD PLAYER USER GUIDE
SETUP : Exit
17
SETTINGS IN THE SETUP MENU
• Use the number buttons to enter a 4-digit password.
It’s also possible to use the cursor buttonsto set the
password (up and down to set the number; left and
right to change the cursor position).
• Press SELECT to register the password.
AUDIO VIDEO
LAN
GENERAL
Factory settings
All setups you have made will be zeroed.
AUDIO VIDEO
LAN
GENERAL
PARANTAL LOCK
PARANTAL PWD
FACTORY SETTINGS
REMOTE IR
RESUME MODE
PROG
OLD PASSWORD :
NEW PASSWORD :
CONFIRM :
PROG
NO PARANTEL
CHANGE
RESET
FRONT REMOTE
OFF
RECALL FACTORY SETTINGS
MOVE
SETUP : Exit
PLEASE ENTER OLD PASSWORD
MOVE
SETUP : Exit
Remote IR
Note! The password stays with operation 'Factory reset'.
The DVD26 is controlled by an infra/red remote controll
pointed at the front panel.
Changing your password
The DVD26 can also be controlled using the IR/input at
the back panel.
To change your password, confirm your existing password
then enter a new one.
• Select ‘Password Change’.
• Use the number buttons to enter your existing password.
– The numbers appear as asterisks as you enter them.
– It’s also possible to use the cursor bottons to set the
password (up and down to set the number; left and
right to change the cursor position).
• Press SELECT.
• Enter a new password.
AUDIO VIDEO
LAN
GENERAL
PARANTAL LOCK
PARANTAL PWD
FACTORY SETTINGS
REMOTE IR
RESUME MODE
PROG
NO PARANTEL
CHANGE
RESET
FRONT REMOTE
BACK REMOTE
SELECT BACK/FRONT REMOTE
MOVE
SETUP : Exit
For security reasons this setting disappears every time the
DVD26 player is switched off using the main switch. You
have to go back to the setup menu to reactivate it.
• Press SELECT.
18
DVD26 DVD AND CD PLAYER USER GUIDE
SETTINGS IN THE SETUP MENU
Resume mode
Progressive mode
If Resume Mode is set to 'On' the track position of the
DVD-player is memorized when the DVD player is stopped.
• Default setting: RGB
• Restart playing and the player starts from the memorized position.
• Select YUV if you want to use Component Video
format.
If Resume Mode is set to 'Off' the DVD-player will start
from track 1.
• Select RGB if you want to use RGB Video format.
AUDIO VIDEO
LAN
P. S. MODE
RGB
AUDIO VIDEO
LAN
GENERAL
PARANTAL LOCK
PARANTAL PWD
FACTORY SETTINGS
REMOTE IR
RESUME MODE
GEN
PROGRESSIVE
YUV
RGB
PROG
NO PARANTEL
CHANGE
RESET
FRONT REMOTE
ON
OFF
SET YUV MODE
MOVE
SETUP : Exit
SET RESUME MODE
MOVE
DVD26 DVD AND CD PLAYER USER GUIDE
SETUP : Exit
19
20
DVD26 DVD AND CD PLAYER USER GUIDE
PLAYING MP3'S
This chapter explains how to play MP3 -files on
CD-Rom discs.
MP3 compatibility information
Caution!
• The CD-ROM must be ISO 9660 compatible.
• DVD-R/RW and CD-R/RW discs recorded using a
personal computer or a DVD or CD recorder may not
play if the disc is damaged or dirty, or if there is dirt or
condensation on the player’s lens.
• Mono or stereo MPEG-1 Audio Layer 3 format, 44.1
or 48kHz, fixed bit-rate. Incompatible files will not
play and a questionmark will be displayed.
• Not compatible with variable bit-rate (VBR) files.
• This player only plays tracks that are named with the
file extension “.mp3” or “.MP3”.
• This player is not compatible with multi-session discs.
If you try and play a multi-session disc, only the first
session will be played.
• Use CD-R or CD-RW media for recording your MP3
files. The disc must be finalized in order to play.
• If you record a disc using a personal computer, even
if it is recorded in a compatible format, there are cases
in which it may not play because of the settings of the
application software used to create the disc. (Check
with the software publisher for more detailed information.)
• Unfinalized DVD-R/RW discs cannot be played.
• Unfinalized CD-R/RW discs can be played, but not all
time information (playing time, etc.) will be displayed.
• Audio encoded at 128Kbps should sound close to regular audio CD quality. Although this player will play
lower bit-rate MP3 tracks, the sound quality becomes
noticeably worse at lower bit-rates.
• Only the first 11 characters of folder and track names
(excluding the “.mp3” extension) are displayed.
• This player can recognize a maximum of 250 folders
and 250 tracks. Discs containing more than 250 folders
or tracks will play, but only the first 250 folders/tracks.
DVD26 DVD AND CD PLAYER USER GUIDE
21
PLAYING MP3’S
Using the Smart Navigator for
MP3's
Use the Smart Navigator to make searching for the track(s)
you want to play easier. You can also use it to add or clear
tracks from the program list.
• Load a CD-ROM containing MP3 tracks.
The Smart Navigator screen is displayed.
– The left side of the screen shows a list of folders
containing MP3 tracks.
– On the right side is a list of MP3 tracks from the
first folder in the list.
SMART NAVI
FOLDER 1
FOLDER 2
FOLDER 3
FOLDER 4
MP3
MP3
MP3
MP3
MP3
MP3
MP3
FOLDER
TRACK
TRACK
TRACK
TRACK
TRACK
TRACK
TRACK
1
1
2
3
4
5
6
7
Displaying MP3 information
• Press DISP repeatedly during playback to display various MP3 information on-screen.
There are three information screens:
- Elapsed playing time
- Remaining playing time
- Off.
Properties
• Stop the disk by pressing the button on the front
panel or the
on the remote control.
• Select a track in the Smart Navigator list and press
DISP.
SMART NAVI
FOLDER 1
FOLDER 2
FOLDER 3
FOLDER 4
Navigate using the following controls:
The
or
buttons
Select folder and tracks from the current
screen.
The
or
buttons
Select the previous/next of folders and
tracks.
The
button
Play a 10-second intro of each track.
MP3
MP3
MP3
MP3
MP3
MP3
MP3
FOLDER
TRACK
TRACK
TRACK
TRACK
TRACK
TRACK
TRACK
1
1
2
3
4
5
6
7
The following properties of the MP3-track are displayed
on-screen:
SELECT
Play the currently selected folder or track.
PROGRAM
Add the currently selected track to the program list.
- List position and name
REPEAT
Repeat the current track or repeat all tracks
in the selected folder.
- File size
- Bitrate
The Smart Navigator remains on-screen during playback
and displays the current folder and track.
- Sampling frequence
- Audio mode
- Total playing time.
You can select a folder in the same way. The properties
displayed are
- Folder name
- All filenames within the selected folder
22
DVD26 DVD AND CD PLAYER USER GUIDE
PLAYING MP3’S
Making a program list of MP3
tracks
• Press PROG.
• Use the number buttons or the
a folder or track.
buttons to select
• Press SELECT to add the track to your program list.
You can only build a program list within one folder.
When your program list is completed, press , then
press to replay. The program list is displayed on the
front panel display.
• Press 'C' to correct wrong choices.
• Press , then press PROG twice to exit.
DVD26 DVD AND CD PLAYER USER GUIDE
23
24
DVD26 DVD AND CD PLAYER USER GUIDE
PLAYING JPEG'S
This chapter explains how to play JPEG-files on
CD-Rom discs.
JPEG compatibility information
Caution!
• The CD-ROM must be ISO 9660 compatible.
• DVD-R/RW and CD-R/RW discs recorded using a
personal computer or a DVD or CD recorder may not
play if the disc is damaged or dirty, or if there is dirt or
condensation on the player’s lens.
• This player only plays tracks that are named with the
file extension “.jpg” or “.JPG”.
• This player is not compatible with multi-session discs.
If you try and play a multi-session disc, only the first
session will be played.
• Use CD-R or CD-RW media for recording your JPEGfiles. The disc must be finalized in order to play.
• This player can recognize a maximum of 250 folders
and 250 tracks. Discs containing more than 250 folders
or tracks will play, but only the first 250 folders/tracks.
DVD26 DVD AND CD PLAYER USER GUIDE
• If you record a disc using a personal computer, even
if it is recorded in a compatible format, there are cases
in which it may not play because of the settings of the
application software used to create the disc. (Check
with the software publisher for more detailed information.)
• Unfinalized DVD-R/RW discs cannot be played.
• Unfinalized CD-R/RW discs can be played, but not all
time information (playing time, etc.) will be displayed.
25
PLAYING JPEG'S
Using the Smart Navigator for
JPEG's
Use the Smart Navigator to make searching for the track(s)
you want to play easier. You can also use it to add or clear
tracks from the program list.
• Load a CD-ROM containing JPEG-files.
Displaying JEPG information
• Press DISP when stepping through the track list to
display JPEG information on-screen.
The properties of the JPEG is displayed:
- File name
- File size
The Smart Navigator screen is displayed.
- Picture mode
– The left side of the screen shows a list of folders
containing JPEG-files.
- Resolution (W
(W×H)
– On the right side is a list of JPEG-files from the first
folder in the list.
- Camera model
- Maker:
Displaying a 9-picture overview
SMART NAVI
FOLDER 1
FOLDER 1
FOLDER 2
FILENAME
1
FOLDER 3
FILENAME
2
FOLDER 4
FILENAME
3
FILENAME
4
FILENAME
5
FILENAME
FILENAME
6
7
Navigate using the following controls:
The
or
buttons
Select folder and tracks from the current
screen.
The
or
buttons
Select the previous/next of folders and tracks.
• Press to switch from the Smart Navigator to a
9-picture overview on-screen.
Zoom
• Press ANG on the remote control. 'Zoom on' is displayed on-screen.
• Press
to zoom in from 100 to 200%.
• Press
to zoom out from 100 to 25%.
SELECT
Play the currently selected folder or track.
PROGRAM
Add the currently selected track to the program
list.
Panning
TOP
Takes you back to the beginning of the list
• Press the
buttons to move the picture into the
desired position.
• Press ANG to switch off zooming.
Rotating
• Press
to rotate the picure to the right.
• Press
to rotate the picture to the left.
Mirror
26
• Press
to mirror the picture horizontally.
• Press
to mirror the picture vertically.
DVD26 DVD AND CD PLAYER USER GUIDE
PLAYING JPEG'S
Making a program list of JPEG-files
• Press
to stop the disk.
• Press PROG.
• Use the number buttons or the
a folder or track.
buttons to select
• Press SELECT to add the track to your program list.
You can only build a program list within one folder.
When your program list is completed, press , then
press to replay. The program list is displayed on the front
panel display.
• Press 'C' to correct wrong choices.
• Press , then press PROG twice to exit.
DVD26 DVD AND CD PLAYER USER GUIDE
27