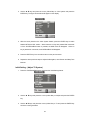
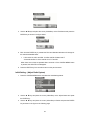
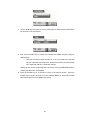
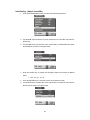
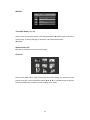
1
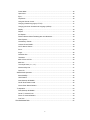
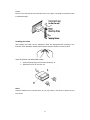
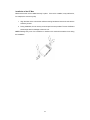
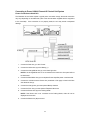
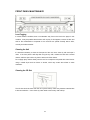
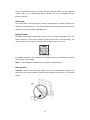
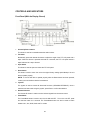
Model PAV2000DTV
MOBILE THEATER
AM/FM, with DVD/CD Changer Controller
and Motorized 7” Wide TFT LCD Display
Owner’s and
Installation Guide
INTRODUCTION
Thank you for choosing the PAV2000DTV MOBILE THEATER AM/FM, with DVD/CD Changer
Controller and Motorized 7” Wide TFT LCD Display. This unit provides state of the art
electronics and is constructed to provide years of reliable, trouble-free service.
Please read all
documentation prior to using this product. The documentation will assist you in obtaining the
best equipment performance. Save this manual for later use.
IMPORTANT NOTICE
For your safety, the driver should not watch the TV or operate the controls while driving. Please
note watching and/or operating the TV while driving is prohibited by law in some countries. An
LCD Panel and/or Video Monitor may be installed in a motor vehicle and visible to the driver if
the LCD Panel or Video Monitor is used for vehicle information, system control, rear or side
observation or navigation. If the LCD Panel or Video Monitor is used for television reception,
Video or DVD playback, then the LCD Panel or Video Monitor must be installed so that these
features will only function when the vehicle is in "park" or when the vehicle’s parking brake is
applied. Always keep the volume to a level at which outside sounds can be heard.
SAFETY PRECAUTION
For safety reasons, when changing video media, it is recommended that the vehicle is not in
motion, and that you do not allow children to unfasten seat-belts to change video media or make
any adjustments to the system. Enjoy your entertainment system but always remember-safety
of all passengers remains the number one priority.
1
CAUTIONS AND WARNINGS
The lightning flash with arrowhead symbol, within an equilateral triangle, is intended to alert the
user to the presence of un-insulated “Dangerous Voltage” within the product’s enclosure that
may be of sufficient magnitude to constitute a risk of electric shock to persons.
The exclamation point within an equilateral triangle is intended to alert the user to the presence
of important operating and maintenance (servicing) instructions in the literature accompanying
the appliance.
WARNING: TO REDUCE THE RISK OF FIRE OR ELECTRIC SHOCK, DO NOT
EXPOSE THIS APPLIANCE TO RAIN OR MOISTURE.
CLASS 1
LASER PRODUCT
CLASS 1
LASER PRODUCT
The label above is attached to the chassis / case and notes that the component uses laser
beams that have been classified as Class 1. It means that the unit is utilizing laser beams that
are of a weaker class. There is no danger of hazardous radiation outside the unit.
2
IMPORTANT SAFETY INSTRUCTIONS
Safety Precautions
1. Caution
Do not spill or spray liquid of any kind on or in the system (this may result in a fire or
electric shock). Insert the unit all the way in until it is fully locked in place. Otherwise, it
may fall out of place when jolted. To prevent a short circuit, never put or leave any
metallic objects (such as coins or metal tools) inside the unit. To prevent damage to
the motorized mechanism do not hold the LCD display panel while it is opening or
closing. Do not drop the PAV2000DTV or subject it to strong shocks. Doing so could
damage the delicate parts contained within the unit. Use the hardware supplied with
the PAV2000DTV for the installation. The use of incorrect hardware can damage the
unit.
2. Warning
During installation of the PAV2000DTV, make sure to use automotive-grade wires or
other wires with a 0.75mm² (AWG18) or more when extending the ignition, battery, or
ground wire to prevent wire deterioration and damage to the wire coating. Ensure that
the unit is grounded to a negative 12VDC power supply.
To reduce the risk of electric shock, do not perform any servicing other than that
contained within the operating instructions. There are no user-serviceable parts inside.
Refer all servicing to qualified service personnel. Do not install the PAV2000DTV in an
area that is exposed to direct sunlight, excessive heat humidity and/or dusty conditions.
Do not install the PAV2000DTV where it may be exposed to water splashing or the
possibility of rain. Only replace fuses with fuses of the same ampere rating. Failure to
do so may result in damage to the unit, use a new one with the prescribed rating.
Using a fuse with the wrong rating may cause your unit to malfunction. In order to
prevent a short circuit when replacing a fuse, first disconnect the wiring harness.
Do not use 3-inch CD’s. Do not use adapters to load 3-inch CDs in the CD slot. It is
possible for the 3-inch CD to separate from its adapter and damage the unit.
5. Cleaning DVD Player
When cleaning, make sure the system is unplugged from the power source. Do not
use liquid cleaners or aerosol cleaners. Use a soft cloth lightly dampened with water
for cleaning the exterior of the system only.
6. Disc
It is not recommended to insert 3” CD’s with adapters into the PAV2000DTV. The CD
adapter may separate from the CD and damage the unit.
Do not use irregularly
shaped discs such as heart or star-shaped discs as they may cause the DVD Player to
malfunction. Do not stick paper, tape or glue on the disc. Do not expose the disc to
direct sunlight or heat sources. Do not touch the surface of disc, handle the disc by its
3
edge. Always wipe the disc from the center out with a soft cleaning cloth when cleaning
the disc. Remove the disc from the DVD Player and store it in its case after playing.
NOTE: Some software producers may intentionally fix some playback operations of
discs. Since this DVD Player plays discs according to the disc contents the software
producers designed, some playback features may not be available. Also refer to the
instructions supplied with the discs.
4
TABLE OF CONTENTS
INTRODUCTION ........................................................................................................................ 1
CAUTIONS AND WARNINGS .................................................................................................... 2
IMPORTANT SAFETY INSTRUCTIONS..................................................................................... 3
Safety Precautions .................................................................................................................. 3
TABLE OF CONTENTS .............................................................................................................. 5
PAV2000DTV SYSTEM SPECIFICATIONS ................................................................................ 8
FM Tuner Specifications .......................................................................................................... 8
AM Tuner Specifications.......................................................................................................... 8
TV Tuner Specifications........................................................................................................... 8
DVD Player Specifications....................................................................................................... 8
Audio Amplifier Specifications ................................................................................................. 8
Input Specifications ................................................................................................................. 8
Video Output Specifications .................................................................................................... 8
LCD Monitor Specifications ..................................................................................................... 9
General Specifications ............................................................................................................ 9
INSTALLATION OF THE PAV2000DTV SYSTEM..................................................................... 10
Installation Kit(s) Contents .................................................................................................... 10
Headunit Installation.............................................................................................................. 10
Mounting Angle Adjustment ............................................................................................... 10
Installing the Holder ............................................................................................................11
Installation of the RT Box................................................................................................... 12
Connecting to Power & Multi Channel AV Control Unit System ............................................. 13
Power Connection to Head Unit......................................................................................... 13
RT Box Connections .......................................................................................................... 14
WIRING DIAGRAM OF RT BOX 16PIN CONNECTOR ..................................................... 14
Connecting to the Multi Channel AV Control Unit System...................................................... 15
Connecting to the DVD Changer Control System.................................................................. 17
Connecting to the Multi Channel AV Control Unit System w/ Additional 6CH Amp ................ 17
FRONT PANEL MAINTENANCE .............................................................................................. 19
Lens Fogging ........................................................................................................................ 19
Cleaning the Unit................................................................................................................... 19
Cleaning the CD Slot............................................................................................................. 19
HANDLING CDs ....................................................................................................................... 20
CD cleaning .......................................................................................................................... 20
Removing CDs ...................................................................................................................... 20
CDs That Can Not Be Used .................................................................................................. 20
CD storage............................................................................................................................ 21
5
Region Number ..................................................................................................................... 21
Disc Insertion ........................................................................................................................ 21
CONTROLS AND INDICATORS............................................................................................... 22
Front Panel (With the Display Closed) .................................................................................. 22
Front Panel (With the Display Open)..................................................................................... 24
Rear Panel ............................................................................................................................ 24
REMOTE CONTROL................................................................................................................ 25
Battery Installation................................................................................................................. 25
Remote Control Functions..................................................................................................... 26
Remote Control Key Functions ............................................................................................. 27
SYSTEM OPERATION ............................................................................................................. 29
Turning The System Power ON/OFF..................................................................................... 29
Opening The Monitor............................................................................................................. 29
Closing The Monitor .............................................................................................................. 29
Picture Control ...................................................................................................................... 30
Audio Control ........................................................................................................................ 31
Initial Setting - (Color System)............................................................................................... 32
Initial Setting - (Adjust TV System)........................................................................................ 33
Initial Setting - (Adjust Radio System) ................................................................................... 34
Initial Setting - (Adjust Sound Mix) ........................................................................................ 36
Initial Setting - (Rear Camera)............................................................................................... 37
Rear Monitor ......................................................................................................................... 38
OVERVIEW OF THE RDS FUNCTION ................................................................................. 39
AF (Alternative Frequencies) / REG (Regional): ................................................................ 39
TA(Traffic Announcement) / TP (Traffic Program)............................................................... 40
PTY (Program Type) .......................................................................................................... 40
RDS (Radio Data System) .................................................................................................... 40
Tuning (TV-Auto Search)....................................................................................................... 41
Tuning (Radio-Auto Search).................................................................................................. 41
DVD Player Operation .............................................................................................................. 42
Changing DVD System Setting ............................................................................................. 42
Language .......................................................................................................................... 42
Video ................................................................................................................................. 42
Audio ................................................................................................................................. 43
More Audio Settings .......................................................................................................... 43
Parental ............................................................................................................................. 45
Disc Playback Operation ....................................................................................................... 46
Disc Insertion..................................................................................................................... 46
6
Power/ Mode ..................................................................................................................... 46
Open/Close........................................................................................................................ 46
Eject .................................................................................................................................. 46
Play/Pause ........................................................................................................................ 46
Using the Remote Control ................................................................................................. 47
Changing Subtitle Language (S-TITLE) ............................................................................. 47
Changing the Audio Soundtrack & Language (AUDIO)...................................................... 47
Display............................................................................................................................... 48
Repeat............................................................................................................................... 48
A-B Repeat ........................................................................................................................ 48
Direction Buttons-Menu/Title Navigation and Movement ................................................... 49
After Playback ................................................................................................................... 49
Last Memory Feature......................................................................................................... 49
Volume UP and DOWN ..................................................................................................... 49
GOTO Search Feature ...................................................................................................... 49
Zoom ................................................................................................................................. 50
Angle ................................................................................................................................. 50
Fast/Slow Disc................................................................................................................... 50
Title Menu.......................................................................................................................... 50
MP3 & Photo CD File......................................................................................................... 50
MP3 Disc ........................................................................................................................... 51
Track Up & Down ( I<<, >>I) .............................................................................................. 51
Numerical Key Pad ............................................................................................................ 51
Photo CD ........................................................................................................................... 51
AM/FM Radio Operation........................................................................................................ 52
Band (AM/FM) ................................................................................................................... 52
OSD ON/OFF .................................................................................................................... 52
Seek (Manual) UP/DOWN ................................................................................................. 52
Preset Radio Station SCAN ............................................................................................... 52
Stored Radio Station Deletion............................................................................................ 52
TV Operation......................................................................................................................... 53
Seek (Manual) UP/DOWN ................................................................................................. 53
Preset TV Channel Scan ................................................................................................... 53
Stored TV Channel Deletion .............................................................................................. 53
Fine Tune........................................................................................................................... 53
TROUBLESHOOTING.............................................................................................................. 54
7
PAV2000DTV SYSTEM SPECIFICATIONS
FM Tuner Specifications
Frequency Range
87.50MHz to 108.0MHz
Usable Sensitivity
9 dBf
50dB Quieting Sensitivity
15dBf
Alternate Channel Selectivity
70dB
Stereo Separation (1kHz)
30dB
AM Tuner Specifications
Frequency Range
530kHz to 1710kHz
Usable Sensitivity
25 dBuV
TV Tuner Specifications
Receiving Channel
VHF LOW (S3-NZ1)
VHF HIGH
(E12 – E5)
UHF (E69 – E21)
DVD Player Specifications
System
Digital Versatile Disc System with CDDA
capable
Usable discs
DVD video disc, Compact DISC Frequency
Response:
20Hz to 20 kHz (± 3dB)
20Hz to 20 kHz (CD) (± 3dB)
Signal to Noise Ratio
90 dB (1kHz) IHF-A
Dynamic Range
90 dB (1kHz)
Distortion
0.05 %
Audio Amplifier Specifications
Rated power output
18W x 4 plus 7W x2 (20 Hz to 20 kHz, 1%,
4Ω )
Maximum power output
200W (50W x4) plus 50W (25W x 2)
Speaker impedance
4Ω (4 to 8 Ω)
Input Specifications
Audio input
780± 50mVrms (input impedance 75 Ω)
Video input
1.0± 0.2 Vp-p (input impedance 75 Ω)
Video Output Specifications
Video output
1.0 ± 0.2 Vpp (output impedance 75 Ω)
8
LCD Monitor Specifications
Screen Size
7-inch wide type 166mm with x 100mm Height
Display method
Transmission type TN liquid crystal display
Drive method
TFT (thin-film transistor) active matrix driving
Pixels
336,960 (1440 x 234)
General Specifications
Power source voltage
14.4VDC 10.8 to 15.6V allowable
Ground
Negative
Current consumption
3.0A (1W)
Auto Antenna Rated Current
500mA less
Dimensions of the Main Unit
178mm width x50mm Height x 159.8mm
Depth
Dimensions of the Tuner Amp Unit
166mm Width x 38mm Height x 266mm Depth
Weight of the Main Unit
2kg
Weight of the Tuner Amp Unit
1kg
Dimensions of the Remote Control Unit
50.8mm Width x 11.4mm Height x 160mm
Depth
Weight of the Remote Control Unit
70g
NOTE
Specifications and design are subject to be changed without notice for further improvement.
NOTE
If you experience problems during installation, consult your Audiovox dealer.
If the unit fails to operate properly, press the Reset button. The unit returns to factory setting
when the Reset button is pressed. If the unit still fails to operate properly after the Reset button
has been pressed, contact your local Audiovox dealer for assistance.
9
INSTALLATION OF THE PAV2000DTV SYSTEM
Installation Kit(s) Contents
1. Main Control Unit Accessory Kit
(P/N 170-0004)
1x
DIN Sleeve
(P/N 108-3812)
1x
Fuse/Filter Harness
(P/N 112-3425)
1x
Power/Speaker Harness
(P/N 112-3426)
1x
Remote Control
(P/N 136-3712)
1x
Video Cables
(P/N 112-3427)
1x
Antenna Extension Cable
(P/N 118-1132)
1x
Data Control Harness
(P/N 112-3428)
2. Mounting / Bracket Hardware Kit
(P/N 150-1562)
2x
Mounting Bracket
4x
#8-32x1/4" Phil.Screw, Cap Point (P/N 100-1473)
4x
Flat Washer, #10
(P/N 100-2160)
4x
Lock Washer, #10
(P/N 100-2161)
4x
Washer, #8 Flat Washer
(P/N 100-1880)
4x
#8-Lock Washer
(P/N 100-2308)
3. Installation Hardware Kit
(P/N 108-3814)
(P/N 150-1563)
1x
Strap, Rear Mounting, Perforated (P/N 108A3698)
2x
Flat Washer, #10
(P/N 100-2160)
2x
Lock Washer, #10
(P/N 100-2161)
1x
M5x8MM Hex Hd. Machine Screw (P/N 100-1602)
Owner's and Installation Guide
(P/N 128-7148)
Headunit Installation
Choose the mounting location carefully so that the unit will not interfere with the normal driving
function of the driver. Avoid installing the unit where it would be subject to high temperatures
such as from direct sunlight or hot air from the heater or where it would be subject to dust, dirt
or excessive vibration. Use only the supplied mounting hardware for a safe and secure
installation.
Mounting Angle Adjustment
Adjust the mounting angle to less than 20 degrees.
MOUNTING EXAMPLE
Installation in the dashboard
10
STRAP
Be sure to use the strap to secure the back of the unit in place. The strap can be bent by hand
to the desired angle.
Installing the Holder
After inserting the holder into the dashboard, select the appropriate tabs according to the
thickness of the dashboard material and bend them inwards to secure the holder in place.
HOW TO DETACH THE MOUNTING FRAME
1. Insert the release keys into the holes indicated by “A”.
2. Remove the frame “B” from the unit.
NOTE:
Keep the release keys in the safe place, as you may need it in the future to remove the unit
from the car.
11
Installation of the RT Box
Make sure that the unit is installed securely in place. If the unit is unstable, it may malfunction,
for example, the source may skip.
1. Align the holes in the unit with the vehicle-mounting bracket and secure the unit with the
accessory screws.
2. During installation, do not use any screw except for those provided. The use of different
screws might result in damage to the main unit.
NOTE: Damage may occur if a screwdriver or similar tool is used with excessive force during
the installation.
12
Connecting to Power & Multi Channel AV Control Unit System
Power Connection to Head Unit
The illustration shown below depicts a typical power connection though the actual connection
may vary depending on manufacturers (refer to the documentation supplied with the equipment
to be connected). If the connection is not properly made, the unit may sustain unexpected
damage.
1. Connect the Red wire (1) to ACC Power.
2. Connect the Yellow wire (2) to the Battery (+).
3. Connect the Orange/White wire (3), to the Dash Light wire.
NOTE: If the Orange/White wire is not connected to the head unit’s front panel will not
be illuminated.
4. Connect the Blue/White wire (4) to an Optional Power Amplifier power control terminal.
5. Connect the vehicles Antenna Power wire (motorized or film-type) to head unit’s Blue
Auto Antenna wire (5).
6. Connect the Orange wire (6) to the Optional Backup Camera.
7. Connect the Pink wire (7) to the Optional Telephone Mute wire.
8. Connect the Brown wire (8) to the Parking Brake.
NOTE: If the Brown wire is not connected to the Parking Brake, video will not be
displayed on the screen.
9. Connect the Black wire (10) to Ground.
13
RT Box Connections
1. Connect the Yellow wire to the Battery (+).
2. Connect the Red wire to ACC Power.
3. Connect the Black wire to Ground.
WIRING DIAGRAM OF RT BOX 16PIN CONNECTOR
1. Connect the Yellow wire (1,9) to the Battery (+).
2. Connect the Black wire (2) to Ground.
3. Connect the Red wire (3) to ACC Power.
4. Connect the White wire (4) to the Positive (+) of the Left Front Speaker.
5. Connect the White/Black wire (5) to the Negative (-) of the Left Front Speaker.
6. Connect the Gray wire (6) to the Positive (+) of the Right Front Speaker.
7. Connect the Gray/Black wire (7) to the Negative (-) of the Right Front Speaker.
14
8. Connect the Brown wire (8) to the Positive (+) of the Center Speaker.
9. Connect the Blue/Black wire (10) to the Negative (-) of the Navigation Sound
10. Connect the Blue wire (11) to the Positive (+) of the Navigation Sound
11. Connect the Green/Black wire (12) to the Negative (-) of the Left Rear Speaker.
12. Connect the Green wire (13) to the Positive (+) of the Left Rear Speaker.
13. Connect the Purple/Black wire (14) to the Negative (-) of the Right Rear Speaker.
14. Connect the Purple wire (15) to the Positive (+) of the Right Rear Speaker.
15. Connect the Brown/Black wire (16) to the Negative (-) of the Center Speaker.
Connecting to the Multi Channel AV Control Unit System
The Illustration on the following page is an example setup with the Multi Channel AV Control
Unit System. The exact connection method will vary depending on the specific components
selected for a particular installation.
Please refer to the owner’s and installation manuals
supplied with the associated equipment.
15
If a DVD or VCD Changer is used, connect the Video Output of the changer to the Video Input
of AV2.
Do not connect the Audio Output of the changer to the Audio Input of AV2 this
connection is done through the Din Cable connection.
NOTE:
•
Make sure that power is OFF before making signal connections.
•
Connect the Head Unit MINET Jack directly to RT Box MINET Jack
16
•
When installing a Subwoofer, use an additional power amplifier equipped with a
Subwoofer analog line out.
WARNING
The Digital Audio Output of this DVD player can only be connected to a compatible Dolby Digital
and/or DTS decoder or to an amplifier equipped with a digital audio input.
High volume digital signals may damage other equipment and hearing.
Connecting to the DVD Changer Control System
Connecting to the Multi Channel AV Control Unit System w/ Additional
6CH Amp
The Illustration on the following page is a possible example for Multi Channel AV Control Unit
System in additional 6CH Amplifier with RT BOX. The exact connection method will vary
depending on the specific components selected for a particular installation. Please refer to the
owner’s and installation manuals supplied with the associated equipment.
17
NOTE: For a more powerful 5.1CH sound system, an additional power amplifier of 6CH or
5CH +1CH amplifier will need to be added to the system.
18
FRONT PANEL MAINTENANCE
Lens Fogging
In certain weather conditions, dew or condensation may form on the lens in the player. In this
condition, it may be possible that the discs will not play. If this happens, remove the disc and
wait for the condensation to evaporate. If the unit does not operate normally after a while,
consult your Audiovox dealer.
Cleaning the Unit
If it becomes necessary to clean the front panel of the unit, use a clean dry soft cloth wipe it
clean. If the front panel is still dirty after using the dry cloth, moisten the cloth with a neutral
cleaner, and then wipe it with a dry cloth to remove all of the cleaner.
Do not apply spray cleaner directly onto the unit. Do not wipe the front panel with a hard cloth or
using a volatile liquid such as thinner or alcohol, which may scratch the surface or erase
characters.
Cleaning the CD Slot
The CD slot should be clean and clear of any dust build-up. Discs may become scratched due
to dust accumulation. Use a clean dry cotton swab to remove any dust build-up
19
HANDLING CDs
Do not touch the recorded surface of the CD.
CD-R and CD-RW discs are easier to damage than a normal music CD.
Do not apply tape or adhesive stickers etc. to the CD. Tape or adhesive stickers could come
off and cause damage to the unit.
CD cleaning
Clean discs from the center of the disc and move outward towards the outside edges.
Removing CDs
When removing CDs from the unit, pull the discs out horizontally.
CDs That Can Not Be Used
CDs that are not round cannot be used.
Do not use CDs that are scratched or dirty.
This unit can only play discs of the following formats:
•
Audio CD
•
CD-R
•
CD-RW
•
DVD
The unit may not correctly play discs with other formats.
20
CD-R or CD-RW discs that have not been finalized cannot be played. (For the finalization
process, refer to your CD-R/CD-RW writing software, and your CD-R/CD-RW recorder
instruction manual.)
CD storage
Do not place CDs in direct sunlight (On the seat or dashboard etc.) or where the CDs will be
subjected to high temperatures. CDs should be stored in their storage cases in an area of the
vehicle that will not be subjected to damaging heat.
Region Number
Most DVDs are manufactured specifically for sale and use in a specific geographic region. The
Region Number on a DVD must correspond to the Region Number of the DVD Player. The
region number of the DVD Player is labeled on the top label on the top of the unit.
If the Region Number of a disc is different from the Region Number of the DVD Player, playback
of the disc will not be possible.
NOTE: The PAV2000DTV is designed for use in Region 1 (North America).
Disc Insertion
CAUTION: With the screen in the open position, the driver may have difficulty seeing the disc
insertion slot. As a safety precaution, discs should be inserted while the screen is in the closed
position.
21
CONTROLS AND INDICATORS
Front Panel (With the Display Closed)
1. Volume Up/Down buttons
This button is used to increase/decrease the Audio Volume.
2. Tilt button
Momentarily press and release this button to adjust the angle of the TFT LCD panel with 3
steps. When this button is pressed and held for 2 seconds, the TFT LCD panel moves 2
steps backward & 1 step to forward.
3. Open button
This button is used to Open and Close the TFT LCD panel.
4. Reset button
This button is used to return the unit to the original factory settings (Initial Mode) if the unit
fails to operate properly.
NOTE: If the unit still fails to operate properly after the Reset button has been pressed,
contact your local Audiovox dealer for assistance.
5. Joystick
The joystick is used to choose all directional functions (UP/DOWN/LEFT/RIGHT). Once a
selection has been made using the joystick, press Enter to confirm the selection.
6. Remote IR Sensor
The Remote IR Sensor is used to receive infrared signals from the remote control.
7. Power/Mode
The Power/Mode button is used to turn the unit ON and OFF. To turn the unit OFF, press
and hold the button for 2 seconds. The Power/Mode button can also be used to switch
between AV1, AV2, DVD, Radio and TV modes.
22
8. Menu/Setup
•
Menu: This button is used to display the System Menu.
•
Setup: Press and hold this button for 2 seconds to display the DVD MPEG Setup
Menu.
•
NOTE: This button is used to switch between receiving bands for Radio or TV
modes.
9. Mute
This button is used mute all Audio outputs. Pressing the Mute button again will restore all
Audio outputs.
10. P.S/BSM
This button is used to scan and store AM/FM stations. Momentarily press and release this
button to start the scan mode. When a desired station is reached, press the button again
to stop the scan mode. Press and hold this button for 2 seconds to store the station.
11. TRACK/TV CH Up/Down
This button is used to tune the stations to be stored in Radio and TV mode.
•
Delete (I<<)
The Delete button is used to remove previously stored stations that are displayed
on the screen. Press and hold this button until the selected station is deleted.
•
Memory (>>I)
The Memory button is used to store desired stations. Once a desired station is
displayed on the screen, press and hold the button until the station is stored into
memory.
These buttons are also used to select the next Track or Song of an Audio or MP3 CD.
These buttons are also used to select the next Chapter of a DVD.
12. Seek Tuning UP/DOWN
•
In Radio Mode: This button is used to seek the next Radio station with clear
reception.
•
In TV Mode: This button is used to seek the next TV Channel with clear reception.
•
In CD or DVD Modes: Press the directional buttons to scan Fast Forward or Fast
Reverse on the disc. Press and hold the button for 2 seconds play the disc in
Slow Forward or Slow Reverse.
13. Eject
This button is used to eject the disc from the unit.
14. Sub Level
Use this knob to adjust the Subwoofer level for analog line output only.
23
Front Panel (With the Display Open)
bq P.S./BSM >lll
br TRACK l<<
TRACK >>l
15. P.S/BSM
Same as item number 10 on the previous page.
16. Track/TV CH Up/Down Track l<< and Track >>l
same as item number 11 on the previous page.
Rear Panel
1
2
3
4
5
6
7
1. RGB Input for Audiovox Navigation Connection
2. Minet for RT Box Connection
3. Optical Digital Output for Special Dolby Digital & DTS Decoder Connection
4. Mounting Bolt
5. Cooling Fan
6. 16 Pin Power Connector
7. Video In/Out for RT Box Connection
24
REMOTE CONTROL
Battery Installation
1.
Place the Remote Control button side down.
2.
Slide the Battery Compartment Cover open (Off).
3.
Insert two (2) AAA Batteries.
NOTE: Be sure to observe the correct polarity (+/-) as indicated in the battery
compartment.
4.
Replace the Battery Compartment Cover
CAUTION: INCORRECT BATTERY USEAGE MIGHT CAUSE EARLY DISCHARGE,
LEAKAGE OR CORROSION DAMAGE.
•
It is dangerous to charge/heat/open or short-circuit the batteries.
•
Remove the batteries if the remote control will not be used for long periods of time.
•
Replace the batteries when the operating range becomes reduced or if the remote
control does not work properly.
•
Should battery leakage occur, clean the battery compartment with a soft cloth and
install new batteries.
25
Remote Control Functions
The remote control should be pointed directly at the IR remote sensor (as shown above) in
order for the headunit to function correctly.
Distance: The maximum distance that the remote control can be used is
approximately 16 feet from the front of the remote sensor.
Angle: The maximum angle that the remote control can be used is approximately ±30
degrees from center of the IR remote sensor.
NOTE:
•
Do not install the headunit where direct sunlight or fluorescent illumination can shine
directly into the IR remote sensor.
Direct sunlight or fluorescent illumination could
interfere with proper remote control operation.
•
Avoid dropping the remote control.
•
Avoid spilling liquids on the remote control or exposing it to extreme heat.
26
Remote Control Key Functions
No
Short Press (1 SEC)
Long Press (2 SEC)
Remark
1
Power ON/Mode
Power OFF
2
Mute
3
Open/Close
4
Volume Up/Down
5
AF-Alternate Frequency
TA -Traffic Announcement
For use with RDS only
6
PTY-Program Type
REG-Region
For use with RDS only
7
Track Up/Down
8
Band
9
System Menu
10
Direction Key ( , , , ) ENTER
11
DVD Set Up
12
DVD Title Menu
13
Fast Disc/ Manual Tuning
Slow Disc/Seek Tuning
DVD/CD/Radio/TV
14
Tilt (5 Steps)
Navigation Hot Key
Tilt / Navigation
15
Rear Monitor
DVD/CD/MP3/Radio/TV
OSD ON/OFF(Changer)
DVD/CD/MP3/Radio/TV
27
16
NT/PAL-NTSC or PAL
17
Preset Scan
18
Play/Pause
19
Stop
20
Numeric Key Pad (Detailed Below)
DVD Mode Only
BSM(Best Station Memo)
DVD/CD/MP3
Eject
DVD/CD/MP3
1
1
Repeat
Repeat in CD Changer
2
2
A → B Repeat
Random in CD Changer
3
3
Display
Intro Scan in CD Changer
4
4
Title
5
5
S-Title-Sub Title
6
6
Audio
7
7
Angle
8
8
Zoom
9
9
Goto
0
0
PBC
21
Aspect
Fine Tune (TV Mode)
22
Clear
23
Return
24
+10
3D
28
SYSTEM OPERATION
Turning The System Power ON/OFF
To turn the system power ON, press and release the POWER button. The monitor will be
vertically positioned when pressing Open/Close button.
Pressing and releasing the Open/Close button can also turn ON the system power.
To turn the system power OFF, press and hold the POWER button again for 2 seconds. The
monitor will automatically close when the unit is powered OFF.
Opening The Monitor
Press the OPEN/CLOSE button to open the monitor.
Closing The Monitor
1. Hold the upper left & right side of the monitor parallel with the front of the unit as shown
in the picture below.
2. Press the OPEN/CLOSE button or POWER button for 2 seconds or longer and the
monitor will automatically close.
NOTE:
•
If the monitor is not parallel to the front of the unit (the monitor is angled to the
left or the right) the monitor cannot be closed. A beep tone will alert the user to
the problem.
•
If the OPEN/CLOSE button is pressed while radio or video is on, the monitor
will close, and sound will still be audible. When pressing power button for 2
seconds, the sound and power will be “OFF”.
29
Picture Control
1. Press the SYSTEM MENU button on the remote control until the monitor displays
following picture and choose “PICTURE” on OSD.
2. Using the
keys, place the cursor (Yellow Bar) on Picture and press the ENTER key.
3. Use the
keys and place the cursor (Yellow Bar) on the feature that needs
adjustment (Ex. Contrast, Brightness, Tint). Press the ENTER key to make the desired
selection.
4. Press the
keys to adjust the level of the feature that needs adjustment as shown in
the figure below.
30
5. Press the ENTER key for 2 seconds to return to the previous menu. When there are no
keys are pressed after 5 seconds or if the SYSTEM MENU button is pressed, the OSD
menu will disappear.
Audio Control
1. Press the SYSTEM MENU button on the remote control until the monitor displays the
figure shown below.
2. Use the
keys and place the cursor (Yellow bar) on Audio and press the ENTER
key.
3. Use the
keys and place the cursor (Yellow bar) on the item feature that needs
readjustment (Ex. Tone, Volume). Press the ENTER key to make the desired selection
as shown in the picture below.
4. Use the
keys and place the cursor (Yellow bar) on the item that needs to be
adjusted (Ex. BASS, MID, TREBLE). Press the ENTER key to make the desired
selection.
31
5. Press the
keys to adjust the level of the selected item as shown in the figure
below.
6. Press the SYSTEM MENU button for about 2 seconds in order to return to the previous
menu.
NOTE: When there are no keys are pressed after 5 seconds or if the SYSTEM MENU
button is pressed, the OSD menu will disappear.
7. The Bass/Mid/Treble features can be adjusted from –6 level to +6 level.
8. Repeat the same process for the other features that need to be adjusted.
9. Press the ENTER key for 2 seconds in order to return to the previous menu. Press the
SYSTEM MENU button to leave the MENU OSD.
Initial Setting - (Color System)
1. Press SYSTEM MENU button until the monitor displays the following picture shown in
the picture below.
2. Use the
keys and place the cursor (Yellow Bar) on Initial Setting and press the
ENTER key.
32
3. Use the
keys and place the cursor (Yellow Bar) on Color System and press the
ENTER key. The figure shown below will appear on the display.
4. With the cursor placed on the Color System feature, press the ENTER key to switch
between NTSC and PAL modes. When there are no keys are pressed after 5 seconds
or if the SYSTEM MENU button is pressed, the OSD menu will disappear. When no
key is pressed for 5 seconds, the SYSTEM MENU will disappear.
5. Press the ENTER key for 2 seconds to return to the previous menu.
6. Repeat the above previous steps to adjust the Navigation, Auto Dimmer and Beep Tone
features
Initial Setting - (Adjust TV System)
1. Press the SYSTEM MENU button and select the Initial Setting feature.
2. Use the
keys and place the cursor (Yellow Bar) on Adjust and press the ENTER
key.
3. Use the
keys and place the cursor (Yellow Bar) on TV and press the ENTER key
as shown in the figure below.
33
4. Use the
keys and place the cursor (Yellow Bar) on the Field feature and press the
ENTER key as shown in the figure below.
5. Each time the ENTER key is pressed the Field and Standard selections will change for
the selections detailed below:
•
U.S.A and M Æ CCIR1 and B/G Æ CCIR2 and BGÆ Ireland and IT’
Æ Australia and BG Æ China and BGÆ O.I.R.T and DK
When there are no keys are pressed after 5 seconds or if the SYSTEM MENU button
is pressed, the OSD menu will disappear.
6. Press the ENTER key for 2 seconds to return to the previous menu.
Initial Setting - (Adjust Radio System)
1. Press the SYSTEM MENU button and select the Initial Setting feature.
2. Use the
keys and place the cursor (Yellow Bar) on the Adjust feature and press
the ENTER key.
3. Use the
keys and place the cursor (Yellow Bar) on Radio and press the ENTER
key as shown in the figure on the following page.
34
4. Use the
keys and place the cursor (Yellow Bar) on Band and press the ENTER
key as shown in the figure below.
5. Each time the ENTER key is pressed, the FM Band and FREQ. Step will change as
detailed below:
•
USA and 100 kHzÆ Europe and 50K Hz Æ O.I.R.T and 50K HzÆ Asia and
50K Hz Æ Australia and 100 kHzÆ S. America and 100 kHz Æ China and 50K
HzÆ Japan and 100K Hz Æ Korea and 100 kHz
When there are no keys are pressed after 5 seconds or if the SYSTEM MENU button is
pressed, the OSD menu will disappear.
6. Press the ENTER key for 2 seconds to return to the previous screen.
Press the
ENTER key for about 2 seconds to turn the SYSTEM MENU off. Press the SYSTEM
Menu button again to turn the MENU OFF directly.
35
Initial Setting - (Adjust Sound Mix)
1. Press the SYSTEM MENU button and select the Initial Setting feature.
2. Use the
keys and place the cursor (Yellow Bar) on Sound Mix and press the
ENTER key.
3. Use the
keys and place the cursor (Yellow Bar) on NAVIGATION and press
the ENTER key as shown in the figure below.
4. Each time ENTER key is pressed, the Navigation feature will change as detailed
below:
•
OFF Æ R Æ L Æ L+R
5. Press the ENTER key for 2 seconds to return to the previous screen.
6. Use the
keys and place the cursor (Yellow Bar) on Handsfree and press the
ENTER key as shown in the figure below.
36
7. Each time the ENTER key is pressed, the Handsfree feature will change as detailed
below:
•
OFFÆ R Æ L Æ L+R
8. Press the ENTER key for 2 seconds to return to the previous screen.
9. Press the ENTER key for 2 seconds to return to the previous screen. Press the
ENTER key for 2 seconds to turn the MENU off. Press the SYSTEM MENU button
again to turn MENU OFF directly.
When there are no keys are pressed after 5 seconds or if the SYSTEM MENU
button is pressed, the OSD menu will disappear.
Initial Setting - (Rear Camera)
1. Press the SYSTEM MENU button and select the Initial Setting feature.
2. Use the
keys and place the cursor (Yellow Bar) on Rear Camera and press
the ENTER key.
3. Use the
keys and place the cursor (Yellow Bar) on USE and press the ENTER
key as shown in the figure below.
4. Each time the ENTER key is pressed the USE feature will change as detailed below.
•
ON Æ OFF
When there are no keys are pressed after 5 seconds or if the SYSTEM MENU
button is pressed, the OSD menu will disappear.
5. Press the ENTER key for 2 seconds to return to the previous screen.
37
6. Use the
keys and place the cursor (Yellow Bar) on ANGLE and press the
ENTER key as shown in the figure below.
7. Each time the ENTER key is pressed the ANGLE feature will change as detailed
below:
•
0 deg Æ 180 deg
8. Press the ENTER key for 2 seconds to return to the previous screen. Press the
ENTER key for 2 seconds again to turn the MENU off. Press the SYSTEM MENU
button again to turn the MENU off directly.
Rear Monitor
1. Press the SYSTEM MENU button and select Rear Monitor as shown in the figure
below.
2. Use the
keys for setting the Rear Monitor feature to DVD, Radio, TV, AV1, AV2,
OFF as shown in the figure below. The Rear Monitor feature can be set via the Rear
Monitor button on the remote control button.
When there are no keys are pressed after 5 seconds or if the SYSTEM MENU
38
button is pressed, the OSD menu will disappear. When no key is pressed for
5seconds, the menu will be disappeared. Or press SYSTEM MENU button again to
turn MENU off directly.
OVERVIEW OF THE RDS FUNCTION
AF (Alternative Frequencies) / REG (Regional):
After turning the RDS feature on, AF can be set to become “ON” or “OFF” using the AF button
on the remote control.
•
AF “OFF”: When the AF switching mode is set to OFF and RDS is set to “ON”,
a maximum number of 6 RDS and non-RDS will be stored together.
•
AF “ON”: When the AF switching mode is set to ON the RDS station information
will only be displayed.
•
AF Segment Flashing: When the AF switching mode is selected and the RDS
information is not received yet AF segment flashing will occur.
When the AF switching mode is “ON”, the radio continually checks the AF signal strength. The
interval of checking time of each AF depends on the signal strength of current station which can
be anywhere from a few seconds for strong station to a few minutes for weak station.
Every time a new AF is stronger than a current station, the AF will it switch over to the stronger
station quickly.
To access the Region feature, press the PTY button on the remote control for 2 seconds and the
REGIONAL mode will be set to ON or OFF.
-REG mode “ON”: When the Region mode is set to ON the AF switching or PI SEEK is
implemented to the station that has all PI codes that are the same as the current station. “REG
ON” should be shown on screen.
-REG mode “OFF”: When the Region mode is set to OFF the regional code in the format of PI
code is ignored when AF switching or PI SEEK is implemented. “REG OFF” should be shown on
screen.
When the regional mode is “OFF”, the radio may switch from a national program station to a
local variant of that program, or from a local station in an area to a local station in another area.
This may cause customers to listen to a wrong program. To avoid this feature set the Region
mode to “ON”, and then the radio will only switch to an AF that broadcasts Region mode to the
same program.
39
TA(Traffic Announcement) / TP (Traffic Program)
TP mode will automatically switch between “ON” and “OFF” depending upon the broadcast. In
order to access the TA mode, press the AF button on the remote control for 2 seconds and the
TA mode will switch between “ON” and “OFF”.
When the TA mode is “ON” and a traffic announcement is received the following may occur:
•
The unit will switch out of DVD/TV/AV1/AV2 modes temporarily to radio mode.
•
The volume level will be raised to the threshold point. If the volume level was
greater than the threshold point, the volume will decrease.
•
When the TA mode is “ON”, the OSD will display “TA ON”
•
When a TP station is received, the OSD will display ”TP ON”.
PTY (Program Type)
To access the Program Type feature, press the PTY button the remote control and the OSD will
display “PTY ON” or “PTY OFF”. When in the “PTY ON” mode, the different program types can
be selected by using the track up and down buttons (I<<, >>I)
RDS (Radio Data System)
1. Press SYSTEM MENU button and the monitor will display the figure show below.
2. Use the
keys and place the cursor (Yellow Bar) on RDS and press ENTER key.
3. Use the
keys to turn the RDS function ON or OFF as shown in the figure below.
When the RDS function is set to ON the OSD will be similar to that as shown in the figure
below.
4. Press P.S/BSM button to store the RDS stations.
NOTE: Only six RDS stations can be stored at one time per band.
40
Tuning (TV-Auto Search)
1. After adjusting the TV system within the Initial Setting feature, press the P.S/BSM button
on the front panel of the unit to store TV channels.
The indication “Searching” will flash on the screen during the TV Auto Search feature
and the channels will be memorized automatically.
2. When the Auto-Search has completed, the memorized channels will be displayed on the
screen and circulated until the P.S/BSM button is pressed again.
3. Select the memorized TV Channels by using the direction keys (
).
Tuning (Radio-Auto Search)
1. After adjusting the Radio system within the Initial Setting feature, press the
P.S/BSM button on the front panel of the unit to store Radio stations.
The indication “Searching” will flash on the screen during searching Radio Station
Search Feature and the stations will be memorized automatically.
2. When the Auto-Search has completed, the memorized stations will be displayed on
the screen and circulated until the P.S/BSM button is pressed again.
3. Select the memorized Radio Stations by using the direction keys (
41
).
DVD Player Operation
Changing DVD System Setting
Press the MPEG SET UP button on the remote control, and five categories will be displayed on
the screen: Language, Video, Audio, More Audio, and Parental. Use the directional arrows
and
to select between the displayed features. Use the ENTER button to select the desired
feature.
Language
Within the Language menu, the following features can be adjusted: OSD Menu, Subtitle, Audio,
and DVD Menu. Use the directional arrows
directional arrows
and
and
to choose the desired selection. Use the
to adjust the settings. The available language settings are English,
French, Japanese, Korean, and Spanish.
Video
Within the Video menu, the following features can be adjusted: TV Shape and TV System. Use
the directional arrows
and
and
to choose the desired selection. Use the directional arrows
to adjust the settings. TV Shape can be adjusted to the following features: 16:9, 4:3
PS, and 4:3 LB. TV System can be adjusted to the following features: NTSC, PAL, and AUTO.
42
Audio
Within the Audio menu, the following features can be adjusted: Dolby Digital, DTS, MP3/WMA,
and CD/VCD. Use the directional arrows
directional arrows
and
and
to choose the desired selection. Use the
to between digital and analog out. Use the ENTER button to adjust
the settings. The Analog output can be set for 2-Channel and 6-Channel Output. The digital
output can be set for PCM, RAW, or OFF.
More Audio Settings
Within the More Audio Menu, the following features can be adjusted: Speaker Setting, Speaker
Level, Speaker Delay, Dynamic Range Compression Decompression, Prologic and Pink Noise.
Use the directional arrows
and
and
to choose the desired selection. Use the directional arrows
to adjust the settings.
Speaker Setting
Press the ENTER button to cycle the Speaker Setting between two modes: Center and
Subwoofer. To select a feature, press the direction button
on the screen. Use the directional arrows
•
and
and "Yes" and "No" will appear
to select either yes or no.
"Yes": The audio output of the Center and Subwoofer speakers will be separated.
Based on the 5.1 CH decoder. A separate Center or Subwoofer speaker is
necessary.
•
"No": The audio output of the Center and Subwoofer speaker will be sent to Front
Rear speakers. This feature should be used when the system does not have a
separate Center or Subwoofer speaker.
43
Speaker Level
Press the ENTER button to cycle through the Speaker Level selections for 5.1 CH speakers
as follows: Center, Left Surr, Right Surr, Subwoofer, Front Left, and Front Right. Each time
the ENTER button is pressed, each mode will change. To select a mode, press the direction
arrow
and the display will show the level at 0 dB. The level can be adjusted by using the
direction arrows
and
. Press the ENTER button to choose the level selection.
Speaker Delay
Press the ENTER button to cycle through the Speaker Delay selections for delay time as
follows: Center Delay and Surr Delay. Each time the ENTER button is pressed, each mode
will change. To select a mode, press the direction arrow
and the display will show the
delay starting at 0 ms. The delay time can be adjusted by using the direction arrows
and
. Press the ENTER button to choose the delay time.
Dyn Range Comp (Dynamic Range Compression)
Press the ENTER button to cycle through the Dynamic Range Compression modes as
follows: Full or Off.
•
Full: In order to limit the audio output, select this mode and the volume level will be
decreased by a specified level.
•
Off: In this setting, the Dynamic Range Compression mode is "Off".
Prologic
Press the ENTER button to select the Prologic settings. Prologic can be set to Auto, ON, or
OFF. Use the directional arrows
and
to cycle through the selections and press the
ENTER button.
•
Prologic On: In this setting, when the original audio output is 2CH, Stereo, this
mode will render the audio output as virtual 5.1CH sound. This mode only applies to
DVD and CD Audio modes.
•
Prologic Off: In this setting, the Prologic mode is "Off".
Pink Noise
Press the ENTER button to select the Pink Noise settings via the directional arrows
and
. Pink Noise can be set to the following modes: Off, Left, Center, Right, Left Surr, Right
Surr, and Subwoofer. This mode confirms the proper location for each speaker and the pink
noise is audible in each speaker, and the correct location can be verified before the final
setting.
44
Parental
The Parental Menu prohibits the play of specified DVDs that are unsuitable for children. Press
the ENTER button to access the Parental Menu. There are two features within the parental
menu: Password and Rating.
The Password feature is initially unlocked. To set a password, enter a 4-digit code and press
the ENTER button.
The Rating feature allows the user to set the Parental rating level of the allowable discs to be
played. The rating levels are as follows:
1. Kid safe
2. G
3. PG
4. PG-13
5. PG-R
6. R
7. NC-17
8. Adult
Use the ENTER button to cycle through the rating level selections.
45
Disc Playback Operation
Disc Insertion
Insert a disc into the center of the insertion slot with the label side facing up. The disc will
automatically play after loading.
NOTE: Do not insert foreign objects into the disc insertion slot. If the mechanism does not
accept the disc, either there already may be a disc in the unit or the unit may need service.
Loading 8 CM disc into the center of the insertion slot
Power/ Mode
The Power/Mode button turns the system ON and OFF. To turn OFF the unit, press and hold the
Power/Mode button for 2 seconds. Each time the Power Mode button is pressed, the source will
change from DVD / RADIO / TV / AV1 / AV2. When there is no disc in the loader, the mode will
automatically switch to Radio mode. The last mode will be memorized when the system is
powered off.
Open/Close
The OPEN button on the unit and the remote control will either open or close the monitor screen.
The monitor will only open when the OPEN button is pressed although the unit power is on. The
monitor will automatically close when the system is powered off.
Eject
In order to eject a disc, press and hold the EJECT button on the unit for 2 seconds. Pressing
and holding the STOP button on the remote control for 2 seconds will also eject the disc.
Play/Pause
The disc will load and playback will begin automatically. Upon insertion, when the Play /Pause
button is pressed a second time the disc play will be paused.
•
If a single-sided disc is loaded upside down, the disc will automatically eject after a
few seconds.
46
•
If an Audio CD is inserted, the monitor will display "CD" on the screen.
When all chapters on the disc have been played, the unit will automatically stop
playing.
Using the Remote Control
To select a function that is printed on a button on the remote control, press the desired
button for 1 second. To select a function that is printed above a button on the remote control,
press and hold the desired button for 2 seconds.
Changing Subtitle Language (S-TITLE)
To change the subtitle language to a different language from the language selected at the initial
setting, follow the steps detailed below:
•
Press the S-TITLE button (the number 5 button on the remote control) for 2
seconds during playback.
•
•
Repeatedly press the S-TITLE button until the desired language is selected.
To turn OFF the subtitle feature, press the S-TITLE button until "OFF" is displayed
on the screen.
Note: This feature only works with discs with multiple subtitle languages.
Changing the Audio Soundtrack & Language (AUDIO)
To change the Audio Soundtrack Language to a different language from the language selected
at the initial setting, follow the steps detailed below:
•
Press the AUDIO button (the number 6 button on the remote control) for 2 seconds
during playback.
•
Repeatedly press the AUDIO button until the desired Audio Soundtrack Language is
selected.
NOTE: This feature only works with discs with multiple audio tracks.
47
Display
To access the Display Feature of the unit, press the DISPLAY button (the number 3 button on
the remote control) for 2 seconds. The first time the button is pressed, the track elapsed time
and time to end of the disc is displayed on the screen. Pressing the button a second time
displays all of the information as shown in the figure above. Pressing the button a third time will
remove the display info from the screen.
Repeat
The Repeat feature allows for continuous viewing or listening of a track or disc. To access the
Repeat feature, press the Repeat button (the number 1 button on the remote control) for 2
seconds.
For DVD, each time the button is pressed, the screen will display the Repeat
features as follows:
•
OFFÆRepeat ChapterÆRepeat TitleÆShuffle.
For CD audio, each time the button is pressed, the screen will display the Repeat features as
follows:
•
Repeat DiscÆShuffleÆOff.
A-B Repeat
The A-B Repeat feature allow for the repeating of a section between two specific points. To
access the A-B repeat feature, press the A-B repeat button (number 2 button on the remote
control) for 2 seconds and follow the steps detailed below:
•
Press the A-B Repeat button during play at the point where repeat play is to start
(A).
•
Press the A-B Repeat button during play at the point where repeat play is to be
concluded (B).
•
•
Play will continuously repeat between the selected A and B points.
To return to normal play, press the A-B Repeat button once and "OFF" is displayed.
NOTE: In CD Changer Mode, this button function is achieved by Random Playback.
48
Direction Buttons-Menu/Title Navigation and Movement
Press the direction buttons ( ,
,
,
) to navigate through various on-screen selections.
Press the ENTER button to select a desired feature.
After Playback
When the unit is not in use, eject the disc and turn OFF the power by pressing the POWER
button for 2 seconds.
NOTES:
•
If the icon “
“ appears on the screen when a button is pressed, this indicates that
the selected function is not available on the disc at that time.
•
Depending on the DVD disc, some operations or features may not be allowed.
Refer to the jacket or case of the disc for further information.
Last Memory Feature
The unit is equipped with a "LAST MEMORY" function that allows the user to resume viewing of
a movie from the point where it was last left off.
NOTE: The Last Memory function is not supported once the disc is ejected.
Volume UP and DOWN
The volume of the audio output can be adjusted by pressing the Volume
and
buttons.
GOTO Search Feature
The GOTO Search feature allows the user to move to any title, chapter, or elapsed time on the
disc. Press the GOTO button (the number 9 button on the remote control) for 2 seconds and the
search features are selectable on the screen as detailed below:
•
Time: Input the desired elapsed time with the Numeric Keypad, and press
the ENTER button.
•
TITLE/CHAPTER: Input the desired title or chapter number with the
Numeric Keypad and press the ENTER button.
49
Zoom
The ZOOM feature allows the user to “ZOOM IN” and enlarges the picture on the screen. Press
the ZOOM button (the number 8 button on the remote control) for 2 seconds to access the
zoom feature. Repeatedly press the ZOOM button to cycle between OFF, 1X, 2X, and 3X
enlargement.
While in Zoom mode, the directional buttons enable a Pan and Scan feature that allows the user
to view areas of the picture that are not readily visible on the screen.
Angle
Some DVDs contain scenes that can be viewed from a number of different angles. For discs
with this feature, the same scene can be viewed from each different angle using the ANGLE
button. Press the ANGLE button (the number 7 button on the remote control) for 2 seconds to
access this feature.
Fast/Slow Disc
Every time the FAST DISC buttons are pressed, the playback speed of the disc will change by
x2, x4, x8, and x20 the original speed in either direction. To access the slow disc feature, press
and hold the FAST DISC button for 2 seconds and the playback speed of the disc will change by
x1/2, x1/4, x1/6 or x1/7 the original speed in either direction.
Title Menu
Press the TITLE MENU button to access the menu of the DVD TITLE and to choose a disc
menu as desired.
MP3 & Photo CD File
The unit has the capability of playing MP3 and Photo CDs. Refer to the information below to
access these discs.
If the disc contains multiple files, such as MP3 and Photo CD files, the figure shown above will
appear on the screen. The user must select the desired file type to be played.
50
MP3 Disc
Track Up & Down ( I<<, >>I)
Use the Track Up and Down buttons or the directional buttons (
and
) to skip to the next or
previous song. To see the next page on the screen, use the directional buttons
(
and
).
Numerical Key Pad
MP3 files can be selected via the numerical keypad.
Photo CD
Press the Title Menu button, while accessing the Photo CD to display and preview the first 9
pictures on the disc. Use the directional buttons ( ,
,
,
) to navigate through the pictures.
Press the ENTER button to select a picture to display on the screen.
51
AM/FM Radio Operation
Band (AM/FM)
Repeatedly press the BAND button on the remote control to change between the FM and AM
bands as follows:
•
FM1 / FM2 / FM3 / AM1 / AM2
Each band can store 30 stations.
OSD ON/OFF
•
When the changer is connected, the OSD for changer information will be shown in
AV2 mode. Press the BAND button, and the OSD of the changer information will be
"ON" or "OFF".
Seek (Manual) UP/DOWN
The Seek Up/Down feature allows the user to manually tune to a radio station. Press and hold
the SEEK button for 2 seconds to access the Seek Mode. To use this button for Manual Tuning,
press this button for 2 seconds and then tune the frequency by channel spacing. If a button is
not pressed for 5 seconds, the mode will change back to SEEK mode.
•
Memory: In order to memorize the station as tuned manually, first press the SEEK
UP/DOWN buttons and press and hold this button after finding the station. Then, the
desired station should be memorized.
Preset Radio Station SCAN
(P.S/BSM button on the display or P.SCAN button on the remote control.)
With the Preset Scan feature, the unit will scan the desired band for tunable stations. First,
select the desired band (FM1/FM2/FM3/AM1/AM2) and press the PS/BSM button for 2 seconds.
The tuner will then search until a station of sufficient signal strength has been found. The unit
will store 30 stations in the band automatically starting at the strongest signal strength.
Press this button quickly and stations will be automatically stored. When seeking for a desired
station, press this button once, and the Tuner will stop at the station.
Stored Radio Station Deletion
Locate the radio station as shown on the monitor by using the direction buttons ( ,
•
,
,
).
Delete: First select a stored station to be deleted as shown on the display. Then
press the DELETE button to erase it from stored memory.
52
TV Operation
Seek (Manual) UP/DOWN
The Seek Up/Down feature allows the user to manually tune to a TV channel. Press and hold
the SEEK button for 2 seconds to access the Seek Mode. To use this button for Manual Tuning,
press this button for 2 seconds and then tune the frequency by channel spacing. If a button is
not pressed for 5 seconds, the mode will change back to SEEK mode.
•
Memory: In order to memorize the TV channel as tuned manually, first press the SEEK
UP/DOWN buttons and press and hold this button after finding the station. Then, the
desired TV channel should be memorized.
Preset TV Channel Scan
(P.S/BSM button on the display or P.SCAN button on the remote control.)
This button is used to scan through preset TV channel. First select the desired TV band (TV1
or TV2) you would like to scan and then press and release either the P.S/BSM button or the
P.SCAN to begin scanning within the selected TV Band for the desired TV Channel. The TV
Tuner will search for stations of significant signal strength and store up to 30 of these stations
automatically.
Stored TV Channel Deletion
Locate the TV Channels as shown on the monitor by using the direction buttons ( ,
•
,
,
).
Delete: First select a stored TV Channels to be deleted as shown on the display.
Then press the DELETE button to erase it from stored memory.
Fine Tune
Press this button about 2 seconds or longer to tune the TV channel for a fine tuned picture.
53
TROUBLESHOOTING
Problem
Cause
Power does not turn ON
Measure
Fuse is blown
Replace the blown fuse with a fuse of the
same amperage. If the fuse blows again
G
E
N
E
R
A
L
consult your AUDIOVOX dealer.
Incorrect wiring
Nothing
happens
when
buttons are pressed.
The
Consult your AUDIOVOX dealer.
microprocessor
has
Press the reset button on the RT BOX unit and
malfunctioned due to noise,
main unit for about 2 seconds with a thin
etc.
instrument.
Display is not accurate.
NOTE: When the reset button is pressed the
ACC power will be turned OFF.
TV/Radio
stations, and titles stored in memory are
cleared.
The remote control does
Sunlight is interfering with the
Sunlight is interfering with the IR Sensor on
not work.
IR Sensor.
the front of the main unit, causing the remote
control not to work.
The batteries of the remote
Check the batteries of the remote.
control are either discharged/
not
installed
or
installed
incorrectly.
The image is not displayed.
The
parking
brake
is
not
T
pulled or the parking brake
V
wire is not connected.
The display is dark.
The brightness control is too
Check that the parking brake is applied.
Adjust the brightness properly.
low.
Inadequate operating
The temperature inside the vehicle may be 0
temperatures.
or less. Allow the vehicle to warm up.
The color of the display is
The headlight of the vehicle is
The display is made darkened at night to
light or a shade of color is
lit.
prevent glare.
not good.
The color is not adjusted
Check that COLOR and TINT are adjusted
adequately.
properly.
Improper NTSC/PAL setting.
Set the NTSC/PAL properly according to the
When the VTR or other
video source is connected
VTR or other video source.
the image is disturbed.
54
When
the
TV
tuner
is
Bad reception
A radio wave may not reach sufficiently due to
connected the image gets
obstruction by mountains or buildings. Check
unclear.
it again at a place where a radio wave can be
received properly.
The TV tuner has a ghost
Bad receiving condition
image
A radio wave may not reach sufficiently due to
obstruction by mountains or buildings. Check
it again at a place where a radio wave can be
received properly.
The TV tuner has spots or
Presence of jamming
System is subjected to interference from
stripes in the image.
automobiles, power cables, neon sign, and so
forth.
Check it again after changing location.
The TV tuner has spots or
This is not a failure, but a phenomenon
stripes in the image.
peculiar to a liquid crystal panel (The LCD
panel is produced according to technology
with very high precision.
Note that, though there are effective
Pixels of 99.99% or more, pixel missing or
D
V
normally lit pixels account for 0.01%)
Disc cannot be loaded.
D
P
Another
disc
is
already
Eject the disc before loading the new one.
loaded.
Sound skips or is noisy
Compact disc is dirty.
Clean the compact disc with a soft cloth.
L
Compact
A
scratched or warped.
scratches.
Sound is bad right after
Droplets may form on the
Let dry for about 1 hour with the power on.
power is turned on.
internal lens when the car is
Y
E
R
disc
is
heavily
Replace
with
a
compact
disc
with
no
parked in a humid place.
Disc cannot play and the
The view is limited.
Release the view limitation or change the
words “PARENTAL
parental level. See the subsection “Setting up
VIOLATION” are displayed.
the parental level”
55
12 MONTH LIMITED WARRANTY
Applies to Audiovox Video Products
AUDIOVOX ELECTRONICS CORP. (the Company) warrants to the original retail purchaser of this
product that should this product or any part thereof, under normal use and conditions, be proven
defective in material or workmanship within 12 months from the date of original purchase, such
defect(s) will be repaired or replaced with reconditioned product (at the Company's option)
without charge for parts and repair labor.
To obtain repair or replacement within the terms of this Warranty, the product is to be delivered
with proof of warranty coverage (e.g. dated bill of sale), specification of defect(s), transportation
prepaid, to the Company at the address shown below.
This Warranty does not extend to the elimination of externally generated static or noise, to
correction of antenna problems, to costs incurred for installation, removal or reinstallation of the
product, or to damage to tapes, discs, speakers, accessories, or electrical systems.
This Warranty does not apply to any product or part thereof which, in the opinion of the
Company, has suffered or been damaged through alteration, improper installation, mishandling,
misuse, neglect, accident, or by removal or defacement of the factory serial number/bar code
label(s).
THE EXTENT OF THE COMPANY'S LIABILITY UNDER THIS WARRANTY IS
LIMITED TO THE REPAIR OR REPLACEMENT PROVIDED ABOVE AND, IN NO EVENT,
SHALL THE COMPANY'S LIABILITY EXCEED THE PURCHASE PRICE PAID BY
PURCHASER FOR THE PRODUCT.
This Warranty is in lieu of all other express warranties or liabilities.
ANY IMPLIED
WARRANTIES, INCLUDING ANY IMPLIED WARRANTY OF MERCHANTABILITY, SHALL BE
LIMITED TO THE DURATION OF THIS WRITTEN WARRANTY.
ANY ACTION FOR
BREACH OF ANY WARRANTY HEREUNDER INCLUDING ANY IMPLIED WARRANTY OF
MERCHANTABILITY MUST BE BROUGHT WITHIN A PERIOD OF 24 MONTHS FROM DATE
OF ORIGINAL PURCHASE. IN NO CASE SHALL THE COMPANY BE LIABLE FOR ANY
CONSEQUENTIAL OR INCIDENTAL DAMAGES FOR BREACH OF THIS OR ANY OTHER
WARRANTY, EXPRESS OR IMPLIED, WHATSOEVER.
No person or representative is
authorized to assume for the Company any liability other than expressed herein in connection
with the sale of this product.
Some states do not allow limitations on how long an implied warranty lasts or the exclusion or
limitation of incidental or consequential damage so the above limitations or exclusions may not
apply to you. This Warranty gives you specific legal rights and you may also have other rights,
which vary from state to state.
USA: AEC, 150 MARCUS BLVD. HAUPPAUGE, NY. 11788
1-800-645-4994
CANADA: CALL 1-800-645-4994 FOR LOCATION OF WARRANTY STATION SERVING YOUR AREA
128-5495D
56
For Customer Service
Visit Our Website At
WWW.audiovox.com
Product Information, Photos,
FAQ’s Owner’s Manuals
© 2004 AEC, 150 Marcus Blvd., Hauppauge, N.Y. 11788
57
128-7148B