1
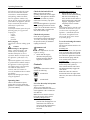
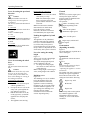
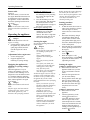
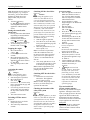
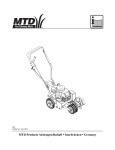
I 03 FORM NO. 769-00759 MTD Products Aktiengesellschaft • Saarbrücken • Germany 2 1 G 4 3 1 2 A 6 5 7 8 9 11 10 12 14 13 J 15 16 MTD Products Aktiengesellschaft Industriestraße 23 D-66129 Saarbrücken Germany * ++ 49-6 80 57 90 • ++ 49-6 80 57 94 42 jqa=e~åÇÉäëÖÉëÉääëÅÜ~Ñí=ãÄe jqa=aÉåã~êâ=^ép jqa=eìåÖ•êá~=hÑí tÉäëÉê=píê~É=NOO QSNQ=j~êÅÜíêÉåâ jÉëëáåÖîÉà=PM=^ UVMM=o~åÇÉêë aµòë~=dóÕêÖó=Ñí=N UOQU=kÉãÉëî•ãçë * MT=OQ=OS=MR=RR * UT=NN=VN=MM * MS=UU=RM=RR=OM UT=NN=VS=MM MT=OQ=OS=MR=RQ MS=UU=RN=RR=MM jqa=_ÉåÉäìñ=kKsK jqa=fåíÉêå~íáçå~ä=cê~åÅÉ jqa=qê®ÇÖ™êÇëã~ëâáåÉê mêáåë=^äÄÉêíä~~å=VS _JUUTM=fòÉÖÉã _KmK=QRP=p~áåíJbíáÉååÉ=Çì=oçìîê~ó TSUMS=`ÉÇÉñ p®íìå~î®ÖÉå=P RONQN=c~äâÕéáåÖ * HHPOJRN=QM=OQ=QN * MO=PO=VN=VQ=PO * M=RN=RN=TN=MM M=RN=RT=NN=QN=Q MO=PO=VN=VQ=PS HHPOJRN=QM=PT=TR jqa=jçíçêÖÉê®íÉ=dãÄe bKmK_~êêìë=iqa jqa=pÅÜïÉáò=^d fåÇìëíêáÉëíê~É=VÓNN TPMRQ=báëäáåÖÉå=L=cáäë i~ìåíçå=oç~Ç luS=Mro=_áÅÉëíÉêI=lñÑçêÇëÜáêÉ ^ääãÉåÇëíê~É=NQ RSNO=sáääãÉêÖÉå * M=TN=SN=UR=MR=M M=TN=SN=UR=MR=TM * M=NU=SV=PS=PS=PS M=NU=SV=PS=PS=OM jqa=mçä~åÇ=ëéK=ò=çKçK riK=lÖêçÇåáÅò~=N UQJORO=lêäÉ * MRU=RT=OM=TMN MRU=RT=OM=SVV © 2007 MTD Products AG * MR=SS=NU=QS=MM MR=SS=NU=QS=MV Operating Instructions Details on the rating plate These details are very important for identifying your appliance when you order spare parts or contact our aftersales service. The rating plate is found near the engine. Enter all the details on your appliance’s rating plate in the following fields. English Observe the safety and operating information Before using the appliance for the first time, read and follow these operating instructions carefully. Keep these instructions in a safe place for future reference. General safety information Disposal and environment Caution! Engine oil pollutes the environment. After changing oil, give the waste oil you have drained to a centre authorised to dispose of waste oil or to another disposal company. Batteries pollute the environment. Used batteries do not belong in domestic waste. Give used batteries to your dealer or other disposal company. Remove batteries before appliances are scrapped. For your safety Use the appliance properly This appliance has been designed: - to mow the lawns of domestic and leisure gardens - in accordance with the details and safety information given in these operating instructions. The appliance must not be put to any other use. The user is liable for all damage caused to third parties and their property. The manufacturer is not liable for any damage incurred as a result of unauthorised changes to the appliance. Before working with the appliance Persons using the appliance must not be under the influence of intoxicants, e.g. alcohol, narcotics, medication, etc. Persons under sixteen years of age must not operate the appliance. Before starting work, familiarise yourself with all the installations and controls as well as their functions. Store fuel in approved receptacles only, and never near sources of heat, e.g. ovens, hot water tanks, etc. Do not fuel the appliance when the engine is running or hot. Fuel the appliance outdoors only. Replace damaged exhausts, fuel tanks, and filler caps. Before using the appliance: - check that the deflector closes correctly and the (optional) grass catcher works and is installed correctly, - replace worn parts, and install missing parts, - check for any wearing or damage to the cutters, fastening pins, and the whole cutter unit; if individual parts are worn or damaged, unbalanced masses are avoided when the complete set is replaced at a specialised garage. Replacement parts must comply with the requirements specified by the manufacturer. This is always the case with original replacement parts. For this reason, use only original replacement parts or replacement parts approved by the manufacturer. All repair work must be conducted exclusively at a specialised garage. 1 When working with the appliance When working with or on the appliance you must wear protective clothing. This includes: - safety shoes, - trousers, - close-fitting garments, - protective goggles, etc. All safety devices must be installed on the appliance, and they must be complete and in a fully functional condition. You must not make any changes to the safety devices. Operate the vehicle only when it is in good technical condition as stipulated and delivered by the manufacturer. Avoid naked flames and sparking, and do not smoke. Before all work on this appliance Before all work on this appliance, you can prevent injury by observing the following: - switch OFF the engine, - take out the ignition key (on the control panel), when provided. - wait until all moving parts have come to a complete stop and the engine has cooled down, - disconnect the spark plug terminal on the engine so that it cannot start by accident, - observe the additional safety information in the operating instructions for the engine. After working with the appliance Never leave the appliance without first switching OFF the engine and taking out the ignition key (on the control panel), when provided. Operating Instructions English Safety devices Safety lever (A) This safety lever initiates an emergency stop of the appliance (with activated wheel drive) and the cutters (within three seconds). There must be no attempt to circumvent this function, which is crucial for your personal safety. The appliance must not be used when the cutter brake does not function correctly (cutters stopped in three seconds). A Deflector (B) The deflector protects you from injury that can be inflicted by the cutters or solid objects flung out by the appliance. The appliance must be operated with installed deflector only. Risk of injury from rotating parts. Never put your hands and/or feet in the vicinity of rotating parts. Risk of injury from slippery surfaces – do not work in wet conditions. Before all work on the vehicle, disconnect the spark plug terminal. Risk of injury from grass cuttings or other solid objects flung out of the appliance. Working on steep inclines can be dangerous: max incline 15°. There must be no persons, in particular no children or animals, in the appliance’s path. Persons must keep a safe distance of 15 m. B Caution! Explosion hazard. Symbols on the appliance On the appliance you will find various symbols on adhesive labels. These symbols are explained in the following: Risk of injury or damage to property. Read and observe these instructions and in particular the section “For your safety” before operating the appliance. Battery acid/risk of chemical burns. Risk of injury. Never use the appliance without the V belt guards. Always keep these symbols on the appliance in a legible state. 2 Symbols in these instructions These instructions make use of the following symbol: Caution! Danger! This points out dangers that are connected with the described activity and that can cause injury to persons and damage to property. Directions When directions are described for the appliance (e.g. left, right) the view is always from the steering assembly towards the engine. Assembling the appliance Disconnect the spark plug terminal to prevent the engine from starting by mistake. Caution! The engine should have been filled with oil before the appliance left the production halls. Please check and, if necessary, top up the oil level. See the operating instructions for the engine. Note on assembly! The appliance cannot be pushed over the floor: the wheels remain locked until the gearshift mechanism is installed. Caution! After assembly, check the tight seat of all screws. Installing the guide stems Figures 1 and 2 ‚" Remove the screws (G) ‚" Loosen the two screws (D), and position the stem (E) as shown in Figure 2. ‚" Attach the left stem (E) with the screw (G). Do not tighten. ‚" Attach the strut (A) with the screw (B) so that its flat side faces the control panel. Do not tighten. ‚" Fasten the bottom end of the strut (A) to the screw (G). ‚" Repeat this procedure to attach the stem (E) and the strut (A) on the right side. ‚" Tighten the screws (G and D) before tightening the screws (B and F) on the control panel. Operating Instructions Battery (appliances with electric starter) Danger Risk of poisoning and injury from battery acid. Wear protective goggles and gloves. Prevent battery acid from coming into contact with skin. If battery acid displays into your face our eyes, wash immediately with cold water and contact a doctor. If battery acid is swallowed accidentally, drink copious amounts of water and contact a doctor immediately. Store batteries out of the reach of children. Never tilt the battery as acid could run out. Return used batteries to your dealer or a specialist disposal company. Warning Risk of fire, explosion and corrosion caused by battery acid and battery acid gases. Immediately clean parts of the mower which have been sprayed with battery acid. Battery acid is corrosive. Do not smoke, keep burning and hot objects at a distance. Charge batteries in well ventilated and dry areas only. Possible short-circuit when working on the battery. Do not place any tools or metal objects on the battery. Observe the installation sequence when disconnecting and connecting the battery. Disconnecting the battery: ‚" Disconnect the black cable (–) first, then the red cable (+). ‚" Remove the battery from the mower. Connecting the battery: ‚" First connect the red cable (+), then the black cable (–). NB: The positive terminal on the battery is marked Pos. (+). The negative terminal on the battery is marked Neg. (–). English Mower supplied with an "maintenance-free/sealed" battery (Type 1) (battery with no battery stoppers) The battery is filled with acid and sealed in the factory. If the battery is not used until after the date indicated on the top of the battery, it should first be charged up for at least 1 hour at 12 V (6 Amps). Mower supplied with an empty battery (Type 2) (battery with battery stoppers) ‚" Remove the stoppers from the battery cells. ‚" Slowly fill each cell with battery acid to a level 1 cm below the filler hole. ‚" Leave the battery standing for 30 minutes to allow the lead to absorb the battery acid. ‚" Check the acid level and top up with acid, as required. ‚" Before putting the battery into use, charge it with a battery charger (maximum charging current 12 V – 6 Amps) for 2–6 hours. When charging is complete, first disconnect the charger from the mains supply and then remove the battery. (Refer also to instructions for use of charger.) ‚" Replace stoppers in battery cells. ‚" Install battery in mower. ‚" Remove the battery breather cap. Connect the drain tube and feed down into the unit (ensure that the hose is not obstructed). ‚" First connect the red cable (+), and then the black cable (–). ‚" Top up the battery subsequently with distilled water only. (Check every 2 months.) ‚" Keep the battery clean. Connecting the battery Figure 3 1 = lead for the negative terminal (black) 2 = lead for the positive terminal (red) Note: The lead for the positive terminal (red) is connected before the appliance leaves the production halls. 3 ‚" ‚" ‚" Remove the cover (G). Connect the black lead to the negative terminal. Reattach the cover (G). Installing the actuating rods Danger! The actuating rods are configured at the production halls and do not need readjusting for assembly. After assembly their configuration should be checked. Any readjustments must be conducted at a specialist garage only. Failure to observe these instructions can cause serious injury and damage to property. Installing the actuating rods for the wheel drive Figures 4, 5, and 6 ‚" Remove the split pin (BB), and take the actuating rod (F) out of the mounting plate. Figure 6. ‚" Attach the bottom end (H) with washer (A) and split pin (B) as shown in Figure 4. ‚" Use the split pin (B) to reattach the top end of the actuating rod (F) to the mounting plate Figure 6. Installing the actuating rod for the safety lock system Figures 4 and 5 ‚" Use the washer and bottom end (G) of the actuating rod (E) to the mounting plate (T) as shown in Figures 4 and 5. Installing the actuating rod for the cutters Figure 5 ‚" Use the washer and split pin (CC) to attach the bottom end of the actuating rod (C) to the mounting plate (D). ‚" Use the washer and split pin (AA) to attach the top end of the actuating rod (C) to the lever (J). Operating Instructions Installing and configuring the gear select lever Figures 5, 7 and 8 ‚" Detach the screws and nuts (O) and remove the mounting plate (N). ‚" Remove the plastic grip (B) from the lever (I). ‚" Press the nylon sleeve (Z) into the control panel (L) from below. ‚" Push the unit (J = washer, spring, washer) on the lever (I). ‚" Now guide the lever (I) through the sleeve (Z), and make sure that the pin (K) is engaged in the bottom recess Figure 7. ‚" Now use the screws and nuts (O) to reattach firmly the mounting plate (N), including the rod (I), to the bracket (M) as shown in Figure 8. Make sure that the mounting plate (N) is under the bracket (M). ‚" Push the plastic grip (B) over the lever (I). ‚" Turn the lever (I) clockwise until the pin (K) engages in the neutral position (at the right side of the bottom recess) as shown in Figure 7. ‚" If necessary, move the shift arm (X in Figure 8) from side to side at every shift stage until the gears engage in neutral. Note: When the shift arm (X) is moved to the far left, and then to the far right a notch down, neutral should be engaged. At neutral the appliance must offer no resistance at all when the user presses the safety lever (W in Figure 5) to push it over the floor. ‚" Once the shift lever (X) is at neutral, it may become necessary to screw in or out the connector (P) until it lies flush with the hole in the rod (I). Note: Make sure that the pin (K) is still at the neutral position. ‚" Now guide the bent end of the connector (P) through the hole in the rod (I), and secure this with the split pin (Q). English ‚" Press the lever (W) for the safety lock, and move the appliance backwards and forwards. The wheels should turn without resistance. Should this not be the case, the length of the connector (P) must be readjusted. Checking the braking system Move the gearshift lever to the neutral position (N). Let go of all control levers, and try to move the appliance back and forth. The wheels should not turn. Should they turn, the braking system must be configured. Do not use the appliance, and please contact a specialist garage that can configure the appliance. Connecting the cable rod to the ignition (appliances with electric starter) At the free end of the cable rod there are four cables attached to a large plastic plug and two to a small one. Connect the large plug to the base of the ignition lock located on the control panel. Use two cable ties to secure the cable rod to the right stem at a safe distance from the rotating parts. Operating safety Also observe the information in the operating instructions for the engine. Danger/accident! All persons, and especially children, and animals must not come near the appliance when it is mowing. There is a risk of injury from stones and similar flung out of the appliance. Children must not operate the appliance. Before reversing, you must check the area behind the appliance and switch OFF the cutters. Falls Operate the vehicle at walking speed only. Be particularly careful when mowing in reverse and pulling the appliance towards you. 4 Mowing on steep inclines can cause the appliance to tip, and you can become injured. Steer the appliance directly across inclines, and never up and down them. Be particularly careful when changing direction. Do not mow on inclines greater than 15°. Mowing along perimeters involves a risk of injury. Mowing near edges, hedges, or steep inclines is dangerous. Keep a safe distance from perimeters when mowing. Mowing on damp grass can reduce the appliance’s wheel grip, and you can fall. Mow only when the grass is dry. Work only by daylight or in good artificial lighting. Injury The safety distance between the guide stems and the rotary cutters must be maintained at all times. Before manoeuvring the appliance over footpaths, access roads, or similar, stop the engine. Check the surface on which the appliance is to be used and remove all objects that the appliance can take up and fling out. Should a foreign body, e.g. a stone, hit the cutters or the appliance begin to vibrate with unusual violence: stop the engine immediately. Check the appliance for damage, and have any damage repaired at a specialised garage. There must be nothing placed in front of the grass ejector of a rotary lawnmower. Asphyxiation. Risk of asphyxiation from carbon monoxide. Let the IC engine run only in well-ventilated rooms and outdoors. Explosion and fire hazard. Petrol vapours are explosive, and petrol is highly flammable. Fill the engine with fuel before starting it. Keep the fuel tank closed when the engine is running or still hot. Operating Instructions Fill with fuel only when the engine has been switched OFF and has cooled down. Avoid naked flames and sparking, and do not smoke. Fuel the appliance outdoors only. Do not start the engine when fuel has spilt. Remove the appliance from the surface soiled with fuel and wait until the fuel vapours have evaporated. To avoid fire hazard, please keep the following parts free of grass and escaping oil: engine exhaust battery fuel tank. Risk of tripping. Operate the vehicle at walking speed only. Caution! Prevent damage to the appliance Stones, scattered branches, and similar objects can damage the machine and impair its correct operation. Remove all objects from the appliance’s path before every use. Operate the appliance only when it is in good technical condition. Subject the appliance to a thorough visual check before using it. In particular, check that the safety devices, controls, and screw unions are correctly installed and do not exhibit any damage. Replace any damaged parts before using the appliance. Operating times Observe the national or bylaws for the times you may operate the appliance. You may have to consult your local authority. English Check the fuel and oil levels Note: See also the provided operating instructions for the engine. Engine oil: The appliance should be filled with oil on delivery. Please check and, if necessary, top up the oil level. Fuel: Fuel the appliance as specified in the operating instructions for the engine. Never fill the tank to the rim, but no higher than 1 cm below the filler neck’s bottom edge. Check the air pressure Check the tyres against the specifications on their walls (approx. 1–1.3 bar), if necessary correcting the pressure (both tyres should be equally pressurised). Adjustment work Danger! Never make adjustments when the engine is running. ‚" Switch OFF the engine, disconnect the spark plug terminal, and wait until the engine has cooled down. Controls Symbols The symbols found on the controls include the following: switched ON switched OFF Lever for the safety lock system Figures 9 and 10 The lever (A) must always be pressed before either the cutter drive or the appliance’s drive controls are switched ON. Note: The lever must be released before the engine can be started. Switching ON (position 2): ‚" Press the lever, and keep it pressed. This disengages the rear wheel brake. The wheels can now turn, and the separate drive for the cutters can now be activated. 5 Switching OFF (position 1): ‚" Release the lever. The rear wheels are braked automatically and come to an abrupt stop. Also, the drive for the cutters is deactivated and the cutter brake engaged , stopping the cutters completely in three seconds. Danger! This function must be ensured at all times and checked before every use (see the section “Operating the appliance”). Should this function not activate, the appliance must not be used. In this event contact a specialist garage. Lever for activating the cutters Figures 9 and 10 The lever (B) activates the drive for the cutters. Switching ON To activate the cutters, first press the lever (A) for the safety lock system. Now push forward the lever (B) for the cutter drive against the resistance from the tension spring until the lever remains in this position. Switching OFF Stop the cutters by releasing the lever for the safety lock system (A). This switches OFF the cutter drive (B) and automatically engages the cutter brake. Note: The cutter drive must be deactivated before the engine starts. Otherwise, the cutters will also start to rotate. Operating Instructions Lever for setting the speed and direction Figure 9 Caution! The speed and direction must be changed only when the appliance is stationary. The lever (C) selects the direction of motion. F = forwards with four speeds for the wheel drive: 1 = slow, 2 and 3 = medium-speed, 4 = fast, N = neutral This is selected when the appliance is not in use or when it is to be moved by hand. R = reverse The lever must first be lifted before reverse can be selected. English Deactivating the wheel drive (position 1): ‚" Release the lever (D); the wheels come slowly to a stop. Note: For sudden stops, release the levers for the safety lock system and the wheel drive at the same time. Note: The wheel drive should be deactivated (lever deactivated) before the engine is started. Otherwise, the wheels will start to turn immediately the engine starts. Pushing the appliance by hand Figure 9 The appliance can be pushed and pulled by hand when the gearshift lever (C) is at neutral and the lever (A) for the safety lock system is pressed against the grip. The wheels always come to a stop when the lever for the safety lock system is released. Lever for setting the cutting height Lever for activating the wheel drive Figure 10 The lever (D) activates the wheel drive. Caution! Activate the wheel drive only when the lever (A) for the safety lock system is also pressed. Otherwise, there will be damage or wearing to the braking mechanism. Activating the wheel drive (position 2): ‚" First select the direction/speed with the gearshift lever, ‚" Now press the lever (A) for the safety lock system against the grip, and keep it pressed, ‚" Pull the wheel drive lever (D) on the grip slowly (so that the appliance does not jump into action), ‚" The appliance starts moving. Figure 11 The lever (E) sets the cutting height from approx. 2.5 to 10 cm. The actual cutting height depends on the conditions of the soil. ‚" To change the cutting height, move the lever either clockwise or anticlockwise. Note: Cutting height A is the largest value, cutting height G the smallest. Mulching cover Figure 12 The mulching cover (F) is installed before the appliance leaves the production facilities. When the appliance is used as a mulching lawnmower, the cover must remain installed. When the appliance is to eject cuttings, the mulching cover must be removed. Further information can be found in the section “Operating safety”. 6 Throttle Figure 13 The lever (G) sets the engine speed and stops the engine. The best mowing results are obtained at the highest engine speed. The symbols: “Choke” for starting a cold engine (depending on the model). “Fast” for the optimal (maximum) engine speed. “Slow” for idle speed. Engine stop (switches OFF the engine). Choke button (depending on model) Figure 13 The choke button (J) is pulled out to start a cold engine. Ignition lock (for appliances with electric starter only) Figure 13 Danger! Do not turn the ignition key before you have read the section “Operating the appliance” in these instructions. The ignition lock (H) is used to start and stop the engine of appliances fitted with an electric starter. The settings are listed in the following. Engine stop / OFF RUN mode Engine start Note: Always take out the ignition key when the appliance is left unattended or when inspection, cleaning, or service work must be conducted. Operating Instructions Starter cable Figure 14 The starter cable (1) is used to start the engine. Detailed information can be found in the section “Operating the appliance” in these instructions and in the operating instructions for the engine. Danger! Do not use the starter until you are familiar with all the information on its use Operating the appliance Adjustment work Danger! Never make adjustments when the engine is running. ‚" Switch OFF the engine, take out the ignition key, disconnect the spark plug terminal, and wait until the engine has cooled down. Adjustments before engine start ‚" ‚" Set the cutting height Equip the appliance for mulching or ejecting cuttings. Equipping the appliance for mulching or ejecting cuttings Figure 15 When the appliance is to eject cuttings, the mulching cover must be removed. The mulching cover is designed to raise the deflector when it is installed. When the mulching cover is removed, the deflector falls back, and the appliance can again eject cuttings. Danger! Before all installation and removal work: Stop the engine, and wait until all rotating parts have come to a stop Take out the ignition key, and disconnect the spark plug terminal. English Installing the mulching cover ‚" Raise the deflector, and install the mulching cover by inserting the catch on the right into the receiver (A). ‚" Press the mulching cover into the ejection duct, and check that the notch (B) on the left has fully engaged in the rear edge of the mower’s ejection duct. Removing the mulching cover ‚" Raise the deflector, and push the mulching cover to the right (towards the front of the mower). The mower’s edge then releases the notch, and you can take out the mulching cover. Starting the engine See also the operating instructions for the engine. Danger! To prevent injury: do not start the engine when you are standing in front of the ejector; always stand behind the appliance when starting the engine; keep your feet away from the cutters; never place your hands, feet, or other parts of the body near rotating parts; always keep away from the ejector; never lift or carry the appliance when the engine is running So that the engine can never start by accident, switch it OFF and, when the latter two are provided, remove the ignition key (on the control panel) and disconnect the spark plug terminal: before you clear the ejector of blockages and other hindrances; before you check, clean, or configure the lawnmower or perform any work on it; immediately after a foreign object has struck the cutters and before you look for damage on the appliance and start any repair work immediately after the appliance starts to vibrate with unusual violence and before you check the appliance. 7 Before starting the engine, disengage the clutches for all cutters and drives. Do not tip the appliance when starting. Keep the appliance on an even surface with little or the shortest possible grass. Starting procedure Setting the controls ‚" So that the cutters do not start to rotate or the wheel drive activate when the engine is started, release all levers on the control panel. ‚" Disconnect the battery charger (on appliances fitted with an electric starter) from the mains (first pull the mains plug out of the socket, and then the plug out of the control panel). ‚" Open the fuel valve (when fitted, see the operating instructions for the engine). ‚" Move the throttle to “Fast” . ‚" When the engine is cold, move the throttle to “Choke” , or pull out the choke button (depending on model). Starting the engine Appliances without electric starter ‚" Stand at the rear left of the appliance. Make sure your feet are at a safe distance from the cutters. ‚" Push one foot against the rear tyre for better stability. ‚" Slowly pull the starter cable grip until you feel resistance, and then pull quickly and strongly. Do not let the starter cable grip snap back, but let it return slowly. Appliances with electric starter ‚" Stand at the rear of the appliance. ‚" Turn the ignition key on the control panel clockwise to “Start” , and keep it turned until the engine starts to run (start attempt max five seconds, wait ten seconds before the next attempt). When the engine is running, turn the ignition key to the RUN/ position. Operating Instructions Note: Should the electric starter not function properly, e.g. owing to a low battery, you can also start the appliance by hand. Do not use jumper cables, but proceed as follows. ‚" Turn the ignition key to “Run” . Start the engine by following the instructions for appliances without electric starter. Setting the controls after engine start ‚" Slowly push in the choke button (depending on model) until the engine runs smoothly. ‚" Push the throttle between “Fast” and “Slow” until the engine has warmed up. ‚" To start mowing, move the throttle to full / “Fast” .. Stopping the engine ‚" Move the throttle to “Slow” . ‚" Let the engine run for a few seconds. ‚" Move the throttle and, when provided, the ignition key (for appliances with electric starter) to “Stop” . ‚" The engine stops after a short time. Activating the cutters Figure 16 Danger! Always switch OFF the cutters before reversing the appliance. ‚" Start the engine as specified. ‚" Move the throttle to full / “Fast” . ‚" Press the lever (A) for the safety lock system against the grip, and keep it pressed. ‚" Now slowly press the lever (B) for the cutter drive forwards to the stop until it remains in this position. ‚" The cutters start to rotate. Switching OFF the cutters Figure 16 ‚" Release the lever (A) for the safety lock system. ‚" The cutters stop within three seconds. English Switching ON the wheel drive Figure 16 Caution! Before using the appliance, first check every time that the lever is correctly engaged in neutral. The user must be able to manoeuvre the device without any resistance at all when the safety lever (A) is pressed. Shift gears only when the appliance is stationary, and switch ON the wheel drive only when the lever (A) for the safety lock system has been pressed. Failure to do so will cause damage or wearing to the braking mechanism and gears. ‚" Start the engine as specified. ‚" Press the lever (A) for the safety lock system against the grip, and keep it pressed. ‚" Move the gearshift lever (C) to a drive speed (1–4). Note: Your choice of speed must reflect the conditions of the soil. On uneven soil or dense growth of grass, select a low speed. Speed 1 (“Slow”) is recommended for the first use. ‚" Now slowly pull the lever D, to switch ON the wheel drive, until it reaches the stop on the grip. Note: Sensitive adjustments to the lever prevent the appliance from jumping into motion. Switching OFF the wheel drive Figure 16 ‚" Release the lever (D) for the wheel drive. The appliance slowly comes to a stop. Note: For a fast, abrupt stop release the lever (A) for the safety lock system at the same time. Checking the functions of the safety lock system Figure 16 Danger! Before using the appliance, you must check every time that the safety lock system functions correctly. Should this not be the case (the cutters not switched OFF within three seconds), the appliance must not be used. Please contact a specialist garage without delay. 8 Proceed as follows ‚" Place the appliance on the lawn. Make sure that the test area is free of foreign bodies and that there are no persons or animals within fifteen metres. ‚" Set the appliance’s cutting height to approx. one third of the grass length. ‚" Start the engine. ‚" Move the throttle to full / “Fast” . ‚" Press the lever (A) for the safety lock system against the grip, and keep it pressed. ‚" Now slowly press the lever (B) for the cutter drive forwards to the stop until it remains in this position. ‚" Move the gearshift lever (C) to speed 1. ‚" Pull slowly the lever (D). The appliance starts to move and mow. ‚" Release the lever (A) for the safety lock system. Let us call the position the appliance stops at “Point A”. ‚" Let the appliance run with the cutters switched OFF. The lawn should be mown only to “Point A”. ‚" Danger! A mown lawn beyond “Point A” means that the safety lock system is not functioning correctly. In this event, immediately switch OFF the engine The appliance must not be used any more until the safety lock system has been repaired at an authorised specialist garage. Tips and useful info Turning with the appliance Reduce the speed before turning the appliance. Turning becomes easier when you apply pressure to the stem opposite the direction taken. The differential in the axle retards the inside wheel, but does not affect the torque applied to the outer wheel. Sharp turns Switch OFF the drive, and turn the appliance by hand (if necessary, switch to neutral so that the wheels can turn freely). Operating Instructions For the optimal mowing results Lawns consist of various grass types. Frequent mowing promotes the growth of grass, resulting in strong roots and a firm sward. Infrequent mowing promotes the growth of tall grasses and other wild-growing plants (e.g. clover, daisies). The normal height of a lawn is approx. 4–5 cm. Only one third of this height should be mown, i.e. 7–8 cm should be mown to the normal height. Wherever possible, do not mow the lawn to shorter than 4 cm, otherwise dry spells can damage the sward. Tall grass (e.g. after a holiday) should be mown to the normal height over several stages. ‚" Never let grass grow too long. ‚" Never mow grass too short. ‚" Mow over straight stretches. ‚" Do not mow at high speed, particularly when a mulching kit or grass catcher is installed. Note: This appliance is designed to mow lawns. It must not be used to cut scrub, weeds, or too tall grass. Mulching grass Mulching means that grass is cut into small pieces (approx. 1 cm), which remain lying. The lawn therefore retains a lot of nutrients. For the optimal results the lawn must always be kept short. The following must be observed. ‚" The mulching cover must be installed. ‚" Do not mow wet grass. ‚" Never mow more than max 2 cm. ‚" Mow slowly. ‚" Use the max engine speed. ‚" Clean the lawnmower deck at regular intervals. Mulching leaves The appliance can also be used to mulch leaves. The leaf particles penetrate the lawn and function as a natural fertiliser. The following must be observed. ‚" The mulching cover must be installed. ‚" The leaves must be dry. ‚" Use the max engine speed. English ‚" Reduce the speed when the ‚" ‚" leaves are not being mulched to small pieces. When oak leaves are mulched (acidic), you must lime the lawn in the spring to reduce the acid content of the soil. Clean the lawnmower deck at regular intervals. After finishing work ‚" Take the ignition key, when provided, out of the control panel. ‚" Disconnect the spark plug terminal on the engine. ‚" Empty the (optional) grass catcher. ‚" Let the engine cool down before placing the appliance in enclosed spaces. ‚" Close the fuel cock (when provided, see the operating instructions for the engine). Transporting the appliance Caution! Spilt fuel pollutes the environment The appliance must not be tilted when it is transported. Before manoeuvring or carrying the appliance over footpaths, access roads, or similar, first stop the engine. For transport on or in a vehicle, secure the appliance adequately against slipping. Servicing / cleaning Danger! To protect against injury before all work on the appliance: switch OFF the engine, take out the ignition, when provided. wait until all moving parts have come to a complete stop and the engine has cooled down, disconnect the spark plug terminal on the engine so that it cannot start by accident, observe the additional safety information in the operating instructions for the engine. 9 Danger! To protect against injury from the cutters, have a specialist garage perform all work such as replacing or regrinding the cutters (special tools required). Caution! The appliance must be tilted back on its back wheels only. This prevents fuel or oil from damaging the engine. Secure the appliance adequately against slipping and tilting. Make sure that no fuel runs out of the tank. Servicing Observe the servicing instructions for the engine in the provided operating instructions for the same. At the end of the season a specialist garage must check and service the appliance. After the first five engine hours First oil change for the engine. For the subsequent intervals see the operating instructions for the engine. Use the oil channel or (optional) quick oil drain. Quick oil drain Every 25 operating hours ‚" Check air filter, see provided operating instructions for the engine. ‚" Lubricate the controls, pivot pins, and bearing bolts with a few drops of light oil. Every 50 operating hours Lubricate the front-wheel bearings with vaseline. Operating Instructions When needed Charging the battery (appliances with electric starter) Battery (Type 1/2) Charge the battery if the unit has not been used for more than 3 weeks. If you put the unit into storage (e.g. in winter), it is recommended to take the battery out of the unit and charge it before the unit is put into storage, every 2 months during storage and before the unit is switched on again. Note: Follow the instructions in the battery charger operating manual. Cleaning the battery Clean the battery at regular intervals. Keep the terminal posts and the cables clean. Lubricate the terminal posts with a little vaseline. Once a season ‚" Change the oil, see provided operating instructions for the engine. ‚" Lubricate the pivot points and torsion spring on the ejector cover. ‚" At the end of the season the appliance must be checked and serviced at a specialist garage. Cleaning Caution! Clean the appliance after every use. Failure to clean the appliance can damage the materials and cause malfunctions. Do not use highpressure media for cleaning. Danger! Work on the cutters can cause injury. Wear safety gloves for your protection. Moving one cutter causes all other cutters to move at the same time. Clean with caution. English Whenever possible, always clean the appliance directly after mowing. Clean the cutter chamber and the ejector cover with brush, hand broom, or cloth. Set the appliance down on its wheels, and remove all visible grass residue and other soiling. Laying up the vehicle Danger! Explosion and fire hazard When there is fuel (petrol) in the tank, never keep the appliance in rooms where fuel vapours can come into contact with naked flames or sparking. Caution! Prevent damage to the appliance Keep the vehicle only in clean and dry rooms when the engine is cold. For longer periods of inactivity, protect the vehicle in all events against rust, e.g. in winter. At the end of the season or when the vehicle will not be used for longer than a month: ‚" drain off the fuel into a suitable receptacle, and immobilise the engine as described in the engine manual. Note: Drain fuel outdoors only. ‚" Clean the appliance. ‚" To protect metal parts from rust, wipe them all down with an oiled cloth (resin-free oil) or apply an oil spray. Units with electric starter: ‚" Remove the battery, store in a dry/cool location and recharge every 8 weeks. Caution! The appliance must be tilted back on its back wheels only. This prevents fuel or oil from damaging the engine. Secure the appliance adequately against slipping and tilting. Make sure that no fuel runs out of the tank. 10 Warranty The warranty rules issued by our company or the importer apply to every country. As part of the warranty, we remedy malfunctions on your appliance free of charge provided that this malfunction is caused by a material or manufacturing defect. In the event of a warranty claim, please turn to your dealer or the nearest branch office. Engine The manufacturer of the engine is liable for all engine-related problems with respect to output power, power measurement, specifications, warranties, and service. More detailed information can be found in the owner / operator handbook provided separately by the engine manufacturer. Operating Instructions English Identifying and eliminating malfunctions Vehicle malfunctions often have simple causes that you should know and be able to (partially) eliminate yourself. In cases of doubt your specialised garage will be pleased to assist you further. Remedy Specialist garage Connect spark plug terminal Fill tank with clean, fresh fuel Move throttle / choke to right position Clean spark plug, check spark plug gap, if necessary replace spark plug. Air filter clogged Clean air filter. Battery discharged Charge battery with provided battery charger. Lead damaged Check whether electric lead OK. Battery not connected properly Check battery connections. Screws, nuts, or other fasteners loose Switch OFF appliance immediately. Secure parts. When noises persist specialist garage. Cutter(s) loose Switch OFF appliance immediately. Cutter fastening screw must be tightened at specialist garage. Cutter(s) damaged Switch OFF appliance immediately. Cutters must be replaced at specialist garage. Cutters not balanced correctly Switch OFF appliance immediately. Cutters must be replaced or balanced at specialist garage. Engine not secure Switch OFF appliance immediately. Engine must be secured at specialist garage. Too much oil in engine. Switch OFF appliance immediately. Check the oil level. Engine defective. Switch OFF appliance immediately. Engine must be checked at specialist garage. Grass too high Set larger cutting height, if necessary mow twice. Problem Possible cause(s) Starter cable resists pulling Engine does not start Engine defective. Spark plug terminal not connected No fuel in the tank Choke or throttle at wrong position Spark plug is defect – for appliances with electric starter Unusual noises (rattling, clanging, knocking) Shaking, vibrations Smoke from engine Ragged cut or engine speed drops Grass stays on ground or grass catcher never fills Wheel drive does not work Grass too damp Ejector clogged Cutters blunt Grass catcher full or clogged V belt torn or gears defect Cutters do not switch OFF (in Safety lock system defect three seconds) after lever for safety lock system released 11 Let the lawn dry Switch OFF engine, remove hindrance Cutters must be replaced or reground at a specialist garage. Switch OFF engine, empty or clean grass catcher. Damaged parts must be replaced at a specialist garage. Switch OFF appliance immediately. The appliance must no longer be used until it is repaired at a specialist garage.