1
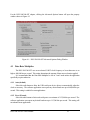
DSU-200/300-SIT
Single Channel RS-232
with
Single Channel RS-422/485
USB adapter
Users Manual
TWO PORT SERIAL USB ADAPTER
FOR PERSONAL COMPUTERS
QUATECH, INC.
662 Wolf Ledges Parkway
Akron, Ohio 44311
TEL: (330) 434-3154
FAX: (330) 434-1409
http://www.quatech.com
-1
Generic Inc.
Warranty Information
Quatech Inc. warrants the DSU-200/300-SIT to be free of defects for five (5) years from the date of
purchase. Quatech Inc. will repair or replace any system component that fails to perform under normal operating
conditions in accordance with the procedures outlined in this document, provided the failure occurs during the one
year warranty period. Any damage resulting from improper installation, operation or general misuse voids all warranty
rights. No representation is made regarding the suitability of this product for any particular purpose.
Please complete the following information and retain for your records.
Date of Purchase:
Model Number:
Product:
______DSU-200/300-SIT
_ Serial USB Adapter____
Serial Number:
All products returned to Quatech for either warranty or non-warranty repair MUST be assigned a Returned
Material Authorization (RMA) number prior to shipment. This RMA number must be clearly marked on the exterior
of the product’s return packaging and in any correspondence to ensure proper routing and prompt attention. To
obtain an RMA number, contact the Quatech Technical Support Department at 1-800-553-1170 or (330) 434-3154. In
order to prevent damage to returned merchandise during shipment, please package electronic components in
anti-static/shock proof materials.
For warranty repair/returns, please have the following information available when contacting the Technical Support
department:
1. Model number and serial number of the product under warranty,
2. Repair instructions and/or specific description of the problem.
For non-warranty repairs or upgrades, contact the Technical Support department for current repair charges and
please have the following information available:
1. Purchase order number to cover the cost of the service,
2. Model number and serial number of the product,
3. Repair or upgrade instructions relative to the product.
Product Name User's Manual
-2
Notice
The information contained in this document cannot be reproduced in any form without the written
consent of Quatech Inc. Any software programs accompanying this document can be used only in
accordance with any licensing agreement(s) between the purchaser and Quatech Inc. Quatech Inc.
reserves the right to change this documentation or the product to which it refers at any time and without
notice.
The authors have taken due care in the preparation of this document and any associated software
program(s). Every attempt has been made to ensure accuracy and completeness. Under no
circumstances will Quatech Inc. be liable for damages of any kind, incidental or consequential, in regard
to or arising from the performance or form of the materials presented herein or in any software
program(s) that may accompany this document.
Quatech Inc. encourages and appreciates feedback concerning this document. Please send any written
comments to the Technical Support Department at the address listed on the cover of this manual.
Copyright ©2002 by
Quatech Inc.
662 Wolf Ledges Parkway
Akron, Ohio 44311
All rights reserved. Printed in the U.S.A.
IBM®, PC®, and PC-AT® are trademarks of the International Business Machines Corporation. Windows®,
Windows 95®, Windows 98®, Windows NT® and MS-DOS® are trademarks of the Microsoft Corporation. Other
product and company names are registered trademarks or trademarks of their respective holders.
-3
Generic Inc.
Table of Contents
1. Introduction
7
7
1.1 System Requirements
2. Hardware Installation
8
8
11
2.1 Plug-and-Play Installation
2.2 Viewing Properties with the Device Manager
3. Input/Output Connections
14
14
15
16
17
3.1 D-9 Connectors
3.2 RS-232 Port - Port 2
3.3 RS-422/485 Port - Port 1
3.3.1 Termination Resistors
4. Advanced Options
18
19
19
19
20
20
20
20
20
20
21
21
21
21
21
4.1 Data Rate Multiplier
4.1.1
4.1.2
4.1.3
4.1.4
Auto (default)
Force X1 mode
Force X2 mode
Force X4 mode
4.2 Connector Signal Selection
4.2.1 All Loopback (default)
4.2.2 Modem Control
4.2.3 Clocks
4.3 Duplex Mode
4.3.1
4.3.2
4.3.3
4.3.4
Full Duplex (default)
Half Duplex using RTS
Half Duplex using DTR
Half Duplex Automatic Transmitter Control
5. Troubleshooting
6. Specifications
Product Name User's Manual
22
23
-4
List of Figures and Tables
Figure 2-1.
Figure 2-2.
Figure 2-3.
Figure 2-4.
Figure 2-5.
Figure 2-6.
Figure 3-1.
Figure 3-2.
Figure 3-3.
Figure 3-4.
Figure 4-1.
Table 3-1.
Table 3-2.
-5
Add New Hardware Dialog Window #1
Add New Hardware Dialog Window #2
Add New Hardware Dialog Window #3
Add New Hardware Dialog Window #4
Quatech USB Serial Port Properties Box
Quatech USB Serial Port Settings Window
DSU-200/300-SIT Male D-9 Connector
DSU-200/300-SIT Female D-9 Connector
Use of DTE and DCE in a Communications Link
RS-422/485 Jumper Settings
DSU-200/300-SIT Advanced Options Dialog Window
DSU-200/300-SIT (port 2) D-9 Connector Definitions
DSU-200/300-SIT (port 1) D-9 Connector Definitions
8
9
10
10
12
13
14
14
15
17
19
15
16
Generic Inc.
1. Introduction
Quatech’s DSU-200/300-SIT provides one independent RS-232 serial interface and one
independent RS-422/485 serial interface to the host PC via the Universal Serial Bus (USB) port.
Each adapter comes standard with 16550 Universal Asynchronous Receiver/Transmitters
(UARTs) containing 16 byte First In First Out (FIFO) storage devices. These FIFOs, in conjunction
with the USB micro controller FIFOs, help to relieve the CPU of excessive interrupts by buffering
received and transmitted data. This configuration allows each channel (either two or four) to obtain data
rates up to 460.8 kbps. The adapters are USB bus powered, therefore no external power supply is
required.
These products are fully compliant with USB Specification version 1.1 and are fully supported
under Windows 98? .
This Users Manual describes how to setup and install your Quatech Serial USB Adapter.
1.1 System Requirements
Quatech’s serial USB adapters require the Windows 98? operating system and an IBM or compatible
PC with a standard USB port or an add-in USB host adapter.
Product Name User's Manual
1-1
2. Hardware Installation
2.1 Plug-and-Play Installation
The following procedures are step-by-step instructions for installing the Quatech USB adapter under
Windows 98? .
1. Turn on the computer and boot up the Windows 98 operating system.
2. Plug the wide flat end of the USB cable into the downstream connector located on the back
of the computer or USB hub. Plug the square end of the USB cable into back of the
DSU-200/300-SIT USB box.
3. Once the cable is connected to the USB box, the “Add New Hardware Wizard” dialog
window shown in Figure 2-1 should appear.
Figure 2-1. Add New Hardware Dialog Window #1
8
DSU-200/300-SIT Users Manual
4. Insert the disk provided with your hardware into the system’s floppy drive and press the
‘Next’ button to proceed to the dialog window shown in Figure 2-2.
Figure 2-2. Add New Hardware Dialog Window #2
5. Select the recommended option: ‘Search for the best driver for your device’ and then press
the ‘Next’ button to proceed to the dialog window shown in Figure 2-3.
DSU-200/300-SIT Users Manual
9
Figure 2-3. Add New Hardware Dialog Window #3
6. Select the ‘Floppy Disk Drives’ check box and click the ‘Next’ button to proceed to the
dialog window shown in Figure 2-4.
Figure 2-4. Add New Hardware Dialog Window #4
10
DSU-200/300-SIT Users Manual
7. When the dialog window shown in Figure 2-4 appears, click the ‘Next’ button to view the
final dialog window and then click ‘Finish’ to complete the installation of your USB adapter.
8. Once the adapter configuration is finished, Windows 98 will then configure the individual
serial ports (e.g. COM3, COM4) which completes the hardware installation process.
2.2 Viewing Properties with the Device Manager
The following procedures are step-by-step instructions on using the Windows 98 “Device
Manager” utility to view properties of the serial ports enumerated by the Quatech USB adapter. Select
Start|Help from within Windows 98 for additional information on this utility.
1. Double click the “System” icon inside the Control Panel folder. This opens up the System
Properties window.
2. Click the “Device Manager” tab located at the top of the System Properties window. The
Device Manager lists all hardware devices registered in the Windows 98 registry. Additional
information is available on any of these devices by clicking on the device name and then
clicking the "Properties" button.
3. In order to view the properties for each individual serial port, double click the device group
“Ports (COM & LPT)”. Double click on the desired serial port to open the properties box
shown in Figure 2-5. Quatech USB serial ports have a tab that lists the USB adapter
model number. The DSU-200/300-SIT will be identified as a DSU-200/300.
DSU-200/300-SIT Users Manual
11
Figure 2-5. Quatech USB Serial Port Properties Box
2. Click on the model name port settings tab to view the property box shown in Figure 2-6.
12
DSU-200/300-SIT Users Manual
Figure 2-6. Quatech USB Serial Port Settings Window
3. The Port Settings window can be used to create default settings for the selected serial port,
however most communication applications implement their own method for choosing serial
port settings. Clicking the “Restore Defaults” button resets all property fields to their
original default value. Clicking the "Advanced..." button opens the Advanced Options dialog
window. For a detailed description of advanced options , refer to Section 4.
DSU-200/300-SIT Users Manual
13
3. Input/Output Connections
3.1 D-9 Connectors
The DSU-200/300-SIT comes with a standard male D-9 connector on port 2. Refer to Figure
3-1 for pin numbers.
5
9
8
7
6
4
3
2
1
Figure 3-1. DSU-200/300-SIT Male D-9 Connector (port 2)
The DSU-200/300-SIT comes with a standard female D-9 connector on port 1. Refer to Figure 3-2
for pin numbers.
1
5
2
3
4
5
4
3
2
1
9
8
7
6
6
7
8
9
Figure 3-2. DSU-200/300-SIT Female D-9 Connector (port 1)
3-1
Generic Inc.
3.2 RS-232 PORT - PORT 2
RS-232 devices are classified by their function as either Data Terminal Equipment (DTE) or
Data Communication Equipment (DCE). Generally DTE is defined as the communication source and
DCE is defined as the device that provides a communication channel between two DTE type devices.
(See Figure 3-3).
PC
Modem
RS-232
DTE
PC
RS-232
DTE
DCE
Modem
Telephone
line
DCE
Figure 3-3. Use of DTE and DCE in a Communications Link
The DSU-200/300-SIT port 2 is a DTE device which connects to peripheral equipment through a male
D-9 connector. The serial port connector definitions are listed in Table 3-1.
Table 3-1. DSU-200/300-SIT (port 2) D-9 Connector Definitions
RS-232 Signal
Description
Data Carrier Detect (DCD)
DTE
Connection
D-9
1
Receive Data (RxD)
2
Transmit Data (TxD)
3
Data Terminal Ready (DTR)
4
Signal Ground
5
Data Set Ready (DSR)
6
Request To Send (RTS)
7
Clear To Send (CTS)
8
Ring Indicator (RI)
9
Product Name User's Manual
3-2
3.3 RS-422/485 PORT - PORT 1
The DSU-200/300-SIT port 1 provides four differential communication signals (either RS-422
or RS-485) per channel. Transmit Data (TxD) and Auxiliary Output (AUXOUT) are the two output
signals. Receive Data (RxD) and Auxiliary Input (AUXIN) are the two input signals. A ground signal is
also provided.
The AUXOUT pair can carry the UART’s RTS signal. The AUXIN pair can carry the
UART’s CTS signal. Alternatively, The AUXOUT pair can be configured to internally loopback to the
AUXIN pair. Refer to Section 4 for details on software selectable advanced options. Connector
definitions are listed in Table 3-2.
Table 3-2. DSU-200/300-SIT D-9 (port 1) Connector Definitions
RS-422/485 Signal
Description
3-3
All Ports
D-9
Transmit Data (TxD+)
2
Transmit Data (TxD-)
7
Receive Data (RxD+)
4
Receive Data (RxD-)
8
Auxiliary Output (AUXOUT+)
1
Auxiliary Output (AUXOUT-)
6
Auxiliary Input (AUXIN+)
5
Auxiliary Input (AUXIN-)
9
Signal Ground
3
Generic Inc.
3.3.1 Termination Resistors
Factory installed resistors allow for DSU-200/300-SIT signal line termination in compliance
with RS-422 and RS-485 standards. The desired termination can be selected or removed by
configuring the associated jumper for the port. Figure 3-4 shows the factory default configuration: ‘no
termination’.
J3
2
1
J2
4
3
2
1
4
3
CN1
Factory Default = pins 3 & 4
(no termination)
Figure 3-4. RS-422/485 Jumper Settings
Jumpers J2 and J3 allow the selection of RS-422 (100? ) termination, RS-485 (120? )
termination or no termination. For normal operations over shorter distances or when using a termination
in the connecting cable, the default setting will suffice. For communications over great distances or if
termination via the connecting cable is not feasible, the jumpers may be configured for the desired
termination.
To select RS-422 termination, move the jumpers to pins 1 & 3. For RS-485 termination, use
pins 2 & 4. Ensure both jumpers are configured for each port. To access the USB adapter directly,
remove the four screws on the bottom of the box and open the top cover.
Product Name User's Manual
3-4
4. Advanced Options
Advanced setting selection is accomplished using the Advanced Options dialog window from
the Windows 98 Device Manager. To view the Advanced Options dialog window, double click the
device group “Ports (COM & LPT)”. Double click on the desired serial port and then select the model
name port settings tab.
Note 1: Changing any setting in the advanced options window will
affect both ports on the DSU-200/300-SIT USB adapter.
Note 2: DSU-200/300-SIT port properties can only be altered from
the Device Manager window. Attempts to access these properties from
another software program will generate an error message box that refers
the user to Device Manager.
18
DSU-200/300-SIT Users Manual
For the DSU-200/300-SIT adapter, clicking the Advanced Options button will open the property
window shown in Figure 4-2.
Figure 4-1. DSU-200/300-SIT Advanced Options Dialog Window
4.1 Data Rate Multiplier
The DSU-200/300-SIT uses an accelerated UART clock frequency to boost data rates to as
high as 460,800 bits per second. This setting determines the amount of data rate acceleration applied.
It is recommended that the Data Rate Multiplier be left in "Auto" mode unless the application
specifically requires otherwise.
4.1.1 Auto (default)
Select this radio button to allow the USB serial port device drivers to automatically adjust the
clock as necessary. The software application can request any desired baud rate up to 460,800 bits per
second. This setting is suitable for most applications.
4.1.2 Force X1 mode
Select this radio button to limit each serial port to a maximum of 115,200 bits per second. The
software application can request any desired baud rate up to 115,200 bits per second. This setting will
not enhance most applications.
DSU-200/300-SIT Users Manual
19
4.1.3 Force X2 mode
Select this radio button to allow each serial port to run at a maximum of 230,400 bits per
second. The software application can request any desired baud rate up to 115,200 bits per second.
The actual baud rate will be two (2) times higher than requested. This setting allows applications not
capable of asking for higher baud rates to achieve them.
4.1.4 Force X4 mode
Select this radio button to allow each serial port to run at a maximum of 460,800 bits per
second. The software application can request any desired baud rate up to 115,200 bits per second.
The actual baud rate will be four (4) times higher than requested. This setting allows applications not
capable of asking for higher baud rates to achieve them.
4.2 Connector Signal Selection
This setting determines which signals are routed to the AUXIN and AUXOUT pins of the
RS-422/485 port (port 1) connector. Regardless of which setting is chosen, each UART's DTR output
is internally looped back to its own DSR, DCD and RI inputs.
4.2.1 All Loopback (default)
Select this radio button when only transmit and receive data signaling is required on the
RS-422/485 port (port 1). The UART's RTS output is internally looped back to its CTS input. The
UART's baud clock output is internally looped back to its receive clock input. The port's AUXIN
signal pair is looped back to its AUXOUT signal pair at the connector.
4.2.2 Modem Control
Select this radio button when hardware flow control is required on the RS-422/485 port (port
1). The UART's RTS output and CTS input are routed to the AUXOUT and AUXIN signal pairs,
respectively. The UART's baud clock output is internally looped back to its receive clock input.
4.2.3 Clocks
This setting is not valid for the DSU-200/300-SIT. Selecting this setting will result in the
RS-232 port (port 2) being inoperative.
4.3 Duplex Mode
The duplex mode settings only affect the RS-422/485 port (port 1). The RS-232 port (port 2)
will always operate in full duplex mode.
20
DSU-200/300-SIT Users Manual
4.1.1 Full Duplex (default)
Selecting this radio button allows simultaneous transmit and receive operation. Transmit and
receive data must move over separate dedicated pairs of conductors in the attached cable. Each
UART's transmit drivers are always active in this mode.
4.1.2 Half Duplex using RTS
Selecting this radio button allows communication in only one direction at a time. Transmit and
receive data can share a single pair of conductors in the attached cable. The software application can
disable the port's transmit drivers by deasserting the UART's RTS output. To allow transmission again,
the software application must assert the RTS output.
4.1.3 Half Duplex using DTR
This mode operates the same as Half Duplex using RTS, except that the UART's DTR output is
used.
4.1.4 Half Duplex Automatic Transmitter Control
If this box is checked when using a half duplex mode, the USB serial port device drivers will
automatically control the RTS or DTR signal to enable and disable the transmit drivers. The transmit
drivers will be enabled when there is data from the software application ready to be sent. The transmit
drivers will be disabled after all data has been transmitted and the device drivers' internal transmit
buffers are empty.
If this box is not checked, the software application is responsible for manually switching RTS or
DTR as needed.
DSU-200/300-SIT Users Manual
21
5. Troubleshooting
Listed here are some common installation problems and their causes. If the information here
does not provide a solution, contact Quatech’s Technical Support department at 1-800-553-1170 or
(330) 434-3154.
Note: Any unauthorized repairs or modifications will void the USB adapter's warranty.
Computer will not boot
Is the adapter properly connected? Remove the USB cable from both the DSU-200/300-SIT
adapter and the PC or USB hub connector. Check the cable for signs of damage or deterioration. Try
reconnecting the cable and ensure it is firmly seated in both the DSU-200/300-SIT adapter and the PC
or hub connector. If this is unsuccessful, try a different adapter cable.
Cannot communicate with other equipment
Ensure the D-9 cable connections are correct and that all cables are securely attached.
Double check the Windows 98 Device Manager per the instructions in Section 2 to ensure that
drivers were correctly installed and that all devices are working properly. Try removing the USB
adapter from the Device Manager window and then repeat the hardware installation instructions.
22
DSU-200/300-SIT Users Manual
6. Specifications
Bus Interface
USB Specification 1.1
Data Rates
460.8 kbps max with X4 setting
230.4 kbps max with X2 setting
115.2 kbps max with X1 setting
Ports
1 RS-232
1 RS-422/485
UARTs
2 16550 UARTs with 16-byte FIFOs
Transceivers:
(SP211HB)
RS-232 (port 2)
RS-232 Output
Voltage Swing: +5V min, +7V typical
RS-232 Input
Voltage Range: -15V min, +15V max
Input Threshold Low: 0.8V min, 1.2V typical
Input Threshold High: 2.4V max, 1.7V typical
Transceivers:
(MAX491 or compatible)
RS-422/485 (port 1)
Differential Driver Output (50W Load): +2V min
Differential Driver Output (27W Load): +1.5V min
+5V max
High Input: +2V min
Low Input: +0.8V max
Driver Rise or Fall Time: 5ns min, 15 ns typ, 25ns max
Driver Input to Output Delay: 40 ns min, 70 ns typ,
150ns max
Receiver Input to Output Delay: 40 ns min, 70ns typ,
150ns max
Connectors
1 DB-9 male connector (RS-232)
1 DB-9 female connector (RS-422/485)
Dimensions
6.08” L x 4.26” W x 1.50” H
Power Requirements
USB bus powered,
(no external connection required)
Suspend Power: < 500uA
Unconfigured Power: < 82mA
Configured Power: < 182 mA
Temperature:
Operating: 0 to 70? C
Storage: -50 to 80? C
Humidity
10 to 90 %
OS Support
Windows 98?
23
DSU-200/300-SIT Users Manual
24
DSU-200/300-SIT Users Manual
DSU-200/300-SIT
Users Manual
Version 1.01
March 26, 2002
Part No. 940-0170-101
DSU-200/300-SIT Users Manual
25