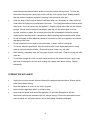
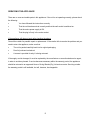
1
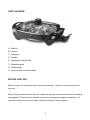
INSTRUCTIONS AND WARRANTY MODEL NO. RHFP910 RUSSELL HOBBS CASSEROLE FRYING PAN Congratulations on purchasing our Russell Hobbs Casserole Frying Pan. Each unit is manufactured to ensure safety and reliability. Before using this appliance for the first time, please read the instruction manual carefully and keep it for future reference. FEATURES OF THE RUSSELL HOBBS CASSEROLE FRYING PAN 1500W 6.8L capacity ULTRA deep 8cm interior for cooking, roasting, grilling, frying and steaming, poaching, defrosting and keeping food warm Pan dimensions: 29cm x 38cm Die-cast aluminium construction – 4mm thick pan Cooks from simmer to 220ºC Easy-to-read, adjustable thermostat control with 5 heat settings for precision cooking Convenient for serving - select the first setting to serve directly from the pan With power indicator light for that perfect temperature convenience Stylish and ergonomic design Tempered glass lid with steam vent Cool-touch handles Non-stick coated aluminium pan for hassle-free cooking and easy cleaning Dishwasher safe lid Includes recipes For domestic use only 1 year warranty IMPORTANT SAFEGUARDS When using any electrical appliance, basic safety precautions should always be followed including the following: 1. Please read the instructions carefully before using any appliance. 2. Always ensure that the voltage on the rating label corresponds to the mains voltage in your home. 2 3. Incorrect operation and improper use can damage the appliance and cause injury to the user. 4. The appliance in intended for household use only. Commercial use invalids the warranty and the supplier can not be held responsible for injury or damage caused when using the appliance for any other purpose than that intended. 5. Avoid any contact with moving parts. 6. Close supervision is required when any appliance is used near or by children or invalids. 7. Check the power cord and plug regularly for any damage. If the cord or the plug is damaged, it must be replaced by the manufacturer or a qualified person in order to avoid an electrical hazard. 8. Do not use the appliance if it has been dropped or damaged in any way. In case of damage, take the unit in for examination and/or repair by an authorised service agent 9. To reduce the risk of electric shock, do not immerse or expose the element, thermostat control/ probe, plug or the power cord to water or any other liquid. 10. Never immerse the unit in water or any other liquid for cleaning purposes. 11. Remove the plug from the socket by gripping the plug. Do not pull on the cord to disconnect the appliance from the mains. Always unplug the unit when not in use, before cleaning or when adding or removing parts. 12. The use of accessory attachments or thermostat control/ probes that are not recommended or supplied by the manufacturer may result in injuries, fire or electric shock. 13. A short cord is provided to reduce the hazards resulting from becoming entangled in or tripping over a longer cord. 14. Do not let the cord hang over the edge of a table or counter. Ensure that the cord is not in a position where it can be pulled on inadvertently. 15. Do not allow the cord to touch hot surfaces and do not place on or near a hot gas or electric burner or in a heated oven. 16. Do not use the appliance on a gas or electric cooking top or over or near an open flame. 17. Use of an extension cord with this appliance is not recommended. However, if it is necessary to use an extension lead, ensure that the lead is suited to the power consumption of the appliance to avoid overheating of the extension cord, appliance or plug point. Do not place the extension cord in a position where it can be pulled on by children or animals or tripped over. 18. This appliance is not suitable for outdoor use. Do not use this appliance for anything other than its intended use. 19. DO NOT carry the appliance by the power cord. 3 20. Do not leave this appliance unattended during use. Always unplug the unit when not in use or before cleaning. 21. Always operate the appliance on a smooth, even, stable surface. Do not place the unit on a hot surface. 22. Ensure that the switch is in the “Off” or “0” position after each use. 23. The manufacturer does not accept responsibility for any damage or injury caused by improper or incorrect use, or for repairs carried out by unauthorised personnel. 24. In case of technical problems, switch off the appliance and do not attempt to repair it yourself. Return the appliance to an authorised service facility for examination, adjustment or repair. Always insist on the use of original spare parts. Failure to comply with the above mentioned pre-cautions and instructions, could affect the safe operation of this appliance. 25. Do not move the unit while in use. 26. Always insert the thermostat control/ probe into the unit and ensure it is fully inserted before inserting the plug in the power socket. 27. Do not use any sharp cooking utensils, as this will damage the non-stick finish on the unit. Only use wooden or plastic utensils. 28. DO NOT use caustic cleaners, nylons or metal brushes on the non-stick surface. It may scratch or damage the surface. 29. Do not touch hot surfaces. Use handles or knobs. 30. Close supervision is necessary when any appliance is used by or near children. 31. DO NOT place the thermostat control/ probe on the non-stick surface or store the thermostat control/ probe inside the pan. It may scratch or damage the surface. 32. Do not operate any appliance with a damaged cord or plug or after the appliance malfunctions, or has been damaged in any manner. Return appliance to the nearest authorised service facility for examination, repair or adjustment. 33. Extreme caution must be used when moving an appliance containing hot oil or other hot liquids. 34. Do not operate this appliance by means of an external timer or separate remote control system. 35. Always lift the lid away from your face as escaping steam may cause injury or scalding. 36. Keep hands, arms, face etc clear from the escaping steam when opening the lid. 4 PARTS DIAGRAM B A H D D C F E G C F A. Glass lid E G B. Lid knob C. Frying pan D. Handles E. Thermostat control/ probe F. Temperature dial G. Indicator light H. Inner pan with non-stick coating BEFORE FIRST USE Before using this unit, please read these instructions completely. Save this manual and pass it on to next user. Before using this appliance for the first time, unpack the frying pan and remove all protective packaging and wrappings. Please ensure to discard the protective packaging and wrappings immediately. It is important to keep these away from babies, infants and children for safety purposes. 5 Wash the frying pan as per the cleaning instructions provided. The inner pan must be wiped with warm soapy water, rinsed and towel dried. DO NOT IMMERSE the UNIT in any liquid. DO NOT IMMERSE the thermostat control/ probe or let the control come in contact with any liquid. OPERATING INSTRUCTIONS 1. Place the unit on a firm, flat surface and place the lid on the unit. 2. Turn the temperature dial of the thermostat control/probe to the “Off”, “0” or “Min” position. Plug the thermostat control/ probe into the unit and ensure that it is fully inserted. Note: If the thermostat control/ probe is not completely inserted, abnormal heating may occur, resulting in damage. 3. Now insert the plug into the power socket and switch the power on. 4. Turn the thermostat control’s dial in a clockwise direction to turn the unit ON, and turn it to the temperature required. The indicator light will turn on and the unit will start heating to the temperature required. 5. The indicator light will turn off when the unit has reached desired temperature. 6. Before first use: pour some salad or vegetable oil into the pan together with some water and bring it to the boil. Leave to boil for 5-7 minutes. Once complete, discard the oil and water mixture. Clean the inner pan and begin the cooking process. This quick measure will eliminate any manufacturing odours. 7. To cook: Follow steps 1 to 5 above. Now lift the lid and place the food to be cooked into the pan. Be careful when inserting the food as the pan is hot and this may cause the food to splatter. During cooking, the indicator light may cycle on and off indicating that the desired temperature is being maintained. 8. As a general tip: low settings are ideal for casseroles, stews, steaming and other slow cooking. High settings are used for browning, shallow frying and grilling. Should you wish to let the food simmer, turn the temperature to its lowest setting. NOTE: Never turn the unit on without any food and / or liquid in the pan. 9. Once the food is cooked to your preference, turn the thermostat control’s dial to the “Off” or “0” position and unplug the unit from the power socket. NOTE: Be careful when working with the frying pan during use, as the pan and lid will be hot. Only the handles will be cool enough to touch. 6 Following a few general tips can prolong the life of your frying pan: 1. Always wash the pan and lid as soon as possible after each use. 2. DO NOT pour cold water into a hot pan. 3. Never scrape with hard or sharp utensils when cleaning. 4. DO NOT place the thermostat control/ probe on the pan surface. It may scratch or damage the non-stick coating. 5. DO NOT wash the pan with the thermostat control/ probe connected. 6. Wash the frying pan after each use to avoid stains caused by a build-up of food or grease residues. Never leave food in the pan overnight. 7. Hold the unit at a 45° angle, socket side facing upwards so as to wash. This will prevent or atleast minimize the likelihood of water getting into the socket. COOKING TIPS Foods which overcook easily should be removed from the frying pan as soon as cooking has been completed. Try to dry meat, fish, poultry, etc. before adding to hot oil to prevent unnecessary splattering. Do not fry too much food at a time in order to prevent the oil temperature from dropping too dramatically. CLEANING AND MAINTENANCE This appliance is for household use only and is not user-serviceable. Do not open or change any parts by yourself. Please refer to a qualified electrical service department or return to the supplier if servicing is necessary. Always remember to unplug the unit from the electrical outlet when not in use and before cleaning. Ensure that the temperature dial is set to the “OFF” or “0” position. Always unplug the thermostat control/ probe from the unit before cleaning. Remove the thermostat control/ probe by gripping the control on either side firmly and pulling. Do not pull on the cord to remove the thermostat control/ probe from the pan. 7 Never allow the thermostat control/ probe to come into contact with any liquid. To clean the thermostat control/ probe, gently wipe it with a soft dry cloth or paper towel. Always ensure that the probe is completely dry before inserting it into the socket of the pan. Clean the body of the frying pan while it is still warm after use. Be careful as it may still be hot. Clean when the frying pan is comfortable to the touch. The frying pan should be cleaned with a damp cloth. Do not let water enter the appliance. Clean the frying area of the unit with a damp sponge. Should food not come off immediately, soak the unit with warm water for a few minutes, and then try again. Do not scrub the unit as this will damage the non-stick coating. Always ensure that the socket is completely dry before inserting the thermostat control/ probe. Do not use bleach or other abrasive substance or solvents to clean your appliance as it can be damaging to the finish. Do not immerse the unit in water or any other liquid, or hold it under a running tap. To remove stubborn spots/marks, wipe the surfaces with a cloth slightly dampened in soapy water or mild non-abrasive cleaner. Rinse and dry with a clean, dry, soft cloth. After cleaning, completely wipe the frying pan dry with a soft cloth. Clean the frying pan after each use. To maintain a longer life of the non-stick coated surface on the inside of the pan, apply a very light coat of cooking oil to the non-stick coating with a paper towel before storing. Repeat periodically. STORING THE APPLIANCE Unplug the unit from the wall outlet and clean all the parts as instructed above. Ensure that all parts are dry before storing. Store the appliance in its box or in a clean, dry place. Never store the appliance while it is still wet or dirty. Never wrap the power cord around the appliance. Do not store the appliance with the thermostat control/ probe inserted in the unit, always unplug it. Ensure the thermostat control/ probe is stored in a safe place where it will not be dropped, bumped or damaged. 8 SERVICING THE APPLIANCE There are no user serviceable parts in this appliance. If the unit is not operating correctly, please check the following: You have followed the instructions correctly That the unit has been wired correctly and that the wall socket is switched on. That the mains power supply is ON. That the plug is firmly in the mains socket. If the appliance still does not work after checking the above: Consult the retailer for possible repair or replacement. If the retailer fails to resolve the problem and you need to return the appliance, make sure that: The unit is packed carefully back into its original packaging. Proof of purchase is attached. A reason is provided for why it is being returned. If the supply cord is damaged, it must be replaced by the manufacturer or an authorised service agent, in order to avoid any hazard. If service becomes necessary within the warranty period, the appliance should be returned to an approved Home of Living Brands (Pty) Ltd service centre. Servicing outside the warranty period is still available, but will, however, be chargeable. 9 CHANGING THE PLUG Should the need arise to change the fitted plug, follow the instructions below. This unit is designed to operate on 230V-240V current only. Connecting to other power sources may damage the appliance. Connect a three-pin plug as follows: The wires in this mains lead are coloured in accordance with the following code: Green/Yellow = Earth Blue = Neutral Brown = Live TASTY RECIPES AND MEAL IDEAS Important: Temperature settings as given in recipes are approximate. Due to personal differences in taste, some foods may be desired more or less crisp, more or less done, especially in the case of meats. Therefore, heat settings may be increased, decreased or varied in any way to suit individual preference. CHINESE MEAT BALLS 500g minced beef 5ml salt 250g cabbage 15ml soy sauce 2 onions 30ml shortening or cooking oil 10 1.5ml ginger METHOD: Preheat the frying pan to about 150°C. Put meat, cabbage and onions through meat grinder using coarse cutter, or place in a food processor. Combine ginger, salt and soy sauce and add to meat mixture. Mix well. Shape into balls about 2.5 – 3 cm in diameter. Fry in melted shortening until done, browning well on all sides. PORK CHOPS PAPRIKA 4 to 6 pork chops Pepper Paprika 3ml Sage Salt 300ml Milk METHOD: Preheat the frying pan to setting 5.5. Sprinkle chops with paprika, salt, pepper and sage. Grease the frying pan lightly and brown the chops on both sides. Reduce the heat setting to 2.5. Add milk gradually as needed. Cover and braise until done. ROAST CHICKEN WITH ROAST POTATOES 1 x 1.5kg chicken 60g butter 7ml mixed dried herbs 6 medium sized potatoes, peeled 3ml tumeric Salt and pepper 1 large onion, quartered Flour 60ml oil METHOD: Wash and dry chicken inside and out. Mix salt, pepper, herbs and tumeric and sprinkle over chicken. Place onion inside cavity of chicken and tie legs. Heat oil and butter in frying pan to about 180°C until butter begins to foam. Fry chicken until nicely browned all over. Turn heat down to approximately 120°C. Cover and roast chicken for about 1 hour, turning every 15 minutes. Season potatoes and sprinkle with flour. Add potatoes to frying pan for the last 30 minutes of cooking. Roast with the chicken, turning regularly. 11 SAVOURY LAMB STEW 750g lamb shoulder 300ml water cut in 2.5cm pieces 5ml salt 30ml cooking oil 8 to 10 small whole onions 1 x 300ml can condensed 300ml canned peas tomato soup METHOD: Preheat frying pan. Heat the cooking oil and brown the meat. Skim off the excess fat as it accumulates. Combine the tomato soup, water and salt and pour over the meat. Add the onions. Reduce the heat. Cover and cook for 1 hour or until the meat is tender. Add peas just before serving and reheat. Serve hot from the frying pan. BEEF STROGANOFF 750g round steak cut into strips 300ml sour cream Flour, salt and pepper 1can tomato soup 30ml shortening 15ml Worcestershire sauce 150ml chopped onions 6 to 8 drops Tabasco sauce 1 clove garlic, minced 2.5ml salt 1 x 200g can mushrooms 1ml pepper METHOD: Preheat the frying pan to 180°C. Dredge meat in seasoned flour. Melt shortening and brown meat well. Add onions, garlic and mushrooms and sauté lightly. Reduce heat to 100°C. Combine cream, tomato soup, Worcestershire sauce, tobasco sauce, salt and pepper and pour over meat. Cover and braise 1 ½ hours or until tender. Serve over hot spaghetti or rice. Sprinkle with parmesan cheese. 12 SCRAMBLED EGGS 6 Eggs slightly beaten 100ml cream or milk Salt and pepper 30ml butter METHOD: Preheat the frying pan. Combine the eggs, salt, pepper and milk. Melt the butter in the pan and add the eggs. Stir the eggs as they become firm. Serve when firm but not dry. Variations: • Curried – Add 5 to 10ml curry powder • Dried Beef – Add 230ml shredded dried beef • Ham or Bacon – Add sautéed cubed ham or bacon. • Onion and Parsley – Add chopped onion and parsley • Chives – Add chopped chives • Mushrooms – Add sliced canned or fresh mushrooms 13 PLEASE AFFIX YOUR PROOF OF PURCHASE/RECEIPT HERE IN THE EVENT OF A CLAIM UNDER WARRANTY THIS RECEIPT MUST BE PRODUCED. WAR RAN TY 1. Home of Living Brands (Pty) Limited warrants to the original purchaser of this product (“the customer”) that this product will be free of defects in quality and workmanship which under normal personal, family or household use and purpose may manifest within a period of 1 (one) year from the date of purchase (“warranty period”). 2. Where the customer has purchased a product and it breaks, is defective or does not work properly for the intended purpose, the customer must notify the supplier from whom the customer bought the product (“the supplier”) thereof within the warranty period. Any claim in terms of this warranty must be supported by a proof of purchase. If proof of purchase is not available, then repair, and/or service charges may be payable by the customer to the supplier. 3. The faulty product must be taken to the supplier's service centre to exercise the warranty. 4. The supplier will refund, repair or exchange the product in terms of this warranty subject to legislative requirements. This warranty shall be valid only where the customer has not broken the product himself, or used the product for something that it is not supposed to be used for. The warranty does not include and will not be construed to cover products damaged as a result of disaster, misuse, tamper, abuse or any unauthorised modification or repair of the product. 5. This warranty will extend only to the product provided at the date of the purchase and not to any expendables attached or installed by the customer. 6. If the customer requests that the supplier repairs the product and the product breaks or fails to work properly within 3 (three) months of the repair and not as a result of misuse, tampering or modification by or on behalf of the customer, then the supplier may replace the product or pay a refund to the customer. 7. The customer may be responsible for certain costs where products returned are not in the original packaging, or if the packaging is damaged. This will be deducted from any refund paid to the customer. HOME OF LIVING BRANDS (PTY) LTD (JOHANNESBURG) JOHANNESBURG CAPE TOWN DURBAN TEL NO. (011) 490-9600 TEL NO. (021) 552-5161 TEL NO. (031) 792-6000 www.homeoflivingbrands.com www.russellhobbs.co.za www.facebook.com/RussellHobbsSA 14