1
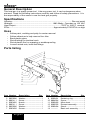
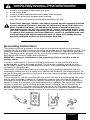
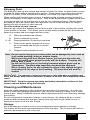
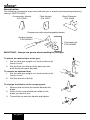
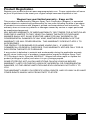
Heat Gun
Model HT775
Owner’s Manual
Read all instructions and product labels. When using
electrical tools, follow all precautions to reduce the
risk of fire, electric shock, and other personal injury.
Need help? Call us first for answers fast.
Call Wagner toll-free if you have any comments
or problems with this Wagner product.
1-800-727-4023
Wagner Technical Service
Register your product online at:
http://www.wagnerspraytech.com
56M8
1770 Fernbrook Lane, Plymouth, MN 55447
0908 • Form No. 0283739J
Español Français English
General Description
This heat gun is a quality power tool. Like any power tool, it can be dangerous when
misused. Read the following instructions carefully and follow all safety precautions. It is
the responsibility of the owner to use the heat gun properly.
Specifications
Housing:......................................................................................................... Die cast metal
Wattage:....................................................................... 1680 Watts. Operates on 120 VAC
Heat Output:................................................................................ 750ºF to 1000°F nominal.
BTUs.............................................................................. Approximately 5700 BTUs on high
Uses
•
•
•
•
•
•
Soften paint, caulking and putty for easier removal
Soften adhesives to help remove floor tiles
Bend plastic pipes
Shrink tubing for electrical work
Shrink plastic film for wrapping or weatherproofing
Loosen rusted nuts, bolts and fittings
Parts listing
7
8
9
10
11
12
13
14
1
2
3
4
5
6
Item Number
1 0283481
2 9820906
3 9803111
4 0283482
5 9803111
6 9820906
7 0283490
2
Description
Qty.
Shield................................ 1
Washer.............................. 1
Screw................................ 1
Nozzle............................... 1
Screw................................ 1
Washer.............................. 1
Screen............................... 1
English
Item Number
8 0283492
9 0293491
10 9804924
11 0283485
12 0283292
13 0283484
14 ---------
Description
Qty.
Plate.................................. 1
Retaining ring.................... 1
Screw................................ 1
Mica sheet........................ 1
Element assembly............. 1
Stand................................ 1
Basic unit assembly.......... 1
Important Safety Information • Read all safety information
before operating the equipment. Save these instructions
To reduce the risks of fire or explosion, electrical shock and the injury to persons,
read and understand all instructions included in this manual. Be familiar with the
controls and proper usage of the equipment.
Indicates a hazardous situation which, if not avoided, could result in death or
serious injury.
Hazard: POISON
Extreme care should be taken when stripping paint. The peelings, residue and vapors of
paint may contain lead, which is poisonous. Any paint applied to homes before 1950 is
likely to contain lead. Any paint manufactured before 1977 may contain lead. Once the
paint is deposited on surfaces, hand-to-mouth contact can result in the ingestion of lead.
Exposure to even low levels of lead can cause irreversible brain and nervous system
damage. Young and unborn children are particularly vulnerable to lead poisoning.
Before beginning any paint removal process you should determine whether the paint
you are removing contains lead. This can be done by your local health department or
by a professional who uses a paint analyzer to check the lead content of the paint to be
removed. Lead-based paint should only be removed by a professional and should not be
removed using a heat gun.
Prevention:
1. Move the work piece outdoors. If this is not possible, keep the work area well
ventilated. Open the windows and put an exhaust fan in one of them. Be sure the
fan is moving the air from inside to outside.
2. Remove or cover any carpets, rugs, furniture, clothing, cooking utensils and air
ducts.
3. Place drop cloths in the work area to catch any paint chips or peelings. Wear
protective clothing such as extra work shirts, overalls and hats.
4. Work in one room at a time. Furnishings should be removed or placed in the
center of the room and covered. Work areas should be sealed off from the rest of
the dwelling by sealing doorways with drop cloths.
5. Children, pregnant or potentially pregnant women and nursing mothers should not
be present in the work area until the work is done and all cleanup is complete.
6. Wear a dust respirator mask of a dual filter respirator mask for dust and fumes
which has been approved by the Occupational Safety and Health Administration
(OSHA) the National Institute of Safety and Health (NIOSH), or the United States
Bureau of Mines. These masks and replaceable filters are readily available at
major hardware stores. Be sure that the mask fits properly. Beards and facial hair
may keep masks from sealing properly. Change the filters often. Disposable paper
masks are not adequate.
7. Use caution when operating the heat gun. Keep the heat gun moving as excessive
heat will generate fumes which can be inhaled by the operator.
8. Keep food and drink out of the work area. Wash hands, arms and face and rinse
mouth before eating or drinking. Do not smoke or chew gum or tobacco in the work
area.
9. Clean up all removed paint and dust by wet mopping the floors. Use a wet cloth
to clean all walls, sills and any other surface where paint dust is clinging. Do
not sweep, dry dust or vacuum. Use a high phosphate detergent of trisodium
phosphate (TSP) to wash and mop areas.
10. At the end of each work session, put the paint chips and debris in a double plastic
bag, close it with tape or twist ties and dispose of properly.
11. Remove protective clothing and work shoes in the work area to avoid carrying dust
into the rest of the building. Wash work clothes separately. Wipe shoes off with
a wet rag and then wash it with the work clothes. Wash hair and body thoroughly
with soap and water.
English
3
Important Safety Information • Read all safety information
before operating the equipment. Save these instructions
hazard: EXPLOSION OR FIRE
This heat gun produces extremely high temperatures (as high as 1450° F). It must be
used with caution to prevent combustible material from igniting.
PREVENTION:
1. Keep the gun in constant motion. Do not stop or dwell in one spot.
2. Use extreme caution if the other side of the
material being scraped is inaccessible, such
as house siding. The hidden side could catch
Facia
on fire if it becomes too hot. Some buildings
contain highly flammable materials behind
Soffit
siding, floors, facia, soffit boards and other
Inside
panels. Check these areas before applying
Wall
heat and do not use a heat tool if flammable
Siding
materials are present or if you are unsure of the
hidden material.
3. Do not use near surfaces with cracks or near metal pipes or flashing. Heat may
be conducted behind the work surface and ignite hidden material. The ignition of
hidden materials may not be readily apparent and can result in property damage
and injury.
4. Do not use electric tools in the presence of flammable liquids or gases.
5. Do not use near combustible materials such as dry grass, leaves, and paper which
can scorch and catch fire.
6. The nozzle becomes very hot. Do not lay the heat gun on flammable surfaces
when operating the gun or immediately after shutting the gun off. Always set the
gun on a flat, level surface so that the nozzle tip is directed upwards and away from
the supporting surface.
7. Do not touch the nozzle until the tool has cooled.
8. Do not use the heat gun as a hair dryer.
9. Tools and paint scrapings become very hot. To avoid burns, use work gloves when
scraping.
10. Always treat the hot air units with the same respect as an open flame.
hazard: ELECTRIC
May cause property damage, severe injury or loss of life.
PREVENTION:
1. Do not disassemble the heat gun.
2. Do not work in wet areas or expose the heat gun to rain.
3. Guard against electric shock by preventing body contact with grounded surfaces
such as pipes, radiators, ranges, aluminum ladders or other grounded devices.
4. Do not abuse the electric cord. Never carry the heat gun by the cord or yank on the
cord to disconnect if from the power supply. Keep the electric cord away from heat,
oil and sharp edges. Inspect the cord for wear or damage regularly.
5. Use only extension cords rated for outdoor use. If an extension cord is damaged or
otherwise unsuitable for use, replace it with a new cord.
HAZARD: GENERAL
May cause property damage or severe injury.
PREVENTION:
1. Disconnect the heat gun from the power supply when not in use. Store indoors in a
dry place and out of the reach of children.
2. Keep your work area well lighted and clean.
3. Do not overreach, especially when working on ladders. Keep proper footing and
balance at all times. Be certain any ladders being used are sturdy, stable, on a firm
4
English
Important Safety Information • Read all safety information
before operating the equipment. Save these instructions
4.
5.
6.
7.
surface and erected at safe working angles.
Avoid power lines.
Keep moveable items secured and steady while scraping.
Always use protective eyewear when working.
Stay alert and use common sense when operating any tool.
Some dust, peelings, residue, and vapors caused by paint removal activities
contain chemicals known to the state of California to cause birth defects or
other reproductive harm. An example of a chemical would be lead from
lead-based paints (do not use a heat tool to remove lead-based paint). Your
risk from exposure varies, depending on how often you do this type of work.
To reduce your exposure to these chemicals: work in a ventilated area, and
work with approved safety equipment, such as those dust masks that are
specially designed to filter out microscopic particles.
Grounding Instructions
This product must be grounded. In the event of an electrical short circuit, grounding
reduces the risk of electric shock by providing an escape wire for the electric current. This
product is equipped with a cord having a grounding wire with an appropriate grounding
plug. The plug must be plugged into an outlet that is installed properly and grounded in
accordance with all local codes and ordinances.
WARNING - Improper installation of the grounding plug can result in a risk of
electric shock.
If repair or replacement of the cord or plug is necessary, do not connect the green
grounding wire to either flat blade terminal. The wire with insulation having an outer
surface that is green, with or without yellow stripes, is the grounding wire and must be
connected to grounding pin.
Check with a qualified electrician or serviceman if the grounding instructions are not
completely understood, or if in doubt as to whether the product is grounded properly. Do
not modify the plug provided; if it will not fit the outlet, have the proper outlet installed by a
qualified electrician.
This product is for use on a nominal 120 volt circuit, and has a grounding plug that looks
like the plug illustrated in sketch A. A temporary adapter that looks like the adapter
illustrated in sketch B and C may be used to connect this plug to a 2 pole receptacle as
shown in sketch B if a properly grounded outlet is not available. The temporary adapter
should be used only until a properly grounded outlet (sketch A) can be installed by a
qualified electrician. The green colored rigid ear lug, or the like extending from the
adapter must be connected to a permanent ground such as a properly grounded outlet
box cover. Whenever the adapter is used, it must be held in place by a metal screw.
(A)
(B)
(C)
English
5
Using the Heat Gun
Always read the safety information included in this manual before using the
heat gun.
1. Plug the unit into a standard wall outlet.
2. Turn on the unit by moving the rocker switch to hot. The
motor-driven fan noise will indicate that the unit is running.
The heating coil will light up slowly to dark red.
Note: Smoke may appear during the initial start up
due to the burning of manufacturing oils. The
smoke should disappear in less than a minute.
IMPORTANT: If the blower motor in the heat gun does not turn on when the switch
is set to either HOT or COLD, turn the switch OFF immediately. The heating
element will burn out if it is not cooled by the blower.
3. Adjust the heat output by turning the thumb screw on the
adjustable air intake cover to change the size of the intake
openings. The larger the openings, the cooler the output.
The smaller the openings, the hotter the output. Heat output
will vary by about 250° F between a fully opened and a fully
closed intake cover.
Do not block the air intake openings opposite the
adjustable intake cover. The heating element will burn
out if too much air intake is blocked.
o
Co
4. When you are done, move the rocker switch to cold. Allow the
blower to operate for a few minutes to cool the gun. This helps to
extend the life of the heat gun.
5. Move the rocker switch to off and unplug the heat gun.
Note: Always set the heat gun upright after it is turned off, either
for a short break or for storage. Avoid laying the unit on the
side after shutdown. The heat will remain in the unit and
cooling will take longer. Store the unit only after the nozzle
is cool. Unplug the unit before storing to prevent accidental
startup.
IMPORTANT: Always protect glass when working near windows.
Do not touch nozzle or the scraper blade when working. These become
extremely hot and will cause severe burns. Wear gloves to protect hands
from hot scrapings.
6
English
r
tte
Ho
ler
Stripping Paint
The heat gun heats up the surface and causes the paint to soften, at which time it can be
scraped off easily without damaging the surface. Some paints may soften even though
they do not blister; some may become rubbery, and some may require higher heat.
When working with several layers of paint, it speeds up the scraping process to heat the
surface thoroughly, all the way to the wood. Then all the layers can be scraped at one time.
A soft wire brush may be the best tool to use for very intricate surfaces. Mineral paints
and finishes, such as cement paint and porcelain, do not soften with heat, so using a
heating tool will not work for paint removal.
The best method of paint removal
Move the gun slowly and steadily forward at an angle to the surface, pointing the nozzle
in the direction of motion. This allows you to scrape safely outside the hot air stream and
keeps the scraper and the scraped surface cooler.
A.
B.
A + B.
C.
D.
Warm air preheats the surface.
Paint is softened by hot air.
Deep penetration of heat over total area.
Paint can be easily scraped off as soon
as it is softened and the gun is moved
forward.
Stripped surface allowed to cool.
A
B
C D
Note: Do not use the heat gun on surfaces that can be damaged by heat, such as
vinyl-coated paneling, siding or window frames.
When removing paint from window frames, the heat gun will soften the
putty. Be careful not to gouge the putty with the scraper. The putty will
firm up after it cools.
Do not use the heat gun on insulating laminated window glass such as
Thermopane. The glass edge expansion may break the edge seal.
When scraping fascia, do not overheat the edges of the asphalt shingles
protruding over the edge of the sheathing. Too much heat will melt the
asphalt.
important: The removal of paint by heat gun is safe if the above guidelines are
used, but always keep either a container of water or an ABC fire extinguisher within
reach.
important: Read the general operating and safety information sections of this
owner’s manual before using the heat gun.
Cleaning and Maintenance
Keep the intake openings on the housing clean and free of obstructions. Us a soft, dry
brush to clean the openings periodically. Use only mild soap and a damp cloth to clean
the heat gun. Many household cleaners contain chemicals which could seriously damage
the housing.
Do not use gasoline, turpentine, lacquer or paint thinner, dry cleaning fluids or similar
products when cleaning the heat gun. Never allow any liquid to get inside the tool or
immerse any part of the tool into a liquid.
Storage
Allow the heat gun nozzle to cool to room temperature before placing in storage.
The nozzle will turn dark over time because of the high heat. This is normal and will not
affect the performance or life of the unit.
English
7
Accessories
The following accessories may come with the gun or may be purchased separately by
calling 1-800-727-4023.
Concentrator Nozzle
P/N 10355
Flare Nozzle
P/N 10357
Glass Protector
P/N 10356
Scraper tool with interchangeable blades
Scraper handle
P/N 0283453
Five-blade set
P/N 0283452
IMPORTANT: Always use gloves when handling the heat gun.
To attach an optional item to the gun:
1. Set the heat gun upright on a level surface until
the tip is cool.
2. Set the item onto the tip of the heat gun and
push firmly into place by hand.
To remove an optional item:
1. Set the heat gun upright on a level surface until
the tip is cool.
2. Pull the item off of the tip.
To change the blades on the scraping tool:
1. Remove the nut from the handle beneath the
blade.
2. Slide off the current blade and slide on the
blade you want to use.
3. Thread the nut onto the handle and tighten.
8
English
Product Registration
Register your product online at www.wagnerspraytech.com. Proper registration will serve
as proof of purchase in the event your original receipt becomes misplaced or lost.
Wagner two year limited warranty - Keep on file
This product, manufactured by Wagner Spray Tech Corporation (Wagner), is warranted
against defects in material and workmanship for two years following the date of purchase
if operated in accordance with Wagner’s printed recommendations and instructions. This
warranty does not cover any defects or damages caused by service or repair performed
by unauthorized personnel.
Any implied warranty of merchantability or fitness for a particular
purpose is limited to two year following the date of purchase.
Wagner shall not in any event be liable for any incidental or
consequential damages of any kind, whether for breach of the
warranty or any other reason. This warranty does not apply to
accessories.
The product is designed for home usage only. If used for
commercial or rental purposes, this warranty applies only for 30
days from the date of purchase.
If any product is defective in material and workmanship during the applicable warranty
period, return it with proof of purchase, transportation prepaid to Wagner Spray Tech,
1770 Fernbrook Lane, Plymouth, MN 55447. Wagner will either repair or replace the
product (at Wagner’s option) and return it to you, postage prepaid.
Some states do not allow limitations on how long an implied
warranty lasts or the exclusion of incidental or consequential
damages, so the above limitation and exclusion may not apply to
you.
This warranty gives you specific legal rights, and you may also have
other rights which vary from state to state.
English
9
Copyright © Wagner Spray Tech Corporation. All rights reserved,
including right of reproduction in whole or in part, in any form.
Printed in China.
Wagner Spray Tech
1770 Fernbrook Lane
Plymouth, MN 55447
Tel: 1-800-727-4023
© Droits d’auteur Wagner Spray Tech Corporation. Tous droits
réservés, y compris le droit de reproduction, en entier ou en partie,
sous quelque forme que ce soit. Imprimé en Chine.
Copyright © Wagner Spray Tech Corporation. Reservados todos
los derechos, incluyendo el derecho de reproducción de cualquier
clase, ya sea total o parcial. Impreso en China.