1
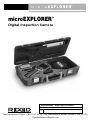
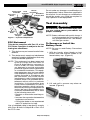
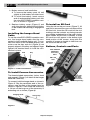
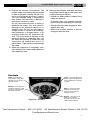
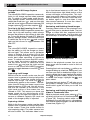
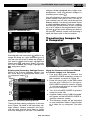
Operator’s Manual
microEXPLORER™
Digital Inspection Camera
WARNING!
Read this Operator’s Manual
carefully before using this
tool. Failure to understand
and follow the contents of
this manual may result in
electrical shock, fire and/or
serious personal injury.
99 Washington Street
Melrose, MA 02176
Phone 781-665-1400
Toll Free 1-800-517-8431
Visit us at www.TestEquipmentDepot.com
microEXPLORER™ Digital Inspection Camera
Table of Contents
Safety Symbols ....................................................................................................2
General Safety Information
Work Area Safety...............................................................................................2
Electrical Safety .................................................................................................2
Personal Safety .................................................................................................3
Electrical Device Use and Care .........................................................................3
Service...............................................................................................................3
Specific Safety Information
microEXPLORER™ Digital Inspection Camera Safety .......................................3
Description, Specifications and Standard Equipment
Description.........................................................................................................4
Specifications.....................................................................................................4
Standard Equipment ..........................................................................................5
FCC Statement ..................................................................................................5
Tool Assembly
To Remove Or Install Battery Pack....................................................................5
Install Imager Head Cable .................................................................................6
Install Camera Accessories ...............................................................................6
Install SD Card...................................................................................................6
Buttons, Controls, Ports.....................................................................................6
Tool Inspection.....................................................................................................7
Tool and Work Area Set-Up .................................................................................7
Operating Instructions
Controls .............................................................................................................9
Icons ................................................................................................................10
On Screen Navigation......................................................................................11
Transferring Images to a Computer .................................................................13
Cleaning Instructions ........................................................................................15
Accessories ........................................................................................................16
Storage................................................................................................................16
Service and Repair.............................................................................................16
Troubleshooting .................................................................................................17
Battery Charger
Battery Pack/Battery Charger Safety ...............................................................17
Description, Specifications and Standard Equipment
Description.......................................................................................................18
Specifications...................................................................................................18
Charger Inspection and Set-Up ........................................................................18
Charging Procedures/Operating Instructions .................................................19
Cleaning Instructions ........................................................................................19
Accessories ........................................................................................................20
Storage................................................................................................................20
Service and Repair.............................................................................................20
Disposal ..............................................................................................................20
ii
Ridge Tool Company
microEXPLORER™
Digital Inspection Camera
microEXPLORER™ Digital Inspection Camera
Record Serial Number below and retain product serial number which is located on nameplate.
Serial
No.
Test Equipment Depot - 800.517.8431 - 99 Washington Street Melrose, MA 02176
TestEquipmentDepot.com
microEXPLORER™ Digital Inspection Camera
Safety Symbols
In this operator’s manual and on the product, safety symbols and signal words are used to
communicate important safety information. This section is provided to improve understanding of these signal words and symbols.
This is the safety alert symbol. It is used to alert you to potential personal injury hazards. Obey
all safety messages that follow this symbol to avoid possible injury or death.
DANGER
DANGER indicates a hazardous situation which, if not avoided, will result in death or
serious injury.
WARNING
WARNING indicates a hazardous situation which, if not avoided, could result in
death or serious injury.
CAUTION
CAUTION indicates a hazardous situation which, if not avoided, could result in minor
or moderate injury.
NOTICE
NOTICE indicates information that relates to the protection of property.
This symbol means read the operator’s manual carefully before using the equipment. The operator’s manual contains important information on the safe and proper operation of the equipment.
This symbol means always wear safety glasses with side shields or goggles when handling
or using this equipment to reduce the risk of eye injury.
This symbol indicates the risk of hands, fingers or other body parts being caught or wrapped
in gears or other moving parts.
This symbol indicates the risk of electrical shock.
earthed (grounded) power tools. Unmodified plugs and matching outlets will
reduce the risk of electric shock.
General Safety
Information
WARNING
Read and understand all instructions.
Failure to follow all instructions listed
below may result in electric shock, fire
and/or serious personal injury.
SAVE THESE INSTRUCTIONS!
Work Area Safety
• Keep your work area clean and well lit.
Cluttered benches and dark areas may
cause accidents.
• Do not operate electrical devices in explosive atmospheres, such as in the
presence of flammable liquids, gases,
or heavy dust. Electrical devices create
sparks which may ignite the dust or fumes.
• Keep bystanders, children, and visitors
away while operating electrical devices.
Distractions can cause you to lose control.
Electrical Safety
• Electrical device plug must match the
outlet. Never modify the plug in any
way. Do not use any adapters with
2
• Avoid body contact with earthed or
grounded surfaces such as pipes, radiators, ranges and refrigerators. There is
an increased risk of electrical shock if your
body is earthed or grounded.
• Do not expose electrical devices to rain
or wet conditions. Water entering an
electrical device will increase the risk of
electrical shock.
• Do not abuse the cord. Never use the
cord for carrying, pulling, or unplugging
the electrical device. Keep cord away from
heat, oil, sharp edges or moving parts.
Damaged or entangled cords increase the
risk of electrical shock.
• When operating an electrical device
outdoors, always use an extension cord
suitable for outdoor use. Use of a cord
suitable for outdoor use reduces the risk of
electric shock.
• If operating an electrical device in a
damp location is unavoidable, use a
ground fault circuit interrupter (GFCI)
protected supply. Use of a GFCI reduces
the risk of electrical shock.
Ridge Tool Company
microEXPLORER™ Digital Inspection Camera
Personal Safety
• Stay alert, watch what you are doing
and use common sense. Do not use
electrical devices when tired or under the
influence of drugs, alcohol, or medications. A moment of inattention while operating an electrical device may result in serious personal injury.
• Do not overreach. Keep proper footing
and balance at all times. Proper footing
and balance enables better control of the
electrical device in unexpected situations.
• Use personal protective equipment.
Always wear eye protection. Dust mask,
non-skid safety shoes, hard hat, or hearing
protection must be used for appropriate
conditions.
• Dress properly. Do not wear loose clothing or jewelry. Keep your hair, clothing,
and gloves away from moving parts.
Loose clothes, jewelry, or long hair can
be caught in moving parts.
Electrical Device Use and
Care
• Do not force electrical device. Use the
correct electrical device for your application. The correct electrical device will do
the job better and safer at the rate for
which it is designed.
• Do not use the electrical device if the
switch does not turn it ON and OFF.
Any electrical device that cannot be controlled with the switch is dangerous and
must be repaired.
• Store idle electrical devices out of the
reach of children and do not allow persons unfamiliar with electrical devices
or these instructions to operate the
electrical device. Electrical devices are
dangerous in the hands of untrained users.
• Maintain electrical devices. Check for
misalignment or binding of moving
parts, breakage of parts and any other
condition that may affect the electrical
devices’ operation. If damaged, have
the electrical device repaired before
use. Many accidents are caused by poorly
maintained electrical devices.
• Use the electrical device and accessories in accordance with these instructions, taking into account the working
conditions and the work to be performed. Use of the electrical device for
operations different from those intended
could result in a hazardous situation.
Service
• Electrical device service must be performed only by qualified repair personnel. Service or maintenance performed
by unqualified repair personnel could result
in injury.
• When servicing an electrical device,
use only identical replacement parts.
Follow instructions in the Maintenance
Section of this manual. Use of unauthorized parts or failure to follow maintenance
instructions may create a risk of electrical
shock or injury.
Specific Safety
Information
WARNING
This section contains important safety information that is specific to the inspection camera.
Read this operator’s manual carefully before using the microEXPLORER inspection camera to reduce the risk of electrical shock or other serious injury.
SAVE THESE INSTRUCTIONS!
A manual holder is supplied in the carrying
case of the microEXPLORER inspection
camera to keep this manual with the tool for
use by the operator.
microEXPLORER™ Digital
Inspection Camera Safety
• Do not immerse the handle or the display unit in water. Such measures reduce the risk of electric shock and damage. The imager head and the cable are
water resistant when the unit is fully assembled, but the video display is not.
• Do not place the microEXPLORER inspection camera anywhere that may
contain a live electrical charge. This increases the risk of electrical shock.
• Do not place the microEXPLORER inspection camera anywhere that may
Ridge Tool Company
3
microEXPLORER™ Digital Inspection Camera
contain moving parts. This increases the
risk of entanglement injuries.
• Do not use this device for personal inspection or medical use in any way:
This is not a medical device. This could
cause personal injury.
• Always use appropriate personal protective equipment while handling and
using the microEXPLORER inspection
camera. Drains and other areas may contain chemicals, bacteria and other substances that may be toxic, infectious, cause
burns or other issues. Appropriate personal protective equipment always includes safety glasses and gloves, and
may include equipment such as latex or
rubber gloves, face shields, goggles, protective clothing, respirators and steel toed
footwear.
• Practice good hygiene. Use hot, soapy
water to wash hands and other exposed
body parts exposed to drain contents after
handling or using the microEXPLORER
inspection camera to inspect drains and
other areas that may contain chemicals
or bacteria. Do not eat or smoke while operating or handling the microEXPLORER
inspection camera. This will help prevent
contamination with toxic or infectious material.
• Do not operate the microEXPLORER
inspection camera if operator or device is standing in water. Operating an
electrical device while in water increases
the risk of electrical shock.
Description,
Specifications and
Standard Equipment
Recommended Use ...Indoor
Viewable Distance .....1" to 12"
(2.5 cm – 30 cm)
Power Supply .............Rechargeable
Lithium Ion Battery
Pack (3.7 Volt)
Estimated Battery Life ..3-4 hours of
continuous use
Weight ........................2.5 lbs (1.3 kg)
Dimensions:
Length .......................10.5" (26.7 cm)
Width .........................4.13" (10.5 cm)
Height ........................2.38" (6.00 cm)
Display:
Resolution .................320 x 240 RGB
Screen Type ..............3.5" TFT LCD
Operating Environment:
Temperature ..............32°F to 113°F
(0°C to 45°C)
Humidity ....................5% to 95% non-condensing (display unit)
Storage Temperature...-4°F to 158°F
(-20°C to 70°C)
Water Resistance ........Imager head and
cable (When properly assembled.)
Cable Length..............3'
JPG Image Resolution
Best ...........................1024 x 1280
Good..........................640 x 480
Video Resolution .......320 x 240
Description
The microEXPLORER inspection camera is a
powerful handheld video inspection system. It
is a completely digital platform that allows
you to perform and record pictures and videos
of visual inspections in hard to reach areas.
Several image manipulation features such
as self leveling, pan, zoom and low light vision
are built into the system to ensure detailed
and accurate visual inspections. Accessories
(mirror, hook and magnet) are included to attach to the imager head to provide application
flexibility.
4
Specifications
Memory ......................6 MB Internal
Memory. SD Card
Slot provided for additional memory (SD
Card not included)
Computer Interface ...USB (Cord
Included)
Standard Equipment
The microEXPLORER inspection camera
comes with the following items:
Ridge Tool Company
microEXPLORER™ Digital Inspection Camera
Imager Head
and Cable
Accessory
Mirror
Lithium
Cord
Ion Battery
Organizer
Hand Held
Display Unit
Do not make any changes or modifications to
the equipment unless otherwise specified in
the manual. If such changes or modifications
should be made, you could be required to
stop operation of the equipment.
Tool Assembly
WARNING
Accessory
Hook
Accessory
Magnet
Battery
Charger
To reduce the risk of serious injury during use, follow these procedures for
proper assembly.
NOTE! Battery delivered with partial charge. It
is recommended that the battery be
fully charged before use. See Battery
and Charger section.
USB Cord
Figure 1 – System Components
FCC Statement
This device complies with Part 15 of the
FCC Rules. Operation is subject to the following two conditions:
1. This device may not cause harmful interference.
2. This device must accept any interference
received, including interference that may
cause undesired operation.
NOTE! This equipment has been tested and
found to comply with the limits for
Class B digital devices, pursuant to
Part 15 of the FCC rules. These limits
are designed to provide reasonable
protection against harmful interference
in a residential installation. This equipment generates uses and can radiate
radio frequency energy and, if not installed and used in accordance with
the instructions, may cause harmful
interference to radio communications.
However, there is no guarantee that interference will not occur in a particular
installation. If this equipment does
cause harmful interference to radio or
television reception, which can be determined by turning the equipment off
and on, the user is encouraged to try to
correct the interference by one or more
of the following measures:
• Reorient or relocate the receiving antenna.
• Increase the separation between the
equipment and receiver.
• Consult the dealer or an experienced
radio/TV technician for help.
Use of shielded cable is required to comply
with Class B limits in Subpart B of Part 15 of
the FCC rules.
To Remove or Install the
Battery Pack:
NOTE! Be sure to read Battery Precautions
section.
1. With dry hands, place thumb on lock
button and slide toward middle to release battery cap. (Figure 2).
Lock
Button
Figure 2 – Battery Cap
2. Lift and pull to remove cap when released. (Figure 3)
Figure 3 – Removing/Installing Battery
Ridge Tool Company
5
microEXPLORER™ Digital Inspection Camera
3. Battery removal and installation.
A. To remove the battery pack, tilt unit
slightly to slide battery into other hand.
B. To install the battery, Insert contact
end of rechargeable battery pack into
the microEXPLORER inspection camera, as shown in Figure 3.
4. Replace battery cover (Figure 2) and
snap into place by sliding the lock button
to the middle and releasing to engage the
lock.
Installing the Imager Head
Cable
To use the microEXPLORER inspection camera, the imager head cable must be connected to the handheld display unit. To connect the cable to the handheld display unit,
make sure the key and slot (Figure 4) are
properly aligned. Once they are aligned, finger
tighten the knurled knob to hold the connection in place.
Slot
Figure 6 – Installing Accessories
To install an SD Card
Using the tab on the port cover (Figure 7), lift
and pull to remove the cover and expose the
SD card slot. Insert the SD card into the slot
making sure the contacts are facing towards
you and the angled portion of the card is facing
down. When an SD card is installed, a small
SD card icon will appear in the bottom right
hand portion of the screen, along with the
number of images or length of video that can
be stored on the SD card.
Buttons, Controls and Ports
Mini USB Port
Additional
Accessory
Ports
Key
SD Card
Slot
ON/OFF
Button
Figure 4 – Cable Connections
To Install Camera Accessories
The three included accessories, (mirror, hook
and magnet) (Figure 1) all attach to the imager
head the same way.
To connect, hold the imager head as shown in
Figure 5. Slip the semicircle end of the accessory over the flats of the imager head as
shown in Figure 5. Then rotate the accessory
a 1/4 turn so the long arm of the accessory is
extending out as shown (Figure 6).
Imaging Head
Port
Cover
Figure 7 – Port Cover
Accessory
Flats
Figure 5
6
Ridge Tool Company
Expansion
Bay Door
For Other
Accessories
(Sold Separately)
microEXPLORER™ Digital Inspection Camera
Port Cover
7. Check that the warning label is present,
firmly attached and readable. Do not operate the microExplorer Digital inspection camera without the warning label.
ON\OFF
Button
Figure 8 – ON/OFF Button
Figure 9 – Warning Label
Tool Inspection
8. Check to make sure the expansion bay
door is fully closed.
WARNING
9. With dry hands re-install the battery making sure to properly close the battery
door.
Daily before use, inspect your inspection camera and correct any problems
to reduce the risk of serious injury from
electric shock and other causes and
prevent tool damage.
1. Make sure the unit is OFF.
2. Remove the battery and inspect it for
signs of damage. Do not use the
microEXPLORER inspection camera if
the battery is damaged in any way.
10. Turn the power on (Figure 8) and make
sure the device cycles through the splash
screen and then displays the live screen.
Consult the troubleshooting section of
this manual if problems arise.
11. Turn camera OFF.
Tool and Work Area
Set-Up
WARNING
3. Clean any oil, grease or dirt from the
equipment, especially the handles and
controls. This helps prevent the tool from
slipping from your grip.
4. Inspect the camera head lens for condensation. To avoid damaging the unit, do not
use the camera if condensation forms
inside the lens. Let the water evaporate
before using again.
5. Inspect the full length of the cable for
cracks or damage. A damaged cable
could allow water to enter the unit and increase the risk of electrical shock.
Set up the microEXPLORER inspection
camera and work area according to
these procedures to reduce the risk of injury from electrical shock, entanglement,
and other causes and prevent tool and
system damage.
1. Check work area for:
6. Check to make sure the connections between the handheld unit and imager
cable are tight. All connections must be
properly assembled for the cable to be
water resistant. Confirm unit is properly
assembled.
Ridge Tool Company
• Adequate lighting.
• Flammable liquids, vapors or dust that
may ignite. If present, do not work in
area until sources have been identified
and corrected. The microEXPLORER
inspection camera is not explosion proof
and can cause sparks.
7
microEXPLORER™ Digital Inspection Camera
• Clear, level, stable, dry place for operator. Do not use the inspection camera
while standing in water.
2. Examine the area or space that you will
be inspecting and determine if the microEXPLORER inspection camera is the
correct piece of equipment for the job.
• Determine the access points to the
space. The minimum opening the camera head can fit through is approximately 3/4" in diameter.
• Determine if there are any obstacles
that would require very tight turns in
the cable. The inspection camera cable can go down to a 2" radius without
damage.
• Determine if there is any electrical
power supplied to the area to be inspected. If so, the power to the area
must be turned off to reduce the risk of
electric shock. Use appropriate lock
out procedures to prevent the power
from being turned back on during the inspection.
• Determine if the any liquids will be encountered during the inspection. The
cable and imager head are water resistant to a depth of 10'. Greater depths
may cause leakage into the cable and
imager and cause electric shock or
damage the equipment. The handheld
display unit is not water resistant and
should not be exposed to wet conditions.
Determine if any chemicals are present,
especially in the case of drains. It is
important to understand the specific
safety measures required to work around any chemicals present. Contact
the chemical manufacturer for required
information. Chemicals may damage
or degrade the inspection camera.
• Determine the temperature of the area
and items in the area. The working
temperature of the inspection camera is
between 32 and 113 degrees F. Use in
areas outside of this range or contact
with hotter or colder items could cause
camera damage.
• Determine if any moving parts are present in the area to be inspected. If so,
these parts must be deactivated to prevent movement during inspection to
reduce the risk of entanglement. Use
appropriate lock out procedures to pre8
vent the parts from moving during the
inspection.
If the microEXPLORER inspection camera
is not the correct piece of equipment for the
job, other inspection equipment is available
from Ridge Tool.
3. Make sure the inspection camera has
been properly inspected.
4. Install the correct accessories for use in
the appropriate application.
Operating Instructions
WARNING
Always wear eye protection to protect
your eyes against dirt and other foreign objects.
Follow operating instructions to reduce
the risk of injury from electrical shock,
entanglement and other causes.
1. Read the entire manual to become familiar with safety procedures, operating instructions and on screen navigation.
2. Charge battery by following instructions
found in the “Charging Procedure/Operating Instructions” section.
3. Install the battery by following the instructions found in the “To Remove or Install
the Battery Pack” section.
4. Remove the rubber cover and insert an
SD card (if needed) as seen in the “To
Install An SD Card” section.
5. Make sure that the inspection camera
and work area have been properly set up
and the work area is free of bystanders
and other distractions.
6. Turn the power on using the ON/OFF
button. There is no need to remove the
rubber cover when turning the power on
and off. Simply push the raised ON/OFF
button.
7. See sections on Controls, Icons and On
Screen Navigation.
Ridge Tool Company
microEXPLORER™ Digital Inspection Camera
8. Prepare the camera for inspection. The
camera cable may need to be pre-formed
or bent to properly inspect the area. Do
not try to form bends less than 2" radius.
This can damage cable. If inspecting a
dark space, turn the LEDs on before inserting the camera or cable.
Do not use excessive force to insert or
withdraw the cable. This may result in
damage to the electrical device or inspection area. Do not use the cable or
imager head to modify surroundings,
clear pathways or clogged areas, or as
anything other than an inspection device. This may result in damage to the
electrical device or inspection area. Do
not insert the camera or cable into any
space that will require less than a 2"
bend radius. Tight bends could damage
the cable.
10. Remove the batteries and refer servicing
to qualified service personnel under any
of the following conditions.
• If liquid has been spilled or objects have
fallen into product.
• If product does not operate normally
by following the operating instructions.
• If the product has been dropped or damaged in any way.
• When the product exhibits a distinct
change in performance.
9. When the inspection is complete, carefully withdraw the camera and cable from
the inspection area.
Controls
Trash – Pressing the trash
button while in the playback
screen will delete an image
or video.
Back – Pressing the
back button at any time
will take you to the last
viewed screen.
Shutter – Pressing shutter button will take a still
image or start and stop
the video recorder.
Select – Pressing select
while in live screen will
take you to the primary
settings screen.
Figure 10 – Controls
Arrows – Use the arrow
buttons to navigate
through menus, operate
LEDs, zoom and pan.
Test Equipment Depot - 800.517.8431 - 99 Washington Street Melrose, MA 02176
TestEquipmentDepot.com
9
microEXPLORER™ Digital Inspection Camera
Icons
Battery Life Indicator – Fully charged battery.
Battery Life Indicator – Less than 25% of battery charge remains.
SD
SD Card – Indicates an SD card has been inserted into the device.
Still Camera – Indicates device is operating in still camera mode.
Video Camera – Indicates device is operating in video camera mode.
Playback Mode – Pressing select on this icon allows you to view and
delete previously saved images and video.
Mode – Pausing on this icon allows you to switch between still camera
and video camera mode.
Menu – Push select on this icon to be taken to the secondary settings
screen.
Up-is-Up – Pausing on this icon allows you to turn self leveling on and off.
Self leveling ensures image is consistently upright. A red icon indicates
Up-is-Up is OFF and a green icon means it is ON.
Pan – Indicates the right, left, up and down arrows are controlling the pan
function. Use arrow controls to shift image up, down, left and right.
Zoom and LED Brightness – Indicates the right and left arrows are
controlling LED brightness and the up and down arrows are controlling
zoom in and out.
Arrow Control – The up, down, left and right arrows either control the
zoom and LED function or the Pan function while in the live screen.
Select – Pressing select from the live screen will take you to the primary
settings screen.
Thumbnails View – Select the thumbnails view while in playback mode
to view 9 images at a time.
B
W
Black and White – Pausing on this icon will allow you to turn black and
white on and off.
Image Quality – Pausing on this icon will allow you to choose between
Good and Best image quality. Choosing best image quality will increase
file size and reduce the number of images that can be stored in memory.
Choosing best will also slow down the frame refresh rate resulting in a
delay on the screen.
Low Light Vision – Turn this feature on to improve light contrast in dark
spaces.
Automatic Shut Down – Device will automatically shut down after 5, 10
or 20 minutes of inactivity.
About – Displays software version.
Time and Date – Enter this screen to set time and date.
Reset – Restore factory defaults.
Picture Information – Display image or video name, size and length on
the screen.
10
Ridge Tool Company
microEXPLORER™ Digital Inspection Camera
Icons (continued)
Language – Choose between, English, French, Spanish, German,
Dutch, Italian, etc.
Save – Indicates image or video has been saved to memory.
On Screen Navigation
Splash Screen
When the microEXPLORER inspection camera is powered on, the first screen displayed is
referred to as the splash screen. This screen
tells you the device is booting up. Once the
product is fully powered up, the screen will automatically switch to the live screen.
indicator bar will be displayed on the screen
as you adjust brightness.
Figure 13 – Adjusting LED
Zoom
The microExplorer inspection camera has a
3X digital zoom. Simply press the up and
down arrows while in the live screen to zoom
in or out. A zoom indicator bar will be displayed on the screen as you adjust your
zoom.
Figure 11 – Splash Screen
Live Screen
The live screen is where you will do most of
your work. A live image of what the camera
sees is displayed on the screen. You can
pan, zoom, adjust LED brightness and take
images and video from this screen.
Figure 14 – Adjusting Zoom
Entering the Primary Settings Screen
Pressing the select button
while in the live
screen will take you to the primary settings
screen.
Figure 12 – Live Screen
Adjust LED brightness
Pressing the right and left arrow button on
the key pad (In live screen) will increase or
decrease the LED brightness. A brightness
Press the back button
at any point to take
you back to the live screen.
Primary Settings Screen
The icons in the dashed box can be controlled from the Primary Settings Screen
(Figure 15).
Ridge Tool Company
11
microEXPLORER™ Digital Inspection Camera
Change From Still Image Capture
to Video
The microEXPLORER inspection camera defaults to still image capture when powered
ON. To switch to video mode, enter the primary settings screen, use the down arrow to
select the mode icon
and use the right
and left arrow buttons to switch between still
image capture
and video capture
.
Turn Up-Is-Up Self Leveling On or Off
The microEXPLORER inspection camera features Up-is-Up self leveling, which always
ensures the picture on the screen is right side
up. To turn this feature ON and OFF, enter the
primary settings screen, use the down arrow
to select the Up-is-Up icon
and use the
right and left arrows to toggle between ON
and OFF.
Pan
The microEXPLORER inspection camera
has the ability to shift the image up, down,
left and right. This allows you to get better
views of objects that may be just off the
screen in its original setting. The pan function
works best when operating at maximum
zoom. To switch from zoom and LED control
to pan, enter the primary settings screen,
use the down arrows to select the arrow
control icon
and use the right and left
arrow on the microEXPLORER inspection
camera to toggle between zoom/LED
and
pan
.
Capturing a still image
While in the live screen, make sure the still
camera icon is present at the top left portion
of the screen. Press the shutter button to
capture the image. The save icon
will
momentarily appear on the screen. This indicates the still image has been saved to the
internal memory or SD card. You will also notice that the number at the bottom of the
right hand portion of the screen has advanced to 1/25. This means you have one
image saved out of a total capacity of 25.
The number to the right will increase or decrease as different capacity SD cards are
used or the image quality is adjusted.
Capturing a Video
While in the live screen, make sure the video
camera icon is present at the top left portion
of the screen. Press the shutter button to
start capturing video. The video camera icon
will start to blink. This indicates video is sav12
ing to the internal memory or SD card. The
time at the bottom right hand portion of the
screen will begin counting down. This indicates how much video you can collect on the
internal memory or SD card. Press the shutter button again to stop the video. It may
take several seconds to save the video if
saving to the internal memory.
Reviewing and Deleting Saved Images
Pressing select while on the playback icon
will take you to playback mode. The last
image or video that was captured will be
displayed on the screen. Use the right and
left arrow keys to move from image to image.
Figure 15 – Primary Settings Screen
While in the playback screen, the up and
down arrow can be used to zoom in and out
of images.
Pressing the trash can button
while on an
image will bring up a text box asking you if you
are sure you want to delete the image. If you
want to delete the image, highlight the check
mark
, and press select. If you do not want
to delete the image, highlight the
, and
press select.
Pressing the back button
will take you to
the primary settings screen. Pressing the
back button again will take you to the live
screen.
Reviewing and Deleting Images and
Video in Thumbnails View
While in playback mode, press select
. This
will bring up the icon for the thumbnails
(Figure 16). Pressing select while on the
thumbnails icon will take you to a thumbnails
view where multiple images can be reviewed
at one time (Figure 17).
Ridge Tool Company
microEXPLORER™ Digital Inspection Camera
category will be highlighted with a bright silver
background. Once the desired category is
reached, press select
.
You will notice the up and down arrows on the
screen switch from gray to red. The red arrows indicate you can now scroll through the
different settings. Use the up and down arrows
to switch between settings. Once on a setting,
use the right and left arrows to turn a setting
on or off or adjust to the required level. Pressing back
at any point will bring you back to
the primary settings screen and pressing it
again will return you to the live screen.
Figure 16 – Thumbnails Icon
Transferring Images To
A Computer
Figure 17 – Thumbnails View
Pressing the trash can button
while on an
image will bring up a text box asking you if
you are sure you want to delete the image. If
you want to delete the image, highlight the
check mark
, and press select. If you do
not want to delete the image, highlight the
, and press select.
Entering the Secondary Settings Screen
While in the Primary Settings Screen, use
the arrow keys to highlight the menu icon
and press select
.
Playback
Tools
Using the Camera and Scanner Wizard
to Transfer Images to a Computer
1. Use the USB cable to connect the
microEXPLORER inspection camera to
the computer as shown in Figure 19.
2. Place the small side of the USB cable
into the mini USB port in the microEXPLORER inspection camera (Figure
7), and the larger end into an open USB
port in your computer.
Setting
Categories
Camera
Figure 19 – Image Transfer
Setting
3. Turn the microEXPLORER inspection
camera’s power ON.
4. A splash screen saying “USB Connected”
will appear on the microEXPLORER inspection camera’s screen.
Figure 18 – Secondary Settings Screen
There are three setting categories to choose
from (Figure 18) while in the secondary settings screen; camera, playback and tools.
Use the right and left arrow keys to switch
from one category to the next. The selected
5. The following screen will be displayed
on your computer. Select “Copy pictures
to a folder on my computer” and click
OK.
Ridge Tool Company
13
microEXPLORER™ Digital Inspection Camera
8. Fill in the name for this group of pictures
and choose a location to save the files. To
select an alternate saving location, click
browse and select a drive and folder.
Press next.
Figure 20 – Copy Pictures Window
NOTE! This will only happen provided you
have pictures saved on the hand held.
Figure 23 - Save Location Window
6. The following screen will be displayed.
9. The pictures and the videos will save to
the chosen location.
10. Click next when the following screen is
displayed.
Figure 21 - Scanner and Camera Wizard
7. Click OK or “next”. The following screen
will be displayed.
Figure 24 – Other Option Window
11. Click finish on the following screen to finalize the saving process.
Figure 22 – Image Select Screen
Place a check mark in the box to the
upper right hand side of the image you
want to save and press next.
14
Figure 25 – Finished Window
Ridge Tool Company
microEXPLORER™ Digital Inspection Camera
Manually Saving Images to Your
Computer’s Hard Drive.
1. Use the USB cable to connect the
microEXPLORER inspection camera to
the computer as shown in Figure 19.
2. Place the small side of the USB cable
into the mini USB port in the microEXPLORER inspection camera (Figure
7), and the larger end into an open USB
port in your computer.
3. Turn the microEXPLORER inspection
camera’s power ON.
Figure 28 – DCIM Folder
8. Open the 100SNAKE folder.
4. A splash screen saying “USB Connected”
will appear on the microEXPLORER inspection camera’s screen.
5. Click on the “My Computer” icon on your
desktop.
Figure 29 100Snake Folder
9. Select the image you want by right clicking on it and selecting copy from the
drop-down menu.
Figure 26 – My Computer Icon
6. Click on the new “Removable Storage
Device”.
Figure 30 - Image Window
10. Open a folder where you would like to
save the image.
Figure 27 – Available Drive Window
NOTE! You may also delete content from the
microEXPLORER inspection Camera
from this screen. Use caution, as the
contents will be permanently removed.
The microEXPLORER inspection camera is equipped with internal storage
but can be expanded by inserting an
SD card. SD cards can be purchased
from your local electronics retailer.
When you insert an SD card, the device will automatically configure the
card and present an icon indicating
that the card has been recognized and
is ready for storage.
11. Right click in that folder and press paste.
Cleaning Instructions
WARNING
Remove batteries before cleaning.
• Always clean the imager head and cable
after use with mild soap or mild detergent.
• Gently clean the LCD with a clean dry
cloth. Avoid rubbing too hard on the LCD.
7. Open the DCIM folder.
Ridge Tool Company
15
microEXPLORER™ Digital Inspection Camera
• Use only alcohol swabs to clean the connections.
• Wipe the hand held display unit down with
a clean dry cloth.
Accessories
WARNING
Storage
WARNING The microEXPLORER inspection camera must be stored in a dry secure
area between -4 degrees F and 158 degrees
F. Store the tool, battery, battery charger and all
cables in its case in a locked area out of the
reach of children and people unfamiliar with visual inspection equipment.
Only the following tool accessories
have been designed to function with
the microEXPLORER inspection camera. Other accessories suitable for use
with other tools may become hazardous
when used with the microEXPLORER
inspection camera. To reduce the risk of
serious injury, use only the accessories
specifically designed and recommended
for use with the microEXPLORER inspection camera, such as those listed
below.
microEXPLORER Digital Inspection
Camera Accessories
Catalog
No.
30083
30203
30068
30198
30208
16
Description
Imager Head
Accessory Pack (Mirror, Hook
and Magnet)
9.5 mm Diameter Imager
Head
3.7V Lithium Ion Battery
DC Adapter
Ridge Tool Company
microEXPLORER™ Digital Inspection Camera
Troubleshooting
SYMPTOM
POSSIBLE REASON
SOLUTION
Loose cable connections.
Check cable connections, clean if required. Re-attach.
Imager head covered by debris.
Visually inspect imager head to make
certain it is not covered by debris.
LEDs on imager head
are dim at max brightness, display switches
between black and
white, color display
turns itself OFF after a
brief period.
Battery low on power.
Charge battery.
Unit will not turn ON.
Dead battery.
Charge battery.
Display turns ON, but
does not show image.
Battery and Charger
Battery Pack/Battery Charger
Safety
WARNING
To reduce the risk of serious injury, read
these precautions carefully before using
the battery charger or battery.
Battery Charge Safety
• Charge only the RIDGID rechargeable
battery listed in the Accessories Section with the RIDGID Battery Charger
(Catalog Number 30758). Other types of
batteries may burst causing personal injury
and property damage.
• Do not probe battery charger with conductive objects. Shorting of battery terminals may cause sparks, burns or electrical
shock.
• Do not insert battery into charger if
charger has been dropped or damaged
in any way. A damaged charger increases
the risk of electrical shock.
• Charge battery in temperatures above
41 degrees F ( 5 degrees C) and below
113 degrees F (45 degrees C). Store
charger and battery pack in temperatures
above -40°F (-40°C) and below 104°F
(40°C). Storage for a long time at temperatures above 104F can reduce the capacity of the battery. Proper care will prevent serous damage to the battery.
Improper care of the battery may result
battery leakage, electrical shock and burns
• Use an appropriate power source. Do
not attempts to use a step-up transformer
or an engine generator. Doing so may
cause damage to the charger resulting in
electrical shock, fire or burns.
• Do not allow anything to cover the
charger while in use. Proper ventilation is
required for correct operation of the charger. Allow a minimum of 4" (10 cm) of
clearance around the charger for proper
ventilation.
• Unplug the charger when not in use.
Reduces the risk of injury to children and
untrained persons.
• Unplug the charger from outlet before
attempting any maintenance or cleaning. Reduces the risk of electrical shock.
• Do not charge battery pack in damp,
wet or explosive environment. Do not
expose to rain, snow or dirt. Contaminants
and moisture increase the risk of electrical
shock.
• Do not open the charger housing. Have
repairs performed only at authorized locations.
• Do not carry charger by power cord.
Reduces the risk of electrical shock.
Battery Safety
• Properly dispose of the battery. Exposure to high temperatures can cause the
battery to explode, so do not dispose of in
a fire. Place tape over the terminals to
prevent direct contact with other objects.
Some countries have regulations concerning battery disposal. Please follow all applicable regulations.
Ridge Tool Company
17
microEXPLORER™ Digital Inspection Camera
• Do not insert the battery with cracked
case into charger. Damaged batteries
increase the risk of electrical shock.
• Never disassemble battery. There are
no user-serviceable parts inside the battery
pack. Disassembling batteries may cause
electrical shock or personal injury.
• Avoid contact with fluids oozing from
defective battery. Fluids may cause burns
or skin irritation. Thoroughly rinse with
water in case of accidental contact with
fluid. Consult doctor if fluid comes into
contact with eyes.
Cooling .......................Passive Convention
Cooling (No Fan)
NOTE! This charger and batteries are not compatible with any of RIDGID Li-Ion Batteries and chargers. See Accessories
section for batteries compatible with
this charger.
Charger Inspection and
Set-Up
WARNING
Description,
Specifications and
Standard Equipment
Description
The RIDGID Battery Charger (Catalog Number 30758), when used with appropriate battery packs (Catalog Number 30198) listed in
the Accessories section, is designed to charge
a 3.7V Lithium Ion RIDGID battery in approximately 4-5 hours. This charger requires no adjustments.
Daily, before use, inspect the charger
and batteries and correct any problems.
Set up charger according to these procedures to reduce the risk of injury from
electrical shock, fire, and other causes
and prevent tool and system damage.
1. Make sure the charger is unplugged.
Inspect the power cord, charger and battery for damage or modifications, or broken, worn, missing, misaligned or binding
parts. If any problems are found, do not
use charger until the parts have been
repaired or replaced.
2. Clean any oil, grease or dirt from the
equipment as described in the Maintenance section, especially handles and
controls. This helps prevent the equipment from slipping from your grip and
allows proper ventilation.
Figure 31 – Battery and Charger
Battery & Charger
Specifications
Input............................100-240 VAC/
12 VDC 50/60Hz
3. Check to see that all warning labels and
decals on the charger and battery are
intact and readable. The figures below
show the warning labels on the bottom of
the charger and the bottom of a battery.
Output.........................4.2V DC
Battery Type ...............3.7V Lithium Ion
Input Current.................0.3A/1A (DC)
Weight ........................0.4 lbs (0.02 kg)
Dimensions:
Length .......................4.1" (10.4 cm)
Width .........................3.3" (8.4 cm)
Height ........................1.8" (4.6 cm)
Charge Time ...............4-5 hours
18
Figure 32 – Label on Charger
Ridge Tool Company
microEXPLORER™ Digital Inspection Camera
Charging Procedure/
Operating Instructions
WARNING
Figure 33 – Label on Battery
4. Select the appropriate location for the
charger before use. Check work area
for:
• Adequate lighting.
• Flammable liquids, vapors or dust
that may ignite. If present, do not work
in area until sources have been identified and corrected. The charger is not
explosion proof and can cause sparks.
• Clear, level, stable, dry place for
charger. Do not use the device in wet
or damp areas.
• Proper operating temperature range.
The charger and battery must both be
between 41°F (5°C) and 113°F (45°C)
for charging to begin. If the temperature
of either is outside of this range at any
point during charging, the operation will
be suspended until brought back to the
correct temperature range.
• Appropriate power source. Check to
see that the plug fits correctly into the
desired outlet.
• Sufficient ventilation area. The charger needs a clearance of at least 4" (10
cm) on all sides to maintain a proper operating temperature.
5. Plug cord into charger.
6. With dry hands, plug charger into the appropriate power source.
Always wear eye protection to protect
your eyes against dirt and other foreign objects.
Follow operating instructions to reduce
the risk of injury from electrical shock.
NOTE! New batteries reach their full capacity
after approximately 5 charging and discharging cycles.
1. Set up charger according to the Charger
Inspection and Set Up section,
2. The charger conducts a 1-second life
test during which the LED blinks from
red to green. The charger then goes into
standby mode in which the LED is OFF.
3. With dry hands, insert the battery pack
onto the charger. The battery pack will
begin charging automatically. While the
battery is charging, the red LED will glow
solid.
4. When the battery is fully charged, the
green LED glows solid. The battery may
be removed and used.
• Once the battery is charged, it may remain on the charger until it is ready to
be used. There is no risk of over-charging the battery. When the battery has
been fully charged, the charger automatically switches to retention charging.
5. With dry hands, unplug charger from outlet once charging completes.
Cleaning Instructions
WARNING
Unplug charger before cleaning. Do not
use any water or chemicals to clean
charger or batteries to reduce the risk of
electrical shock.
1. If present, remove battery from charger.
2. Remove any dirt or grease from the exterior of the charger and battery pack with a
cloth or soft non metallic brush.
Ridge Tool Company
19
microEXPLORER™ Digital Inspection Camera
Accessories
Disposal
WARNING
Only the following accessories have
been designed to function with the
RIDGID Li-Ion Battery Charger (Catalog
Number 30758) To prevent serious injury, use only accessories specifically
designed and recommended for use with
the RIDGID Li-Ion Battery Charger, such
as those listed below. Included charger
and batteries are not compatible with
other models of batteries and chargers.
Li-Ion Battery Charger Accessories
Catalog
No.
Description
30208
Charger DC Adapter
30198
3.74V Li-Ion Battery Pack
Storage
The RBRC™ (Rechargeable
Battery Recycling Corporation)
Seal on the battery packs
means that RIDGID has already paid the cost of recycling the lithium-ion battery packs once they
have reached the end of their useful life.
RBRC™, RIDGID®, and other battery suppliers have developed programs in the USA
and Canada to collect and recycle rechargeable batteries. Normal and rechargeable batteries contain materials that should not be
directly disposed of in nature, and contain
valuable materials that can be recycled. Help
to protect the environment and conserve natural resources by returning your used batteries to your local retailer or an authorized
RIDGID service center for recycling. Your
local recycling center can also provide you
with additional drop-off locations.
WARNING Store the charger and the batteries in a dry, secured, locked area that is out
of reach of children and people not familiar
with proper charger operation.
The battery packs and charger should be
protected against hard impacts, moisture and
humidity, dust and dirt, extreme high and low
temperatures and chemical solutions and vapors.
NOTICE Long-term storage in temperatures
above 104°F (40°C) can permanently reduce
the capacity of the battery pack.
Service and Repair
WARNING
Improper service or repair can make
machine unsafe to operate
There are no user-serviceable parts for this
charger or battery packs. Do not attempt to
open charger or battery cases, charge individual battery cells or clean internal components.
20
Ridge Tool Company
Visit us at www.TestEquipmentDepot.com