1
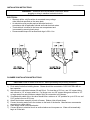
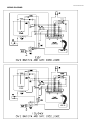
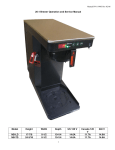
Man PN 151680 Iss 0503
Rev . 0903
CAFÉ 98 BARISTA SERIES – OPERATION MANUAL
Man PN 151680 Iss 0503
INSTALLATION INSTRUCTIONS
WARNING: - Read and follow all installation instructions before
plugging or wiring in machine to electrical circuit.
ELECTRICAL
• Warranty will be void if machine is connected to any voltage
other than that specified on the name plate.
• An electrician must provide required electrical service in
accordance with all applicable national and local electrical codes.
• Terminal block is located in the lower rear compartment and
is accessed by removing back panel.
• Recommended torque for terminal block lugs is 20 In. Lbs.
PLUMBER'S INSTALLATION INSTRUCTIONS
CAUTION: Power to brewer must be OFF before proceeding with plumbing installation.
1)
2)
3)
4)
5)
6)
7)
Flush water line before installing brewer. Brewer should be connected to COLD WATER LINE for
best operation.
Water pressure should be between 20 and 90 psi. For less than a 25 ft run, use 1/4" copper tubing
and connect to 1/2" or larger water line. For longer runs, use 3/8" copper tubing and connect to 1/2"
or larger water line and provide an adapter fitting for connection to the brewer.
If installed with saddle valve, the valve should have a minimum of 1/8" porthole for up to 25 ft run, and
5/16" porthole for over 25 ft runs.
Attach flow/strainer assembly to back of brewer. Strainer inlet will point down.
Connect incoming water line to the strainer on the back of the brewer. Manufacturer recommends
connecting to copper tubing.
Place empty server under brew basket.
Connect brewer to electrical circuit as outlined above and turn power on. Water will automatically
begin to fill the tank.
Man PN 151680 Iss 0503
BREWING INSTRUCTIONS
Café 98 Barista brewers may be preprogrammed at the factory for your particular brew parameters
including; brew volumes, brew time, water temperature, brewing modes (ie pre-infusion, pulse brew), etc.
If your brewer has been set up you are ready to begin brewing. If you would like to review or modify the
brewer parameters, skip ahead to the PROGRAMMING INSTRUCTIONS section.
1)
Ensure that brewer has been plumbed in and connected to proper voltage power supply as described
above. Tank should be up to preset temperature, indicated by ready light on some units, or autoarm
feature should be engaged to ensure optimum brewing temperature.
2)
Ensure that a decanter of suitable size for volume to be brewed is located below brew basket.
3)
Place a coffee filter into brew basket.
4)
Add the appropriate amount of ground coffee to the filter for the volume of coffee being brewed.
5)
Slide the brew basket into holder.
6)
Depress the brew switch that corresponds to the desired beverage volume. Depress and hold switch
to over ride the autoarm function. Brew cycle may be cancelled by depressing cancel button.
7)
Hot water will be delivered through the sprayhead. This distributes the hot water evenly over the
coffee bed within the brew basket. The coffee brew will drain from the brew basket into the decanter
below.
8)
If the audible alert feature is enabled the brewer will signal by emitting a beep at the completion of the
brew cycle.
9)
The resultant coffee should be crystal clear and have the desired properties attainable through
excellent extraction.
10) To clean basket, simply remove from brew rails and dump the filter into wastebasket. The brewing
process, as described above, can now be repeated.
CLEANING
1)
Place a fresh filter into brew basket and add appropriate amount of sanitizer.
2)
Place thermal server in place and initiate a brew cycle to fill dispenser.
3)
After cycle has finished, allow to sit for several minutes.
4)
Draw cups of cleaner through dispenser to ensure cleaner reaches all parts of dispenser.
5)
Rinse the brew basket and thermal server with fresh water, again drawing water through dispenser.
6)
Discard any remaining water and you are ready to brew.
Man PN 151680 Iss 0503
FEATURE DESCRIPTION
This section describes the various features of the Café 98 Barista series coffee brewers. If you are
already familiar with these features, and would like to begin programming the brewer, skip ahead to the
PROGRAMMING INSTRUCTIONS section.
The Barista series by Café 98 incorporates the latest features in brewer control technology along with the
proven brewing system you have come to rely on. Although providing for enhanced functionality brewer
controls remain intuitive and setup of key operating parameters couldn’t be easier. Multiple brew times,
visa-brew delay, tank temperature set point, brew mode, filter parameters and more are all set from the
front control panel using a digital display for precise control. The following pages will explain the control
features and then step through the process required to program your unit.
Brew Time – The Barista series has two independently programmable brew times denoted Brew 1 and
Brew 2. Either of these brew times may be turned off or set for any amount of time between 30 seconds
and 6 minutes for ultimate flexibility.
Visa-Brew Time – Provides for additional time to flash brewing light after the water delivery portion of brew
cycle to allow for the coffee to finish draining from the brew basket. The flashing indicator light, and the
delay in the audible coffee ready signal, aid in preventing premature removal of either the brew basket or
the dispenser.
Water Temperature Set Point – Allows for digitally setting the temperature of the water in the brewers tank
system to any value between 170 and 205 Deg F.
Auto Arm – When enabled this feature ensures that the brewer is up to temperature prior to brewing to
ensure proper extraction is obtained. If the water temperature in the tank is below the water temperature
set point when the brew cycle is initiated the water delivery portion of the brew cycle is delayed. The
heating light will begin to flash indicating that the unit is in the brew mode but is not up to temperature. At
the same time the tank heater will begin heating and when the tank reaches the preset temperature the
brew cycle will resume. Auto arm may be overridden by pressing and holding the appropriate brew button
for several seconds until the brew cycle starts.
Pre-infusion mode – This mode delivers a small amount of hot water over the coffee grounds and then
pauses to allow the gasses in the coffee to escape and to allow the grounds to absorb the water before
continuing. After this pause the brew cycle resumes normally. Pre-infusion can yield better extraction
rates than normal brewing modes. The pause time is added to the brew and visa brew time. The preinfusion times are preset at the factory. Pre-infusion for Brew 1 and 2 may be turned on and off
independently.
Pulse Brew Mode – This mode cycles the valve on and off during the brew cycle. This slows the entry of
cold water into the tank and minimizes the mixing action caused by introducing a large volume of cold
water into the tank at one time resulting in an increase in brew temperature. The additional turbulence
and mixing created along with the increased temperature can result in higher extraction rates for the
coffee. The time set for pulse brewing should exceed the time set for brew time. The time difference
between the pulse brew time and the brew time is the amount of time available as off time. The difference
is divided equally and distributed throughout the brew cycle to provide a pulse after every 20 seconds of
brewing. Pulse brew mode for Brew 1 and 2 may be turned on and off independently.
Audible Alert Mode – Provides an audible signal when coffee has finished brewing notifying everybody
that fresh coffee is available. May be turned on or off and set for 1-9 beeps.
Man PN 151680 Iss 0503
Coffee Freshness Monitor – Not available on all models. Monitors the elapsed time since the brew cycle
to assure the coffee is fresh. Freshness time may be set for 10 minutes to 2 hours. The last 10 minutes
of the freshness time are counted down on the display and when the preset time is reached a beep is
sounded and the coffee monitor light begins to flash. Some units will have a ready function rather than the
coffee monitor function.
Ready – Not available on all models. Monitors the tank temperature. The ready light will come on when
the tank temperature is within 3 degrees of set point, thereby allowing a brew cycle to begin. Some units
will have the coffee freshness monitor function rather than the ready function.
Heating Light – The heating LED burns steadily when the tank temperature is more than 3 degrees below
the set point. As the temperature in the tank closes on the set point, the LED will begin to pulse along with
the tank heater. This pulse heating allows the brewer to reach the set point without overshooting as would
occur in a normal heating system. It also allows the water in the tank to reach a more uniform
temperature. The pulses become shorter as the set point is approached. Once it has been reached the
pulses will be very short to maintain the temperature. If the set point is exceeded pulsing will stop
altogether.
Filtering Flow Rate – This is the flow rate of incoming water and is used to calculate the volume of water
that has been filtered. The flow rates may be turned off or set for .25, .50, .75 or 1.00 gallon per minute
flow rates.
Filter Capacity – The filtering capacity in gallons of the filter installed (optional) on the brewer may be
selected here. Capacity may be turned off or set for one of the following available values; 0, 500, 1500,
2000 or 2500 gallons.
Number of Brews – The number of brew cycles started may be tracked with this feature. The accumulated
number of cycles may be reset by using the brew buttons to display “Clr” when in the program mode and
then depressing cancel. A new brewer may have 1 or more cycles registered due to unit testing at the
factory.
Power Mode - allows you to automatically save energy when the brewer is not in use for a length of time
specified under power shutdown time. Available modes are normal, power save (standby) and power
down. The modes are described below.
•
•
•
Normal - In this mode the tank temperature will be maintained at the preset temperature at all
times.
Power Save (Standby) - In this mode the tank temperature will be maintained at approximately 170
degrees when the set time has been reached. Brew 1 light will flash about once every 10 seconds
to indicate unit is in power save mode.
Power Down - In this mode the tank heater element will be disabled when the set time has been
reached. Brew 2 light will flash about once every 10 seconds to indicate unit is in power down
mode.
By depressing the brew start switch or by turning the power back on with the "On/Off" switch the timer is
reinitialized and the set time frame starts over. In standby and power down modes the auto arm feature, if
enabled, will bring the tank up to the preset temperature before brewing when the brew switch is
depressed.
Power Shutdown Time – This feature is used to set a specified length of time ranging from 30 to 240
minutes before the standby or power down modes will take effect.
Man PN 151680 Iss 0503
PROGRAMING INSTRUCTIONS
•
•
Depress and hold Cancel button until display lights up (Approx. 10 seconds).
You are now in the Program Mode. Functions to be programmed appear in the order in which they are
shown in the following table.
Use the Cancel button to cycle through the functions to find the one you wish to change.
Use the BREW 1 button to lower the displayed value and the BREW 2 button to raise the value. Press
Cancel to store the changed value and advance to next function.
If the Brewer detects no activity for approx. 60 seconds it will exit the Program Mode, except as noted
below.
•
•
•
CODE
FUNCTION TO SET
SET VALUES AVAILABLE
LIGHTS ICON ADJACENT TO
1A
Brew 1 time
OFF, 30 seconds – 6 minutes
BREW 1
1b
2
3
4
5A
5b
6
6A
6b
Brew 2 time
Visa-brew time
Water Temperature 1
OFF, 30 seconds – 6 minutes
OFF, 30 seconds – 2 ½ minutes
170 °F – 205 °F
ON or OFF
ON or OFF
ON or OFF
ON or OFF
0 seconds – 60 seconds
0 seconds – 60 seconds
BREW 2
BREW 1 and BREW 2 (both flashing)
SERVICE
HEATING, (flashing)
BREW 1, (pulsing), COFFEE MONITOR
BREW 2, (pulsing), COFFEE MONITOR
BREW 1 and BREW 2 (pulsing)
BREW 1 (pulsing)
BREW 2 (pulsing)
ON or OFF
OFF, 1 - 9
None
None
10 minutes – 2 hours
COFFEE MONITOR
9A
9b
Audible alert mode
Audible alert no. of beeps
Coffee freshness monitor
(Not all models)
Filtering flow rate
Filter capacity 4
OFF, 0.25 – 1.00 gal. / min
OFF, 0.50 – 2.50 gal. X 100
WATER FILTERING
WATER FILTERING, (flashing)
10
12A
12b
End
Number of Brews
Power mode
Power shutdown time 5
None 6
ON or OFF, Clr
Normal, Power Save, Power Down
BREW 1 and BREW 2
None (Displayed P: n, P: s and P: d respectively)
None
“END”
Auto Arm
Pre-infusion 1 mode
Pre-infusion 2 mode
Pulse brew mode
Pulse brew 1 time 2
Pulse brew 2 time 3
7A
7b
8
1.
2.
3.
4.
5.
6.
30 minutes – 4 hours
N/A
Brewer will remain in this sequence indefinitely until CANCEL button is pressed. Heating icon will
track heater operation.
Hidden if pulse brew mode is OFF or brew 1 time is OFF.
Hidden if pulse brew mode is OFF or brew 2 time is OFF.
Hidden if filter flow rate is OFF.
Hidden when power save mode is normal.
Program mode will time out in 15 seconds at end of programming sequence.
ERROR MESSAGES
The following table explains the error messages which may be encountered on the brewer. The error
messages may be cleared by going into the program mode, using the brew buttons to display “Clr” and
then pressing the cancel button.
ERROR MESSAGE
DESCRIPTION
Er1
Fill run error
Er2
Er3
Er4
Ful
Heater run error
Shorted probe
Open probe
Filter limit reached
CAUSE
The fill solenoid has either run for more than six minutes on the initial
tank fill or 3 minutes in normal operation.
The tank heater has run for more than 30 consecutive minutes.
Short in the thermistor circuit.
Break in the thermistor circuit.
The selected filtering capacity of the filter has been reached
Man PN 151680 Iss 0503
REPLACEMENT PARTS
Electrical Components
151850 Café Excellence Control Board
151975 Barista, Newco, Control Board
105115 Transformer, 120 V Primary, 24 V ct,
40 VA Secondary
110367 Relay Kit, 50 Amp Solid State
111592 Limit Thermostat, Manual Reset
120142 Snubber (For Fill Valve)
110626 Switch, On/Off Rocker, DPST
Tank Assemblies and Parts
151771 Tank Assembly, 120 V 1475 W
151766 Tank Assembly, 120 V 1775 W
151772 Tank Assembly, 240 V 3500 W
151740 Tank Element, 120 V 1475 W
151745 Tank Element, 120 V 1775 W
151755 Tank Element, 240 V 3500 W
100642 Tank Warmer Element, 220 V 100 W
151800 Thermistor Probe Assembly
152207 Silicone Plug, Tank Lid
Plumbing Components
102770 Hot Water Faucet
102675 Seat Cup, Faucet
151770 Fill Valve Assembly
102383 Fill Valve Only
151970 Dump Valve Assembly
152114 Dump Valve Only
110305 PDS Valve Assembly, Low Flow
151955 Sprayhead Tube Assembly
152213 Silicone Tubing, 3/8 ID x 5/8 OD
152218 Silicone Tubing, 1/4 ID x 5/8 OD
100445 Teflon Tubing, 3/16 ID x 1/4 OD
Miscellaneous Parts
151940 Café Excellence Face Plate Label
151502 Barista Face Plate Label
111225 Sprayhead, RD Dump
151736 Brew Rail, LH
151737 Brew Rail, RH
151185 Brew basket, Plastic W/Clip
WARRANTY
Newco coffee brewers are warranted against defects in workmanship or materials, under normal use, for 90
days from the date of purchase. Brewer parts are warranted against defect for 12 months from date of purchase.
Liability in all events is limited to the purchase price paid and liability under the aforesaid warranty is limited
to replacing or repairing any part or parts which are defective in material or workmanship, and returned to our factory,
shipping cost prepaid. No warranty expressed or implied, other than the aforesaid is made or authorized by Newco
Enterprises, Inc.
Prompt disposition will be made if item proves to be defective, within warranty. Before returning any item,
write or call Newco, or the dealer from whom the product was purchased, giving model number, serial number, and
date of purchase, and describe nature of the defect. If damage was incurred during transit to you, file claim with the
carrier.
Man PN 151680 Iss 0503
WIRING DIAGRAMS