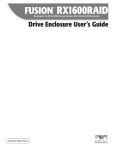
1
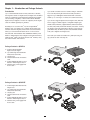
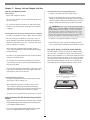
Windows
User’s
Guide
for Qio Professional Universal Media Reader & Writer
®
™
For
Windows
Contents
1 Introduction and Package Contents...........................................................................................1
Introduction
Package Contents—QIO-E34
Package Contents—QIO-PCIE
2 Qio Enclosure Description..........................................................................................................2
3 Hardware Installation and Connection Steps..............................................................................3
A – Express Bus Extender PCIe Installation Steps
B – Connect Qio to a Desktop Computer
B – Connect Qio to a Laptop Computer
4 BIOS Setup and Software Installation Steps...............................................................................5
A – BIOS Settings Change for Desktop Users
A – BIOS Settings Change for Laptop Users
B – Software Download
C – SxS Drivers Installation
D – P2 Drivers Installation
E – SATA Drivers Installation
5 Memory Card and Adapter Card Use...........................................................................................8
Inserting and Removing Cards
All Card Types
Inserting/Removing SxS Media and ExpressCard/34 Adapters
Inserting/Removing P2 Media
Inserting/Removing CF (CompactFlash) Cards
Using the Sonnet PCIe Bus Extender ExpressCard/34 Adapter
SxS and P2 Memory Card Write Protect Switches
6 Formatting Drives Connected to the Qio....................................................................................9
Drive Formatting Overview
7 Tips and Known Issues............................................................................................................10
Tips
Known Issues
8 Specifications, Precautions, FCC Compliance, and Support Information......................................11
Specifications
Safety Precautions
FCC Compliance
Contacting Customer Service
Chapter 1 – Introduction and Package Contents
Introduction
Qio’s eSATA controller is based on Sonnet’s Tempo™ SATA E4P
host controller, sharing the same functionality and drivers.
Support for port multipliers and hardware RAID controllers
enable Qio to control up to 16 drives (in four drive enclosures).
Qio is a universal media reader & writer, eSATA host controller,
and expansion chassis for ExpressCard/34 adapter cards. Included
with Qio is either the Sonnet Express Bus Extender PCIe adapter
card (for desktop computers) or the Sonnet PCIe Bus Extender
ExpressCard®/34 adapter (for notebook computers). Both adapter
cards are available separately for purchase.
Qio’s SxS slots support ExpressCard/34 adapter cards, while the
P2 slots support CardBus adapters. Compatible adapter types
include eSATA, FireWire®, Gigabit Ethernet, SmartCard reader,
TV tuner, USB, WiFi, and WWAN modem, and others. You may
use adapter cards at the same time as memory cards, however,
performance may be limited by the total bandwidth available
from your computer’s PCI Express® bus.
Featuring two slots each for SxS™, P2, and CompactFlash®
memory cards, Qio enables you to transfer data between cards,
between cards and computer, and between cards and attached
drives; you can even transfer data from two or more cards at
the same time. The included Sonnet Multimedia Memory Card
Reader & Writer ExpressCard/34 adapter reads from and writes to
Memory Stick™, MMC, SD and xD-Picture Card™ memory cards,
and works in either of the SxS slots.
Please take a few minutes to read this user’s guide before using your
Qio; you will save time in the long run.
Package Contents—QIO-E34
1 – Sonnet PCIe Bus Extender
ExpressCard/34 adapter
2 – Qio universal professional media
reader/writer (enclosure)
3 – Carrying case
4 – 1-meter external PCIe x1 interface
cable
5 – Sonnet Multimedia Memory Card
Reader & Writer ExpressCard/34
6 – Universal 12V power supply with
10-foot cable
Package Contents—QIO-PCIE
1 – Sonnet Express Bus Extender PCIe
adapter card
2 – Qio universal professional media
reader/writer (enclosure)
3 – Carrying case
4 – 1-meter external PCIe x1 interface
cable
5 – Sonnet Multimedia Memory Card
Reader & Writer ExpressCard/34
6 – Universal 12V power supply with
10-foot cable
1
Chapter 2 – Qio Enclosure Description
3 – P2 Media Slots
These slots accept P2 memory cards
1 – Power Indicator LED
This indicator lights when Qio is powered, the Sonnet adapter
card is installed properly in its slot, the PCIe cable between
the two is plugged in properly, and the computer powered on
4 – Eject Buttons for P2 Media Slots
Press these buttons to eject cards from the P2 slots
2 – SxS Media Slots
These slots accept both SxS memory cards and ExpressCard/34
adapter cards. Use the included Sonnet multimedia memory
card adapter in these slots to work with Memory Stick, SDXC,
SDHC, SD, MMC, and xD-Picture memory cards
5 – CF (CompactFlash) Card Slots
These slots accept Type I CF memory cards. Qio is not
compatible with Type II (Microdrive, etc.; 5mm thick) CF cards
6 – Security Slot
This slot works with Kensington® brand and similar security
locks to secure the Qio enclosure and deter theft
9 – 12VDC Input Socket
Connect either the included AC power adapter cable, or the
optional XLR power adapter cable (connected to an external
battery or other power source) to power the Qio enclosure
7 – eSATA Ports
These connect eSATA data cables. Each port supports
individual drives, or up to four SATA hard disk drives (or
SSDs) in enclosures with an eSATA interface, and a built-in
hardware RAID controller or port multiplier
10 – 12VDC Output Sockets
Use these sockets to power connected Sonnet Fusion™ F2
2-drive RAID SATA storage systems. DO NOT CONNECT
POWER INPUT CABLES HERE
8 – PCIe x1 Connector
This connects the included interface cable between the Qio
enclosure and the PCIe bus extender card in your computer
2
Chapter 3 – Hardware Installation and Connection Steps
3.Open the computer to access the expansion card area (PCI
Express slots); refer to your computer’s user manual for specific
information.
WARNING: When handling computer products, take care
to prevent components from being damaged by static
electricity; avoid working in carpeted areas. Handle expansion
cards only by their edges and avoid touching connector traces
and component pins. Also, avoid touching the logic board and
any of its components.
4.Locate an available PCI Express slot and remove its access
cover.
A – Express Bus Extender PCIe Installation Steps
Support Note: To avoid generating a static charge in
your body, do not walk around the room until after you
finish installing the Qio and close the computer.
If you purchased the QIO-PCIE, install the PCIe adapter card into
your computer first. Otherwise, skip to the next page.
5. Remove the Sonnet card from its packaging, and then install
it into the slot; make sure the card is firmly seated and
secured.
1.Shut down your computer, and then touch an expansion
card access cover on the back of the computer to discharge
any potentially damaging static electricity.
6. Close your computer; do not reconnect any power cables yet.
2. Disconnect the power cord and any remaining cables for
powered devices (monitor, printer, etc.) from the computer.
B – Connect Qio to a Desktop Computer
1.Install the Bus Extender PCIe adapter card into your
computer as described above.
2.Connect the external PCIe x1 interface cable to the Bus
Extender PCIe adapter card in your computer.
3.Connect the other end of the interface cable to the Qio
enclosure.
4.Connect either the AC adapter or the optional XLR
power cable (connected to a battery or other power source).
5. Reconnect the power cord and peripheral cables to the
computer, and then skip to Chapter 4 – BIOS Setup and
Software Installation Steps.
3
Chapter 3 – Hardware Installation and Connection Steps
B – Connect Qio to a Laptop Computer
Connect the PCIe Bus Extender ExpressCard/34 adapter and the
Qio enclosure in the proper order, before you turn on your computer:
1.Connect the external PCIe x1 interface cable to the PCIe Bus
Extender ExpressCard/34 adapter.
2.Insert the PCIe Bus Extender ExpressCard/34 adapter into
your computer’s ExpressCard slot.
3.Connect the other end of the interface cable to the Qio
enclosure.
4.Connect either the AC adapter or the optional XLR power
cable (connected to a battery or other power source).
4
Chapter 4 – BIOS Setup and Software Installation Steps
A – BIOS Settings Change for Desktop Users
A – BIOS Settings Change for Laptop Users
Support Note: Due to limited PCI I/O space, you will be
instructed in the section below to disable at least one option
ROM in the computer’s BIOS. It may be necessary to disable at least
one additional option ROM to support all of the Qio’s features. If
necessary, you can re-enable option ROMs in the BIOS.
Support Note: Due to limited PCI I/O space, you will be
instructed in the section below to disable at least one option
ROM in the computer’s BIOS, and possibly move the Sonnet card to
a different slot. It may be necessary to disable at least one additional
option ROM to support all of the Qio’s features. If necessary, you can
re-enable option ROMs in the BIOS.
1.Turn on your computer and boot immediately into the
computer’s BIOS (or setup) menu. Please refer to the
computer’s user’s guide for specific instructions on how to
perform the step.
1.Turn on your computer and boot immediately into the
computer’s BIOS (or setup) menu. Please refer to the
computer’s user’s guide for specific instructions on how to
perform the step.
2.Locate and disable the S errors (SERR#) option, if available.
2.Locate and disable the S errors (SERR#) option, if available.
3.Save the changes and exit; the computer will restart. If
the computer boots normally, proceed to C – Software
Download. Otherwise, go to the next step. Please note that
Windows will take longer than usual to run normally the first
time after you install the Qio and its adapter card; the Device
Manager takes extra time to discover all the Qio devices and
installs device drivers. Subsequent operation should be normal.
3.Save the changes and exit; the computer will restart. If
the computer boots normally, proceed to C – Software
Download. Otherwise, go to the next step. Please note that
Windows will take longer than usual to run normally the first
time after you install the Qio and its PCIe card; the Device
Manager takes extra time to discover all the Qio devices and
installs device drivers. Subsequent operation should be normal.
4.Turn on your computer and boot immediately into the
computer’s BIOS (or setup) menu.
4.Shut down the computer, disconnect the power cord and
any remaining cables for powered devices (monitor, printer,
etc.), and then open it to access the expansion card area.
5.Locate and disable an available, unused option ROM; the
logic board’s LSI RAID controller may be good option.
5.Remove the Sonnet card from its current slot and move it
into another PCIe slot; if necessary, swap positions between
the Sonnet card and another (except the graphics card).
Make sure the card is firmly seated and secured.
6.Save the changes and exit; the computer will restart. If the
computer boots normally, proceed to B – Software Download.
Otherwise, shut down the computer and repeat steps 4 and 5,
disabling another available, unused option ROM.
6. Close your computer and reconnect the power cord and
peripheral cables.
Support Note: If your computer fails to operate with
the Qio attached, remove the Sonnet card and contact
Sonnet support; refer to Contacting Sonnet Customer Support
at the end of this manual. For further info, check the Qio for
Windows FAQs at www.sonnettech.com/support/kb/kb.php
7.Turn on your computer. If it boots normally, proceed to
C – Software Download. Otherwise, repeat steps 4–6 using
any remaining available slots. After trying all the available
slots, if your computer still freezes with the Sonnet card
installed, move the card back to a slot you tried previously.
B – Software Download
1. Log onto the Internet.
8.Turn on your computer and boot immediately into the
computer’s BIOS (or setup) menu.
2.Go to http://www.sonnettech.com/support/kb/kb.php, click
on the Pro Media Readers link, and then click on the Qio for
Windows link.
9.Locate and disable an available, unused option ROM; the
logic board’s LSI RAID controller may be good option.
3.Locate and click the Driver link, then click the Qio System
Installer (Windows) link, and then click the Download Now
button; depending on how your computer is configured,
a new window may appear asking you what to do with
the file; click Open. If another window appears asking for
permission to open the file, click Allow.
10.Save the changes and exit; the computer will restart. If the
computer boots normally, proceed to B – Software Download.
Otherwise, shut down the computer and repeat steps 8 and 9,
disabling another available, unused option ROM.
Support Note: If your computer fails to operate with
the Qio attached, remove the Sonnet card and contact
Sonnet support; refer to Contacting Sonnet Customer Support
at the end of this manual. For further info, check the Qio for
Windows FAQs at www.sonnettech.com/support/kb/kb.php
5
Chapter 4 – BIOS Setup and Software Installation Steps
B – Software Download (continued)
9.When a prompt appears instructing you to insert P2 cards,
insert a P2 card into either of the Qio’s P2 slots, and then
click Install (if Windows Security windows appear, click
Install); the drivers are installed.
4.When the window showing the contents of the .zip file
appears, locate and click the Extract Files button.
5.When the Extract Compressed (Zipped) Folders window
appears, click Browse.
10.When the Install Wizard Completed window appears, click
Finish.
6.When Select a destination window appears, click to choose
a destination, and then click Make New Folder. Name the
folder Qio Installers, and then click Extract.
11.When the Panasonic P2 Drivers Installer Information window
appears, click Yes to restart your computer.
C – SxS Drivers Installation
E – SATA Drivers Installation
1.Open the Qio Installers folder, and then double-click the
SxS_Driver_Installer_xxx file; when the Open File – Security
Warning window appears, click Run.
1.Open the Qio Installers folder, and then open the Tempo
SATA Installer folder.
2.When the SxS device driver InstallShield Wizard window
appears, click Next.
2.If you are using a 64-bit version of Windows, double-click
Tempo SATA Installer 64; otherwise, double-click Tempo
SATA Installer.
3.When the next window appears, click Install; the drivers are
installed.
3.When the Open File – Security Warning window appears, click
Run.
4.When the Install Wizard Complete window appears, click
Finish.
4.When the Tempo SATA Installer window appears, click Next.
5.When the End User License Agreement window appears, read
the agreement, select “I accept this EULA”, and then click
Next.
D – P2 Drivers Installation
Support Note: Installation of the drivers to support
Panasonic P2 media requires that a P2 memory card be
inserted into one of the Qio’s P2 slots at the time the installer is
run. Otherwise, the installer will not work. If you don’t have a P2
card, you may run this installer at a later time.
6.When the next window appears click Finish. If a window
appears stating the driver installation failed, click OK; please
note this is normal and will be “fixed” in the following steps.
7.Restart the computer.
1.Open the Qio Installers folder, and then open the P2Winx64
folder if you are using a 64-bit version of Windows;
otherwise, open the P2Winx32 folder.
8.Click Start > Control Panel. In the Control Panel window,
click Device Manager. If you haven’t disabled User Account
Control (UAC), a UAC window will appear; click Continue.
2.Double-click Setup.exe to launch the installer.
9.When the Device Manager window appears, click the arrow
next to Storage Controllers to expand the list. If “Sonnet
Tempo SATA QIO PCI Express Adapter” appears in the list,
your installation is complete and the Qio is ready to use.
Otherwise, go to the next step.
3.When the Open File – Security Warning window appears, click
Run.
4.When the Panasonic P2 Drivers InstallShield Wizard window
appears, click Next.
10.Click the arrow next to IDE ATA/ATAPI controllers to
expand the list. If there is only one “Standard Dual Channel
PCI IDE Controller” listed, double-click it and then skip to
step 14. Otherwise, go to the next step.
5.When the License Agreement window appears, read the
agreement, select “I accept the terms in the license
agreement”, and then click Next.
6.When the Destination Folder window appears, either accept the
default location or choose a new one, and then click Next.
11.Select the first “Standard Dual Channel PCI IDE Controller”
listed, right-click and then select Properties.
7.When the Ready to Install the Program window appears, click
Install.
12.When the Standard Dual Channel PCI IDE Controller Properties
window appears, select the Details tab, and then click on the
Property drop-down menu and select Hardware id.
8.When the Panasonic P2 Installation Window appears, select
the “P2 card CardBus driver (2 slot(s))” checkbox, and then
click OK.
6
Chapter 4 – BIOS Setup and Software Installation Steps
13.Verify the ID listed is PCI/Ven_11ab&Dev_7042… If the
ID matches, go to the next step; otherwise, repeat steps
11–13, substituting the next “Standard Dual Channel PCI
IDE Controller” in the list until you find the one with the
matching hardware ID.
14.Click the Driver tab and then select Update Driver.
15.When the Update Driver Software window appears, click
“Browse my computer for driver software”.
16.When the Browse your computer for driver software window
appears, click “Let me pick from a list of device drivers on
my computer”.
17.When the Select device driver you want to install for this
hardware window appears, select “Standard Dual Channel
PCI IDE Controller”, and then click Have Disk.
18.When the Install from Disk window appears, click Browse.
19.When the Locate File window appears, navigate to the Tempo
SATA Installer folder. If you are using a 64-bit version of
Windows, double-click the amd64 folder; otherwise, doubleclick the i386 folder. Select “mvsata”, and then click open.
20.Back in the Install from Disk window, click OK.
21.Back in the Select device driver you want to install for this
hardware window, the model will have changed to read
“Sonnet Tempo SATA QIO PCI Express Adapter”. Click Next;
a Windows Security window may appear. Click Install; the
drivers are installed.
22.When the Windows has successfully updated your driver
software window appears, click Close.
23.Restart the computer; the Qio is ready for use.
Support Note: After its drivers have been updated,
Device Manager identifies Qio’s SATA controller as a
Storage Controller.
7
Chapter 5 – Memory Card and Adapter Card Use
Inserting and Removing Cards
Inserting/Removing CF (CompactFlash) Cards
• To insert a card, push it into the slot until it stops
All Card Types
• Insert cards straight into the slots
• In order for your computer to recognize CF cards after insertion
into the Qio, you must open Device Manager (click Start, and then
right-click Computer > Manage. In the left-hand pane, click Device
Manager) and then from the menu select Action > Rescan Disks
• Do not force a card into a slot, as you may damage the card or
the slot connector
• Do not remove memory cards from Qio while data is being
written or read; otherwise data on the memory card may be
corrupted
WARNING: Do not “eject“ CF cards (selecting Safely
remove… from the taskbar); otherwise, the Qio may
become disabled. Some CF cards are seen as non-removable
disks. Ejecting these cards by this method will cause the entire
Qio (and any cards inserted or drives attached) to eject. If you
did eject a CF card by choosing Safely remove from the taskbar,
restart your computer to restore functionality to the Qio.
Inserting/Removing SxS Media and ExpressCard/34 Adapters
• To insert a card, push it into the slot until it “clicks” into place
• To remove a CF card, pull it straight out of the slot
• Before removing any SxS memory card, be sure to “eject” it
first by clicking it in the taskbar and selecting Safely Remove
Hardware > Safely remove Sony SxS…; otherwise, data on the
memory card may be corrupted
• After removing a CF card, open Device Manager and select
Action > Rescan Disks to refresh the system’s inventory of disks
• Before removing any ExpressCard/34 adapter, be sure to
“eject” it first by clicking it in the taskbar and selecting Safely
Remove Hardware
SxS and P2 Memory Card Write Protect Switches
SxS and P2 memory cards have write protect switches. When
set to the “WP” or “PROTECT” position, saving, editing and
deleting data are disabled. Do not change the switch positions on
SxS or P2 cards when they are in the Qio. If you need to change
the switch position, follow the instructions on card removal as
previously described, pull the card out of its slot, change the
card’s switch position, and then reinsert the card into its slot.
• To remove a card, push it further into the slot until it “clicks”
again; the card will be ejected
• Do not pull out a card without first pushing it in; the next
card you insert into the slot will be ejected immediately and
may cause a problem
• If you are using an ExpressCard adapter to which you connect
cables, always connect the cables to the adapter card before
inserting it into the Qio enclosure’s slot Only change the write protect switch
position when the card is not inserted
into the Qio
Inserting/Removing P2 Media
• To insert a card, push it into the slot until it stops; the eject
button next to the slot will pop out
• Before physically removing a P2 memory card, be sure to
“eject” it first by clicking it in the taskbar and selecting
Safely Remove Hardware > Safely remove Panasonic P2 Card;
otherwise, data on the memory card may be corrupted
• To remove a P2 card, push in the eject button next to the slot
Using the Sonnet PCIe Bus Extender ExpressCard/34
Adapter
• Always connect the external PCIe x1 interface cable to the PCIe
Bus Extender ExpressCard/34 adapter before inserting it into
your computer’s ExpressCard slot
• Do not eject the PCIe Bus Extender ExpressCard/34 adapter
from your computer unless the computer is shut off
8
Chapter 6 – Formatting Drives Connected to the Qio
Drive Formatting Overview
If you intend to format drives connected to the Qio using Windows
drive formatting tools, you may find much more information by using
“format volume” as the search item in Windows Help. The procedure
listed below describes the process of formatting and configuring drives
under Windows Vista; steps for formatting under Windows 7 are very
similar.
1.Turn on your storage system, start Windows, log in, and then click
Start > Control Panel.
2.In the Control Panel window, double-click Administrative Tools. If
you have not disabled User Account Control (UAC), a UAC window
will appear; click Continue.
3.In the Administrative Tools window, double-click Computer
Management.
Figure 1
4.In the Computer Management window, click Disk Management
under Storage to launch the Disk Management application.
5.If an Initialize Disk window appears or if disks are described as not
initialized, select a partition style for the attached drive(s), and then
click OK; the drive will be initialized (Figure 1). Repeat as necessary
with other drives attached to the Qio.
6.Right-click the field next to the name field of one of the attached
drives and select the formatting type you wish to use for it. Repeat as
necessary with other drives attached to the Qio (Figure 2).
7. Depending on the formatting type you chose, a New Partition
Wizard may appear; follow the onscreen instructions to complete
formatting of the drive(s). Once formatting is finished, the drives
are ready to use.
Figure 2
9
Chapter 7 – Tips and Known Issues
Tips
Known Issues
Hot-Plugging SxS, P2, and SD Cards
You may hot-plug and hot-swap SxS, P2, and SD memory cards
(by way of the included Sonnet Multimedia Memory Card
Reader & Writer ExpressCard/34) in and out of the Qio enclosure.
However, you must follow proper procedures for ejecting volumes
or else you may lose data on the card or cause your computer to
behave unexpectedly. Do not insert cards into the Qio enclosure
while your computer is sleeping.
Depending on Which Slot You Installed the Sonnet Internal
Express Bus Extender PCIe card, CompactFlash (CF) Cards
May Appear as Disabled
There is a very limited resource in PCI I/O space in PCs, and
depending on the slot you installed the card, there may not be
enough I/O space for the CF drivers to start. This can often be
fixed by moving the Internal Express Bus Extender PCIe card to a
different slot.
Hot-Plugging the Qio Enclosure
Hot-plugging the Qio enclosure is not supported. You must connect
the Qio to its adapter card (and plug in the adapter if you’re using
a notebook computer), connect power to the Qio enclosure,
and then power on the computer. Memory cards and adapter
cards may already be plugged into Qio when you turn on the
computer.
CF Cards Do Not Appear Automatically After Hot-Plugging
CF cards use an IDE hard disk driver that does not expect hotplugging. As a result, you must open Device Manager and select
Scan for New Devices after inserting or pulling a card. Sonnet is
developing an update that will allow CF cards to be hot-plugged.
Ethernet connections may not work after the Qio is installed
In some cases, Windows assigns new port numbers when the Qio
is installed, and as a result, any Ethernet-specific settings must be
reset in Adapter Settings. Sonnet is investigating this issue.
Memory Card Formatting
For best compatibility, format memory cards in the cameras in
which you use them. In some cases, a card formatted in Qio will
not be recognized and must be reformatted in the camera.
Device Drivers
When using adapter cards, some of them require additional drivers
and application software to operate or have full functionality.
Software should be included with the device, or available to
download from the manufacturer’s web site. Check the peripheral’s
user’s manual for information about necessary software.
Powering Devices Connected to Adapter Cards
Although many peripherals may draw power directly through
adapter cards plugged into the Qio enclosure, other devices may
draw more power than Qio can provide and require an external
power source. Remember to use external power supplies when
necessary.
10
Chapter 8 – Specifications, Precautions, FCC Compliance, and Support Information
Specifications
External Connectors
(Qio Enclosure)
Warnings (continued)
• Do not insert your fingers or foreign objects inside the enclosure.
Two CompactFlash
Two CardBus (P2)
Two ExpressCard/34 (SxS)
Two eSATA
External PCIe x1 - 18
Three power; one 12VDC @
3A (20VDC MAX., rev. d and
later) input, two x 12VDC @ .5A
output
• Do not expose the device to rain, use it near water or containers
that contain liquids which might spill into any openings, or in
damp or wet conditions.
• If unusual smells, sounds, or smoke come from the device, or if
liquids enter it, switch it off immediately and unplug it from the
electrical outlet.
External Connectors
(Adapter Card)
External PCIe x1 - 18
Data Transfer Speed
Up to 200 MB/s aggregate
• Follow the instructions in this manual carefully; contact your
reseller or local distributor for additional advice not covered in
this User’s Guide.
Bus Interface
PCI Express x1
Supported Media,
CompactFlash Slots
Type I CompactFlash
FCC Compliance
Supported Media, CardBus
Slots
P2, P2 E-series
Supported Media,
ExpressCard/34 Slots
SxS; SxS Pro; SD, SDHC, SDXC,
Memory Stick, MMC, and
xD-Picture Card using included
adapter
Drives Supported
Up to 16*
Drive Types Supported
Serial ATA I & II
Firmware
Flash-ROM upgradeable to latest
firmware version
Bootability
Not supported
Dimensions (Qio Enclosure)
WxDxH: 5.9 x 6.2 x 1.2 in. (14.9 x 15.7 x 3 cm)
Weight (Qio Enclosure)
1.1 lbs (0.5 kg)
RoHS Compliant
Yes
Express Bus Extender PCIe, PCIe Bus Extender ExpressCard/34,
and Qio comply with Part 15 of the FCC Rules. Operation is
subject to the following two conditions: This device may not
cause harmful interference, AND this device must accept any
interference received, including interference that may cause
undesired operation.
Contacting Sonnet Customer Service
USA Customers
The Sonnet Web site located at www.sonnettech.com has the
most current support information and technical updates. Before
you call Sonnet Customer Service, please check our Web site for
the latest updates and online support files, and check this User’s
Guide for helpful information. When you call Sonnet Customer
Service, have the following information available so our customer
service staff can better assist you:
• Product name
• Date and place of purchase
• Hard drive model(s)
• Computer model
• Operating system version
• Software/firmware versions
* Support for up to 16 drives requires the use of drive chassis
employing a hardware RAID controller (like Sonnet's Fusion
D400QR5 or R400QR5).
SAFETY PRECAUTIONS
If further assistance is needed, please contact Sonnet Customer
Service at:
Online Service Form: http://serviceform.sonnettech.com
Tel: 1-949-472-2772
(Monday–Friday, 7 a.m.–4 p.m. Pacific Time)
Fax: 1-949-457-6349
E-mail: [email protected]
Please read this section carefully before proceeding. These
precautions explain the correct and safe use of this device,
thereby helping to prevent injury to you or others, and also help
you to minimize the risk of damaging the device.
Warnings
Always follow the basic warnings listed here to avoid the risk of
serious injury or death from electrical shock, short-circuiting, fire,
and other hazards. These warnings include, but are not limited to:
For Customers Outside the USA
For support on this product, contact your reseller or local
distributor.
• With the exception of the user-swappable parts, do not attempt
to disassemble or modify the enclosure. If this device appears to
be malfunctioning, contact your reseller or local distributor.
Visit Our Web Site
For the most current product information and online support
files, visit the Sonnet Web site at www.sonnettech.com/support/.
Register your product online at http://registration.sonnettech.com
to be informed of future upgrades and product releases.
• Do not drop the enclosure or adapter card; dropping or
mishandling of the enclosure or adapter card may result in a
malfunction leaving the product inoperable.
11
©2011 Sonnet Technologies, Inc. All rights reserved. Sonnet, the Sonnet logotype, Creativity Stored Here, Simply Fast, the Simply Fast logotype, Fusion, Qio, and Tempo are trademarks
of Sonnet Technologies, Inc. FireWire, Mac, the Mac logo, Mac OS, and MacBook are trademarks of Apple Inc., registered in the United States and other countries. Memory Stick and
SxS are trademarks of Sony Corporation. Other product names are trademarks of their respective owners. Product specifications subject to change without notice. Printed in the USA.
UG-QIO-PC-E-A-111011