1
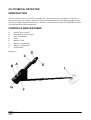
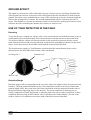
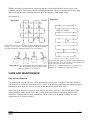
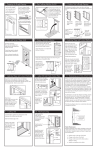
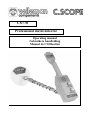
CS770
Professional metal detector
Operating manual
Gebruikers handleiding
Manuel de l’Utilisation
CS-770 METAL DETECTOR
INTRODUCTION
You are now the owner of a CS-770 metal detector. These detectors are recognised as one of the
finest metal detectors available. The are designed and manufactured to the highest standard to give
you the maximum enjoyment and success. In order to obtain the best results it is IMPORTANT that
you read and follow these instructions.
CONTROLS AND FEATURES
A
B
C
D
E
F
G
I
- On/Off Tune Control
- Discriminate Level Control
- Auto Tune Button
- Meter
- Battery Check
- Battery Compartment
- Battery Compartment
- Search Head
Diagram 1
CS-770
1
GB
ASSEMBLY AND BATTERIES
Your CS-770 comes to you broken down for packaging. To assemble, insert the thickest pipe with
drilled holes into control box underside and secure with the 2 bolts provided, slacken the knurled
locking collar on the top stem and insert the middle stem.
Insert the lower stem in the middle stem and tighten locking collar. Twist the head cable around the
stems until the slack is taken up, then connect the head to the lower stem using the bolt provided.
Height adjustment can be achieved by slackening off the knurled locking collars and extending or
shortening the whole assembly.
BATTERIES
Before you can operate your CS-770 you need to purchase 4 x PP3 batteries, preferably by a well
known manufacturer.
N.B. Over 80% of all faults occurring with metal detectors can be traced to poorly fitted or faulty
batteries - even new ones !
By removing battery covers (F and G) access is gained to the battery compartments. To remove
battery covers gently depress ribbed and slide forward. Connect batteries firmly onto battery clips
and replace battery covers.
Battery life will be longer if headphones are used.
Diagram 2
CS-770
2
GB
BATTERY CHECK
As a guide to battery condition a battery check is provided (E). To check batteries, simply depress
button (E) (N.B. machine must be switched on) and note the position of the meter needle, the further
the needle is to the right of the "Change Battery" mark the better the condition of the batteries.
TUNING YOUR DETECTOR
First switch on knob (A) and whilst depressing Auto Tune Button (C) turn clockwise until a faint
noise is heard (and the meter needle centres). Then release Auto Tune Button. The best optimum
tuning point is where the sound can just be heard if the machine is operated on a silent setting of
where the noise is too loud sensitivity will be lost.
N.B. Before tuning machine ensure no metal objects are in the vicinity.
RE-TUNING
Should the detector go out of tune for any reason, e.g., changes in temperature or ground conditions,
encounters with large metal objects or an alteration of the discriminate control, simply depress the
auto tune button and the detector will return to the pre-selected optimum tuning point.
DISCRIMINATION
The CS-770 has a variable discrimination control which allows the operator to choose from any
setting between all metal detection (Reject 0) to iron and silver paper rejection (Reject 10).
To adjust the Discriminate Level Control (B) depress the Auto Tune Button turn discriminate level
control to the desired level and release Auto Tune Button.
Discrimination of a target object is indicated by a reduction in signal strength and by the meter
moving to the left. For example, with the reject setting at 5 an iron nail will give a negative reaction
(reduction in sound, meter moves to the left) whereas on a coin there will be a positive reaction (an
increase in sound and a meter movement to the right).
All metal detector discriminations suffer from anomalies when objects are close to the search head.
This is indicated by receiving a positive and negative reaction from the same object. If this occurs
simply raise the detector about 3" re-tune and scan again.
CS-770
3
GB
GROUND EFFECT
The signal of your detector will be affected by the type of terrain you are searching. Normally this
effect produces an increase or decrease in the audio signal when the search head is raised from the
ground. This effect can be controlled in two ways. If the search head is kept at a constant height the
effect of the ground will be constant. The second method should only be used when the effect is
severe. This method is to de-tune the machine so that it is less sensitive to the ground. However this
will have the effect of making the machine less sensitive to coins as well.
USE OF YOUR DETECTOR IN THE FIELD
Detecting
To test for the type of signal you will get, take a coin or metal object and with the detector set up on
a table tuned as previously described, move the metal object towards and across the search head.
You will note that the volume will increase quickly as the metal object passes across the search
head, with the loudest sound occurring when the search head is immediately centred over the metal
object. As the object passes beyond the search head the sound will quickly fade.
The metal detectors employ a Total Response search head which means that the object can be
detected across the full width, back to front, of the search head.
See Diagram 3
Transmit Coil
Search area
Pick-up area
Receive coil
Detection Range
Detection ranges will vary depending on the size of the object, the length of time an object has been
buried in. The best ground conditions are dry well compacted soils then coins can be found at the
greatest depths if they have been buried for some time and the coin has interacted with the salts in
the ground, thereby appearing larger to the detector. The worst conditions for detecting are on
loosely compacted or freshly dug ground or when the object has only recently been buried. In these
conditions detection range will be reduced. 90% of all objects are found within 6" (20 cm) of the
surface. Adverse soil conditions can reduce depth of detection by more than half.
CS-770
4
GB
Determining the Target Size and Depth
An operator who is familiar with his instrument will be able to do an excellent job of determining
object size, shape and depth before he digs. The technique is learned from careful analysis of the
audio signals coming from the detector. Each time a signal is heard, listen for any peculiar
characteristics it may have ; determine over how large an area you get a detector signal ; and try to
"outline" the object before you dig. Listen for the sharpness or dullness of the signals and determine
the magnitude of strength of the signal. A coin will have a sharp signal, a nail a fuzzy signal.
RECOMMENDATIONS FOR USE
Treasure hunting can be a profitable and rewarding hobby, if approached in a patient and diligent
manner. Time spent researching to locate a worthwhile site for a search can be time wasted if your
search is hasty and erratic.
To achieve maximum results, it is important, then, to decide on your approach to each particular
site, in advance of the actual search.
Tactics will be decided by the type of site - it is more profitable to scan a small area thoroughly than
to conduct a haphazard search of the total site. However, when the site is too far away for you to
make several return visits, a plan should be adopted which gives maximum site coverage, at the
same time as indicating the most likely areas for detailed search.
One method is to divide the area into large squares of a ’criss-cross’ search pattern, starting along the
left hand perimeter, search in a straight line, marking the location of any finds with small sticks,
until you have covered the length of the site. Then, moving approximately ten feet (3m) to the right,
search in a straight line parallel to the first line of search. This pattern should be repeated until the
right hand perimeter is reached ; then follow a similar pattern ACROSS the tracks of the first lines
of search. (See diagram 4).
It quite often happens that where one find is made, other finds will be made in the immediate
vicinity. Accordingly, places having the highest density of markers, placed where finds were made,
represent the most likely spots for further finds.
The detailed search is made by marking out strips of a width determined by the sweep of the
detector, and moving forwards the approximate diameter of the search head after each sweep until
the ’strip’ has been completely covered. The adjacent strips are covered in a similar manner, until the
complete area has been thoroughly searched. (see diagram 5).
Wooden pegs and string are ideal for marking out areas, but very often natural land marks such as
trees, rocks and plants can, with practice, prove just as effective.
CS-770
5
GB
Whilst searching it is important to remember that the search head should be kept as close to the
ground as possible. This ensures maximum depth penetration. There is a maximum detection range
and a large gap between head and ground reduces the effective depth of the search.
See diagram 6.
Diagram 4
FINISH
Diagram 5
LINE OF SWEEP
START
On arrival at the site a criss-cross is made marking the positions
of finds : 1, 2, 3, 4 and 5. A detailed search of the area around
the finds is made on completion of the criss-cross search.
Diagram 6 It is essential that the search head is kept
close and parallel to the ground to avoid
missing finds as in A, C and D.
An area ten foot square is marked out around the find
located by criss-cross search. This is then divided into
strips which are carefully searched.
Distance A = width of the detector’s pick-up area
Distance B = length of a comfortable sweep
CARE AND MAINTENANCE
Care of Your Detector
The working life of your detector will be shortened by careless use or neglect of the unit. Think of
your detector as a scientific instrument NOT A TOY. Your detector is designed to withstand rugged
handling on any terrain, but mis-use or lack of due attention will tell in the end.
After using your detector in a hostile environment (salt water, sand, etc.), the exterior parts of the
casing should be flushed with fresh water, paying particular attention to the head, and carefully
wiped dry. Foreign particles in the control box can be removed by brushing carefully (or with
compressed air or vacuum cleaner).
CS-770
6
GB
Salt Damage
If you use your detector continually in a salty environment, particularly when the wind is blowing
off the sea, salty air can penetrate the control box.
Corrosion can occur in vital parts of the delicate electronic circuitry.
It is, therefor, recommended that precautions such as covering the control box with polythene be
taken to avoid damage.
The guarantee cannot cover such occurrences and any repairs needed because of salt water or spray
will be charged.
The Use of Solvents
It has been found that some types of solvent used for cleaning circuitry will in fact melt the plastic
covered components.
Clean the circuit board only with recognised circuit board cleaning agents.
The life of the controls may be extended by periodic (100 hours of use) application of small
quantities of light lubricant to the spindles, threads and knob grub screws (’3 in 1’ or similar
household oil is suitable).
This operation requires the knobs to be removed.
Light packing grease should be smeared on the threads of the locking collar, and at the same time,
the head fixing bolt. Do not store the detector in a damp place.
If the detector is to be stored, remove the batteries as the may leak and corrode the surrounding
electronics.
Detector Not Operating
(a)
(b)
Check the conditions of batteries.
Interchange batteries and ensure connections are correct and secure.
Battery life can vary tremendously between markers, therefore your ’new’ batteries may
already be insufficiently powerful to run your detector.
Oscillating Signal Accompanied by Slight Meter Fluctuation
(a)
Caused most often by outside equipment such as fluorescent lights, taxis, radios, power lines,
and other metal detectors working nearby. Little can be done to alleviate the problem except
to find a new site.
CS-770
7
GB
Intermittent Sound From Speaker
(a)
(b)
(c)
This could be due to poor battery connections. Ensure they are tight and the batteries are
securely clipped into place.
Radio transmission from passing taxi or vehicle using radio transmitter equipment.
Loose speaker, in which case the speaker needs fastening back into place.
The Detector Drifts Out of Tune
(a)
(b)
(c)
Temperature drift caused by the change in air temperature when a machine is moved from a
house or a car into the open.
The greater the change in temperature the more the drift, and up to 30 minutes may be needed
for the electronic circuitry to acclimatise itself.
Sometimes battery drain can cause drift of signal. Replace batteries and this should help to
maintain a stable signal.
CS-770
8
GB