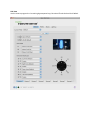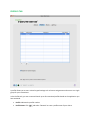
1
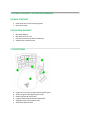
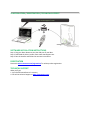
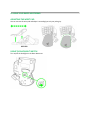
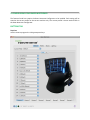
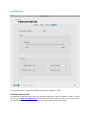
Whether your passion lies in FPS, MMORPG, or RTS games, the Razer Nostromo® gaming keypad is designed to give you the upper hand with cutting edge ergonomics designed for intuitive game control while you play in complete comfort. With an arsenal of tournament-grade controls including 16 fully programmable Hyperesponse™ keys, 8 keymaps that you can switch between on the fly, and an 8-way directional thumb pad all integrated into one dedicated gaming keypad, you’re prepared to take on all challengers. MASTER GUIDE CONTENTS 1. 2. 3. 4. 5. 6. 7. 8. Introduction Package Contents / System Requirements Key Features Installation / Registration / Technical Support Using Your Razer Nostromo Configuring Your Razer Nostromo Safety and Maintenance Important Product Information Guide 1. PACKAGE CONTENTS / SYSTEM REQUIREMENTS PACKAGE CONTENTS Razer Nostromo® Expert Gaming Keypad Quick Start Guide SYSTEM REQUIREMENTS Mac with USB port Mac OS X (v10.5 to 10.7) Internet connection (for driver installation) 35MB of free hard disk space 2. KEY FEATURES A. B. C. D. E. F. Ergonomic form factor and tournament-grade layout 16 fully programmable Hyperesponse keys Backlit keypad and scroll wheel Programmable 8-way directional thumb pad Adjustable Soft-Touch Handrest Pad 20 Different Game Profiles 3. INSTALLATION / REGISTRATION / TECHNICAL SUPPORT SOFTWARE INSTALLATION INSTRUCTIONS Step 1: Plug your Razer Nostromo into the USB port of your Mac. Step 2: Download the driver installer from www.razersupport.com. Step 3: Run the installer and follow the onscreen instructions. REGISTRATION Please visit www.razerzone.com/registration/ for online product registration. TECHNICAL SUPPORT What you’ll get: • 1 year limited manufacturer’s warranty • Free online technical support at www.razersupport.com. 4. USING YOUR RAZER NOSTROMO ADJUSTING THE WRIST PAD You can remove the wrist pad and adjust it accordingly to suit your palm grip. USING THE BACKLIGHT SWITCH Turn on/off the backlight on the Razer Nostromo 5. CONFIGURING YOUR RAZER NOSTROMO The features listed here require the Razer Nostromo Configurator to be installed. Each setting will be saved to the current profile on the current machine only. The current profile is shown under Profile in the Razer Nostromo Configurator. BUTTONS TAB Top View Use this view to program the 14 Hyperesponse keys. Side View Use this view to program the 2 remaining Hyperesponse keys, Directional Thumb Pad and Scroll Wheel. Each key can be programmed using the following functions: Single Key Macro Keymap Default Profile Launch program Disable Mouse Left Click Right Click Scroll Click Mouse Button 4 Mouse Button 5 Double-Click Scroll Up Scroll Down - Change the function of the key to another. - Assign a macro to the key. - Assign a keymap to the key to quickly change settings. - Revert to the default function of the key. - Assign a profile to the key for quick profile change. - Activate a program with a key. - Disable the functionality of the key. - Assign a mouse function to the key. *Make use of the Current Profile drop down menu to switch between different profiles during key assignment. KEYMAPS You can toggle between Keymaps within each Profile. The lighting on the 3 LEDs on the Razer Nostromo will instantly show you the exact Keymap you are using. PROFILES TAB A profile allows you to store various keypad settings such as button assignments and macros as a single group for your convenience. In the Profiles tab, you can create and launch up to 20 customized profiles based on the application you have activated. Profile: Indicates the profile number Profile Name: Click and select “Rename” to enter a profile name of your choice. Application: Click and select “Assign Application” to open up Finder. Select the application you want the profile to be linked to. Auto Switch: Check the box to enable automatic profile switching when the chosen application is launched. Enable On-Screen Display Tick the “Enable On-Screen Display” to show the profile name when you switch or activate a profile. MACROS TAB A macro is a sequence of keystrokes executed in a particular order and timing. Macros allow you to maximize your gameplay by executing a chain of commands with just a press of a button. In the Macros tab, you can record unlimited keystrokes (depending on your storage resources). These macros can be imported and exported onto a drive to backup or share with your friends. Right-clicking a macro allows you to quickly access a list of extra commands. Macro Entry: Enter your macro in the Macro Entry box. You can even choose to insert a delay time and/or a mouse-button press. Key Press: This shows which keys are pressed during macro recordings. After recording, you can edit the keys pressed by right-clicking on the specific entry. Changing which key is pressed will also change the Key Release entry. Seconds Delay: This shows the delay in-between key presses or release. After recording, you can edit the duration of the delay by right-clicking on the specific entry. Key Release: This shows which keys are released. After recording, you can edit the keys released by right-clicking on the specific entry. Changing which key is released will also change the Key Press entry. LIGHTING TAB You may adjust the intensity of the backlight by using the “Brightness” slider. SOFTWARE UPDATE & RESET To update the Razer Nostromo’s driver and firmware clicking the “Check for updates” button. This will connect you to www.razersupport.com for the latest driver and firmware versions. You can also restore your current profile to the default settings by clicking the “Reset active profile” button. PROGRAMMING MACRO KEYS You may record macros using the Razer Nostromo Configurator. For example to configure Key “03” to “Save As” in TextEdit, follow these steps: 1. Open up the Razer Nostromo Configurator. 2. Go to the Macros Tab. 3. Under the Macro Name box, click “+” to create a new macro. 4. Enter the name “Save”. 5. Under the Macro Entry box, click “Record”. 6. 7. 8. 9. 10. 11. Press “⌘” and “S” (this command is the “Save” function) to define the keystroke for the macro. Click “Stop” to end the recording. Go to the Keys tab. Click on “03” PopUp button in the Keys tab. Choose Macro from the list. Select the “Save” macro. SWITCHING PROFILES There are 4 ways you can switch between profiles: 1. By changing the Current Profile in the Razer Nostromo Configurator. Steps: a. Open up the Razer Nostromo Configurator. b. Click on the Buttons Tab. c. Choose the profile you would like to use from the Current Profile dropdown list. 2. By selecting the Profile in the Profiles tab. Steps: a. Open up the Razer Nostromo Configurator. b. Click on the Profiles tab. c. Click on the Profile you would like to activate. 3. By activating auto-switching profile in the Profiles Tab. Example: Selecting Profile 6 to be activated upon loading of Application A Steps: a. Open up the Razer Nostromo Configurator. b. Click on the Profiles tab and select Profile 6. c. Click , select “Rename” and enter a name for the profile. d. Click , select “Assign Application” to open the Finder and locate Application A. e. Tick the “Autoswitch” option for Profile 6 to activate auto-switching. 4. By programming a key in the Buttons Tab to activate a particular Profile. 7. SAFETY AND MAINTENANCE SAFETY GUIDELINES In order to achieve maximum safety while using your Razer Nostromo, we suggest that you adopt the following guidelines: 1. Should you have trouble operating the device properly and troubleshooting does not work, unplug the device and contact the Razer hotline or go to www.razersupport.com for support. Do not attempt to service or fix the device yourself at any time. 2. Do not take apart the device (doing so will void your warranty) and do not attempt to operate it under abnormal current loads. 3. Keep the device away from liquid, humidity or moisture. Operate the device only within the specific temperature range of 0°C (32°F) to 40°C (104°F). Should the temperature exceed this range, unplug and switch off the device in order to let the temperature stabilize within the optimal temperature range. COMFORT Research has shown that long periods of repetitive motion, improper positioning of your computer peripherals, incorrect body position, and poor habits may be associated with physical discomfort and injury to nerves, tendons, and muscles. Below are some guidelines to avoid injury and ensure optimum comfort while using the Razer Nostromo. 1. Position the Razer Nostromo and your mouse side-by-side in front of the monitor. Place your elbows next to your side, not too far away and with your peripherals within reach. 2. Adjust the height of your chair and table so that your keyboard and mouse are at or below elbow height. 3. Keep your feet well supported, posture straight and your shoulders relaxed. 4. During gameplay, relax your wrists and keep it straight. If you do the same tasks with your hands repeatedly, try not to bend, extend or twist your hands for long periods. MAINTENANCE AND USE The Razer Nostromo requires minimum maintenance to keep it in optimum condition. Once a month we recommend you unplug the device from the USB port and clean it using a soft cloth or cotton swab with a bit of warm water to prevent dirt buildup. Do not use soap or harsh cleaning agents.