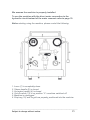
1
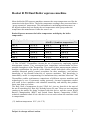
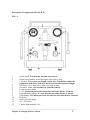
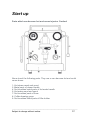
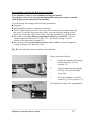
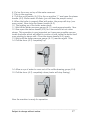
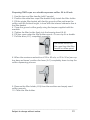
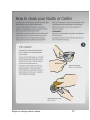
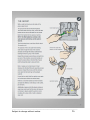
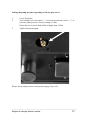
Rocket R 58 Dual Boiler Espresso Coffee Machine _____________________________________________________________________________________________ Subject to change without notice. 1 Contents Rocket RE 58 Dual Boiler espresso machine 3 Important safeguards 4 Introduction 5 Instruction for use 6 Installation 10 Technical data 11 Start up 12 Programming the machine 13 Preparing espresso 18 Dispensing steam 20 Dispensing hot water 21 How to make great espresso 22 How to texture milk 23 How to clean your Rocket R 58 25 How to disassemble/dismantle the machine 27 Routine Maintenance 28 Espresso glossary and recipes 29 Trouble shooting 30 Setting the pump pressure 32 Connection to water supply 33 Alarm messages 34 For European Community countries: declaration of CE conformity 35 _____________________________________________________________________________________________ Subject to change without notice. 2 Rocket R 58 Dual Boiler espresso machine Most dual boiler PID espresso machines measure the water temperature used for the extraction in the brew boiler. The boiler temperature reading is then converted into a “group extraction” temperature. This information is misleading and inaccurate, as the digital readout does not display the real temperature at the group rather the temperature the manufacturer wishes the user to see. Rocket Espresso measure the boiler temperature and display the boiler temperature. PID displayed boiler temperature 103 °C 104 °C 105 °C 106 °C 107 °C 108 °C 109 °C 217.4 °F 219.2 °F 221.0 °F 222.8 °F 224.6 °F 226.4 °F 228.2 °F Group temperature measured using SCASE (*) Ambient temperature (**) 90.8 °C 194.0 °F 91.7 °C 195.8 °F 92,0 °C 197.6 °F 93.5 °C 199.4 °F 94.6 °C 201.2 °F 95.3°C 203.0 °F 96.2 °C 204.8 °F (*) The “SCASE” Thermofilter elevates the art of espresso by employing applied measurement science. Very convenient brew temperature measurements are now possible through use of the Thermofilter. The results of these measurements enhance machine optimization for specific coffee blends, enable individual coffee shops to establish enhanced quality control procedures for their machinery, and increase knowledge of the thermal behaviour of espresso machines. This knowledge is immediately useful in compensating for intermittent duty machine behaviour. The Thermofilter enables performance comparisons of different espresso machines and technologies by use of systematic testing protocols. Accurate temperature studies will result in new machines with enhanced tuneability and stability that produce better taste than ever before. The Holy Grail of temperature devices? Well, let’s just say, that this is the state of the art of something big. How big? Nobody knows for sure. However new machines coming to the market are being evaluated with this device, and the current World Barista Championship (WBC) and United States Barista Competition (USBC) technical standards teams all use this device to test and evaluate the machines used in competitions. (**) Ambient temperature 19°C. (66.2 °F) _____________________________________________________________________________________________ Subject to change without notice. 3 Important Safeguards 1. Read all Instructions 2. Do not touch hot surfaces. Use handle or knobs. 3. To protect against electric shock do not immerse cord and plugs in water or other liquid. 4. This appliance is not intended for use by persons (including children) with reduced physical, sensory or mental capabilities or lack of experience and knowledge, unless they have been given supervision or instruction concerning use of the appliance by a person responsible for their safety. Children should be supervised to ensure that they do not play with the appliance. 5. Unplug from outlet when not in use and before cleaning. Allow to cool before putting on or taking off parts. 6. Do not operate any appliance with a damaged cord, plugs, or after the appliance malfunctions or has been damaged in any manner. Return appliance to the nearest authorized service facility for examination, repair, or adjustment. 7. The use of accessory attachments not recommended by the appliance manufacturer may cause injuries. 8. Do not use outdoors. 9. Do not let cord hang over edge of table or counter, or touch hot surfaces. 10. Do not place on or near a hot gas or electric burner or in a heated oven. 11. Extreme caution must be used when moving an appliance containing hot oil or other hot liquids. 12. Always attach plug to appliance first, then plug cord into wall outlet. To disconnect, turn any control to “off”, then remove plug from wall outlet. 13. Do not use appliance for other than intended use. 14. Save these instructions. _____________________________________________________________________________________________ Subject to change without notice. 4 Introduction Please read this technical handbook carefully since it provides important information on the correct installation, use and maintenance of your coffee machine. The information contained in this manual is necessary for the safe installation and operation of your coffee machine. It should be retained in a safe place for future reference. Copies are available from your local dealer. The information contained in this manual relating to installation and operation is not a substitute for safety instructions and technical data affixed to the machine and/or its packaging. The manual provides information that is current at the time of publication. The information is subject to amendment or alteration without notice. Your machine should only be operated in accordance with instructions contained in this manual and verbal instructions and training provided by an authorised Rocket Espresso Ltd. dealer. Installation and maintenance should only be carried out by technicians and service providers authorised by Rocket Espresso Ltd. Rocket Espresso Ltd. accepts no liability for injury and damage to person, persons or property caused by incorrect installation, misuse, and user negligence, neglect of the machine or any other circumstances beyond its control. _____________________________________________________________________________________________ Subject to change without notice. 5 Instructions for use This machine has been designed for the sole purpose of producing coffee, hot water and steam for hot beverages. All other uses are outside of the scope of this machine and, therefore, dangerous and hazardous. The machine has been designed from safe, accessible, durable components and materials and manufactured to the highest standards for use only in home / domestic environment. The machine should not be exposed to elements such as sunlight, rain, snow, extreme temperatures etc. The machine must be operated by responsible adult persons who know the use of the equipment and should not be used by children, minors or untrained persons. To protect against electric shock do not immerse machine, cord and plugs in water or other liquid and do not ever let the machines internal parts come in contact with liquids. The user should be fully conversant with safety operating procedures contained in the manual and should follow the instructions and advice provided with. To ensure maximum performance efficiency, it is essential that technical service and maintenance is carried out exclusively by Rocket Espresso Ltd. authorised technicians. It is the responsibility of the user to notify the manufacturer of any defects or damages which may affect the safety of the original installation or future safe operation of the machine. The user must respect the safety regulations at the point of installation. The user must check the surrounding areas to ensure safe and hygienic use is guaranteed. The machine component’s manufacturers are responsible for the parts supplied by them. The customer is responsible for the personal use of the equipment. _____________________________________________________________________________________________ Subject to change without notice. 6 It is the responsibility of the user to ensure that the location of the machine is hygienic, and that its continued safe operation can be guaranteed. When the machine is not being used for long periods of time, the hydraulic systems should be drained completely and the machine stored in a temperature above freezing (0°C or 32°F). This will prevent the hydraulic system from freezing which could damage internal pipes and boiler. This appliance is intended to be used in household and similar applications such as: • staff kitchen areas in shops, offices and other working environment • farm houses • by clients in hotels, motels and other residential type environments • bed and breakfast type environments If the appliance should be connected to the water mains: • The maximum inlet pressure is 0,4 MPa • The minimum inlet pressure is 0,1 MPa • You must use the new hose-sets supplied with the machine. Do not reuse old hose-sets. All spare parts fitted to the machine must be original Rocket Espresso Ltd. components. Before any cleaning or maintenance the machine should be disconnected from the electric supply. Never pull the electrical supply cable. When cleaning the machine never use caustic or abrasive cleaning chemicals. To avoid electric shocks: • Do not immerse machine itself, cord and plugs in water or other liquid and do not ever let the machines internal parts come in contact with liquids. • Ensure that the machine is installed with a proper earth/ground in accordance to local safety practises, codes and legislation. • Prevent the power cable from being stretched, or pulled tight. _____________________________________________________________________________________________ Subject to change without notice. 7 • Avoid using the machine with wet hands. • Never operate the machine with bare feet. Never operate the machine without ensuring the water reservoir contains water. The machine must be operated with soft, clean drinking water. This means that there must be a minimum content of mineral in the water. If the local water supply has a high mineral content use a water softener. A build up of mineral deposit may restrict the flow of water within the hydraulic systems causing damage to the machine and risking personal injury. The machine must be switched off whenever it is left unattended. _____________________________________________________________________________________________ Subject to change without notice. 8 Description of components Rocket R 58 FIG. A 1 2 3 4 5 6 7 8 9 10 11 12 13 Steam wand. Can become hot and cause burns. Steam valve handle: turn left to open, turn right to shut. Cups tray. Never pour any liquid on this tray! It will filter inside the equipment and cause electrical shocks and serious injuries. Danger! Hot water valve: turn left to open, turn right to shut. Hot water wand. Can become hot and cause burns. Pump pressure gauge Lever. It’s metal parts can become hot and cause burns. Caution! Brewing head (group). It’s very hot and can cause burns! Caution! Filter holder. It’s metal parts can become hot and cause burns. Caution! Drip tray Boiler pressure gauge On / off switch Control light machine “on” _____________________________________________________________________________________________ Subject to change without notice. 9 Installation All machines are designed to ensure maximum possible user safety. It is, however, an important responsibility of the user to observe the following safety codes to further enhance safe installation and operation. • Always ensure that hazardous packing items such as plastic bags, Styrofoam, nails, etc. are properly disposed of to prevent accidental injury to children or other persons. • If there is evidence of defect or damage to the machine an authorised Rocket Espresso Ltd. dealer or technician should be notified immediately so that remedial action can be taken. • This machine is safe only when it has been correctly connected to an efficient earthing/grounding system. This should conform to local safety standards and legislation in force at the time of installation. • Installation of any Rocket Espresso Ltd. product should only be undertaken by duly authorised, properly trained and qualified personnel • Dangerous or improper electrical connections are extremely hazardous and should never occur. • Always check the integrity of the components elements of the machine. • Never fit defective or damaged spare parts. Always request replacement from Rocket Espresso Ltd. . • Before connecting the machine to electric supply, always check that capacity and power rating at least equals the power requirement of the machine. • Protect the user by fitting a circuit breaker to electric supply feeding the machine. • Never attempt to run the machine with water that is harder than 7°F. This equipment is to be installed to comply with the applicable Federal, state, or local plumbing codes having jurisdiction. _____________________________________________________________________________________________ Subject to change without notice. 10 Technical data Bodywork Brewing head Pre-infusion Dual boiler system Boilers Heaters Pump Temperature control of boilers Pressure gauges Stainless steel steam wand Electronically controlled Safety valve Water supply Dimensions (WxDxH) Weight Additionally All stainless steel (AISI 304). Commercial brewing head. Weight 4.05 kg (9 lb). Dual pre-infusion system: mechanical pre-infusion system with progressively working piston and static pre-infusion chamber. This reflects a smooth coffee extraction with optimum aroma, body and “crema”. Rocket R 58 machines come with one dedicated boiler for coffee water and one boiler for steam and hot water (service boiler). The guarantee of consistent performances. Coffee water boiler: 0.58 litre capacity. Copper made. External insulation. Service boiler: 1.7 litre capacity. Copper made. Boiler comes with lead free brass end plates and additional external insulation for optimum thermal retention. Optimised boiler capacity ratio to heater power. Results in fast heat up time. Coffee water boiler: 1.400 W Service boiler: 1.400 W Max. simultaneous power consumption: 1.550 W Full commercial rotary type pump (not vibration type pump) with external pressure adjustment. Electronic control by PID sensors inside the boilers for precise temperature control. True boiler temperature displayed on PID. Not a “calculated” group temperature display which does not accurately reflect the “true” group temperature. One dedicated gauge for pump pressure and one for service boiler pressure control. With our cool-touch technology: anti-burn (only the nozzle gets hot); easy cleaning as milk doesn’t bake on wand; more efficient steam, as heat is not dissipated around the wand. Steam nozzle designed for easy milk foaming with fine texture. Microprocessor controlled automatic level control of coffee water boiler, service boiler and fresh water reservoir, with low water level indication system. Fully certified commercially rated safety valve. 2.5 litre fresh water reservoir or alternatively by turning the control switch, steel braided direct water connection (hard plumbed) with full drip tray drainage system. 31 cm x 44 cm x 41 cm 12.2 in x 17,32 in x 16.14 in 29 kg / 64 lb Full size commercial one and two cup filter handles and baskets. One blind filter. Metal tamper. Microfiber towel. Group cleaning brush. Full training guide and instructions (DVD and manual). _____________________________________________________________________________________________ Subject to change without notice. 11 Start up Parts which can become hot and cause injuries. Caution! Never touch the following parts. They are or can become hot and could cause burns: 1: Hot steam wand and spout 2: Metal parts of steam handle 4: Not insulated metal parts of hot water handle 5: Hot water wand and spout 7: Not insulated parts of lever 8: Coffee brewing group 9: Not insulated metal parts of filter holder _____________________________________________________________________________________________ Subject to change without notice. 12 Programming your Rocket R 58 espresso machine Your machine is factory set to optimum working parameters. Nevertheless you can set your personal parameters using the remote controller (with display) to be connected to the machine. You can change the settings of the following parameters: ■ Language ■ Hard plumbing to mains or pour over operation ■ Service boiler heating on or off. The service boiler is the one providing steam and hot water. If you plan to produce only coffee, you can switch the heating of this boiler off, so only the coffee water boiler (“brewing head boiler”) will be heated. ■ The coffee water brew boiler’s temperature is factory set to 105°C. You can set the temperature between 95°C and 115°C. The factory setting of 105°C reflects to an extraction of around 92°C. ■ The pressure of the service boiler is factory set to 1,1 Bar. It can be changed in a range in between 0,8 Bar and 1,3 Bar. Fig. D Connecting the remote controller to the machine Please proceed as follows: 1. Switch the machine off (turning on/off switch Fig. A/12 to position “0”). 2. Plug the cable into the machine (see Fig. D/1). Port left hand lower side. 3. Now turn machine on (on/off switch Fig. A/12 to position “1”). The machine is ready to be programmed. _____________________________________________________________________________________________ Subject to change without notice. 13 The display reads: Key 1 Brew boiler temperature 105°C ok Key 3 P Key 2 This means the machine is in normal operation mode. Please proceed as follows to enter programming mode. 1. Keep Key 3 pressed for at least 5 seconds until display reads “Language”. 2. Press Key 1 or key 2 until the display reads the desired language. 3. Press Key 3 to confirm and to move to the next setting which is the selection of “Water reservoir operation” or “hard plumbing operation” of the machine. 4. Use Key 1 or Key 2 to program the desired operation and press Key 3 to confirm and proceed to the next setting which is enabling or disabling the heating of the hot water/steam boiler (“service boiler”). 5. The display will read “Service boiler heating: off” or “Service boiler heating: on”. Use Key 1 or Key 2 to program the desired option and confirm with Key 3. Please note that turning off the heating of the service boiler means operating only in coffee dispensing mode (using the coffee brew boiler only). 6. Use Key 1 or Key 2 to program the desired operation and press Key 3 to confirm and proceed to the next step which is setting the coffee brew boiler temperature. The factory setting is 105°C. The temperature can be set within a range from 95°C to 115°C. 7. Use Key 1 or Key 2 to program the desired temperature and press Key 3 to confirm and proceed to the next step which is setting the service boiler pressure (hot water/steam boiler). The pressure can be set within a range of 0.8 Bar to 1.3 Bar. Factory setting is 1.1 Bar. 8. Use Key 1 or Key 2 to program the desired operation and press Key 3 to confirm. Now the display reads again Temperature Brew boiler 105 °C (or the pressure you set) Important: For “operation” you must exit “programme” mode through the exit screen only.: Temperature Brew boiler 105 °C (or the temperature you set) _____________________________________________________________________________________________ Subject to change without notice. 14 We assume the machine is properly installed To use the machine with the direct water connection to the hydraulic circuit instead of the water reservoir refer to page 33. Before starting using the machine, please control the following: 1. Lever (7) is completely down. 2. Steam handle (2) is closed. 3. Hot water handle (4) is closed. 4. On/off switch (12) is on position “0” =machine switched off 5. Machine is unplugged. 6. Drip tray (10) and its grid are properly positioned into the machine. _____________________________________________________________________________________________ Subject to change without notice. 15 Now please proceed as follows: (A) (B) 1. Remove the cover from the water reservoir Fig. B-2 2. Remove the water reservoir (Fig. B-2 and clean it carefully with food quality cleaning products. It’s very important that the water reservoir is always clean! Please repeat this operation every day and whenever necessary. 3. Fill the water tank with fresh drinking water to just over ¾ full. 4. Place the tank inside the machine taking care not to spill water. 5. Refer to page 33 for connection to the water supply. _____________________________________________________________________________________________ Subject to change without notice. 16 6. Put on the cover on top of the water reservoir. 7. Plug in the machine. 8. Turn the on/off switch (A-12) to the on position “1” and open the steam handle (A-2). Boiler water fill starts (you will hear the pump’s noise). 9. When the boiler is properly filled with water, the pump will stop (=no more noise). Now close the steam handle (A-2). 10. The heating up of the boiler water starts. 11. Wait till the boiler pressure gauge (A-11) reads approximately 1 bar. 12. Now open the steam handle (A-2) for 5 seconds to let out some steam. This operation is very important as it removes possible vacuum inside the boiler which will reflect in suction of milk inside the boiler itself once starting to steam milk. Close the steam handle (A-2) again. 13. Wait until the boiler pressure gauge (A-11) reaches again 1 Bar. 14. Pull the lever (A-7) completely up. 14. Allow a cup of water to come out of the coffee brewing group (A-8). 15. Pull the lever (A-7) completely down (water will stop flowing). Now the machine is ready for operation. _____________________________________________________________________________________________ Subject to change without notice. 17 Preparing one or two cups of espresso. For the correct espresso preparation technique see page 30 Preparing a single espresso 25ml 1. Use one cup filter handle (with 1 spout) 2. Position the metal one cup filter basket firmly inside the filter holder 3. Fill the single filter basket with freshly ground coffee and tamp the coffee until the finished height, is level with the internal reference line in the filter basket. 4. Tamp the ground coffee gently using the tamper supplied with the machine 5. Tighten the filter holder firmly into the brewing head (A-8). 6. Put one cup under the filter holder spout. 7. Pull the lever (A-7) completely upwards. Hot coffee flows into the cups from the filter handle’s coffee spouts. 8. When the MAXIMUM extraction of 25 to 30 ml of espresso has been dispensed, position the lever (A-7)completely down to stop the coffee dispensing process. 9. Remove the filter holder (A-9) from the machine and empty used coffee grounds. 10. Clean the filter holder. _____________________________________________________________________________________________ Subject to change without notice. 18 Preparing TWO cups or a double espresso coffee. 50 to 60 mls. 1. Use the two cup filter handle (with 2 spouts) 2. Position the metal two cups filter basket firmly inside the filter holder 3. Fill the single filter basket with freshly ground coffee and tamp the coffee until the finished height, is level with the internal reference line in the filter basket. 4. Tamp the ground coffee gently using the tamper supplied with the machine 5. Tighten the filter holder firmly into the brewing head (A-8). 6. Put two cups under the filter holder spouts. Or one cup for a double. 7. Pull the lever (A-7) completely upwards. Hot coffee flows into the cups from the filter handle’s coffee spout 8. When the maximum extraction of 50 to 60 mls, or 25 to 30 ml per cup has been achieved, position the lever (A-7) completely down to stop the coffee dispensing process. 9. Remove the filter holder (A-9) from the machine and empty used coffee grounds. 10. Clean the filter holder. _____________________________________________________________________________________________ Subject to change without notice. 19 Dispensing steam to froth or heat up liquids 1. Fill a suitable ideally stainless steel pitcher (used for food only) with an insulated grip with the liquid to be heated up or frothed. 2. Position the steam nozzle of the steam wand (A-1) just below the surface of the liquid inside the liquid in the recipient. To avoid personal injury always ensure that the end nozzle of the steam pipe (A-1) is below the surface of the liquid to be steamed. 3. Turn on steam valve (A-2) fully. 4. Heat up or froth the liquid inside the pitcher. Pay attention to hot sprays! They may cause injuries. 5. When you’re done, close the steam valve (A-2). Clean the steam wand (A-1) and the steam wand’s end nozzle carefully with a non abrasive damp cloth after each single use without touching it directly with any part of the body to avoid injury or damage due to the hot surface of steam wand end nozzle. Caution: Hot surface. Example: Steaming milk. For the correct milk texturing and heating technique see page 28. 1. Use a clean, cold pitcher and fill 1/3 with cold, fresh milk. If milk has previously been steamed and stored in the refrigerator, we suggest adding some fresh milk in order to achieve optimum foam. Milk should be stored at a temperature around 4-5°C (app. 40°F). 2. Insert steam nozzle (A-1) into the centre milk just below the surface of the milk. 3. Open steam valve (A-2) rapidly. 4. Steam will come out of the nozzle and froth the milk. The milk volume will increase rapidly. Please lift the pitcher progressively to make sure that the steam nozzle is always right below the surface of the milk. _____________________________________________________________________________________________ Subject to change without notice. 20 5. When enough foam is achieved, submerge nozzle (going sidewise) and keep it in that position finishing heating milk until the pitcher is too warm to touch. Please remember that milk should never be steamed over app. 76°C (168°F). Milk steamed to over this temperature is scalded. 6. Close steam valve (A-2) rapidly, then remove milk pitcher from steam wand. 7. Wipe the steam wand (A-1) immediately after using with a non abrasive clean damp towel without touching the steam wand (A-1) directly with any part of the body to avoid injury or damage due to the hot surface of steam wand end nozzle. Use a towel that is designated for the steam wand only. Do not cross contaminate kitchen towels by using the same towel for cleaning the steam wand and i.e. kitchen tops. Do not let the milk bake onto the steam wand. Clogged wands and steam valves can be expensive to repair or to replace. 8. Burp your steam wand (A-1) immediately after using opening and closing immediately after the steam valve (A-1). Caution: Hot steam will come out of steam wand (A-1). Burping the wand will remove the milk residue from the inside of the nozzle. 9. Finish espresso drinks with correct portions of milk and foam. 10. Clean steam pitcher and store for next drink. Dispensing of hot water 1. Position the end nozzle of the hot water wand (A-5) inside a suitable pitcher used for food only. 2. Open the hot water valve (A-4). 3, Hot water will be dispensed into the pitcher. 4. Close the hot water valve (A-4) when you’re done. _____________________________________________________________________________________________ Subject to change without notice. 21 _____________________________________________________________________________________________ Subject to change without notice. 22 _____________________________________________________________________________________________ Subject to change without notice. 23 _____________________________________________________________________________________________ Subject to change without notice. 24 _____________________________________________________________________________________________ Subject to change without notice. 25 _____________________________________________________________________________________________ Subject to change without notice. 26 How to disassemble/dismantle the machine The machine has to be disassembled and dismantled by an authorized technician. Disassembling of the machine: Operations to be effected with machine in working conditions at operating temperature. 1. Place a recipient (with insulated grip) under the hot water wand (A-1). 2. Open the hot water valve (A-4) and let hot water flow in the recipient. 3. When no more hot water comes out, close the hot water valve (A-4). 4. Put on/off switch (A-12) to position “0” (machine off). 5. Unplug the machine from the electrical mains. Operations to be effected with machine switched off and cooled down to room temperature. 1. Empty the fresh water reservoir and clean it carefully before replacing it back into the machine. 2. Make sure that the lever (A-7) is completely down. 3. Store the machine in a safe, dry place. _____________________________________________________________________________________________ Subject to change without notice. 27 Routine Maintenance Simple, routine care of your espresso machine is your best defence against poor quality shots, as well as preventing breakdowns or, even worse, personal injuries. After each use: 1. Wipe the steam wand (A-1) immediately after using with a non abrasive clean damp towel without touching it directly with any part of the body to avoid injury or damage due to the hot surface of steam wand end nozzle. Do not let the milk bake onto the steam wand. Clogged wands and steam valves can be expensive to repair or to replace. 2. Burp your steam wand (A-1) immediately after using opening and closing immediately after the steam valve (A-2). Caution: Hot steam will come out of steam wand (A-1). Burping the wand will remove the milk residue from the inside of the nozzle. 3. Knock used coffee grounds from filter holder and rinse. Re-use or store in brewing head (group) to keep the filter holder warm. (Please remember to take out filter holders when machine is not operating for some hours (i.e. at night). Throughout the day: 1. Wipe the screens inside your group head with a damp clean towel to remove excess grounds. Before shutting down the machine (i.e. at night): Caution: For the following operations the machine has to be switched off, unplugged and completely cooled down 1. Clean showers, group gaskets and group flange with a clean brush (to be used only for this purpose). 2. Wash metal filter baskets and filter handle in warm water adding a special detergent product following the instruction’s of the specific product. It has to be food quality and for this specific use with coffee machines. 3. Clean the drip tray (A-10) and grid with a non abrasive damp cloth. Make sure to empty the drip tray (A-10) before it flows over. 4. Wipe down surface of machine with non-abrasive clean cloth. Do never use aggressive cleaners or scouring powders! This operation has to be done when necessary. 5. Remove the water reservoir (B-4) and clean it carefully with food quality cleaning products. It’s very important that the water reservoir is always clean! Please repeat this operation every day and whenever necessary. _____________________________________________________________________________________________ Subject to change without notice. 28 _____________________________________________________________________________________________ Subject to change without notice. 29 _____________________________________________________________________________________________ Subject to change without notice. 30 _____________________________________________________________________________________________ Subject to change without notice. 31 Setting the pump pressure operating on the by-pass screw 1. Loose fixing nut. 2. Turn setting screw clockwise (“-“ ) to decrease and anti clock (“+”) to increase pump pressure. Factory setting is 9 Bar. Please do not set lower than 8 Bar or higher than 10 Bar. 3. Tighten fixing nut again. Please check pump pressure with pressure gauge (Fig. A/6). _____________________________________________________________________________________________ Subject to change without notice. 32 Hard plumbing the machine Your Rocket R 58 espresso machine is built with a full commercial rotary pump. This feature enables the user to connect the machine directly to the mains water supply. With your Rocket R 58 espresso machine there is the choice to use the 2.5 litre water reservoir or alternatively use a mains water connection. The machine is preset at the factory to use the supplied 2.5 litre water reservoir. To set the machine to be mains water feed, please ensure the following instructions are adhered to: Program through the remote controller the operation mode from water reservoir to connection to the mains water supply (please refer to page 16). Using the steel braided water hose supplied, connect the machine to the water supply. Rocket Espresso recommends the following procedures when installing the machine to a mains water supply feed: Use a certified plumber to complete the installation and insure that the installation meets local authority standards and regulations in all cases. Line pressure exceeding 5 bars should be limited with the use of a pressure regulating valve on the water feed line. We recommend the use of a shut off valve to isolate the water supply to the machine. We recommend the use of an inline filter to ensure the water supply to the machine is of the highest quality. Example: Everpure ocs filter range. If you are drawing the water from a non pressurized system (ie from a remote water supply tank, not mains pressurized) it is recommended that a non return valve is fitted to the end of the water supply hose to ensure that inline pressure is maintained at all times. _____________________________________________________________________________________________ Subject to change without notice. 33 Alarm messages The microprocessor controls the main functions of the machine as i.e. the water level controls (water reservoir, service boiler and coffee water brewing boiler) and the proper function of the temperatures probes inside the service and coffee water boiler. Alarm messages can be read out on the display connecting the setting device to the machine. If the device is not connected, please note that some alarm information is given by flashing of the control light (Fig. A/13). 2 times flashing: There may be a problem with the service boiler temperature probe. 3 times flashing: There may be a problem with the coffee water boiler temperature probe. In both cases turn the machine off and then on again. If this doesn’t solve the problem please contact the authorized Rocket Espresso Ltd. technical service. _____________________________________________________________________________________________ Subject to change without notice. 34 _____________________________________________________________________________________________ Subject to change without notice. 35