1
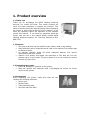
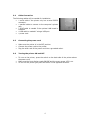
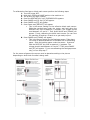
Operation Manual SX4M SX5M TXPSX4 TXPSX5 www.satolabeling.com Precautions The following precautions will help to ensure that this machine will continue to function correctly. 1. Try to • • • • • • avoid locations that have the following adverse conditions: Temperatures out of the specification Direct sunlight High humidity Shared power source Excessive vibration Dust/Gas 2. The cover should be cleaned by wiping with a dry cloth or a cloth slightly dampened with a mild detergent solution. NEVER USE THINNER OR ANY OTHER VOLATILE SOLVENT on the plastic covers. 3. DO NOT STORE the paper or ribbons where they might be exposed to direct sunlight, high temperatures, high humidity, dust, or gas. 4. Ensure the printer is operated on a level surface. 5. Any data stored in the memory of the printer could be lost during a printer fault. 6. Try to avoid using this equipment on the same power supply as high voltage equipment or equipment likely to cause mains interference. 7. Unplug the machine whenever you are working inside it or cleaning it. 8. Keep your work environment static free. 9. Do not place heavy objects on top of the machines, as these items may become unbalanced and fall causing injury. 10.Do not block the ventilation slits of the machines, as this will cause heat to build up inside the machines and may cause fire. 11.Do not lean against the machine. It may fall on you and could cause injury. 12.Care must be taken not to injure yourself with the printer paper cutter. 13.Unplug the machine when it is not used for a long period of time. 1 1. Product overview 1.1 Thank You Thank you for purchasing the SATO Labeling Solutions America, Inc. model SX Printer. This owner’s manual will cover the steps necessary to operate the machine. This owner’s manual should be read completely before operating the printer to help minimize failures of the machine. If you have any questions about the operation of the machine consult this manual. If you have any questions about the printer that are not in the manual please contact SATO Labeling Solutions America, Inc. Technical Support at 800888-7425. 1.2 Features • The print head block can be raised for easy ribbon, label or tag loading. • Many different kinds of materials can be used in the machine from plastic tags to adhesive labels. • An optional interface board will allow advanced features like remote maintenance and print servers. • Superior Print quality and speed, the resolution of 203 dots per inch will provide clarity on the media. The print speed of up to ten inches per second will help you save time. 1.3 Unpacking the printer • Check for damage or scratches on the printer • Keep the cartons and materials used in packaging the printer for future service to the printer. 1.4 Accessories When unpacking the printer, make sure that the box contains the following materials: • Power cord. • Parallel Cable • Front extension plate • Fan filter and filter plate. 2 2. Printer Setup 2.1 Guidelines To provide the best operating conditions and the safety of the operator follow these guidelines: • Make sure that the printer is set on a flat stable surface in an environment that is free of dust. • Make sure the work area is free of static. • Turn the printer off and unplug it before servicing the machine. • Store the ribbon and labels in a clean area. • Clean the print head and other parts in the printer every time you change labels. • Be careful when cleaning the print head. There are sensitive electronics on the head that should not be scratched. • Use only denatured or hardware store grade alcohol. Standard rubbing alcohol contains mostly water and should not be used. 2.2 Setup Process 1. Unpack the Printer and accessories from the box. 2. Review the printer setup section (section 2.1). 3. Install the fan filter and filter screen. 4. The host computer must have a free LPT or COM port. 5. Make sure the printer is plugged in. 6. Load the ribbon in the machine. 7. Load the tag/labels into the machine. 8. Adjust the feed gap sensor per media. 9. Turn the power ON. 10.Install the printer drivers. 2.3 Installation of Fan Filter The fan filter consists of two parts. 1. The filter 2. The filter cover Install the filter inside the filter cover. Then press the cover and filter into the two holes in the case near the fan. 3 2.4 Cable Connection The following cables will be needed for installation: • 1 serial cable if the printer only has a serial RS232 connector. • 1 parallel cable to connect to the computer’s printer port. • 1 RJ45 cable is needed if the optional LAN board is installed. • 1 USB cable is needed if using a USB port. • 1 power cord. 2.5 Connecting the power cord • • • 2.6 Make sure the printer is in the OFF position. Connect the power cord to the printer. Plug the other end of the power cord into a grounded outlet. Turning the printer ON and OFF • • • To turn on the printer, press the switch on the back side of the printer above the power cord. Make sure the front display reads ONLINE and the green power LED is on. To turn off the printer just press the switch in the opposite direction. 4 2.7 Loading the Media Warning! • Do not let any loose clothing or other objects fall in the printer when printing as they can become tangled up and cause injury or damage to the printer. • The print head can become very hot after use. Use caution when working with it or loading labels. • When engaging the print head be careful not to lock clothing or loose objects in it. Notes: • When the print head lever is set in the up position the print head is up. • The print head must be locked down to allow printing. There are two levels that the print head lever can be set to. This allows for the adjustment of the print quality. The following section will describe how to load the media into the printer. 1. Release the print head. 2. Raise the print head block. 3. Slide the media onto the roll in the back of the machine. 4. Pass the media under the print head block. 5. Align the labels with the print head. 6. If you are using notched tags they should be moved over to the left of the printer. 7. Adjust the label guides to hold the label in place. 8. Make sure that the label roll is lined up with the labels that are under the print head. 9. Lock down the print head. 10.Adjust the feed gap sensor. 2.8 Loading the Ink Ribbon 1. Make sure that the ribbon stoppers are properly installed and pushed back to the back of the spool. 2. Hold the new ribbon roll in your right hand and hold the take up roll in your left hand. 3. Place the new ribbon roll on the back ribbon spool. 4. Slide the ribbon under the print head block ONLY. 5. Place the take-up roll on to the front ribbon spool. 6. Roll up the slack so that the ribbon is tight and free of wrinkles. 5 2.9 Sensor Calibration and Alignment The feed gap sensor must be calibrated to the backing paper of the adhesive labels. The reflective black mark sensor must be calibrated to the darkest color of tag material on hand. The sensors must also be aligned according to the example below. The machine comes factory calibrated for both materials. Make sure that the correct sensor is being used. When using notched material the reflective black mark sensor (indicated by the arrow that is bouncing off the line) should be used. When using adhesive backed labels the feed gap sensor (indicated by the arrow that is passing through the line) should be used. Make sure that when printing on notched material you change the sensor to black mark per software setting. If the machine reads “paper jam” or “no paper” continuously the machine might need calibration. 6 To calibrate the feed gap or black mark sensor perform the following steps: 1. Turn the printer OFF. 2. Hold down FEED and PAUSE and turn the machine on. 3. The printer will read (1)DIAG. 4. Press the RESTART key until (5)SENSOR ADJ appears. 5. Press PAUSE and [H] and [A] will appear. 6. Press PAUSE and [S] will appear. 7. Press Pause and [REFLECT] will appear. This is the sensor setting for the reflective black mark sensor: Slide the notched tags under the sensor and hold down the RESTART key until an asterisk (*) appears. The voltage should read between 4.5 and 4.7. Then press PAUSE and [TRANS] will appear. If only calibrating the black mark sensor you can shut the machine off and turn it back on to get ready to print. 8. Press PAUSE and [TRANS] will appear. This is the sensor setting for the feed gap sensor: Take about 10 inches of labels and take all of the labels off of the backing paper. Slide the backing paper under the sensor. Press and hold the RESTART key until an asterisk (*) appears. The voltage should read between 4.5 and 4.7. Then press PAUSE and [PE] will appear. If you are calibrating the feed gap sensor only you can skip step 7. For the sensor alignment the sensor must be placed according to the picture depending on what kind of media is being used. 7 2.10 Test Printing A test print should be performed to ensure that the printer is operating correctly. 1. Use label stock for best results (test print may be performed on tags but may not be as clear). 2. Turn the printer off. 3. Hold down the FEED and PAUSE key and turn the machine on, (1)DIAG will appear. 4. Press the FEED key until (4)TEST PRINT appears. 5. Press the PAUSE key and PRINT CONDITION will appear. 6. Press PAUSE and ISSUE COUNT will appear. 7. Press the FEED or RESTART key until the desired quantity is selected. 8. Press PAUSE and PRINT SPEED will appear (leave this setting as is). 9. Press PAUSE and SENSOR TRANS will appear (leave this setting as is unless you are test printing on plastic tags then set it to REFLECT by pressing RESTART). 10.Press PAUSE and PRT TYPE TRANSFER will appear (leave this setting as is). 11.Press PAUSE and TYPE [S] NO CUT will appear (leave this setting as is). 12.Press PAUSE and LABEL LEN. 76mm will appear. Change this setting according to the size of labels that are being printed by pressing the FEED or RESTART keys. 13.Press PAUSE and PAPER FEED will appear. 14.Press PAUSE and the printer will present one blank label and display (4) TEST PRINT. 15.Press PAUSE and the printer will display PRINT CONDITION. 16.Press RESTART until SLANT LINE (3 DOT) appears. 17.Press PAUSE and the requested number of labels will print out with a slanted line pattern. 8 3. Online Mode This section describes the operation of the printer when it is online. 3.1 Operation panel The LCD display shows the status of the printer. There are also indicator lights under the display. The printer under normal conditions will read ONLINE. 1. When the printer has an error the ERROR light will light up. 2. When the error occurs there will also be a message on the LCD panel. 3. To clear the error you can turn off the machine and turn it back on, or you can hold down the RESTART key until the display reads RESET and then press PAUSE. 4. If the PAUSE key is pressed in the middle of printing, the display will read PAUSE. 5. If the RESTART key is pressed, the printer will resume printing. 9 4. Maintenance This section will describe some of the steps to perform basic maintenance and cleaning on the machine. Warning! 1. Disconnect the power cord from the back of the machine before servicing. 2. Do not pour water directly into the printer 3. Be careful while working inside the machine. The power supply could still contain an electrical charge. 4.1 Cleaning To ensure the proper operation and to help extend the life of the printer, the printer must be cleaned regularly. 1. Turn the printer off and unplug it from the back of the machine. 2. Open the cover of the machine. 3. Unlock the print head lever and raise the print head block. 4. Inspect the printer for damage and debris. 5. Using a can of compressed air blow out any dust and debris from the machine. 6. Using hardware store grade rubbing alcohol, wipe the machine clean. 7. Make sure that the surfaces are free of debris and adhesive. 8. Be sure that the feed gap sensor is clear and free of debris. 9. Wipe the print head element to remove and ink and debris (this procedure should be performed every time you change labels). 10.Be sure to let the machine dry out before beginning the operation of the machine. Caution! 1. Do not use any scrubbing agents or pads on the machine, especially the print head. Using abrasive cleaners and pads can cause damage to the print head element. 2. Use rubbing alcohol on the machine. Using any other cleaning agent may cause discoloration and damage to the machine. 3. Make sure the print head is cleaned every time you load new label stock into the machine. This will ensure proper printing and help extend the life of the machine. 4.2 Cleaning the outside of the printer 1. Do not use rubbing alcohol on the screen. Damage could be caused to the printer. 2. Do not use water to clean the machine. Water could cause damage to the electrical parts in the machine. 10 4.3 Care and handling of the ribbon and media • • • • Do not store the ribbon and media for longer than the manufacture’s recommendation. Store the media rolls on the flat side. Storing the media on the round side could cause the media to flatten and cause the machine to print erratically. Make sure to store the media in plastic bags. The media can be come statically charged and can attract dust and other debris. To prevent damage to the machine the media must be clean. Store the ribbon in a cool dry place. Excessive heat and humidity could cause severe damage to the ribbon. 11 5. Troubleshooting If a problem cannot be solved by taking the steps listed in this section contact your service representative. Notes: If an error is not cleared by pressing the RESTART key then turn the machine off and back on again. Error Message Head Open Errors Printing was attempted while the print head was raised Comms Error A communication error has occurred Solutions Lock down the print head Make sure the printer cable is correctly plugged into the Machine and the printer Make sure that the label path is free of debris and labels Make sure that the labels are not shifting Paper Jam The media may be jammed in the machine Be sure that the correct label size has been entered The wrong media sensor may be selected in the software Make sure that the sensor is aligned with the media The sensor may not be properly aligned with the media Make sure that the correct sensor type is selected according to media type The media may not be calibrated correctly to the sensor Make sure the machine is calibrated to the correct media type The media has run out The media is not loaded properly Check to make sure that the media is loaded Make sure it is under the print head block No Ribbon The sensor is not aligned with the media properly The ribbon is not loaded in the machine properly the ribbon is not loaded on the machine or has ran out Excess Head Temp The print head has over heated Head Error Check the software setting and check to make sure the machine is operating correctly No Paper Ribbon Error 12 Be sure to set the sensor to the correct position check to make sure that the ribbon is loaded like the example affixed to the case of the printer Make sure that the ribbon is loaded into the machine correctly Turn the machine off and let the print head cool down. If that does not fix the problem contact your distributor for service turn the machine off and then back on and re try the print making sure the settings in the software are set correctly and that no debris or dust are in the machine 5.2 Possible Problems This section will give information for some various problems that can occur Possible problems Causes Solutions Plug the power cord in the socket or printer Make sure the printer is plugged in Make sure the AC outlet is functioning The printer will not turn on The power cord might be defective The printer is displaying an error The media is not feeding The media is loaded incorrectly Make sure the printer is not plugged into a power strip or the switch for the outlet is ON Try swapping a cord from another machine Turn the printer off and then back on so it displays ONLINE Check to make sure the media is loaded correctly Check to make sure the media is loaded correctly The media is not loaded correctly The ribbon is not loaded correctly Nothing is printed on the media The print head is not installed properly This problem requires contacting the distributor for assistance Clean the print head with a clean cloth and hardware store grade rubbing alcohol If the media has dust and debris on it try switching rolls of label stock The print head is dirty The media is dirty The print image is blurred Check to make sure the ribbon is loaded correctly the temperature is set too high 13 Adjust the temperature in the software and the printer or both if necessary 5.3 Removing Jammed Media This section will describe how to remove jammed media from the machine. 1. 2. 3. 4. 5. 6. 7. 8. Turn off the printer. Open the cover of the printer. Raise the print head. Pull the arm back and swing it out of the way. Raise the print head block. Remove the media from the printer. Make sure there is nothing stuck in the machine, do not use sharp objects. Clean the print head and media surface to ensure all debris is gone. 14 GLOSSARY Bar code A code which represents alphanumeric characters by using a series of black and white stripes in different widths. Bar codes are used in various industrial fields: Manufacturing, Hospitals, Libraries, Retail, Transportation, Warehousing, etc. Reading bar codes is a fast and accurate means of capturing data while keyboard entry tends to be slow and inaccurate. Black mark A mark printed on the media so that the printer can maintain a constant print position by detecting this mark. Black mark sensor A reflective sensor which detects the difference of potential between the black mark and print area to find the print start position. Cut mode Printer mode of operation where an optional cutter module is installed to automatically cut media from the supply roll after they are printed. The print command can specify to cut every media or to cut after a set number of media have been printed. DPI Dot Per Inch The unit used to express print density. Expansion I/O interface An optional interface circuit that may be installed into printer to allow the printer to be connected to an external device such as a wrapping machine and to receive feed, print start, and pause signals from the external device and to send back print, pause, and error status signals to the external device. Feed gap sensor A transmissive sensor which detects the difference of potential between the gap between labels and the label to find the print position of the label. Font A complete set of alphanumeric characters in one style of type. E.g. Helvetica, Courier, Times Gap Clearance between labels 15 IPS Inch per second The unit used to express print speed. Label A type of media with adhesive backing. LCD Liquid Crystal Display Installed on the operation panel and displays operation modes, error message and so on. Media Material on which data is printed by the printer. Label, tag paper, fanfold paper, perforated paper, etc. PCMCIA interface An optional interface circuit that may be installed into the printer to allow the use of the small credit card sized PC cards such as flash memory cards and LAN cards. PCMCIA is the acronym for Personal Computer Memory Card International Association. Pre-printed media A type of media on which characters, logos, and other designs have been already printed. Print head element The thermal print head consists of a single line of tiny resistive elements and when current is allowed to flow through each element it heats up causing a small dot to be burned onto thermal paper or a small dot of ink to be transferred from a thermal ribbon to ordinary paper. Print speed The speed at which printing occurs. This speed is expressed in units of ips (inches per second) Reflective sensor See Black mark sensor. Resolution The degree of detail to which an image can be duplicated. The minimum unit of divided image is called a pixel. As the resolution becomes higher, the number of pixels increased, resulting in more detailed image 16 Ribbon An inked film used to transfer an image onto the media. In the thermal transfer printing, it is heated by the thermal print head, causing an image to be transferred onto the media Supply Media and ribbon Tag A type of media with no adhesive. Usually tags are made of cardboard or other durable material. Thermal direct printing A printing method using no ribbon, but thermal media which reacts to heat. The thermal print head heats the thermal media directly, causing print image to be printed on the media. Thermal print head A print head using thermal transfer or thermal direct printing method. Thermal transfer printing A printing method that the thermal print head heats an ink or resin coating on the ribbon against the media, causing the ink/resin to transfer onto the media. Threshold setting A sensor setting operation to have the printer maintain a constant print position of pre-printed media. Transmissive sensor See Feed gap sensor. USB (Universal Serial Bus) An interface that is used to connect peripherals, such as a printer, keyboard, mouse. The USB allows disconnection of a USB device without turning off the power. 17