1
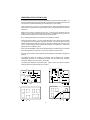
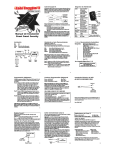
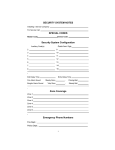
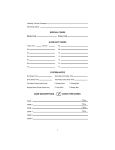
Installing/Service Company
Monitoring Center
SPECIAL CODES
Master Code
Duress Code
AUXILIARY CODES
"Quick Arm"
" Chime"
08
02
09
03
10
04
11
05
12
06
13
07
14
SYSTEM NOTES
Exit Delay Time
Secondary Exit Delay Time
Entry Delay Time
Secondary Entry Delay Time
Fire Alarm Sound (check one)
Steady Siren
Pulsing Bell
Burglar Alarm Sound (check one)
Yelp Siren
Steady Bell
ZONE DESCRIPTIONS
8 CHECK FIRE ZONES
ZONE 1
Fire
ZONE 2
Fire
ZONE 3
Fire
ZONE 4
Fire
ZONE 5
Fire
ZONE 6
Fire
1
THIS MANUAL IS FURNISHED TO HELP YOU UNDERSTAND YOUR SECURITY SYSTEM
AND BECOME PROFICIENT IN ITS OPERATION. ALL USERS OF YOUR SECURITY
SYSTEM SHOULD READ AND FOLLOW THE INSTRUCTIONS AND PRECAUTIONS IN
THIS BOOKLET. FAILURE TO DO SO COULD RESULT IN THE SECURITY SYSTEM NOT
WORKING PROPERLY. THIS BOOKLET SHOULD BE KEPT IN AN ACCESSIBLE
LOCATION FOR THE LIFE OF THE SECURITY SYSTEM. IF YOU DO NOT UNDERSTAND
ANY PART OF THIS MANUAL YOU SHOULD NOTIFY YOUR INSTALLING COMPANY AND
ASK FOR THAT SECTION OF THE MANUAL TO BE EXPLAINED FULLY.
The SECURITY CONTROL CENTER is turned on (ARMED) and off (DISARMED) by entering
a 4 digit code into the Keypad Control,, which is similar to a telephone keypad. The Keypad
Control includes 10 indicator lights and a built-in electronic sounder. These provide specific
information relating to the status of the security system which is described in this booklet.
Understanding what the lights and sounds mean will help you easily operate your system.
SO REMEMBER, READ THE ENTIRE MANUAL, AND IF POSSIBLE, PRACTICE ON THE
KEYPAD CONTROL WHILE YOUR PROFESSIONAL INSTALLER IS AT YOUR SITE. IF
YOU HAVE ANY QUESTIONS, ASK YOUR INSTALLING COMPANY.
PLEASE KEEP IN MIND THAT THE LEVEL OF SECURITY YOU WILL OBTAIN WITH THIS
SYSTEM RELATES SPECIFICALLY WITH TWO MAJOR FACTORS:
1. The quantity, quality, and placement of security devices attached to this system.
2. The knowledge you have of the security system and how that knowledge is utilized in a
weekly test of the complete system.
YOU SHOULD BE AWARE OF THE FOLLOWING FACTS AND USE THEM WHEN
PREPARING A SAFETY/SECURITY PLAN FOR YOUR HOME/BUSINESS.
1. Your security system is an electronic device and is subject to failure or malfunction. Do
not rely on it as your single source of security.
2. Your system should be tested weekly.
3. Your system will not work without power.
4. Warning devices will need to be loud enough, wired correctly, and properly placed to
provide notification of an alarm event.
5. Smoke and heat detectors may not detect heat and smoke in all situations.
6. Use qualified security professionals to select, install, and maintain your security system.
7.
It may be possible to arm the security system without the backup battery connected. Your
periodic test should be done with A.C. Power removed to verify the battery is connected
and adequately charged.
8. Care should be taken to plug in and properly restrain the A.C. Transformer after testing.
PLEASE READ THIS ENTIRE BOOKLET CAREFULLY BEFORE OPERATING YOUR
SECURITY CONTROL SYSTEM. IF YOU DO NOT UNDERSTAND ANY PORTION OF THIS
MANUAL, OR IF YOU HAVE ANY QUESTIONS ABOUT YOUR SYSTEM, CONTACT THE
INSTALLING COMPANY LISTED ON PAGE 1 OF THIS BOOKLET.
2
HOW TO ARM YOUR SECURITY SYSTEM
To Arm the security system, close all of the protected doors and windows. The green "READY"
light on the keypad control will be illuminated when all of the protected zones and sensors are
secure. If any of the zones are bypassed, a sensor in that zone can be violated without
affecting the "READY" light. The security system will not arm if the "READY" light is not
illuminated unless "FORCE ARMING" has been enabled (see "FORCE ARMING" page 4).
With the "READY" light on, you may arm the security system with your Master Code or one of
the auxiliary codes. Each time a key is pressed on the keypad control, a short tone (beep) will
sound. If the keypad beeps three times after a code entry, it is an indication that the code has
not been accepted. Press the [#] key (reset) and re-enter a valid code. If the keypad control
beeps continuously after code entry, it is an indication that; (1) the "POWER" light is off,
meaning there is no AC power to your system; (2) a faulted fire zone; or (3) a faulted phone
monitor. The keypad sounder can be silenced by re-entering your four digit code. If the
"POWER" light is off, you should restore power to the system if possible. If the “Ready” light
is flashing, a telephone line fault has been detected. If you are unable to correct the above
conditions, you should contact the installing company listed on page 1 of this booklet for
service. When the security system has accepted a valid code, the red "ARMED" light will
illuminate indicating that the system has been turned on. If you choose to leave the protected
area, you must exit through a designated exit door within the exit delay time noted on page 1.
If you choose to stay within the protected area, insure that all interior zones which may be
tripped by your movement are bypassed.
NOTE: If the exit door is open when the exit delay expires, the siren will sound, and the entry
delay will begin. If a valid code is not entered prior to the expiration of the entry delay, an
alarm report will be transmitted to the monitoring station if the system is monitored. Entering
a valid code during the entry delay will disarm the system, silence the siren, and keep an alarm
report from being transmitted.
HOW TO DISARM YOUR SECURITY SYSTEM
When you enter the protected area through one of the designated entry/exit doors, the keypad
control will sound a continuous tone (beep) for the duration of the entry delay time, or until you
enter a valid code. After a valid code has been entered, the red "ARMED" light will turn off, and
the tone will stop. The security system is now DISARMED. If a valid code is not entered before
the end of the entry delay time, an alarm will occur. (NOTE: IF THE RED "ARMED" LIGHT IS
FLASHING DURING THE ENTRY DELAY, THE ALARM SYSTEM HAS BEEN ACTIVATED
IN YOUR ABSENCE. LEAVE THE BUILDING IMMEDIATELY AND CALL YOUR ALARM
COMPANY AND/OR THE POLICE FROM A SAFE LOCATION.)
HOW TO BYPASS ZONES
When zones are open or unsecured, their corresponding LEDs will flash. To bypass any of the
zones, press [U], zone number(s) to be bypassed, and [U]. When bypassed, corresponding
zone LEDs will be on steady. Zones cannot be bypassed while the control is in the armed
state. Upon disarming, all bypassed zones will be unbypassed. As bypassed zones are not
protected, the bypass procedure should only be given to authorized persons.
QUICK-ARM FEATURE
If checked, your security system has a "QUICK ARM" code programmed. This feature will allow
you to arm the security system by pressing one, pre-designated key on the keypad control.
This "QUICK ARM" code is for ARMING ONLY, and will not disarm the security system. This
makes it ideal for a maid code, babysitter code, etc. This code can only be programmed and/or
changed by your installing company.
3
K
AUTOMATIC BYPASS OPTION
If checked, the "AUTOMATIC BYPASS" option has been selected by your installing company.
With this feature enabled, all interior zones will automatically bypass if you "ARM" your security
system and do not leave through a designated entry/exit door. The "AUTOMATIC BYPASS"
will occur at the end of the exit delay time. At this time, all bypassed "ZONE" lights will become
illuminated. With the interior zones bypassed, occupants are allowed the freedom of movement
inside of the Home/Business while the security system is "ARMED". If enabled by the installer,
interior zones that have bypassed automatically can be unbypassed by pressing [X] - [U]
(X=the first digit of the Master Code). Check with the installing company to see if your system
has this option.
INSTANT / DELAY OPTION
If checked, the "INSTANT" option has been selected by your installing company. With this
feature enabled, if you do not wish to have a delay on your entry/exit doors, this can be
accomplished by pressing the [U] key on your keypad while the system is "ARMED". At this
time, the "INSTANT" light will illuminate and there will be no entry delay when the entry/exit
doors are opened. Any time the "INSTANT" light is on and the exit delay has expired, the
opening of an entry/exit door will produce an immediate alarm, making this feature ideal when
a high level of security is desired, and no authorized entries are anticipated. By pressing the
[U] key again, the "INSTANT" light will turn off, and an entry delay will be present on
designated entry/exit doors.
NOTE: Your installing company may have programmed the "INSTANT" option to occur in
conjunction with the "AUTOMATIC BYPASS" feature. In this case, the "INSTANT" light and the
bypassed "ZONE" lights will become illuminated at the end of the exit delay. If this occurs, you
still have the ability to turn the "INSTANT" feature off, and/or on by pressing the [U] key.
GROUP BYPASS OPTION
K
If checked, the "GROUP BYPASS" option has been selected by your installing company. If you
wish to bypass all zones designated as "GROUP BYPASS" zones, do so by entering [U]-[9]-[U]
while the system is disarmed. Once these zones have been bypassed, they will remain
bypassed until the system is armed and disarmed.
FORCE ARMING OPTION
K
If checked, the "FORCE ARMING" option has been selected by your installing company. Force
arming allows the system to be armed without a green "READY" light illuminated. Any zones
that restore prior to the end of the exit delay will become active in the system, while those
zones that do not restore prior to the end of the exit delay will become bypassed zones.
Caution: If this feature is selected, an intrusion through one of the bypassed zones will not be
detected.
K
AUTOMATIC ARMING OPTION
If checked, the "Automatic Arming" option has been selected by your installing company. This
feature is used to make your system automatically arm itself at a designated time of day, if it
is not already armed. The keypad will sound a continuous beeping tone for a 50 second time
frame before automatically arming. If a valid code is entered during this time frame, the system
will not automatically arm. When automatic arming occurs, all zones that are not secure, will
become bypassed.
(K) These features cannot be enabled on UL listed systems.
4
THE CHIME FEATURE
If checked, your security system will operate in the "CHIME" mode, allowing the monitoring of
pre-designated zones while the security system is not armed. While in the "CHIME" mode, the
opening of any of these zones will produce a 1 second beep from the keypad control. To
activate this feature, press the "CHIME" digit which is the first digit of the Master Code. Five
seconds after pressing the "CHIME" digit, a one second tone will occur indicating that this
feature has been activated. Repeat this procedure to turn the "CHIME" feature off.
KEYPAD ACTIVATED PANIC/HOLD-UP ALARM
If checked, this feature has been selected by your installing company. If so, when the star [U]
and pound [#] keys are pressed at the same time for one second, a local audible alarm will
sound. If your system is connected to a monitoring center, an emergency report could be
transmitted to that center. These keys should only be pressed in an emergency situation
requiring immediate response by law enforcement personnel.
PLEASE NOTE: Some Panic/Hold-Up alarms are programmed to be silent at the protected site
while reporting an alarm to the monitoring center. Check with your installing company to
determine how your security system will respond to the Panic/Hold-Up activation.
KEYPAD ACTIVATED FIRE ALARM
If checked, this feature has been selected by your installing company. If so, you can activate
the Fire alarm by pressing the one [1] and three [3] keys at the same time for one second. If
your system is connected to a monitoring center, an emergency report could be sent to that
center. These keys should only be pressed in an emergency situation requiring response by
fire department personnel.
KEYPAD ACTIVATED AUXILIARY ALARM
If checked, this feature has been selected by your installing company. If so, you can activate
the auxiliary alarm by pressing the four [4] and six [6] keys at the same time for one second.
If your system is connected to a monitoring center, an emergency report could be sent to that
center. These keys should only be pressed in an emergency situation requiring response by
emergency personnel.
TELEPHONE LINE MONITOR
If checked, your installing company has selected the TELEPHONE LINE MONITOR which will
monitor your telephone line that links your security system to the monitoring station. When
selected, the loss of your telephone line will give either immediate, or delayed notification by
sounding the siren and/or keypad sounder. Check with the installing company listed on page
1 to find out if notification will be delayed or immediate, and what kind of sound will be created
in case of a telephone line fault.
5
DURESS CODE
If checked, your security system has a "DURESS CODE" option. If so, this code may be
programmed to send a special message to the central monitoring station if you are forced to
arm or disarm your security system against your will. Check with your Installing/Servicing
company to see if this option has been enabled for your system.
FIRE ZONE
If checked, your system has zones designated as "FIRE" zones. When this option is selected,
and approved heat or smoke detectors are attached to these selected zones, a Fire alarm
sound can be initiated from the security system. You should familiarize yourself and your family
or staff with this sound (see page 1, Fire Alarm sound) and follow an evacuation plan if this
"FIRE" alarm sound is heard. (see page 8 for assistance in formulating an evacuation plan).
To silence the audible "FIRE" alarm sound, enter a valid code. To reset the zone LEDs
designated as "FIRE" zones and /or smoke detectors, press the [#] key (reset) on the keypad.
After 10 seconds, the zone LEDs designated as "FIRE" zones should extinguish, and the light
on the affected smoke detector should go out. If you are unable to reset the LEDs for
designated "FIRE" zones or smoke detectors after all smoke has cleared, you should
immediately call the service phone number listed on page 1 of this booklet.
PROGRAMMING ARM/DISARM CODES
The security system can be armed and disarmed by the Master code (User Code #1), and up
to 13 auxiliary codes. All codes must have 4 digits. These Auxiliary codes are individually
numbered from 2 to 14 (NOTE: If your system is programmed for a DURESS code mentioned
above, user code #7 will not be available). If Auxiliary codes are desired, they must be
programmed individually. Codes 2 thru 7 can be changed by the procedures described below,
while codes 8 thru 14 can only be changed by your installing company. Only persons knowing
the master code can assign or change auxiliary codes 2 thru 7 (See programming Auxiliary
codes below).
CHANGING THE MASTER CODE - The Master Code is user code #1, and must be
programmed by referring to it as code #1. For example, if the Master code is [1]-[2]-[3]-[4], and
you want to change it to [5]-[3]-[4]-[2], the programming sequence would be as follows: Press
[U]-[1]-[#], (this enters programming for user #1). Enter the current Master Code [1]-[2]-[3]-[4].
Press [U]-[1]-[#] to verify user #1 programming. Enter your new Master Code [5]-[3]-[4]-[2],
and exit programming with [U]-[1]-[#]. The entire sequence would consist of pressing 17 keys
as follows:
[U]-[1]-[#] - [1]-[2]-[3]-[4] - [U]-[1]-[#] - [5]-[3]-[4]-[2] - [U]-[1]-[#]
PROGRAMMING AUXILIARY CODES 2 THRU 7- In order to program Auxiliary Codes 2 thru
7 you must know the Master code. As stated earlier, each auxiliary code has its own unique
number from #2, thru #7 and must be referred to by its number. It is programmed much like
the Master Code. For example, to program Auxiliary user code #2, the sequence would be as
follows:
[U]-[2]-[#] - [1]-[2]-[3]-[4] - [U]-[2]-[#] - [ ]-[ ]-[ ]-[ ] - [U]-[2]-[#]
(New Code)
REMOVING AUXILIARY CODES - To remove an Auxiliary user code, use the sequence
above, and program the new code as the [ ]-[ ]-[ ]-[ ]
(Master Code)
6
RESETTING YOUR SECURITY CONTROL CENTER
In the event of a system malfunction in the Security Control Center, press the [#] (reset) key
on the keypad control. This should reset the code sequence and restore normal operation. If
the problem persists, call the service number located on page 1 of this booklet for service.
AUDIBLE ALARM SOUNDS
FIRE: Steady siren, pulsing bell (see page 1) or beeping keypad.
INTRUSION & PANIC: Yelp siren, steady bell (see page 1) and beeping keypad.
KEYPAD CONTROL LIGHT INDICATORS
ARMED
RED: On when system is armed; off otherwise. Flashes for alarm memory if alarm
was activated during arming cycle.
READY
GREEN: On when all zones are secure and/or Bypassed and the system is ready
to arm; off otherwise. Flashes for telephone line fault.
INSTANT RED: On when the entry/exit zones are instant; off otherwise.
POWER
RED: On when AC power is on; off otherwise. Flashing when the system standby
battery is low.
ZONES
YELLOW: Flashing means unsecured. Steady means bypassed. Off means
secure.
KEYPAD CONTROL TONES (BEEPS)
A sounder is built into the keypad and may sound for any of the following reasons:
Beeps for all keypresses.
Sounds a continuous tone during the Entry delay time.
Pulses when a day zone is violated while the system is disarmed.
Pulses when a FIRE zone has a trouble condition; there is a low battery, or bell circuit
trouble.
Pulses when the armed status changes and the AC power is off.
Beeps 3 times for trying to arm with the "READY" light off, if "FORCE ARMING" has not
been selected.
Beeps 1 second for the "CHIME" feature.
Beeps 1 second at the end of the exit delay.
Beeps to indicate telephone line fault if selected.
Beeps 1 long beep followed by 3 short beeps to alert you that there are only ten seconds
remaining in the exit delay.
When pulsing, the keypad sounder may be silenced by entering a valid code. The arm/disarm
state of your system will not change when entering a code to silence a pulsing keypad
sounder.
7
SERVICE CONDITION
The “Ready” LED will flash in the event of a system fault. Press [U]-[2]-[2] to identify the
source of the fault. One or more zone lights will illuminate indicating what service(s) is
required. Call your service provider immediately for these problems. Below is a listing of what
each light means in a service condition.
Light
Service Condition
1
Telephone Line Fault
2
Bell Fault
3
Fuse
4
Fail to Communicate
5
Bell Overcurrent
Press any key to exit this mode.
TESTING YOUR SECURITY SYSTEM
There are several tests you should perform on a periodic basis (at least once a week) to insure
that your Security System is functioning properly.
Enable the "CHIME" Feature and open all protected windows and doors. The Keypad
Control should sound (beep) for each device and the appropriate yellow zone light should
blink.
Walk into all areas protected by motion detection devices while someone observes the
Keypad Control. The appropriate yellow zone light should blink for each sensor tested.
If your system has a "FIRE" Zone, the Smoke or Heat detectors should be tested at least
monthly. If your Security System is monitored by a Central Monitoring Station, always call
before to let them know that you are about to conduct a test of the fire detection system.
Always call after the test to ask for results and to put your fire detection system back into
service.
If the Siren/Bell test option has been selected by your installing company, you may activate
the siren/bell by pressing the one [1] and the seven [7] keys at the same time for one
second. To silence the siren/bell, enter your 4 digit Master or Auxiliary Code.
If any of the above tests are not successful or the results unclear, contact your service
company at the phone number listed on page 1 of this booklet.
8
EMERGENCY EVACUATION PLANS
An emergency evacuation plan should be established for an actual fire alarm condition. For
example, the following steps are recommended by the National Fire Protection Association and
can be used as a guide in establishing an evacuation plan for your building.
Draw up a floor plan of your home. Show windows, doors, stairs, and rooftops that can be
used for escape. Indicate each occupant's escape routes. Always keep these routes free from
obstruction.
Determine two means of escape from each room. One will be the normal exit from the
building. The other may be a window that opens easily. An escape ladder may have to be
located near the window if there is a long drop to the ground below.
Set a meeting place outdoors for a headcount of the building occupants.
Practice escape procedures. In a home, sleep with bedroom door closed; this will increase
your escape time. If you suspect fire, test the door for heat. If you think it is safe, brace your
shoulder against the door and open it cautiously. Be ready to slam the door if smoke or heat
rush in. Practice escaping to the outdoors and meeting in an assigned spot. Call the Fire
Department from a neighbor's phone.
NOTE: After the installation of your Security System has been completed, notify your local Fire
and Police Departments to give them your name and address for their records.
Early warning fire detection is best achieved by the installation of fire detection equipment in
all rooms.
This equipment should be installed in accordance with the National Fire Protection
Association's Standard 72. For additional information write the National Fire Protection
Association, Batterymarch Park, Quincy, MA 02269.
The following are examples of evacuation plans. A plan unique to your home or business
should be drawn and memorized by each occupant.
9
8600E USER’S MANUAL
8600EUE99 REV E (04-28-99)