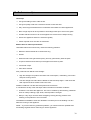
1
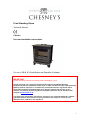
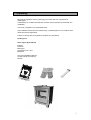
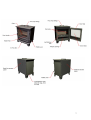
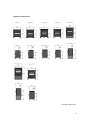
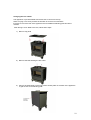
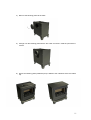
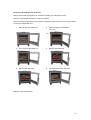
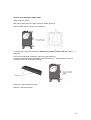
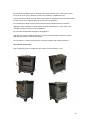
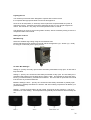
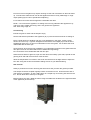
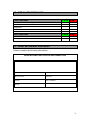
Free Standing Stove
Technical Manual
8 Series
User and Installation Instructions
For use in GB & IE (Great Britain and Republic of Ireland).
IMPORTANT
Please read thes e Instructions carefully before installation or use.
Please note that it is a legal requirement under England and Wales Building
Regulations that the installation of the stove i s either carried out under Local Authority
Building Control approval or is installed by a Competent Person regi stered with a
Government approved Competent Persons Scheme. HETAS Ltd operate such a
Scheme and a listing of their Regi stered Competent Persons can be found on their
website at www.hetas.co.uk.
This appliance will become hot whilst in operation. It is recommended that a suitable
guard be used for the protection of young children, the elderly or infirm. Do not
attempt to burn rubbi sh in thi s appliance.
1
Contents
Section
Pages
1
Unpacking
3
2
Technical Specifications
4
3
Pre-Installation
5
4
Unit Basic Information
6-8
5
Installation
9-12
6
Commissioning
13
7
Briefing and handover to the customer
14
8
Servicing and Maint enance
15-21
9
Spare Parts
22
10
User Instructions
23-31
Lighting Instructions
26-27
11
Performance tips
30
12
Installer Check List
31
13
Dealer and Installer Information
31
14
Annual Service Rec ords
32
2
1. Unpacking
Remove the appliance from its packaging and check that it is complete and
undamaged.
If satisfied by its condition and that the cont ents are as specified, proceed with the
installation.
The stove is supplied in an assembled state.
The installation should only be carried out by a qualified pers on in accordance with
national and local regulations.
Failure to comply with the regulations nullifies ALL guarantees.
Packing List.
Stove Type s (Assembled)
Flatford
Petworth
Barrington
Hampstead / LS / XLS
Belgravia
User and Installation Manual
Ashpan handle (In Ashpan)
Gloves
3
2. Technical Specifications
Wood Logs
All tests used 2.25 – 2.5 kg of test fuel (at 12.1% moisture) – 2 logs (12 inches)
All efficiencies in the table are Net values
Total Efficiency 76%
Parameter
1
2
3
Mean
h
0.92
1.00
0.93
0.95
Nominal heat output
kW
8.5
8.2
8.3
8.3
Mean CO2 emission
%
12.84
11.64
11.11
11.86
Mean CO emission
%
0.42
0.29
0.36
0.36
Mean CO emission (at 13 % O2)
%
0.26
0.19
0.25
0.23
Mean flue gas temperature
ºC
354
368
357
360
Flue gas mass flow
g/s
5.5
5.9
6.5
6.0
Test Duration
Manufacturers declarations
Refuelling period
Nominal out put
1 hour
8 kW
Ancit
All tests used 2.5 kg of test fuel (at 0.7% moisture)
All efficiencies in table are Net values
Total Efficiency 75.4%
Parameter
2
3
Mean
h
1.85
2.08
1.97
Nominal heat output
kW
9.0
8.0
8.5
Mean CO2 emission
%
11.35
10.83
11.09
Mean CO emission
%
0.33
0.26
0.30
Mean CO emission (at 13 % O2)
%
0.21
0.16
0.19
Mean flue gas temperature
ºC
334
328
331
Flue gas mass flow
g/s
6.2
5.8
6.0
Test Duration
Manufacturers declarations
Refuelling period
Nominal out put
2 hours
8 kW
Temperature safety test
Safe distance from combustibles
Side
600 mm
Rear
650 mm
Shelf 400 mm
Maximum Heart h Temperature 70.3°C (obtained duri ng tests with Ancit)
This appliance has been HETAS Approved
These appliances have been approved by HETAS Ltd as an intermittent operating appliance for
burning wood and smokeless fuels only.
4
3. Pre-Installation
Products of combustion entering the room can cause serious health risks.
This appliance must be fitted in accordanc e with building regulations and by an
approved HE TAS registered installer.
IMPORTANT: Seek specialist advice if the installation is in a dwelling with a thatched
roof.
The flue or chimney system must be in good condition, meet all regulations and work
correctly.
The flue must be ins pected by a competent person and passed for use with the
appliance before installation.
The construction of the chimney and connecting flue pipe system must comply with
building regulations.
It is advised that provisions be made for the removal of the appliance without the need
to dismantle the chimney.
The flue or chimney system must be swept and inspected to ensure that it is structurally
sound and free from obstructions
NOTE - The flue must not be shared with any other applianc e.
The flue must have suitable access to enable the collection and removal of debris.
Inspect the flue after the appliance has been installed.
NOTE – The smoke pellet gives a fair idea on the draw before fitting the unit but is
no guarantee that the products of combustion will clear from the fire unit after fitting,
so testing is to be done after the installation of the unit by carrying a spillage test.
Ventilation
In certain conditions room sealed applianc es require a permanently open dedicated
air supply. This can be provided by means of an air vent in accordance
with Approved Document J, Section 2 (Table 1).
This appliance must have a permanent air vent opening with a total free area of at
least 1650mm².
The permanent air vent/s should be non-adjustable and positioned where they are
unlikely to become blocked. Carefully consider the placement of the vents to ensure
they are placed in areas that are unlikely to cause discomfort from draughts. This
can be avoided by placing vents near ceilings or close to the appliance.
NOTE – Window vents are not considered to be a permanent air supply.
5
4. Unit – Basic Information
Appliance types and approximate weights
Flatford 143kg / Petworth 151kg / Barrington 148kg / Hampstead 155kg
Hampstead LS 172kg / Hampstead XLS 180kg / Belgravia 148kg
6
7
Appliance Dimensions
Flue size 150mm (6”)
8
5. Installation
Please read these instructions before installing the appliance.
In all cases the installation must comply with current Building Regulations, Local Authority
Byelaws and other specifications or regulations as they affect the installation of the stove. It
should be not ed that the Building Regulations requirements may be met by adopting the
relevant recommendations given in British Standards BS 8303, BS EN 15287-1:2007 as an
alternative means to achieve an equivalent level of performance to that obtained following the
guidance given in Approved Document J.
Careful planning and implementation of the construction, positioning, flue lengths and sizes
will help the applianc e run smoothly, safely, and give good performance.
The appliance must comply with the following regulations:British Standards BS 8303, BS EN 15287-1:2007
Building Regulations Approved Document J for England and Wales.
Building Regulations Part F for Scotland.
Building Regulations / 1997 Technical Guidance Approved Document J - Heat Producing
Appliances for the Republic of Ireland.
Registered body: HE TAS (GB only)/INFO (Ireland)
This appliance must be fitted to meet all the requirements of the local and national building
regulations.
If there is any conflict between these instructions and the building regulations, the building
regulations are to be followed.
This appliance must be fitted by an approved installer.
NOTE - This appliance is heavy and must be handled with care.
Care must be taken when installing or servicing to avoid personal injury.
Wear protective clothing when fitting or carrying works out on the appliance.
Special care must be taken when installing the stove such that the requirements of the Health
and Safety at Work Act are met.
Some types of fire cement are caustic and should not be allowed to come into cont act with
the skin. In case of contact wash immediately with plenty of water.
This appliance contains no asbestos.
Installing the appliance
WARNI NG – The se appliances are heavy
Lifting these appliances requires 2 pers ons.
Handle the appliance with care to avoid damage.
Place the appliance in the desired area, remove any supporting packaging from the appliance
and check the levers, fire bricks and parts are in the correct place and are in good working
order.
9
Changing the flue outlets
This appliance is pre-assembled with the flue set to come from the top.
When carrying out a survey assess the situation as to the exit of emissions.
If the flue is to exit the rear of the appliance then an additional blanking plate should be
ordered.
If the flueing is to be fitted to the rear, follow these steps.
1) Remove top panel
2) Remove the bolts holding the flue collar.
3) Using a hacksaw blade cut the lugs off the access plate on the back of the appliance
to gain access to the blanking plate
10
4) Remove the blanking plate via the bolts.
5) Change over the blanking plate with the flue collar and secure. Seal the joint with fire
cement.
6) Ensure the blanking plat e (additional part) is bolted to the underside of the removable
top.
11
Connection to chimney
All the stoves have either a top or rear flue outlet adaptor that allows the connection to be
made, to either a masonry chimney or a factory-made insulated metal chimney, using a
connecting flue pipe. The outlet is designed to fit a connecting flue pipe of 150 mm nominal
diameter. The connecting flue pipe and the chimney flue must at no point be less than the
diameter of the stove outlet (or equivalent in the case of a square section chimney).
All joints in the appliance to chimney flue connection must be sealed using approved
materials.
If the stove is fitted in place of an open fire then the chimney should be swept one month after
installation to clear any soot falls which may have occurred due to the difference in
combustion between the stove and the open fire.
IMPORTANT INFORMATION FOR BURNI NG WOOD IN A SMOKE CONTROL AREA
It is an offence to burn wood or other non-authorised smokeless fuels in a smoke control area
on an appliance that is not exempt ed for burning the non-authorised fuel. Currently Chesney’s
8 Series Stove Collection are not exempt applianc es.
Hearths
The area where the appliance is to be fitted must have a suitable load-bearing capacity for
both hearth and appliance.
The appliance must stand on a non-combustible heart h.
Check building regulations.
If you are using an existing hearth check it complies with the relevant construction regulations
and is at least the minimum sizes specified.
A suitable clearance is required around the stove to enable the use of all levers, allow for
maintenance and for air to circulate around the appliance.
Maximum Heart h Temperature 70.3°C (obtained durin g tests with Ancit)
12
6. Commissioning
Before Lighting
Ensure that all parts are in position such as firebricks, baffles, grate, riddle plate, fuel retainer
bar etc.
All castings, joints and door seals must be checked for soundness.
Check that the riddling lever, fuel selector lever and the air flow bar operate smoothly.
Flue draught
When commissioning the installation it may be necessary to carry out a flue draught test. The
ideal flue draught is 12pa.
Insufficient or excessive flue draught can lead to poor combustion, blackened glass and
reduced efficiency. These can cause damage to the appliance.
Carrying out smoke tests
Heat up the flue system for about 10 minutes using a blowlamp or similar.
Open the air controls and place a smoke pellet in the centre of the riddle plate then close the
appliance door.
Check the appliance and flue for the correct withdrawal of the smoke.
If the tests fail then the flue system, ventilation and appliance must be re-checked and
amended.
If it passes then the appliance can be lit for further tests.
Light the appliance and increase the temperature slowly, ensuring there are no combustion
products entering the room. Also check for emissions in other parts of the dwelling where the
flue / chimney routes including loft areas.
LIGHTING THE APPLI ANCE FOR THE FIRST TIME
When lighting the appliance for the first time, the materials (i.e. paint, sealants etc.) may give
off a smoke haz e and an unpleasant odour. This is quite normal and will disappear after a
few lightings. During this period, keep the room well ventilated to keep the room free of
odours and fumes.
We recommend that you have 2 or 3 small fires before operating the stove at full
temperature. This will allow the paint to cure.
Once the appliance reaches the operating temperature carry out a further spillage test by
opening the door, this time checking around the door opening using either a smoke match or
smoke pellet.
If excessive spillage occurs allow the appliance to cool down and re-check the flue and
ventilation system.
If the appliance, flue system and ventilation work correctly move on to briefing and handover
to the customer.
13
7. Briefing and handover to the customer
Explain to the user the full operation of the appliance.
Warn the customer that the fire unit will give a temporary odour caused by the paint ‘curing’.
This is normal running in of the unit and will disappear after a short period of use.
Inform the user not to use the appliance as an incinerator and ex plain the importance of using
appropriate fuels.
Advise the customer not to over-fire the appliance.
Inform the customer that it is recommended to regularly clean and maintain the appliance and
to check for damage to firebricks, seals, lever operations or any irregularities and if in any doubt
seek advice.
Brief the customer that eventually stove paint work may need a light re-spray occasionally after
a seasons use, and that stoves painted in a lighter colour are more likely to require this and to
ensure that the appliance is off and cool and the appropriate safety guidelines are followed
when carrying out such work. Touc h-up spray is available from most Chesney’s stockists.
Advise the customer that it is recommended to have the appliance and flue system serviced on
an annual basis.
Warn the user that the applianc e is not supplied with a fireguard but that the use of such is
recommended for the protection of young children, the elderly or infirm and in the course of
normal use and that any fireguard used conforms to standards.
Advise the us er not to stand too close to the appliance for prolonged periods of time, loose
clothing is particularly at risk of burning, due to the heat produced from the appliance and flue.
Advise the us er against placing combustible materials directly above or in front of the appliance.
Ensure the installer details are filled in.
Give the copy of the installation manual to the customer, and advise the user to keep it handy
for fut ure referencing and maint enance.
14
8. Servicing and Maintenance
It is important that this appliance is properly installed and regularly maintained.
Periods of Prolonged Non-Use
If the stove is to be left unus ed for a prolonged period of time then it should be given a
thorough clean to remove ash and unburned fuel residues. To enable a good flow of air
through the appliance to reduce condensation and subsequent damage, leave the air controls
fully open.
The chimney system should be checked for blockage aft er periods of prolonged shut down.
If the appliance is emitting fumes into the room it is strongly advised that the appliance and
the chimney / flue system is checked over for blockages and that all seals are intact.
Before carrying out fitting, servicing or maintenance works on the appliance or flue / chimney
system ensure that the surrounding area is protected so as not to damage the property.
It is advised that the flue is checked regularly and that the flue is swept at least once a year.
It is best to carry out an annual service at the end of a heating season.
Clean ash / soot build up and inspect for any damage and wear and tear and repair if
necessary.
Parts to clean and inspect
Removable parts
Fixed Parts
Mechanical Parts
Baffles
Firebricks
Grate
Riddle Plate
Fuel retaining bar
Ash pan
Glass
Internal surfaces
Seals
Door hinges
Ash riddling lever
Fuel selection lever
Maintenance Products
User, Installation and Maintenance
Product
User Protection
Heat resistant gloves
Installation and Maintenance
Fire cement
Stove glass cleaner
Door Rope seal
Glass seal
Rope adhesive
Heat resistant spray paint
Miscellaneous
15
Paintwork
It is generally accepted that stove paintwork may need a light re-spray occasionally after a
seasons use, stoves painted in a lighter colour are more likely to require this.
Touch-up spray is available from most Chesney’s stockists.
Ensure that there is adequate ventilation and that areas to be sprayed are clean and dry. Make
sure that all parts and the surrounding area that do not require paint are properly masked up.
NOTE – Only re-spray when the appliance is off and cool following the safety guidelines when
carrying out such work.
Cleaning the glass
The appliance is designed to keep the glass from badly staining provided the solid fuel is of
good quality and is burned in the correct manner but sometimes due to the nature of the burn,
tars and creosotes may stain the glass.
If the glass is dirty check that fuel selector lever is set correctly.
To clean the glass use a stove glass cleaner.
Do not clean the glass if the glass is still hot.
Ensure the glass is cool before applying glass cleaner.
Use an appropriate stove glass cleaner following the instructions on the glass cleaning.
Changing the door glass
If the glass is damaged resulting in cracks or breaks do not use the fire until the glass is
replaced.
Glass staining may be caus ed by too low a burning temperature, poor quality fuels or
incorrect use of the air flow lever.
If the glass is badly stained and the stains cannot be removed this will not damage the
appliance but may hinder the inspection of the burn. Replacement of the glass is advised if
you are unable to inspect the burn.
Removal of the glass panel
Wear appropriate safety equipment and take care when removing the glass panel.
On changing the glass it is advised that the glass seal is also renewed to ensure a good seal.
Remove the glass retaining bracket via the two screws.
Gently push the glass out on the retaining bracket side and pull the glass out of the retainer.
Replace in the reverse order.
16
Removal and refitting of the fuel retaining bar
To remove the fuel retaining bar lift from the slot in the fire grate and rot ate to clear the sides
and door.
Cleaning is done using a wire brush.
Replace in the reverse order.
Removal and refitting of the riddling plate
The riddling plate is removable for cleaning and inspection.
For easier access remove the fuel ret aining bar and the ashpan, then unhook riddle lever out
of the riddle plate hole.
Once the riddle plate has been unhook ed the riddle plate can be lifted clear from the
appliance.
Cleaning is done using a wire brush.
Replace in the reverse order.
17
Removal of the main fire grate
Ensure that the appliance is cool before starting.
Before removing the main fire grate, the fuel retaining bar, ashpan and riddle plate need to be
removed.
(See ‘Removal and refitting of the fuel retaining bar’ and ‘Removal and refitting of the riddling
plate’).
After the removal of the fuel ret aining bar, ashpan and riddle plate, the main fire grate can
then be removed by firstly lifting the front edge of the grate from underneath (through the
ashpan opening) then lifting from the main opening whilst rotating the grate to clear the
opening.
Cleaning is done using a wire brush.
Replace in the reverse order.
18
Removal and refitting of the firebricks
Always ensure that the appliance is cool before starting any maintenanc e work.
Replace any damaged firebricks as soon as possible.
When removing the firebricks wear protective clothing and take care when removing as these
can become fragile after use.
1.
Remove the fuel retainer bar.
2.
Take the weight of the baffle in
one hand.
3.
Turn and slide the baffle out.
4.
Remove the side brick.
5.
Remove the side brick.
6.
The back brick is then removed.
Replace in the reverse order.
19
Removal and refitting the baffle plates
Wear protective gloves.
Removal of these parts also gains access to the flue openings.
The first baffle plate is in place on the firebricks.
To remove this - follow the instructions ‘Removal and refitting of the firebricks’ steps 1 – 3.
(Page 19)
The second baffle plate is hooked in place using key-hole slots.
To remove, take the weight of the baffle and pull towards you. This will release it from its
retaining bolts and it will drop downwards.
Cleaning is done using a wire brush.
Replace in the reverse order.
20
Replacing the glass seal
Stove glass seals are available from most Chesney’s suppliers.
The glass seal is a peris hable item and at some point may need changing.
If the seal leaks emissions then it must be replaced.
To replace the glass seal see instructions ‘Removal of the glass panel’ ,Page 16, for removing
the glass.
The glass seal is pressed between the door and glass without the need of glues.
The perished seal may stick to the glass panel or door frame and will need removing. This
can be done using a sharp blade or chisel to remove any fragments of the old seal before
replacing the new seal.
Replacing the door rope
The door rope is a perishable item and at some point may need changing.
If the door rope is frayed and starting to leak emissions then it must be replaced.
The stove rope and rope adhesive are available from most Chesney’s suppliers.
Remove the old seal and clean off any dirt and old adhesive from around and in the seal
channel.
Dry fit the seal and cut off any overlapping excess.
Add a small bead of adhesive around channel and then fit the seal into the channel, wiping off
any excess glue.
Close the door to press the seal in place and allow the glue to dry before re-using the
appliance.
Door hinge adjustment
The door hinges can be adjusted to adjust the sealing of the door.
Lift the door off its hinges, revolve the hinge half a turn (outwards or inwards as necessary)
and refit the door. The hinge pin should slide freely into the hinge block. If not, you need to
equally adjust the top and bottom hinges.
Chimney sweeping
To ensure safe and efficient use of the appliance the chimney/flue must be inspected and
swept at least once a year by a qualified chimney sweep, but if the appliance is used
constantly throughout the year the chimney should be swept more frequently.
The chimney sweeping must be done by a NA CS (UK ) / INFO (Ireland) certified person.
(NA TIONAL ASSOCIA TION OF CHIMNEY SWEEPS)
21
9. Spare Parts
ITEM NO.
PART NUMBER
QTY
1
101-105 Main body
1
2
106 Flue Blanking Plate
1
3
107 Top Duct
1
4
108 Baffle Plate
1
5
109 Side Fire Brick
2
6
110 Flue Adaptor
1
7
111 Rear Fire Brick
1
8
112 Grate
1
1
9
113 Riddle Plate
10
114 Riddling Bar
1
11
115 Air Flow Plate
1
12
116 Air Flow Bar
1
13
117 Fuel Retainer bar
1
14
118 Ash Pan
1
15
119 Secondary Baffle
1
16
120 Knob
2
17
121 Ash Pan Handle
1
18
122 Static Air plate
1
19
123 Back Panel
1
20
124 Fuel Selector Plate
1
21
125 Air Flow Bar Bush
1
22
126 Air Plate Bush
1
23
201-001 Flatford / Petw orth Door Casting
1
24
201-001 Barrington Door Casting
1
25
201-006 Belgravia Door Casting
1
26
004-001 Hampstead/LS/XLS Door Casting
1
27
202 Hinge Pin
2
28
203 Door Glass
1
29
204 Glass Retainer
1
30
205 Door Mechanism
1
31
206 Door Handle Hex
1
32
207 Rope Seal
1
33
208 Glass Seal
1
34
003-001 Flatford Plinth
1
35
401-001 Petw orth Plinth
1
36
501-001 Barrington / Belgravia Plinth
1
37
005-001 Hampstead Plinth
1
38
007-001 Hampstead LS Plinth (log store)
1
39
007-002 Hampstead XLS Plinth (log store)
1
40
303-001 Flatford Top
1
41
402-001 Petw orth Top
1
42
502-001 Barrington / Belgravia Top
1
43
006-001 Hampstead / LS / XLS Top
1
44
Comp Spring
1
The body of the stove is covered by
the warranty, not consumables.
Cons umables are as follows:
Glass seal
Door rope seal
Baffle plate
Secondary baffle
Door glass
Grate
Riddle plate
Side firebricks
Rear firebrick
22
10. User Instructions
General
Before using this appliance please read these instructions carefully.
All local regulations, including those referring to National and European Standards must be
complied with when installing this appliance.
The builder's opening or fireplace opening must be constructed of a non-combustible
material.
Before the fire is installed, the chimney should be swept and a flue test in accordanc e with
National Regulations should be carried out.
It is important that the chimney system be checked for blockage after periods of prolonged
shut down.
Only use the appliance for domestic heating in accordance with these operating instructions.
This appliance is capable of intermittent operation.
Burn only approved fuels. Do not use with liquid fuels or as an incinerator.
The appliance door should be closed except when attending.
Appliance surfaces become very hot when in use. In the presence of young children, elderly
or infirm use a suitable fireguard that complies with the local and national regulations.
It is advised not to stand too close to the appliance for prolonged periods of time, loose
clothing is particularly at risk of burning due to the heat generated from the fire unit.
Do not use an aeros ol spray on or near the stove when it is alight. This may lead to ignition of
the aerosol propellant or spray contents with a risk of personal injury or damage to property.
Allow adequate clearances for curtains, pictures, soft furnishings, electrical appliances or any
items that may get damaged through heat.
It is also advised against placing combustible mat erials or soft furnis hings directly in front or
above the appliance. Floor coverings, such as carpets (up to the hearth), are considered to
be acceptable.
Extractor fans or cooker hoods must not be placed in the same room or space as this can
cause appliance to emit fumes into the room.
Open flued appliances can be affected by temporary atmospheric conditions and can allow
fumes to enter the hous e. It is recommended that an electronic carbon monoxide detector
conforming to BSEN50291 be fitted and maintained.
23
De-ashing and refuelling may occasionally emit fumes into the room. If there are a lot of
fumes in the room open a window or door to the outside to ventilate the room.
If fume emission persists, open all doors and windows to ventilate the room and eit her allow
the fire to burn out or safely dispose of the fuel from the appliance.
Do not attempt to relight until the cause of the emission spillage has been corrected.
Regularly check ventilation for obstructions inside and outside do not cover vents over.
Ventilation allows the safe use of the appliance.
Do not make unauthorised changes to the applianc e.
The chimney must be swept at least once a year by a NA CS approved chimney sweep
(National Association of Chimney Sweeps).
Do not connect, or share, the same flue or chimney system with another appliance.
Door Handle and Levers
Use a heatproof glove to operate the door handle and levers when in use.
24
Lighting Instructions
Your Chesneys stove has been designed to operate with minimum effort.
The appliance door should be closed except when attending.
Lighting the appliance for the first time.
Due to the newness of materials, the fire will give off an unpleasant odour for a period of time
after commissioning. This is quite normal and should disappear within a few hours of
operation.
It is preferable to leave the room whilst the curing process is taking place.
Have 2 or 3 small fires initially. This will build up the temperature gradually and allow the paint
to cure.
Operate the appliance at a low out put for first few burns to allow the curing of the materials
Do not touch painted surfac es on the appliance during the first period of use.
Keep the room well ventilat ed to avoid a build-up of fumes.
Recommended Fuels
Please note that HETAS Ltd Appliance Approval only covers the use of wood and smokeless
fuels on this appliance. HETAS Ltd Approval does not cover the use of other fuels either alone
or mixed with the recommended fuels listed above, nor does it cover instructions for the use of
other fuels.
Wood
Burn only seasoned timber with a moisture content of less than 20%.
Maximum wood length for this appliance is 350mm.
Poor quality timber can cause low combustion efficiency and the glass will not remain clear.
Harmful condensation may be produced which would reduce the life of the appliance.
Do not burn the following –
Painted Timber
Construction timber
Pallet wood
Treat ed wood
Manufactured board products
Coal
Do not burn bituminous coal, ‘petro-cok e’ or other petroleum based fuels as this can damage
the appliance and invalidates the product guarantee.
Burn anthracite or approved manufactured briquette smokeless fuels that are suitable for use
with closed heating appliances.
25
Lighting the fire
Your Chesneys stove has been designed to operate with minimum effort.
It is important that appropriate fuels are used in this appliance.
Once set in its fuel position, a Ches neys stove implements a sophisticated air system to
control the primary, secondary air and air wash with the use of a very simple single lever
control. This results in a very easy and uncomplicated means of control.
This will allow you to be up and running within minutes, without constantly having to refer to a
complicated instruction manual.
Setting the control s
Woodburning
Select the woodburning setting using the fuel selector lever
Set the fuel selector lever (located on the left side of the appliance (w) = Wood / (C) = Coal)
for the type of solid fuel you are going to burn.
Air Flow Bar Settings –
Setting lll – primary air is fully open and the secondary air/airwash is fully open. Air flow bar is
fully extended.
Setting ll – primary air is closed and Secondary air/airwash is fully open. The secondary air is
preheated and washes over the glass door to keep it clean. This airwas h air promotes clean
burning, increased efficiency and reduc ed emissions. The stove will run quit e fast at this level
if the wood is dry and well seasoned.
Between Settings II and I – primary air is closed and Secondary air/airwash is partially open.
Air flow bar is partially extended. Fire will burn well at this setting. Experience will dictate your
preferred setting.
Setting I – Primary and secondary air fully closed. Air flow bar is fully pushed in. The fire is
starved of air in this setting. The temperat ure will gradually fall and the fire will eventually die
out.
26
Lighting
Pull the air flow bar fully out towards you, allowing full primary and secondary air into the
stove. (Setting lll)
Lay the fire using dry kindling wood and paper or firelighters. Place these on the bas e of the
stove and cover with two small split logs. Make sure that the logs are not in contact with the
glass when the door is shut as this could cause the glass to blacken and possibly crack.
Light the paper or firelighters and close the appliance door. To assist the fire in starting you
may wish to have the door slightly ajar for a minute or two. Do not leave the stove
unattended whilst the door is open.
Close the door when the fire has established.
When the stove is up to temperature with seasoned wood this will take about 20 minut es you
can start to control the stove using the air flow bar to adjust the burn rate bet ween Settings ll
and l.
The flames will die down and take their time on leaving the stove, the glass should still remain
clear under these conditions.
Depending on the flue draught the normal setting would be approximately 50% shut between
Settings ll and l. Experience will dictate your preferred setting.
Refuelling
The typical refuelling int erval is around 1hour for logs (based on two average size logs) and
2 hours for ancit.
Do not overload the appliance.
The maximum filling height for logs is about three average size logs high.
The maximum filling height for ancit is 60mm (to the top of the fuel retainer bar).
Wear the heat resistant gloves provided when refuelling the stove as the handle will be hot.
Open the Air flow lever fully (Setting lll) then open the door slowly and leave ajar for a few
seconds to equalise the air pressure then slowly open the door to reduce the disturbance of
ash.
Re-fill when low.
Wood burns better on a bed of ash therefore prior to refuelling, open the air control fully and
rake the embers evenly over the fire bed. Place the new logs using the gauntlet provided and
run the appliance on setting lll for a few minutes before adjusting to your usual preferred
setting.
When in use, burning the appliance at high out put for a short period also reduces tars and
creosote from building up in the appliance.
27
From time to time the glass may require cleaning as tars and creosotes from the fuels buildup. To reduce this effect do not over fill the appliance and burn newly added logs on ‘high’
output (S etting lll) for a short period before adjusting
For a cleaner and more efficient appliance refuel little and oft en.
NOTE – Do not leave the appliance on setting lll for too long otherwise the appliance may
over heat, this is called ‘Over-firing’ and is not good for the appliance.
See ‘Over-firing’ Page 29.
Coal burning
Ensure the grate is clean and the ashpan empty.
Set the fuel selector (left side of the appliance) to (C) Coal and the air flow bar to setting lll.
Place a small amount of kindling and one or two firelighters in the grate. Place a small
amount of ancit on top. Light the firelighters and leave the door slightly ajar until the fire is
established and there is no sign of condensation on the door glass. Do not leave the stove
unattended with the door ajar.
Close the door when the fire has established, (if condensation appears on the glass leave the
door ajar until it can be closed without the condensation appearing).
Do not leave the stove unattended with the door ajar.
When the ancit starts to glow red, open the door 5mm then slowly open wide, spread out the
glowing ancit and add more fuel then close the door.
Allow the temperature to increase in the stove until all the ancit is alight and then adjust the
burn rate using the air flow bar between settings ll and l to your desired setting.
Ash removal
Safety is paramount so when removing the ash ensure that you wear the gloves provided.
The ashpan should be emptied regularly before it becomes too full. Ensure that the ash is
cool before it is emptied. An ash caddy carrier is a simple way of removing hot ash from the
fire. Do not allow ash to build up in the grate.
Before opening the door, riddle the ashes using the riddle lever located on the right hand side
of the appliance (shown below).
28
Open the door.
Under the grate is a compartment where the ashpan is located this collects the ash and
requires emptying from time to time, take care when emptying.
Using the gloves provided and the ashpan handle (supplied) hook the handle to the ashpan
and carefully remove the ashpan safely away from the appliance and dis pose of the ashes
into a non combustible metal ash bin.
Do not place hot ashes into a bin made of plastic. Check that any bin into which ashes are to
be emptied does not contain combustible materials and if so remove the same before
emptying hot ashes into the bin.
Over-firing
It is important not to over fire the appliance.
Over-firing can cause permanent damage to the appliance.
Damage caused from over-firing is not covered under the warranty.
Over-filling the appliance with fuel or using the appliance on maximum output ‘high burn’ for
long periods can cause over-firing.
If the flue pipe, flue collar or top plate glows red / orange the appliance is over-firing
If this occurs care must be taken, wearing safety gloves close the air flow to setting l to
reduce the burn.
Chimney fires
If a chimney fire occurs shut the air flow to setting l immediately.
Evacuate the building and call the fire brigade.
Do not re-enter the building until it is confirmed safe to do so.
Do not use the applianc e or flue system until a registered installer has examined, cleaned,
made safe and ensured that it is structurally sound.
29
11. Performance tips
Useful tips
Use good kindling wood to start the fire.
Use good quality wood with a moisture content of less than 20%.
Only use an approved anthracite or smokeless fuel suitable for closed appliances.
Burn at high out puts for short periods to avoid large build-ups of soot on the glass.
Provide sufficient amount of air to the appliance to ens ure the fire keeps burning.
Ensure the appliance and flue is serviced regularly.
Check required vents are clear of obstruction.
Effects that can reduce performance
Unsuitable fuels and wet wood may cause the following problems.
Difficult to start and difficult to continue burning.
Smoke.
Glass and fire bricks get stained quickly and may permanently stain the parts.
A rapid creosote and tar build-up in the appliance and flue system.
Lower heat output.
Parts life is reduced.
Poor performances relat ed to flue draught.
High flue draught can produce excessive fuel cons umption, overheating, wind noise
and poor burning control.
Low flue draught can make the fire difficult to start and keep alight. It will cause low
heat output and cause smoke to ent er the room.
Weather conditions can also affect the performance of the fire.
A cowl fitted to the top of the flue helps reduce the effects of weather conditions
Turbulence can affect the appliance. This can be creat ed by trees blowing, obstacles
such as nearby buildings, high winds, and temperature changes.
Damp or rainy days can also affect the lighting causing burning problems and
resulting in the production of more smoke.
The additional installation of extract ventilation to another part of the building can als o
affect the running of the appliance.
NOTE – If you encounter any persistent problems, you should consult a qualified solid
fuel heating engineer before continuing to use the appliance.
30
12. INSTALLER CHECK LIST
Flue Checklist
PASS FAIL
Flue system correct for the appliance
Flue swept
Spillage test
Smoke test on Installed Unit
Unit Checklist
PASS FAIL
Appliance controls operates correctly
Seals in good condition
13. Dealer and Installer Information
Please complete the following information:-
DEALER AND INSTALLER INFORMATION
Dealer
Installation Company
Contact No.
Engineer
Date of Purchase
Contact No.
Model No.
Date of Installation
Serial No.
31
14. Annual Service Record
Annual service record
Year 1
Annual service record
Year 2
Engineer
Engineer
Contact No.
Contact No.
Date of Service
Date of Service
Annual service record
Year 3
Annual service record
Year 4
Engineer
Engineer
Contact No.
Contact No.
Date of Service
Date of Service
Annual service record
Year 5
Annual service record
Year 6
Engineer
Engineer
Contact No.
Contact No.
Date of Service
Date of Service
The followi ng infor mati on s upplied in this manual is correct at the time of publish;
Date of last manual update 05 August 2010. V9.
32