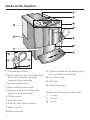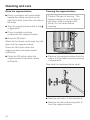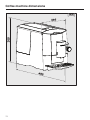
1
Operating instructions
Freestanding coffee machine
CM 5100
To avoid the risk of accidents or
damage to the machine, it is
essential to read these instructions
before it is installed and used for the
first time.
en - GB, HK, SG, ZA
M.-Nr. 07 902 360
Contents
Packing material / Disposal of old machine . . . . . . . . . . . . . . . . . . . . . . . . . . . . 5
Guide to the machine . . . . . . . . . . . . . . . . . . . . . . . . . . . . . . . . . . . . . . . . . . . . . . 6
Warning and Safety instructions . . . . . . . . . . . . . . . . . . . . . . . . . . . . . . . . . . . . . 8
Preparing the coffee machine for use . . . . . . . . . . . . . . . . . . . . . . . . . . . . . . . . 13
Before using for the first time . . . . . . . . . . . . . . . . . . . . . . . . . . . . . . . . . . . . . . . . . 13
Switching on for the first time. . . . . . . . . . . . . . . . . . . . . . . . . . . . . . . . . . . . . . . . . 13
Water hardness . . . . . . . . . . . . . . . . . . . . . . . . . . . . . . . . . . . . . . . . . . . . . . . . . . . 14
Filling the water container . . . . . . . . . . . . . . . . . . . . . . . . . . . . . . . . . . . . . . . . . 16
Filling the coffee bean container . . . . . . . . . . . . . . . . . . . . . . . . . . . . . . . . . . . . 17
Switching on and off . . . . . . . . . . . . . . . . . . . . . . . . . . . . . . . . . . . . . . . . . . . . . . 18
Pre-heating cups . . . . . . . . . . . . . . . . . . . . . . . . . . . . . . . . . . . . . . . . . . . . . . . . . 19
To switch cup heating on or off . . . . . . . . . . . . . . . . . . . . . . . . . . . . . . . . . . . . . . . 19
Pre-heating cups using the cup heating function . . . . . . . . . . . . . . . . . . . . . . . . . 19
Making coffee or espresso . . . . . . . . . . . . . . . . . . . . . . . . . . . . . . . . . . . . . . . . . 20
Making coffee or espresso . . . . . . . . . . . . . . . . . . . . . . . . . . . . . . . . . . . . . . . . . . 20
Making two portions of coffee or espresso at the same time . . . . . . . . . . . . . . . . 20
Cancelling preparation . . . . . . . . . . . . . . . . . . . . . . . . . . . . . . . . . . . . . . . . . . . . . 21
Adjusting the coffee spouts to the correct cup height . . . . . . . . . . . . . . . . . . . . . 21
Making coffee or espresso using ready ground coffee . . . . . . . . . . . . . . . . . . 22
Adding ready ground coffee . . . . . . . . . . . . . . . . . . . . . . . . . . . . . . . . . . . . . . . . . 22
Preparing coffee or espresso using ready ground coffee. . . . . . . . . . . . . . . . . . . 23
Cancelling preparation . . . . . . . . . . . . . . . . . . . . . . . . . . . . . . . . . . . . . . . . . . . . . 23
Frothing and heating milk . . . . . . . . . . . . . . . . . . . . . . . . . . . . . . . . . . . . . . . . . . 24
Preparation . . . . . . . . . . . . . . . . . . . . . . . . . . . . . . . . . . . . . . . . . . . . . . . . . . . . . . 24
Preparing milk froth . . . . . . . . . . . . . . . . . . . . . . . . . . . . . . . . . . . . . . . . . . . . . . . . 24
Preparing hot milk . . . . . . . . . . . . . . . . . . . . . . . . . . . . . . . . . . . . . . . . . . . . . . . . . 25
Cancelling preparation . . . . . . . . . . . . . . . . . . . . . . . . . . . . . . . . . . . . . . . . . . . . . 25
After preparing milk . . . . . . . . . . . . . . . . . . . . . . . . . . . . . . . . . . . . . . . . . . . . . . . . 25
Temperature of the milk and consistency of the milk froth . . . . . . . . . . . . . . . . . . 26
Coffee specialities . . . . . . . . . . . . . . . . . . . . . . . . . . . . . . . . . . . . . . . . . . . . . . . . . 26
Preparing hot water . . . . . . . . . . . . . . . . . . . . . . . . . . . . . . . . . . . . . . . . . . . . . . . 27
Coffee the way you like it . . . . . . . . . . . . . . . . . . . . . . . . . . . . . . . . . . . . . . . . . . 28
Grinder setting . . . . . . . . . . . . . . . . . . . . . . . . . . . . . . . . . . . . . . . . . . . . . . . . . . . . 28
Amount of coffee . . . . . . . . . . . . . . . . . . . . . . . . . . . . . . . . . . . . . . . . . . . . . . . . . . 29
Pre-brewing the coffee . . . . . . . . . . . . . . . . . . . . . . . . . . . . . . . . . . . . . . . . . . . . . 30
Brewing temperature . . . . . . . . . . . . . . . . . . . . . . . . . . . . . . . . . . . . . . . . . . . . . . . 30
Contents
Setting the portion sizes . . . . . . . . . . . . . . . . . . . . . . . . . . . . . . . . . . . . . . . . . . . 32
Programming the amount using the ., /, - or * button . . . . . . . . . . . . . . . . . . . . 32
Setting the portion sizes for espresso, coffee and hot water . . . . . . . . . . . . . . 32
Setting the duration of the steam used for hot milk and milk froth . . . . . . . . . . 33
Selecting the PROG. THE AMOUNT option in the SETTINGS menu . . . . . . . . . . . 33
The SETTINGS menu . . . . . . . . . . . . . . . . . . . . . . . . . . . . . . . . . . . . . . . . . . . . . . 34
Operating principles . . . . . . . . . . . . . . . . . . . . . . . . . . . . . . . . . . . . . . . . . . . . . . . 34
Possible setting options . . . . . . . . . . . . . . . . . . . . . . . . . . . . . . . . . . . . . . . . . . . . . 35
Language . . . . . . . . . . . . . . . . . . . . . . . . . . . . . . . . . . . . . . . . . . . . . . . . . . . . . . . 36
Time of day and Clock display . . . . . . . . . . . . . . . . . . . . . . . . . . . . . . . . . . . . . . 37
To set the clock display . . . . . . . . . . . . . . . . . . . . . . . . . . . . . . . . . . . . . . . . . . . . . 37
To set the time of day . . . . . . . . . . . . . . . . . . . . . . . . . . . . . . . . . . . . . . . . . . . . . . 37
Timer function . . . . . . . . . . . . . . . . . . . . . . . . . . . . . . . . . . . . . . . . . . . . . . . . . . . 38
To set the timer . . . . . . . . . . . . . . . . . . . . . . . . . . . . . . . . . . . . . . . . . . . . . . . . . . . 38
To activate and deactivate the timer . . . . . . . . . . . . . . . . . . . . . . . . . . . . . . . . . . . 40
Factory default . . . . . . . . . . . . . . . . . . . . . . . . . . . . . . . . . . . . . . . . . . . . . . . . . . . 41
Operating modes . . . . . . . . . . . . . . . . . . . . . . . . . . . . . . . . . . . . . . . . . . . . . . . . . 42
To lock the coffee machine . . . . . . . . . . . . . . . . . . . . . . . . . . . . . . . . . . . . . . . . . 43
To activate and deactivate the system lock . . . . . . . . . . . . . . . . . . . . . . . . . . . . . 43
To deactivate the system lock temporarily . . . . . . . . . . . . . . . . . . . . . . . . . . . . . . 43
To display information . . . . . . . . . . . . . . . . . . . . . . . . . . . . . . . . . . . . . . . . . . . . 44
Cleaning and care . . . . . . . . . . . . . . . . . . . . . . . . . . . . . . . . . . . . . . . . . . . . . . . . 45
Quick guide . . . . . . . . . . . . . . . . . . . . . . . . . . . . . . . . . . . . . . . . . . . . . . . . . . . . . . 45
Rinsing the system. . . . . . . . . . . . . . . . . . . . . . . . . . . . . . . . . . . . . . . . . . . . . . . . . 46
Switching automatic rinsing on and off. . . . . . . . . . . . . . . . . . . . . . . . . . . . . . . 46
Rinsing the system manually . . . . . . . . . . . . . . . . . . . . . . . . . . . . . . . . . . . . . . 47
Cappuccinatore . . . . . . . . . . . . . . . . . . . . . . . . . . . . . . . . . . . . . . . . . . . . . . . . . . . 47
Rinse the cappuccinatore. . . . . . . . . . . . . . . . . . . . . . . . . . . . . . . . . . . . . . . . . 48
Cleaning the cappuccinatore . . . . . . . . . . . . . . . . . . . . . . . . . . . . . . . . . . . . . . 48
Water container . . . . . . . . . . . . . . . . . . . . . . . . . . . . . . . . . . . . . . . . . . . . . . . . . . . 49
Drip tray cover . . . . . . . . . . . . . . . . . . . . . . . . . . . . . . . . . . . . . . . . . . . . . . . . . . . . 49
Drip tray and waste container . . . . . . . . . . . . . . . . . . . . . . . . . . . . . . . . . . . . . . . . 50
Coffee bean container . . . . . . . . . . . . . . . . . . . . . . . . . . . . . . . . . . . . . . . . . . . . . . 51
Brew unit . . . . . . . . . . . . . . . . . . . . . . . . . . . . . . . . . . . . . . . . . . . . . . . . . . . . . . . . 52
Remove the brew unit and wash by hand . . . . . . . . . . . . . . . . . . . . . . . . . . . . 52
Cleaning the brew unit . . . . . . . . . . . . . . . . . . . . . . . . . . . . . . . . . . . . . . . . . . . 53
Casing . . . . . . . . . . . . . . . . . . . . . . . . . . . . . . . . . . . . . . . . . . . . . . . . . . . . . . . . . . 54
Contents
Descaling . . . . . . . . . . . . . . . . . . . . . . . . . . . . . . . . . . . . . . . . . . . . . . . . . . . . . . . 55
Selecting the Descale option in the MAINTENANCE menu . . . . . . . . . . . . . . . . . 56
Problem solving guide . . . . . . . . . . . . . . . . . . . . . . . . . . . . . . . . . . . . . . . . . . . . 57
After Sales / Guarantee . . . . . . . . . . . . . . . . . . . . . . . . . . . . . . . . . . . . . . . . . . . . 68
Accessories . . . . . . . . . . . . . . . . . . . . . . . . . . . . . . . . . . . . . . . . . . . . . . . . . . . . . 69
Saving energy . . . . . . . . . . . . . . . . . . . . . . . . . . . . . . . . . . . . . . . . . . . . . . . . . . . 70
Transporting the coffee machine . . . . . . . . . . . . . . . . . . . . . . . . . . . . . . . . . . . . 71
Evaporating the coffee machine . . . . . . . . . . . . . . . . . . . . . . . . . . . . . . . . . . . . . . 71
Packing the machine . . . . . . . . . . . . . . . . . . . . . . . . . . . . . . . . . . . . . . . . . . . . . . . 71
Electrical connection . . . . . . . . . . . . . . . . . . . . . . . . . . . . . . . . . . . . . . . . . . . . . . 72
Installation . . . . . . . . . . . . . . . . . . . . . . . . . . . . . . . . . . . . . . . . . . . . . . . . . . . . . . 73
Coffee machine dimensions . . . . . . . . . . . . . . . . . . . . . . . . . . . . . . . . . . . . . . . . 74
Short instructions
A short instruction leaflet is supplied
with this coffee machine which gives
basic information on how to operate
and clean the machine on a daily basis.
It is not a substitute for this operating
and installation instruction manual.
To avoid the risk of accidents or
damage to the machine it is important
to read this operating and installation
instruction manual carefully and take
note of the Warning and Safety
instructions.
You can keep the short operating
instructions in the slot at the back of the
coffee machine so that they are always
to hand.
Packing material / Disposal of old machine
Packing material
Disposing of your old machine
The packing material protects the
machine during transit.
Electrical and electronic machines
often contain materials which, if
handled or disposed of incorrectly
could be potentially hazardous to
human health and to the environment.
They are, however, essential for the
correct functioning of your machine.
Please do not therefore dispose of it
with your household waste.
Please retain the original box and
polystyrene pieces so that you can
pack the coffee machine securely,
should you wish to transport it in the
future.
The original packaging will also be
useful should you wish to return the
coffee machine to Miele for servicing.
Please dispose of it at your local
community waste collection/recycling
centre, or contact your Dealer for
advice.
Ensure that it presents no danger to
children while being stored for
disposal.
5
Guide to the machine
a Cup heating surface
b Bean container, ground coffee chute
and rotary control for selecting
fineness of ground coffee
c Display and controls
k Cappuccinatore dial for selecting hot
milk, hot water and milk froth
l Air intake nozzle
m Milk tube
n Dispensing spout
d Steam and hot water spout
e Cappuccinatore for frothing milk
(see inset diagram above)
f Coffee spouts
g Drip tray cover
h Drip tray with waste container
i Master switch
j Water container
6
Symbols on the cappuccinatore dial:
-
Hot water
z
Milk froth
J
Hot milk
Guide to the machine
Display and controls
Control
How to operate
Function
a
Coffee button /
Press
For dispensing coffee
b
Espresso button .
Press
For dispensing espresso
c
On/Off button -
Press
For switching the coffee machine on or off
(Standby mode)
d
Rotary control
Turn clockwise or
anti-clockwise
For displaying options or settings
e
OK button
Press
For confirming a selection or action
For cancelling drink preparation
For calling up the SETTINGS menu
(Press and hold for 2 seconds)
The crescent will light up, if the option is
available
The crescent will flash before steam is generated
f
Hot water button -
Press
For dispensing hot water
g
Steam button *
Press
For dispensing milk froth or hot milk
h
Display
For displaying messages
For customising the coffee machine
(in the SETTINGS menu)
7
Warning and Safety instructions
Correct application
This coffee machine conforms with
all current safety requirements.
Improper use can, however, lead to
personal injury and damage to
property.
~ The coffee machine is not designed
To avoid the risk of accidents and
damage to the machine, please
read these instructions carefully
before using it for the first time.
They contain important notes on the
installation, safety, operation and
care of the machine.
– Shops
Keep these instructions in a safe
place and pass them on to any
future owner.
for commercial use. It is intended for
use in domestic households and for use
in similar working and residential
environments such as:
– Offices and showrooms
and by residents in establishments
such as:
– Hostels and guest houses.
Should it be used in such
environments, it must be used as a
domestic appliance and only for the
preparation of (a maximum of 20 cups
a day) espresso, cappuccino, latte
macchiato etc.
Any other usage is not supported by
the manufacturer and could be
dangerous. Miele cannot be held liable
for damage resulting from incorrect or
improper use or operation.
The coffee machine is not intended for
outdoor use.
~ The coffee machine is intended for
use by people with reduced physical,
sensory or mental capabilities, or lack
of experience or knowledge, only if they
are supervised whilst using it or have
been shown how to use it correctly by a
person responsible for their safety.
8
Warning and Safety instructions
Safety with children
Caution. The coffee spouts and the
cappuccinatore present a danger of
burning or scalding.
Children's skin is very sensitive and
reacts to hot temperatures.
~ Place the coffee machine where it is
out of the reach of children.
~ It is not a toy! To avoid the risk of
injury do not allow children to play with
it or its controls. Supervise children
whilst you are using it.
~ Children 8 years and older may use
the machine only if they have been
shown how to use it in a safe way and
understand the hazards involved. Older
children may only use the machine if its
operation has been clearly explained to
them and they are able to use it safely,
recognising the dangers of misuse.
~ Children under 8 years of age must
be kept away from the machine unless
they are constantly supervised.
Remember that coffee and espresso
are not suitable drinks for children.
Technical safety
~ Before setting up the machine,
check it for any externally visible
damage. Never use a damaged
machine. Danger of injury.
~ To avoid the risk of damage to the
machine, make sure that the rating on
the data plate corresponds to the
voltage and frequency of the household
supply, before connecting the machine
to the mains supply. Consult a qualified
electrician if in any doubt.
~ The electrical safety of this machine
can only be guaranteed if correctly
earthed. It is most important that this
basic safety requirement is observed
and regularly tested and where there is
any doubt the household wiring system
should be inspected by a qualified
electrician.
The manufacturer cannot be held liable
for the consequences of an inadequate
earthing system (e.g. electric shock).
~ Do not connect the machine to the
mains electricity supply by a
multi-socket adapter or an extension
lead. These do not guarantee the safety
of the appliance, (e.g. danger of
overheating).
9
Warning and Safety instructions
~ Disconnect the machine from the
electricity supply immediately you
notice any damage or the smell of
scorching, for example.
~ Ensure that the mains connection
cable cannot become trapped or
damaged by any sharp edges.
~ The mains connection cable should
not hang down. Someone could trip
over it and the machine could be
damaged. Excess cable can be
pushed through the cable exit at the
back of the machine.
~ The coffee machine must not be
used in a non-stationary location (e.g.
on a ship).
~ Only use the coffee machine in
rooms where the ambient temperature
is between 10 °C and 32 °C.
~ Ensure that there is sufficient
ventilation around the coffee machine.
Do not cover the vent on the top of the
machine.
~ If the coffee machine is installed
behind a kitchen furniture door, it may
only be used with the furniture door
open. Do not close the furniture door
while the coffee machine is in use.
~ Protect the coffee machine from
water and water spray.
~ Installation work and repairs may
only be carried out by suitably qualified
and competent persons to ensure
safety. Repairs and other work by
unqualified persons could be
dangerous and the manufacturer will
not be held liable.
10
~ While the machine is under
guarantee, repairs should only be
undertaken by a service technician
authorised by the manufacturer.
Otherwise the guarantee will be
invalidated.
~ Faulty components must only be
replaced by genuine Miele original
spare parts. Only genuine Miele original
spare parts guarantee the safety of the
machine.
~ The machine must be disconnected
from the electricity supply during
installation, maintenance and repair
work.
~ Disconnect the coffee machine from
the electricity supply if it is not going to
be used for a while, e.g. during
holidays.
Warning and Safety instructions
Correct use
Caution. The coffee spouts and the
cappuccinatore present a danger of
burning or scalding. The liquids and
steam dispensed are very hot.
~ Please note:
– Keep well away from the area
underneath the coffee spouts or
cappuccinatore when hot liquids and
steam are being dispensed.
– Do not touch hot components.
– Ensure that the cappuccinatore is
fitted correctly. Only fit the
cappuccinatore if it is clean. If it
becomes clogged, hot liquid or
steam could spatter from the nozzle
or it could dislodge.
– The machine must not be used for
cleaning objects.
– Do not use water from reverse
osmosis units. The machine could be
damaged.
~ Only fill the bean container with
roasted coffee beans. Do not fill the
bean container with coffee beans which
have been treated or with ground
coffee.
~ Do not reach into the grinding
mechanism.
~ Only add ground coffee or cleaning
tablets to the ground coffee chute. The
cleaning tablets remove grease from
the brew unit.
~ Only use milk without additives.
Sugar additives would stick to the milk
pipework and the cappuccinatore.
~ Do not use coffee beans which have
been treated with caramel, sugar or
other substances as they could
damage the machine.
~ Clean the coffee machine
thoroughly before using it for the first
time. Rinse through the coffee and milk
pipework (see "Cleaning and care").
~ Do not place any alcohol mixtures
~ Please note the following regarding
water:
~ Do not place any naked flames, e.g.
– Only use cold, clean tap water to fill
the water container. Warm or hot
water or other liquids could damage
the machine.
which are alight underneath the coffee
spouts. The flames could ignite plastic
components and cause them to melt.
a candle, on or near the coffee
machine. The coffee machine could
catch fire.
– Change the water every day to
prevent a build-up of bacteria.
– Do not use mineral water. Mineral
water will cause serious limescale
deposits to build up in your machine
and damage it.
11
Warning and Safety instructions
~ Please note the following with
regard to cleaning the coffee machine:
For machines with a stainless steel
trim:
– Disconnect the coffee machine from
the electricity supply before
cleaning.
~ Do not use sticky notes, transparent
– Clean the coffee machine every day
(see "Cleaning and care" for more
information).
– Do not use a steam cleaner to clean
this appliance. Steam could cause a
short circuit.
– Descale the coffee machine regularly
using the appropriate number of
Miele descaling tablets for the water
hardness level in your area. Descale
the machine more frequently in areas
with very hard water. The
manufacturer cannot be held liable
for damage arising from insufficient
descaling.
– Degrease the brew unit regularly with
Miele cleaning tablets. Depending on
the natural oil content of the coffee
used, the brew unit can become
blocked quite quickly.
– Used coffee grounds should be
disposed of with organic rubbish or
on the compost heap, but not
emptied down the sink as they could
block it.
12
adhesive tape, masking tape or other
types of adhesive on the stainless steel
trim. These damage the surface,
causing it to lose its dirt repellent
protective coating.
~ The surface of the stainless steel
trim is susceptible to scratching. Even
magnets can cause scratches to
appear.
The manufacturer cannot be held
liable for damage caused by
non-compliance with these Warning
and Safety instructions.
Preparing the coffee machine for use
Switching on for the first time
Please read the operating
instructions and take the time to
familiarise yourself with the coffee
machine before using it for the first
time.
When you switch the coffee machine on
for the first time, after the welcome
screen has appeared you will be
prompted to set the following:
– Language
Before using for the first time
– Clock format
^ Set up the coffee machine and
remove any protective film (see
"Installation").
– Time of day
^ Insert the plug of the coffee machine
into the socket (see "Electrical
connection"). If the connection cable
is too long, you can push some of it
through the opening in the rear of the
appliance.
Please clean the machine
thoroughly before filling the water
container and the coffee bean
container (see "Cleaning and care").
^ Fill the coffee bean container with
coffee beans (see "Filling the coffee
bean container").
^ Fill the water container with fresh,
cold tap water (see "Filling the water
container").
^ Set the master switch at the back of
the coffee machine to "l".
^ Press the On/Off button -.
The welcome message MIELE WILLKOMMEN will appear in the
display briefly.
To set the language
^ Turn the rotary control until the
language you require appears in the
display.
Press the OK button.
The setting is now saved.
13
Preparing the coffee machine for use
To set the clock display
^ If you want the time to be shown as a
12 hour clock, turn the rotary control
until 12 H appears.
or
^ If you want the time to be shown as a
24 hour clock, turn the rotary control
until 24 H appears.
The following will appear in the display:
SYSTEM FILLING UP
START
^ Press the OK button.
TIP Continue following the instructions
given in this booklet to set up your
machine and familiarise yourself with it.
^ Press the OK button.
Water hardness
The setting is now saved.
The water hardness indicates how
much calcium is dissolved in the water.
The higher the calcium content, the
harder the water, and the harder the
water, the more often the coffee
machine will need to be descaled.
To set the time of day
You can now enter the hours and
minutes:
^ Turn the rotary control until the
current hour appears.
Press the OK button.
^ Turn the rotary control until the
current minutes appear.
Press the OK button.
The setting is now saved. SET UP
SUCCESSFUL will appear in the
display.
^ Press the OK button.
If the water container is empty, the
following will appear in the display
FILL WATER CONTAINER
AND PLACE IN MACHINE
^ Fill the water container with fresh,
cold tap water.
TIP Place a suitable container
underneath the cappuccinatore.
14
The coffee machine measures the
quantity of water and steam used. The
number of drinks which can be
dispensed before the machine needs to
be descaled will depend on the water
hardness level set.
Set the water hardness level on the
coffee machine to the water hardness
level for the local area to ensure that
the machine functions correctly and is
not damaged. This will ensure that the
reminder to descale the machine will
appear in the display at the correct
time.
Preparing the coffee machine for use
There is a choice of four water
hardness levels:
– Level 1 (soft):
Local water hardness range 0-8.4 °d
(0-1.5 mmol/l)
Water flow rate: approx. 220 l
Steam flow rate: approx. 440 min
– Level 2 (medium):
Local water hardness level 1
8.4-14 °d (1.5-2.5 mmol/l)
Water flow rate: approx. 100 l
Steam flow rate: approx. 200 min
– Level 3 (hard):
Local water hardness range 2
14-21 °d (2.5-3.8 mmol/l)
Water flow rate: approx. 70 l
Steam flow rate: approx. 140 min
– Level 4 (very hard):
Local water hardness range 3-4
21 °d (21 °d (>21 °d (>3.8 mmol/l) or
more
Water flow rate: approx. 40 l
Steam flow rate: approx. 80 min
Measuring the water hardness
You can use the test strip supplied to
check the water hardness level, or your
local water supplier will be able to
advise you on the water hardness in
your area.
^ Dip the test strip in water for a
second, then shake off any excess
water. The result will be evident after
about a minute.
You can now set the water hardness
level for the coffee machine.
Setting the water hardness
^ In the main menu, press the OK
button for two seconds.
r
SETTINGS
WATER HARDNESS
s
^ Turn the rotary control until WATER
HARDNESS appears in the display.
Press the OK button.
^ Turn the rotary control until the water
hardness level you require appears
in the display.
Press the OK button.
The setting is now saved.
15
Filling the water container
The quality of the water plays an
important part in the overall quality of
the coffee.
The water container should therefore be
emptied and filled with fresh tap water
every day.
Warning. Bacteria can cause
infection.
It is important to empty and fill the
container with fresh tap water every
day to avoid the risk of bacteria
building up.
Hot or warm water or other liquids
can damage the coffee machine.
Do not use mineral water in the
water container. Mineral water will
cause serious limescale deposits to
build up in your machine and
damage it.
^ Open the lid on the left hand side of
the coffee machine a. Pull the water
container up by its handle and
remove it b.
^ Fill the water container with fresh,
cold tap water up to the "Max."
marker.
^ Replace the water container in the
coffee machine. Make sure that the
water container fits correctly onto the
notch at the top of its housing.
^ Close the lid.
TIP If the water container is a little high
or at a slant, check whether the surface
that the water container sits on is dirty.
If the water container is not sitting
correctly, the drainage valve will not be
sealed.
Clean the surface, if necessary.
16
Filling the coffee bean container
If you want to use freshly ground coffee
beans for each cup of espresso or
coffee, fill the coffee bean container
with roasted coffee beans.
Alternatively, you can make coffee or
espresso with ready ground coffee (see
"Preparing coffee or espresso using
ready ground coffee").
Warning. Only put roasted coffee
beans in the container.
Anything else, including ground
coffee, will damage the grinder.
Warning. Do not use coffee beans
that have been treated with sugar,
caramel, or other substances and
do not put drinks containing sugar in
the coffee bean container. Sugar will
damage the machine.
^ Open the lid on the right hand side of
the coffee machine a. Remove the
coffee bean container lid b.
^ Fill the container c with roasted
coffee beans .
^ Replace the container lid and close
the lid of the coffee machine.
TIPP Only add enough beans to last for
a few days as contact with the air
causes coffee beans to loose their
flavour.
17
Switching on and off
You can use the On/Off button (standby) to switch the coffee machine
on and off, if the master switch at the
back of the machine is switched on.
Switching on
When the On/Off button - is pressed,
the coffee machine will heat up and the
pipework will be rinsed through. This
cleans and heats the pipework ready
for coffee preparation. After rinsing, hot
water will run into the drip tray.
If the coffee machine still has an
operating temperature which is higher
than 60 °C, then rinsing will not take
place.
^ Press the On/Off button -.
The following will appear in the display:
HEATING-UP PHASE
If automatic rinsing has been activated,
then the following will appear in the
display after the heating-up phase:
RINSING
Hot water will be dispensed from the
coffee spouts.
The main menu will then appear:
SELECT TYPE OF DRINK
You can now prepare coffee or
espresso.
18
Switching off
^ Press the On/Off button -.
If the automatic rinsing function has
been switched on, the pipework will be
rinsed through before the coffee
machine switches itself off.
If you have switched the automatic
rinsing function off, you should rinse the
pipework manually (see "Cleaning and
care") before switching the coffee
machine off.
TIP To save energy, use the master
switch at the back of the coffee
machine to switch it off if it is not going
to be used for a long period of time,
e.g. during holidays.
Please note that the time of day will not
be saved and must be entered again
the next time the coffee machine is
switched on.
Pre-heating cups
Cups should always be pre-heated to
allow the flavour of the coffee to
develop and be retained.
The smaller the volume of
coffee/espresso and the thicker the
cup, the more important it is to pre-heat
the cup.
You can use the cup heating surface on
the top of the coffee machine to
pre-heat coffee cups and glasses. The
cup heating function must be switched
on.
TIP To save energy you could also heat
cups with hot water by using the
- button.
Pre-heating cups using the
cup heating function
*
^ Arrange the cups or glasses on the
cup heating surface on the top of the
coffee machine.
To switch cup heating on or off The cup heating surface will be heated
continually until the coffee machine is
switched off.
^ In the main menu, press the OK
button for two seconds.
r
SETTINGS
CUP HEATING
s
^ Turn the rotary control until CUP
HEATING appears in the display.
Press the OK button.
^ To switch the cup heating function
on, turn the rotary control until YES
appears in the display.
or
^ To switch the cup heating function
off, turn the rotary control until NO
appears in the display.
^ Press the OK button.
19
Making coffee or espresso
Making coffee or espresso
When the / or . button is pressed, the
coffee machine grinds the beans and
then uses the freshly ground beans to
brew the coffee.
Making two portions of coffee
or espresso at the same time
You can select two portions of coffee or
espresso at the same time. The coffee
machine will then make the portions
one after the other.
To prepare two cups of coffee or
espresso at the same time:
^ Place a cup under the coffee spouts.
^ To make a coffee press the / button.
or
^ To make an espresso press the .
button.
The coffee or espresso will be
dispensed from the coffee spouts into
the cup.
To ensure that any coffee residues
from the factory testing process are
removed from the brewing system,
please throw away the first two cups
of coffee when using the coffee
machine for the first time.
20
^ Place one cup under each of the
coffee spouts.
^ Then press the / button twice to
dispense two portions of coffee.
or
^ Press the . button twice to dispense
two portions of espresso.
Two portions of the coffee/espresso will
be dispensed from the two coffee
spouts.
Making coffee or espresso
To make a double portion of coffee or
espresso,
Adjusting the coffee spouts to
the correct cup height
^ place one cup under both coffee
spouts.
You can adjust the coffee spouts to suit
the height of the cup you are using so
that the coffee or espresso will not cool
down as quickly and the crema will
have a better consistency.
^ Press the / button twice, to make a
double coffee.
or
^ Press the . button twice, to make a
double espresso.
Two portions of the coffee/espresso will
be dispensed from the coffee spouts
into the cup.
Cancelling preparation
Milk preparation can be cancelled while
STOP? is showing in the display. Any
coffee beans which have already been
ground will be directed into the waste
container.
^ Then press the OK button.
^ Pull the coffee spouts down until they
are at the same level as the rim of the
cup.
Preparation will be cancelled.
or
^ Push the spouts up until there is
enough room to fit a larger cup or
mug underneath.
21
Making coffee or espresso using ready ground coffee
To make espresso or coffee using
ready ground coffee, you add a portion
of ground coffee to the ground coffee
chute.
This gives you the option of preparing a
cup of decaffinated coffee, for
example, even though the coffee bean
container is filled with roasted coffee
beans.
The coffee machine will automatically
recognise that ready ground coffee has
been added to the ground coffee
chute.
Only one portion can be prepared at a
time when using ready ground coffee.
^ Open the lid on the right hand side of
the coffee machine a.
^ Open the lid of the ground coffee
chute. Add one level scoop of ready
ground coffee.
^ Close both lids.
Adding ready ground coffee
The coffee machine will use all the
ground coffee which has been
added to the chute to make the next
coffee.
Use the scoop supplied to ensure you
add the correct amount for one portion
of coffee.
Do not add more than one level
scoop of ground coffee to the coffee
chute. If too much is added, the
brew unit will not be able to process
the coffee.
22
The following will appear in the display:
r
GROUND COFFEE
YES B
s
^ Press the OK button to prepare
coffee or espresso using ready
ground coffee.
or to cancel preparation with ready
ground coffee:
^ Turn the rotary selector until NO
appears in the display.
^ Then press the OK button.
The ground coffee will be directed into
the waste container.
Making coffee or espresso using ready ground coffee
Preparing coffee or espresso
using ready ground coffee
You can now select whether you want
to dispense a coffee or an espresso
made with ground coffee.
If no button is pressed within
approx. 15 seconds, the ground coffee
is emptied into the waste container.
Cancelling preparation
Preparation can be cancelled while
STOP? is showing in the display. The
ground coffee will be directed into the
waste container.
^ Then press the OK button.
Preparation will be cancelled.
The following will appear in the display:
SELECT DRINK
USE GROUND COFFEE
^ Place a cup under the coffee spouts.
^ To make a coffee press the / button.
or
^ To make an espresso press the .
button.
The coffee machine will now prepare
the coffee/espresso.
23
Frothing and heating milk
You can use the coffee machine to heat
or froth milk.
Preparing milk froth
The coffee machine draws the milk
through a tube from the container, e.g.
a milk carton. Steam is then used to
heat the milk in the cappuccinatore. It
can also be frothed if milk froth is
required.
If you have not prepared any milk
drinks for some time, rinse the milk
system before preparing the first
drink to remove any bacteria which
may have formed in the milk tube
and in the cappuccinatore.
^ Turn the cappuccinatore dial to the
z position.
^ Place a cup or suitable container
under the cappuccinatore.
^ Press the * button.
The coffee machine will heat up.
HEATING-UP PHASE will appear in the
display. After being heated, milk froth
will be dispensed from the
cappuccinatore into the container
underneath.
^ Press the OK button when there is
enough milk froth in the container.
Preparation
^ Place a container with sufficient milk
beside the coffee machine on the
right hand side.
^ Insert the milk tube in the container.
Make sure that the milk tube is
sufficiently submerged in the milk.
Caution. Danger of burning and
scalding on the cappuccinatore. The
liquids and steam dispensed are
very hot.
24
If the level of milk in the milk container
is higher than the cappuccinatore, turn
the dial on the cappuccinatore back to
the - position to stem the flow of milk.
TIP For best results use cold milk
(<13 °C).
Frothing and heating milk
Preparing hot milk
Cancelling preparation
Milk preparation can be cancelled while
STOP? is showing in the display.
^ Press the OK button.
Milk preparation will be cancelled.
After preparing milk
^ Turn the cappuccinatore dial to the J
position.
The cappuccinatore can become
clogged with milk residues so it should
be rinsed through if more than an hour
has elapsed since a drink with milk has
been prepared (see "Rinsing the
cappuccinatore").
^ Place a cup or suitable container
under the cappuccinatore.
^ Press the * button.
The coffee machine will heat up.
HEATING-UP PHASE will appear in the
display. After being heated, hot milk will
be dispensed from the cappuccinatore
into the container underneath.
^ Press the OK button when there is
enough hot milk in the container.
If the level of milk in the milk container
is higher than the cappuccinatore, turn
the dial on the cappuccinatore back to
the - position to stem the flow of milk.
25
Frothing and heating milk
Temperature of the milk and
consistency of the milk froth
You can use the cappuccinatore dial to
adjust the temperature of the milk and
the consistency of the milk froth.
Coffee specialities
You can use the coffee machine to
prepare these easily and quickly.
For a Cappuccino:
^ Half fill a cup with milk froth.
^ Then place the cup under the coffee
spouts and dispense an espresso.
For a Latte Macchiato:
^ First fill a glass with one third hot milk
and then add one third milk froth.
^ Place the glass under the coffee
spouts and dispense an espresso.
Hot milk
Turn the dial to the position below for:
a
Warm milk
b
Hot milk
Milk froth
Turn the dial to the positions below for:
c
Hot milk froth with a fluid consistency
d
Warm milk froth with a creamy consistency
26
Preparing hot water
If you have previously used the
cappuccinatore to prepare hot milk or
milk froth:
^ Rinse the cappuccinatore with water
(see "Cleaning and care").
Caution. Danger of burning and
scalding on the cappuccinatore. The
liquids and steam dispensed are
very hot.
^ Turn the cappuccinatore dial to the position.
^ Place a cup or suitable container
under the cappuccinatore.
^ Press the - button.
^ Press the OK button when there is
enough hot water in the container.
27
Coffee the way you like it
You can customise the coffee machine
to suit your exact requirements. You
can
– adjust the grinder setting,
– change the amount of coffee,
– pre-brew the freshly ground coffee,
To avoid damaging the grinder:
only ever adjust the grinder by one
setting at a time. Grind the coffee
beans again if you want to adjust the
grinder to the next setting.
– set the brewing temperature.
^ Place a suitable container
underneath the coffee spouts.
Grinder setting
^ Open the lid on the right hand side of
the coffee machine.
You can adjust the grinder setting to
suit the type of coffee you are using.
^ Press the / or . button.
When the beans are ground correctly,
the coffee or espresso will flow evenly
into the cup with a good crema.
The crema should have an even
nut-brown colour.
There are various ways to tell whether
the coffee grinder is set correctly.
The coffee is too coarsely ground, if
– espresso or coffee flows into the cup
too quickly.
– the crema is very pale and uneven.
Set a finer grinder setting.
The coffee is too finely ground, if
– espresso or coffee only trickles into
the cup.
– the crema is dark brown.
Set a coarser grinder setting.
28
^ Turn the rotary control for the grinder
setting anti-clockwise, if you want the
beans to be ground more finely.
or
^ Turn the rotary control for the grinder
setting clockwise, if you want the
beans to be ground more coarsely.
The altered grinder setting will not be
used until after the second coffee has
been dispensed.
Coffee the way you like it
Amount of coffee
The coffee machine can grind and
brew 6-14 g of coffee per cup. The
greater the quantity, the stronger the
coffee or espresso.
You can alter the amount of coffee, by
selecting a different setting. There is a
choice of three settings:
– mild
– normal
There are various ways to tell whether
the amount of coffee is set correctly.
– strong
The amount of coffee is too low, if
You can set different amounts of coffee
for espresso and coffee.
– espresso or coffee flows into the cup
too quickly.
^ In the main menu, press the OK
button for two seconds.
– the crema is very pale and uneven.
– the espresso or coffee lacks body.
Increase the amount of coffee so that
more ground coffee is brewed.
The amount of coffee is too high, if
– espresso or coffee only trickles into
the cup.
– the crema is dark brown.
– the espresso or coffee tastes bitter.
Decrease the amount of coffee so that
less ground coffee is brewed.
r
SETTINGS
AMOUNT OF COFFEE
s
^ Turn the rotary control until AMOUNT
OF COFFEE appears in the display.
Press the OK button.
^ To set the amount of coffee for
espresso, turn the rotary control until
ESPRESSO appears in the display.
or
^ To set the amount of coffee for
coffee, turn the rotary control until
COFFEE appears in the display.
^ Then press the OK button.
^ Turn the rotary control until the
setting you want appears in the
display.Press the OK
button.
The setting is now saved.
29
Coffee the way you like it
Pre-brewing the coffee
Brewing temperature
When the pre-brewing function is
switched on, the freshly ground coffee
is first moistened with a little hot water.
Then the remaining water is forced
through the moistened coffee at high
pressure. This helps release the flavour
of the coffee.
The ideal brewing temperature will
depend on
The pre-brewing function can be
switched on or off. The machine is
delivered with pre-brewing switched
off.
^ In the main menu, press the OK
button for two seconds.
r
SETTINGS
PRE-BREWING
s
– the type of coffee,
– whether an espresso or a coffee is
being prepared, and
– the altitude of the region.
If the coffee machine is located at more
than 2000 metres above sea level, the
brewing temperature needs to be set
lower due to the change in pressure.
This is because the boiling point for
water at a high altitude above sea level
is lower than the boiling point for water
at sea level.
^ Turn the rotary control until
PRE-BREWING appears in the
display. Press the OK button.
You can set different temperatures for
espresso and coffee. There is a choice
of three temperatures:
^ Turn the rotary control until YES
appears in the display, if you want to
switch pre-brewing on.
– low
or
^ Turn the rotary control until NO
appears in the display, if you want to
switch pre-brewing off.
^ Then press the OK button.
The setting is now saved.
30
– normal
– high
TIP Not all types of coffee can
withstand a high temperature. Certain
types are too delicate - the crema on
top would not be as good and the taste
would be impaired.
Coffee the way you like it
^ In the main menu, press the OK
button for two seconds.
r
SETTINGS
TEMPERATURE
s
^ Turn the rotary control until
TEMPERATURE appears in the
display. Press the OK button.
^ To set the brewing temperature for
espresso, turn the rotary control until
ESPRESSO appears in the display.
or
^ To set the brewing temperature for
coffee, turn the rotary control until
COFFEE appears in the display.
^ Then press the OK button.
^ Turn the rotary control until the brew
temperature you require appears in
the display.Press the OK
button.
The setting is now saved.
31
Setting the portion sizes
You can programme the amount of
water used for each portion of
espresso, coffee or hot water to suit
your taste and your cups.
With milky drinks you can set the
duration of the steam used for heating
or frothing the milk.
There is a maximum amount of water
which can be programmed for each
type of drink. Water flow stops
automatically when the maximum
amount possible is reached. The
maximum amount possible for that type
of drink will then be saved.
To programme the amount either:
– Press the ., /, - or * button for
3 seconds, or
– Select the PROG. THE AMOUNT
from in the SETTINGS menu.
If there is insufficient water in the
water container, the process will be
stopped and the amount will not be
saved.
32
Programming the amount
using the ., /, - or * button
Press the ., /, - or * button for at least
3 seconds to programme the amount
for that particular drink.
Setting the portion sizes for
espresso, coffee and hot water
^ Place a cup of the size you wish to
programme the drink for under the
coffee spouts.
^ Press the ., / or - button until
PROG. THE AMOUNT appears in the
display.
Espresso or coffee will be prepared
and SAVE will appear in the display.
^ Press the OK button when the cup
has been filled to the level you want.
The portion size programmed in will
now be dispensed every time that
particular drink is selected.
TIP You can cancel programming the
amount as long as CANCEL is visible in
the display.
Setting the portion sizes
Setting the duration of the steam
used for hot milk and milk froth
The duration of steam used is the same
for heating milk and for frothing milk.
^ Place a container with sufficient milk
beside the coffee machine on the
right hand side. Insert the milk tube in
the container.
^ Turn the cappuccinatore dial to the z
or J position.
^ Place the cup you wish to
programme the steam duration for
under the cappuccinatore.
^ Press the * button until PROG. THE
AMOUNT appears in the display.
Selecting the PROG. THE
AMOUNT option in the
SETTINGS menu
^ Press the OK button for two seconds.
r
SETTINGS
PROG. THE AMOUNT
s
^ Turn the rotary control until PROG.
THE AMOUNT appears in the
display.
Press the OK button.
^ Turn the rotary control until the drink
for which you want to set the portion
size appears in the display.
Press the OK button.
Hot milk or milk froth will be prepared
and SAVE will appear in the display.
^ Turn the rotary control until START
appears in the display. Press the OK
button.
^ Press the OK button when the cup
has been filled to the level you want.
Preparation will begin and SAVE will
appear in the display.
Milk will be heated or frothed with
steam for the duration you have
programmed in every time hot milk or
milk froth is selected.
^ Press the OK button when the cup
has been filled to the level you want.
TIP You can cancel programming the
amount as long as CANCEL is visible in
the display.
The portion size programmed in will
now be dispensed every time that
particular drink is selected.
33
The SETTINGS menu
You can use the SETTINGS menu to customise the coffee machine to suit your
personal requirements.
Options which are currently selected will have a tick B next to them.
If none of the buttons has been pressed for a while, the coffee machine will revert
to the main menu.
Operating principles
What to you want to do?
How to do it
Call up the SETTINGS menu
In the main menu or standby mode, press the OK
button for 2 seconds.
Call up an option
Turn the rotary control anti-clockwise or clockwise
until the option you want appears in the display.
Then press the OK button.
Alter a setting
Turn the rotary control anti-clockwise or clockwise
until the setting you want appears in the display.
Then press the OK button.
Come out of the SETTINGS menu or
go back to the previous option or go back to
the previous menu
Turn the rotary selector until BACK appears in the
display.
Then press the OK button.
Call up the main menu or drinks selection
menu
Press the OK button for two seconds.
The factory default setting for each option is shown in bold in the following chart.
34
The SETTINGS menu
Possible setting options
Option
Available settings
Language
Deutsch, English and other languages
Maintenance
Rinse the system
Descale
Clean the brew unit
Time of day
(available in Comfort mode)
Clock display
12 H / 24 H
Set
Timer
(available in Comfort mode)
Set
switch on at / switch off after (1:00) / switch off at
Activate
switch on at (12:00) / switch off at (12:00)
Programme the amount
Espresso
Coffee
Steam
Hot water
Amount of coffee
Espresso
mild / normal / strong
Coffee
mild / normal / strong
Pre-brewing
Yes / No
Temperature
Espresso
low/ normal / high
Coffee
low/ normal / high
Operating mode
Eco mode
Comfort mode
Automatic rinsing
On / Off
Info
Total portions
Coffee
Steam
Hot water
No. portions until descaling
Water hardness
Soft 1
Medium 2
Hard 3
Very hard 4
System lock
On / Off
Cup heating
Yes / No
Factory default
Reset
35
Language
You can select the language you want
the display to appear in in the
SETTINGS menu.
^ Press the OK button for two seconds.
r
SETTINGS
LANGUAGE F
s
^ Turn the rotary control until
LANGUAGE appears in the display.
Press the OK button.
^ Turn the rotary control until the
language you want appears in the
display. Press the OK button.
The setting will be saved and the
display will revert to the previous
screen.
The display will now appear in the
language you have set.
If you select the wrong language by
mistake, find the LANGUAGE option via
the flag symbol F again.
36
Time of day and Clock display
If you are operating the coffee machine
in Comfort mode you can set the Time
of day and the Clock display in the
SETTINGS menu.
The clock can be displayed as:
– a 12 hour clock
To set the time of day
You can now enter the hours and
minutes:
The time of day has to be set for the
timer to work, however it will not be
visible in the display.
You will need to reset the time of day
if there is a power cut or if you
switch the coffee machine off with
the master switch.
^ Press the OK button for two seconds.
SETTINGS
TIME OF DAY
The setting is now saved.
^ Turn the rotary control until SET
appears in the display. Press the OK
button.
– a 24 hour clock
r
^ Then press the OK button.
^ Turn the rotary control until the
current hour appears. Press the OK
button.
^ Turn the rotary control until the
current minutes appear. Press the
OK button.
The setting is now saved.
s
^ Turn the rotary control until TIME OF
DAY appears in the display. Then
press the OK button.
You can now set the clock display and
the time of day:
To set the clock display
^ Turn the rotary selector until CLOCK
DISPLAY appears in the display.
Press the OK button.
^ If you want the time to be shown as a
24 hour clock, turn the rotary control
until 24 H appears.
or
^ If you want the time to be shown as a
12 hour clock, turn the rotary control
until 12 H appears.
37
Timer function
To set the timer
The timer is only available if you are
operating the coffee machine in
Comfort mode.
^ Press the OK button for two seconds.
r
You can set the timer so that
the coffee machine:
– switches on at a particular time, e.g.
in the morning for breakfast (SWITCH
ON AT).
– switches off at a particular time
(SWITCH OFF AT)
– switches off after a particular length
of time if none of the buttons have
been pressed or no drink has been
prepared (SWITCH OFF AFTER).
The timer will only work correctly if
- the time of day has been set
correctly,
- the coffee machine is switched off
via the On/Off button - the appropriate timer function has
been activated (see "To activate and
deactivate the timer").
Once you have set the "Switch on at" or
"Switch off at" timer functions you then
need to activate them.
38
SETTINGS
TIMER
s
^ Turn the rotary control until
ACTIVATE appears in the display.
Press the OK button.
^ Turn the rotary control until SET
appears in the display. Press the OK
button.
You can now choose the timer function
you want to set.
Switch on at
Please note that the coffee machine
will not switch on at the required
time if you have activated the
system lock.
^ Turn the rotary control until SWITCH
ON AT appears in the display. Then
press the OK button.
You can now enter the hours and
minutes:
^ Turn the rotary control until the hour
you want appears in the display.
Press the OK button.
Timer function
^ Turn the rotary control until the
minutes you want appear in the
display. Press the OK button.
The setting is now saved. If you have
activated the timer function (see "To
activate and deactivate the Timer"), the
coffee machine will now switch on at
the required time.
If the coffee machine has switched
itself on automatically 3 times and no
drinks have been dispensed, the
machine will not switch itself on again
automatically. This prevents the coffee
machine from switching itself on
unnecessarily, for example whilst you
are away on holiday.
The programmed times will, however,
remain in memory and will be
reactivated after manually switching the
machine on again.
Switch off at
^ Turn the rotary control until SWITCH
OFF AT appears in the display. Then
press the OK button.
Switch off after
If none of the buttons have been
pressed or no drink has been
prepared, the coffee machine will
switch itself off after one hour to save
energy.
You can change this to another time of
between 15 minutes and 9 hours.
^ Turn the rotary control until SWITCH
OFF AT appears in the display. Press
the OK button.
You can now enter the hours and
minutes:
^ Turn the rotary control until the hour
you want appears in the display.
Press the OK button.
^ Turn the rotary control until the
minutes you want appear in the
display. Press the OK button.
The setting is now saved. The coffee
machine will now switch itself off after
the time you have set.
You can now enter the hours and
minutes:
^ Turn the rotary control until the hour
you want appears in the display.
Press the OK button.
^ Turn the rotary control until the
minutes you want appear in the
display. Press the OK button.
The setting is now saved. If you have
activated the timer function (see "To
activate and deactivate the Timer"), the
coffee machine will now switch off at
the required time.
39
Timer function
To activate and deactivate the
timer
If you have activated the "Switch on at"
option for the timer, c will appear in the
display when the coffee machine is in
Standby mode.
^ Press the OK button for two seconds.
r
SETTINGS
TIMER
s
^ Turn the rotary control until TIMER
appears in the display. Press the OK
button.
^ Turn the rotary control until
ACTIVATE appears in the display.
Press the OK button.
^ Turn the rotary control until SWITCH
ON AT appears in the display, if you
want to activate or deactivate the
automatic switching on function.
or
^ Turn the rotary control until SWITCH
OFF AT appears in the display, if you
want to activate or deactivate the
automatic switching off function.
^ Then press the OK button.
The setting is now saved.
40
Factory default
You can reset the settings back to the
ones which were set when the coffee
machine was delivered - the factory
default settings.
Please refer to the "Possible setting
options" chart for the factory settings
which are shown in bold.
Please note that the following
settings will not be reset:
-
Language
Time of day
Number of drinks dispensed
To reset the settings:
^ Press the OK button for two seconds.
r
SETTINGS
FACTORY DEFAULT
s
^ Turn the rotary control until FACTORY
DEFAULT appears in the display.
Press the OK button.
^ Turn the rotary control until RESET
appears in the display. Press the OK
button.
The settings are then reset to the
default.
41
Operating modes
You can operate the coffee machine in
Eco mode or Comfort mode.
The Eco Mode is an energy-saving
mode. The coffee machine will switch to
energy saving mode if it has not been
used to prepare a drink for some time.
The coffee machine will heat up again
when a button is pressed. The "Switch
on at" and "Switch off at" timer functions
are not available in Eco mode.
In Comfort mode the coffee machine
will remain heated and all functions are
available without restriction. The
amount of energy used in Comfort
mode is considerably higher than that
used in Eco mode.
When the coffee machine is operated in
Eco mode, the following will appear in
the display while the machine is heating
up:
r
HEATING-UP PHASE
ECO MODE
The coffee machine is delivered with
Eco mode preset.
42
To select the operating mode
^ In the main menu, press the OK
button for two seconds.
r
SETTINGS
OPERATING MODE
^ Turn the rotary control until
OPERATING MODE appears in the
display. Press the OK button.
^ If you want to operate the coffee
machine in energy saving mode, turn
the rotary control until ECO MODE
appears in the display.
or
^ If you want to operate the coffee
machine in Comfort mode, turn the
rotary control until COMFORT MODE
appears in the display.
^ Then press the OK button.
The setting is now saved.
s
s
To lock the coffee machine
To deactivate the system lock
temporarily
You can lock the coffee machine to
prevent it being used without your
knowledge, by children, for example.
To activate and deactivate the
system lock
When the system lock is activated,
the "Switch on at" option for the timer
will not work. The c timer symbol
will not appear in the display.
^ Press the OK button for two seconds.
r
SETTINGS
SYSTEM LOCK
You can deactivate the system lock
temporarily, if you want to prepare
drinks, for example.
^ Press the OK button for three
seconds.
You can now prepare drinks.
As soon as you switch the coffee
machine off, the system lock will be
activated again and the coffee
machine is locked again.
s
^ Turn the rotary control until SYSTEM
LOCK appears in the display.
Press the OK button.
^ To activate the system lock, turn the
rotary control until ON appears in the
display.
or
^ To deactivate the system lock, turn
the rotary control until OFF appears
in the display.
^ Then press the OK button.
The setting is now saved.
When the coffee machine is switched
off it is locked and drinks cannot be
dispensed.
43
To display information
You can use the INFO option to check
– the total number of portions of
espresso, coffee, steam and hot
water dispensed (TOTAL
PORTIONS),
– the number of portions of espresso
and coffee dispensed (COFFEE),
– how many times steam for hot milk
and milk froth has been generated
(STEAM),
– how many times hot water has been
generated (HOT WATER) and
– whether more than 50 portions can
be dispensed before the machine
needs to be descaled (NO.
PORTIONS UNTIL DESCALING).
^ In the main menu, press the OK
button for two seconds.
r
SETTINGS
INFO
s
^ Turn the rotary control until INFO
appears in the display.
Press the OK button.
^ Turn the rotary control until the
information you want appears in the
display.Press the OK
button.
The information selected will appear in
the display.
To return to the previous menu,
^ Turn the rotary control until BACK
appears in the display.
Press the OK button.
44
Cleaning and care
Quick guide
Clean the coffee machine every day to prevent a build-up of bacteria.
Recommended frequency
What do I have to do?
Each time milk is prepared, if more Rinse the cappuccinatore
than one hour has passed since the
last time milk was prepared
Clean the cappuccinatore
Every day
Rinse the system
(usually at the end of the day,
before the machine is switched off) Clean the water container
Clean the waste container
Clean the drip tray and the drip tray cover
Once a week
Clean the brew unit
Approx. every 200 portions
Degrease the brew unit (with cleaning tablets)
Depending on the hardness of the
water
Descale the coffee machine
When necessary
Clean the coffee bean container
Clean the front of the machine (especially straight after
descaling)
Some components of the coffee machine are dishwasher safe. Cleaning these
in the dishwasher frequently can cause them to become discoloured due to
regular contact with food residues (e.g. tomatoes) in the dishwasher. The
surface can also become damaged.
Clean by hand only
Dishwasher-safe
–
–
–
–
–
–
–
Brew unit
Drip tray
Coffee bean container lid
Cappuccinatore
Waste container
Drip tray cover
Water container
45
Cleaning and care
Rinsing the system
Danger of burning and scalding on
hot components or by hot liquids!
Always allow the coffee machine to
cool down before cleaning. Caution.
The water in the drip tray can be
very hot.
Do not use a steam cleaner to clean
the coffee machine. The steam
could cause a short circuit.
Do not use cleaners containing
chlorides, acids, soda or scouring
agents. These would damage the
surface.
Avoid using the following on all
surfaces:
– cleaning agents containing soda,
ammonia, acids or chlorides,
– solvent-based cleaning agents,
– cleaning agents containing
descaling agents,
– stainless steel cleaning agents,
– dishwasher cleaner,
– oven cleaner,
– abrasive cleaning agents, e.g.
powder cleaners and cream
cleaners,
– hard, abrasive sponges, e.g. pot
scourers, brushes or sponges which
have been previously used with
abrasive cleaning agents,
– melamine eraser blocks,
– sharp metal scrapers.
46
It is very important to rinse the system
every day to remove any coffee
residues before using the coffee
machine. The hot water from the rinsing
process also pre-warms the pipework
so that it is ready for preparing coffee
or espresso.
It is just as important to rinse the
system before you switch the coffee
machine off.
TIP If you do not want the water from
the rinsing process to flow into the drip
tray, place a suitable container
underneath the coffee spouts before
preparing the first coffee of the day.
Switching automatic rinsing on and
off
The pipework is rinsed through
automatically when the coffee machine
is switched off if the automatic rinsing
function is switched on and the coffee
machine has been used for preparing
drinks.
The machine is delivered with automatic rinsing switched on.
TIP To ensure that you do not forget to
rinse the system, leave the automatic
rinsing function switched on or switch it
on (if it has been switched off).
Cleaning and care
^ Turn the rotary control until RINSE
THE SYSTEM appears in the display.
Press the OK button.
^ In the main menu, press the OK
button for two seconds.
r
SETTINGS
AUTOMATIC RINSING
s
^ Turn the rotary control until AUTOMATIC RINSING appears in the
display.
Press the OK button.
^ Turn the rotary control until YES
appears in the display, if you want to
switch the automatic rinsing function
on.
or
^ Turn the rotary control until NO
appears in the display, if you want to
switch the automatic rinsing function
off.
^ Then press the OK button.
The setting is now saved.
^ Turn the rotary control until START
appears in the display.
Press the OK button.
The piping will now be rinsed through.
The water used for the rinsing process
will run out of the coffee spouts.
Cappuccinatore
The cappuccinatore can become
clogged with milk residues so it should
be rinsed through if more than an hour
has elapsed since a drink with milk has
been prepared. Milk residue can clog
up the cappuccinatore.
If the cappuccinatore is used to heat or
froth milk, it is important to take it apart
and clean it once a day.
The cappuccinatore must be cleaned
by hand only using hot water and a little
washing-up liquid.
Rinsing the system manually
If you have switched the automatic
rinsing function off, you will need to
rinse the system through manually if
you have used the machine.
^ Place a suitable container
underneath the coffee spouts.
^ In the main menu, press the OK
button for two seconds.
r
SETTINGS
MAINTENANCE
s
^ Turn the rotary control until
MAINTENANCE appears in the
display.
Press the OK button.
47
Cleaning and care
Rinse the cappuccinatore
^ Place a container with some water
beside the coffee machine on the
right hand side. Insert the milk tube in
the water.
^ Turn the cappuccinatore dial to the J
or z position.
Cleaning the cappuccinatore
Caution! Danger of burning. The
cappuccinatore is very hot after it
has been used to prepare milk.
Allow it to cool down before
cleaning.
^ Place a suitable container
underneath the cappuccinatore.
^ Press the * button.
Water will be drawn up through the milk
pipe and the cappuccinatore.
Press the OK button when the
cappuccinatore has been rinsed
sufficiently.
^ Press the OK button when the
cappuccinatore has been rinsed
sufficiently.
^ Remove the cappuccinatore from the
steam and hot water spout by pulling
it downwards.
Now take the cappuccinatore apart:
^ Remove milk tube a and nozzles b.
^ Remove the dial and locking disc c
from the cappuccinatore.
48
Cleaning and care
^ Clean all parts with a solution of hot
water and washing-up liquid. If
neccessary, a small brush can be
used to remove any stubborn milk
deposits.
^ Rinse all parts carefully under
running water.
^ Then dry them carefully.
Drip tray cover
^ Remove the drip tray cover from the
drip tray.
^ The drip tray cover can be cleaned in
the dishwasher or by hand using hot
water and a little washing-up liquid.
^ Dry the drip tray thoroughly.
Reassemble the cappuccinatore in the
reverse order:
^ First replace the locking disc
followed by the dial on the
cappuccinatore.
^ Then replace the milk tube and
nozzles.
^ Fit the cappuccinatore on to the
steam and water spout from below.
Water container
Change the water every day to prevent
a build-up of bacteria.
^ Replace the cover onto the drip tray.
Make sure that the outer hole is
located underneath the
cappuccinatore.
Make sure that the valve, the
underside of the water container and
the surface the water container sits
on are clean. Otherwise the water
container will not sit correctly.
^ The water container can be cleaned
in the dishwasher or by hand using
hot water and a little washing-up
liquid.
^ After cleaning, dry the water
container.
^ Clean the surface the water container
sits on, particularly the slots,
carefully.
49
Cleaning and care
Drip tray and waste container
Clean the drip tray and waste
container every day to avoid
unpleasant smells and mildew.
The waste container is located in the
drip tray.
The coffee machine will alert you via the
display when the drip tray and/or waste
container is full and needs to be
emptied. Remove the drip tray and
waste container and empty and clean
them when this message appears, if not
before.
TIP If the rinsing process is in progress,
wait a while before removing the drip
tray as the water used for rinsing will
run out of the central spout and the
water may overflow.
Drip tray
^ Push the coffee spouts as far
upwards as they will go.
^ Carefully remove the drip tray
together with the waste container.
^ Empty the drip tray and waste
container.
50
^ Clean the drip tray by hand using hot
water and a little washing-up liquid.
Clean the waste container, if
necessary (see "Waste container").
^ Dry the drip tray.
Make sure that the metal contact
discs on the drip tray are cleaned
and dried properly. The discs will
not be able to detect that the drip
tray is full if they are dirty or damp.
^ Replace the waste container in the
drip tray and push the drip tray back
into the coffee machine.
Make sure the drip tray has been
pushed right into the machine as far
as it will go.
Cleaning and care
Waste container
The waste container will usually contain
some residual water from the rinsing
process.
^ Push the coffee spouts as far
upwards as they will go.
^ Carefully remove the drip tray
together with the waste container.
^ Empty the waste container and the
drip tray, if necessary. Used coffee
grounds should be disposed of with
organic rubbish or on the compost
heap.
^ The waste container can be cleaned
in the dishwasher or by hand using
hot water and a little washing-up
liquid. Clean the drip tray, if
necessary (see "Drip tray").
^ Dry the waste container.
^ Replace the waste container in the
drip tray and push the drip tray back
into the coffee machine.
Coffee bean container
Disconnect the coffee machine from
the electricity supply before
cleaning.
^ Open the lid on the right hand side of
the coffee machine. Remove the
coffee bean container lid.
^ Remove any coffee beans.
TIP Use a vacuum cleaner to remove
any coffee beans.
^ Clean the bean container with a soft,
dry cloth.
^ Refill it with roasted espresso or
coffee beans.
^ Replace the coffee bean container
lid.
If necessary, clean the ground coffee
chute:
^ Open the lid of the ground coffee
chute.
^ Remove any ground coffee.
TIP Use a vacuum cleaner to remove
any coffee residues.
^ Close the lid of the ground coffee
chute.
Close the lid on the right hand side of
the coffee machine.
51
Cleaning and care
Brew unit
Clean the brew unit by hand only
using hot water. Do not use
washing-up liquid.
When the brew unit has been pulled
out, do not alter the position of the
brew unit handle. This would
displace the brew unit and it would
not fit back into the coffee machine.
Please note:
– The moving parts of the brew unit are
lubricated. Washing-up liquid will
damage the brew unit.
^ Clean the brew unit by hand under
hot running water without using
washing-up liquid.
– Clean the brew unit once a week.
Remove the brew unit and wash by
hand
The brew unit can be removed for
cleaning. To do this:
^ Pull out the two flaps on the right
hand side of the coffee machine.
Turn the flaps 90° clockwise. Open
the door.
^ Wipe any remaining coffee off the
filters. One filter is located in the
funnel a and the other to the left of
the funnel b.
^ Dry the funnel area a to prevent
ground coffee sticking to it.
^ Press the button under the handle of
the brew unit a and whilst doing so
turn the handle clockwise b.
^ Carefully pull the brew unit out of the
coffee machine.
If you cannot remove the brew unit or
can only do so with difficulty, the brew
unit is not in the correct position (see
"Problem solving guide").
52
^ Clean the inside of the coffee
machine. Use your vacuum cleaner
to remove dry coffee grounds.
Cleaning and care
To replace the brew unit proceed in the
reverse order:
^ Push the brew unit back into the
coffee machine, making sure it is
straight.
Cleaning the brew unit
Depending on the natural oil content of
the coffee used, the brew unit can
become blocked quite quickly.
Degrease the brew unit using a
cleaning tablet.
Use the cleaning tablets supplied.
These have been specially formulated
for use in this coffee machine and are
available from the Miele Spare Parts
Department or via the Internet at
www.miele-shop.com.
^ Press the button under the handle of
the brew unit a and whilst doing so
turn the handle anti-clockwise b.
^ Close the door. Turn the flaps 90°
anti-clockwise. Close the flaps.
After 200 portions have been
dispensed, CLEAN THE BREW UNIT
will appear in the display. This
message will not go out until the
cleaning programme has been carried
out.
The cleaning programme lasts approx.
10 minutes.
It is important to degrease the brew
unit regularly.
^ Press the OK button for two seconds.
r
SETTINGS
MAINTENANCE
s
^ Turn the rotary control until
MAINTENANCE appears in the
display.
Press the OK button.
^ Turn the rotary control until CLEAN
THE BREW UNIT appears in the
display. Press the OK button.
^ Turn the rotary control until START
appears in the display.
Press the OK button.
53
Cleaning and care
Various instructions about degreasing
the brew unit will appear in the display.
You must empty the drip tray when
prompted to do so in order that the
cleaning programme can continue.
TIP Place a suitable container
underneath the coffee spouts, so that
you do not have to empty the drip tray
too frequently.
When DROP CLEANING TAB IN
GROUND COFFEE CHUTE appears:
^ Open the lid on the right hand side of
the coffee machine.
Casing
Remove any soiling straight away. If
soiling is not removed promptly it
could cause the surface of the
machine to alter or discolour.
Make sure that water cannot get
behind the display.
External surfaces are susceptible to
scratching and contact with
unsuitable cleaning agents can
cause discolouration.
Wipe up any spillages or splashes of
descaling agent immediately.
^ Switch the machine off using the
On/Off button -.
^ Clean the casing with a soft, damp
cloth and a solution of hot water and
a little washing-up liquid.
^ Dry it with a soft cloth.
^ Open the lid of ground coffee chute
a. Drop a cleaning tablet into
ground coffee chute b.
^ Close both lids.
^ Follow the instructions given in the
display.
^ When PROGRAMME FINISHED
appears in the display, press the OK
button.
The brew unit has now been degreased
and drinks can be prepared again.
54
TIP You could also use a clean, damp
microfibre cloth to clean the casing.
Descaling
Limescale builds up in the coffee
machine during use. It will need to be
descaled regularly. How often, will
depend on the hardness of the local
water supply.
The coffee machine will remind you
when the descaling programme needs
to be carried out. NO. PORTIONS
UNTIL DESCALING: 50 will appear in
the display. The remaining number of
drinks that can be made before
descaling will now show in the display
after each drink is made.
^ Confirm the message by pressing the
OK button.
When 0 is reached, the coffee machine
will lock out. START THE DESCALING
PROGRAMME will appear in the
display.
Descaling must now be carried out.
The programme takes approx.
20 minutes.
You can switch the coffee machine off if
you do not want to run the descaling
programme at this time. However, you
will not be able to make any more
drinks until the descaling programme
has been carried out.
The machine will guide you through the
whole procedure. Various instructions
will appear in the display, e.g. you will
be prompted to empty the drip tray, fill
the water container, etc.
During the descaling programme, water
containing descaling agent will run out
of the steam and hot water spout. This
is followed by an activation period
before a little more descaling agent is
dispensed.
^ Press the OK button to start the
descaling programme.
This descaling programme cannot
be cancelled once it has started.
The programme has to be
completed through to the end.
^ Turn the cappuccinatore dial to the position.
If the coffee machine is too hot, it will
cool down for approx. 10 minutes
before starting to run the descaling
programme.
TIP Place a suitable container under
the cappuccinatore, e.g. the waste
container, so that you do not have to
empty the drip tray too frequently.
Descaling solution
The descaling tablets supplied have
been specially formulated for use with
this coffee machine. They are available
from the Miele Spare Parts Department
or via the internet at
www.miele-shop.com.
You will need one descaling tablet to
descale the machine.
Only use the descaling tablets
supplied. Other types of descaling
agents will damage the machine
and affect the taste.
^ Fill the water container up to the 0.5 l
mark with lukewarm water.
^ Drop one descaling tablet in the
water.
55
Descaling
Follow the instructions on the packet
carefully. It is important that you fill
the water container with enough
water. Too little water will cause the
descaling programme to be
cancelled prematurely.
^ Replace the water container in the
coffee machine.
Please follow the instructions which
appear in the display.
When FILL WATER CONTAINER AND
PLACE IN MACHINE appears,
^ remove the water container and rinse
it carefully with clean water. Make
sure that no descaling agent is left in
the water container. Fill the water
container with cold, clean tap water
up to the "Max." marker.
PROGRAMME FINISHED will appear in
the display to indicate that descaling
has been completed.
^ Press the OK button.
^ Clean the cappuccinatore to remove
any descaling agent.
^ Finally, empty the drip tray.
The descaling programme is finished
and the machine can be used for
making drinks again.
When descaling the machine, wipe
up any spillages or splashes of
descaling agent immediately. These
would damage the surface.
56
After descaling the machine carefully
rinse the water container and the drip
tray to remove all traces of descaling
agent.
Selecting the Descale option in
the MAINTENANCE menu
^ In the main menu, press the OK
button for two seconds.
r
SETTINGS
MAINTENANCE
s
^ Turn the rotary control until
MAINTENANCE appears in the
display.
Press the OK button.
^ Turn the rotary control until DESCALE
appears in the display.
Press the OK button.
^ Turn the rotary control until START
appears in the display.
This descaling programme cannot
be cancelled once it has started.
The programme has to be
completed through to the end.
^ Press the OK button.
Problem solving guide
, Warning. Do not open the outer
casing of the appliance.
Maintenance and repairs should
only be carried out by a service
technician authorised by the
manufacturer.
Maintenance and repairs done by
unqualified persons could be
dangerous and the manufacturer will
not be held liable.
Most faults are easily rectified yourself
without contacting the Service
Department.
In some cases, a message will appear
in the display. Follow the instructions to
remedy the problem.
Other problems and faults which can
occur during daily use are described in
this section.
57
Problem solving guide
Messages in the display
Message
Possible cause and remedy
FAULT - 1
The coffee machine has overheated.
^ Switch the machine off with the On/Off button. Wait for
one hour and then switch it back on again.
FAULT - 2
FAULT - 82
If the fault message appears in the display again,
^ Call the Service Department.
FAULT - 28
There is too much ready ground coffee in the ground
coffee chute.
If more than one level scoop of ground coffee is added to
the coffee chute, the brew unit cannot process the coffee.
The ground coffee will be directed into the waste container
and a fault message will appear in the display.
^ Switch the machine off with the On/Off button -. Wait for
two minutes and then switch it back on again.
FAULT - 73
The brew unit cannot be positioned correctly.
^ Switch the machine off with the On/Off button -.
^ Press the . and / buttons at the same time. Then press
the OK button twice.
This will initialise the brew unit motor and the brew unit will
move into its starting position.
If the fault message appears in the display again,
^ call the Service Department.
58
Problem solving guide
Message
Possible cause and remedy
The following
appears in the
display, even
though the drip tray
is empty:
The drip tray is not sitting correctly.
EMPTY THE
The metal contact discs are dirty.
^ Clean the discs and then dry them thoroughly.
DRIP TRAY
^ Push the drip tray into the coffee machine until it clicks
into position.
or
or
^ The drip tray sensing mechanism is not working.
^ Switch the coffee machine off and then back on again
using the master switch.
If the fault message appears in the display again,
^ Call the Service Department.
You can hear the
noise of the pump
and the following
appears in the
display:
The coffee machine is attempting to draw in water although
the water container is empty. Air is present in the pipework.
FILL WATER
^ Then press the OK button.
^ Fill the water container with cold tap water.
SYSTEM FILLING UP - START will appear in the display.
CONTAINER AND
PLACE IN THE
MACHINE
Dispensing stops
and the following
appears in the
display:
PROCESS STOPPED
WATER CONT. EMPTY
There is not enough water in the water container.
^ Fill the water container with fresh tap water and replace it
in the machine.
^ Then press the OK button.
The following message appears in the display: CONTINUE
DISPENSING - YESB.
^ Press the OK button to continue dispensing,
or select NO to cancel preparation.
59
Problem solving guide
Message
Possible cause and remedy
The following
appears in the
display, although
the water container
is full:
The water container is not sitting correctly.
^ Remove the water container and replace it.
If the fault message appears in the display again,
^ empty the water container.
FILL WATER
CONTAINER
AND PLACE IN
THE MACHINE
^ Shake the water container to check that the float is
moving freely.
^ Fill the water container with fresh tap water and push it
into the machine.
If the fault message appears in the display again,
^ Call the Service Department.
60
Problem solving guide
Message
Possible cause and remedy
The message
The coffee machine needs descaling and/or the brew unit
filters are blocked.
SYSTEM FILLING UP START appears
in
the display again.
^ Switch the machine off with the On/Off button -.
^ Press the OK button for 2 seconds and call up
MAINTENANCE - DESCALE.
^ Descale the coffee machine.
^ Remove the brew unit and rinse under running water
(see "Cleaning and care - Brew unit").
If the fault message appears in the display again,
^ Degrease the brew unit (see "Cleaning and care - Brew
unit")
If the fault message appears in the display again,
^ Call the Service Department.
61
Problem solving guide
Unsatisfactory results
Problem
Possible cause and remedy
Only water is
dispensed from the
coffee spouts when
coffee has been
selected.
The ground coffee chute lid has been opened and then
closed again without any ready ground coffee being added
to the chute. Then the YES option was selected when
GROUND COFFEE appeared in the display.
^ If you have not added any ground coffee to the ground
coffee chute you must select NO when prompted to use
GROUND COFFEE.
or
Coffee beans have become stuck in the grinder.
^ Switch the coffee machine off with the master switch.
^ Remove all coffee beans from the bean container. Use a
vacuum cleaner if necessary.
^ Add some fresh coffee beans and Make a coffee.
Espresso or coffee
flows into the cup
too quickly.
The coffee is too coarsely ground.
^ Set the grinder on a finer setting (see "Grinder setting").
Espresso or coffee The coffee is too finely ground.
flows too slowly into ^ Set the grinder on a coarser setting (see "Grinder
the cup too.
setting").
62
Problem solving guide
Problem
Possible cause and remedy
The coffee or
espresso is not hot
enough.
The cup has not been pre-heated.
^ Pre-heat the cups (see "Pre-heating cups").
or
The brewing temperature has been set too low.
^ Set a higher brewing temperature (see "Brewing
temperature).
or
The filters in the brew unit are blocked.
^ Clean the brew unit (see "Cleaning the brew unit")
^ Degrease the brew unit (see "Cleaning the brew unit")
The crema on the
coffee or espresso
is not as it should
be.
The grinder setting is not correct.
^ Set the grinder on a finer or coarser setting (see "Grinder
setting").
or
The brewing temperature is too high for this type of coffee.
^ Set a lower brewing temperature (see "Brewing
temperature").
or
The coffee beans are no longer fresh.
^ Add new coffee beans to the coffee bean container.
or
The coffee spouts are set too high.
^ Pull the coffee spouts down until they are at the same
level as the rim of the cup.
63
Problem solving guide
Unusual performance of the coffee machine
Problem
Possible cause and remedy
The filters in the brew unit are blocked.
Only very little
coffee or nothing at
^ Clean the brew unit (see "Cleaning the brew unit")
all is dispensed from
^ Degrease the brew unit (see "Cleaning the brew unit")
the coffee spouts,
although a drink has
been selected.
Water stopped
flowing whilst
programming the
amount to use.
The maximum amount possible was reached. Preparation
is halted and the maximum portion size possible will be
saved.
or
There is insufficient water in the water container. The
programming the amount process will be cancelled and
the portion sizes will not be saved.
^ Fill the water container with fresh tap water and replace it
in the machine.
^ Repeat the procedure for programming the amount.
This is not a fault.
The machine does
not rinse through
If the coffee machine still has an operating temperature
when switched on,
higher than 60 °C , then rinsing will not take place.
even though the
Automatic rinsing
function is switched
on.
There is a lot of
residual "coffee
water" in the waste
container.
64
The coffee is too coarsely ground.
^ Set the grinder on a finer setting (see "Grinder setting").
^ If necessary, adjust the amount of coffee (see "Amount of
coffee").
Problem solving guide
Problem
Possible cause and remedy
The display remains
dark when the
coffee machine is
switched on using
the On/Off button -.
The master switch is at "0".
^ Set the master switch to "I".
or
The plug is not inserted in the socket correctly.
^ Insert the plug in the socket correctly.
or
The main fuse has tripped due to a problem with the
coffee machine, the electricity supply or another
appliance.
^ Switch off at the wall socket and unplug it.
^ Contact a qualified electrician or Miele.
The coffee machine The switching off time programmed using the timer has
been reached.
switches off
suddenly.
^ If required, you can select a new switching off time (see
"Timer functions").
or
The plug is not inserted in the socket correctly.
^ Insert the plug in the socket correctly.
The coffee machine
does not switch
itself on, although
the Switch on at
setting has been
activated for the
timer.
The system lock is activated.
^ Deactivate it (see "To lock the coffee machine").
or
The machine was not used after being switched on
automatically 3 times in succession.
^ Switch the machine on and make a drink.
or
The Eco mode is activated. The timer function in not
available in this mode.
^ Select the Comfort mode function (see "Operating
modes").
65
Problem solving guide
Problem
Possible cause and remedy
The coffee grinder
makes a louder
noise than usual.
There could be stones in amongst the coffee beans.
^ Switch the coffee machine off, immediately.
^ Call Miele Service.
or
The coffee bean container has become empty during the
grinding process.
^ Fill the container with fresh beans.
The brew unit
cannot be removed.
or
The brew unit
cannot be replaced
in the coffee
machine.
The brew unit or the brew unit motor is not in the correct
position. This can happen if the brew unit or the drip tray is
pulled out while brewing is taking place.
^ Switch the machine off with the On/Off button -.
^ Press the . and / buttons at the same time. Then press
the OK button twice.
This will initialise the brew unit motor and the brew unit will
move into its starting position.
If, after doing this, you still cannot remove the brew unit,
^ call the Service Department.
The grinder setting
control will not
move.
The control is blocked.
^ Make a coffee.
^ Reset the grinder setting while grinding is in progress.
66
Problem solving guide
Problem
Possible cause and remedy
The descaling
programme was
started by mistake.
The descaling programme cannot be cancelled once you
have pressed the OK button.
The programme has to be carried through to the end. This
is a safety measure to ensure that the machine is fully
descaled, and is important for the long-term protection of
the machine and to ensure it functions correctly.
^ Descale the coffee machine (see "Descaling").
You can hear loud
noises during the
descaling
programme.
This is not a fault.
These noises occur when water is being flushed through
the machine under high pressure.
The heating-up time The coffee machine needs descaling.
is getting longer, the ^ Descale the coffee machine (see "Descaling").
amount of water
being dispensed is
incorrect and the
coffee machine is
not performing
properly.
The cappuccinatore and steam tube are not connected
Water is being
sprayed above or is securely.
running out of the
^ Make sure all connections are secure and push them on
top of the
tighter if necessary.
cappuccinatore.
^ Turn the supports so that they are fitted securely on the
steam pipe.
^ Push the cappuccinatore up again.
Milk is dripping out
of the
cappuccinatore
even though you
have finished
dispensing milk.
The level of milk in the milk container is higher than the
cappuccinatore.
^ Turn the cappuccinatore dial to the - position.
67
After Sales / Guarantee
In the event of a fault which you cannot
correct yourself, or if the machine is
under guarantee, please contact:
– your Miele Dealer
or
– Miele (see back cover for contact
details).
When contacting your Dealer or Miele,
please quote the model and serial
number of your machine, both of which
are shown on the data plate located
behind the drip tray inside the machine.
Please note that telephone calls may
be monitored and recorded for
training purposes (UK only).
N.B. A call-out charge will be applied
for service visits where the problem
could have been resolved as described
in these instructions.
Guarantee
For information on the machine
guarantee specific to your country
please contact Miele. See back cover
for contact details.
In the UK, your machine is guaranteed
for 2 years from the date of purchase.
However, you must activate your cover
by calling 08706 080028 or registering
online at www.miele.co.uk.
68
Accessories
The following accessories are supplied
with the machine:
– Measuring spoon
for ground coffee
– Cleaning tablets
for degreasing the brew unit
– Descaling tablets
for descaling the water pipework
– Test strips
for determining the water hardness
level
Miele offers a range of useful
accessories as well as cleaning and
conditioning products for your coffee
machine.
– Microfibre cloth
for removing finger marks and light
soiling
– Cleaning brush
for cleaning the milk pipework
– Milk flask
for keeping milk cool for longer
These products and other useful
accessories can be ordered via the
internet at www.miele-shop.com, from
Miele (see back cover for contact
details) or from your Miele dealer.
69
Saving energy
Eco mode
Using the coffee machine in Eco mode
saves energy.
The coffee machine will switch to
energy saving mode if it has not been
used to prepare a drink for some time.
This means that the machine does not
remain heated and so saves energy.
The coffee machine will heat up again
as soon as a drink is selected.
Pre-heating the cups with hot water
If you only want to pre-heat cups
occassionally you can switch the cup
heating surface off.
You can then use hot water from the
cappuccinatore to pre-heat the cups.
70
Switching the coffee machine off
with the master switch
If you are not going to be using the
coffee machine for a long period of
time, switch it off with the master switch
at the back of the machine.
Transporting the coffee machine
If you are not going to use the coffee
machine for a long period of time and it
needs to be moved, e.g. when moving
house:
– Empty and clean the coffee bean
container
– Empty and clean the water container
Caution. Danger of burning and
scalding from hot steam coming out
of the cappuccinatore.
The evaporation process is finished
when this message goes out.
– Evaporate the coffee machine
^ Switch the machine off with the
master switch.
– Clean the drip tray and waste
container
^ Clean the drip tray and waste
container.
– Pack the machine securely
You can now pack the coffee machine.
Evaporating the coffee
machine
The system will need to be filled with
water when the coffee machine is
installed at its new location (see
"Preparing the coffee machine for
use").
The coffee machine should be
evaporated before it is stored for a long
period of time or transported any
distance - particularly at temperatures
below freezing.
Evaporating the machine involves
removing all traces of water from the
system to prevent water and frost
damage.
^ Switch the machine off with the
On/Off button -.
^ Empty the water container.
TIP Place a suitable container
underneath the cappuccinatore.
Packing the machine
The coffee machine should only be
packed when it is clean and dry. Coffee
and milk residues or water can cause a
build-up of bacteria.
Use the original packing material,
including polystyrene pieces to pack
up the machine.
Also pack the operating instructions so
that they are available when the coffee
machine is next used.
^ Press the OK button.
^ Press the * button twice.
The evaporation process will start and
DRAIN THE SYSTEM will appear in the
display.
71
Electrical connection
All electrical work should be carried out
by a suitably qualified and competent
person only, in strict accordance with
current national and local safety
regulations (BS 7671 in the UK).
Installation, repairs and other work by
unqualified persons could be
dangerous. The manufacturer cannot
be held liable for unauthorised work.
Ensure power is not supplied to the
machine until after installation work has
been carried out.
The voltage and connected load are
given on the data plate located on the
appliance behind the drip tray. Please
ensure these match the household
mains supply. The fuse rating is quoted
on the plug.
The machine is supplied with a mains
cable with moulded plug for connection
to a 50 Hz, 220-240 V mains supply.
Connection should be made via a fused
plug and suitable switched socket
which is easily accessible after
installation.
Do not connect via an extension lead or
an adapter. These do not guarantee the
safety of the machine (e.g. danger of
overheating).
For extra safety it is advisable to protect
the machine with a suitable residual
current device (RCD). Contact a
qualified electrician for advice.
If the socket is not accessible after
installation (depending on country) an
additional means of disconnection must
be provided for all poles.
72
Do not connect the machine to an
inverter such as those used with an
autonomous energy source e.g. Solar
power.
When switched on peak loads in the
system can cause the safety switch off
mechanism to be triggered. This can
damage the electronic unit.
The machine must not be used with
so-called Energy saving devices either.
These reduce the amount of energy
supplied to the machine causing it to
overheat.
WARNING: THIS APPLIANCE
MUST BE EARTHED
Non-rewireable plugs BS 1363
The fuse cover must be refitted when
changing the fuse, and if the fuse cover
is lost, the plug must not be used until a
suitable replacement is obtained. The
colour of the correct replacement cover
is that of the coloured insert in the base
of the plug, or the colour that is
embossed in words on the base of the
plug (as applicable to the design of
plug fitted).
Replacement fuses should be ASTA
approved to BS 1362 and have the
correct rating. Replacement fuses and
fuse covers may be purchased from
your local electrical supplier.
Installation
Please note:
Danger of overheating.
Ensure that there is sufficient
ventilation around the coffee
machine.
Make sure that the vents on the top
of the machine are not covered
completely.
Danger of overheating. If the coffee
machine is installed behind a
kitchen furniture door, it may only be
used with the furniture door open.
Do not close the furniture door while
the coffee machine is in use.
If the coffee machine is installed in a
niche, the minimum dimensions for the
niche are as follows:
height
508 mm
width
450 mm
depth
555 mm
^ Postion the coffee machine so that
the front lines up with the front edge
of the niche.
– The coffee machine should be
located in a dry and well ventilated
room.
– The ambient temperature should be
between + 10 °C and + 32 °C.
– The coffee machine should be
placed on a horizontal surface which
should be impervious to water.
– The vents on the top of the coffee
machine must not be covered
completely (e.g. with a cloth).
73
Coffee machine dimensions
74
75
Alteration rights reserved / 5011
CM 5100
M.-Nr. 07 902 360 / 09