1
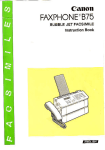
Canon
FMPHONE,*B
BUBBLE-JET
FACSIMILE
InstructionBook
I7IGilrJ!'
Canron
FAXPHONE'"B
B U B B L E - J E TF A C S I M I L E
InstructionBook
Copyright
c o p y r i g h t o l g g 2 b y c a n o n , l n c . A l l r i g h t s r e s e r v e dN. o p a r t o f t h i s p u b l i c a u o n m a y b e
r e p r o d u c e dt,r a n s m i t t e dt,r a n s c r i b e ds, t o r e di n a r e t r i e v asl y s t e m ,o r t r a n s l a t e di n t o a n y
l a n g u a g eo r c o m p u t e rl a n g u a g ei n a n y f o r m o r b y a n y m e a n s ,e l € c t r o n i cm
, echanicar
m a g n e t i c ,o p t i c a l ,c h e m i c a l ,m a n u a l ,o r o t h e r w i s ew, i t h o u tt h e p r i o rw r i t t e np e r m r s s r o o
ni
C a n o n ,I n c .
tiris facsimilecombinesthe functionsof a facsimile
and qualityprinter. lts compact,verticaldesign means
lesswastedspace in your work area. The bubUe_jet
printeruses cut-sheetplain paper to deliver sharp
reproductionsof your fax documentsand copies.you
no longer have to bother with speciallytreated rolls of
recording paper that cud after coming out of the fax.
Users in the U.S.A.
PRE-INSTALLATION
R E O U I R E M E N T SF O R C A N O N F A C S I M I L EE Q U I P M E N T
A. Location
S u p p l ya s u r t a b l et a t J l ec, a b i n e t ,o r d e s k . S e e b r o c h u r ef o r u n i t ' s
d i m e n s i o n sa n d w e i g f r t .
B. Order lnformation
1 . O n l y a s i n g l et e l e p h o n el i n et o u c h { o n e o r r o t a r yi s t o b e u s e d .
2 . O r d e r a n R J 1 1 - Cm o d u l a rw a l l j a c k ( U S O Cc o d e ) ,w h i c h s h o u l do e
installedby the phone company. lf the RJ1 1-C wall jack is not present,
telephone/faxoperationis not possible.
3 . O r d e r a n o r m a lb u s i n e s sl i n ef r o m y o u r t e l e p h o n ec o m p a n y ' s
business representative The line should be a regularvoice grade line
o r t h e e q u i v a l e n t .U s e o n e l i n e p e r u n i t .
DDD (DirectDistanceDial)line
-orIDDD (lnternationalDirectDistanceDial)line if you communicate
overseas
C. Power Requirements
The FAXPHONE870 should be connected to a standard120 volt AC,
three-wiregrounded outlet only. Do not connect this unit to an outletor
power line shared with other appliancesthat cause electricalnoise. Air
conditioners,electrictypewriters,copiers, and machinesof this sort
generateelectricalnoise which often interfereswith communications
e q u i p m e n ta n d t h e s e n d i n ga n d r e c e i v i n go f d o c u m e n t s .
N o t e : C a n o n r e c o m m e n d s a n i n d i v i d u a ll i n e f o l l o w i n g i n d u s t r y
standards, e.g. the 25OO(Touch Tone) or 5OO(Rotary/PuiseDial)
telephones. A dedicated extensionoff a PBX unit without'Call
Waiting" can be used with your FAX unit. Key telephone systems are
n o t r e c o m m e n d e d b e c a u s e t h e y s e n d n o n - s t a n d a r ds i g n a l s t o
i n d i v i d u a lt e l e p h o n e s f o r r i n g i n g a n d s p e c l a l c o d e s , w h i c h m a y c a u s e
a FAX error.
C O N N E C T I O NO F T H E E Q U I P M E N T
This equipmentcomplies with Part 68 of the FCC rules. On the rear panel
of this equipment is a label that contains,among other information,the
FCC RegistratioN
n u m b e r a n d R i n g e rE q u i v a l e n c eN u m b e r( R E N )f o r t h i s
e q u i p m e n t . l f r e q u e s t e dt,h i s i n f o r m a t i o nm u s t b e g i v e nt o t h e t e l e p h o n e
company. This equipment may not be used on coin serviceprovidedby
the telephonecompany. Connectionto party lrnesis subjectto statetariffs.
I N C A S E O F E Q U I P M E N TM A L F U N C T I O N
S h o u l da n y m a l f u n c l i o no c c u r w h i c h c a n n o l b e c o r r e c t e db y t h e
p r o c e d u r e sd e s c r i b e di n t h i s i n s t r u c t i o nb o o k , d i s c o n n e c t h e e q u i p m e n t
l r o m t h e t e l e p h o n el i n e a n d u n p l u gt h e p o w e r c o r d . T h e t e l e p h o n es h o u l d
n o t b e r e c o n n e c t e do r t h e s w i t c ht u r n e do n u n l i lt h e p r o b l e mi s c o m p l e t e l y
resolved. Users should contact their local authorizedCanon Facsrmile
ServiceDealerfor servicingof equipment.
R I G H T SO F T H E T E L E P H O N EC O M P A N Y
S h o u l dl h e e q u i p m e n tc a u s e h a r m t o t h e t e l e p h o n en e t w o r k t, h e t e l e p h o n e
company may temporarilydisconnect service. The lelephonecompany
also retainsthe rightto make changes in facililiesand serviceswhich may
affectthe operationof this equipment. When such changes are necessary,
the telephonecompany is requiredto give adequateprior noticeto the user.
WARNING
Do not make any changes or modificationsto the equipmentunless
otherwisespecifiedin the manual. lf such changes or modiiicationsshould
be made, you could be requiredto stop operationof the equipment.
Note: This equipment has been tested and found to comply with the limits.
for a Class B digitaldevice, pursuantto Part 15 of the FCC Rules. These
limitsare designed to provide reasonableprotectionagainstharmful
interferencein a residentialinstallation.This equipmentgenerates,uses
and can radiateradio frequency energy and, if not installedand used in
accordancewith the instructions,mav cause harmfulinterferenceto radio
communications.
However,there is no guaranteethat interferencewill not occur in a
parlicularinstallation.lf this equipmentdoes cause harmfulintefferenceto
radio or televisionreception,which can be determinedby turningthe
equipmentoff and on, the user is encouragedto try to correctthe
interferenceby one of the following measures:
- Re-orientor relocatethe receivingantenna.
- Increasethe separationbetweenthe equipmenlor receiver.
- Connect the equipment into an outlet on a circuitdifferentfrom that to
w h i c h t h e r e c e i v e ri s c o n n e c t e d .
- C o n s u l tt h e d e a l e ro r a n e x p e r i e n c e dr a d i o f f Vt e c h n i c i a nf o r h e l p .
I M P O R T A N TS A F E T YI N S T R U C T I O N S
1 . R e a da l l o f t h e s ei n s t r u c t i o n s .
2 . S a v el h e s e I n s t r u c t i o n fso r l a t e ru s e .
3 . F o l l o wa l l w a r n i n g sa n d i n s t r u c t i o n sm a r k e do n t h e p r o d u c t .
4 . U n p l u gt h i s p r o d u c tf r o m t h e w a l l b e f o r ec l e a n i n go r m a i n t e n a n c e D
. o
n o t u s e l i q u i dc l e a n e r so r a e r o s o lc l e a n e r s .u s e a d a m o c l o t hf o r
cleaning.
5 . D o n o t u s e t h i s p r o d u c tn e a rw a l e r .
6. Do not place this product on an unstablecart, stand, or table. The
product may fall, causing serious damage to the product.
7. slots and openings in the cabinet and the back or bonom are provided
for ventilationto ensure reliableoperationof the product and to protect
it from overheating.These openings must not be blocked or covereo.
The openings should never be blocked by placingthe product on a
bed, sofa, rug, or other similarsurface. This product should never be
placed near or over a radiatoror heat register. This product should not
be placed in a built-ininstallationunless proper ventilationis provided.
B. This product should be operatedfrom the type of power source
indicatedon the marking label. lf you are not sure of the type of power
available,consult your dealeror local power company.
9. This product is equipped with a polarizedalternating-currenl
line plug (a
plug with one blade wider than the other). This plug will fit into the
power outlet only one way. This is a safetyfeature. lf you are unableto
insertthe plug fully into the outlet,try reversingthe plug. lf the plug fails
to fit, contact your electricianto replaceyour obsoleteoutlet. Do not
defeatthe safety purpose of the polarizedplug.
10. Do not allow anythingto rest on the power cord. Do not locatethis
product where persons will walk on the cord.
11. lf an extensioncord is used with this product, make sure that the total of
lhe ampere ratingson the products plugged into the extensioncord
does not exceed the enension cord ampere rating. Also, make sure
that the total current of all products plugged into the wall outletdoes not
e x c e e d1 5 a m p e r e s
12. Never push objects of any kind into this product through cabinetslots
as they may touch dangerousvoltage points or short out partsthat
c o u l d r e s u l ti n a r i s k o f f i r e o r e l e c t r i cs h o c k . N e v e rs p i l ll i q u i do f a n y
kindon the product.
13. Do not attemptto servicethis product yourself,as opening or removing
certaincovers may expose you to dangerousvoltage points or other
r i s k s . R e f e ra l l s e r v i c i n gt o s e r v i c ep e r s o n n e l .
.14.
Unplug this product from the wall outlet and referservicingto qualified
s e r v i c ep e r s o n n e lu n d e rt h e f o l l o w i n gc o n d i t i o n s :
A . W h e n t h e p o w e r c o r d o r p l u g i s d a m a g e do r f r a y e d .
B
l f l i q u i dh a s b e e n s p i l l e di n t o t h e p r o d u c t .
C . l f t h e p r o d u c th a s b e e n e x p o s e dt o r a i n o r w a t e r .
D. lf the producl does nol operatenormallywhen lhe operating
instructionsare followed. Adlust only those controlslhal are
covered by the operatinginstructionssince improperadjustmentof
other conlrols may resull in damage and will often requireenensive
work by a qualifiedlechnicianto restorethe product to normal
ooeration.
E. lf the product has been dropped or the cabinet has been damaged.
F. lf the product exhibitsa distinctchange in performance,indicatinga
need for service.
U s e r si n C a n a d a
PRE-INSTALLATION
R E O U I R E M E N T SF O R
C A N O N F A C S I M I L EE A U I P M E N T
A. Locatlon
S u p p l ya s u i t a b l et a O t ec, a O i n e ,o, , .O u r f , .
S e e b r o c h u r ef o r u n i l , s
o t m o n s i o n sa n d w e i g h t .
B. Order Informatlon
1 . P r o v i d eo n l y a s i n g l el i n eo r t o u c h { o n e
o r r o t a r yt e l e p h o n es e t
termrnated
w i t h a s t a n d a r d4 _ p i nm o d u l a rp h o n e p l u g .
f f o u c h _ r o n ei s
recommended if availablein your area.)
2 Order an RJ r 1-c modurarwat jack (usoc
code), which shourd be
installedby the phone company. lf the
RF11_Cwall jack is n, prur"n,,
telephone/faxoperationis not possible.
3. Order a normal businessline from your
telephonecompany,s
businessrepresentative.The rineshourd be
a regurarvoice grade rine
or tne equivalent. Use one line per unlt.
DDD (DirectDistanceDiat)tine
-orIDDD (rnternationar
DirectDistancediar)rineif you communicate
overseas
Note: canon recommends an individuarrine
foilowingindustrystandards
as the 25OO(t"u!l tone) or 5OO(rotary/putse
dial) tetephones. A
luch
dedicated e>rlensionoff a pBX without camp
on srgnatsis arso permitted
with a FAX unit. Key telephone systems are
not recommended because
tney send non- standardsignalsto individuar
terephonesfor ringing,or
send special codes which may cause a FAX
error.
C. Power Requirements
The power outretshourd be a three-pronggrounded
receptacre(singreor
duplex) lt shourd be independentfrom iopi"r",
heaters,air conditioners
or any electricarequipmentthat is thermostaticaily
controiled. The rated
value is t 15 vorts and 15 amperes. The RJ1'1-c
modurarjack shourd be
relativelyclose to the power outletto facilitate
installation.
NOTICE
The canadian Departmentof communications
raberidentifiescertified
equipment. This certificationmeans that the equipment
meets certain
telecommunicationsnetworksprotective,operational
and safety
requirements.The Departmentdoes not guarantee
the equipmentwirl
operateto the user's satisfaction
Beforeinstailingthis equipment,users shourdensure
that it is permittedto
b e c o n n e c t e dt o t h e f a c i l i t i e so f t h e l o c a lt e l e c o m m u n i c a t i o n s
company.
The equipment must also be installedusing an
acceptabtemethod of
c o n n e c t r o n .I n s o m e c a s e s ,t h e c o m p a n y ' si n s i d e
w i r i n ga s s o c i a t e dw i l h a
single-line
i n d r v i d u asr e r v r c em a y b e e n e n d e d b y m e a n s o f a c e r t i f i e d
connector assembry(terephoneerlension cord). The
custornershourd be
awarethat compliancewith the above conditionsmay
not prevent
d e t e f l o r a t t o on f s e r v i c ei n s o m e s i t u a t i o n s .
I l t o L o a d N u r n b o r ( L N ) a s s i g n c . dt o e a c h t e r n l n a l d e v i c e d e n o t e s t h e
p o r c o n t a g eo f t h e t o t a l l o a d t o t l e c o n n e c t e d l o a t e l e p h o n el o o p w h i c h i s
u s o c lb y l h e d e v i c o , t o p i e v e n t o v o r l o a d i n g . T t r e t e r r n i n a t i o no n a l o o p m a y
o o n s r s to f a r , y c o r n b i n a l i o no f d e v i c e s s u b , e c t o n l y t o t h e r e q u i r e n t e n t h a t
t h e l o t a l o f t h e L o a d N u r n b e r so f a l l t h e d e v i c e s d o e s n o t e x c e e d 1 0 0
R e p a i r st o c e r l i f i e de q u i p r n e n ts h o u l d b e r n a d e b y a n a u t h o r i z e dC a n a d i a n
m a i n t e n a n c ef a c i l i t yd e s i g n a t e db y t h e s u p p l i e r . A n y r e p a i r so r a l t e r a t i o n s
m a d e b y t h e u s e r t o t h i s e q u i p r n e n t ,o r e q u i p m e n t m a l f u n c t i o n s ,m a y g i v e
t h e t e l e c o m r n u n i c a t i o n sc o t r p a n v c a u s e l o r o e u e s tt h e u s e r t o d i s c o n n e c t
the equipment.
U s e r s s h o u l d e n s u r e f o r t h e i r o w n p r o t e c t i o nt h a t t h e e l e c t r i c a g
l round
c o n n e c t i o n so f t h e p o w e r u t i l i t y ,t e l e p h o n e l i n e s a n d i n t e r n a lm e t a l l i cw a t e r
pipe system, if present, are connecled together This precaution may be
particularlyimportant in rural areas
CAUTION
Users should not attempt to make such connections themselves, but
should contact the appropriate electric inspection authority, or electrician,
as appropriate.
This digital apparatus does not exceed the Class B limits for radio noise
emissions from digital apparatuses set out in the Radio Interference
Regulationsof the Canadian Department of Communications.
Table of Contents
How to use this instructionbook
894 1: GETT|NGSET UT
Check list: Do you have everything?
A Quick Look at the Fax
4
4
Front View
RearView
Left View
The Handset
R i g h tV i e w
. 5
. 5
. 5
Controlpanelsummary
6
Setting Up the Fax
I
I
I
9
Findingthe right location
Powerrequirements
Operatingand storingenvironment
Fastening
the handsetcradle
Connecting
the handsetcord
12
12
12
Connectingan extensionphone or answering
machine
Connectingthe telephoneline
Turningthe facsimileon/off
The standby mode
How to remove a document
What's standby?
Tone/pulsesetting
Settingup the printer
Cartridgehandling precaLrtions
Installingan ink cartridqe
Recommended paper specifications
Loading paper in the printer
C l e a n i n gt h e p r i n th e a d
1?
13
t.+
< A
t a
1 A
t a
l q
.
.16
18
20
21
23
PaTt2: BEFoREYoU USETHETAX *
R e g i s t e r i n g y o u r n u m b e r a n d name
(TTt)
b e f o r ey o u r e g i s t g r . . .
R e g i s t e r i n tgh e d a t e a n d t i m e
Registering
y o u r t e l e p h o n en u m b e r
R e g i s t e r i n ygo u r n a m e
When you are finishedregistering..
.
.25
26
26
28
30
32
PaTt3: GETTINGSTARTM
Using the telephone
33
34
35
35
Using regulardialingwith numeric keys
Redialing
Answering
the phone
Specialdiating
.
Switchingtone/pulsedialing
Dialingthrough a switchboard(pBX)
.36
36
37
Beforesendingdocuments
38
38
39
40
4'l
42
43
Papersize
What the receivingfax doesn,ts€e
Preparingdocuments before sending
SettingdocumentdensiW
Seningreproduction
quulity
Inserting
a document
Sending a document
Dialinga number and sending a document
. Manual Dialingto send a
document
. Automaticdialingto send
a document
Redialinga facsimilenumber
. Automaticredialino
. M a n u a lr e d i a l i n g
Clearingdocument feed iams
.
.
.
.
4
4
4
.44
5
5
7
48
48
48
49
Receiving documents
.
What the fax doesn'l see when receivino
Getting ready to.receivedocuments
Receivingwhen you're in thd office
.
51
52
53
anddocuments
automarrcaily
lr%gy,lp
fl^ol:.,?:it.
(r/{A/ I trL aulo
Swttcnover)
.Receivingphoneca||sanddocUmentsmanua||y(manua|reception)
. Receivinga fax from an e)dension
phone connedeclto your fax . . . .
. Receivingon a dedicatedfax
line
( a u t o m a l i cr e c e i v i n g )
Receivingwhen you're not in the office
.
.
.
.
.
.
wirhno answering
machine
1"99!yilg
(auromattc
receiving)
Receiving
documentsIn memory
Printing documents receivedin the memory
lf a power failureoccurs ...
ldentifyingthe sender (RTl)
Clearingprinterjams
Cleaninga dirty platen
Makingcopies
.
iii
53
55
56
FA
59
59
61
63
63
64
66
67
67
68
68
69
72
Receivingthrough an answeri
rng machine
Adjustingthe fax for rrss wilh diierent types of
answeringmachines
Changing th€ time before disconnection .
Disablingautomaticreceivingwith an answenng
machine
C h a n g i n gt h e r i n g t i m e
Printingan activity managementreport
.50
.
.73
.74
P a r t 4 : A D V A N C E DF E A T U R E S
One-touch dialing
75
76
B1
a2
82
B3
Registeiingnumbers and n a m e sf o r O n e { o u c h
dialing
A d j u s t i n gt h e p a u s et i m e
U s i n g O n e - t o u c hd i a l i n g
. O n e - t o u c hd i a l i n gt h e t e l e p h o n e
. O n e - l o u c hs e n d i n qa d o c u m e n l
. Printinga list of relistered numbers
t1r+
Coded speed dialing
85
B5
90
90
91
91
Registeringnames and numbers for Coded speed dialing
U s i n gC o d e d s p e e d d i a l i n g
.
.
'
J
.
.
.
speeddiatingrhetetephone
. !o!ed
Coded speed dialingto send a document
. Printinga list of numbers registered
for Coded speed dialing
Using delayed transmission
Seningup delayedtransmission
Canceling
delayedtransmission
.
.92
. . . 9 2
.
Usingpolling
9
4
Sending a document in responseto polling
Manuallypolling anotherfax to receiveVour documenl
95
96
97
98
Setting the printer data
99
Registering
yourpollinglD
Enteringthe printersetting mode (BJ DATA)
Sening slower speed for printinggrapnics .
Settingfor halftoneprinting
99
.'to0
.101
Printingreports
102
.103
.10s
.105
.106
.107
.108
.110
Printingactivityreports
Printingactivitymanagementreporls
. Printinga report manuallv
. Printinga report after20 iransactions
. Printinga reporteveryday at the same
time
. Printingsend/receive
transactions
separately
. Printingerrortransmission
reoorts
Summaryof user settings
.
Printinga list of user settings
C h a n g i n gt h e u s e rs e t t t n g s
.
.
iv
.112
...112
1 1 4
t t J
Troubleshooting
. . 1 1 6
. .116
.l 1 8
Troubleshootingsummary table
Displ.ay,nteso€lg{?s
and errrorcodes
B e f o r ec a l l i n gf o r s e r v i c e . . .
1 1 4
Maintenance
Cleaningthe fax
. Cleaningthe fax e),iterior
. Cleaningthe document
scanningglass
. Cleaningthe printerarea
.
.120
. .120
. . .120
. . .120
't21
Specifications
122
Glossary
123
F AX PH O N E@
860
Quick Reference
How to set up the fax
(for more detailssee pages g_15).
Connect to 6.
Power ON/OFF Brryltch
Handsel cradls connecllon
volume swllch
OFF-LOW-HIGH
Hook button
Handsel
@r-.
l
I
q
AC outlet (t20 V 60 Hz)
6-Modular lack for
single line (RJlt C)
Answerlngmachlne6r erctenslon
phono (seo lllustratlonbelow).
FAXPHONE@ A60
1. Openthe printer
cover.
Quick Referenc
2 . P u l l t h ec a r t r i d g e
releaselever up.
3 . R e m o v et h e p r i n t
head cap.
sv
@
4. Remove the
protectivetape
5. Hold the cartridoe.
7. Pressthe
cartridgerelease
l e v e rd o w n .
B . C l o s et h e p r i n t e r
cover.
6. Insertthe cartridge.
FAXPHONF
@ A60
Quick Referenc,
Loadingletter-sizepaper
o
o
o
o^"o
)^vo
1. Insertthe paper
supporttray.
2. Pressdown on the
paperfeederplate
3. Pickup a small
stack of paper
and fan the paper.
-\-
$"o
4. Tap the stackto
eventhe edge.
5. Slidethe paperinto
the tray.
S-"""""tt""-==\
9"":s
7. Pressdown on the
tab.
6. Slidethe guide
againstthe paper
F AX P H ON E G)
A60
Quick Referent
clearing paper jams with the paper nait reteaserever
(For details,see page 61)
1. Openthe paper
bail releasecover
on the bottom left
corner on the front
of the fax.
2, Press the paper
bail releaselever
down to releasethe
paper.
into the documentfeeder
43
o ooo -o
; ;
-
OOO
l:o
^ o o o o d c
OLro ooo
1. Adjust the paper
guides to the width
of the document.
2. Tap the stack to even
theedge.
w
lnsertthe documents
face-downinto the fax
T h e d i s p l a yc h a n g e s :
F A X P H ON E ()i J6 0
Quick Referer
S e n d i n g a d o c u m e n tw i t h m a n u a l d i a l i r
(for details,see I
Setting reproduction quality
Followthisprocedureto set the qualityof the reproduction
for
transnrission
or copy accordingto the contentsof your
docurnent.
Press ft-iA L r i O ruE to changethe sening.
O ntr
O utrrotr
l----'l
F I N Eo n
Standardtextwith increasedclarity.
HALFTONEon
Textwith photosor graphics.
Standardtext (FINE,HALFTONEoff)
Standardtyped textwithoutphotosor graphics.
Just press t Hn tf-f-
N E I to alternatethe settingsin this order:
Standard + F I N E + HALFTO N E
L
I
D i a l i n ga n d s e n d i n g
W
Feedthe document
into the fax.
3. Dialthe other pafty's
f a c s i m i l en u m b e r .
2. Pick up the handset.
4 . l f y o u h e a ra t o n e , t h i s m e a n s t f
the other party's fax is set for
automatic receivino. Press
fs-rrnITnT-TTOFYltostart
transmitting
the document.
-or-
I t s o m e o n e a n s w e r st h e p h o n e
the other party to press their sti
key and then hang up theirphc
Pr e s s
on
fax, and hang up your handset
5
T h p r ^ l r s n l a vt e l l s v O u w h e n
t r a n s m i t t i n gb e g i n s .
. For sending a document wittt automatic dialing,
see page 47 of the instruction ntanual for f ufther
details.
TRANSMITTING
F A X P H ON F @
A60
Quick Reference
Receivingphone messagesand fax transmissions
Using Al.tro FAXfTELswitchover with@
connected (for details,see pages 63_64)
O ruro
.^t;us,voor //p
When you have an answeringmachineconnected
to the middle jack, press the ANS HOOK Up key
until the lamp is lit. The fax will then automaricaliy
receivea fax, or the callercan leavea messaoe
on the answeringmachine.
Using the AUTO FAX|TELswitchover
with no answeringmachine connected
:-Y;,-o
O l,ys lyoof ap
When the AUTO lamp is lit, the fax will automaticailv
receivea document. lf it is a phone call,the fax wili
ring again to alertyou to pick up the handset.
tT{:FSl
lf you experlence a problem, refer to
troubleshootlng table on page 116.
How lo usa lhis instruction book
document
A few simple notationsare used to help you read faster
and find the informationyou need. Beiore you use this
instructionbook, glanceover this list of soecial
notationsand be sure you understandwhat they mean.
A document is the sheet of paper you send or receive
with the facsimile,or copy.
fax
The facsimileunit,includingthe handset,
IFNNETTOI_I
The name of the key is enclosedin a box.
fo
(+ 1o)
Numbers are the number keys on the numeric key pad
on the control panel.
Numbers preceded by an arrow and enclosed in
parenthesesare referencesto page numbersthat
contain more informationabout the topic of the
previoussentence.
. Textin italicsdescribeshetpfuthints,
restrictions,
or how
to avoid difficulties.
CAUTION!
Failureto pay attentionto CAIITIONsmay resuftIn damage
to the egulpment.
A complete glossaryof terms is includedat the end of
this instructionbook.
How to u.so fhi.s instruc(iorr book
This manualis designedto help you get set up and
start using your fax in as short a time as possible. y<
will find this instructionbook easierto use if you reac
throughit in the order the materialis presented.
GETTINGSET UP
Showsyou how to set up your new facsimileand ge
ready for operation. This sectionstarts from openin
the box and guides you step by step to get you read
to use the telephone,fax, and copier.
B E F O R EY O U U S E T H E F A X . . .
Follow these instructionsto registeryour own name
and telephonenumber in your fax. your personalor
companyname and telephonenumberthat you
registerare printedautomaticallyon the documents
that you send. This informationis used bv the other
party to identifyyou as the sender.
GETTING STARTED WITH THE BASICS
Basicsare what you need to know on the first day yc
have your fax set up. This sectiondescribeshow to
use the telephone,send and receivea document,
make copies, and print an activitymanagementrepc
so you can start keeping a record of your fax
transactionsfrom the first day. This sectionalso
describeshow to connect and use an extensionoho
or answeringmachinewith the fax.
ADVANCEDFEATURES
Introducesthe time-savingfeaturessuch as One-tou
speed dialing and Coded speed dialing of registere
fax numbers. This section also shows you how to se
up your fax to receiveand send when Vou are not in
the office.
MAINTENANCEAND TROUBLESHOOTING
Shows you how to keep the fax and printerin good
workingconditionand what to do if a problemoccu
Citock /ls{: Do you hava avoryltilnq.?
Part1: GETTTNG
SETUp
Urrpackyour fax and make sure you have
everything
listedbelow.
u
1 FAXPHONE
860 mainunit
o
1 Handsel
o
1 Handsetcradle
o
2 Screws for the handsetcradle
ct
1 Telephoneconnectioncord
o
1 Paper support tray
1 Bubbte-jetcartridgeBC_O1(F45_0022_00O,Btack)
o
o
o
o
o
c]
I Instructionbook
'l
Sheet of destinationlabels
1 Registrationcard
't
Authorized service facilitieslist
1 Postcard
A Quick Look at tlto Fax
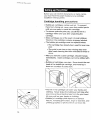
fake a few minutesto look over your new fax so you
know how it should look when it is set uD.
r Front View
Pap6r aupport lr
Automallc documenl
loodor (ADF)
Prlnior papor foodor
i2_g;:-
.;>y
4'-'.:"o'
Handsst
lammso paper
Printer cover
Coversthe print well and
opens for installationof
bubble-ietcartridgs.
Paper outlel
Paper bail release cover
Opens for operationol the
paper bail releaselever.
r Rear View
Power cord
Power (on/off) swilch
r/F wtutu
T/P Oone/Pulse) switch
GISTRATION switch
A Quick Look at tlto Fax
r Left View
Jack for extenslon phone
aneworlng machlns
r The Handset
Hook button
Rlnger volume swltch
Adjuststhe volume of the
ringer for three settinas:
OFF, LOW. HIGH.
r Right View
T/P REG6TRAilOIT
T P O N O F F
T/P flone/Pulse) switch
REGISTRATIONswitch
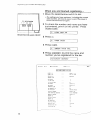
C t s r i l r o lp a n c l s u r n n t a r y
Beforeyou registeruser data or use the facsimile,take
a few minutesto familiarizeyourselfwith the keys and
indlcatorson the controloanel.
FUNCTIONkoy
Used with other koys to porform specialoperationslike
registeringinformationin
your fax.
AUTO lamp
Fax receives documents automatically
when you are not in the office.
PAUSE key
Pressto enter a pause in a
telephonenumber when
registeringor dialing.
ANS HOOKUP lamp
Sets the lax to be used with an answerino
machineconn€cted.
lN USE lamp
Ughts when your
fax uses the
telephoneline.
rrn | | ,qa
PAI,.SE.
F I N El a m p
Increasesthe clarity o{ documents sent.
FINE
HALFTONE lamp
Increasesthe quality of documents with photographsand
graphics.
FINE/HALFTONEkey
Pressto light FINEor
HALFTONElamp. When both
lamps are off, this is the standard settingfor typed text.
HALF
ANS HOOK UP
STARr/COPY
,,IEIIORY
STOP key
Pressto stop an
operationand
returnto standby
M E M O R Yl a m p
Lightswhen recordingthe
document into memory,
receivingand printingthe
d o c u m e n to u t o f m e m o r y
F l a s h e sw h e n d o c u m e n l s
are receivedin memory
AUTO/ANS HOOK UP key
Pressto tight AUTO or ANS HOOK Up
lamp. When both lamps are ofl, you can
r e c e r v en o r m a l p h o n e c a l l s a n d r e c e i v e
oocuments manuallv.
START/COPY key
Pressto start an
operattonor to
startcopying.
R E D I A Lk e y
Pressto redial
telephoneor facs i m i l en u m b e r s .
TONE key
S e tf o r t o n e d i a l i n g
whenyou diala numb e r i f y o u rf a x i s n o r mally set for rotary
p u l s ed i a l i n g .
Control panol summary
S Y M B O L Sk e y
Enlerssymbols norm a l l yf o u n do n
typing keyboards
l i k ep a r e n t h e s e s ,
brackets,and so on
SEARCH keYs
Pressto search
lor items and features in menus.
SPACE key
Pressto enter a
space betweentext
o r n u m b e r sw h e n
registering.
UP/LOW CASE keY
Switches between
upper and lowercase letters for text
inlormationthat
you want to register
in the fax.
,l
\
r
I
iF
\
I
SPACE
E
06
CLEAR
t
s6r
;n
07
REPORf
\ l
COOED DIAL
l\l
CLEARkey
Pressto clear
numberswhen
registering.
:
'$'
I
I
SET key
After you reach the
menu or rtem you
want with the
searchkeys, press
this koy to selectit
{or operation.
NUMERIC keys
Use these keys to dial
numbers that are not
registered for Onetouch dialing or Coded
dialing. These keys are
also used when
r e g i s t e r i n gd a t a .
C O D E DD I A Lk e y
Pressto start Coded
dialing.
On€-touch dlallng koYs
You can register 7 {acsimile numbers {or Onetouch clialing.
REPORTkey
Pressto start printing an activity
management
report.
Setling Up ttro Fax
Finding the r ight location
. Find a place that is out of direct sunlight.
. The fax requiresa telephoneline, so place it near an
existingtelephoneoutlet. This may save you the
expenseof havingthe phone company installa new
line or buying an enra extensioncord.
Power requirements
. Plug the fax into a 120 volt AC 60 Hz three-wire,
grounded outletonly.
. Do not plug the fax into a power outlet sharedwith
an air conditioner,electrictypewriter,copier,or other
equipmentthat can generateelectricalnoise or radio
frequencywavesthat can interferewith fax
transmission.
. Once the power is turned off, wait at least 5 seconds
before turning it on again.
Sellingy Up llte F;tx
Operatingand storingenvironment
Make sure tlre plage where you set up the fax satisfies
t l r c l o l l o w i n gc o n d i t i o n s :
. Use tlre fax only within the followingranges of
temperatureand humidity.
50"F to 95"F (10"C to 35oC)
20% to 85% RH (no condonsation
. When installedneara window,put up a blindor curtain to protectthe fax from sunlight.
. Do not installthe fax neardeviceswhich contain
magnetsor generatemagneticfields.
Settrng Up tho Fax
. Do not subjectthe fax to strong physical
shock or
vibration.
. Place the fax on a level surface.
. Keepthe fax clean.Dustaccumulation prevent
can
the fax from operatingproperly.
. Never removethe bubble-jetcartridge
from the
printeruntil it has to be replaced. lf the cartridge
print head is removedand left unprotected,it
willdry
out and you may not be able to use it
10
)otting Up tha Fax
Here are some other general precautions when Vou are
using the fax or workinq around it.
CAUTION!
. Avold lnstalling your f ax in places exposed
to dlrect
sunllght, dust, vlbratlon, hlgh temperature or humldlty,
or on unstable surfaces.
. fo assure proper electrlcal contact, make
sure the fax
Is flrmly plugged ln.
. Never pull on the cord to unplug the fax. pull
on the
plug ftsetf.
11
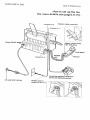
Sotting Up llto Fat:
Fasteningthe handsetcradle
Follow this procedureto aftachJ.hehandsetcradle to,
hold the handsetprovidedwith the fax.
1 Fitthe handsetcradleoverthe holes.
2 Fastenthe handsetcradleto the fax with the
two screwsprovided.
Connectingthe handsetcord
The connectorsfor the handset,telephone
line,and e)dension
phoneare togetheron
the leftsideof the mainunit.(+5)
2 Connectthe end of the handsetconnector
cord to the jack markedNl.
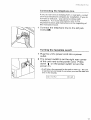
Connectingan extensionphone or
answeringmachine
You can connectan eltensionphoneor answering
machineto your taxbut not both. Thereis onlyone
jack available
for connectionof an e)ftension
phoneor
answeringmachine.
lf you want to connectan extensionphoneor
answeringmachineto the fax, removethe
coveroverthe middleiackmarkeda.
2 Connectthe extensionphoneor answering
machinecord to the middlejack marked6.
. Use a standard modular jack available from most
telephone supply stores fo attach an answering machine
to the fax.
. For mere information about using an extensionphone or
answering machine with the lax see page 56 or 61.
12
Scftinq Up llto F;tx
C o n n e c t i n gt h e t e l e p h o n el i n e
lf you do not havean existingR.J1.{
-rCwailjzrck,contact
your localtelephonecompanyfor installation.
lf you do
not havea walllack, you cannotcontinuewith
installation.For moreinformation,
referto the
importantnoticesand instructionsat the beginningof
this instructionbook.
Connectthe telephonelineto the leftjack
markedEl.
Turningthe facsimileon/off
1 Plugthe unit'spowercord intoa power
outlet.
2 The powerswitchis on the rightrearcorner
of the unit nelitto the powercord. press
down I on the powerswitchto turnthe
poweron.
. It will take a few soconds for the unit to warm up. The
unit
is warmed up and ready to use when you see ihe date and
time in the display.
I2/3I/92
09:45
13
Seltlng Up tlta Fax
T he standby m ode
When you see the date and time in the one_linedisplay,
the fax is in the standby mode.
L2/3I/92
09:4
lf a documentis alreadyin the documentfeederwhen
you turn the fax on, an alarm will sound and the display
will show:
CHECK DOCUI.{ENT
Removethe documentfromthe fax as fohows.
r How to removea document
1 Press rcTo-F].
2 Placeyou fingersunderthe controlpanel
rs5'.;_s
: "^ ""3gids
{1dT:o
where it is marked [FTsn and gentiypull out
the controlpaneltowardsyou untilif opens.
3 Pullthe documentout from the top or bottom.
4 Gentlypushthe controlpanelcloseduntilit
clicksshut.
. As soon as the document is removed, the
fax will return to
standby.
r What's standby?
Whenthe fax is in standby,it displaysthe currentdate
and time. Thistellsyou the fax is readyand waitingto
respondto your ne).toperationor to an incomingcall.
Do not worryif the dateand timeare not correct.We'll
showyou howto setthemon page26.
14
Sofling Up tha Fax
Tone/pulsesetting
Followthisprocedureto set thefaxfor useon ybur
telephoneline. Therearetwo typesof dialingusedon
telephonelines:touch-toneand pulse.you haveto set
the fax accordingto thetypeof linethat you are using.
Thefax is setfor touch-toneat thefactorybefore
shipping,so if you are usinga touch-toneline,you
won't haveto changethissetting.
The vp switch(tone/pulse)is locatedon the
nght rearcornerof the fax,nearthe power
cord.
Checkthe setting.lf you wantto changeit,
slidethe switchi6 p tor putseoil ior
touch-tone.
f/P R€G6TRAT,d.I
f P O N 6 F
15
S o t t i r r gu p t h o p r i n t e r
Befcre you can receivedocumentsor rnakecopies,
you must have the paper loaded and a cartridge
installedin the fax printer.
Cartridgehandlingprecautions
. Bubble-iet
cartridges
containwet ink. To prevent
themfromdryingout, neveropentheirsealedpacks
untilyou are readyto installthe cartridge.
. To ensureoptimumprintouts,
useallthe ink in a
cartridgewithinone yearafterunpackingthe
cartridge.
. Storecartridgesout of the reachof smallchildren.
Theink in the cartridgecontainsisopropylalcohol.
. Thebubble-jetcartridgemustbe replacedwhen:
o The cartridgehas alreadybeenusedfor overone
year.
o The printis not clearor hasmissingdotseven
afterheadcleaninghasbeenexecuted5 timesor
more.
. Afteryou removea usedcartridge,discardit away
immediately.Usedcartridgescannotbe refilledwith
ink.
. Bubble-jet
cartridgescan stain. Nevertouchthe wet
headof the bubble-jet
cartridge,
and neverlay it
downon a surfaceit couldstain.
. The ink in the cartridgecan stainyour handsand
clothing. Never shake the bubble-letcartridgeafter
you remove the protectivetape from the print head.
Ink may spillon your handsor clothing.
. Bubble-jetcartridgeyielddependson several
factors,includingprintstyles,large or bold text,and
printinggraphicsor photoswhich use more ink.
16
Softing up tlto printor
. Do not attemptto re{illa bubble_jetcartridge.
A
clearprintoutcannotbe obtained.
. Neverdisassemblea bubble-letcartridge.
Ink
may spillon your handsor clothing.
. Never remove the bubble.jet cartridge,except
when replacing it. This preventsthe cartridgefrom
dryingout.
. Howeuer,if you moveand transpottthefax,removethe
cartridge. Whenyou sof up the fax again,you mayhaveto
installa nawcartridge.
1 a
S o l { / / r g lu p t l r o p r i n t a r
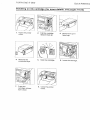
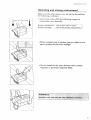
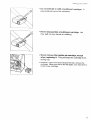
Installingan ink cartridge
Follow this procedureto installor replacethe
bubble-jetcartridge.
Beforeyou installor replacethe bubble-jet
printercartridge,makesurethe powerii on.
.lf the power is ofl when you instalta cartridge, caftridge
head cleaning will not staft automaticaltyafter you close
the printer cover.
Openthe printercoveron the frontof the fax.
Pullthe cartridgereleaseleverup untilit
locksopen.
. lf you.are replacing a cartridge, pull the old cartridge out
and throw it away immediatety.
. Open a new bubble-jet caftridge pack.
4 To removethe print head cap from the
cartridge,carefullypushon the rightsideof
the cap.
5 Removethe orangeprotectivetape.
m
1B
)attirtg up tlto printor
Hold the labelside of the cartridgetoward
you so you can read it, then turn it up side
down.
lnsertthe cartridgeinto the machineso that
the yellowplasticguide is visiblethroughthe
cartridgeslot.
Pressthe cartridgereleaseleverdownuntilit
locksin placeand alignsthe cartridge.
Closethe printercover.
h
€"o
. The cartridgeprint head starts cleaning automaticaily.
installation,
followthe procedureto load
@;r-: 1 0 After
p a p e r( . +2 1 ) .
.t9
Soltlrtg up llro printor
Recommendedpaperspecifications
This section explainsthe recommendedpaper
specifications.To ensurethe best print qualityand
efficientprinteroperation,use only paperthat meets
the specificationsdescribedbelow. Paperthat does
not meet these specificationsmay be used in the
printer,but the resultscannot be guaranteed.
Quality
Use only plain bond, typewritorquality
papsr without curls,lolds, or damagod
odqes.
Woight
s2glmzto 9o g/m2(14tbsto 24 lbs)in
upporloadinq.
Under0.2mm
Thicknoss
Storage
64oFto TsoF (1BoCto 24oC)
40% to 60% relativohumiditv
Althoughthe printercan printon plain,bondpaper,
you shouldtestit to makesurethe resultsare
satisfactorybecausemost paperis sensitiveto
temperatureand humidity.Printeroperationmay alsc
be adverselyaffectedby extremetemperatureor
humidity.
. Do not load and try to use punched or colored paper. Us
only white papor.
. If you do not use the recommended paper, the printing
may be blurred, or the paper not feed correctly into the fi
. The amount of time for the ink to dry and fix depends on
paper quality.
20
Setting up tha Prtnter
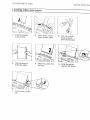
Loading PaPerin the Pq!.t
Followthis procedureto load paperin the printer'The
paper'
fax is setto loadand printon letter-size
Makesurethe papersuppofttray is installed
in the holesprovidedon the printerpaper
feeder.
Use your thumbsto press9oyn.onthe
paperfeederplateso it locksin the open
position.
w
. lf there are a few sheets of paper on tha tray and you want
them
to add more, remove them from the fax and combine
with the now PaPer.
Pick up a smallstack (abo-uj50 sheets,less
than O.2"or 5 mm thick)of letter-sizepaper,
and fan the paperbeforeloadingit'
. This removes the stiatlc charge that can cause the sheets
of paPer to sttck togother.
21
Sotling up tha printor
Tap the edge to align the edge of the stack.
. Aligning the edge of tha stack before you inserl it helps to
.
:
prevent paper jams.
Slidethe paperintothe tray untilit stops.
Tap the paperso it is flushwith the right side
of the feeder.
R;"ffi
6 On the leftside of the paperfeeder,slidethe
guideagainstthe paperso it holdsthe stack
firmlyin place.
. Don't push too hard. The stack should be in place firmly
and flat agalnst tha feeder plate and not bowed.
Sor'
7 On the rightsideof the paperfeeder,press
downon the tab to releasethe paperfeeder
plate.
R,-j..'.j"ru
22
Sefting up the printer
Cleaningthe print head
When you open or close the printercover, the print
head is cleaned automatically.However,if you cannot
get good quality printing,do the following procedureto
clean the print head.
1 Load paperin the printerpaperfeeder.
2 Press fFTN-erTor-I.
1.
DIAI, SET UP
3 Press€t.
5.
HEAD CLEANING
PressfsETt to startcleaningthe head. The
fax beepsonce and head cleaningstarts
automatically.
IN
PROGRESS
The test patternis printed. Aftercleaning,
the fax returnsto standby.
r |l r t Tl n l t F rl t r lit1-ifl1i t i+l-H11l l++111H-{11-1-ltll l l LLLtlM'Lll
Solfingy up tho printar
CAUTION
. Never turn ths system olf when the MEMORY lamp ls
on. lt you turn the fax off durlng copylng.or prlntlng,
the cartrldgs may stop where ft ls and remaln there. tl
left too long out ol posftlon, the cartrldge may dry out.
. When the tax ls not copylng or recelvlng documents,
the prlnt cadrldge should always be posltloned, lnslde
the prlnter, on the rlght slde of the prlnter area. Ihls
prevonts the wet surface of the prlnt head from drylng
out.
c Do not execute unnecessary prlnt head cleanlng.
Needlessly repeatlng thls procedure wastes lnk
24
Rogistoring your numbar and name QTI)
Part 2: BEFOREYOU USE THE FAX ...
In accordancewith recent amendmentsto the FCC rules governing
the use of facsimileequipment,you are now requiredto includeyour
fax number,your name or companyname,the date and time of the
fax that you are sendingeach and every time that you send a fax.
Pleasefollow the instructionsin this manual in order to set these
features.
In this sectionwe will showyou step by step how to
registeryourown name,facsimilenumber,and the
currentdateand time in the fax.
proceduresinvolvethesethree important
Registration
generalsteps:
. Turningthe REGISTRATION
switchON. You cannot
registerdata in the fax unlessthis switchis on.
. Registering
the databy followingthe appropriate
procedure.
. Turningthe REGISTRATION
switchOFF.
procedures
Whenyou arefollowingthe registration
hereand in othersectionsof the manual,keepthese
importantpointsin mind:
. lf you wantto canceltheprocedureor staftover
againfrom the beginning,press l-STOF-lto returnto
standby.
. lf the fax telephoneringswhileyou are registering,
press[STdpl, and liftthe handset.lf it is a regular
phonecall,go aheadand talkto the otherparty. lf
you heara beep,this meanssomeoneis tryingto
senda documentto you by fax. Press
ts r A-FTITOF-fl then hangup the handsetto start
receiving
thedocument.
25
Registering your numbor and namo (TTI)
Beforeyou register...
Beforeyou registerdata on the fax, move the
REGISTRATION
switchto the ON position.
1 The REGtsrRAloN
switch is on the right rear
corner of the unit.
2 Movethe necrsrRATtoN
switchto or{.
TURN REG SW OFF
. When you are finished registering settrngs, you will have
to move tho switch back to OFF.
.lf you try to register anything with the REG/SIRAI/ON
switch in the OFF position, the following message is
displayed.
r/p trG6IE/rAfl
TURN
REG SW ON
T P O N O F F
Registeringthe date and time
REGISTRATION switch ON/OFF
Follow this procedure to registerthe current date and
time to be displayedin the oneline display on standb
mode and to print the currentdate and time at the top
of documents you send to other facsimilemachines.
Press fFnrc-T-Ibrt.
I.DIAI
SET UP
2 Press€t.
2.USER DATA
3 Press ts-T-].
I.ENTER
YOUR TEL
4 PressO.
4.
SET TII-{E
PresstsE-].
. The current seffings are displayed.
L2/3I/92
10:10
Use the num er ickeys to enterthe new date
and tim e over the old display.
26
yournumberand nameQTI)
Rogistoring
.lf there is a previously registereddate and tima, simply
enter the new date and time over the old one.
. Ehtar the month, the day, and the /ast fwo digits of the
year. tho day or month ls a single-digit, pracede it with a
.lf
zero (0). For example, Apritwould Oe:-01.
. Sef the time using the 24-hour system. lf the hour or
minute .is a single digit, precede it with a zero (0). For
example, 5 minutes aftor g would be: Og:OS.
.lf you make a mlstake when antering the date or time,
press fhe search keys to move the cursor under the
number you want to change. Enter the correct number.
7 Pressrc-rTtto registerthe new date and
time. The clock startsthe momentyou press
ffi
lJtr
| l.
DATE
5.
ENTRY OK
MID
PAUSE
8 Press [sToF-lto returnto standby.
27
Rogistering your number and name (Tfl)
Registeringyour telephonenumber
Follow this procedureto registeryour telephone
number.The number you registerherewill print at the
top of every document you send so the person who
receivesthe document will know immediatelywhere it
came from.
Make surethatthe FEG/SIMI/ON switchis ON baforeyou
enteryour telephonenumber. Turnit OFFafteryou
compl ete regi stration.
1 Press fF-ur.r-dT-t-OTl
.
I.DIAI
sET UP
2 Pressg.
2.USER
DATA
3 Press [srT-I.
I.ENTER
YOUR TEL
4 PressfsETt.
TEL
=
5 Usethe numerickeysto enteryour
telephonenumber.You can entera number
up to 20 digitslong.
. Press fSf-Actrl
to enter a space in the number.
. You don't have to enfer spaces, but they will make tong
numbers easier to read.
.lfJey tTEmmmmmmmmmmmmmmm!:.
a mistake when entering your number, press
rc LETF-I . Then enter the correct number.
. f! i{4ee" a previously registered number, press
rcTETRl, or you can just registerthe new number over
the old one.
TEL =
2A
516 4BB 670
Registering your numbar and name Q-ll)
6 Press tstrT-I.
DATA
2.
ENTRY OK
ENTER NAME
7 lf you wantto continuewithyour name
registration,go on to step 5 in the next
section.
-or-
lf you want to end the registration,
press
and turn the neclsrRATtoN
fs-TOF-l
switch oFF.
29
Ragistorinq your numbor and name (Tft)
Registeringyour name
Followthis procedureto registeryournameor your
company'sname.Thenameyou registerherewill be
printedat the top of everydocumentsentto another
facsimile
unit.
Make sure that the REG/SIRAI/ON swltch is ON betoro you
enter your name. Turn it OFF after you comploto rogistration.
Press |_FnNdT-Torl.
I.
DIAL
SET UP
2 Pressg.
2.
USER DATA
3 Press [s€-T-I.
I.
ENTER YOUR TEL
4 Pressgr.
2.
ENTER NAME
r T C S SI S E T I .
. lf a name is already registered,you can enter the new
name over the old one. lf you want to erase previously
entered characters,press [E L E A R l.
Look at the numerickeys(2 through9).
Thesekeys are assigned3 lettergroups.
Pressthe key whereyou see the letteryou
want to enter. The firstletterof the group is
displayed.
. Lefters Q and Z are not shown on the control panel, but
they are included with the PQFS and WXYZgroups.
Pressthe samekey untilthe letteryou want
to enteris displayed.lf you go pasta letter
continuepressingthe samekey untilthe
letteryou wantreappears.
. lf you want to enter lower-case /effers,press
E I . Keep pressing this key to alternal
InFT777777777777777LOW-TAS
between upper and lower-caseletters
30
Reqistaringl your number and name (TT!)
8 Pressthe rightsearchkey ' to movethe
cursorto the nextcharacterposition.
. Pross t-Sf A-Fa-ctrl
to enter spaces between words.
. You can also enter the following symbols as paft of the
name:
tlY_i l):;. : >?t' + $%&'O,-/@.
JustpressiSTlUEOlfl to displaythe firstsymbol.
Pressthis keyto displaythe symbolyou wantto enter,
thenpress > to moverightto the nextposition.
lf you press ruF7rcW-leT3el afterpressing
tSYlvEOI-Sl,you can scrollsymbolsbackwardsby
pressingTSTIEOI-SI.
.You can enter a name up to l6letters long, including
spaces.
CANON U. S .A-
9 Checkthe namedisplayed.lf you see a
mistake,presseithersearchkey (< or >)to
movethe cursorleftor rightto the letteryou
wantto correct. Then enterthe correctletter.
. lfJgy y3lto
rcIETF-I.
erase the entire name and start again, press
10 Whenyou are finishedenteringthe name,
press I-sETl.
DATA
3.
ENTRY
POLLING
OK
ID
11 Press fs.r-r-o-F-]
and turn the necrsrRATloN
switch oFFto returnto standbV.
31
Roglislarinq your number and name (TTt)
When you are finishedregistering...
Move the RecrsrRATloN
switch to orr.
. Tho seftingsyou have registerod, including the current
date and time, will now be sayed, even if tho power is
turnad off and turned on agaln.
f/P REGIS\RATPil
T P O N O F F
2 To checkthe numberand nameyou have
just entered,printit on the printer.press
fFTNcT-fotil.
1.
DIAL
SET UP
REGISTRATIONewltch ON/OFF
3 Press€t.
2.
USER DATA
4 Press fsET-|.
I.
ENTER YOUR TEL
5 Press tnEFoFTIto print the name and
numberyou'veregistered
for the fax.
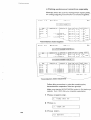
ACTIVITY
REPORT
tiSla arr at00
oa/ ta/9t
.....
usa
Ug'5
DATI LIS.....
S t0
USE'S EL
516 at!
e?00
rcLLItsC IO
uffi
Tts
IIO P USE
2
A/F 5r TtE
6
F/T A'IIC TIIE
l:
fl
RErcN
otmtr
ro
u
Ifroffi
o6M
no
omq
u
AL&
]:&tfAL
nl
oil
IO
od
rulTIOd
AqIYIfl
offil6
RErcM
Afr
rm
u
mR
n
crcn
qwr
sEP&r
or|ru
I u m
ownT
u
tsal/h-'L srlG
u m u
u
ON
lWtol
ss/Fu
srlu
msNslw
t-1ffi/m
32
ox
str
atDtsqt0i
fff
m
Iuc
ns
5m
to
Using the tolaphono
PaTt3: GETTINGSTARTEDWITH BASICS
In thissectionwe willshowyou howto usethe regular
dialingfeaturesof yourfax to maketelephonecalls.
Thefeaturesdescribedin thissectioninclude:
. Dialingthe telephonemanually
. Redialing
the telephonemanually
. Answering
the telephone
Automaticdialingfeatures,
whichcan be set up to dial
at the touch of one or two keys,are describedin a later
chapter.
33
t/sing f/ro tolaplrcne
Using regular dialing with numeric keys
Follow this procedureto use regulardialingto make a
local or long distancetelephonecall. Regulardialing is
just like using a telephone.
Checkthe displayand makesurethe fax is in
standbymode.
L2/3L/92
12:01
Pickup the handset.
.You cannot use regular dialing with the handsetin its
cradle.
Whenyou hearthe dialtone,usethe
numerickeysto enterthe completephone
"l" and
numberyou wantto dial,including
the areacode for long distancecalls.The
displaywillshoweach numberas it is
entered.
TEL
:
TEL :
L3L2228570
4 Whenthe otherparty answers,you may talk.
5 Whenyou are finished,hang up the handset.
The fax returnsto standbymode.
L2/31/92
34
L2:.I
Using tlte lalaphonB
Redialing
Follow this procedureto redialthe number previously
ciialed.
1 P i ck u p th e h a ndset.
L2/3L/92
L2z3
2 Press tilE-prlTt. The numberdialed
previously
withthe numerickeysis displayed
and then dialedagain.
TEL =
L3I2228570
3 Whenthe otherpartyanswers,you may talk.
Whenyou are finished,hangup the handset.
Answeringthe phone
1 Whenthe fax rings,just pick up the handset
and answer.lf it is a telephonecall,you can
talk normally.
-or-
lf you heara beep,this meansthat someone
is tryingto send you a fax. To receivethe
document,go on to the nextstep.
2 Press tsrA-F-T-ieor-n.
3 Hangup the handsetto startreceivingthe
document.
. For more detailed inlormation about automatic and manual
receiving, see page 53.
35
Spocl:r/ dialing
In this sectionwe describeimportantfeaturesyou
should know about dialingas soon as you get your fax
set up and ready to use. Thesefeaturesinclude:
. Switchingto tone dialing if your fax is set for rotary
pulsedialing.
. Dialingthrough a switchboard(PBX)
Switchingtone/pulsediating
In orderto gainaccessto mosttelephoneinformation
you haveto usetonedialing,evenif you are
services,
connectedto a pulseline. lf you are connected
througha pulseline,followthisprocedureto setthe
fax temporarily
for tonedialing.
Pickup the handset.
L2/3L/92
2 3 z4
2 Withthe numerickeys,type the firstnumber
of the telephonenumberyou wantto dial.
Afteryou pressthe first key, the display
changes.
TEL
=
3 Usingthe numerickeys,enterthe complete
number.
TEL :
31222857 0
Presst-T-oxTl
afteryou hearthe recorded
messageof the information
service.
TEL =
3L22285700
Use the numerickeys to enter the
informationrequestedby the information
service.
. When making the initial call to the information service, you
can use either tone or pulse dialing. Afterthe information
seryice answers, you then have to send the appropriate
slgna/s using tone dialing.
36
Spocial dialinq
Dialing through a switchboard (pBX)
A PBX (privatebranch exchange)ls an on_site
telephoneswitchboard. lt you set up the fax in an
office where you have to go through a switchboard to
dial an outside number,just dial thl fax's numeric keys
as you would a regulartelephone.
Pickup the handset.
L2/31/92
L2:5
Usethe numerickeysto dialthe outsideline
number.
Usethe numerickeysto enterthe restof the
number.
37
B a l o r o s c n , I i r t( l d o c u t n o t i l s
This sectionshows you how to check documentsand
preparethem beforesendingthrough the fax. For the
best reproductionqualityand to preventiams, read
this sectioncarefully.
Papersize
Beforesendinga document,checkthe documentsize.
Thisfax can sendstandardlefteror 44 sizepaper. lf a
documentis largeror smallerthanthe sizesshown
below,if possible,usea copy machineto enlargeor
reduceit to withinthe acceptablerange.
Maximumdocument size
8.5 in.
( 2 1 6m m )
8.3 in.
( 2 1 0m m )
T
I
1 1 . 7i n .
(297 mm)
I1
3B
Minimum document size
I
1 1 .)0i n .
(271
9 mm)
n
I
I
I
Bo{oro sendino documenls
What the receivingfax doesn't see
Beforesendinga document, check the margins.
For best reproduction,documentsyou send should
have left and right marginswider than the shaded
portions shown in the illustrationbelow.
0 . 0 4 i n .l l
(1 mm)
8.4in.
( 2 1 4m m )
llo.04.n.
(1 mm)
39
Boloro sanding docurnonts
Preparingdocumentsbefore sending
Beforesendinga document, check and prepare
documentsfor sending by followingthese guidelines.
. To preventa paper jam, do not feed the following
types of paper into the fax. lf you haveto send a
document on such paper, copy it firstthen send the
copy through the fax.
zt
Wrinkledor
creasod paper
trI
Curled paper
E
Torn paper
rt
TEI
trI
Carbonor
carbon-backe
pap6r
frated paper
Onionskinor
thin paper
. Alldocumentstransmitted
withinthe samegroup
shouldbe of the samewidthand paperthickness.
. Removeall clips,staplesand similarobjectsfrom
documentsbeforefeedingthemintothefax.
. Letink or pasteon documentsdry completelybefore
feedingthemintothe fax.
. Theautomaticdocumentfeeder(ADF)on the fax
can feed a sheetof paperbetween0.003in. (0.08
mm)and 0.005in. (0.13mm)thick. Do notusethe
ADFfor thickerpaper,or if you haveto feeddocumentsof differentthickness.In eithercase,makea
copy of the originaldocumentand feedthe copy.
40
Boforo sendino documorils
Settingdocumentdensity
Followthisprocedureto setthe densityfor documents
thatyou sendor copy. Therearethreeseftings:
STANOARD,
L|GHTER,and DARKER.The seftingyou
select remainsin effectfor all documentsyou send or
copy until you change the settingagain.
Press tFnXeT-IOTt.
I.
DIAI,
SET UP
2 Press6;.
6.
DENSITY sET
3 Press ts.T].
STANDARD
Presseithersearchkey (< or >) to display
the othersettings.
. Press either search key again to alternate the setting.
LIGHTER
Whenthe settingyou wantis displayed,
press tsE-Tt.
DATA
ENTRY OK
41
Bcfora st:nding doctrmants
Settingreproductionquality
Followthis procedureto set the qualityof the
reproductionfor transmissionor copy according to th
contentsof your document.
When neitherthe F|NEor HALFTONE
lamp is on, the
fax is set for standardreproductionquality. Make
these seftingsbefore you send or copy a document.
Afteryou turn the poweron, the fax is set fo
standardtext. The FINE
and HALFToNE
lamps
are off.
Pressffi
to turn on the F|N
lamp,pressagainto turn on HALFToNE,
and
againto turn both lampsoff. Everytime yol
pressthis key,the settingalternatesbetwee
thesethreekeys.
Stardard + FINE + HALFTONE
Hereis a summaryof howthesesettingsareto be
used.
Standardtext
lf the documentcontainsonlystandardtypedtextwit
no photosor illustrations,
sendit withboththe F|NE
and HALFTONE
lampsoff.
Standardtext with increasedclarity
Forthe besttextreproduction
possible,press
ffi
untilthe FlNElamp
lights.
Text with photos or graphics
To reproducethe shadesand halftones
of
qlgtographs,illustrations,
or othergraphics,press
ffi
untiltheHALFTONE
tampligh
42
B a l o r o s o n d i n 9 1d o c u m o n t s
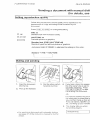
Insertinga document
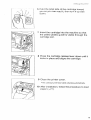
After you have preparedthe document and made the
appropriateseftingsdescribedin the previous
sections,follow this procedureto feed the document
into the fax.
Adjustthe paperguidesto the widthof the
document.
o OOO E€
o OOOFC:
- O
o:
OOO
OOO
Ec
o€
. The document feeder can hold up to S documents for
sending.
. ll you are sending more than one page, fan the pages to
make sure that the pagos are not stuck together.
. Arrange documents in the order you want them sent (first
page on top, lastpage on the bottom).
. Arrange the documenf pages so the edges are aligned.
2 Tap the edgeto alignthe edgeof the
documentpages.
r lhls helps to prevent paper jams.
Insertthe documentsface-downinto the fax.
The firstpagefeedspart of the way into the
fax.
. lf you are sending more than one page, the firstpage
feeds part of the way into the fax. The fas<feeds the
document paqe.sconsecutively from the bottompage.
R"-t";."s.-=l
*"3>==s
DOCUI,IENT READY
43
Sonc/irrrJa d oc urttonl
In this sectionwe will show you how to send a
document. These importanttasks are describedbelow:
. Dialingand sendingmanually
. Redialingwhen the other party does not answer
. Clearingdocumentjams
Feedthe documentintothe automatic
documentfeeder.
("43)
. The fax can send a document when printing a document
that has been received in memory. Ihis is called
semi-dual access.
. lf you are sending a long document, you caninsert a
document of up to 5 pages in the automatic document
feeder.
DOCUI.IENT READY
Pressm
to makethe
appropriatesettingfor the document.(+42)
44
Scrrriirro a docuntont
Dialing a number and sending a document
. Thereare two ways to dial a numberanclsend a fax.
. Manualdialing.Use manualdialingwhen you need
to talkto the otherpartyon the telephonebefore
sendingthe document.
. Automaticdialing. Useautomaticdialingto send
the fax withouttalkingto the other party.
r Manual Dialingto send a document
Followthis procedureto dial a numbermanuallywhen
you needto talk to the other partyon the telephone
beforesendingthe document.
1 Feed the documentinto the fax.
2 Pick up the handset.
"ffi
3 Dialthe other party'sfacsimilenumberwith
the numerickeys.
'Q5' 4
After dialing,if you hear a tone, this means
that the other party'sfax is set for automatic
receiving. Press rsft-T
AF-TlreoF-nto start
transmitting
the document.
-or-
lf someoneanswersthe phone,tellthe other
party to press their start key and then hang
up tnerrpnone. Press fs-IrART / coFn on
your fax, and hang up your handset.
45
Sondinq a docrtnront
The displaytellsyou whentransmitting
begins.
TRANSMITTING
Aftera few momentsthe displaywillbegin
alternating
every2 seconds.First,the other
party'snameand pagenumberare
displayed.
. The other party'sname is displayed only if the other
party's fax is programmed with this information.
PO
CANON INC.
Thenthe otherparty'sfacsimilenumberwill
be displayed.
2 2 8 5 ' t ' 70
. lf there are additional pages, after the first page is eiected
from the fax, those messages are repeated.
. lf you have to add pages to a long document, wait until th<
/astpage starts through the fax. Then you can insert up to
5 more pages.
Afterthe documentis sent,the fax will beep
once and the displaywilltellyou whenthe
transmission
has ended.
TRANSMITTING
46
OK
Sendino a document
r Automatic dialing to send a document
Follow this procedureto dial a number and send the
documeht without talkingto the other party on the
telephone.
1 Feed the document into the fax.
2 Dialthe other party's number with the
numeric keys.
. You can also dial the number with One-touch or Coded
speod dialing. (+75,85) lf you do, dialing stafts
automatically,and you can skip the next step.
3 Press fs riRTITOF-n to start sending.
The displaytellsyou when transmitting
b e g i n s.
TRANSI,lITTING
Aftera few momentsthe displaywill begin
alternatingevery2 seconds. First,the other
party'snameand pagenumberare
displayed.
. The other parly's name is displayed only if the other
party's fax is programmed with this information.
CANON INC.
PO
Thenthe otherparty'sfacsimilenumber.
228 5770
. lf there are additional pages, after the first page is ejected
from the fax, the messages are repeated.
. lf you have to add pages to a long document, wait until the
/ast page starfs fhrough the f ax. Then you can inseft up to
5 more pages.
Afterthe documentis sent,the fax willbeep
once and the displaywilltellyou whenthe
transmission
hasended.
TRANSMITTING
OK
47
Sonding a docuntont
Redialinga facsimilenumber
-
..r. r
.{ -
lf the facsimileline is busy or if there is no answer,thel
the fax will make two more attempts to dial at two
minute intervals.You can also rediala facsimile
numbermanuallv.
r Automatic redialing
1 The fax willautomatically
go intothe redialin
mode.
REDIALING
2 AfterWvominuteshaveelapsed,the fax will
attemptto dial again. lf the lin
automatically
is stillbusy or there is no answer,the fax wil
againenterthe redialingmode.
REDIAI.ING
3 Afterthe secondattempt,if the call is not
connectedthe fax will display:
BUSY/NO
SIGNAL
. Then the fax will sound an alarm that shows the fax failac
send the document.
. At any time if you want to cancel automatic redialing ana
return to standby, press fSTo P'l .
DOCUI{ENT
READY
r Manualredialing
Followthis procedureto manuallyrediala facsimile
number.
1 Press fRjj-EDTAn.
. The fax will redial the previous number dialed with the
numeric kevs..
4B
Sending a documont
Clearingdocumentfeed jams
Jf ar.lccurnBnljamsor stops halfwaywhile it is being
sent, the fax will alert you of a problem by alternatelow
and high pitch beeping. Followthis procedureto
removea jammeddocument.
1 Pressfs.r-Totrl.
2 Placeyour fingersunderthe controlpanel
whereit is markedpusn,and gentlypullout
the controlpaneltowardsyou untilit opens.
if$$
3 Pullthe documentout fromthe top or bottom.
4 Gentlypush the controlpaneluntilit clicks
shut.
49
Rocoivinq docrtrnonts
fj'.
J
Ttvse ,*e a variety of ways you can set your fax to
receivedocuments. The proper settingdependson
whether or not you use your fax for both facsimileand
voice communication,
and if thereis an answering
machine connectedto the fax. The fax can receive
documentsin the memorywhen printingdocuments
from the memory.
FAX/TEL auto switch over( + 53)
Set the fax to receiveboth facsimilemessagesand
telephonecalls if you have only one phone line which
you use for both telephoneand facsimile
communication,and you want the lax to monitor all
incoming calls for you.
Manual reception (+ 55)
Set the fax to receivemanuallyif you haveonly one
phone line which you use for both telephoneand
facsimilecommunication,and you want to monitor all
incoming calls yourself.
Receiving with an elctensionphone (.r 56)
Set the fax to answerthe phone or receivewhen an
extensionphone is connectedto the fax and you are
not near the fax.
Automatic receiving (+ 57)
Set the fax to receiveautomaticallywhen you have a
separateline for both the facsimileand your telephone
and you use the fax only for sending and receiving
documents.
Receivingthrough an answering machine (+ 61)
Set the fax to receivephone messagesthrough an
answeringmachineif you have one connectedto the
fax, and receivedocumentsautomatically.
Receiving in memory ( + 67)
lf paper or ink runs out, the fax will automaticallystore
receiveddocuments in memory so you can print them
later.
50
Roceivino docunents
What the fax doesn't see when receiving
The shad.edpoltions"of the document shown in the
diagram are not recorded by your fax.
Ink footprlnt**
Thesmallblacksquaremarkedwitha doubleasterisk
in the diagram(**) is the rnkfootprint.The ink
footprintappearsat the lowerleftcornerof the
receiveddocument.
Whenthe ink footprintbecomesa lightercolor,this
indicatesthatink in the cartridgeis runninglow and will
requirereplacement
soon. Whenink runslow in the
cartridgeand the faxdetectsa lightink footprint,the
displaywill read:
CHANGE CARTRIDGE
When you see this message,follow the procedureson
page 18 to installa new ink cartridge.
51
R oc a ivi n g docrrrrronls
Gettingreadyto receivedocuments
TOyeqeivea document,the fax shouldbe in
the standbymode (thedateand timeshould
be displayed).
L2/3L/92
L3:4
lf there is a document in the document
feeder,the displayreads
DOCU},TENT READY
Removethe documentto returnto standby.
. When the fat<is in the manual reception mode and there is
a document in the document teeder, you won't be able to
receive documents.
2 Makesurethereis paperloadedin the
printerpaperfeeder.
ffi
s2
.lf there is no papor in the printer paper feeder, or if tho
supply of paper is low, put more paper in the feeder.
(+21)
. Always keep the printer paper feeder well stocked with
paper.
. Make sure the paper feeder plate is released. lf it is not,
press the release so the p/ate is unlocked. ( + 21)
Keepthe areain front of the fax clearso
documentsyou receivewillhavea placeto
stackafterthey are ejected.
Receivino documortts
Receivingwhen you're in the office
lf you have onl.y one.{ine sorr,ir' ^into'your office, follow
this procedure to use the unit as both a fax and
telephone.
Note that you cannot receive documents in the following
cases.'
. When you are copying a document or printing a fax report.
r Receiving phone calls and documents
automatically(FA)(/TELauto switch over)
Checkto be surethatthe auro lampis on. lf
not,pressffiuntil
the
AUTolampis on.
. When your fas<
rocelves a call, it checks the transmlsslon
for a special signal called a calling tone (CNG) sent from
the other party's fax. Ihls signal identifies the call as a
fac s i m il e transmisslon.
lf your fax detectsthis CNG signal,it will
automatically
startto receivethe document
from the callingfax.
. lf your fax does not detect this signal, the fax witt ring and
alertyou to pick up the handset.
-or-
lf the telephonerings,pick up the handset.
TALK
lf someoneis callingyou, you may talk.
-orAfteryou pick up the handsetand say
"Hello",if no one answers,this
means
someoneis tryingto sendyou a document
transmission
withoutthe CNG signal.lf this is
the case,go to the nextstep.
. Iho CNG signal that triggers automatic receiving on your
fax is always sent if the othar party uses One-touch or
Coded speed dialing. The CNG signatis generated by the
majority of faxes in use. However, if the other party picks
up the handsef and dials your fax manually to send you a
document, the CNG signal is not generated. Sorne faxes
cannot send the CNG signal.
53
Ro c o ivi n q clo c u ttto n ts
4 To receivethe fax, press fsrTFT-/rc-eoF-n.
5 Hangup the haitdset.
Afterthe receiveddocumentis printed.the
fax returnsautomatically
to standby.
L2/3L/92
l3:5
. The faxbeeps once to tell you that your document has
been recaived.
. lf an error occurs, the fax beeps intermiftentlylor a few
seconds. lf this happens, contact the other party and
roquesf that they send the document again.
. This function can only be used when the FMITEL SWITC
is ON. (+ 57)
54
Recoiving documants
r Receivingphonecallsand documentsmanually
(manualreception)
Check the nuro and ANSHooK up lamps.
They should both be off. lf either lamp is on,
p r e s s t h em
they are both off.
keyuntil
Whenthe telephonerings,pick up the
handset.You maytalk.
Afteryou talk, if you wantto receivea
document,go to the nextstep.
-orlf you heara tone,this meanssomeoneis
tryingto sentyou a document. Go to the
nextstep.
-orAfteryou pick up the handsetand say
"Hello",if no one answers,this means
someoneis tryingto sendyou a document
transmission
withoutthe CNGsignal.Go to
the nextstep.
. Ihe CNG signal that triggers automatic receiving on your
fax is always sent if the other pafi uses One-touch or
Coded speed dialing. Ihe CNG slgna/ is generated by the
majority of faxes in use. However, if the other parly picks
up the handset and dials your fax manually to send you a
document, fhe CNG signal is not generated. Some faxes
cannot send fhe CNG signal.
4 To receive the fax, press fsrrFT-7ToFYl.
5 H a n g u p th e handset.
After the receiveddocument is printed,the
fax returns automaticallyto standby.
L2/31/92
l3:5
. The fax beeps once to tell you that your document has
been received.
. lf an error occurs, the fax beeps intermittentlyfor a f ew
seconds. lf this happens,contactthe other parly and
request that they send the documentagain.
55
Rocoiving docuntents
r Receivinga fax from an exlension phone
connected to your fax
Followthis procedureto receivea documentwhen the
fax is set for manual receiving,but you are too far from
AnTTeb-fVl
the fax to pressfsft-T
S@s
To an extension phone
50
Checkand makesurethat your extension
phoneis connectedto the middlejack (@.
Whenthe phonerings,pick up the handset
phone.
of the e)dension
3 lf you heara slow beep,this means
someoneis tryingto sendyou a document
by facsimiletransmission.Pressthe hook
buttonon the handsetand hang up the
phone.
. The fax begins to receive the document.
Receivinq documenls
r Receivingon a dedicated tax line
(automaticreceiving)
Follow this procedureif you have one line in your office
that is used only for receivingand sending documents.
You can receivedocumentsat any time, whetheryou
are in or out of the office. When the fax receivesa call,
it will automaticallyreceiveany document that is sent.
Make surethe FEG/SfRATION
switchis ON beforeyou
register. Turnit OFF afteryou completeregistration.
1 Press [FnNc.rr-N].
I.
DIAL
SET UP
2 Press Ol.
3.
USER SW
3 Press tSE-r-].
TX
REPORT
4 Pressthe searchkeys (. ') to display
FAXTTELSWITCH.
FAX/TEL
SWITCH
5 Press fsi-T-].
. Thecurrentsettingis displayed.
ON
6 Pressthe searchkeys (. ') to changethe
settinqto orr.
OFF
57
Rocoiving docurrronts
7 Press ts€-al.
DATA
I
ENTRY OK
REMoTE RX
I
8 PressfsJ-ToF-l
and turn the necrsrRATtoN
switchoFFto returnto standby.
9 Pressm
lampis on.
untiltheAuro
. Use this seftlng whan the fax is connected to a line that
you intend to use only for facsimile communication.
5B
Rocoivinq documants
Receivingwhen you're not in the office
lf you have only one line for telephoneand fax
transmissionscoming into your office,follow this
procedureto receivedocumentssent to you when you
are not in the office.
r Receiving with no answering machine
(automaticreceiving)
Makesure the RFG/SfMTIONswitchis ON beforoyou
register.Turnit OFFafteryou completerogistration.
1 Beforeyou leavethe office,make sure that
you haveenoughpaperin the printerpaper
feeder. lf the papersupplyis low, put more
paperin the printerpaperfeeder.(+21)
2 Press tFrFcm-M.
I.
DIAI,
SET UP
3 PressO.
3.
USER SW
4 Press fsET-].
TX
REPORT
5 Pressthe searchkeys (. ') to display
FAVTEL SWITCH.
FAX/TEL
SWITCH
6 Press fs-Er-1.
. The current setting is displayed.
ON
7 Pressthe searchkeys (. ') to changethe
settingto orr.
OFF
59
Rocaiving cJocurnonls
8 Press tseil.
DATA
ENTRY
OK
REMOTE RX
9 Press fs.r-T-o-trl
and turn the RecrsrRAnoN
oFF
to
return
switch
to standby.
10 Pressm
lampis on.
untiltheAuro
. When the AUTO lamp is on, if someone sends you a
document, no fufther operation is required. The fax will
roceive the document automatically.
. lf the fax runs out of paper or ink, it receives documents in
the memory. Aftor you return to the office, chack tha
MEMORY lamp. lf the memory lamp is on, printthe
contents of the memory. ( + 67)
60
Receivirto docunents
r Receivingthrough an answering machine
Follow this procedurewhen you want to leavgthe fax
du
unattendedwith your answeringmachine connectedThis will allow you to receivedocuments automatically
and record messageson the answeringmachinewhen
it is connectedto the middle iack on the fax.
Your caller can both leave a messageon your
answeringmachineand send a document using only
one call. All they have to do is pressthe start key on
their own fax to send a document after they finish
recordingtheir message.
S.@s
To an answerlng machlne
1 Checkand makesurethat your answering
machineis connectedto the middleiack (@.
2 Recorda messageon your answering
machineto informcallersthat they can leave
a voicemessageor send a documentfrom
theirfax machine.
"Hello. l'm not in the office right now, but you can
leavea messageafterthe beep. l'll returnyour call
as soon as possible. lf you would like to send a
fax, press the start key on your fax after recording
your message.Thank you."
IMPORTANT:Follow these recommendations when you set
up your fax to receive messages when you are not in the
office.
. When you record your message, leave a four second
pause at the beginning of the m€ssage.
. Speak clearly with frequent one second pauses in your
speecD.
. KeePyour message shofterthan 15 seconds'
. Set the answering machine to answer on the first or
second ring. (The toll saver feature cannot be used with
this sefting.)
3 Beforeyou leavethe office,turn the
machineon.
answering
61
R o c a i vi rty1cJocr/rnon(s
Pressmkeyuntil
the
ANSHooKup lamp lights. The fax is now set
to receivethrough the answeringmachine.
Hore's what happens when you get a call:
. Your fax answers and your mossage is played back.
. During your messago,your fax checks the incoming call
for tho CNG (calling tone) signal that identifiesthe call as
a fac s im i Ie transmission,
. lf a CNG signa/ is detocted, your fax will roceive the document automaticallyafter your rnessage plays back.
. lf a CNG slgna/ is not detected, your fax will let your
answering machine record the voice message of the other
parly.
. lf the other party is dialing manually to send a document,
or if the other party'sfax cannot send a CNG signal, ho or
she will have to follow the instructlons of your voice
message to send the documenf (see the sample message
on the previous page).
Whenyou returnto the office,turn the
answeringmachineoff.
. To ensure that the answering machine doesn't affect your
fax communications, always turn the answering machine
off when it is not rn use.
youreset
the fax for manualreceptionor auto receiving.
6 Pressmuntil
. When both lamps aro off, the fax ls set for manual
You have to answer the phone and press
to receive the document. ( + 53)
. When the AUTO lamp is on, the fax ls sef to receive
documents automatically. ( + 59)
. Some answering machines cannot be used with this
feature.
62
Rocoivinq documonts
r Adiusting the fax lor use with different types of
answering machines
When you the fax is set to answerthrough an
answeringmachine,first the answeringmachinewill
answerthe call. Next, the fax will detect if the caller is
a telephoneor anotherfacsimileunit:
. lf the fax detects a facsimilecallingtone (CNG),it will
receivethe document automatically.
-or. lf the fax detects silencefor six seconds, it will
receivethe document automatically.Six seconds is
the factory setting. The ANS HOOKUP must be on.
An answeringmachinewill disconnectthe line after a
certainperiod of silence. The amount of time to elapse
before an answeringmachinedisconnectswillvary
according to the type of answeringmachine.
lf your answeringmachinedisconnectsbeforea
facsimiledocument can begin transmission,then the
call will disconnect, and the caller will be unable to
send a fax on the same call. lf you experience a
problem with your answeringmachinedisconnecting
before it can receive a document, you may need to
adiust the A/F SW TIME.
r Changing the time before disconnection
Follow this procedureto adiustthe A/F Sw TIMEfrom 6
secondsto 4-12 seconds.
.
1 Pres s fFrr-U-NJ-reTtotrl
1.
DIAI,
SET UP
2 Press@.
2.
USER DATA
3 Press fSETl.
I.
ENTER YOUR TEL
63
Rocoiving clocurnents
4 P resstl.
F. wr;'';;*rn--------,
5 Press tsr-trT].
6
6 Usethe numerickeysto entera numberto
set the time.
. The time can be set from 4 to 12 seconds.
A
7 Press fs-trT-l
to registerthe time setting.
DATA
8.
ENTRY
OK
F,/T R'ING
TII'{E
I Press rsr-oF-land turn the necrsrRAloN
switchoFFto returnto standby.
r Disablingautomaticreceivingwith an answering
machine
Followthisprocedureif you do not wantthefax to
switchto automaticreceivingafterwaitingfor the
programmedperiodof silence.
1 Press lFnxer
1.
DIAL
rTl.
SET UP
2 Pressg.
3. usER sw
3 Press fs-trn.
TX
64
REPORT
R o c e iv i rto d o c u nt o rtts
4 Pressthe searchkeys(. ') to displaythe
ANS/FAX SWITCH.
ANs/FAX
SWITCH
5 Press fSE=il.
. The current setting is displayed.
ON
6 Pressthe searchkeys (. ') to changethe
settingto orr.
7 PressfsETl.
DATA
ENTRY
OK
TX REPORT
8 Press fs.r-TEFI
and turn the nectsrRATtoN
switchoFFto returnto standby.
65
Ro c c ivt r t q <7o c u r n a rtl s
r Changing the ring time
When the fax is set up in FAVTEL auto switch over,
( + 53), it will ring to alert you to pick up the phone
when the call is from another person. lf you do not
pick up the phone within a certainamount of time, the
fax stops ringingand hangs uP.
This next procedureshows you how to change the
duration of the ring time.
. Thefactoryseftingis 22 seconds.
switchis AN beforeyou
Make surethe SEGISIfiATION
registration.
you
complete
after
it
OFF
Turn
registor.
Press [FnNcrTNl.
DIAL
I.
SET UP
2 Press€t.
USER DATA
2.
3 PressrsE-T-I.
1.
ENTER YOUR TEL
4 Press€t.
8.
R'ING
F/T
TIME
5 Press fs-ETl.
22
6 Usethe numerickeysto entera numberto
set the ringingtime.
. The time can be set from 15 to 40 seconds.
I5
7 PressfsETl to registerthe time setting.
DATA
]..
ENTRY
OK
ENTER YOUR TEL
Pressfs-TOF-]and turn the nectsrRATtoN
switchoFFtO returnto standby.
66
Roceivine documents
Receivingdocuments in memory
The fax will stop printingand record the remainderot
the documentin the memorywhen:
- The printerruns out of paper
. The printercover is open
' A paper jam occurs
Subsequentdocuments are also stored in memory, up
to a total of 20lefter-sizepages*. When documents
are in the memory, the MEMORYlamps continuesto
blink. The fax can receivedocuments into the memory
when printingdocuments from memory
(semi-dual
access).
*8ased on CCITTNo.1 chaft. Standardmode.
r Printing documents received in the memory
Followthis procedureto print the contents of the
memory.
. lf the memorybecomeslull, it won'tbe ableto receiveany
moredocuments.
1 Whenthe ueuoRylampis blinking,this
meansthereare documentsin the memory
waitingto be printed.
2 Checkthe printerand makesurethereis
paperin the printerpaperfeeder. lf the
supplyis low, put more paperin the printer
paperfeeder.(" 21)
CHECK
PAPER
REC'D
IN
MEMORY
-or-
lf lightprintingoccurs,the displaywill
indicatethat the cartridgeis out of ink,and
you willhaveto replacethe bubble-jet
cartridge.( * 1B)
CHANGE
REC'D
CARTRIDGE
IN
I.{EMORY
. lf the print is not light, or if only a partial pago prints, go to
the next step.
67
Recaiving documents
l. Printingbegins.
3 Press fsJ-TTETIToFy
!{EMORY
(:CP:II
lamp goes off and all documents
4 The MEMoRy
are printed.
lf a power failureoccurs ...
a powerfailurewhenthereare
lf you experience
documentsin the memory,allthe documentsare
erased.Afterpoweris turnedon again,thefax
printsa reportto tell you the numberof
automatically
numbers.Use
documentslostandtheirtransaction
the listto requestthe otherpartyto sendthe
again.
document(s)
ldentifyingthe sender (RTl)
Mostdocumentsthat you receivewill havethe other
printedacrossthe top of the
party'sidentification
document. Likethe returnaddresson a letter,you ctl
tellat a glancewho sentthe document.The namean
numberof the otherpartyis also
telephone/facsimile
calledthe remofeterminalidentification(RTl).
6B
Receiving documants
Clearingprinteriams
Followthis procedureto clearprinterpaperjams.
Open the paper bail releasecoveron the
bottomleft corneron the front of the fax.
Pressthe paperbailreleaseleverdown to
releasethe paper.
3 Openthe printercover.
g{€--=
Pullthe jammedpaperout from the top or
bottom. Removeany bits of torn paper.
e"t>4
-nC"tr"1:=
. Avoid letting the paper touch the printing head of the
bubble-jet carlridge.
. Check the platen for ink stains. lf the bubble-jet cattridge
has printed directly on the platenand stained it, follow the
procedure on page 72 to clean the platen.
69
Rocoiving <locumants
5 Closethe printercover.
6 Raisethe paperbailreleaselever.
7 Closethe paperbail releaselevercover.
I Removethe paperfrom the printerpaper
feeder.
9 Press t-sr-Fl.
IN
Rri*rG
70
PROGRESS
Roceiving docurnanls
10 Use your thumbsto pressdown on the
paperfeederplateso it locksin the open
position.
11 lf any paperremainsin the printer,removeit.
12 Fanthe paperand stackit. (*21)
13 lnsertthe paperin the printerpaperfeeder.
. Make sure the guide is snug against the left edge of tho
stack.
s-ffi
14 Pressthe platereleasedown to releasethe
pressureplateso it comesforwardand
clampstl-repaperin the printerpaperfeeder.lf the MEMORYtamp is on, press [S-tl:-r-TFTId6-p-Y].
s"-.-j.j.
"%";'qQ
71
Racoiving documonts
Cleanlnga dirty ptaten
When a jam occurs and4he,pap*rdses not feed
correctlyto the printer,the bubble-jetcartridgemay
print directlyon the platen. This ink on the platen may
stainthe back of your paper. Follow this procedureto
clean ink stainsfrom the printerplaten.
1 Loadpaperin the printerfeedtray.
2 Press t-ilrrNeT-T-oTC.
I.
DIAL
SET UP
3 Pressg.
8.
CLEAN ROLLER
4 Press [sE-T-l
to feed a sheet of paper and
startcleaningthe platen.
IN
PROGRESS
t Three sheets of paper are fed to clean the platen.
5 lf the platenis stillnot clean,repeatthis
procedure.
72
Makitrg copios
-t-
Foilowthis procedureto copy documentswith the fax-
Set the print densityfor the documentsthat
you want to copy. (.r41)
Feed the documentin the automatic
documentfeeder.
DOCU},IENT READY
lf you have photographsor graphicsin the
to light
document,press ffi
the HnlrroNElamp.
. The fax automaticallycopiesdocumentsin the FINEmode'
Press rcTrF-T-7TbF-n.
COPY
PAGE
O
lf you wantjust one copy,go on to the next
step.
-or-
lf you wantmorethanone copy,usethe
numerickeysto enterthe numberof copies
you want.
. The fax can make up to 99 coples automatically.
COPY
PAGE
O
To startcopying,pressfs-Tnn-tlreo_F-n. lf the memorybecornesfull when copying, a warning
beeps and a messagels displayed. Enter 01
for the numberof cooies.
},{EMORY FULL
7 lf vou want to stop copying, press fs.r-To trl.
73
Printing an activity managotnonl repod
lf you want to see a record of your tratisac.ions,iollovi
this procedureto print an activitymanagementreport.
The activitymanagementrepon is a record of the
documents you have sent and received.
Checkthe displayand makesurethe fax is in
standby.
L2/3L/92
14:I
2 Press filrN-dT-IOTl.
1.
DIAI, sET UP
3 Press I-R-Ep-oTR.The repoft prints.
ACTIVITY
REPORT
us^c€ T
f,^m
Tl rE
A m u
c J
oalta
ta: !t I
AWU
Cl
0all{
l6r5!
AWU
Cl
mmffIoN
toofi
ffl-
TI
r
coNreqloN
to
I
PAGS
oo lo
oo t 0
fr
ITAL|A
06lta
tt:5t
505,
c/-\ot
carot
oCl:l
lt:06
ol 2l
o0 00
RESULT
NC
o
xc
or
xc
o m P
o
xc
I
?7t
!l7t
csoil
m
06/21
l1: o!
0o'o0
I
7t!
tt7!
cI\oN
w
oalt{
l7:0t
00 00
I
77!
llTt
csox
n
06/!a
t7:Ol
00'00
0
NC
L7: to
tt: ta
00 !a
oo 20
I
o(
tc
lI: tl
Oalt5 llir5
06/25 ll:lt
oo ll
o0 : l
00 00
O!/2S tt:l!
0o 0o
oalt!
oa/23
0al!S
0o
oo
0o
oo
o s P
TI
xc
o m P
o m P
WUAL
WUAL
TI
TI
CJ
I
G!
t
7t!
t7t
JltJ
tl7:
caon
calod
ux
w
oa/la
o6lIa
t
t7!
tt?!
C!
I
r7t
!r7!
q
u
tAroAL
D
n
ca\ol
*tot
oa/:5
INAL
|NAL
N
I
I
I
0
ox
of,
NC
o r0o5
NC
o m P
INAL
IAW
A m u
lem
n
U
u
C!
C!
c J
ci
I
I
l
t
t7J
77!
r7l
7t!
tl7:
!l7t
tlTt
!t7t
c&\ot
G
lca\oN w
LCSOT W
tcMon (n
loalItr
tl: lr
tl:ra
t I i tt
tl: Jo
Ia
a?
ao
at
nlm
74
I
I
I
coum
0(
o(
oI
lox
l0 t
Ona touch dialirtgl
Part 4: ADVANCEDFEATURES
One-touchdialingallowsyou to registera phone
numberor facsimilenumberundera One-touchkey
andthenallyou haveto do to dialthenumberis iust
pressone key. Here'show One-touchdialingworks:
. You can registerup to sevenphonenumbersunder
the One-touchdialingkeys @] to E.
. Witheachnumberyou can alsoregisterthe nameof
the otherparty.The nameyou enteris printedin
your One-touchdialinglist. (+ 84)
. You can registera telephonenumberor a facsimile
number,but not both,undera One-touchkey.
. Aftera numberis registered,it can be dialedjust by
touchingthe keywhereit is registered.Destination
labelsare providedso you can labeltheOne-touch
keyson the controlPanel.
. You can entera numberfor One-touchdialingup to
38 digitslong,includingsPaces.
. To interruptOne-touchdial registrationand returnto
standby,just press fs-T-O-Pl.
75
Ono-touch dialingl
Registeringnumbersand namesfor
One-touchdialing
Follow this procedure to register names and numbr
for One-touch dialing.
Make sure that the REG/SIRAilON switch is ON before'
enter your telephona number. Turn it OFFafter you
c o mpl eto regi stration.
1 Press fFnxc-T-Tort.
1.
DIAI
SET UP
2 Press fsETt.
l.
I-TOUCH DrAr,
3 Press fs-trT].
01 =
4 Pressthe searchkeys (. ') to displaythe
numberof the One-touchkeywhereyou
wantto registerthe numberfor dialing.
0 2 =
. lf a number is already registered under the code you
chose, the fas<displays that numbor.
. Prass I-C]iiiiiiiiiiiiiii--IETRI
to clear a previously registered nun
5 Use the keysin the tablebelowto entertl
number.
02=
Keys to press
O to @
rcTTeE]
ttrATStrl
lTt
E A-R I
fTONEI
76
3I2
228 570
What hapoons
Types a number.
Enters a space. Spaces are optional.
Entersa pause. Within a number a
pause equals 2 sec. At the end of a
n u m b e r ,a p a u s ee q u a l s1 0 s e c . ( + 8 1 )
Clearsthe entire number so you can
start again.
+36)
E n t e r s a T f o r t o n e d i a l i n( g
Ono-touclt dialinq
Rogletorlng
long dlelanco
numbore
Wtren you registera long distance number, you may
have to insert a pause either within or after the number.
Ttre locatiorr of the pause and the actual pause time
may differclependinEcri the ;.:lephonesystem. lf you
experienceproblems with long distance dialing of
numbers registeredfor One-touch or Coded speed
dialing,contact your Canon authorizeddealer.
To inserta pause in the number,press
tp AnsEl. Pausesare shown in the display
ASAP.
. A pauso entered at the end of a number is displayad as an
upper-case P and gives a 10 second pause in dialing.
Q2 =
312 228 5700p
.A pause enteredwithin a number is displayedas a
lower-casep and gives a 2 second pausein dialing. The
length of thispause can be adiustad. (+ 81)
02 =
e3L2 228 5700
. More than 1 pause can be enteredto create continuous
pauses within numbors.Each pause is 2 seconds. ln the
examplebelow, the 2 pausescraato a continuouspause
of 4 seconds.
02 =
Roglslerlngnumbers for dlaling
through a PBX
1pp3l2
228 57
lf you are usinga PBX (privatebranchexchange),you
may haveto inserta pauseafterthe outsideline
numberwhen you registera numberfor One-touch
dialing. lf you experienceproblemswith dialing
throughyour switchboard,contactyour Canon
authorizeddealer.
lf you needto adjustthe pausetime,followthe
procedurein the ne).tsection.
6 Press fsEr-l to registerthe number.
DATA
ENTRY
OK
. The display changes to prompt you for the other party's
name.
I_TOUCH
SPD NAME
77
BL
(O) =
oN
(r)
=
SII
'Outuase aX€LU noA
ol
Jol ]teMpue
A1;ecrieruolne
oOueqcute6e lltmAeldslpaq1
ZSCOH XJ
TSS
'apouj uotssil.usueJl
aLll]os
ol poldurotd ale no^ puocas L lnoqe laUV
xo
'oujeu
Lt{JNg vJvo
'tI-lE ssaJd
aq] outJaluopaLlstuuaJe no^ uoLlM 8
'Jalue ol
lue^ no^ loqLUAsaq1Aeldsrp
of ( < >) sAel qctees aql osn .palalua aq
uec leql les oql ut loquAs lsll aql sAeldsrg I--t OlOtrtiISl
.u1ebe
uEls uec noA os fu1ueallua aql sreelC iET=-T
'iaUel p tero edAl
uec noA os 1q6uJo Ual Jos:no aql so^ohl
'Josrnc eql o^oqB
Jellel aql
rot ess+ra^ 01pue taddn uaa^ loq seqcll^S [nOT/em
'uoplsodJosJncoql
lp Jollols teno eceds
E sJolui 'sJa$oluae,$loq e3pds p sralu3 {-3 C-OT"SI
'peAeldsrp
s! luE^\ no{ legel €Lllltlun Ae1 eqgburssetd
cleal 'lu€/ri no^ euo aql lou st rauol lsJUer.|l
'Ae1cueunu oql
ol lxau leued lolluoc eql
;1
uo umorls dnor6 aq1lo rapal lst4 eql srolu:l
@ of @
suedduq 1uq11
sseta oFIo)
'syodet tnoA pepJocel
ut
suo1cesuul 1o >1cet1dee>1
o1noA rc1./e/see il oput ly/ slql .eueu e rclue no,{ :r;tll
pueuuoceJ en'pettnbet pu sr A4ue eueu eql q6noq1y.
etrtprp noA ueqn Aeldslp eutreuo eq1ur peAepsi::'\li
st-todetxe! uuo tnol ut paluud s/ eleq,telue noA @uJeuol! o
raluool Motoq
olqeloLtiutpalslrnrit"iiJ.?i .
'ouo plo eql
JeAoeueu lieu
otll )slue 6:snl'Alsnornetdpetelstber useq see eweu e J! o
'eu.Leus,Ayed
JsLllo eLil teluo ol
nOAnt.qllItA
Ono-lortch diating
9 The rx MoDE
is for transmission
of
documentsfrom the fax to anotherfax
machine.press6 if the numberyou are
registering
is for facsimiletransmission.lf
you pressO go on to the nextstep.
-or-
Pressg if the numberyou are registering
is
for dialinga regulartelephonecall.
. The next One_touch
number is displayed. Repoat this
procedure to enter anothernumber
a,nd name for
One-touch diating, orpress
fEff
; return to standby.
10 The displaywaitsfor you to enterthe
transmission
speed.
. You can sot two transmission
speeds: 4g0Oand 9600 bps.
rl." searchkeys( < ,1 ti aiternaiJLpeen
fi.:""
mese
fwo seffings.
The sending
:p?.d. in bitsper second(bps)
the speedat wh'icn
aocumeiti are sentover
!.ete.rn1ings
tha telephoneline.
4800 bps
Use.4800bps for a line with a bad connection
such as
static on the line.
9600 bps
Use 9600 bps for the fastesttransmission
speed. lf a
problem occurs, the fax automatically
aJiusts the
speed for the best possibletransmission'
1 1 PressrcET-tto registerthe transmission
speed.
DATA
ENTRY
OK
. After 1 second the next
display appears.
LoNG DTSTANCE (o)
1 2 Pressthe searchkeys
to disPraY
the
settingyou want (0,i, !:;)]
79
Ono-touclt dialinq
lf the facsimilenumberyou are registering
i
not a longdistancenumber,set to 0.
-or-
Fora longdistancenumber,select1,2, or
First,try setting'1. lf you havea problem
sendingor receivingdue to poortelephon
lines,registerthe numberagainand try
settings2 or 3 untilyou correctthe problen
1 3 Whenthe settingyou wantis displayed,
press rsET].
DATA
ENTRY
OK
. Afterabout 1 second, the next One-touch number is
displayed for your next ontry.
0 3 =
1 4 lf you want to enteranothernumberand
namefor One-touchdialing,repeatthis
procedure.
-or-
Press l-s-ToF-l
and turn the necrsrRATtoN
switchoFFto returnto standby.
1 5 Writethe nameof the other partyon one c
the destinationlabelsprovidedand sticktf
labelon the controlpanelnextto the
the
One-touchkey whereyou registered
number.
. This reminds you of what key fo press when you want
use the key lor One-touch dialing.
BO
Ono-touclt diating
Adjustingthe pausetime
"
Follow this procedureto adjust the length pause
of
time for your switchboardor telephonesystem.
. Pausesenteredwithin numbers
are set for 2 seconds.
. Pausesenteredat the end
of numbersare set for 10
seconds.
. Only the length of the 2_second
pause enteredwithin
a number can be adjusted.
Makesure thatthe REG/SfRAI/ONswitchis ON
beforeyou
adjustthe time. Turnit OFF afteryou complete
the settiiq.
1 Press TFTNETIEFI
I.
DIAL
SET UP
2 Press@.
2.
USER DATA
3 PressISET].
I.
ENTER YOUR TEL
4 PressO.
5.
MID
PAUSE
5 PressrcETt.
z
6 Usethe numerickeysto entera numberto
set the lengthof the pausein seconds.
. T h e p a u s ec a n b e s e t f r o m 1 t o
lsseconds.
. lf you enter a number larger
than 15, the faxwitt beep to
warn you of the error.
5
7 PressfsEi-tto registerthe new pausesetting.
DATA ENTRY OK
6.
REPORT TIME
8 Press rc-a-.] and turn the necrsrRATloN
switch oFFto returnto standbV.
B1
i
l
Otta-tottclt dialing
UsingOne-touchdialing
F.-ollow
this procedureto use One-touchdialingfor
telephoneand lacsimiletransmission"Beforeyou
attempt to use One-touchdialing be sure you have
registeredthe number for telephoneor facsimile
transmission.(+ 76)
r One-touch dialing the telephone
Follow this procedureto dial a telephonenumber wi
a One{ouch dialing key. The number registeredun<
the One-touchkey must not be set for the transmiss
mode. ( + 76)
CheckthOautomaticdocumentfeeder. lt
shouldbe emptyand the fax shouldbe in t
standbymode.
L2/3L/92
l4:3
2 Pickup the handset.
3 Pressthe One-touchkev wherethe numbe
is registered.
CANON
INC.
312 228 5700
4 Whenthe otherpartyanswers,you can ta
a2
Ona-touch diating
r One-touch sending a
document
Follow this procedureto use One_touch
dialingwhen
you want to send a document. The
number registered
under the One-touchkey must be set
iorlne document
transmissionmode. (+ 76)
Feedthe documentintothe automatic
documentfeeder.(* 43)
Pressthe One-touchkey.
. As the numberis beingdiated
thenumber
atternatatydisptayedit 2 "."onJ int"*Ji." and nameare
. lf a namewas not registered,
onty thenumberis displayed.
. When the call is connected,
fransmissionof the document
begins.
TRANSMITTING
. When the document beglns
transmitting,the otherparty,s
na.meand page number then the telepione
number
'
are
alternatety disptayed at Z secono iii{iaisl
3I2 228 57oO
. When transmission ends.after
the last page, the faxbeeps
an ending tone for about l second .n'a
tir'fax returns to
standby.
B3
Ona-touclt clialin.r1
r Printinga list of registerednumbers
Followthis procedureto printa listof the numbersth
'*aferegistered
lUrOrib-touch
dialing.
1 Press [FTNer-Ta-N].
I.
DIAI,
SET UP
2 Pressfs-ETt.
I.
I-TOUCH
DIAL
Press fREr-ETOFI
to print the list of numbers
and names.
ACTIVITY
50
ONrcTTfi
(
ol
I
I
o!
Oa
so,
l.0l I
l.o:l
l.oJl
B4
TL
I 77t:t7t
!12 ltt
5?oo
:5050
! Tttotor
(m8td
ltrcx
a\off
]f,SN
aron
SrefrId
!! a!0t
to:t5!5a5
r a! t5 at t
REPORT
EL
t0
I
tNc.
ITALI
ffi&c
ffiION
JAq Jffi
Jtff
um
Mmm
ID
TI SEB
t60obpr
0
9tOOb?.
taogbP.
0
o
tCOObp.
O
uslm
9000br.
ttoobe.
t600bp.
0
O
O
Codad spae<l diating
Codedspeeddialingaltowsyou to dial
a facsimile
nrTbgr^bypressingonly three keys.you
can register
up to 10 numbersfor Codes speeddialinq.
Each
you registercan be up to 38 digiG
lumDer
long,
includingspaces.
Registeringnamesand numbers
fo r C o d e d sp e ed dialing
Make sure that the REGTSTRATTON
switchis ON beforeyou
enter your telephone number. Turn it
OFF ifter you
c ompl ete reg i stration.
Press trTNcTToTI.
1.
DIAI
SET UP
2 Press[sET].
1.
I_TOUCH DrAL
3 PressO.
2.
CODED SPD DIAI
4 Press IStrT-I.
*01=
5 Pressthe searchkeys (< ') to displaya
2-digitcode underwnicnyou want to register
the number.
*05=
. ,l:^\y?O:, is atreadyregistered
under the codeyou
cnoose,the tax displaysthatnumber. press
[Tt'FAR-l ro
erasea previouslyregistorednumber.
85
Coctod spoad clialinq
6 Usethe keysin the tablebelowto enterthe
facsimilenumber.
ffittllrr
Koys to prosa
O to @
rcFA-efl
fPi- US-trI
ITTETFI
I T-ONEI
What happons
Typesa number.
Entersa space.Spacesareoptional.
Entersa pause.Withina numbora
pauseequals2 sec.At the endof a
n u m b e ra, p a u s ee q u a l s1 0s e c .( + 8 1 )
Cloarsthe ontironumborso you can
startagain.
Entersa T fortonediating.(+ 36)
7 Presst-s=r1to registerthe number.
DATA
ENTRY
OK
. The display changes to prompt you for the othar party's
name.
CODED SPD NAME
. The display changes again automatically and waits for y
to enter the other party's name.
* 05=
. lf a name has been registered previously,
iust enter the
new name over the old one.
86
Cocled speecl ctiatino
I U.sethe keys in the table below to enter
the
other party's name.
. The name you enter
," printed in your own fax repotts
!:r: one-line
and is displayad in the
disptayinin yo, dial the
numbor.
. Although the name entry is
not required, we recommend
that you entera name.. Thiswill i"Xii'i^"ier
for you to
keep track of transactionsrecorded in yiui
,epons.
n € y, a l o- D
- -s
-s
r ' re
@ to O
w
r .a-l . rh -n-n-n- al ^n_o Wh
Enterstho.firstlunffi
nexrto rnJnumer;c
*ey.'ir
ll:
rne :9ltl9].p"net
ttrst letteris not the
ons you want, keeo
qlessing the key until the lener you *;ni;;
orsplayed.
rcTTCil
I-UF-7TOWI
[eTTTE-l
I-STIUEOil
Enters a space between letters. Entors
a
space ovsr a letterat tho cursor position.
Switches between upper and lower-case
for
the letterabove the cursor.
type over a lettor.
Clears tho entir€ entry so you can start
again.
Displays the first symbol in the set that can
be enterod. Use the searchkeys
1. ;
display the symbol Vou want to enter. ii"
I Whenyou are finishedenteringthe name,
press ITcTt.
DATA
ENTRY
OK
. After abou.t1 second, you
are prompted to sef fhe
fransmissionmode.
SET TX MODE?
. The display again will change
automaticallyand wait for
you to make a sefting.
YES =
(1)
No =
(0)
1 0 The rx MoDE
is for transmission
of
documentsfrom the fax to anotherfax
machine.Pressg if the numberVouare
registering
is for facsimile
transmLsion.lf
you presso go on to the nextsteo.
-or-
Pressg if the number.
you are registering
is
for dialinga regulartelephone
cail.
87
Codod spoecl dialinq
. The next Coded speod dial number is displayad. Repe
this procedure to enter another number and name for
Coded speod dialing, or press ISTOFI to return to
standby.
1 1 The displaywaits for you to enter the
tr ansmissionspeed.
9600 bp
. You can set two transmission spoeds; 4800and g600 b1
Press fhe soarch keys ( < , ) to alternatebetween fhosr
two sefflngs. The sending speod in bits per second (bt
datermines tho speed at which documents are sent ove
the telephone lina.
4800 bps
Use 4B0O bps for a line with a bad connection such r
staticon the line.
9600bps
Use9600bpsfor the fastesttransmission
speed. lf r
problemoccurs,the fax automaticallyadjuststhe
speedfor the bestpossibletransmission.
1 2 Pressfs-rTl to registerthe transmission
speed.
DATA
ENTRY
OK
After1 secondthe nextdisplayappears.
LoNG DTSTANCE (0)
1 3 Pressthe searchkeys (. ') to displaythe
settingyou want(0, 1, 2,3).
lf the facsimilenumberyou are registerin
not a long distancenumber,set to 0.
-or-
For a longdistancenumber,select1, 2, or
First,try setting1. lf you havea problem
sendingor receivingdue to poortelephon
lines,registerthe numberagainand try
settings2 or 3 untilyou correctthe proble
BB
Codecl spood dialing
1 4 Whenthe settingyou want is displayed,
press rc€-il.
DATA
ENTRY
OK
. After about 1 second,.the next Codod
speed dialing
number is displayed for your nextentry'.
*06=
1 5 lf you wantto enteranothernumberand
namefor Codedspeeddialing,repeatthis
procedure.
-orPress rcToF-land turn the necrsrRAloN
switchoFFto returnto standby.
B9
Cocled speetd diating
UsingCoded speed diating
Follow this procedureto use Coded speed dialingfor
telephoneand facsimiletransmission.Beioreyou
attempt to use Coded speed dialing,make sure you
have registeredthe number for telephoneor facsimile
transmission.( + 85)
r Coded speed dialing the telephone
Follow this procedureto dial a telephonenumber usin
Coded speed dialing. The number registeredunder
the Coded speed dialing key must not be set for the
transmissionmode. (+ BS)
Checkthe automaticdocumentfeeder. lt
shouldbe emptyand the fax shouldbe in tht
standbymode.
L2/3L/92
l5:0
2 Pickup the handset.
3 Press rcoDED--DTFiland then usethe
numerickeysto enterthe doubledigitcode.
. The name and number of the party you are calling are
displayed alternatelyat 2-second interualsin the one-line
display.
*07
CANON
4t6 795 llrl
. lf a name was not registered, only the number is display
4 Whenthe otherpartyanswers,you can talk
90
Codod spood dialing
r Coded speed dialing to send
a document
Followthis procedureto use Coded speed
dialing
wnen you want to send a document. The
numbei
registeredunder the Coded speed dialing
key must be
set for the documenttransmissionmodel
1" bS)
Feedthe documentintothe automatic
documentfeeder.(.43)
2 PressleoDEp--o]A=L]
then use the numeric
keysto enterthe doubledigitcod;
. As the number is being
dialed the number ancl name are
alternatelydisptayad at 2 second inteiais.
. lf a name was not registered,
only the number is disptayed.
*07
CANON INC.
416 795 1111
. When the call is connected,
fransmisslon of the document
begins.
TRANSMTTTTNG
. When the documenf begrns
transmifting, the other party,s
name and page number then facsimite-number
are
alternately displayed at 2 second interuals.
CANON
INC.
416 795 1111
. Whenfransmissionends.after
the last page,the faxbeeps
an endingtonefor about l second"rA ti" fax
returnsto
standby.
r Printing a list of numbers registered
for Coded
speeddiating.
To print a list of numbersand names registered
-page for
Coded dialing,follow the procedure on
a+.
Numbersand namesfor Coded dialingand
One_touch
dialingare printedtogetherin the sam"eiist.
91
U s i n g d a I aye cl lranstrrlss/on
Follow this procedureto send a document
automaticallyat a pre- set time when you are not in th
office. This allows you to take advantageof lower late
night long-distancetelephonerates given by some
telephonecompanies. Ask your Canon authorized
dealer for more informationabout rates in your area.
While pre-settiming is set up and waitingto send a
document:
. You cannot copy a document.
. You cannot send anotherdocument until the delav
transmissionis sent.
. You can receivedocuments.
. You can use the telephoneto make and receive
telephone calls only.
Setting up delayedtransmission
Followthis procedureto senda documentat a prese
time.
Feed the document into the fax. ( * 43)
DOCUI,IENT READY
2PressfFrlJ'r-eT-j-o-t'il.
I.
DIAL
SET UP
3 Pressg.
4.
DELAYED TX
4 Press t-s.T-l.
SET TI}IE
92
U s i n g d e Iaya d lransmissron
Use the numerickeysto set the sendingtime.
..:el ti le llrne usrrg the 24-hour
syslem.
. lf the hour or minuteis a single digit
number, precede it
with a 0.
. lf you make a mistake,press
IETET R ] and entar the
number again.
. lf you entor a numbor that is beyond
the ranges for the
hour and minute (23 for hours,'59for minute\) the fax
will
beep a warning.
23: 4
6 Press ts-T-].
ENTER rer.
{*
You now haveyour choiceof four methods
to enterthe telephonenumber.
. You can pross a One-touch dialing
key where the othar
party's numbor ls registered. ( + g2)
' Y.ou_clnpress [ED-DED- o t EIl
and enter a dial code.
1+e0)
.You can press InEDTA Ll to enterthepreviously
diated
number.
" Youcan enter the numberwith thenumeric
keys.
lf you pressa One-touchdialkev or use a
Codedspeeddialingkey,the reAistered
numberand nameare displayedbrieflythen
DELAYED
rx is displayed.
CANON
INC.
DELAYED TX
. The fax ls sef up for delayed iransmission you
.
do not
have to go on to the nextstep. rgegistration ends.
93
Us i n g d e Iay o d lr:rnsnrt.sr^lon
*or-
lf you wantto enterthe numbermanually,
use tfle keysin tite tablebelowto enterthe
number.
Koys to progs
O to @l
[SFTCE]
fP-FUSfll
rc L trFR-l
tT O-Ii-tr]
What happons
Typesa number.
Entersa space.Spacesareoptionat.
Entorsa pause.Withina numbera
pausoequals2 sec.At thoendof a
n u m b e ra, p a u s ee q u a l s1 0s e c .( + g 1 )
Clearsthe entirenumberso you can
startagain.
At the end of the number,ontersa T for
t o n ed i a l i n g .( + 3 6 )
TEL =
3L2 228 570
I Press [Sr A-E-T-IeOFv-l
to registerthe numbe
and end delayedtransmission.
DELAYED
TX
. The fax is now set up for delayed transmissionof the
document in the automatic document feeder. The fax wt
send the document at the preset time. lt will beep once
after the document is successfu//y sent
. The fax automatically redialsif the receiving fax does no
answer, or if the line is busy. ( + aB)
. After the document is sent, the time setting is cleared.
The setting is a/so cleared if you turn the power off or it
thero is a power failure.
Cancelingdelayedtransmission
Followthis procedureto canceldelayedtransmissi
1 Press [-s.r-Totrl.
2 Removethe documentVouset.
94
Using polling
Pollingis when one fax requestsanotherto send
a
document. Pollingworks two ways. your fax can poll
other faxes to receivedocuments,and your fax in turn
can be polled to send documents. Thijfeature is
usefulwhen the party who has to send the document
is
not in the office. The party that wants to receive
the
document dials and polls the fax holding the original
and requeststhat it be sent. In order foi pollingsendingand receivingto work, the polling lDs of the
faxes must match.
Pollinginvolvesthree procedures:
. Registeringyour polling lD.
. Allowingyour fax to be polled to
send a document.
. Pollingother faxes to receive
documents.
9s
Using pollirtg
Registeringyour pollinglD
F o l l o w t h i s p r o c e d u r e t o r e g i s t e ry o u r p o l l i n g l D .
Make sure that the REG/SIRAI/ON swilch is ON befora you
register your polling lD. Turn it OFF atter you complete
registration.
1 Press l-FTNeT-Torl
I.
DIAL
SET UP
2 Press€t.
2.
USER DATA
3 Press t-s-ETl.
1.
ENTER YOUR TEL
4 Pressg.
3.
POLLING
ID
5 Press tsETt.
q0000000
6 Use numerickeys g and O to enterthe
8-digitpollinglD.
. lf you make a mistake,press lTLl
A RI then try again.
q0001I01
Note the use of these specialpolling lDs.
11111111
lf you set all 1s, your fax sends documentswhen it
receivesa polling requesteven i{ the other party's iD
does not match.
00000000
lf you set all 0s, your fax does not send when it
receivesa polling requesteven if the other party's lD
matches.
/ L ' T E S ISS E T I .
DATA ENTRY OK
4 .
96
SET
TII'IE
Using polling
B PressEail and turn the necrsrnATtoN
switchoFFto returnto standby.
. Notify all friends, clients, and customers
of your polting tD.
Sendinga documentin responseto
polling
Follow this procedureto set up your fax to send a
document in responseto a polling requestfrom
another fax.
. To cance.lpollingbeforethefaxsends
fhe document,just
removetho documentfrom the documenttray.
1 Press@
lightsand remainson.
untilthe AUrolamp
2 Feedthe documentintothe fax. (.43)
DOCUI,IENT READY
3 Makethe appropriatesettingsfor
reproduction
quality.(. 42)
. Eecausethe documenfis being sent
from your fax, the
receivingunit hasno controloier theseseitlngs.
You can now leave the fax unattended.The fax sends
the document when it receivesa polling requestfrom
anotherfax machine,but only if the Bdigit polling lDs
match.
. Whenthe faxreceivesthe pottingrequest,
thefax displays:
RECEIVING
.
th.efollowing rnessage is displayed when
lhen
transmission begrns.
TRANSMITTING
. The other party's name and the document
page number,
tlt9n..theother party'snumber are alternatelyiisplayed '
briefly.
CANON INC.
PO
3I2
228 5700
97
Using polling
Manuallypollinganotherfax to receive
your document
Followthis procedureto poltdnothbi6i dn?-rediilve
itsdocument.
1 Pickup the handset.
2 Dialthe facsimilenumber.
. You can dial the number manually with the numeric keys
a One-touch key, or Coded speed dialing.
3 Afterdialingif you heara tone,press
and hang up the handset.
fs ri-iAFTITOFYI
. The lax begins polling the other unit. Sending will start
from the remote lax only if it is sef up for polling and if its
polling lD matches your polting lD.
. Your fas<beepsonce to tell you the document has been
received without error.
. The fax automatically redials if the unit does not answer
if the line is busy.
4 To stop pollingbeforecompletion,press
l-sToFland returnto standby.
9B
Selling tha printor data
11
Followthese pro.:-edures
to change the operationof
the printer.
Enteringthe printersetting mode
(BJ DArA)
Make sure that the REG/SIRAI/ONswitchis ON beforeyou
register.Turnit OFFafteryou complete registration.
Press [-FnxdT-rbTt
1.
DIAL
SET UP
2 PressE.
7.
BJ
DATA
3 PressfsETl.
BIDIRECTION
PRT
Pressthe searchkeys (. ') to selectthe
itemyou wantto change.
99
Softrng tlto prinlor data
Settingslower speed lor printinggrapha
Followthisprocedureto switchtrST Fi:{!t%tpQ{,lo
printing.
unidirectional
1 Enterthe printersettingmode.(.99)
2 Pressthe searchkeys (. ' ) to display
B I D I R E C T I O NP R T .
BIDIRECTION
PRT
3 Press tsE-T-1.
OFF
Pressone of the searchkeys (. ') untilthe
settingyou want is displayed.
ON
Setsthe printerfor bi-directionalprinting.In other
words,the printheadprintsin bothdirectionsas it
movesto the rightand leftacrossthe paper.This
seftingprintsand copiesdocumentsmuchfaster.
OFF
Setsthe printertor unidirecfionalprinting.The print
headprintsonlyin onedirectionwhenit movesacro
the pageto the right,anddoes not printas it moves
backto the left. Thissettingis muchslower.Howe
printingimprovesthe printqualityof
unidirectional
vertica
documentsthatcontaingraphics,especially
lines.
5 Pressfs-rn.
DATA
ENTRY
LIGHT/STD
OK
PRT
r r e s s l s r o P l and turnthe RecrsrRATroN
switch oFFto returnto standby.
100
Scllinq tho printar data
ggl,ng for hatftoneprinting
Followthis 6arocpJure{orbetter quality printingin the
HALFTONEprintingmode. photographs print much
betterwith halftoneprinting.
1 Enterthe printersettingmode.(, gg)
2 Pressthe searchkeys (. , ) to display
LIGHT/STD PRT.
LIGHT,/STD
PRT
3 Press |sE-T-].
STD
4 Pressthe searchkeys (. ,) untilthe setting
you wantis displayed.
STD (standard)
Setsfor standardprinting.Text printsdarkerand
photographsreproduceat higherquality.
LIGHTER
Textprintsmuchlighter.Althoughthe printdensityis
slightlyless,thissettingconserves
the amountof ink
usedfor printingdocuments.
5 Press t-S-trT-].
DATA
ENTRY
BIDIRECTION
OK
PRT
6 Press t-STOF-l
and turn the neqsrRATtoN
switch oFFto return to standby.
101
Printing ropotTs
Thissectiondescribeshowto printthefollowingtype
of reportsto helpyou keeptrackof yourfax
transactions.
Activityreport
Printsaftereachtransaction
(receiving
or sendinga
document).
Activitymanagementreport
Printsthe last20 incoming/outgoing
transactions.
You can printonewheneveryou needit, or printone
automatically
afterevery20 transactionsor at the san
timeeveryday.
Errortransmissionreports
Printswhen the fax failsto senda documentbecause
the other party'sline is busyor if anothererroroccurs
102
Printinq rcpotls
Printingactivityreports
Activity reports keepltr.a6kof ,the,docut.r.ients
you send
and receive. Each activityreport shows:
. Date and time of transaction
- Name and telephonenumber
of the party sending or
receivingthe document
. Whetherthe transactionwas
successfullycompleted.
To print activity reports after each transaction you
have
to set switchesin the user menus. This procedure
is
completely optional. Follow this simple procedure
to
set the user switchesIo print an activity i"port
at the
end of each send and receive transaction
Make surethatthe REGTSTRATTON
switchis ON beforeyou
register.Turnit OFFafteryou completeregistration.
Press tFTNel-i-OT|l.
1.
DIAL
SET UP
2 PressO.
3.
usER SW
3 Press[sTTt.
TX
REPORT
. TXREPORT
meanstransmissionrepoft. Toprint a
sending transactionac_tivity
reporteverytime you senda
document,set the A RE?ORTitem on'theuser switch
menuto OUT?UTyES.
4 Press [SET].
OUTPUT NO
5 Pressthe searchkeys (. , ) to display
OUTPUTYES.
OUTPUT YES
6 Press ISET].
DATA ENTRY OK
RX REPORT
't03
Printing raporTs
. RX REPORI moans recoiving roport. To print a receiving
transaction activity repoft avery time you rocoivo a
document, sel the RX REPORTitem on tho user switch
menu to OUTPUTYES-
Press ts E-Tl.
OUTPUT NO
8 Pressthe searchkeys(. ') to display
OUTPUTYES.
OUTPUT YES
9 Press fsET-].
DATA
ENTRY
OFFHOOK
OK
ALARM
10 PressfsJ-T-oand
F-l turn the RectsrRArtoN
switchoFFto returnto standby.Now every
timeyou sendor receivea document,the fa
printsa reportafterthe transactionis
completed.
Gsra ar! a?oo
or
rusrlsslod
@flilaqlc
ruL
(:mFtfi
to
SM
TIE
USA€
TI E
PAGI
EULT
GGmtot
fr
affucts
ftL
l:lNEEIfi
S&
ID
TIE
USAQ] TIG
PAeS
reSILT
104
Printing ropotTs
Printingactivitymanagementreports
Activitymanagementreports reccrclthe !ast 20
sending/receivingtransactions.Activitymanagement
reports can be printed in the followingways:
. Manuallywheneveryou need one.
. Automaticallyafter every20 transactions.
. Automaticallyat the same time everyday.
r Printing I repon manually
Follow this procedureto print an activitymanagement
report wheneveryou need one.
Checkthe displayand makesurethe fax is in
standby.
L2/3r/92
16:4
2 Press fFnxdT-r-o-N]
.
1.
DIAL
SET UP
3 Press tFET-o-FTl.
ACTIVITY
REPORT
The activityreportprints.
tooa
I
mffioroN
nL
oreGIOt
lD
fAM
TIIE
ts^c
T
ESTLT
PAGS
A m u
c i
Oa/ra
La:tf
oo t0
tc
A m u
c J
oa/21
la:54
oo lo
NC
A m u
c !
06lta
la:5,
Odlla
l7: Oa
ot':t
00'00
o(
NG
06lra
l7:O!
00 00
NC
OalIl
t7:0e
oo'00
XC
oa/24
t1:ot
0o 00
fc
06/21
17, lo
tt: la
oo ta
oo tg
oi
NC
Oalt5 ll: It
06125 tl:lt
06/25 I l: It
oo tl
oo tt
o0 o0
ot
o(
tc
II
:::i:
TI
rsU^L
IAUAL
Tt
rNA!
lNAl-
TI
Tt
n
n
C'
C)
cf
ct
CATONUX
c^ton G
lca\or
q
((
lc^1or
I
L
h-'-UAL II
Am
RI
ALIO U
ALiMI
CJ
cl
cJ
cl
I
lc{tor w
n
lcarot q
lcaroJ
l:T:""
T h r ss h o w sh o w m a n y p a g e s
thefaxhasprinted.
06lIa
o w P
o m P
o m P
o m ?
1
oal25
NC
I t: tt
o m P
06/25 ll:ta
06l25 I l:ta
0!/15 I t: l7
o6l15 I l:lo
oo t 6
0o a7
o0 ao
o(
o(
o(
Prirt0ng repods
r Printing a report after 20 transactions
Follow this procedureto print an activitymanagement
report automaticallyafter every 20 transactions.
Make sure thatthoREG/SIRAI/ON
swltchis ON before you
reglster.Turnit OFFafteryou completeregistration.
-l Press
trnr.rer'r-oTl.
1.
DIAI,
SET UP
2 PressrO.
3.
USER SW
3 PressrcETt.
TX
REPORT
4 Pressthe searchkeys (. ') to display
ACTIVITY REPORT.
ACTIVITY
REPORT
5 Pressts-r-I.
OUTPUT
6 Pressthe searchkeys (. ' ) to display
OUTPUTYES.
OUTPUT Y
7 Press tsETl.
DATA
TX
ENTRY OK
RX REPORT TYP
8 Press ISTO-p]and turn the necrsrRATtoN
switch oFFto returnto standbV.
106
Prirtirtrl repods
r Printing a report every day at the same time
Followthis procedureto printan activitymanagemenr
report automaticallyat the same time every day,
regardlessof the numberof transactions.
Makesure thattheREG/SIRAI/ONswitchis ON beforevou
registor.Turnit OFFafteryou completeregistration.
l Presst.trUt.|eTl_o-N_l
I.
DIAL
SET UP
2 PressEt.
2.
USER DATA
3 Press fsET-].
I.
ENTER YOUR TEL
4 Press@.
6.
REPORT TII',I,E
5 Press ts-E-Tl.
. lf a time has already been set, that time is disptayed.
6 Usethe numerickeysto enterthe reporttime.
. Set fhe time with the 24-hour system.
. lf the hour or minute ls a sing/e digit number, precede
it
with a 0.
. lf you make a mistake,press IET eTE-l and
enter the
number again.
. If you enter a number that is beyond the ranges for
the
hour and minute (23 for hours, Sg for minutes) the fax witl
beep a warning.
16 :30
7 PresstsEr-].
DATA ENTRY OK
1.
A,/F Sw TIME
8 Press rcfoPl and turn the nrcrsrRATtoN
switch oFFto returnto standbV.
107
Printing roporls
r Printing send/receivetransactionsseparately
Normallywhen the activitymanagementreport prints,
inr,oming/outgoing
transmissions
are listedtogether.
tllra
{aool
6roo
ata
.....
^Cllvln
..rr.
Srcf
s^m
ltN
u
T I rl:
c,
c ,
A m u
AM
n
RI
CJ
carot
q
Transmlsslons listed together
ttsla
oa/25/ct
cdq
atr aToo
r:o:rfcml
rooa
6
ANU
Ct
Amu
^um u
Amu
Amu
ct
c!
c!
c!
loa/ra \l,oc
ttertr
ONfrION
ftL
@ffiCION
AWU
u s.A
lD
lsffi
TI6
UsA€ T
I
I
7?!
rl!
7t!
77!
lt?!
ttTt
tlTt
tl7!
cf\ot
w
arcr I
C&rcf
crcl
([
ux
lo./r{
lo6/!a
l6:5e
lorzr: rr,tr
loa/15
looz:s
ll:!t
rt'ro
R65ULT
PAGS
r 6 :s 7
l o 6 / u .r . : 6 r
nc
tsc
ot rl
oo lT
oo to
I
I
of,
ox
of,
ol
m I ia cotm
listedseParatelY
Transmissions
Followthis procedureto print the send/receive
transmissionsseparatedinto two groups.
Makesure thatthe REGISTRATION
switchis ON beforeyo
register.Turnit OFFafteryou completeregistration.
1 Press I-FIN c-rlvef-TENl.
1.
DIAT
SET UP
2 Pressg.
3.
108
USER SW
3 PresstseT-l.
TX
REPORT
P r i n t i n g 1r e p o r T s
4 Pressthe searchkeys (. ') to displayrx RX
R E P O R TT Y P .
TX
RX REPORT TYP
5 PresstsETt.
TX
RX ']TOGETHER
6 Pressthe searchkeys (. , ) untilthe setting
you wantis displayed.
TX RX SEPARATE
Transmission
and receivetransactions
are printed
separately.
TX RX TOGETHER
Transmission
and receivetransactions
are printed
together.
7 Pressts-T-1.
DATA
ENTRY OK
ERROR TX
REPORT
8 Press [ST-o*F-l
and turn the RecrsrRATloN
switch oFFto returnto standby.
10s
Printinq reporls
r Printing error transmission reports
The fax can automatically
printan errortransmission
repolt '[ it fails:o serrd.a-i:cument becausethe other
party did not answeror an error occurred. An error
transmissionreporttellsyou the facsimilenumberof
the party you are sendingto so you can try again later.
Follow this procedureto have the fax print out a error
transmissionreport every time an error occurs. When
an error or other problems occur, the fax displaysan
error messagein the one-linedisplay. For a list of
these errors,their cause, and a list of ways to solvethe
problems that cause errors see page 116.
Makesure thatthe REG/SIRAI/ONswitchis ON beforeyou
register.Turnit OFFafteryou completeregistration.
1 PresstrnxerroTl.
1.
DIAI.
SET UP
2 PressO.
3.
USER SW
3 PressfsEr-I.
TX
REPORT
4 Pr essthe sear chkeys ( . ' ) to displayERRo
TX REPORT.
ERROR TX
REPORT
5 PresstsEr-].
OUTPUT
1'to
Printing rePods
6 Pressthe searchkeys (. ') untilthe setting
you wantis displayed.
'!r': \ rY
OUTPUT NO
A transmissionerror report does not print when an
erroroccurs.
O U T P U TY E S
A transmissionerror printswhen an error occurs.
7 Press fs-ETl.
DATA
ENTRY OK
MEMORY RX
8 Press tsT-oFland turn the RecrsrRATroN
switch oFFto return to standby.
11-t
Srtnrntztryol user -sefling.s
The fax has a number of featrrrescalleCusrr.seftings
that you can turn on or off to fit your own needs. For
example,you can set the fax to prrntout an activity
report every time you send or receivea document.
lf techniciansinstallthe fax for you, they should make
the initialuser settingsfor you. lf you have to do the
settingsyourself,or if you want to change them later,
follow the proceduresdescribedbelow.
Printinga list of user settings
Followthis procedureto printa listof the currentuser
settingsbeforeyou changethem.
Press trnxeT-T-o-N-t.
1.
DIAL
SET UP
2 Pressg.
3. usER sw
3 Press fs-trT-].
TX
REPORT
4 Press tREFo-R-Tl.
ACTIVITY
REPORT
A listof the currentusersettinoswillorint.
aa!
6700
.....
cdoN
u
USERS OAT^ Lls
s
A
i....
U5ER'S ID
ustf,-
5 fttt_
rcLLIXC
sfls
ID
Tlui
IIO
PAUSI
A/F
Sr TtG
F/T
8'IIC
n
Rf:mm
RI
f,ErcN
otstnq
II
TITE
At_ut
TITINAI,
nt
AflIVtn
Rt:ils
ACT
TCN
tf,rct
Tr
IEtORt
112
ID
rcslTtor
RI
REP 5E|AR\N
uircffi
omsloH trlct:
otmr
rl
It
olftu
t}s
l1utFa
N0
Sunrmary of user seftings
Changingthe user settings
Follow this procedure to change the user seftings.
Make sure that the REG/SIRAnON switch is ON before you
roglster. Turn it OFF after you complete registration.
1 Press trnxdT-lonl.
1.
DIAL
SET UP
2 P re ssg .
3. usER sw
3 Pressts-T].
TX
REPORT
4 Pressthe searchkeys (. ') to displaythe
settingthat you want to change.
. A complete |ist of all the seftlngs and their functions are
listed in the table on the nextpage.
5 Press tSE-r-].
. The current settlng is displayod.
6 Usethe searchkeys (. ') to makethe
appropriate
setting.
. When you press either search key, the sefting alternates
between the two posslb/e settlngs.
7 Withthe settingyou want displayed,press
ffi
t 5 t rr l .
*
n"Osetting is displayed.
113
Sttrnntary ol tlsor srtft/ngf-s
s
8 lf you want to make more settings,press one
of the sear chkeys ( . ' ) to sear chfor
r
another item to change, then repeat.th'is'
pr ocedur e.
i
9 When you are finishedmaking settings,
press fs-TOF-l
and turn the nectsrRArloN
switch oFFto returnto standby.
User Software Switching Dlsplay
I
Dsfault Messago
Dlsplay Meesage
No.
Optlonal S€ttlng
TX REPORT
NO
OUTPUT
OUTPUTYES
RX REPORT
OUTPUN
TO
OUTPUTYES
iets the lax to print out an activity
eport everytime it receivesa
Jocument.
OFF
[urns the otf-hook alarm for the
:elephoneon or off.
OFF'
Setsthe fax to send your rogisteredlD
(numberand name) on each
document that you send.
OFFHOOK ALARM ON
TX TERMINALID
ON
5
TTIPOSITION
IMAGE INSIDEIMAGE
OUTSIDE
o
YES
ACTIVITYREPORT OUTPUT
B
Commont
iets the fax to print out an activity
oport evorytime it sends a documenl
NO
OUTPUT
Sets the lax to position your lD either
within the document,or on an
additionallength of paper added to th(
document.
Sets the fax to print an activity
managementreportautomaticallyafte
everv 20 transactions.
TX RX REPORT
TYP
TX RX TOGETHERTX RXSEPAMTE Sets the format of your printed activity
IERRORTX
IREPORT
I O U T P UN
TO
I
and managementreportswith all
transmissionslistedtogetheror
separatedinlo two groups: document
roceivedand s6nt.
YES
OUTPUT
Sets the fax to print an error
transmissionreporteverytime the fax
fails to send a document,or when an
error occurs.
9
MEMORYRX
ON
OFF
Wth memory receiveon, the fax will
receiveup to 20 document pages in
memory il you run out of paper or ink
so you can print them later,or you ca
turn this featureoff.
10
FAX,TTEL
SWITCH
ON
OFF
Setsthe lax to ring and alert you whe
you receivea normal phone call when
the lax is set uo for automaticreceivi
11
REMOTERX
ON
OFF
Turnsthe remote receivingfeatureon
or of{. Use remote receivingwith an
extensionphone connectedto the la)
12
RX REDUCTION
ON
OFF
Sets the fax to reduceall received
d o c u m e n t ss l i g h t l y( d o w nt o 9 0 %
o r i g i n a sl i z ei n w i d t h ,8 6 % i n l e n g t h )
13
ANS/FAXSWITCH
ON
OFF
Sets the f ax to switchto automatic
r e c e i v i n gb e fo r e t h e a n s w e r i n g
m a c h i n eh a n g su p .
" P l e a s e n o t e :T h i s f e a t u r e
s h o u l dn o t b e t u r n e do f f
P l e a s cs e c p a g e 2 5 f o r r e f e r e n c e .
114
PaTt5: TROUBLESHOOTING
AND
s * ..,F,M,{\l,hlTENANCE
Thissectiondescribesbasictroubleshooting
and
procedures,
maintenance
and howto dealwith errors.
Thisfacsimileis designedto withstandyearsof use.
However,evenwith qualitymachines,
a problem
sometimes
occurs.Thissectionis includedto help
you solveproblemsyou mighthaveto dealwith over
the years.Canon'sinterestin you did not stopwhen
you boughtthisequipment.Our salesand service
representatives
are alwaysreadyto answerquestions
you may haveaboutoperationof the fax.
11s
T r o u l t l es l r o o t i n q
Tr oubleshooting summ ar y table
T r o u b l e s h o o t l n gt a b l e
Answerlng machlne
Can't use the answ6ringmachine.
Can't record callor'smessaoe.
Can't use the answeringmachine
remote lunction.
Copylno
Dlaling
Display
Polllng
Receiving
- T h e A N S H O O K U P l a m p s h o u l db e
l i t .( + 6 1 1
. Check the answeringmachine
c o n n c c t i o n( {. 6 1 )
. Adiustthe Ay'FSW TIME.( +
- ChangeANS/FM SWTTCH
ro OFF.
(+64.|
. The handsetshould be on the hook
. The fax should be set for touch or
pulse dialing,accordingto the type
of lelephoneline that you have.
(+ ls)
. Check the power switch.( + 14)
. Check the oower switch.( + 14
Displavis blank
Can't ooll other units.
Check your fax.
. lf a document is fed into your fax,
removeit.
. Make sure paper is loaded in your
fax.
. Power should be on (the [_l on tho
power switch should be depressed).
Checkwith th€ operatorof the remote
{ax unit.
. Your polling lD must match that of
the remote fax.
. The remote {ax must be set to send
automatically.
. The document should be properly
fed into the remote fax.
. Make sure the fax is set to receive
FAVTEL auto swilchover.
automatically.The AUTOlamp
s h o u l db e o n .
. Check that the FAVTEL SW is on.
1+113)
. Check the connectedteleohoneline
(+ 116)
.
Can't receivedocuments automaticallV
T h e A N S H O O K U P l a m p s h o u l db e
with answeringmachine.
Ii t .
. Check that the ANS/FM SW is on.
(+64)
. ll the callercan't send documents,
a d j u s t t h e A / FS W T I M E .
(+63)
- l f t h e c a l l e rc a n ' tl e a v ea m e s s a g e ,
set the ANS/FM SW to OFF. (+ 6a1
. C h e c kt h a t t h e l i n e b e t w e e nt h e
a n s w e r i n gm a c h i n ea n d t h e f a x i s
c o n n e c t e dp r o p e r l y (. i 1 2 )
. M a k es u r e t h e a n s w e r i n gm a c h i n ei
o p e r a t i n gp r o p e r l yw i t h o u tt h e { a x
Can't make copies
Can't do regulardialing with numeric
keys.
connecteo.
116
T r o u bl e s l t o o t i r t g
Can't recoivedocumantsautomatically. ' Make sure tho fax is set to receive
automatically.The AUTO lamP
s h o u l db o o n .
r Checkitlro;,x:lntdri:ayand mako sure
p a p € ri s l o a d o d .
. C h e c kt h e M E M O R Yl a m o . l f t h e
M E M O R Yl a m p i s l l a s h i n g t, h i s
means thero are documents in the
memory that have to be printed
before you can receiveanother
document.
. lf a document is fed into the {ax,
Can't receivedocuments manuallv.
remove it.
. When you hear the low tone, press
ISTART/COPY]belore you hang up
the handset.
. Check the MEMORYlamp. lf the
MEMORYlamp is flashing,this
means there are documents in the
memory that have to be printed
be{ore you can receive another
document.
. Clearpaperiam. (+ 69)
Rocordlng papor lam Paper jammed in the automatic
document feeder.
- Replace the paper and follow the
instructionsfor the paper tray. ( + 21)
- Clean the printerplaten. ( +
Ink smudges on back of paper.
. Pressthe TSTART
Can't send documents.
. Check the document. 1+ +3)
. Check to make sure the remote {ax
has paper installed.
. Check to see if the tax redialedthe
Document feed jam.
. Clearthe document leed iam. (.r 49)
. Check the type ol paper loaded.
The images you send are dirty oI
. Clean the scanningglass. ( + 1291
Nothing works with the fax.
. The fax has overheated and shut
itselfdown. Let it cool down then try
117
Tro t tb I o s I t c';oti r t <1
Displaymessagesand error codes
-
DlsplayMessagesand Error Code Table
Mos
Codo
C H E C KD O C U M E N T
#oor
DOC TOO LONG
#003
BUSY/NOSIGNAL
#00s
CHECK PAPER
#009
CHECK DOCUMENT
# 0 11
NO RX PAPER
#012
POLLING
ID ERROR
#o21
MEMORYFULL
#037
RX ERROR
#052
CHECK PRINTER
DARKPAPERUSED
CHANGE CARTRIDGE
CHK PRINTCOVER
PUSH PAP TRAYIN
REC. PAPERJAM
Causs
D o c u m e n ti s j a m m e d
I ho document you aro trying
to send, roceive,or copy took
l o n q e rt h a n 3 2 m i n u t e s .
The other party is not using a
G3 machine.
During automaticdialing,
cannot connect becausethe
line is busy or the other party
do€s not answer.
No recordingpaper,or there is
a oaoer iam.
\flhen you poll another lax to
receivea document.and a
document is not sent.
When you are trying to send a
document, the other party
does not have any recording
oaoer.
Polling lDs do not match.
Roceived documonts in
memory. No storagospace
remains.
The fax could not print the
receiveddocument correctly.
Printererror indicatesan error
on the orinter.
You installeddirty paper.
What to do
lemove tho document and
;tart aqain. ( -+ 40, a9)
)uplicateon a copying
nachine,cut them up and try
o senclaoarn.
lheck the othor party'
)ommunicationmode
Startthe operationagain.
Check the recordingpaper.
Contact the other party and
ask them to send the
document.
Call the other party, tell them
to replenishrecordingpaper,
then try agaan.
Set your polling lDs so thsy
match.
Printout the documentsin the
memory. ( + 67)
Check tho cartridge to soe il
is dry or not. lf it is dry,
reolaceit and contactthe
other party to send the
d o c u m e n ta q a i n .
PressfS To PI .
Remove dirty paper and
replacewith clean (white)
o " o g 1 .1. . 2 1 )
Executehead cleaning.(+ 2i
Ink is stopped up, or has run
lf there is no ink on th€ papea
out.
the cartridg€is dry. Replace
t h € c a r t r i d q e(. . 1 8 )
Printercover is ooen.
C l o s et h e p r i n t e rc o v e r .( . ) 1 [
You did not pressdown on the Pressdown on the tab. ( i 2
tab to releasethe paper feeder
plate after you insertedthe
oaoer.
Removetho iammed paper.
Paperjam occurred.
{+69)
Error #005 appears only during sending.
At the receiving station, if memory runs out an error is displayed. At the sending slde tho operation ends
normally,butatthe receiving side when the memoryis defectedfull, an erroroccurs when the nextpage i
received. (An error code ls not printed.)
118
Troublashootrng
B e to re ca l l i n g for ser vice ...
lf none of the suggestionsin the tableabove corrects i
the problem,try this procedurebeforeyou call for
service.
1 Turnthe poweroff.
2 Waitfivesecondsand turn it on again.
3 Try the procedureagain.
the problemmay be causedby the other
Sometimes
party'sfax. lf you are surethatyourfax is working
properlyhavethe otherpartychecktheirunit. Yourfax
with otherfacsimilemachinesof
cannotcommunicate
certainspecifications.Makesurethe fax you are trying
to communicatewith is a G3 compatiblefax.
lf you stillcannotsolvethe probtem,contactyour
Canonauthorizeddealeras indicatedin the
includedwith the machine.
information
119
M ai ntonanco
Cleaning the fax
r Cleaning the fax exterior
Lightlywipe the fax with a soft cloth moistenedslightly
with water or a dilutesolutionof dish detergent.To
preventdiscolorationand malfunctions,never use
thinner,benzene,alcohol,or any other kind of organic
solvent.
r Cleaning the document scanning glass
lf the document scanning glass is dirty, the documents
you send or copy will also be dirty.
1 Turn the poweroff and disconnectthe power
cord.
2 Openthe controlpanel.
Use a clean,dry, soft cloth to wipe off the
glass.
120
Mitnlanitnco
r Cleaning the printer area
Clean the printer regulady to avoid print problems.
CAUTION
. To prevent damage to the platen and other prlnter
parts, never use thlnner, benzene, or other volatlle solvents to clean Inslde the Prlnter.
. Never wlpe the head ol the bubble-let catTrldge with a
cloth.
. Do not touch the platen roller.
Turn the power off and disconnectthe power
cord.
Use a clean,dry, soft cloth to cleanthe
printerarea and coverto preventthe
accumulationof paper dust and ink spots.
121
Spocitr/c;rti ons
Sheetslze:
M a x w i d t h 8 . 5 i n . ( 2 1 6m m )
M i n . w i d t h 8 . 3 i n . ( 2 1 0m m )
Effectlve lmage wldth:
8 . 4 i n . ( 2 1 4m m )
T r a n s m l s s l o nt l m e :
Letter-size: G3 MR standardmode. approx.20 sec*
Scannlngllne denslty:
Horizontal
Vertical
Scannlng method:
Solid state electronicscanningby contact sensor
Recordlngmethod:
Bubble-letprinting
Applicable lines:
Subscriber'stelephonecircuit(PSTN)
Automatlc dlal functlons:
One{ouch speed dialing(registrationfor 7 numbers)
Coded speed dialingregistrationfor 30 numbers
Power source:
120V/60H2
Power consumption:
Approx. 10W or less in standby
Approx. 30W or less during 100%of black copy
Operating temperature:
50-95"F (10-35"C)
Humldity:
20 -85% relativehumidity
Weight:
1 1 . 9l b s ( 5 . 4k g ) w i t h o u tp a p e r
Dimensions:
16.1'Wx9.1"xD8.6"H
( 4 1 0m m W x 2 3 0 m m D x 2 1 8 m m H )
203 pels/in.(8.00pels/mm)
Standard98 lines/inch(3.85lines/mm)
Fine 196 lines/inch(7.70lines/mm)
*Based on CCTTTNo. 1 chart (when using standard mode).
Specifications subject to change withod notice.
122
Giossary
actlvlty menagomont rePort
A record of the last 20 sending and recoivingtransactions.The
timer can be s€t to print out this report at the same time every day.
actlvlty roport
Recordof documents sent and received. Each report includosdate
and time ol transaction,nam€ and telephonenumber of the
sending or receivingparty, and number of document pages. The
fax can be set up to print out activityreportsevery time it sends or
receivesa document.
aulo redlallng
Vvhenthe remote fax is busy or does not answer,or when an error
occurswhen sonding,the fax waits 2 minutes and then
automaticallyrodialsthe samo number. lf there is still no answer,it
makes 1 more attempt afterwaiting for 2 minutes.
automatic dialing
Dialingnumbers at th€ press of one or a low keys. To use
automaticdialing,you must registerthe fax numbers. \Mth this fax
you have two methods of automaticdialing available: One- touch
dialing and Coded speed dialing.
aulomstlc recelvlng
Switch to automatic receiving when you are out of the office or not
using the lax as a telephone. Wtrenthe AUTO lamp is on and tho
FAVTEL switch is OFF, the fax is in tho automatic receiving mode.
Even if paper runs out, the fax automaticallystoresany documents
it rocoivesin the m€mory.
printing
The print head prints every time it makes a pass across the page in
both directions. Becausebidirectional printing prints everytime it
moves acrossthe page, it is much {asterthan unidirectional
printing.
bl{lrectional
bps
bubble-lotprlntlng system
CNG
Coded spood dialing:
cur60f
Standsfor blts per second.
Canon'spatentedink iet technologywhich uses an ink cartridge
containing64 nozzlesthat shoot ink onto th€ paper about 30OO
times per second.The ink in the nozzls is heated to lorm a bubble
which {orcesthe ink out of the nozzle. This system is fast, quiet'
and produceshighquality, high resolutiondocuments.
Stands lor caltingtono. This is a signal sent with facsimile
transmissionsto idsntify tho call as an incoming document. When
the receiving fax dotects this signal, it automatically starts to
receivethe tacsimiletransmission.The maiority of facsimile
machinesin use today can send and detect CNG signals.
However,if the senderdials manually,or if the document assent
from a fax that cannot send a CNG signal,to receivethe document
the receiverwill have to answerthe fax manually' pressthe start
key after they hear the tono on the handset,and then hang up the
handset. One-touchand Coded speed dial on your fax always
send this CNG signalwhen you send a lacsimiletransmission. l{
you pick up the handset and dial manuallyto send a document,
this signal is not sent and the receiverwill have to receivemanually.
Lets you dial up to 30 {acsimilenumbers at the touch o{ 3 keys.
Each number can be up to 38 digits long.
The underlinesymbol you see in the one-linedisplay when you
registernumbers and names in the lax. To move the cursor press
t h e s e a r c h k e v s (>
<) .
123
G/os.sary
dolaull sotting
Avaluo ussd in the absonceof one s€t by you. Tho user settings
can bo used to chango presetdefaultvalues.
d e s t i n a t l o nl a b e l
A t t a c h a b l el a b e lu s e d t o l a b e l s p e e dd i a l k e y s .
d o c u m e n tl e o d o r
H o l d sd o c u m e n t sb e i n af e d i n l o t h e { a c s i m i l ef o r t r a n s m i s s i o o
nr
copying.
document
orror lransmisslon reporl:
fax number report
FAX,TTELswltch
FAX/TELauto switch over
FINE/HALFTONElamps
G3 unit (1980)
FINE/HALFTONE
T h e s h e e to f p a p e rw i t h t h e t e x t t h a t y o u w a n t l o s e n d t h r o u g ht h e
fa c s i m i l e .
When an erroroccurs,or if a document cannot be sent for any
other reason,an errortransmissionreport is automaticallyprinted.
The reportlists the lax number of the other party.
Lists all {acsimiloand phone numbers registeredfor One-touchand
C o d e d s p e e dd i a l i n g .
This switch allows you to set the fax to FAVTEL auto switch over
(ON) or automaticroceiving(OFF).
Functionto automaticallyswitch your fax betweenfacsimileor
t e l e o h o n em o d e s .
Increasesth€ clarityol documentsyou send. Lamps show which
setting is on. When both lamps are off, you are in the standard
setting.
A categoryot digital facsimileequipment capableol sending a
letter-size(or 44) document in 'l minute or less. G3 uses digital
handshakingwhich allowsthe two laxes to determinethe type ol
machine,resolutionmaximum, speed o{ transmission,and so on.
G3 fax equipment can communicate at 2400, 4800, 7200, and 96OO
bps. Your facsimileis a G3 categoryfacsimile.
For settingthe reproductionquality of documentsfor sending or
copying. Pressthis key to use one of its three settings.
. FINE/HALFTONElamps off. Use for standardtext with no
photographsor graphics.
. FINE lamp on. Use with text for the best possiblereproduction
quality.
. HALFTONE lamp on. Use with text that also contains
photographs,graphics,artwork.
handset
hook
Ink lootprint
The hook button on the handset or extensionphone. When the
hook button is released,you can hear a dial tone.
The ink footprintappearsat the lower left cornerof the received
document.
manualreception
U s e m a n u a lr e c e p t i o nw h e n y o u r f a x i s b e i n g u s e da s a t e l e p h o n e
After the phone rings and you pick up the receiver,if you hear a
s l o w b e e p t h i s m e a n ss o m e o n ei s s e n d i n gy o u a f a x . P r e s s
[START/COPY].When the AUTO and ANS HOOK UP lamps are off,
t h e { a x i s s e t t o r e c e i v em a n u a l l y .
manualredialing
W h e n y o u u s e r e g u l a rd i a l i n g .y o u c a n r e d i a la n u m b e rm a n u a l l y
s i m p l y b y p r e s s i n g[ R E D I A Lo] n t h e c o n t r o lp a n e l . T h e l a s t n u m b e
c a l l e di s t h e n u m b e rr e d i a l e d .
memory lamp
124
The telephonehandsetprovided with the lax.
L i g h t sw h e n a d o c u m e n th a s b e e n r e c o r d e di n m e m o r y . l { t h e { a x
p r i n t e rr u n s o u t o f p a p e ro r i n k , l h e d o c u m e n ti s a u t o m a t i c a l l y
s t o r e di n t h e m e m o r v .
G/os-sarv
noise
Numeric keys
A g e n e r a lt e r m a p p l t e dt o a n u m b e ro f p r o b l e m st h a t a d v e r s e l y
atfect the operationof telephonelines used for modem and fax
communication.
T h e n u m e r i ck e y sa r e t h e r o u n dk e y so n t h e c o n t r o lp a n e lw i t h a
n u m b e r o n t h e m . P r e s st o p e r f o r mr e g u l a rd i a l i n g . T h e n u m e r i c
keys are also used to enter numbers and letterswhen registering
n u m b e r sa n d n a m e s .
One-touch speod dialing keys:
The square keys on the right side of the control panel marked Ol to
O7. Facsimileor telephonecan be registeredunder these numbers
and later dialed just by pressingtho key. The Ono-touchkoys also
perlorm other tasks in other modes when working with and in other
menus. Thesefunctionsare clearlylabeledabove the keys
(SPACE,CLEAR,etc.)
pause
When registeringlong-distancenumbers,you sometimeshave to
insert a pause eitherwithin or atter the number. The locationof the
pause and pause time dif{erdepending on the system. Pauses
enteredin a number are 2 secondslong, and a pause at the end ol
a number is 10 seconds.
PBX
Stands lor private branch exchange. See switchboard.
pollinglD
An Bdigit number consistingol 0s and 1s. The lD you register
must match tho lD used in the polling network. lf your polling lD is
0OOOOOOO
then your fax neither sends nor receiveswhen it receives
a p o l l i n gr e q u e s t .l f t h e p o l l i n gl D i s 1 1 1 1 1 1 1 t h e n y o u r f a x s e n d s
a document, even if the other party's polling lD does not match. lf
you make any other setting,then the polling lDs of the laxes must
match.
polling
When one facsimileunit requestsanotherunit to send a document.
This is useful when the partywith the originaldocument is not in
the office, but the document must be sent out. Other partiesthat
want to receivethe documentdial the fax holding the originaland
requestthat it be sent. Beforeyou can use the polling feature,you
have to registeryour polling lD.
register
registration switch
r e g u l a rd i a l i n g
rotary-pulse
RTI (remote terminal
identificationl
When you registera name or telephonenumber with the fax, it
remembers and recordsthat settinglor such featuresas One-touch
speed dialing,Coded speed dialing,and so on. Beforeyou register
any such informationwith the fax, the REGISTMTIONswitch on
the back of the fax should be ON. When you are finished
registeringinlormation,this switch must be turned OFF. After
names and numbers are registeredwith the fax, the fax will
remember them, even afterthe power is turned off and turned
a ga in .
Turn this switch ON beforeyou registerinformationsuch as user
n a m e a n d t e l e p h o n en u m b e r ,O n e - t o u c hn u m b e r s ,e t c . T u r n i t
OFF after registrationis completeto protectthe data in memory.
D i a l i n ga n u m b e rw i t h t h e n u m e r i ck e y s . U s e r e g u l a rd i a l i n gt o d i a l
a n u m b e rt h a t i s n o t r e g i s t e r e d
{ o r a n y o l t h e a u t o m a t i cd i a l i n g
methods.
A rotary-pulseor pulse dial telephoneis dialed by manuallyrotating
a d i a l t o s e n d p u l s e st o t h e t e l e p h o n es w i t c h i n gs y s t e m . W h e n y o u
p u l s ed i a l ,y o u w i l l h e a rc l i c k s . W i t h t o n e d i a l i n g ,y o u w i l l h e a r
t o ne s .
I t a v a i l a b l et,h e n a m e a n d t e l e p h o n e / f a c s i m inl eu m b e ro f t h e
r e m o t em a c h i n ei s i d e n t i f i e di n t h e a c t i v i t ym a n a g e m e n tr e p o r t .
125
G/o:^s.lry
RX
e e a r c h k e y s ( <> )
soml-dual
Press to search for menus and enlries or to move the cursor r
displayed.
acco66
This featuro allows you to rscoivo documenls into the memor
s e n d d o c u m e n t s w h o n p r i n t i n gd o c u m o n t s .
atandby
On and (oady to use. All operations start {rom the standby rr
where tho date and time arodisplayed.
swltchboard
P B X ( p r i v a t eb r a n c h o x c h a n g e ) i n t e r n a l s w i t c h i n g s y s t o m . Y (
have to dial an outside line number along with the regular
lacsimilo number. The outsido line numbor must also be
registered. Depending on tho system, you may also have to
a pause after the outside line number.
Tono/pulseswltch
touch-lone
TTI
TX
126
Stands {or rocoiving.
This switch allow you to set the lax to touch ton6 O) or pulse
dialing, depending on the type of phone line you have instal
Atouch-tone or tone dial telephone is dialed by pressing butl
that send tones of varying sequences to the telephone switcl
system.
Stands for terminal lransmlssion idantilication. Tho nams an
telephone/facsimile number of the transmitting machine prir
the top of each page sent.
Stands for transmifting.
unldlrectlonalprlntlng
Vvhen the print head prints only in one direction to the right r
the pags. The print head does not print when the print hea
m o v e s l e f t a c r o s s t h e p a g e . U n i d i r e c t i o n a lp r i n t i n g p r o v i d e s
quality printing lor documents that contain graphics, especi
vertical lines.
volume swilch
Located on the handset, move to one o{ three positions to al
the volume of the phon6 ringing: high, low, and of{.
a c t i v i t ym a n a g € m e n t r e p o r t
tormat, 109
p r i n t i n g ,z 4 , 1 0 2 , 1 0 5
printing overy 2o transactions, 106
p r i n t i n ge v e r y d a y , 1 0 7
p r r n t i n g{ o r m a t , 1 0 8
p r i n t i n gm a n u a l l y , t O 5
activity reports
prntrng, 102,103
a n s w e r i n gm a c h i n e
c o n n e c t i o n ,l 2
m e s s a g e ,6 l
receivinga document, 59
automatic dialing
lacsimilo, 45
redralinga lacsimile number, 48
B
BJ cartridge
cleaning the print head, 23
handling pr€cautions, 16
ink footprint, 51
i n s t a l l i n g ,1 8
when to replace, 51
bubble-jet cartridge
See'BJ cartridge', 16
C
cleaning
fax exterior, 120
print head, 23
p r a n t e ra r e a , 1 2 1
scanning glass, 120
Coded speed dialing
dialing phone, 9O
lacsimile number, 9l
r e g i s t e r i n g ,8 5
using, 90
connecllon
answering machine, 12
extension phone, 12
h a n d s e t ,1 2
phone line,13
control panel
summary,6
copying
documents, 73
n
date
r e g i s t e r i n g ,2 6
date and time
standbymode, 14
delayed transmission
canceling, 94
s e n d i n g ,9 2
setting up, 92
oensrly
document,41
dialing
Coded speed, 85
t a c s i m i l en u m b e r , 4 5
manually for facsimile, 45
Onelouch, 76, 82
phone,34
p u l s e ,3 6
redialing,35
t h r o u g h P B X ,3 7
tone,36
oocument
beforesending,40
d e n s i t y ,4 1
rnsertingin lax, 43
1 a m s ,4 9
r c ' : a i v i n g ,l 0
r e m o v i n g ,1 4
r e p r o d u c t i o nq u a l i t y ,4 2
sending,44
size,38
E
environment
r e c o m m e n d o d ,9
€rror transmission report
p r i n t i n g ,1 0 2 , 1 1 O
€rrors
summary tablo,118
extension phone
c o n n e c t i o n ,l 2
receiving document, 56
F
fax
locating, 8, 9
see "document*, 40
FINE
reproduction quality, 42
H
HALFTONE
p r i n t i n g ,1 0 1
reproduction quality, 42
handset
attaching, 12
I
ink footprint
d e f i n e d ,5 1
J
.iams
clearing, 69
document, 49
L
long distance
registering numb€rs, Z7
M
memory
document in memory, 67
sending with document in memory, 44
N
name
registering your name, 30
o
O n e { o u c hd i a l i n g
facsimrlenumber,83
p h o n e ,8 2
u s i n g ,8 2
127
P
paper
guidos,43
l o a d i n g ,2 1
s o e a l s o " c l o c u m e n t " ,3 8
pauso
a d j u s t i n gt i m e , B 1
r o g r s t e r i n gT
, T
PBX
,
soe "switchboard"3
7
pnone
a n s w e r a n g3, 5
d i a l i n g ,3 4
r o d i a l i n g ,3 5
s e e " h a n d s e t " ,1 2
phone line
c o n n e c t i o n ,l 3
phono numbor
rogistering your phone number, 28
polling
another (ax, 98
registoring your lD, 96
s e n d i n g ,9 7
sending/receiving documents, 95
power
on/off, l3
requirements, 8
power roquirements
s a J o t yp r o c a u t i o n s , 1 1
pflnter
c l e a n i n g p l a t e n ,7 2
clearing jams, 69
setting operation, 99
printing
activity management report, 102
actlvity management reports, 105
activity report, 102
activity reports, 103
error transmission report, 102, 1 10
graphics, l0O
h a l f t o n e ,1 0 1
registering numbers, 84
reports, 102
R
receiving
answering machine, 59
automatic, 53
automatic (dedicated line), 57
document, 50
document manually, 55
extension phone, 56
memory,67
phone manually, 55
polling,95
preparation, 52
raa6/din^
^r^ar
see"paper",21
redialing
{ a c s i m i l en u m b e r , 4 8
registering
C o d e d s p e e d d i a l i n g ,8 5
l o n g d { s t a n c en u m b e r s , 7 7
O n e - t o u c hd i a l i n g , 7 6
pauses,77
polling lD,96
p r i n t i n g r e g i s t e r e dn u m b o r s , 8 4
s w i t c h b o a r dn u m b e r s , 7 7
t u r n i n g o f f R E G I S T R A T I O Ns w i t c h , 3 2
128
your name, 30
your name and number, 25
your phono numbor, 28
R E G I S T R A T I O Ns w i t c h
r o g i s t e r i n gd a t e a n d t i m e , 2 6
removing
d o c u m e n t ,l 4
r ep o r t s
p f l n t r n g ,| 0 2
nng trme
adjusting,66
RTI
r e m o l o t e r m i n a l i d e n l i f i c a t i o n ,6 8
S
sarety
o p e r a t i o n ,I 1
semi-dual access
de{inod, 44
sending
d o l a y e d t r a n s m i s s i o n ,9 2
d o c u m e n t ,4 4
polling, 95
with document in memory, 44
speed
t r a n s m i s s i o n ,7 9
standard
roproduction quality,42
standby modo
defined,14
switchboard
dialing through, 37
r e g i s t e r i n gn u m b e r s , 7 Z
swatches
document density, 41
FAVTEL switching, 53
REGISTMTION,26
t o n e / p u l s e ,1 5 , 3 6
switching
s e e a l s o " u s e r s e t t i n g s " , 11 2
I
time
r e g i s t e r i n g ,2 6
tone/pulse
dialing, 36
setting, 15
switch, 15
transmission
speed,79
TTI
r e g i s t e r i n gy o u r n a m e a n d n u m b e r , :
turning power on/off
fax,13
U
user settings
c h a n g i n g ,11 3
p r i n t i n gl i s t , 1 1 2
summary table, I 14
Canon
FAXPHONE
C A N O N U . S . A .I N C .
C O N S U M E R I N F O R M A T I O NC E N T E R S I N T H E U . S . A .
S I I O U I , I ) S E I I V I C T JB B N I ] C E S S A R Y F O R T I { I S P R O D U ( ] I ' ,
CON|ACI'N ND BRING YOUR ITAXP-IIONETO A CANON
U.S.A. N LII'I IORIZED SBRVICE FACILTI-/. FOR SERVICE
-I]{E
WARRAMY
DURING
PEIUOD, YOU ARE REQUIRED
TO PRESENI' PROOIT OF PURCI{ASE (BILL OF SALE) TO
TI II] AU'I-I IORIZI]D SERVICE FACILITY.
Informationregardingauthorizedscrvicefacilitylocationscanbc obtainedby callingthe
nearestCanonU-S.A.C-onsumer
Informationand ServiccC-cnterbelow,or you mayreferto
the enclosedA.S.F.List for a choiceof seMcc locations.
CANON U.S.A.CONSUMER]NFORMATIONAND SERVICECENTERS
Consumerlnformatlon Center
Telephone:1{00€2&4040
New Jersey Office:
10OJamesburg Road,Jamesburg,NJ 08831
Teleohone:908-521-7000
Chlcago Office:
10OPark 8lvd., ltasca,lL. 60143
Teleohone: 708-25O$2OO
Los Angeles Office:
15955Alton Parkway,lrvine,CA 92718-3616
Telephone:7 14-7534000
Atlanta Offlce:
5625 OakbrookParkway,Norcross,GA. 3OO93
430
Telephone:404-448-1
Dallas Office:
320ORegentBlvd.,lrving,TK 75063
Teleohone:214-83G96O0
Canron
FAXPHONE
CANON CANADA INC.
C A N O N I N F O R M A T I O NA N D
S E R V I C E C E N T E R SI N C A N A D A
FAXPHONE SERVICING IN CANADA
should servico be necessary please call one of the following telephone numbers for
i n f o r m a t i o n r e g a r d i n g t h e n e a r e s t F M p H o N E a u t h o r i z e d s e r v i c e l a c i l i t y ,o r y o u m a y
refer to the enclosed A.S.F.List for a choice ol servicolocations.
Canon Canada lnc.
TORONTO:
6 3 9 O D i x i o R o a d M i s s i s s a u g a ,O n t a r i o L s T 1 p 7
T e l o p h o n e :4 1 6 - 7 9 5 - 11 I 1
CALGARY:
2828 16th Street, N.E. Calgary, Alberta T2E 7K7
T e l e p h o n e : 4 0 3 - 2 9 1- 4 3 5 0
MONTREAL:
j0652 C6te de Uesse Montreal,
euebec HBT tA5
T e l e p h o n e : 5 1 4 _6 3 1€ 8 2 1
CENTRED'INFORMATION
CANONAU CANADA
SERVICEPOUR FAXPHONEAU CANADA
si vous avezbesoinde services,composezI'un des num6rosde t6l6phonesuivants
pour obtenirtous les renseignements
sur le centrede serviceapras-vente
agr6epour
pour FMPHoNE de votrelocalit6,ou r6l6rez-vous
a la listes.A.v.inclusepJur un choi
p l u sa m p l e .
Canon Canada lnc.
TORONTO:
639ODixie Road Mississauga,OntarioL5T t p7
T 6 l 6 p h o n e4:1 6 -7 9 $ 1111
CALGARY:
2828 16th Sreet, N.E. Calgary,AlbertaT2E 7K7
T6l6phone:403-29i-4350
MONTREAL:
10652C6tede UesseMontreal,euebec H8T tAs
T6l6phone:514- 631-8821
Canon
CANON INC.
7 - 1 . N r s h i - s h i n j u k u2, - c h o m e , S h r n j u k u - k u .T o k y o 16 3 - 0 7 , J a p a n
CANON U.S.A., INC.
O n e C a n o n P l a z a ,L a k e S u c c e s s .N Y . 1 1 0 4 2 .U S . A
CANON CANADA INC.
6 3 9 0 D r x r eR o a d , M i s s i s s a u g a ,O n t a n o L 5 T 1P 7 , C a n a d a
CANON EUROPA N.V.
B o v e n k e r k e r w e g5 9 - 6 1 . P O B o x 2 2 6 2 . 1 1 8 0 E G A m s t e l v e e n ,
The Netherlands
CANON DEUTSCHLAND GmbH
P . O . B o x 1 0 0 3 6 4 , H e l l e r s b e r q s t r a s s e2 ' 4 , W - 4 0 4 0 . N e u s s . G e r m a n y
c A N O N( U . K . )L T D .
C a n o n H o u s e . M a n o r R o a d , W a l l r n g t o n .S u r r e y , S M 6 O A J , U n i t e d K i n g d o m
CANON FRANCE S.A.
C e n t r e D A f f a i r e sP a r s N o r d . 9 3 15 4 , L e B l a n c M e s n i l C e d e x , F r a n c e
CANON LATIN AMERICA, INC.
A p a r t a d o 7 0 2 2 , P a n a m a 5 , R e p u b l r co l P a n a m a
CANON AUSTRALIA PTY. LTD.
1 T h o m a s H o l l D r i v e .N o r t h R y d e , S y d n e y .N S W 2 1 1 3 . A u s l r a l r a
CANON SINGAPORE PTE. LTD.
9 5 S o u t h B n d g e R o a d l l 13 0 1/ I 5 , P r d e r n c oC e n t r e . S r n g a p o r e 0 1 0 5
t
CANON HONG KONG TRADING CO., LTD.
1 0 / F M r r r o rT o w e r ,6 1 M o d y R o a d . T s l m s h a t s uE
r aSt Kowloon,
flong Koncl
HT1-2012-000-v.1.0
0193523
o C A N O Nt N C 1 9 3 3
PRINT