1
MultiModemISI Hybrid Series
Models ISIHP- 1S/2S/2U,
ISIHP- 4S/4U/4SD,
and ISIHI-2S/2U
Quick Start Guide
MultiModemISI Hybrid Server Cards
Models ISIHP-1S/2S/2U/4S/4U/4SD & ISIHI-2S/2U
Quick Start Guide
82093804 Revision E
All rights reserved. This publication may not be reproduced, in whole or in part,
without prior expressed written permission from Multi-Tech Systems, Inc. All rights
reserved.
Copyright © 2004 by Multi-Tech Systems, Inc.
Multi-Tech Systems, Inc. makes no representation or warranties with respect to the
contents hereof and specifically disclaims any implied warranties of merchantability
or fitness for any particular purpose. Furthermore, Multi-Tech Systems, Inc.
reserves the right to revise this publication and to make changes from time to time
in the content hereof without obligation of Multi-Tech Systems, Inc., to notify any
person or organization of such revisions or changes.
Record of Revisions
Revision
Description
D
Updated info on Win2000 , Windows Me, Linux-RPM, Novell,
regulatory, & safety (5/8/01).
E
Revised to remove V100 capability.
Patents
This product is covered by one or more of the following U.S. Patent Numbers:
5.301.274, 5.309.562, 5.355.365, 5.355.653, 5.452.289, 5.453.986. Other patents
Pending.
Trademarks
The Multi-Tech logo is a registered trademark of Multi-Tech Systems, Inc.
NetWare is a registered trademark of Novell, Inc.
Pentium is a registered trademark of Intel Corporation.
SCO is a registered trademark of Santa Cruz Operation, Inc.
UNIX is a registered trademark of X/Open Company, Ltd.
Windows 95 and Windows NT are registered trademarks of Microsoft.
Multi-Tech Systems, Inc.
2205 Woodale Drive
Mounds View, Minnesota 55112
(763) 785-3500 or (800) 328-9717
Fax (763) 785-9874
Tech Support (800) 972-2439
Internet Address: http://www.multitech.com
Contents
Chapter 1: Introduction
About This Manual .......................................................................... 12
Peripiheral Component Interconnect (PCI) for ISIHP Cards ........... 12
Communication Protocols for ISIHP Ports ...................................... 13
Chapter 2: Hardware Installation
Introduction ..................................................................................... 16
Computer Requirements ................................................................. 16
Shipping Contents .......................................................................... 16
Safety Warnings Telecom ............................................................... 17
Hardware Installation Procedure .................................................... 17
LED Indicators ................................................................................ 20
Chapter 3: Software Installation
Introduction ..................................................................................... 26
Install ISIHI Software for Windows 2000 ......................................... 26
Recommended Base I/O Address and IRQ Values .......................... 26
Install ISIHP Software for Win 2000 ................................................ 28
ISIHx for Win 2000: Install ISI Management Software .................... 29
ISIHx for Win 2000: Install TAs & Modems to COM Ports .............. 30
Install Terminal Adapters to COM Ports ......................................... 31
Install modems to COM Ports .......................................................... 33
Remove ISIHx Driver (Win 2000) ................................................... 37
ISIHx Software Install for Windows NT 3.51/4.0 ............................. 37
Recommended Base I/O Address and IRQ Values .......................... 38
Install ISIHx TAs & Modems to COM Ports in Windows NT ............ 40
To install terminal adapters: ............................................................. 40
To install modems ............................................................................ 42
Remove ISIHx Card and Driver in Windows NT 3.51/4.0 ................ 46
I/O Addresses and IRQ Codes ............................................................... 46
Configuring the Terminal Adapter .................................................... 47
Introduction ........................................................................................... 47
North American Users ...................................................................... 47
International Users ........................................................................... 48
Optional Settings ................................................................................... 48
ISDN TA Configuration Utility ............................................................. 50
ConfigMenu Configuration Utility ........................................................ 52
Terminal Adapter AT Commands .......................................................... 53
Chapter 3: Software Installation (continued)
NetWare Driver Installation ............................................................. 54
Configuring Ports for NetWare Connect .......................................... 55
Removing the Driver (Novell) ......................................................... 55
SCO Open Server 5 Driver Installation ........................................... 56
To install from CD-ROM: ..................................................................... 56
To format a floppy disk for SCO5: ........................................................ 56
To untar the driver file and copy files onto floppy disk: ....................... 56
To install driver from floppy disk .......................................................... 58
MultiTech Installation Script ................................................................. 59
Activating Ports in SCO Open Server 5 ........................................... 62
Removing the Driver (SCO Open Server 5) .................................... 63
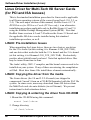
Linux Driver for ISI Server Cards (for PCI and ISA busses) ........... 64
LINUX: Pre-Installation Issues ............................................................. 64
LINUX: Copying the driver from the media ......................................... 64
LINUX: Copying & untarring the driver from CD-ROM ..................... 64
LINUX: Copying & untarring the driver from a floppy ........................ 65
LINUX: Driver installation and loading ............................................... 65
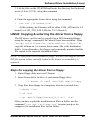
LINUX: Setting the baud rate ............................................................... 66
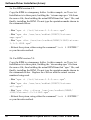
LINUX: Verifying the ports ................................................................... 67
LINUX: TTY Devices Created by the Drivers: .................................... 67
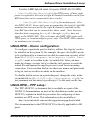
LINUX -- Dial-in configuration: ........................................................... 69
LINUX -- PPP setup: ............................................................................. 69
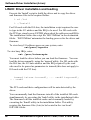
Removing the ISI Driver (Linux) .......................................................... 70
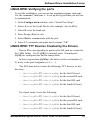
RedHat Linux 6.2/7.0 RPM Drivers for
ISI Server Cards (PCI bus only) ..................................................... 72
LINUX-RPM: Pre-Installation Issues ................................................... 72
LINUX-RPM: Copying the driver from the media ............................... 72
LINUX-RPM: Copying the driver from CD-ROM ............................... 72
LINUX-RPM: Copying the driver from a floppy .................................. 73
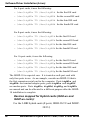
LINUX-RPM: Verifying the ports ......................................................... 75
LINUX-RPM: TTY Devices Created by the Drivers ............................ 75
LINUX-RPM -- Dial-in configuration: ................................................. 77
LINUX-RPM -- PPP setup: ................................................................... 77
Removing the ISI Driver (Linux-RPM) ................................................ 78
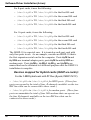
Warning About the Flashing of Terminal Adapter Ports ....................... 78
Firmware Update for ISIHx Terminal Adapters .................................... 78
Chapter 4: Warranty, Service, and Tech Support
Limited Warranty ............................................................................ 81
Upgrades and Support ................................................................... 81
Service ........................................................................................... 82
Index .............................................................................................. 83
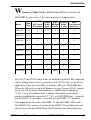
Introduction
W
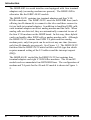
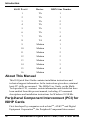
elcome to Multi-Techs MultiModemISI Hybrid Series of
ISDN BRI server cards. The series consists of eight models:
B us
Ty pe
# of ISD N
B R I Lines
Accepted
ISD N
Interface
ISIHP- 2S
PCI
2
S
4
4
4
ISIHP- 2U
PCI
2
U
4
4
4
ISIHP- 4S
PCI
4
S
8
8
8
ISIHP- 4U
PCI
4
U
8
8
8
ISIHI- 2S
ISA
2
S
4
4
4
ISIHI- 2U
ISA
2
U
4
4
4
ISIHP- 1S
PCI
1
S
2
2
2
ISIHP- 4SD
PCI
4
S
none
8
8
Model
# of
# Term.
Max.
Modem Adap. C oncurrent
Ports
Ports
Sessions
The 2S/2U and 4S/4U models are all multiport hybrid ISDN cards that
can be plugged into a server expansion slot (PCI or ISA, as listed) for
applications that involve ISDN or modem calls over ISDN BRI lines.
When the ISI card is used with Remote Access Servers (RAS), remote
users can call in using either modems or ISDN terminal adapters
(TAs). For V.90 modem calls, a 56kbps download speed can be
achieved without the expense of T1, E1, or ISDN PRI lines. S-models
use the ISDN S interface; U-models use the ISDN U interface.
This manual also describes the ISIHP-1S and the ISIHP-4SD cards.
The ISIHP-1S is a revised version of the ISIHP-2S card that has been
altered to accept one ISDN Basic Rate Interface line rather than two.
MultiModemISI Hybrid Server Cards, ISIHP & ISIHI Series
7
Introduction
The ISIHP-4SD is a serial interface card equipped with four terminal
adapters only (no analog modems are present). The ISIHP-4SD is
otherwise like the ISIHP-4S/4U models.
The ISIHP-2S/2U contains two terminal adapters and four V.90/
K56flex modems. The ISIHP-2S/2U uses two ISDN BRI lines (each
offering two B-channels) to connect to the telco and these connect to
its two built-in terminal adapters. In addition to handling ISDN calls,
each terminal adapter can detect analog modem and fax calls. When
analog calls are detected, they are automatically connected to one of
the four V.90 modems on the ISIHP board. In this way, these hybrid
cards can handle either ISDN calls or analog modem calls. Although
the ISIHP-2S/2U contains four ISDN TA ports and four analog
modem ports, only four ports can be active at any one time (because
only four B-channels are present). See Figure 1-1. The ISIHI-2S/2U
function like the ISIHP-2S/2U units but have an ISA-type bus which
requires manual setting of the I/O address and the interrupt request
(IRQ).
The ISIHP-4S/4U works like the ISIHP-2S/2U but contains four
terminal adapters and eight V.90/K56flex modems. The 4S and 4U
models each accommodate four ISDN BRI lines. The configuration of
modem and TA ports for the 4S and 4U models is shown in Figure 12.
8
MultiModemISI Hybrid Server Cards, ISIHP & ISIHI Series
Introduction
The ISIHP-4SD contains four terminal adapters only (the daughter
card containing the eight modems is absent). Since it accommodates
four ISDN BRI lines (each offering two B-channels), it supports eight
independent digital data connections.
Each terminal adapter appears as two ports to the server PC using the
ISI card.
ISIHx cards also support dial-out applications via their modems or
terminal adapters.
MultiTechs ISI Management Software is designed to monitor data
traffic and control the modems/TAs of ISIHx server cards operating
in the Windows 2000 Server and Advanced Server OSs. (See the ISI
Management Software User Guide, doc #88301450.)
The ISIHP-2S/2U and ISIHI-2S/2U cards each offers eight RAS ports
using two Basic Rate Interface (BRI) ISDN lines; the ISIHP-4S/4U
has 16 ports using four BRI ISDN lines. The eight ports of the 2S/2U
models allow a server to accept any combination of analog modem
and digital ISDN calls, making a maximum of four simultaneous
independent data connections (sessions). For the ISIHP-4S/4U, its
sixteen ports allow a server to accept any combination of analog
modem and digital ISDN calls, making a maximum of eight
simultaneous independent data connections. This arrangement gives
the user the flexibility to customize the settings of the terminal
adapters and modems. The terminal adapters on the ISIHP-4SD can
make eight simultaneous independent connections.
MultiModemISI Hybrid Server Cards, ISIHP & ISIHI Series
9
Introduction
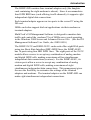
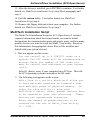
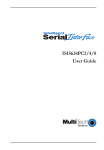
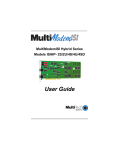
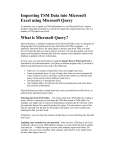
From the perspective of the server PC, the ISIHP-2S/2U (or ISIHI-2S/
2U) is an eight-port serial card with eight devices permanently
attached to the serial ports (Figure 1-1). The first four ports are the
two terminal adapters, each of which appear as two ports. The
remaining four ports are the four central site modems. The following
chart summarizes the correlation of ports and devices.
2S/2U Port #
1
2
3
4
5
6
7
8
Device
ISDN Line Number
TA
TA
TA
TA
Modem
Modem
Modem
Modem
1
1
2
2
1
1
2
2
ISDN
Com Ports
5
Modem
1
2
TA
6
Modem
7
Modem
3456
RJ-45 jack
Line 1
TA
8
Modem
3456
RJ-45 jack
3
4
Line 2
Figure 1-1: Modems and Terminal Adapters of ISIHP-2S/2U and ISIHI-2S/2U.
10
MultiModemISI Hybrid Server Cards, ISIHP & ISIHI Series
Introduction
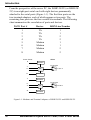
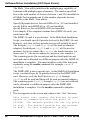
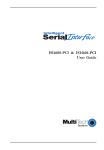
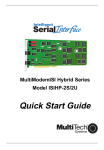
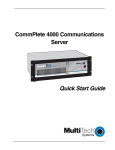
From the perspective of the server PC, the ISIHP-4S/4U is an sixteenport serial card with sixteen devices permanently attached to the serial
ports (Figure 1-2). The first eight ports are the four terminal adapters,
each of which appear as two ports. The remaining eight ports are the
eight central site modems. The following chart summarizes the
correlation of ports and devices. The ISIHP-4SD contains terminal
adapters only; no modems are present.
9
Modem
1
2
TA
10
Modem
11
Modem
3
4
TA
12
Modem
13
Modem
5
6
TA
14
Modem
15
Modem
7
8
TA
16
Modem
3456
RJ-45 Jack
3456
RJ-45 Jack
3456
RJ-45 Jack
3456
RJ-45 Jack
Figure 1-2: Modems and Terminal Adapters of ISIHP-4S/4U (for ISIHP-4SD, no
modems are present)
MultiModemISI Hybrid Server Cards, ISIHP & ISIHI Series
11
Introduction
4S/4U Port #
Device
ISDN Line Number
1
TA
1
2
TA
1
3
TA
2
4
TA
2
5
TA
3
6
TA
3
7
TA
4
8
TA
4
9
Modem
1
10
Modem
1
11
Modem
2
12
Modem
2
13
Modem
3
14
Modem
3
15
Modem
4
16
Modem
4
About This Manual
This ISI Quick Start Guide contains installation instructions and
technical support information. In the instructions given here, minimal
basic PC skills are assumed. The ISIHx User Guide, on the MultiTech product CD, contains certain information and details that have
been omitted from this present manual, including AT command
descriptions and installation instructions for Windows 95/98/Me.
Peripiheral Component Interconnect (PCI) for
ISIHP Cards
First developed by companies such as IntelTM, AT&TTM and Digital
Equipment CorporationTM, the Peripheral Component Interconnect
12
MultiModemISI Hybrid Server Cards, ISIHP & ISIHI Series
Introduction
(PCI) bus used by your ISIHP card provides high performance and is
easy to use. Because PCI devices contain registers with the device
information required for configuration, full auto configuration of PCI
Local Bus add-in boards and components is supported. Performance
factors include a bus data path of 32 bits, and clock speeds of 33
MHz.
Communication Protocols for ISIHP Ports
Ports on the ISIHP card can be associated with different protocols, as
follows:
Auto-Protocol. Terminal adapter automatically detects and switches
to use the protocol of the client terminal adapter.
Auto-Protocol Callback. Same as Auto-Protocol except that it
causes the host terminal-adapter to dial back with the same protocol
with which the client dialed in.
Central Site Modem. The digitally terminated V.90 modems built
into ISIHx series cards (except the 4SD model). For the ISIHP-2S/
2U, the last four modems should be designated as Central-Site
modems; for the ISIHP-4S/4U, the last eight modems should be
designated as Central-Site modems. (See Port/Device table on
previous page.)
PPP async. (Point-to Point Protocol, asynchronous) Protocol
allowing computers a dial-up connection to the Internet. PPP includes
error detection, data compression and other improvements over Serial
Line Internet Protocol (SLIP) connections.
V.120. Terminal rate adaptation protocols. These apply to ISDN Bchannels when using a V interface.
X.75. An international standard that allows X.25 packet-switched
networks to communicate with each other. X.75 is a gateway protocol
for interconnection of X.25 public networks.
MultiModemISI Hybrid Server Cards, ISIHP & ISIHI Series
13
Introduction
14
MultiModemISI Hybrid Server Cards, ISIHP & ISIHI Series
Hardware Installation
Chapter 2:
Hardware Installation
MultiModemISI Hybrid Server Cards, ISIHP & ISIHI Series
15
Hardware Installation
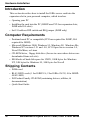
Introduction
This section describes how to install the ISIHx server card into the
expansion slot in your personal computer, which involves
Opening your PC
Installing the card into the PC (ISIHP uses PCI-bus expansion slots;
ISIHI uses ISA slots)
Set I/O address DIP switch and IRQ jumper (ISIHI only)
Computer Requirements
Pentium-based PC or compatible (PCI bus required for ISIHP; ISA
required for ISIHI)
Microsoft Windows 2000, Windows 95, Windows 98, Windows Me,
Windows NT versions 3.51 and 4.0, SCO Open Server version 5.0,
Novell NetWare, or Linux
CD-ROM drive, floppy disk drive (for use in cases where drivers are
downloaded from web site)
800 blocks of hard disk space for UNIX, 100K bytes for Windows
NT, 34K bytes for Windows 95, 50K bytes for Novell
Shipping Contents
ISIHx card
RJ-45 ISDN cords (1 for ISIHP-1S; 2 for ISIHx-2S/2U; 4 for ISIHP4S/4U/4SD)
ISI Product Family CD-ROM (containing drivers, utilities, &
documentation)
Quick Start Guide
16
MultiModemISI Hybrid Server Cards, ISIHP & ISIHI Series
Hardware Installation
Safety Warnings Telecom
1. Never install telephone wiring during a lightning storm.
2. Never install telephone jacks in wet locations unless the jacks are
specifically designed for wet locations.
3. This product is to be used with UL and cUL listed computers.
4. Never touch uninsulated telephone wires or terminals unless the
telephone line has been disconnected at the network interface.
5. Use caution when installing or modifying telephone lines.
6. Avoid using a telephone (other than cordless type) during an
electrical storm. There may be a remote risk of electrical shock from
lightning.
7. Do not use the telephone to report a gas leak in the vicinity of that
leak.
8. To reduce the risk of fire, use only No. 26 AWG or larger
Telecommunication line Cord.
Hardware Installation Procedure
1. Before handling the ISIHP card, discharge any static in your body
by touching a piece of grounded metal such as the computer
chassis.
2. Carefully remove the ISIHP card from its antistatic bag, handling it
only by the mounting bracket and edges. Do not touch the goldplated connectors along the bottom edge. (You may want to save
packaging for possible future use.)
MultiModemISI Hybrid Server Cards, ISIHP & ISIHI Series
17
Hardware Installation
a
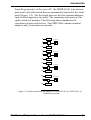
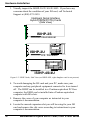
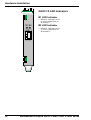
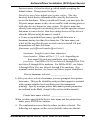
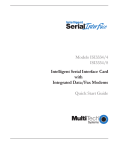
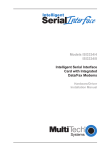
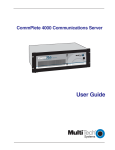
3. Visually inspect the ISIHP-2S/2U/4S/4U/4SD. If you have any
concerns about the condition of your ISI card, call Technical
Support at (800) 972-2439.
Intelligent Serial Interface
Hybrid (ISDN/POTS) Cards
(Side View)
ISIHP-2S
International
a
Modem Card
ISIHP-2U
U.S. Domestic
Modem Card
ISIHP-4S/4U
Figure 1-3: ISIHP Cards; Side View (on ISIHP-4SD, right daughter card is not present)
4. To avoid damaging the ISI card and your PC, make sure your
computer and any peripheral equipment connected to it are turned
off. The ISIHP can be installed in a Pentium equivalent PCI bus
computer; the ISIHI can be installed into a Pentium equivalent
computer with ISA slots.
5. Remove the cover of your computer as instructed in your
computers documentation.
6. Locate the unused expansion slot you will be using for your ISI
card and remove the slot cover according to instructions in your
computers documentation.
18
MultiModemISI Hybrid Server Cards, ISIHP & ISIHI Series
Hardware Installation
7. Install the ISI card in the selected expansion slot in the same
manner as any other add-on card according to your computers
documentation.
8.
Fasten retaining bracket to computer chassis and replace the cover.
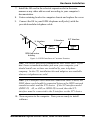
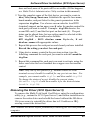
9.
Connect the ISI to your ISDN telephone wall jack(s) with the
provided modular telephone cable.
U Interface
S Interface
S/T Interface
NT1
Device
ISIHP
-2S
ISDN line enters
building
Figure 1-4: ISDN Interfaces at Customer Premises
Note: The ISIHP and ISIHI communicate over ISDN lines. If you
dont have a standard modular jack near your computer, you
should install one or have one installed by your telephone
company. In the US, installation kits and adapters are available
wherever telephones are sold.
Note: If S/T-interface ISDN network connection cable is used, the
ISDN phone cord should be connected between the ISDN network
connection cable and the NT1 device. If the S/T-interface model
(ISIHP-2S, -4S, or 4SD, or ISIHI-2S) is used, then the S/Tinterface must be connected to the S-interface on the NT1 device.
10. Turn on power to the computer. Now you are ready to install
software.
MultiModemISI Hybrid Server Cards, ISIHP & ISIHI Series
19
Hardware Installation
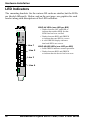
LED Indicators
The mounting brackets for the various ISI cards are similar, but the LEDs
are labeled differently. Below, and on the next page, are graphics for each
bracket along with descriptions of the LED indicators.
1
2
3
4
LINE 1
Line 1
Line 2
ISIHP-4U LEDs (one LED per BRI)
Flashes between OFF and RED to
indicate that neither SPID for that
ISDN line has been verified.
Flashes between RED and GREEN
to indicate that one SPID is correct.
A solid GREEN display indicates
that both SPIDs are correct.
ISIHP-4S/4SD LEDs (one LED per BRI)
Solid GREEN indicates normal operation.
Flashes between RED and GREEN
to indicate that the device has been reset.
Line 3
Line 4
20
MultiModemISI Hybrid Server Cards, ISIHP & ISIHI Series
Hardware Installation
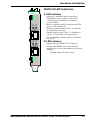
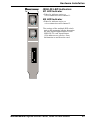
ISIHP-2U LED Indicators
P LED Indicator
D P
LINE 1
D P
LINE 2
Indicates U interface status connection.
Controlled by NT-1, which converts S/T
interface (4-wire ISDN) to U interface
(2-wire ISDN).
When U interface and S/T interface are NOT
active, LED remains off.
Flashes 8 times/second (8 Hz)U interface
is attempting to activate.
Flashes once/second (1 Hz)U interface is
active; S/T interface is not fully active.
Lit, not flashingBoth U and S/T interfaces
are active.
D LED Indicator
Lights when the ISIHP-2U is turned on.
Flashes until SPIDs are verified with the
central office switch; then remains lit without
flashing.
Indicates data link layer status.
MultiModemISI Hybrid Server Cards, ISIHP & ISIHI Series
21
Hardware Installation
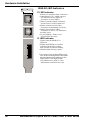
ISIHP-1S LED Indicators
B1 LED Indicator
B1 B2
LINE 1
When lit, indicates active
or voice connection on
B-channel 1.
B2 LED Indicator
When lit, indicates active
or voice connection on
B-channel 2.
D P
LINE 2
22
MultiModemISI Hybrid Server Cards, ISIHP & ISIHI Series
Hardware Installation
ISIHI-2S LED Indicators
B1 LED Indicator
LINE 1
When lit, indicates active or
voice connection on B-channel 1.
B2 LED Indicator
B1 B2
LINE 2
B1 B2
When lit, indicates active or
voice connection on B-channel 2.
The settings of the multiple DIP switch
unit on the mounting bracket determine
the base Input/Output address for the
ISIHI-2S/2U card. Input/Output
(I/O) addresses are used to route
information to and from the card.
I
O
A
D
D
R
MultiModemISI Hybrid Server Cards, ISIHP & ISIHI Series
23
Hardware Installation
ISIHI-2U LED Indicators
P LED Indicator
LINE 1
P
D
LINE 2
P
Indicates U interface status connection.
Controlled by NT-1, which converts
S/T interface (4-wire ISDN) to
U interface (2-wire ISDN).
When U interface and S/T interface
are NOT active, LED remains off.
Flashes 8 times/second (8 Hz)
U interface is attempting to activate.
Flashes once/second (1 Hz)
U interface is active; S/T interface is
not fully active.
Lit, not flashingBoth U and
S/T interfaces are active.
D
D LED Indicator
Lights when the ISIHI-2U is
turned on.
Flashes until SPIDs are verified
with the central office switch;
then remains lit without flashing.
Indicates data link layer status.
I
O
A
D
D
R
24
1 2 3 4 5 6 7 8
The settings of the multiple DIP switch
unit on the mounting bracket determine
the base Input/Output address for the
ISIHI-2S/2U card. Input/Output
(I/O) addresses are used to route
information to and from the card.
MultiModemISI Hybrid Server Cards, ISIHP & ISIHI Series
Software/Driver Installation
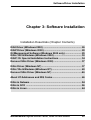
Chapter 3: Software Installation
Installation Essentials (Chapter Contents)
ISIHI Driver (Windows 2000) ........................................................ 26
ISIHP Driver (Windows 2000) ....................................................... 28
ISI Management Software (Windows 2000 only) ........................ 29
ISIHx TAs & Modems (Windows 2000) ........................................ 30
ISIHP-1S: Special Installation Instructions ................................. 34
Remove ISIHx Driver (Windows 2000) ........................................ 37
ISIHx Driver (Windows NT) .......................................................... 37
ISIHx TAs & Modems (Windows NT) ........................................... 40
Remove ISIHx Driver (Windows NT) ........................................... 46
About I/O Addresses and IRQ Codes .......................................... 46
ISIHx in Netware ........................................................................... 54
ISIHx in SCO ................................................................................. 56
ISIHx in Linux ................................................................................ 64
MultiModemISI Hybrid Server Cards, ISIHP & ISIHI Series
25
Software/Driver Installation (Windows 2000)
Introduction
This chapter describes software/driver installation for the ISI cards
when used in Windows 2000, Windows NT4, Windows NT3.51,
Novell, Linux, and SCO Open Server 5. We also describe installation
of MultiTechs Management Software for use with ISI cards under
Windows 2000.
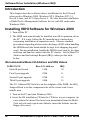
Installing ISIHI Software for Windows 2000
1. Turn off the PC.
2. The ISIHI card must already be installed in an ISA expansion slot in
the PC. If it is not, follow the PC manufacturer's instructions
concerning installation of expansion cards. Observe standard
precautions regarding electro-static discharge (ESD) when handling
the ISIHI board (the board should be kept in its shipping bag until
used). During installation, handle the ISIHI circuit card by its edges
and keep one hand in contact with the PC chassis. Set the Base I/O
Address and the Interrupt Request (IRQ) values per the table
below:
Recommended Base I/O Address and IRQ Values
ISIHI-2S/2U
Initial 8 port board
Base I/O Address
210h
IRQ
10
First 8 port upgrade
220h
11
Second 8 port upgrade
230h
12
Third 8 port upgrade
240h
15
The I/O Address DIP Switch is on the endplate of the ISIHI; the IRQ
Jumper Block is on the component side of the circuit card, lower
middle area.
3. Turn on the PC and start Windows 2000.
4. Insert the ISI installation CD into the CD drive in your computer (in
cases where the driver files have been downloaded from the MultiTech web site and copied onto diskette, insert the diskette into the
floppy drive now).
26
MultiModemISI Hybrid Server Cards, ISIHP & ISIHI Series
Software/Driver Installation (Windows 2000)
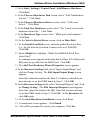
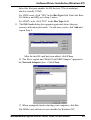
5. Go to Start | Settings | Control Panel | Add/Remove Hardware.
Click Next.
6. At the Choose a Hardware Task screen, select "Add/Troubleshoot
a device." Click Next.
7. At the Choose a Hardware Device screen, select "Add a new
device." Click Next.
8. At the Find New Hardware screen, select "No, I want to select the
hardware from a list." Click Next.
9. At the Hardware Type screen, select "Multi-port serial adapters."
Click Next.
10. At the Select a Device Driver screen, click on Have Disk.
11. At the Install from Disk screen, enter the pathof the driver files
(i.e., the file directory location, in most cases on CD-ROM).
Click OK.
12. In the Models list, highlight "Multi-Tech ISI4608-ISA 8 Port
Serial Card."
A comment screen appears indicating that the Base I/O Address and
IRQ must be specified for the ISIHI card. Click OK.
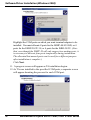
13. The Add New Hardware Wizard Properties screen appears.
A. In the Resource Settings field, select "Input/Output Range" and
click on Change Setting. The Edit Input/Output Range screen
appears.
Select the value that matches the Base I/O Address value that you
have already set on the ISIHI board in Step 2. Click OK.
B. In the Resource Settings field, select "Interrupt Request" and click
on Change Setting. The Edit Interrupt Request screen appears.
Select the value that matches the IRQ value that you have already
set on the ISIHI board in Step 2. Click OK. At the Resources tab,
click OK again.
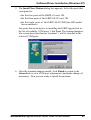
14. At the Start Hardware Installation screen, click Next.
15. A completion screen appears. Click Finish.
16. You will be prompted to restart your computer. Click Yes.
MultiModemISI Hybrid Server Cards, ISIHP & ISIHI Series
27
Software/Driver Installation (Windows 2000)
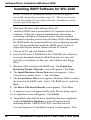
Installing ISIHP Software for Win 2000
NOTE: A series of installation wizard screens will appear
repeatedly during this procedure (step 12). This is not an error.
Do not discontinue the procedure when the installation wizard
screens repeatedly appear.
1. Shut down Windows 2000 and turn off the PC.
2. Install the ISIHP card in an available PCI expansion slot in the
computer. Follow the computer manufacturer's instructions
concerning installation of expansion cards. Observe standard
precautions regarding electro-static discharge (ESD) when handling
the ISIHP board (the board should be kept in its shipping bag until
used). During installation, handle the ISIHP circuit card by its
edges and keep one hand in contact with the PC chassis.
3. Turn on the PC and start Windows 2000.
4. Insert the ISI driver CD-ROM into the CD-ROM drive (if drivers
have been downloaded from the MultiTech web site, they will
typically be on diskette; in that case, insert diskette into floppy
drive).
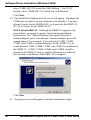
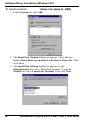
5. Windows 2000 will detect the ISIHP card. The Found New
Hardware Wizard- Welcome screen will appear. Click Next.
6. The Install Hardware Device Drivers screen appears. Select
"Search for a suitable driver ..." and click Next.
7. The Locate Driver Files screen appears (Windows 2000 is seeking
the driver for the ISIHP card). Select CD-ROM drives and click
Next.
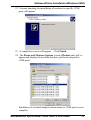
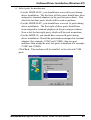
8. The Driver File Search Results screen appears. Click Next.
9. A progress screen will appear briefly while files are being copied.
10.A completion screen will appear. Click Finish.
11. Immediately after the ISI driver installation has been completed,
another Found New Hardware screen will appear briefly
indicating that the MultiTech ISI Port has been detected.
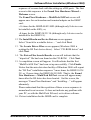
A second sequence of installation wizard screens appears. This
28
MultiModemISI Hybrid Server Cards, ISIHP & ISIHI Series
Software/Driver Installation (Windows 2000)
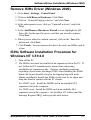
sequence of screens deals with the setting up of ISI ports. The first
screen in this sequence is the Found New Hardware Wizard -Welcome screen.
The Found New Hardware -- MultiTech ISI Port screen will
appear once for each modem and terminal adapter on the ISIHP
card:
16 times for the ISIHP-4S/4U/4SD (although only 8 devices can
be installed on the 4SD); or,
8 times for the ISIHP-2S/2U/1S (although only 4 devices can be
installed for the ISIHP-1S).
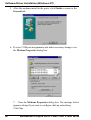
12.The Install Hardware Device Drivers screen appears.
Select Search for a suitable driver ... and click Next.
13. The Locate Driver Files screen appears (Windows 2000 is
seeking the ISI Port device driver). Select CD-ROM drives and
click Next.
14. The Driver Files Search Results screen will indicate that the
isiport.inf file has been found on the CD-ROM. Click Next.
15. A completion screen will appear. It will indicate that the first
MultiTech ISI Port has been set up successfully. Click Finish.
Notice that the auto-detection facility of Windows 2000 will repeat
the ISI Port installation sequence 7 more times for ISIHP-1S/2S/
2U, or 15 more times for ISIHP-4S/4U/4SD. That is, the Found
New Hardware -- MultiTech ISI Port screen will appear many
times after the ISI driver has been located. On this screen, the
messages Found New Hardware and Installing ... will appear
alternately.
Please understand that the repetition of these screen sequences is
normal and is not an error. It does not indicate any problem with
your PC, or with the MultiTech ISI card, or its driver software.
16. Driver installation for the ISIHP card is complete.
MultiModemISI Hybrid Server Cards, ISIHP & ISIHI Series
29
Software/Driver Installation (Windows 2000)
ISIHx for Win 2000: Installing ISI Management
Software (server OSs only)
If you are using a Windows 2000 Server operating system ("Server" or
"Advanced Server"), you must decide whether you want to use the
MultiTech ISI Management Software in conjunction with your ISIHx
board. The ISI Management Software is shipped with the ISI card.
1. Turn on your computer and start Windows 2000.
2. Insert the CD-ROM containing the ISI Management Software into
your CD-ROM drive. (If ISI Management Software has been
downloaded from the MultiTech web site, it will typically be on a
diskette. In that case, insert diskette into floppy drive).
3. Go to Start | Run. In the Run window, enter the file path of the ISI
Management software. Typically, this would be
E:\SERVCARD\UTILITY\MGMT\SETUP.EXE. Click OK.
4. The ISI Management setup screen appears. At the Welcome
screen, click Next.
5. A progress screen appears while files are copied. If the Error
Creating WWW Server message appears, it may indicate that
there was an attempt to install the ISI Management Software on a
client version of Windows 2000. (The ISI Management Software
can be installed only in the Windows 2000 Server and Windows
2000 Advanced Server operating systems.)
6. A completion screen appears.
Select "Yes, I want to restart my computer now" and click Finish.
After the computer has restarted, the installation of the driver and of
the ISI Management Software will be complete.
30
MultiModemISI Hybrid Server Cards, ISIHP & ISIHI Series
Software/Driver Installation (Windows 2000)
ISIHx for Windows 2000: Installing TAs and
Modems to COM Ports
Pre-Requisite: Installation of Windows 2000 driver software must be
completed before you can install the terminal adapters and
modems of the ISIHx card.
1. Go to Start | Settings | Control Panel | Phone and Modem
Options.
2. The Location Information screen appears.
Enter the appropriate area code and access number. Click OK.
3. At the Phone and Modem Options screen, click on the Modems
tab and click Add.
4. At the Install New Modem screen, click on "Don't detect my
modem ... " and click Next.
5. If the software driver CD-ROM (or other media, in cases of using
drivers downloaded from the MultiTech web site) is not already in
the appropriate disk drive in the PC, insert it now.
6. If you are installing an ISIHP-1S card, go to step 25 for special
instructions and then return to step 7. Otherwise go directly to step
7.
Installing Terminal Adapters to COM Ports.
7. The Add/Remove Hardware Wizard screen will appear.
Click Have Disk ... .
8. The Install from Disk screen will appear.
Type or browse for the file path of the terminal adapter software
(for example, E:\servcard\drivers\win2000). Click OK.
9. The Install New Modem screen will appear.
Highlight the terminal adapter protocol to be used. Click Next.
10. The Install New Modem - port list screen will appear.
MultiModemISI Hybrid Server Cards, ISIHP & ISIHI Series
31
Software/Driver Installation (Windows 2000)
Highlight the COM ports on which you want terminal adapters to be
installed. You must allocate 8 ports for the ISIHP-4S/4U/4SD, or 4
ports for the ISIHP-2S/2U/1S, or 4 ports for the ISIHI-2S/2U. (Note
that, even though the ISIHP-1S will only support two modem ports, it
is necessary to allocate four ports temporarily during installation.
The allocated-but-unused ports can be used for a different purpose
after installation is complete.)
Click Next.
11. A progress screen will appear as TA installation begins.
12.As TAs are installed to the specified COM ports, a separate screen
will appear denoting the process for each COM port.
32
MultiModemISI Hybrid Server Cards, ISIHP & ISIHI Series
Software/Driver Installation (Windows 2000)
13.A completion screen will appear. Click Finish.
14. The Phone and Modems Options screen (Modems tab) will reappear and display the TAs that have just been assigned to COM
ports.
If you are installing a ISIHP-4SD, installation is now complete.
(The 4SD has no modems.)
Installing modems to COM Ports (not applicable to -4SD):
15. At the Phone and Modems Options screen (Modems tab), click
Add.
16. The Install New Modems screen will appear.
Select Dont detect my modem ....
Click Next.
17. A screen listing modem manufacturers and models will appear.
Click Have Disk ....
18. The Install from Disk screen will appear.
Type or browse for the file path of the modem software (for
example, E:\servcard\drivers\win2000). Click OK.
19. The Install New Modem screen will show a list of MultiTech
modem and terminal adapter drivers. Select the modem type that
fits the model of your specific server card. For 1S/2S/4S models,
MultiModemISI Hybrid Server Cards, ISIHP & ISIHI Series
33
Software/Driver Installation (Windows 2000)
select ISIHI_HP-2S Central Site 56K Modem. For 2U/4U
models, select ISIHI_HP-2U Central Site 56K Modem.
Click Next.
20. The Install New Modem port list screen will appear. Highlight the
COM ports on which you want modems to be installed. You must
allocate 8 ports for the ISIHP-4S/4U, or 4 ports for the ISIHP-2S/
2U/1S, or 4 ports for the ISIHI-2S/2U.
NOTE about ISIHP-1S. Although the ISIHP-1S supports only
two modems, you must designate 4 ports during installation.
Furthermore, the COM port numbers used must allow for 4
terminal adapter ports, even though 2 terminal adapter ports will
remain unused. For example, if you allocated COM3, COM4,
COM5, and COM6 to terminal adapters for the ISIHP-1S, you
could allocate COM7, COM8, COM9, and COM10 to modems for
the ISIHP-1S. COM5, COM6, COM9, and COM10 would be
unused by the ISIHP-1S and so could be allocated to a different
function after installation of the ISIHP-1S is complete.
Click Next.
21. A progress screen will appear as modem installation begins.
34
MultiModemISI Hybrid Server Cards, ISIHP & ISIHI Series
Software/Driver Installation (Windows 2000)
22. Screens denoting the installation of modems to specific COM
ports will appear.
23. A completion screen will appear. Click Finish.
24. The Phone and Modems Options screen (Modems tab) will reappear and display the modems that have just been assigned to
COM ports.
Installation of terminal adapters and modems to COM ports is now
complete.
MultiModemISI Hybrid Server Cards, ISIHP & ISIHI Series
35
Software/Driver Installation (Windows 2000)
25. For the ISIHP-1S card only. The ISIHP-1S is a scaled-back
revision of the ISIHP-2S card meant for low-density applications
where hybrid flexibility (having TAs and modems on the same
card) is advantageous.
The diagram below describes the design differences between the
ISIHP-1S and ISIHP-2S. It also summarizes how the ISIHP-1S
must be treated during installation.
ISIHP -- Differences between 1S and 2S versions,
especially COM port assignments
ISDN
Com Ports
5
Modem
1
2
TA
6
7
3
4
8
}
3456
RJ-45 jack
Line 1
Modem
These ports
are unused
on the ISIHP-1S.
When installing ISIHP-1S software:
(a) treat ISIHP-1S as an 8-port card;
(b) assign first 2 ports as terminal adapters (TAs);
(c) skip two port numbers;
(d) assign next 2 ports as analog modems.
(e) Other devices can use port numbers
that were skipped by the ISIHP-1S.
36
MultiModemISI Hybrid Server Cards, ISIHP & ISIHI Series
Software/Driver Installation (Windows 2000)
Remove ISIHx Driver (Windows 2000)
1. Go to Start | Settings | Control Panel.
2. Click on Add/Remove Hardware. Click Next.
3. Click on Uninstall/Unplug a device and click Next.
4. In the subsequent screen, click on Uninstall a device and click
Next.
5. At the Add/Remove Hardware Wizard screen, highlight the ISI
driver file for the specific server card that you intend to remove.
Click Next.
6. When you are asked to confirm removal, click on the Yes radio
button and click Next.
7. Click Finish. You can remove the driver for only one ISIHx card at
a time.
ISIHx Software Installation Procedure for
Windows NT 3.51/4.0
1. Turn off the PC.
2. The ISIHx card must be installed in an expansion slot in the PC. If
not, follow the PC manufacturer's instructions concerning
installation of expansion cards. Observe standard precautions
regarding electro-static discharge (ESD) when handling the ISIHx
board (the board should be kept in its shipping bag until used).
During installation, handle the ISIHx circuit card by its edges and
keep one hand in contact with the PC chassis.
For ISIHP cards. Install the ISIHP card in an available PCI
expansion slot in the computer.
For ISIHI cards. Install the ISIHI card in an available ISA
expansion slot in the computer. Set the Base I/O Address and the
Interrupt Request (IRQ) values per the table below:
MultiModemISI Hybrid Server Cards, ISIHP & ISIHI Series
37
Software/Driver Installation (Windows NT)
Recommended Base I/O Address and IRQ Values
ISIHI-2S/2U
Initial 8 port board
Base I/O Address
210h
IRQ
10
First 8 port upgrade
220h
11
Second 8 port upgrade
230h
12
Third 8 port upgrade
240h
15
The I/O Address DIP Switch is on the endplate of the ISIHI; the IRQ
Jumper Block is on the component side of the circuit card, lower middle
area.
3. Turn on the PC and start Windows NT4.0.
4. Insert the driver CD-ROM into the CD-ROM drive. (If drivers
were obtained from MultiTech web site and stored on diskette,
place diskette into floppy drive now.)
5. Click Start | Settings | Control Panel | Network | Adapters. Then
click Add.
6. The Select Network Adapter dialog box appears. Click Have
Disk.
7. The Insert Disk dialog box appears. Type or browse for the path
(file directory location) of the Windows NT driver (for example,
E:\SERVCARD\DRIVERS\WINNT\SETUP.EXE). Click OK.
8. The Select OEM Option dialog box appears. Click OK.
A transient dialog box will appear indicating the progress of the
setup program.
9. The ISI Cards dialog box appears. Click Add.
10. Then the ISI Card Settings dialog box appears. Enter the correct
port count:
allocate 8 ports for 2S/2U cards;
allocate 8 ports for the ISIHP-1S,
(even though 4 of those ports will remain unused);
and
allocate 16 ports for 4S/4U/4SD cards.
38
MultiModemISI Hybrid Server Cards, ISIHP & ISIHI Series
Software/Driver Installation (Windows NT)
Select the first port number for ISI devices (TAs or modems),
which is usually COM3.
For ISIHI cards, click "ISA" in the Bus Type field. Enter the Base
I/O Address and IRQ as in Step 2 above.
For ISIHP cards, click "PCI" in the Bus Type field.
11. The ISI Cards dialog box appears again and shows the port
resource allocation just made. To add more cards, click Add and
repeat Step 9.
After the last ISI card has been added, click Close.
12. The file is copied and "Multi-Tech ISIHP Adapter" appears in
the Network Adapters box. Click Close.
13. When prompted about restarting your computer, click Yes.
The ISIHx card software is now installed in Windows NT.
MultiModemISI Hybrid Server Cards, ISIHP & ISIHI Series
39
Software/Driver Installation (Windows NT)
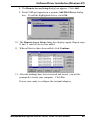
Installing ISIHx TAs & Modems to COM Ports
in Windows NT
To install terminal adapters:
1. In the Control Panel, double-click the Modems icon.
2. The Modem Properties dialog box appears. Click Add.
3. The Install New Modem dialog box appears. Check the box
marked Don't detect my modem; I will select it from a list and
click Next.
4. The Install New Modem dialog box appears. In the Manufacturers
list, highlight "MultiTech Systems." In the Models list, select an
ISDN protocol. The valid choices are:
ISIHI_HP Auto-Protocol
ISIHI_HP Auto-Protocol CallBack
ISIHI_HP PPP async
ISIHI_HP V.110 async
ISIHI_HP V.120 async
ISIHI_HP X.75 async
Click Next.
40
MultiModemISI Hybrid Server Cards, ISIHP & ISIHI Series
Software/Driver Installation (Windows NT)
5. The Install New Modem dialog box appears. Select the ports that
correspond to:
the first two ports of the ISIHP-1S card, OR
the first four ports of the ISIHP-2S/2U card, OR
the first eight ports of the ISIHP-4S/4U/4SD (the 4SD model
has no modems).
Any ports that existed prior to installing the ISIHP appear first in
the list of available COM ports. Click Next. The terminal adapters
(the screen describes them as "modems") will be installed to the
selected COM ports.
6. After the terminal adapters install, click Finish to return to the
General tab to view COM port assignments (and make changes if
necessary). Now you are ready to install the modems.
MultiModemISI Hybrid Server Cards, ISIHP & ISIHI Series
41
Software/Driver Installation (Windows NT)
To install modems:
{does not apply to -4SD}
1. In the General tab, click Add.
2. The Install New Modem dialog box appears. Check the box
marked Don't detect my modem; I will select it from a list. Then
click Next.
3. The Install New Modem dialog box appears. In the
Manufacturers list, select "MultiTech Systems." From the
Models list, select Central Site Modems. Then click Next.
42
MultiModemISI Hybrid Server Cards, ISIHP & ISIHI Series
Software/Driver Installation (Windows NT)
4. Select ports for modem use.
For the ISIHP-2S/2U, you should have reserved 8 ports during
driver installation. The first four of these ports should have been
assigned as terminal adapters (in the previous procedure). Now
select the last four ports, which will be used as modems.
For the ISIHP-4S/4U, you should have reserved 16 ports during
driver installation. The first eight of these ports should have
been assigned as terminal adapters (in the previous procedure).
Now select the last eight ports, which will be used as modems.
For the ISIHP-1S, you should have reserved 8 ports during
driver installation. Recall the port numbers assigned as terminal
adapters (for example, COM3 and COM4); skip two port
numbers; then assign the next two ports as modems (for example
COM7 and COM8).
Click Next. The modems will be installed to the selected COM
ports.
MultiModemISI Hybrid Server Cards, ISIHP & ISIHI Series
43
Software/Driver Installation (Windows NT)
5. After the modems install to the ports, click Finish to return to the
General tab.
6. To view COM port assignments and make necessary changes, use
the Modem Properties dialog box.
7. Close the Modems Properties dialog box. The message below
appears asking if you want to configure dial-up networking.
Click Yes.
44
MultiModemISI Hybrid Server Cards, ISIHP & ISIHI Series
Software/Driver Installation (Windows NT)
8. The Remote Access Setup dialog box appears. Click Add.
9. Each COM port appears in a separate Add RAS Device dialog
box. To add the highlighted device, click OK.
10. The Remote Access Setup dialog box displays again. Repeat steps
8 and 9 until all devices are added.
11. When all devices have been added, click Continue.
12. After the bindings have been reviewed and stored, you will be
prompted to restart your computer. Click Yes.
You are now ready to configure the terminal adapters.
MultiModemISI Hybrid Server Cards, ISIHP & ISIHI Series
45
Software/Driver Installation (Windows NT)
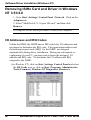
Removing ISIHx Card and Driver in Windows
NT 3.51/4.0
1. Go to Start | Settings | Control Panel | Network. Click on the
Adapters tab.
2. Select "MultiTech 4, 8, 16-port ISI card," and then click
Remove.
To complete the un-install procedure, restart your computer.
I/O Addresses and IRQ Codes
Unlike the ISIHI, the ISIHP has no DIP switch for I/O addresses and
no jumper to determine the IRQ code. The input/output address and
the interrupt request code (IRQ) for the ISIHP are assigned
automatically during driver installation. During any subsequent reconfiguring of your PC, you may need to know the assigned I/O
address and IRQ code. To determine the I/O address and IRQ
assigned to the ISIHP:
(for Windows NT) click on Start, Settings, Control Panel and select
the ISI Cards icon; or click on Start, Programs, Administrative
Tools (Common), Windows NT Diagnostics, Resources;
46
MultiModemISI Hybrid Server Cards, ISIHP & ISIHI Series
Configuring Terminal Adapters
Configuring the Terminal Adapter
Introduction
North American users must configure the terminal adapter to match
network switch type, the service profile identifier (SPID), and the
directory number (DN). For international users, the terminal adapter
ships already configured for NET3, which should work on most phone
lines in Europe. However, you may want to customize settings,
regardless of your location. (See Optional Settings below.)
You can configure the terminal adapters with the ISDN TA
Configuration utility, ConfigMenu, or with AT commands.
Instructions for all three are provided in this manual.
ISDN TA Configuration Utilityrecommended for computers with
Windows 95/98/Me, Windows NT, and Windows 2000.
ConfigMenurecommended for computers with DOS or Windows
3.x and a VT100/ANSI compatible terminal or data communication
program that includes VT100/ANSI terminal emulation.
AT Commands. You can use AT commands and S-registers to fine
tune TA operation. You enter these commands in your data
communication programs terminal mode. AT commands and Sregisters are described in detail in a separate chapter of this manual.
North American Users
Before you connect the ISIHI or ISIHP to your network terminator,
you must configure it to match the following:
Network Switch Type ____________________
Select the network switch type your ISDN service uses at its local
central office. You can set the TA to NET3, AT&T 5ESS, NT DMS100, or US National ISDN-1. If you don't know the switch type, get
the information from the local phone company. AT command: !CO=
SPIDs and DNs ________________________
The TA must be configured with the Service Profile Identifier
(SPID). The SPID, assigned by the local phone company, is for the
specific BRI line where TA is attached. The SPID field is empty prior
to configuration. AT command: AT!C6= and AT*!C6
MultiModemISI Hybrid Server Cards, ISIHP & ISIHI Series
47
Configuring Terminal Adapters
The Directory Number (DN) is the phone number another user would
call to contact this TA once it is attached to the ISDN. AT commands:
AT!N1= and AT*!N1=
Note: SPIDs only apply for North American switch types.
International Users
The terminal adapters ship already configured for NET3, which should
work for most telephone lines in Europe. If you want to customize
settings, refer to the Optional Settings below.
Optional Settings
Data TEI _____________________________
The Data TEI is the TEI (terminal endpoint identifier) assigned to the
data channel. You can select Auto TEI, a fixed TEI, or Disable. A
TEI is a number used by the central office switch to uniquely identify
each device that is connected to the network. When it uses dynamic
TEI assignments (Auto TEI), the central office switch assigns a TEI
each time the TA connects to the network. However, the ISDN
service provider may assign a fixed TEI at subscription time, in
which case you must configure the TA with the fixed TEI number.
You also can disable the channel, which may be useful when multiple
TAs are attached to a network terminator bus. AT command: !D3=
Voice TEI _____________________________
The Voice TEI is the TEI assigned to the voice channel. You have the
same choices as for Data TEI: Auto TEI, fixed TEI number, or
Disable.
AT command: *!D3=
Persistent DTR Dialing __________________
A high DTR (Data Terminal Ready) signal on the serial port indicates
that your computer or terminal is ready to communicate with your
TA. DTR normally goes high when a communication program starts
or is ready to dial. Persistent DTR dialing enables the TA to
automatically redial the number stored in memory location 0
whenever DTR is high, and the serial port does not have an active
call. You can enable or disable this feature. AT command: $D
48
MultiModemISI Hybrid Server Cards, ISIHP & ISIHI Series
Configuring Terminal Adapters
Auto Answer Data Calls _________ Rings to Answer _________
Select Auto Answer if you want the TA to automatically answer all
incoming data calls (option does not affect analog port). The Rings to
Answer number (range: 1255) selects number of rings the TA waits
before answering an incoming call. Default: 1 ring. AT command:
S0=
Dialing Method ________________________
Select either the Enbloc or the Overlap dialing method for use when
establishing a data call. Your ISDN provider determines the dialing
method. The enbloc method is used for most ISDN dialing; however,
you can select the overlap method if you are working with a private
network. AT command: %A97=
Data Protocol _________________________
The data protocol, also known as the B-channel protocol and the rate
adaptation protocol, is the language spoken over each 64 Kbps
channel between two ISDN devices. The devices on both ends of the
ISDN link must use identical protocols. AT command: !Z
V.120 Protocol( !Z = 5 ) for rates up to 64 Kbps on each B channel.
PPP Protocol ( !Z = 9 ) for rates up to 64 Kbps on each B channel.
X.75 Protocol The ISIHP uses layer 2 of the X.75 protocol as an
error correction protocol on the B-channel.
Stored Numbers ________________________
The TA can optionally store as many as 10 phone numbers, up to 20
characters each. AT command: &Z=
Dialing Stored Numbers _________________
The TA can dial a number previously stored in directory number n
using the &Zn=x command. AT command: e.g., DS3
MultiModemISI Hybrid Server Cards, ISIHP & ISIHI Series
49
Configuring Terminal Adapters
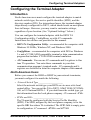
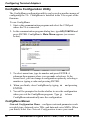
ISDN TA Configuration Utility
1. Make sure Windows NT Remote Access Service (RAS), or any
other application that is using the modem, is shut down. To shut
down RAS, click Start, Programs, and then Administrative Tools
(Common). Then click Remote Access Admin and click Server,
which will indicate whether or not RAS is running. If it is running,
click Stop Remote Access Service.
2. Insert the Config Utility diskette into the floppy drive.
3. From the main desktop of your PC, select Start, Settings, Control
Panel. Click on the Add/Remove Programs icon. Click Install.
4. The dialog box Install Program from Floppy Disk or CD-ROM
appears. Click Next. The Run Installation Program dialog box
appears. Click Finish.
5. The Welcome dialog box for the ISDN TA Configuration Utility
Setup program appears. Click Next.
6. The Choose Destination Location dialog box appears.
7. The Setup dialog box appears.
8. The Information dialog box appears. Click OK.
9.
50
Click Start, Programs, and then the ISDN TA Configuration
Utility icon.
MultiModemISI Hybrid Server Cards, ISIHP & ISIHI Series
Configuring Terminal Adapters
10. The Welcome dialog box appears. Click Next.
11. The Searching for TA dialog box appears. Click Next.
The next dialog box specifies the TA that has been identified.
12. The Configuration dialog box appears. If you have questions
about choices, click Help. After entering information in each
dialog box, click Next.
13.The SPID dialog box appears (North America only). Referring to
your network configuration notes, enter the appropriate information; then click Next.
14. The Data Protocol Setup dialog box appears. Referring to your
network configuration notes, enter the appropriate information;
then click Next.
15. In the Save Configuration dialog box, enter a name to store the
configuration. Then click Next.
16. To load the configuration, click Next in the Load Configuration
dialog box.
17. Then click Finish in the Configured dialog box.
18. The first TA now is configured. Click Back to return to the
Configuration dialog box and repeat steps 4 through 9 to
configure the remaining TA(s). If you install multiple ISIHI or
ISIHP cards in the same PC, you must configure two TAs per 2S or
2U card installed or four TAs per 4S, 4U, or 4SD card. For the
ISIHP-1S, you configure only one TA. For example, if you install
four ISIHP-2S/2U cards in one PC, you have to configure eight
TAs (two per card).
19. After all TAs are configured, close the ISDN TA Configuration
utility.
MultiModemISI Hybrid Server Cards, ISIHP & ISIHI Series
51
Configuring Terminal Adapters
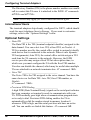
ConfigMenu Configuration Utility
The ConfigMenu configuration utility can be used as another means of
configuring the TA. ConfigMenu is installed in the TAs as part of the
firmware.
To use ConfigMenu:
1. Start a data communication program and select the COM port
where the TA is connected.
2. In the communication program dialog box, type AT@CONFIG and
press ENTER. ConfigMenus Main Menu appears (see screen
below).
3. To select menu item, type its number and press ENTER. A
submenu then appears where you can make selections. At the
lowest level, you can change a configuration option by selecting a
number or typing a value and pressing ENTER.
4. When you finish, close ConfigMenu by typing x
ENTER.
and pressing
5. You will be prompted to decide whether to save the configuration
when you exit the ConfigMenu program. Type y to have
ConfigMenu automatically save the configuration.
ConfigMenu Menus
Network Configuration Menuconfigures network parameters such
as switch type, data and voice TEIs, and data and voice MSNs. When
you finish, select Save Network Configuration to save your work.
52
MultiModemISI Hybrid Server Cards, ISIHP & ISIHI Series
Configuring Terminal Adapters
Call Control Configuration Menuchanges how the TA originates
and answers calls. Options include Auto Answer, Rings to Answer,
Dialing Method, and Persistent DTR Dialing.
Data Protocol Menuchanges rate adaption protocol used by the TA.
Stored Numbers Menustores up to ten phone numbers ( maximum
of 20 characters each). Stored number 0 is the phone number that will
be dialed if persistent DTR dialing is enabled.
Port Control Configuration Menuconfigures TAs serial port,
including how TA responds to control signals on the serial interface.
Help Menuprovides assistance in navigating through the TA menu
system or viewing the firmware version numbers of the ISIHI or ISIHP
card.
Terminal Adapter AT Commands
You can configure the terminal adapters using AT commands just as
you would configure an analog modem. Use this method if you prefer
to work with AT commands or if you have a special requirement not
addressed by either of the configuration utilities.
To configure the TAs with AT commands:
1. Start a data communication program and select the TA COM ports
to be configured.
2. Referring to records made for your system, enter AT commands in
the terminal window of the data communications program.
3. When you finish, use the &W command to save your new
configuration and to select it to load automatically when the ISIHP
is turned on.
4. Close the data communications program. For more information, see
the chapter on AT Commands and S-Registers in this manual.
MultiModemISI Hybrid Server Cards, ISIHP & ISIHI Series
53
Software/Driver Installation (Novell Netware)
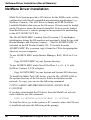
NetWare Driver Installation
Multi-Tech Systems provides AIO drivers for the ISIHx cards, so they
can function with Novell compatible asynchronous applications (e.g.,
NetWare Connect). The AIO driver is simply an NLM (NetWare
Loadable Module) that runs on the file server. Drivers must be loaded
on the file server where the board is installed. Drivers can be loaded
from the file servers console prompt or incorporated for autoloading
in the AUTOEXEC.NCF file.
The file AIOMTS.MDC contains Novell (version 3.12 and higher)
initialization strings for ISI products not previously listed for use with
BorderManager and Netware Connect. The file AIOMTS.MDC is
included on the ISI Product Family CD. To benefit from the
AIOMTS.MDC file, you must copy it from the CD to the appropriate
directory on your computer.
To use AIOMTS.MDC under Border Manager, RAS, NIAS in 4.2 or
5.x:
Copy AIOMTS.MDC to your System directory.
To use AIOMTS.MDC under Novell NetWare 3.x, 4.1, 4.11 with
NetWare Connect 2.0.28 or higher:
Copy AIOMTS.MDC to your System and System/AIO directory.
To install the Multi-Tech AIO driver, copy the file AIOISIX.NLM to
the system directory of the file server from a workstation on the
network. To copy, you can use the following command:
COPY E:\SERVCARD\DRIVERS\NOVELL\AIOSIX.NLM
F:\SYSTEM
If you have downloaded the ISI driver from the MultiTech web site
onto a diskette, use this command:
COPY A:\NOVELL\AIOISIX.NLM
F:\SYSTEM
To load the driver, go to the system or PC console (where the ISI card
is installed) and enter the following at the prompt:
54
MultiModemISI Hybrid Server Cards, ISIHP & ISIHI Series
Software/Driver Installation (Novell Netware)
LOAD AIOISIX [port=W] [interrupt=X] [name=Y]
[note=Z]
For PCI-bus cards (ISIHP models) Netware will set up the interrupt
(IRQ) and I/O address automatically.
To install the ISI card scripts, copy aiomdms.mdc to
f:\system\aio\directory. Click Yes to overwrite the existing
aiomdms.mdc file.
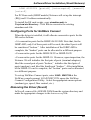
Configuring Ports for NetWare Connect
When the driver is installed, it will allocate consecutive ports for the
ISI card as follows:
16 consecutive ports for the ISIHP-4S/4U/4SD. Note that, for the
ISIHP-4SD, only 8 of these ports will be used; the other 8 ports will
be considered broken. After installation of the ISIHP-4SD is
complete, the broken ports can be allocated to a different purpose.
8 consecutive ports for the ISIHI-2S/2U or ISIHP-2S/2U
8 consecutive ports for the ISIHP-1S. However, upon inspection, the
Netware OS will initialize the first pair of ports (terminal adapters),
label the second pair of ports broken, initialize the third pair of
ports (modems), and label the fourth pair broken. After installation
of the ISIHP-1S card is complete, the broken ports can be allocated
to a different purpose.
To set up NetWare Connect ports, enter LOAD NWCCON at the
NetWare console prompt. LOAD NWCCON opens the NetWare
Connect Configuration Utility. Select the appropriate menu options
(modem type, speed, flow control, etc.).
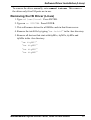
Removing the Driver (Novell)
In Novell, remove file AIOISIX.NLM from the system directory and
make the appropriate changes to the Autoexec.ncf file.
MultiModemISI Hybrid Server Cards, ISIHP & ISIHI Series
55
Software/Driver Installation (SCO Open Server)
SCO Open Server 5 Driver Installation
The ISI driver for SCO Open Server 5 is shipped on CD-ROM (FAT
file system) and can also be downloaded from the Multi-Tech web
site. In both cases, the driver files are compressed (tarred). Users
installing from the CD-ROM should begin at To install from CDROM directly below. Users installing from a floppy disk should skip
down to To install driver from floppy disk later in this section. The
filename of the SCO5 driver in its tarred form is sco50x.tar.
This present installation section is task-oriented with minimal
explanation of procedural steps. The section Multi-Tech Installation
Script, which immediately follows this section, presents additional
details to aid in installation.
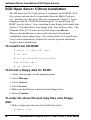
To install from CD-ROM:
# mount -r /dev/cd0 /mnt
# cd /mnt
# cd servcard/drivers/sco50x
#cp sco50x.tar /
# cd <ENTER>
To format a floppy disk for SCO5:
1. At the Unix prompt, run the scosh program.
2. Select Manager.
3. Select Archive.
4. Select Format.
5. Make sure that Device is pointed to the floppy drive.
6. Select Continue.
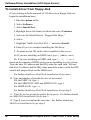
To untar the driver file and copy files onto floppy
disk:
1. Make a temporary directory for the ISI driver files.
# mkdir /isi
56
MultiModemISI Hybrid Server Cards, ISIHP & ISIHI Series
Software/Driver Installation (SCO Open Server)
2. Copy the tarred isi driver file into the temporary directory.
# cp sco50x.tar /isi
3. Untar this file and put its contents into the temporary directory.
# cd /isi
# tar xvf sco50x.tar
4. Copy the untarred (inflated or non-compressed) files to a floppy
disk
# cd /isi/unifiedinstimg301
#scosh
- Select Manager.
- Select Archive.
- Select Create.
- Press space bar to highlight tmp/ and usr/ directories.
- Press <ENTER> to copy.
- Make sure Device is pointed to the floppy disk.
- Make sure that the Type is cpio.
- Select Continue.
5. To verify that the files have been copied onto the floppy disk, use
these commands:
# scosh
- Select Manager.
- Select Archive.
- Select List.
- Make sure Device is pointed to the floppy disk.
- Select Continue.
MultiModemISI Hybrid Server Cards, ISIHP & ISIHI Series
57
Software/Driver Installation (SCO Open Server)
To install driver from floppy disk
(Users starting with the untarred SCO5 driver on a floppy disk can
begin the installation here).
1. Run the custom utility.
2. Select Software.
3. Select Install New.
4 Highlight driver file from local host and select Continue.
5. Select as the Media Device Floppy Disk Drive.
6. Select Continue.
7. Highlight Multi-Tech ISA/PCI ... and select Install.
8. Enter Y (yes) to continue installing the ISI driver.
9. As many as four ISI cards can be installed in the server.
9a. If you are installing an ISIHP card, type 0 (that is, zero).
9b. If you are installing an ISIHI card, type 1, 2, 3, or 4,
based on the number of ISIHI cards you are installing in your system.
Type the base I/O address and the IRQ value for each card. Be sure
that the I/O address and the IRQ value match the values set in the DIP
switch and jumper block on the ISIHI card.
For further details see MultiTech Installation Script step 1.
10. Type the number of pseudo-devices to be created.
For the ISIHP-1S, type 4.
For the ISIHP2S/2U/4SD and ISIHI-2S/2U, type 8.
For ISIHP-4S/4U, type 16.
For further details see MultiTech Installation Script step 2.
11. Type Y (yes) to accept the prefix for tty ports. For further details
see MultiTech Installation Script step 3.
12. Type Y (yes) to confirm the selection. For further details see
MultiTech Installation Script step 4.
58
MultiModemISI Hybrid Server Cards, ISIHP & ISIHI Series
Software/Driver Installation (SCO Open Server)
13. After the driver is installed, press ENTER to continue. For further
details see MultiTech Installation Script step 4(last paragraph) and
step 5.
14. Exit the custom utility. For further details see MultiTech
Installation Script step 6.
15. Remove the floppy disk and reboot your computer. For further
details see MultiTech Installation Script step 7.
MultiTech Installation Script
The Multi-Tech Installation Script for SCO Open Server 5 systems
requests information about how many boards you want to install,
designations for communication ports and printer ports, and how many
pseudo devices you want to create for Multi_View utility. Based on
this information, the appropriate driver files will be installed and
linked with your systems kernel.
1. This text appears on the screen:
You can
system.
bootup.
want to
(0-4):
install up to 4 ISA/PCI cards in a
The PCI cards will be autodetected on
Enter the number of ISA cards you
install and configure on your system
Select 0 (that is, zero) if your computer has a PCI bus. This tells
the SCO operating system to autodetect the ISI cards.
2. The following text appears on the screen:
Multi_View is a utility which will allow you
to have multiple sessions on terminals that
have multiple pages of physical memory. In
order for this utility to work with
MultiTech’s serial cards, pseudo devices have
to be created in your /dev directory. These
devices are system-wide resources.
Enter the number of pseudo-devices to be
created for the use of Multi_View utility
(1 - 256).
MultiModemISI Hybrid Server Cards, ISIHP & ISIHI Series
59
Software/Driver Installation (SCO Open Server)
The Multi_View utility initializes the multiple-page capability of
terminals with multiple pages of memory. The number specified
here is the total number of devices (between 1 and 256) available to
all Multi-Tech terminals and its the number of pseudo devices
available to the Multi_View utility.
Specify 8 pseudo devices for each ISIHx-2S or -2U card installed;
specify 16 for each ISIHP-4S or -4U card installed;
specify 8 devices for each ISIHP-4SD card installed.
For example, if the computer contains three ISIHP-4S cards, you
would enter 48.
The ISIHP-1S card is a special case. In the MultiTech Installation
Script, you should specify 8 pseudo devices for the ISIHP-1S card.
However, only four of these pseudo devices will actually be used.
The first pair, ttyl1A and ttyl1B, will be used as terminal
adapters; the third pair, tty11E and tty11F, will be used as
modems. (In device names like ttyl1A, the fourth character is a
lower-case L; the device names are, however, case sensitive.)
The remaining ports (the second pair and the fourth pair) are not
used and can be allocated to a different purpose after the ISIHP-1S
installation is complete. You must initialize each of the four ports
separately using the enable command (for example, enable
ttyl1a).
The ISIHP-4SD is also a special case. In the MultiTech Installation
script, you should specify 16 pseudo devices for the ISIHP-4SD
card. However, only the first 8 devices (ttyl1A through
ttyl1H) will be used and these will be used as terminal adapters.
The remaining ports (ttyl1J through ttyl1P) are not used and
can be allocated to a different purpose after the ISIHP-4SD
installation is complete. Use the enable command to initialize
ports.
3. This text appears on the screen and relates to the /dev directory.
This script also creates the devices in your
system to communicate with the ports of
ISICOM. The default prefix for the tty ports
is ttyl. The default prefix for the printer
is prnl. Is this acceptable? (y/n/q).
60
MultiModemISI Hybrid Server Cards, ISIHP & ISIHI Series
Software/Driver Installation (SCO Open Server)
For most users, its best to select y, which entails accepting the
default values. Then proceed to step 4.
Details for use of non-default port/printer values. The /dev
directory holds device-information files used by the kernel to
access the hardware. When you add an ISI card, you must give the
ISI ports unique names so they do not conflict with existing ports or
with other devices known to your system. If a device name has
already been assigned to an existing device and the operator assigns
that name to a new device, then the existing device will be deleted
when the ISI port using its name is created.
a. To use a non-default base name, type N and then enter a
basename having less than five characters. The base name you
select will be used for all ports on each card you install. ISI port
designations will have this form:
[basename prefix][board number][port letter].
basename: Length is one to four characters.
board number: Values will be 1, 2, 3, or 4, depending on
how many ISI cards are installed in your computer.
port letter: For ISIHx-2S/2U, use letters A through D for TAs;
use letters E through H for modems. For ISIHx-4S/4U, use letters
A through H for TAs; use letters I through P for modems. (For
terminal control devices, use lower-case letters as port identifiers.)
Device basename selected: _________________
b. After you select a device basename, you are prompted for a printer
base name. This prefix identifies each port that supports a terminal
with a printer attached to its auxiliary port (for transparent
printing). Specify a unique printer base name (printer parameters
are outlined in the Multi_Setup Utility section in this manual ).
Printer base name selected: _________________
When you have specified the device base name and the printer base
name, press ENTER to continue.
4. The confirmation screen lists the values you have selected. The
following text appears on the screen (default values are shown):
MultiModemISI Hybrid Server Cards, ISIHP & ISIHI Series
61
Software/Driver Installation (SCO Open Server)
You have chosen the following setup
The tty prefix is ttyl.
The printer prefix is prnl.
Number of Multi_View pseudo devices
[user-specified number].
If these values are correct, type Y and the installation process will
continue. If there is an error in any of the values displayed, type N
and the first screen displays. Then re-enter the information for each
card.
When you accept the confirmation list (by typing Y), a series of
messages displays while the driver is being installed and the kernel
rebuilt. After the terminals have been added to the Terminal
Control database, and when the display says Press <Enter>
to continue:, then press ENTER. When Installation
complete displays, press ENTER again.
5.
Select Host and press ENTER . Remove the diskette from the
drive.
6.
Select Exit and press ENTER .
7.
To reboot the system (required), enter the following commands:
Type shutdown -g0-y and press ENTER
OR
Type init 6 and press ENTER .
Driver installation for the ISIHP card now is complete.
Activating Ports in SCO Open Server 5
SCO Open Server 5 provides a device database that monitors the
activity of serial ports through which users can log onto the host. If
your ISI ports are used by terminals (e.g., to allow users to log onto
your host), you must create an entry in the systems device database
that furnishes specific information for the terminals that will be used
on each ISI port. The database is referenced each time a user attempts
to log in. If there is no database entry for a particular terminal, access
to the host is denied.
1. Turn on your system and verify that the firmware for each ISIHP
loads successfully. If the firmware for a given ISIHP or ISIHI card
62
MultiModemISI Hybrid Server Cards, ISIHP & ISIHI Series
Software/Driver Installation (SCO Open Server)
does not load, none of its ports will be accessible. (If this happens,
see Multi-Techs Administrative Utility section in this manual.)
2. Type the complete name of the first device you want to create in
usr/lib/uucp/Devices. Substitute the specific base name,
board number, and port letter for the generic parameters in the
expression ttylbx. Use a lower-case x value for local DTE
(terminal) support and an upper case X value for modem control for
each port you want to enable. Example: ttyl2A denotes the
second ISI card (2) and the first port on that card (A). The port
status can be altered later, but one setting must be selected at this
time. The ACU line would read as follows:
ACU ttylbX - 9600 dialer name. Replace b, X and
dialer-name with appropriate values.
3. Repeat this process for each port on each board you have installed.
Record the setting you select for each port.
4. Using device names created in the previous section, type the
following command for each port you want to activate: enable
ttylbx
5. Repeat this command for each port you want to activate, using the
lower case letter for local terminal use or upper case for modem
control.
Note: Only one of the options (e.g., modem control or local
terminal access) should be enabled for any port at one time. For
example, you cannot enable ttyl1a and then enable ttyl1A.
To change the status of a port, disable the current status
(disable ttyl1a) and then enable it for the desired status
(enable ttyl1A).
Removing the Driver (SCO Open Server 5)
To remove the Multi-Tech Serial Card Driver, enter the configuration
utility (e.g., custom for SCO Open Server 5) and follow instructions to
remove the entire driver and rebuild the kernel without the ISI driver.
If it is necessary to reinstall the driver due to I/O address or IRQ
overlap, remove the driver first.
Note: Remove the driver before permanently removing the ISI card from the
computer.
MultiModemISI Hybrid Server Cards, ISIHP & ISIHI Series
63
Software/Driver Installation (Linux)
Linux Driver for Multi-Tech ISI Server Cards
(for PCI and ISA busses)
This is the standard installation procedure for Linux and is applicable
to all Linux operating systems of the correct kernel level (2.0, 2.2, or
2.4). The next major section of this manual, RedHat Linux 6.2/7.0
RPM Drivers for ISI Server Cards (PCI bus only), is an alternative
installation procedure applicable only to RedHat Linux 6.2 and 7.0
using the RedHat Package Management System (RPM). Note that
RedHat Linux versions 6.2 and 7.0 both use the Linux 2.2 kernel and
the applicable ISI driver can be installed using this standard
installation procedure, as well.
LINUX: Pre-Installation Issues
When unpacking the Linux driver, there are two choices, one driver
for the 2.0.x kernel (at this writing, it is filename L300_20X.TAR),
and one driver that works for both the 2.2.x kernel and the 2.4.x kernel
(at this writing, it is filename L305_22X_24X.TAR). Be absolutely
positive about which kernel you have! Note that updated driver files
may be issued from time to time.
The 'make' utility, GNU C compiler, and the kernel sources need to be
installed on your system. If any of these are missing, the compilation
will fail. Most later Linux OSs install these elements automatically .
LINUX: Copying the driver from the media
The Linux drivers (for 2.0 and 2.2/2.4 kernels) are shipped in
compressed (tarred) form on a CD-ROM formatted with the FAT file
system. In some cases, users may download Linux ISI drivers from
the MultiTech web site onto diskette (in ext2 format). We present
instructions for both situations below.
LINUX: Copying & untarring the driver from CD-ROM
1. Mount the CD-ROM using this command:
mount /mnt/cdrom
2. Change directory
cd /mnt/cdrom
64
MultiModemISI Hybrid Server Cards, ISIHP & ISIHI Series
Software/Driver Installation (Linux)
3. List the files on the CD-ROM and locate the directory for the kernel
in use (2.0 or 2.2/2.4), using this command
ls
4. Untar the appropriate Linux driver using this command:
>
tar vxf {filename}/isi
At this writing, the filename will be either L300_20X.tar (for 2.0
kernel) or L305_22X_24X.TAR (for 2.2/2.4 kernel).
LINUX: Copying & untarring the driver from a floppy
The ISI driver .tar file can be copied from a DOS formatted floppy
using the 'mcopy' command if the 'mtools' have been installed. Issue
'mcopy a:isilinux.tar <destination folder>' to
copy the isilinux.tar ( or current driver name) file to the destination
folder. As an alternative, the floppy can be manually mounted and the
file copied to the required destination folder.
NOTE: To read from a DOS formatted floppy, a kernel with support for the
FAT file system (either statically linked in the kernel or as modules) is
required.
Steps for copying the driver from a floppy:
1. Linux floppy disks are in ext2 format.
2. Insert Linux driver in drive A: and mount floppy drive.
> mount -t ext2 /dev/fd0 /mnt/floppy
3. Copy files from floppy to a temporary directory on hard drive.
> mkdir /isi
> cd /isi
> cp /mnt/floppy/kernel_2.2.x/*
/isi
After you have copied the installation tar file to a folder, use the
command 'tar xvf isilinux.tar' to untar (unzip or decompress) the installation files in that folder.
MultiModemISI Hybrid Server Cards, ISIHP & ISIHI Series
65
Software/Driver Installation (Linux)
LINUX: Driver installation and loading
Execute the 'Install' script to build the driver and to copy the driver
and firmware files to the required folder.
> cd /isi
> ./Install
For ISI cards with the ISA bus, the installation script requires the user
to type in the I/O address and the IRQ to be used. For ISI cards with
the PCI bus, simply press ENTER when asked for addresses and IRQs.
The installation creates the script file 'ISICOMStart' in the destination
folder. 'ISICOMStart' automates the loading process for the driver and
firmware.
To view busy I/O address space on your system, enter
cat/proc/ioports
To view busy IRQs, enter:
cat /proc/interrupts
You must load the driver before you can load the firmware. You can
load the driver manually using the 'insmod' utility. For ISI cards with
the ISA bus, the I/O base address and the IRQ required by the card
also need to be passed as parameters to insmod (this does not apply to
ISI cards with the PCI bus).
insmod isicom io=card1, ... card4 irq=card1,
... card4
The PCI cards and their configurations will be auto-detected by the
driver.
You can manually load the firmware into all of the installed ISI cards
simultaneously by executing the 'frmld' utility in the installation folder.
The firmware to all the installed cards can be manually loaded by
executing the 'firmld' utility in the installation folder. This utility
requires the firmware files (.bin) to be located in the /usr/local/
ISICOM/ folder.
66
MultiModemISI Hybrid Server Cards, ISIHP & ISIHI Series
Software/Driver Installation (Linux)
LINUX: Setting the baud rate
The 'stty' utility can be used to set the baud rate of a particular port.
For example, to set the baud rate of the first port on the first card
(ttyM1a) to 38400 bps, execute 'stty 38400 < /dev/
ttyM1a'.
The current baud rate can be viewed by executing 'stty < /dev/
ttyM1a'.
LINUX: Verifying the ports
Terminal utilities like 'minicom' can be used to verify the ports,
'talk' to the modem, and dial out.
To configure 'minicom' for a particular port, run it with the '-s'
option. In the 'serial port setup' menu option, set the serial device to
the required ISI port device (for example, '/dev/ttyM1a' for the first
port on the first card). Save the configuration for a particular port
using the 'save setup as' menu option as, for example, '1a' for the port
/dev/ttyM1a. To connect the next time to the port /dev/ttyM1a using
minicom, 'minicom 1a' needs to be executed.
LINUX: TTY Devices Created by the Drivers:
Device files corresponding to ports on the ISI card are created in
the /dev folder. Use ttyMxy for normal ports and cumxy for
corresponding callout ports. Normal ports (ttyM) are configured for
dial-in connections. Callout ports (cum) are used for dial-out
connections.
In these expressions (ttyMxy and cumxy), the letter x is the
card number (1-4), and y is the port designator (a, b, c, ...).
The ISI Linux driver creates the following TTY devices in /dev
directory:
- /dev/ttyM1a TO /dev/ttyM1p for the first ISI card
- /dev/ttyM2a TO /dev/ttyM2p for the second ISI card
- /dev/ttyM3a TO /dev/ttyM3p for the third ISI card
- /dev/ttyM4a TO /dev/ttyM4p for the fourth ISI card
MultiModemISI Hybrid Server Cards, ISIHP & ISIHI Series
67
Software/Driver Installation (Linux)
For 4-port cards, it uses the following:
- /dev/ttyM1a TO /dev/ttyM1d for the first ISI card
- /dev/ttyM2a TO /dev/ttyM2d for the second ISI card
- /dev/ttyM3a TO /dev/ttyM3d for the third ISI card
- /dev/ttyM4a TO /dev/ttyM4d for the fourth ISI card
For 8-port cards, it uses the following:
- /dev/ttyM1a TO /dev/ttyM1h for the first ISI card
- /dev/ttyM2a TO /dev/ttyM2h for the second ISI card
- /dev/ttyM3a TO /dev/ttyM3h for the third ISI card
- /dev/ttyM4a TO /dev/ttyM4h for the fourth ISI card
For 16-port cards, it uses the following:
- /dev/ttyM1a TO /dev/ttyM1p for the first ISI card
- /dev/ttyM2a TO /dev/ttyM2p for the second ISI card
- /dev/ttyM3a TO /dev/ttyM3p for the third ISI card
- /dev/ttyM4a TO /dev/ttyM4p for the fourth ISI card
The ISIHP-1S is a special case. It is treated as an 8-port card with
only four ports in use. As an example, consider an ISIHP-1S that is
the first expansion serial card in the computer. Ports ttyM1a and
ttyM1b are terminal adapter ports; ports ttyM1e and ttyM1f
are modem ports. Ports ttyM1c, ttyM1d, ttyM1g, and ttyM1h
are unused and can be allocated to a different purpose after the ISIHP1S installation is complete.
Devices mapped for Hybrid cards (ISIHI-xx and
ISIHP-xx cards):
For the 2-BRI hybrid cards (8 ports; ISIHI-2S/2U and ISIHP2S/2U)
68
MultiModemISI Hybrid Server Cards, ISIHP & ISIHI Series
Software/Driver Installation (Linux)
- /dev/ttyM1a to /dev/ttyM1d for ISDN ports. (These four
ports correspond to the total of four B-channels available on the two
BRI lines that can be connected to these cards.)
- /dev/ttyM1e to /dev/ttyM1h for modem ports. (These four
ports accommodate the total of four 56K modems that can operate on
the four B-channels available on the two BRI lines that can be
connected to these cards.)
For the 4-BRI hybrid cards (16 ports; ISIHP-4S/4U/4SD):
- /dev/ttyM1a to /dev/ttyM1h for ISDN ports. (These eight
ports correspond to the total of eight B-channels available on the four
BRI lines that can be connected to these cards.)
- /dev/ttyM1i to /dev/ttyM1p for modem ports. (For
the ISIHP-4S/4U, these eight ports accommodate the total of eight56K
modems that can operate on the eight B-channels available on the
four BRI lines that can be connected to these cards. Note, however,
that this device mapping for ttyM1i through ttyM1p does not apply to
the ISIHP-4SD. This is because the ISIHP-4SD works with ISDN
ports, or terminal adapter ports, only. The ISIHP-4SD contains no
modems in its circuitry.)
LINUX -- Dial-in configuration:
To configure a particular port for dial-in, utilities like 'mgetty' need to
be installed on the system. If, for example, the port /dev/ttyM2c needs
to be configured for a remote-access dial-in connection, an entry of the
form 'M2c:12345:respawn:/sbin/mgetty ttyM2c' needs to be added in
the /etc/inittab file. After you have made the change, execute 'init q' so
that the 'init' process re-reads the inittab file and spawns the mgetty
process to wait for an incoming connection. Users can then dial in, use
their user names and passwords to log in, and access their accounts on
the machine.
To disable dial-in access on a particular port, change the entry in the /
etc/inittab file to 'M2c:12345:off:/sbin/mgetty
ttyM2c'or just comment-out that entry by prefixing a '#' to the entry
on the line.
MultiModemISI Hybrid Server Cards, ISIHP & ISIHI Series
69
Software/Driver Installation (Linux)
LINUX -- PPP setup:
The 'PPP-HOWTO' (a document that is available as a part of the
'HOWTO' documentation on most of the distributions under /usr/doc/
HOWTO) explains in detail the procedure for configuring a Linux
machine as a PPP server. This information is also available at
http://www.interweft.com.au/other/ppp-howto/ppp-howto.html.
The documentation in the PPP-HOWTO is directly applicable to ISI
ports.
Note: A base I/O address of 0, e.g., ISIBaseX=oxo, or omission of
these parameters for any card X, disables that particular card.
Miscellaneous:
Device files corresponding to ports on the ISIHP cards are created in the /
dev folder. Use ttyMxy for normal ports and cumxy for
corresponding callout ports. The letter x is the card number (14), and y
is the port number, (ap) for 16-port cards.
Normal ports (ttyM) are configured for dial-in connections. Callout
ports (cum) are used for dial-out connections.
To view busy I/O address space on your system, enter:
cat /proc/ioports
To view busy IRQs, enter:
cat /proc/interrupts
To load the driver manually, use insmod.
Example: To load two ISI cards configured with base I/O addresses
0x210 and 0x200 and IRQs 5 and 10, enter the following in the
destination folder:
insmod isicom
ISIBase1=0x210
Irq1=5
ISIBase2=0x200
Irq2=10
70
MultiModemISI Hybrid Server Cards, ISIHP & ISIHI Series
Software/Driver Installation (Linux)
To remove the driver manually, enter rmmod isicom. This removes
the driver only if no ISI ports are in use.
Removing the ISI Driver (Linux)
1. Type cd /usr/local. Press ENTER.
2. Type rm -r ISICOM. Press ENTER.
3. This will remove driver for all ISIHx cards in that Linux server.
4. Remove the isictl file by typing rm isictl in the /dev directory.
5. Remove all devices that start with ttyM1x, ttyM2x, ttyM3x and
ttyM4x in the /dev directory.
rm ttyM1*
rm ttyM2*
rm ttyM3*
rm ttyM4*
MultiModemISI Hybrid Server Cards, ISIHP & ISIHI Series
71
Software/Driver Installation (Linux)
RedHat Linux 6.2/7.0 RPM Drivers for
ISI Server Cards (PCI bus only)
This installation procedure applies only to RedHat Linux versions 6.2
and 7.0 and only when used with ISIHP server cards, that is, those
with the PCI bus. The standard Linux installation procedure (Linux
Driver for Multi-Tech ISI Server Cards (for PCI and ISA busses))
still applies to all use of Linux in ISIHI and ISIHP server cards. (Note
that RedHat Linux versions 6.2 and 7.0 both use the Linux 2.2 version
kernel.)
LINUX-RPM: Pre-Installation Issues
The 'make' utility, GNU C compiler, and the kernel sources need to be
installed on your system. If any of these are missing, the compilation
will fail. Most later Linux OSs install these elements automatically .
LINUX-RPM: Copying the driver from the media
The RedHat Linux RPM drivers are on the ISI-Family Installation CDROM in separate directories, ServCard/Drivers/Linux/RPMS/70RPM
for version 7.0 and ServCard/Drivers/Linux/RPMS/62RPM for
version 6.2. In some cases, users may download RPM drivers from
the MultiTech web site onto diskette (in ext2 format). We present
instructions for both situations below.
LINUX-RPM: Copying the driver from CD-ROM
1. Mount the CD-ROM using this command:
mount -r /dev/cdrom /mnt/cdrom
2. Change directory
cd /mnt/cdrom
3. List the RPM files on the CD-ROM using this command:
ls
72
MultiModemISI Hybrid Server Cards, ISIHP & ISIHI Series
Software/Driver Installation (Linux)
LINUX-RPM: Copying the driver from a floppy
The ISI driver .rpm file can be copied from a DOS formatted floppy
using the 'mcopy' command if the 'mtools' have been installed.
For RPM version 6.2, issue the command
'mcopy a:isicom-1.1-3.src.rpm <destination
folder>' to copy the isicom-1.1-3.src.rpm ( or current driver name)
file to the destination folder.
For RPM version 7.0, issue the command
'mcopy a:isicom-1.2-3.src.rpm <destination
folder>' to copy the isicom-1.2-3.src.rpm ( or current driver name)
file to the destination folder.
As an alternative, the floppy can be manually mounted and the file
copied to the required destination folder.
NOTE: To read from a DOS formatted floppy, a kernel with support for the
FAT file system (either statically linked in the kernel or as modules)
is required.
Steps for copying the driver from a floppy:
1. Linux floppy disks are in ext2 format.
2. Insert Linux driver in drive A: and mount floppy drive.
> mount -t ext2 /dev/fd0 /mnt/floppy
3. Copy files from floppy to a temporary directory on hard drive.
> mkdir /isi
> cd /isi
4. The current isicom.o file should be backed up before installing the
RPM. The easiest way is simply to rename it or copy it into another
file. For example, cp (or mv) isicom.o isicom.original.
It is usually located in the /usr/local/ISICOM directory. For the
version 7 RPM, you will need to use the --force option in the RPM
command as in step 5b below.
MultiModemISI Hybrid Server Cards, ISIHP & ISIHI Series
73
Software/Driver Installation (Linux)
5a. For RPM version 6.2:
Copy the RPM to a temporary folder. In this example, well use /isi.
Installation is in three parts, building the isicom-smp.spec file from
the source file, then building the actual RPM from that spec file, and
finally, installing the RPM. Do not type the quotation marks shown in
the commands below.
- Run rpm -i /isi/isicom-1.1-3.src.rpm.
- Run rpm -ba /usr/src/redhat/SPECS/isicomsmp.spec.
- Run rpm -ihv /usr/src/redhat/RPMS/i386/isicom1.1-3.i386.rpm
- Reboot the system, either using the command init 6 <ENTER>
or your favorite method.
5b. For RPM version 7.0:
Copy the RPM to a temporary folder. In this example, well use /isi.
Installation is in three parts, building the isicom-smp.spec file from
the source file, then building the actual RPM from that spec file, and
finally, installing the RPM. Do not type the quotation marks shown in
the commands below. Replace the x below with the actual version
numbers being used.
- Run rpm -i /isi/isicom-1.2-3.src.rpm.
- Run rpm -ba /usr/src/redhat/SPECS/isicomrh7.spec.
- Run rpm -ihv --force /usr/src/redhat/RPMS/
i386/isicom-1.2-3.i386.rpm.
- Reboot the system, using either the command init 6 <ENTER>
or your favorite method.
74
MultiModemISI Hybrid Server Cards, ISIHP & ISIHI Series
Software/Driver Installation (Linux)
LINUX-RPM: Verifying the ports
To test the installation, you can use the terminal program minicom.
Use the command minicom -s to set up the tty port that you will use
to communicate.
1. In the Configuration window, select Serial Port Setup.
2. Select A to set the Serial Device (for example, /dev/ttyM1a).
3. Select E to set the baud rate.
4. Press Escape (Esc) to exit.
5. Select Exit to communicate with the port.
6. Issue AT commands and make sure it returns OK.
LINUX-RPM: TTY Devices Created by the Drivers
Device files corresponding to ports on the ISI card are created in
the /dev folder. Use ttyMxy for normal ports. Normal ports
(ttyM) are configured for dial-in connections.
In these expressions (ttyMxy), the letter x is the card number (14), and y is the port designator (a, b, c, ...).
The ISI Linux driver creates the following TTY devices in /dev
directory:
- /dev/ttyM1a TO /dev/ttyM1p for the first ISI card
- /dev/ttyM2a TO /dev/ttyM2p for the second ISI card
- /dev/ttyM3a TO /dev/ttyM3p for the third ISI card
- /dev/ttyM4a TO /dev/ttyM4p for the fourth ISI card
For 4-port cards, it uses the following:
- /dev/ttyM1a TO /dev/ttyM1d for the first ISI card
- /dev/ttyM2a TO /dev/ttyM2d for the second ISI card
- /dev/ttyM3a TO /dev/ttyM3d for the third ISI card
- /dev/ttyM4a TO /dev/ttyM4d for the fourth ISI card
MultiModemISI Hybrid Server Cards, ISIHP & ISIHI Series
75
Software/Driver Installation (Linux)
For 8-port cards, it uses the following:
- /dev/ttyM1a TO /dev/ttyM1h for the first ISI card
- /dev/ttyM2a TO /dev/ttyM2h for the second ISI card
- /dev/ttyM3a TO /dev/ttyM3h for the third ISI card
- /dev/ttyM4a TO /dev/ttyM4h for the fourth ISI card
For 16-port cards, it uses the following:
- /dev/ttyM1a TO /dev/ttyM1p for the first ISI card
- /dev/ttyM2a TO /dev/ttyM2p for the second ISI card
- /dev/ttyM3a TO /dev/ttyM3p for the third ISI card
- /dev/ttyM4a TO /dev/ttyM4p for the fourth ISI card
The ISIHP-1S is a special case. It is treated as an 8-port card with
only four ports in use. As an example, consider an ISIHP-1S that is
the first expansion serial card in the computer. Ports ttyM1a and
ttyM1b are terminal adapter ports; ports ttyM1e and ttyM1f are
modem ports. Ports ttyM1c, ttyM1d, ttyM1g, and ttyM1h are
unused and can be allocated to a different purpose after the ISIHP-1S
installation is complete.
Devices mapped for Hybrid cards (ISIHP-xx cards):
For the 2-BRI hybrid cards with PCI bus (8 ports; ISIHP-2S/2U)
- /dev/ttyM1a to /dev/ttyM1d for ISDN ports. (These four
ports correspond to the total of four B-channels available on the two
BRI lines that can be connected to these cards.)
- /dev/ttyM1e to /dev/ttyM1h for modem ports. (These four
ports accommodate the total of four 56K modems that can operate on
the four B-channels available on the two BRI lines that can be
connected to these cards.)
76
MultiModemISI Hybrid Server Cards, ISIHP & ISIHI Series
Software/Driver Installation (Linux)
For the 4-BRI hybrid cards (16 ports; ISIHP-4S/4U/4SD):
- /dev/ttyM1a to /dev/ttyM1h for ISDN ports. (These eight
ports correspond to the total of eight B-channels available on the four
BRI lines that can be connected to these cards.)
- /dev/ttyM1i to /dev/ttyM1p for modem ports. (For
the ISIHP-4S/4U, these eight ports accommodate the total of eight56K
modems that can operate on the eight B-channels available on the
four BRI lines that can be connected to these cards. Note, however,
that this device mapping for ttyM1i through ttyM1p does not
apply to the ISIHP-4SD. This is because the ISIHP-4SD works with
ISDN ports, or terminal adapter ports, only. The ISIHP-4SD contains
no modems in its circuitry.)
LINUX-RPM -- Dial-in configuration:
To configure a particular port for dial-in, utilities like 'mgetty' need to
be installed on the system. If, for example, the port /dev/ttyM2c needs
to be configured for a remote-access dial-in connection, an entry of the
form 'M2c:12345:respawn:/sbin/mgetty ttyM2c /dev/
ttyM2c' needs to be added in the /etc/inittab file. After you have
made the change, execute 'init q' so that the 'init' process re-reads the
inittab file and spawns the mgetty process to wait for an incoming
connection. Users can then dial in, use their user names and passwords
to log in, and access their accounts on the machine.
To disable dial-in access on a particular port, change the entry in the /
etc/inittab file to 'M2c:12345:off:/sbin/mgetty ttyM2c'or
just comment-out that entry by prefixing a '#' to the entry on the line.
LINUX-RPM -- PPP setup:
The 'PPP-HOWTO' (a document that is available as a part of the
'HOWTO' documentation on most of the distributions under /usr/doc/
HOWTO) explains in detail the procedure for configuring a Linux
machine as a PPP server. This information is also available at
http://www.interweft.com.au/other/ppp-howto/ppp-howto.html.
The documentation in the PPP-HOWTO is directly applicable to ISI
ports.
MultiModemISI Hybrid Server Cards, ISIHP & ISIHI Series
77
Flash Firmware for TA Ports
Removing the ISI Driver (Linux-RPM)
1. To remove the ISI driver, type rpm -e isicom
If more than one instance of the isicom file exists in the system, an
error message will be returned. To resolve this, type rpm -q isicom.
Press ENTER. All isicom RPM modules will be listed. Decide
which of these files you want to delete. Then type rpm -e
filename to delete those files.
Warning About the Flashing of Terminal
Adapter Ports
New versions of firmware for the TA ports on the ISIHI or ISIHP card
are issued from time to time. When new TA-port firmware is issued,
that code must be "flashed" into the ISIHP/ISIHI card. If the
"Flashpro" program is used to flash new firmware versions, the user
should flash odd-numbered TA ports only.
For each odd-numbered port selected, the program will flash an odd/
even pair of ports (that is, both B-channels of the ISDN connection are
flashed on a single command). So, when COM3 is selected to be
flashed, COM4 will also be flashed. There is no need to flash the even
numbered ports separately. In fact, attempting to flash odd and even
TA ports separately will result in damage to the software that can be
repaired only by sending the ISI card back to MultiTech for repairs.
The correct flashing procedure is presented below.
Firmware Update for ISIHx Terminal Adapters
1. Run FlashPro from the DOS command prompt. Type flashpro -f m and press ENTER.
2. Using the arrow keys, select Configure in the Main Menu and press
ENTER.
3. Select the Active Port value in the Configuration menu and press
ENTER.
4. Select ISI608/ISI4608/PCI and press ENTER.
78
MultiModemISI Hybrid Server Cards, ISIHP & ISIHI Series
Flash Firmware for TA Ports
5. Select the Baud Rate value in the Configuration menu and press
ENTER.
6. Select 115200 and press ENTER.
7. Select the Device Type value in the Configuration menu and press
ENTER.
8. Select MODEMFILE and press ENTER.
9. Select the Base-Address-for-Port value in the Configuration menu
and press ENTER.
10. Type the base address for the ISI card and press ENTER.
11. Select IRQ Number value in Configuration menu and press
ENTER.
12. Specify the IRQ number for the ISI card and press ENTER.
13. Select the ISI-Port-Number value in the Configuration menu and
press ENTER.
14. Type 1 and press ENTER.
15. Press Escape to back out to the Main Menu.
16. Highlight Select-File-to-Program in the Main Menu and press
ENTER.
17. Select the terminal adapter hex file needed for this ISI card. Then
press ENTER.
18. Select Program Firmware in the Main Menu and press ENTER.
19. Wait until the programming of the terminal adapter is complete.
20. Select Configure in the Main Menu and press ENTER.
21. Select the ISI-port-number value in the Configuration menu and
press ENTER.
22. Type 3 and press ENTER.
23. Press Escape to back out to the Main Menu.
24. Highlight Select file to Program in the Main Menu and press
ENTER.
MultiModemISI Hybrid Server Cards, ISIHP & ISIHI Series
79
Software/Driver Installation (Linux)
25. Select the terminal adapter hex file needed for this ISI card. Then
press ENTER.
26. Select Program Firmware in the Main Menu and press ENTER.
27. Wait until the programming of the terminal adapter is complete.
28. For ISIHP-4S/4U/4SD, repeat steps 22-27 two more times, typing
5 on the first repetition and typing 7 on the second repetition.
29. Hit Escape to exit from FlashPro. (Select Yes when asked whether
to Save Changes to Disk? Then press ENTER.)
The terminal adapters on the ISI card are now updated with the new
firmware.
80
MultiModemISI Hybrid Server Cards, ISIHP & ISIHI Series
Warranty and Service Information
Chapter 4:
Warranty & Service Information
Limited Warranty
Multi-Tech Systems, Inc. (MTS) warrants that its products will be free from
defects in material or workmanship for a period of two years from the date
of purchase, or if proof of purchase is not provided, two years from date of
shipment. MTS MAKES NO OTHER WARRANTY, EXPRESSED OR
IMPLIED, AND ALL IMPLIED WARRANTIES OF
MERCHANTABILITY AND FITNESS FOR A PARTICULAR PURPOSE
ARE HEREBY DISCLAIMED. This warranty does not apply to any
products which have been damaged by lightning storms, water, or power
surges or which have been neglected, altered, abused, used for a purpose
other than the one for which they were manufactured, repaired by the
customer or any party without MTSs written authorization, or used in any
manner inconsistent with MTSs instructions.
MTSs entire obligation under this warranty shall be limited (at MTSs
option) to repair or replacement of any products which prove to be
defective within the warranty period, or, at MTSs option, issuance of a
refund of the purchase price. Defective products must be returned by
Customer to MTSs factory transportation prepaid.
MTS WILL NOT BE LIABLE FOR CONSEQUENTIAL DAMAGES
AND UNDER NO CIRCUMSTANCES WILL ITS LIABILITY EXCEED
THE PURCHASE PRICE FOR DEFECTIVE PRODUCTS.
Upgrades and Support
You can access updated versions of firmware, drivers, flash utility
programs and other software-related support for ISIHP server cards
via the MultiTech web site and/or the MultiTech FTP site.
www.multitech.com. Go to Support page. Drivers, software, and
firmware are available here. Follow links for manuals,
replacements, our warranty, and access to our FTP site.
ftp://ftp.multitech.com. ISI Cards have their own directory.
MultiModemISI Hybrid Server Cards, ISIHP & ISIHI Series
81
Warranty and Service Information
Service
Multi-Tech has an excellent technical support staff available to help
you get the most out of your Multi-Tech product. If you have any
questions about the operation of this product, call Technical Support
at (800) 972-2439. Model and serial numbers are located on the
Multi-Tech label on the component side of the ISIHP. To display the
firmware version, type ATI1 in terminal mode. Software versions are
printed on the diskette labels. Before calling Technical Support, note
the status of your equipment, including screen messages, diagnostic
test results, problems with a specific application, etc.
82
MultiModemISI Hybrid Server Cards, ISIHP & ISIHI Series
Index
activating ports in SCO 63
AT commands 47
Auto-Protocol Callback
description 13
ConfigMenu 47, 52
ISDN Configuraiton Utility 50
ISDN Configuration Utility 47
ports
in Netware 55
connecting
to ISDN wall jack 19
Contents, package 12
B
E
Basic Rate Interface (BRI) 9
"broken" ports in Netware
explanation, ISIHP-1S 55
explanation, ISIHP-4SD 55
enabling ports in SCO 63
Index
A
C
COM ports
installing modems to
in Linux 68
in Linux RPM 76
in Netware 55
in SCO 62
in Windows 2000 30
in Windows NT 42
installing TAs to
in Linux 68
in Linux RPM 76
in Netware 55
in SCO 62
in Windows 2000 31
in Windows NT 40, 42
ConfigMenu 47
Call Control Configuration Menu 53
Data Protocol Menu 53
Help Menu 53
menus 53
Network Configuration Menu 53
Port Control Configuration Menu 53
Stored Numbers Menu 53
configuration
AT commands 47, 53
F
firmware update
ISI terminal adapters 78
FlashPro
and TA firmware updates 78
G
GSM
and V110 13
H
hardware
computer requirements 16
installation 17
hardware installation
introduction 16
I
I/O address
and ISIHI cards 46
in Linux 70
ISIHI in Linux 66
ISIHI in Windows 2000 26
ISIHI in Windows NT 38
MultiModemISI Hybrid Server Cards, ISIHP & ISIHI Series
83
install modems to COM ports
in Linux 68
in Linux RPM 76
in Netware 55
in SCO 62, 63
in Windows 2000 30
in Windows NT 40
install TAs to COM ports
in Linux 68
in Linux RPM 76
in Netware 55
in SCO 62
in Windows 2000 30
in Windows NT 40
installation
activating ports
in SCO Open Server 5 62
hardware 17
modems to COM ports
in Netware 55
in SCO 62
in Windows 2000 30
in Windows NT 42
Linux 68
Linux RPM 76
software/drivers
in Linux 65
in SCO Open Server 5 56
in Windows 2000 26
terminal adapters to COM ports
in Linux 68
in Linux RPM 76
in Netware 55
in SCO 62
in Windows 2000 30
in Windows NT 40
installation, ISI Management Software
29
installation, ISIHI driver
in Linux 65
in Netware 55
in SCO 56
in Windows 2000 26
installation, ISIHP driver
in Linux 65
in Netware 55
in SCO 56
in Windows 2000 28
installing modems to COM ports
SCO. See port activation: SCO
installing TAs to COM ports
SCO. See port activation: SCO
IRQ values
and ISIHI cards 46
in Linux 70
in Netware 55
ISIHI in Linux 66
ISIHI in Windows 2000 26
ISIHI in Windows NT 38
ISDN Configuration Utility 47
ISDN line 10, 12
ISDN protocols
descriptions 13
menu selections
Windows NT 40
ISI Management Software
description 9
installation 29
ISIHI install
in Linux 65
in Netware 54
in Windows 2000 26
in Windows NT 37
Index
ISIHP install
in Linux 65
in Netware 54
in Windows 2000 28
in Windows NT 37
ISIHP-1S
special modem/TA install instructions
Linux 68
Linux RPM 76
Netware 55
SCO 60
Windows 2000 36
Windows NT 43
ISIHP-4SD
special modem/TA install instructions
Linux 69
Linux RPM 77
Netware 55
SCO 60
Windows NT 41
ISIHx model distinctions 7
K
kernel versions, Linux 64
L
LED indicators 20
Linux, install in 64
Linux, RedHat RPM drivers,
applicability (PCI cards only) 72
install 72
Linux RPM,
removing driver 78
M
modem/TA install
Linux 67
Linux RPM 75
Netware 55
SCO 62
special instructions for ISIHP-1S
Linux 68
Linux RPM 76
Netware 55
SCO 60
Windows 2000 36
Windows NT 41
special instructions for ISIHP-4SD
Linux 69
Linux RPM 77
Netware 55
SCO 60
Windows NT 41, 42
Windows 2000 30
Windows NT 40
modems
activating ports
SCO 62
installing to COM ports
Linux 68
Linux RPM 76
Netware 55
SCO 62
Windows NT 42
mounting bracket 20
MultiModemISI Hybrid Series
introduction 7
P
package contents 12
packet switching
and X.75 13
port activation
SCO 62
port allocation
Linux 67
Linux RPM 75
Netware 55
SCO 60
Windows NT 38
MultiModemISI Hybrid Server Cards, ISIHP & ISIHI Series
85
Index
PPP async
description 13
PPP, info for Linux 70
PPP, info for Linux RPM 77
PPP protocol
description 49
R
removing
software/driver
Linux 71
Linux RPM 78
Netware 55
SCO 63
Windows 2000 37
Windows NT 46
removing driver,
Linux RPM 78
S
S Interface 7, 20
safety warnings 17
SCO driver installation
detailed form 59
from CD-ROM 56
from diskette 58
terse form 56, 58
SCO Open Server 5
install in 56
service 82
shipping contents 16
special modem/TA install instructions
ISIHP-1S
Linux 68
Linux RPM 76
Netware 55
SCO 60
Windows 2000 36
Windows NT 40, 42
86
ISIHP-4SD
Linux 69
Linux RPM 77
Netware 55
SCO 60
Windows NT 41
SPIDs 51
T
TA port install
Linux 67
Linux RPM 75
Netware 55
SCO 62
special instructions for ISIHP-1S
Linux 68
Linux RPM 76
Netware 55
SCO 60
Windows 2000 36
Windows NT 43
special instructions for ISIHP-4SD
Linux 69
Linux RPM 77
Netware 55
SCO 60
Windows NT 41
Windows 2000 30
Windows NT 40
terminal adapters
activating ports in SCO 62
configuring 47
installing to COM ports
Linux 68
Linux RPM 76
Netware 55
SCO 62
Windows 2000 31
Windows NT 40
MultiModemISI Hybrid Server Cards, ISIHP & ISIHI Series
Index
U
U Interface 7
uninstall ISI driver
Linux 71
Linux RPM 78
Netware 55
SCO 63
Windows 2000 37
Windows NT 46
V
V.110
and GSM 13
description 13, 49
V.120
description 13, 49
W
Windows 2000
ISIHI install 26
ISIHP install 28
modem/TA install 30
uninstall driver 37
Windows NT
ISIHI install 37
ISIHP install 37
modem/TA install 40
uninstall driver 46
X
X.75
and packet switching 13
description 13, 50
MultiModemISI Hybrid Server Cards, ISIHP & ISIHI Series
87
82083804