1
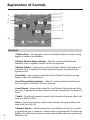
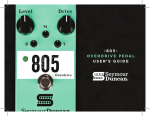
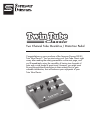
Two Channel Tube Overdrive / Distortion Pedal
Congratulations on your purchase of the Seymour Duncan SFX-03
Twin Tube Classic™. You can start using your Twin Tube Classic right
away after reading the safety precautions on the next page, and
youʼll immediately enjoy the versatility of having two channels of
gain and a wide range of great tones. However, you might want
to read through these instructions in their entirety first, to gain
valuable information, that will enhance your enjoyment of your
Twin Tube Classic.
SFX-03
1
Safety Precautions
Hazardous voltages are present. For your protection, and to reduce the risk
of electric shock and danger to personal health, please observe the following
safety precautions when setting up and using your Twin Tube Classic. Most of
this is common sense, but please read it anyway.
Your Twin Tube Classic is designed to work with typical power systems utilizing
a three-prong outlet. To reduce the risk of electric shock, do not plug your
Twin Tube Classic into any other type of power system. Contact your facilities
manager or a qualified electrician if you are not sure what type of power is
supplied to your building or performance stage. Do not use your Twin Tube
Classic with amplifiers or other gear that has two prong AC plugs. Do not
overload wall outlets, extension cords, or multiple power strips as this can result
in a risk of fire or electric shock.
Never open the chassis. Do not attempt to tamper with or service your Twin Tube
Classic yourself. Youʼre just asking for trouble. Opening or removing the cover
may expose you to dangerous voltage or other hazards, which could result
in serious injury or death – not to mention damage to the Twin Tube Classic.
Wouldnʼt that suck? Refer all servicing to qualified service personnel.
Do not block or cover the side vents on your Twin Tube Classic. Never push
objects of any kind through openings in the equipment. No drummer jokes,
please. Dangerous voltages may be present. Conductive foreign objects could
produce a short circuit that could cause fire, electric shock, or damage to your
Twin Tube Classic.
Never place a Twin Tube Classic near a radiator or heat register. Failure to
follow these guidelines can cause overheating and affect the reliability of your
Twin Tube Classic.
Unplug your Twin Tube Classic from the wall outlet before cleaning. Do not use
liquid cleaners or aerosol cleaners. Use a damp cloth for cleaning.
Do not use your Twin Tube Classic near water - for example, near a bathtub,
washbowl, kitchen sink, or laundry tub; in a wet basement; near a swimming
pool; on stage with water effects or precipitation; and the like. Do not expose
the Twin Tube Classic to dripping or splashing liquids and do not place objects
filled with liquid on or near your Twin Tube Classic (yes, unfortunately, this
includes bottled malt beverage liquids). And for heaven sakes, donʼt use it while
youʼre sitting on the can… OK, enough of that.
2
General Information
The Twin Tube Classic is designed for years of solid performance. One of the
secrets is the duet of type 6021 tubes. These sub-miniature dual triodes represent
the pinnacle of tube technology advancement. The 6021s were designed and
manufactured to meet the MIL-E-1 spec for reliability under conditions of severe
shock, vibration and temperature. They provide extremely long service life with
virtually no tendency towards microphonics (see USA Department of Defense
Standards, Test Methods for Electron Tubes). Also, unlike some “tube” stomp
boxes that only use the tubes as a clipping diode, the Twin Tube Classic employs
a 100% vacuum tube signal path with a high voltage power supply. This allows
the tubes to operate to their fullest potential and provides the most gain and the
smoothest tone. The result is the classic tube sound, smooth distortion, and low
order harmonics you expect from a great tube preamp.
Tube Life
The 6021 tubes will typically last many times longer than even the best 12AX7s.
For most Twin Tube Classic owners, this means youʼll never have to change your
tubes. However, nothing lasts forever. Should you find your Twin Tube Classic in
need of new tubes (e.g., exhibiting erratically fluctuating signal levels, spurious
increases in noise, sputtering, low-level whistling, extreme loss in frequency
response), contact Seymour Duncan or your favorite authorized Seymour
Duncan dealer for your options. Do not try changing the tubes yourself.
Changing tubes on the Twin Tube Classic is more complicated than plugging pins
into a socket and could be dangerous. Make sure a professional does the work.
Two channels means versatility. When coupled with (true) bypass, this effectively
provides three channels: Rhythm, Lead and bypass. Separate gain and volume
controls allow Lead and Rhythm Channel levels to be independently set. The
meticulous internal layout minimizes cross coupling and unwanted circuit
interactions that can be a major problem in high-gain / high-impedance vacuum
tube circuits.
3
Explanation of Controls
3
11
2
7
1
8
6
5
4
9
10
Top Panel
1 Rhythm Gain – Inter-stage gain control for the Rhythm Channel. Provides varying
degrees of overdrive and saturation.
2 Rhythm Channel Status Indicator – When lit, it indicates that the Rhythm
Channel is active or staged for activation if the unit is bypassed.
3 Rhythm Volume – Master volume control for Rhythm Channel. Positioned at end
of the gain chain, it regulates the loudness relative to the other channel and to the
bypassed sound.
4 Lead Gain – Inter-stage gain control for the Lead Channel. Provides for varying
degrees of distortion and saturation.
5 Lead Channel Status Indicator – When lit, it indicates that the Lead Channel is
active or staged for activation if the unit is bypassed.
6 Lead Volume – Master volume control for Lead Channel. Positioned at end of the
gain chain, it regulates the loudness relative to the other channel and to the bypassed
sound.
7 Treble – Controls high frequency content in both channels with greatest effect in the
range of 2 KHz to 20 KHz.
8 Bass – Controls low frequency content in both channels with greatest effect in the
range of 40 Hz to 200 Hz.
4
9 Channel Selector – Selects between the Lead and Rhythm channels. It is possible
to pre-select the gain or volume for a channel when in bypassed mode. This allows the
flexibility of transitioning from bypass to either channel without having to step through
different sounds.
Explanation of Controls
10 On/Bypass Selector – Selects between true bypass and whichever channel has
been selected by the Channel button.
11 On/Bypass Status Indicator – When lit, it indicates that the Twin Tube Classic is
engaged and operational. When dark, it indicates that the unit is in bypass mode and
that the guitar signal is passing straight through unaltered.
1
2
3
Back Panel
1 Input Jack – Plug your guitar in here.
2 Output Jack – Provides the output signal. Connect to the input of a guitar amp,
power amp or other device here.
3 Power Jack – This is where you connect the provided wall-mounted power supply
(“wall wart”) to the Twin Tube Classic. Note: it is a 16 VAC/600mA unit. Do not try
to substitute a DC power supply or another AC supply with a different
voltage value or current rating. If you lose your transformer or if it breaks,
contact an authorized Seymour Duncan dealer for a replacement. As an alternative,
for North America and Japan, you can order a 16 VAC/600mA transformer from
Digi-Key (www.digikey.com). The part numbers for each common voltage are as
follows:
1. North America: 120 Volt/60Hz – Digi-Key part # MT7123-ND
2. Europe and Asia: 230 Volt/50Hz – Seymour Duncan part # 352301-230 (no
known off-the-shelf replacements available)
3. Japan Only: 100 Volt/50Hz – Digi-Key part # MT7127-ND (note: this transformer
is rated by the manufacturer as 20 Volt/450mA output with 120 Volt input, but will
produce the proper output voltage and current when coupled to a 100 Volt mains
supply)
5
Explanation of Controls
You may be wondering why the Twin Tube Classic uses a 16-volt AC transformer
instead of a common 9-volt DC adaptor or even a battery. The Twin Tube Classic
relies on an internal transformer to obtain the high voltage the dual triodes
require. The transformer cannot work on DC voltage. One alternative would be
to run the tubes on low voltage in “starved plate mode.” Here, the tubes are used
like a clipping diode and do not actually amplify. Though starved plate voltage is
used in some inexpensive tube stomp boxes, it is not true tube amplification. The
circuitry in the Twin Tube Classic enables the tubes to work like the tubes in the
preamp section of a high-quality tube amplifier. Another alternative would be to
supply a dedicated AC power cord and an internal high voltage transformer or a
DC-to-DC switching converter. However, these options would make the Twin Tube
Classic larger, heavier and more costly. With the Twin Tube Classic you are getting
true tube tone AND tube amplification with minimal size, weight and cost.
6
Basic Operation
The ¼” mono instrument cable that leaves your guitarʼs jack plugs into the Twin
Tube Classicʼs jack marked “Input.” The cable that exits from the “Output” jack on
the Twin Tube Classic goes to the next effect in the signal chain, or to the amplifier.
When first activating the Twin Tube Classic, start with the Rhythm Channel Volume
and Gain control knobs in the full counter-clockwise position. Then, start rotating
the knobs clockwise until the desired volume level and overdrive are achieved.
Next, with the Lead Channel Volume and Gain control knobs in the full counterclockwise position, depress the Channel Selector switch. This mutes the Rhythm
Channel and activates the Lead Channel. As with the Rhythm Channel, start
rotating the knobs clockwise until the desired volume level and distortion are
achieved, relative to the Rhythm Channel and to the bypassed sound of the Twin
Tube Classic.
Experiment with different Volume and Gain settings. Some of the coolest tones
are achieved with a little discovery. Because of the Twin Tube Classicʼs incredible
amount of gain and distortion in the Lead Channel, be aware that extreme settings
can result in uncontrollable feedback. And, as always, musicians and audience
members are best advised to use ear protection when exposed to loud volume.
Here are some sample settings to get your started:
Classic/Straight-Ahead Rock n’ Roll Tone
Three Channel Setup
Channel #1: (Bypass mode) Amplifierʼs clean tone.
Channel #2: Twin Tube Classic rhythm channel (dirty rhythm).
Channel #3: Twin Tube Classic lead channel (dirty lead tone)
Rhythm
Tone
vol
bass
treble
gain
Lead
vol
gain
7
Basic Operation
Hard Rock Tone
Three-Channel Setup
Channel #1: (Bypass mode) Amplifierʼs clean tone.
Channel #2: Twin Tube Classic rhythm channel (dirty rhythm tone)
Channel #3: Twin Tube Classic lead channel (dirty lead tone)
Rhythm
Tone
vol
bass
treble
gain
Lead
vol
gain
Three Channels of Distortion
Channel #1: (Bypass mode) Amplifier set for slightly dirty rhythm tone.
Channel #2: Twin Tube Classic rhythm channel adds overdrive.
Channel #3: Twin Tube Classic lead channel adds higher saturation
for leads.
Rhythm
Tone
vol
bass
8
treble
gain
Lead
vol
gain
Basic Operation
Two-Channel Setup
(Amp is set clean)
Channel #1: Twin Tube Classic rhythm channel set for clean tone.
Channel #2: Twin Tube Classic lead channel set for moderate
distortion.
Rhythm
Tone
vol
bass
gain
Lead
treble
vol
gain
9
Detailed Step-By-Step Instructions
1. Plug in the cable of the provided 16 VAC power supply to the distortion box
then plug the “wall wart” end into a 120V wall outlet or power strip (or voltage
applicable for your country). You should see the green LED on the Rhythm channel
light up. All other status indicators will be dark. When first powered up, the Twin
Tube Classic will always default to bypassed mode with the Rhythm channel
staged in waiting mode.
2. Turn both Master Volumes fully down (counter-clockwise). Set the Bass and
Treble controls at 12 oʼclock.
3. Connect a good quality, shielded ¼” cable from the output jack to the input of
your amplifier.
4. Connect another good quality, shielded ¼” cable, first to the output jack on
your guitar, and then to the input jack of the Twin Tube Classic. Note that the tubes
in the Twin Tube Classic may require two to three minutes to warm up and begin to
produce sound.
5. Press the “On/Bypass” button to activate the Rhythm Channel. Turn the Gain
control up about half way. Slowly turn the Master Volume up as you pluck a string.
Fine-tune the Gain setting to achieve the level of overdrive and saturation you
want. Set the Master to achieve the playing volume you want.
6. Press the “Channel Select” button to switch to the Lead Channel. Repeat the
previous process of setting up the Gain and Master Volumes.
7. Adjust the Bass and Treble controls as desired. Note that they influence both
channels. We have “pre-voiced” the two channels to provide what we feel is a
balanced tone when switching from Lead Channel to Rhythm Channel and to
facilitate using one common set of tone controls.
8. Balance your wet to dry levels by working with the Volume control(s) on your
amp and the Master Volumes on the distortion box.
9. Never open the chassis. There are no user serviceable parts inside and
tampering with the high voltage tube circuits could result in serious injury or death
– not to mention damage to the unit.
10
Specifications
Description – The SFX-03 is a two-channel guitar preamp employing premium
subminiature type 6021 vacuum tubes. The 6021 is manufactured to meet the
stringent MIL-E-1 specification for reliability and is optimized to provide long
service life under conditions of severe shock, vibration, high temperature, and high
altitude. The tubes are configured with a high-voltage power supply for maximum
dynamic range. True-bypass capabilities are provided to allow uncolored feedthrough.
Gain
• Before level compensation
Rhythm channel – 74dB
Lead channel – 98dB
• After level compensation
Rhythm channel – 52dB
Lead channel – 76dB
(Gain measured at 500Hz).
Nominal output level
•Rhythm channel – 0.4 Vrms (-5dBu)
•Lead channel – 0.5 Vrms (-4dBu)
(Nom. output level measured with 100mV 500Hz input signal and all
controls set to 12 oʼclock).
Max. output level before clipping – 2 Vrms (+8dBu)
(Max. output measured with all controls set fully up).
THD @ 1 Volt RMS output – 3%
Harmonic spectrum @ 1Vo – predominantly 2nd harmonic with minor amounts
of 3rd harmonic @ > 20dB below.
Noise @ output
• Rhythm channel - < 3 mV (< 3 dB hum content)
•Lead channel - < 10 mV (< 3 dB hum content)
(Noise measured with all controls set fully up and input shorted).
Power consumption – 10.4 W
External dimensions – 7.50 X 6.62 X 1.96 in. (190 X 168 X 50 mm)
Weight – 3.15 lbs. (1.43KG)
11
Limited Warranty
Seymour Duncan offers the original purchaser a one-year limited warranty on both labor
and materials (except tubes) starting from the day this product is purchased from an
Authorized Seymour Duncan Dealer. The warranty on the tubes is 90 days. We will repair
or replace this product, at our option, if it fails due to faulty workmanship or materials
during this period. Defective products should be returned to your USA dealer, international
distributor, or sent direct to our factory postage prepaid along with dated proof of purchase
(e.g., original store receipt) and a RMA number clearly written on the outside of the box.
Please call our factory for issuance of an RMA number.
This warranty does not apply to damage to this product or an instrument caused by misuse,
mishandling, accident, abuse, alteration, modification or unauthorized repairs. Product
appearance and normal wear and tear (worn pain, scratches, etc.) are not covered by this
warranty. Seymour Duncan reserves the right to be the sole arbiter as to the misuse or abuse
of this product. Seymour Duncan assumes no liability for any incidental or consequential
damages, which may result from the failure of this product. Any warranties implied in fact or
by law are limited to the duration of this express limited warranty.
Designed and Distributed by:
Seymour Duncan / Basslines
5427 Hollister Ave.
Santa Barbara, CA 93111-2345 USA
tel: 805-964-9610
fax: 805-964-9749
www.seymourduncan.com
12
PN: 501055-110 Rev B
The SFX-03 is made in China. Designed and tested in USA. Printed in China. © 2006