1
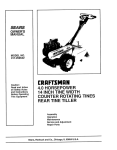
MOWER
Model
INSTRUCTION
BOOK20646x9A
This Instruction Book contains information for several models.
Read and keep this book for future reference.
This book contains important informationon
SAFETY,ASSEMBLY, OPERATION,AND MAINTENANCE.
PRODUCTINFORMATION
The owner must be certain that all
the product Information Is Included with the unit.
This Information Includes
the INSTRUCTION BOOKS,
the REPLACEMENT PARTS and the WARRANTIES.
This Information must be Included to make sure state laws
and other laws are followed.
,.MI
RECORDTHE FOLLOWINGINFORMATION
ABOUTYOURUNIT.
THISINFORMATIONISNECESSARYWHENORDERINGPARTS
OR IN CASEOF LOSSORTHEFT.
WHERE
PURCHASFn:
DATE
PURCHASED:
M_nth
Day
Year.,
MODEL
NO.:
DATE
OFMANUFACTURE:,
F-98534
BUILT IN "n-iE
t--I_A
MURRAY,
INC. Two Year Limited Warranty
Murray, Inc. warrants to the odginal purchaser that this unit shall be free from defects in material and workmanship under normal use and service for a pedod of Two (2) Years from
the date of purchase; however, this warranty does not cover engines, accessories (such as
snow blowers, snow blades, grass baggers and plows), transmissions, batteries and Norreal Wear Parts (except as noted below) or transaxles as the companies that manufacture
these items furnish their own warranfies and provide service through their authorized field
service facilities. For additional information, see the warranties covering these particular
parts. If you are uncertain whether your unit contains or is equipped w_ one or more of
these parts, consult your dealer prior to purchase. Subject to the terms and conditions noted
in this Limited Warranty, we shall, at our option, repair or replace at no cost to the original
purchaser any part covered by this Limited Warranty during the applicable warranty period.
In the event the battery proves defective within ninety (90) days from the dats of purchase,
we will replace it without charge. If the battery proves defective after (90) days but within one
hundred twenty (120) days from the date of purchase, we will replace it for a charge of one
half (1/2) of the ref_l price of the battery in effect at the fime of refurn.
Normal Wear Parts are defined as belts, blades, blade adapters, pneumatic tires, headlights
and seat covers. These parts are warranted to be free from defects in material and workmanship as dalivered with the product. Any claim for repair or replacement of Normal Wear
Parts must be made within thirty (30) days of the date of purchase. No claims involving darnage caused from material use, abuse or misuse will be honored.
This Murray, Inc. Two (2) Year Umlted Warranty is your exclusive remedy; however, this
warranty is void or does not apply to any unit that has been tampered with, altered, misused,
abused or used for rental or other commercial and/or professional (non- homeowner) uses.
Your warranty does not cover minor mechanical adjus_nents which are not due to any defect in material or workmanship. For assistance in making such edjustrnents, consult your
it,.sfrucfion Book.
To make a claim under this Murray, In©, Two (2) Year Umlted Warranty, return the unit (or
it au_orized in advance, the defective part) along with your proof of purchase to an Authcrized Service Center near you. To locate the nearest Authorized Service Center, call the
Central parts Distributor for your area shown in the list provided with your unit or check the
Yellow Page listings in your local telephone directory. If you return the entire unit, we will
repair the unit. If we authorize the return of the defective part only, we will either replace or
repair the part. In the case of a defect in a transmission or differential (as distinguished from
a transaxle), the entire transmission or differential must be returned since they do not include user serviceable parts.
This Murray, In©. Two (2) Year Umlted Warranty gives you specific legal rights, and you
may also have other rights which vary from state to state. This Undted Warranty Is given
In lieu of all other expressed and Implied warranUea Including the implied warranty
of merchantability
and warranty of fitness for a particular purpose. If you need eddi.
tional information on this written warranty or assistance in obtaining service, write or call:
MURRAY, INC.
Outdoor Power Equipment
Customer Service Deparknent
P.O. Box 268
Brentwood, Tennessee 37027
1- 800- 251- 8007
F- 98534
2
OWNER'S
INFORMATION
This instruction book is written for • person with some mechanical ability. Like most service books,
not all the steps are described. Steps on how to loosen or tighten fasteners are steps anyone can
follow wi_ some mechanical ability. Read and follow these instructions before you use the unit.
Know your product: If you understand the unit and how the unit operates, you will get the best
performance. As you read this manual, compare the illustrations to the unit. Learn the Ioca_on and
the function of the controls. To halp prevent an accident, fonow the operating instructions and the
safety rules. Keep this manual for future reference.
IMPORTANT:
Many units are not assembled and are sold in cartons, it is the responsibility of the
owner to make sure the assembly instruc_ons in this manual are exactly followed. O_er units are
purchased in an assembled condition. On assembled
make sure the unit is correctly assembled.
units, it is the responsibility of the owner to
The owner must carefully check the unit according to
the instructions in this manual before it is first used.
RESPONSIBILITY OF THE OWNER
The responsibility
of the owner Is to follow the In_tructfons below.
1.
Carefully read and follow the rules for safe opera, on.
2.
Fallow all the assembly and preparaiton insl_JCtions.
3.
Inspect the unit.
4.
Make sure that the operator of the unit knows how to correctly use all standard and accessory
equipment.
5.
Operate the unit only wi_ guards, shields, and other safoty items in place and working correctly.
6.
Correctly adjust the unit.
7.
Sarvice the unit only with authorized or approved replacement perts.
8.
Complete all maintenance on the unit.
F- 98534
3
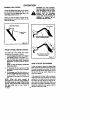
IMPORTANT
Safe Operation
Practices
for Walk-
Behind
Mowers.
This cutting machine is capable of ampotalt ng hands and feet and throwing objects. Failure to observe the following safety insfruotlons could result in serious injury or death.
I. General Operation
tJonwhich can cause drowsiness or affect
your ability to operate this machine safely.
1.
Read, understand, and follow all inslruc5ons on the machine and in the manual(s).
Be thoroughly familiar with the confrols and
the proper use of the mower before starling.
2.
Do not pot hands or feet near or under rotating parts. Keep clear of the discharge opening at all times.
3.
Only allow responsible individuals, who ere
familiar with the instructions, to operate the
mower.
Thoroughly inspect the mower and area
where the equipment is to be used. Clear
the area of objects such as rocks, toys, wire,
bones, sticks etc., which coold be picked up
and thrown by the Made.
5.
Be sure the area is clear of other people before mowing. Stop mower if anyone enters
the area.
6.
Do not operate the mower when barefoot or
wearing open sandals. Always wear substential foot wear.
7.
Do not pull mower backwards unless absolutely necessary. Look down and behind before and while moving backwards.
8.
9.
Do not operate the mower without proper
guards, plotes, grass catcher or other safety
protec_ve devices in place.
See manufacturer's instructions for proper
operation and installation of accessories.
Only use accessories approved by the
manufacturer.
15. Never operate mower in wet grass. Always
be sure of your foo_ng; keep afirm hold on
the handle and walk; never run.
16. Disengage the sail-propelled mechanism
or drive clutch on mowers so equipped before starting the engine (motor).
17. If the equipment should start to vibrate abnormally, stop the engine (motor) and check
immediately for the cause. Vibration is generally a warning of trouble such as a blade
that is damaged, a loose blade, or the engine mounting botts ere loose.
18. Always wear safety goggles or safety
glasses with side shields when aperating
mower to protect your eyes from foreign objecte which can be thrown from the unit.
19. Plan your mowing pattern to avoid discharge of material toward roads, sidewalks,
bystanders and the like.
20. After striking a foreign object, stop the engine. Remove the wire from the spark plug.
Inspect the blade and mower for damage. If
damaged, repair before starting and operating the mower.
21. Keep any washout ports and other mower
housing service openings closed when
mowing.
II. Slope
Operation
Slopes are a major factor related to slip and fall
accidents which can result in severe injury. All
slopes require extra caution. If you feel uneasy
on a slope, do not mow it.
DO:
10. Stop the Made(s) when crossing gravel
drives, walks, or roads.
11. Stop the engine (motor) whenever you
leave the equipment, before cleaning the
mower or unclogging the chute.
12. Shot the engine (motor)
off and wait until the
blade comes to complete stop before removing grass catcher.
13. Mow only in daylight or good artificial light.
14. Do not operate the mower while under the
influence of alcohol, drugs or other medicaF- 98534
4
Mow across the face of slopes; never up
and down. Do not mow excessively steep
slopes (maximum 15 degrees) or areas
where the ground is very rough. See the
"Guide" in the back of this manual to check
a sloge. Exercise ex'b'eme caution when
changing direction on slopes.
Remove objects such as rocks, tree limbs,
etc.
Watch for holes, ruts. or bumps. Tall grass
can hide obstacles.
(ConHnued Following Page)
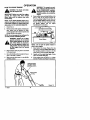
IMPORTANT
DO NO_
Do not mow near drop- offs, ditches,
bankments.
or balance.
The operator
nect the spark plug wire, and keep the wire
away from the plug to prevent accidental
starting. Always wear eye protec_on when
you make adjustments or repairs.
or em-
could lose footing
Do not mow excessively steep slopes.
4.
Keep all nuts and bolts, especially btede attachment bolts, 5ght and keep equipment in
good condition.
5,
Never tamper wi_ safety devices. Check
their proper operation regularly.
6.
To reduce fire hazard, keep mower free of
grass, leaves, or other debris build-up.
Clean up oil or fuel spillage. Allow mower to
cool before storing.
7,
Stop and inspect the equipment if you strike
an object. Repair, if necessary, before restarting.
8,
Neverattemptto make wheelheightadjustmentswhilethe engine(motor)is running.
9.
Always disconnect electric mowers (live operated) before c|eaning, repairing, or edjustlng.
Do not mow on wet grass. Reduced footing
could cause slipping.
IIL Children
Tragic accidents can occur if the operator is net
alert to the presence of children. Children ere
often attracted to the mower and the mowing
activity. Never assume that children will remain
where you last saw them.
1. Keep childrenout of the mowingarea and
underthe watchfulcare of a responsible
adult.
2.
Be alert and turn mower oft if children enter
the area.
3.
Before and while moving backwerds, look
behind end down for small children.
4.
Never allow children to operate the mower.
5.
Use ex_a care when approaching blind corners, shrubs, trees, or other objects that
may obscure vision.
IV.Service
"1. Use extra care in handling gasoline and other fuels. They are flammable and vapors are
explosive.
a. Use only an approved container,
b. Never remove gas cap or add fuel with
the engine running. Allow engine to cool
before refueling. Do not smoke.
c. Never refuel the machine indoors.
d. Never store the machine or fual contain.
er inside where there is an open flame,
such as a water heater.
*2. Never run an engine indoors or inside a
closed area.
3.
Never make adjustments or repalm to items
such as the height adjustors or grass catcher with the engine (motor) running. Discon-
F-98534
10. Grass catcher components are subject to
wear, damage, and deterioration, which
could expose moving parts or allow objects
to be thrown. Frequently check components
and replace with manufacturer's
recommended parts, when necessar-j. For storage, always make sure grass catcher is
empty.
11, Mower blades are sharp and can cut. Wrap
the blade(s) or wear gloves, and use extra
caution when servicing them.
12. Do net changethe enginegovernorsetting
or over-speedthe engine.
13. Frequently check the blade for wear or damages such as cracks and nicks. A blade that
is bent or damaged must be immediately replaced wi_ a factory replacement blade.
For safety and good cutting performance,
replace the blade every two years. Frequently check the blade bolt and the engine
mounting bolts. Replace damaged bolts
and tighten loose bolts.
14. Use only original equipment or authorized
replacement parts.
*Asterisked items do not apply to electric mowers.
5
SAFE MOWING
Every person who uses power equipment
must learn the difference between proper and
improper use, safe and unsafe mowing prac*
fices. Read the next few pages carefully.
They can help you learn. Too often the mower user is inexperienced, not Ixopedy instructed, or has not read the Instruction Book
and ins_-uc_ons on the unit before using it for
the first time. This can result in unsafe use endangering the operotor, bystanders, and the
equipment. Another result can be a poor appearance of the area mowed.
Read this InstrucUon Book. Read the instruoticns on the unit. Operate the mower according to the Safe Mowing Guide and other
safety rules and recommendeflons in this Instruction Book and on the unit. Make sure anyone who uses the unit has read the instructions
and has been told how to operate the mower
safely.
Your mower is designed to provide good service and durability in normal residential cutting. If the mower is not properly serviced and
maintained or used on unsuitable terrain or in
condi_ons not suitable for mowing, product
performance and safety will be reduced.
Proper attire is an important part of safe mowing, Safety glasses protect the eyes from
thrown objects. Safety shoes with steel toes
can protect a foot from being cut by the blade.
Shirts and pants thot cover the arms and legs
can stop or deflect a thrown object.
Practice using the mower before you actually
begin cutting grass, Select a large open level
area. Learn the location and function of the
controls and how they work. It is important that
the blade can be stopped quickly in an emerF- 98534
GUIDE
gency. Learn how to cut and how to keep contrnl of the mower at all times.
Many mowers are started manual,/. When using a pull start or rope start, place your feet
firmly and away from the blade. Hold the rope
handle securely, but never wrap the rope
around your arm or fingers for a "better grip'.
The mower is designed for use by one person.
AJways mow alone. Never carry passengers.
Carrying a passenger is dangerous for the
passenger and the operator. A mower is not for
amusement or for carrying objects.
Is the area you are planning to mow wet? Never cut a wet lawn. Cutting wet grass can cause
an accident. It can affect mower performance
and aJso cause problems with future lawn
growth and appearance. Wet grass is slippery
and might cause the operator to fall or the
mower to slip. Someone could be hurt by
touching the blade. Wet grass tends to clog the
mower, causing poor discharge. Wet clippings
bunch up on the lawn retarding the growth of
grass. A wet mower can cause parts to rust
and reduce the useful life of the unit.
When you look over the lawn, refresh your
memory about hard, immovable obstacles
such as pipes, stomps, and rocks and avoid
them. They can cause damage to the mower
or an accident injuring the operator or a bystander. Take a litter beg along and walk over
the area to be cut. Pick up any stones, toys,
wire, hones, or other Icose objects. These
items can damage the mower or they can become dangerous flying objects it the mower
blade hits them. The blade of a power mower
travels very fast. It can throw rocks and other
objects with force over long distances. Objects
thrown by mowers can break windows, cause
SAFE MOWING GUIDE
bruises, or even put out an eye. Often the person hurt by a thrown object isa bystander such
as a child, another family member or a neighbor. Keep people and _
completely away
from the mowing area. Direct the mower s discharge away from areas whore people can be.
planning your mowing pattern has a double
benefit, it can reduce chances of an injury and
make the clean up after mowing easier.
Are there
ditches,
wails, or major inclines in the area to be
cut? Plan the mowing
pattern to avoid such
danger
areas.
Inclines and rough terrain must be mowed
|"
carefully and some
.
_q
areas must not be cut
';,
*
with a mower at all
,_" _;
With
walk
behind
mow
across the incline so
that if you or the mowequipment,
or slip, you won't run
into each other.
improve the performance, help the engine stay
cooler, extend the life of moving parts, and
minimize the danger of tire, People get burned
working with and around their mowers for other reasons than fire and explosions. It takes
only a few seconds of operation for the engine
and the muffler to become hot. Do not touch
these parts when the mower is running. Stop
the engine and let it cool down before servicing
the mower. Remember, exhaust fumes can be
dangerous, Never operate the engine indoors
or in an enclosed area,
'_ _'
_!o¢,
!_._%.
Never mow slopes greater than 15 degrees.
See the "Guide" in the back of this Instruction
Book to check any slopes.
Ready to start cutting? Net yet. Be sure the
mower has been fully assembled according to
directions in the Instruction Book, Even if assembly was done by a lawn and garden shop
or the store where the unit was purchased, it
must be checked, Are all nuts, belts and
screws tight? Does the engine have oil? These
items must be checked periodically throughout
the life of _e mower.
Your mower has a gasoline engine. Gas is
dangerous, Store fuel only in a approved gas
container, Do not store large amounts of gas.
Put out all cigarettes, pipes and cigars before
working with gasoline, Store fuel and the mower itself in a well ventilated area away from any
possible source of ignition such a pilot light on
a furnace. If the mower isto be stored for an extended time, remove the gas from the tank.
This minimizes the chance of a fire and keeps
the tank clear of deposits and old gasoline,
thus improving mower performance. Move the
mower outside before adding gasoline. Use a
funnel and wipe up any spilled fuel before starting. Remember, gasoline expands when
heated so leave some expansion room. Also,
most mower gas caps are vented to allow for
expansion. Always use theproper cap. People
are needlessly burned by tires, hurt in explosions, mowers and other property are damaged because of failure to follow basic safety
rules related to gasoline and fueling.
Never add gasoline to an engine that is running
or that is hot from recent use, this can cause an
accident. Remove dry grass and other debris
from the mower. Keeping the mower clean will
F- 98534
Getting a new mower can be a big event for a
family. Let family members satisfy their curiosity about the mower and at the same time, tell
them about its dangers, Remember, a mower
is not atoy and is not for use by children or anyone lacking in age, strength or experience.
As with any puwor equipment, a mower can be
dangerous if not assembled, misused, or net
properly maintained. The most important rule
is to always use good judgement and common
sense.
Your mower will cut thick grass and heavy
plant stems with ease. Fingers and toes are no
more resistant to the mower's blade. Many
people are injured because they "forgot" and
reached into the discharge chute. Always _'eat
your lawn mower as if the blade is rotating.
Never perform any service or try to make any
adjus_nent, except carburetor, while the engine Lsrunning.
Use only accessories suited for your mower.
Use of improper accessories can reduce the
safety designed into both the mower and the
accessory, it can even damage the unit. Read
and follow the instructions which come with the
accessory and _e mower.
SAFE MOWING GUIDE
Use only original equipment or approved substitutions as service parts. If you need professional service, select a shop that is an
Au_orized Service Center for your brand of
mower. If you plan to service the unit yourself,
follow directions in the Instruction Book.
in the rain is no fun and it is dangerous. Always
seek shelter in an electrical storm, in exb'emely dry mowing conditions, your safety glasses
can serve a dualpurpose by protecting your
eyes from dust and thrown objects, also a dust
or pollen mask can be helpful.
As you mow, remember children and pets are
sometimes attracted to the es6vity. Be especially careful when trimming around shrubbery
or when backing up. If at all possible, don't
mow when moving backwards. It is dangerous
because vision is restricted. Also, blades are
"designed to cut while the unit is moving forward so cuffing performance is reduced when
mowing in reverse.
Never leave the mower running end unattended. Shut off the engine. Put the mower in
a positon so that it can not roll. if the unit is
sefi- propelled, make sure the drive control is
disengaged.
Your mower is equipped wi_ a number of safe_ feetures which are important to the safety of
• operator and bystanders and must never
he altered or removed. If a safety feature becomes inoperable, lost, or damaged, it must be
repaired or replaced before the mower is used.
Engine speed is a key to safe mowing and a
nice looking lawn. The maximum speed of the
engine on your mower has been set at the fectory. Do not change the engine governor in any
way.
Select the maximum engine and ground speed
that is right for the terrain and the heigld of
grass, You get the best cutting and bagging
performance when using a grass catcher by
operating the engine at maximum speed, Never walk fast or run just to get the job done sooner. On inclines, reduce ground speed and
exercise extreme care.
It is be_t to mow only during daylight hours;
however, if you must mow in the late afternoon
or evening, make sure there is good ar6ficial
light.
Your mower will require maintenance including
service and edjus_nents before end after use
as with any machine. The fTequency of the
maintenance is generally based on hours of
use, however, the frequency can vary because
of mowing conditions. Check the Instruc'don
Book for more detailed inslructions. Proper
maintenance protects your investment in the
mower and helps insure that it will function
safaly and reliably.
When mowing, be aware of your condition and
the weather conditons. After mowing a long
time, you will be fired. This is the time when
reactions slow down, your attention wanders;
the fime when you are wide open for an accident. Take a short break. If temperatures are
high, take precautions to avoid becoming dehydrated, if you are angry, tired, or unable to
gwe your full attention to mowing, if you have
been consuming alcohol, medicines, or drugs,
do not use your mower or any type of power
equipment.
If weather conditions become worse while you
are cutting, stop end finish later. Cutting grass
F- 98534
service wi_ the possible exception of carwith the engine running. After turning the
buretor
adjustment)
engine off,
always /_
disconnect the spark
Neverwire
attempt
any
plug
to prevent
accidenteJ rastarlJng
while the unit is being
serviced,
_
1
SAFE MOWING
While mowing, if you hit a foreign object stop
the engine. Remove the spark plug wire. Care.
fully and thoroughly inspect the mower for
damage. Make necessary repairs before re.
starting. If the unit starts to vibrate abnormally,
stop the engine immediately and check for the
cause. Vibration is generally a warning of
trouble. Keep all nuts, bolts, and screws fight.
The blade is the most dangerous part of the
mower and also the most important part in ohmining a nice lawn appearance. Check the
blade and the blade mounting hardware fre.
quenfiy. Keep it fight. If the blade hits a solid
object, check it thoroughly for deformation or
cracks and replace it damaged, For safety, replace the blade every two years. A sharp blade
reduces the work load on the engine and cuts
grass more clasnly, for a better looking cut with
less work. The blade is always close to the out.
side of the mower housing. For best trimming
on side discharge mowers, cut with the loft
side of the housing toward the area that needs
trimming.
GUIDE
_ggifian when mowing and bagging. When
ing, slower ground speed will provide the
best results.
Change the mowing pattern slightly each time
you cut. If you always cut the same way, the
grass will develop a'set" and clippings will accumulate more heavily in some areas more
than in others causing grass to get thinner in
those areas. Do nat service your mower over
the grass. Spilled oil and gas can kill the grass.
In tail grass or very heavy grass, do not by to
cut it all at once. Raise the height of cut on the
first cutting and lower it for the next cuttingthe
same day or wi_in a few days, Another way is
to cut only part of the width of the mower and
ad ust your ground speed (not the engine) to
move more slowly so the mower can clear itself as it moves forward.
A useful accessory for your mower is a grass
catcher. There are grass catchers available for
most models. For best performance and safety, be sure the grass c_cher is approved for
use with your mower. Assemble as directed
and follow operating and safety instrucfions
with the catoher and in the Instruction Book.
Before mounting, checking or emptying the
grass c_tsher, always turn the engine off. Remember to check the grass catcher before
each use for cracks, wear, or detoriorafion. Replace any pert that is damaged with the manufacturer's recommended replacement part
before using the grass catcher again.
Proper cutting technique is important if you
want your lawn to look good. Avoid the temptation to cut grass too short. Cut_ng grass too
short can kill the plant, cause grass to turn yellow, or make the lawn look brown and thatchy.
Use the lower cutting heights in cool months
when the grass is lush. Use the higher cutting
heights in extremely dry periods. Cutting with
a dull blade or low engine speed bruises,
shreds, and can uproot some grass making
the lawn look dull and brown a few days affer
cutting. AJways put the throttle contral in FAST
F- 98534
When cutting with a walk behind mower, always push the unit. Do not pull it. Pushing the
unit keeps the operator behind the mower in
the "operator's zone" for better control. Pushing the unit also gives you a chance to see exactly where and what you are mowing. There
will be times while you are mowing that you will
have to pull the mower backwards (such as
when the front of the mower has come up
against a wall or fence). If you must beck up,
make sure your fe_ are in the clear. Stand well
back from the mower, plant your feet firmly with
each step and beck up being careful to look behind you. Resume normal mowing as soon as
possible.
If your unit is self-propelled, remember that
Me drive mechanism is nut designed to do all
the work, but the unit can move without your
help. Always keep your hands on the handle
near the controls when the engine is running.
Remember too that the self- propelled mechanism can be dangerous. Keep hands and feet
away from belts and chains. Always turn offthe
engine before attempting to remove anything
that becomes entangled in the soft- propelled
system.
Remember, your mower is a usatut tool, but it
can be dangerous. Follow the instructions in
this Instruction Book. Use the mower properly
and carefully and it will give you many hours of
trouble free, accident free operations.
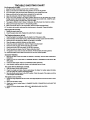
STEPS TO FOLLOW
BEFORE MOWING
•
•
Be sure to dress correctly. Wear hard shoes, not sandals or tennis shoes.
Examine the blade. A blade that is bent, cracked, or damaged must be replaced with a factory
replacement blade.
Fill the fuel tank outside. Clean off spilled fuel.
Read and follow the Owner's Manual, the instructions with the engine, and the ins_Jc_ons wi_
any attachments. Owner's Manual instructions are for your safety and the safety of others.
Exhaust fumes are dangerous. Start the engine outside.
Make sure all safety devices are in place and working correctly.
Operation of the mower is only fur a person that has experience.
Wet grass can be dangerous. Let the grass dry.
Instruct children and others to keep away from the work area.
Never cut the grass wi_out good light.
Pick up loose objects. Remove them from the mowing area.
•
•
•
•
•
•
•
•
•
WHILE MOWING
•
•
•
Watch for fixed objects and avoid them. "llley can darcagethe mower or cause injury.
A hot engine and muffler will cause s burn. Do not touch.
Inclines and slopes must be carefully mowed. See the'Guide" in the back of this book to check
a dope.
Lack of daylight or good artificial light is cause to stop mowing.
Examine the mower, the blade, and other parts fur damage after hitting a foreign object or if the
unit vi_afes excessively.
Do not make adjustments or repairs without stopping the engine (except for carburetor). Disconnect the spark plug wire.
On or near roeds, watch out for traffic. Direct discharge sway from roads.
When mowing, avoid areas where traction is unsure. Before and while moving backwards, look
behind and down for small children.
•
•
•
•
•
•
•
In heavy grass, raise the cutting height. CUt slower. Stop the engine to remove clogged grass
from the mower,
Never remove any safety related parts.
•
Do not pour gasoline into a engine that is hot or running.
AFTER MOWING
•
•
•
•
•
•
•
•
•
•
•
Always let the mower cool before storing in an enclosed area_
Foreign material on the mower is dangerous. Clean off grass, leaves, grease and oil before
storing.
Tighten all loose nuts, bolts and screws before you use the unit.
Empty and clean any grass catcher or other accessory.
Remove the key or disconnect the spark plug wire to prevent unauthorized use.
Make sure the mower is not kept near a source of ignition. Gas fumes can cause an explosion.
Only original parts or factory approved substitutes can be used to service the mower.
When storing the mower for an extended period, remove the fuel from the fuel tank.
Instruct children to leave the mower alone. It is not a toy.
Never keep gasoline near a source of ignition. Always use an approved container. Keep
gasoline away from children.
Lubricate according to the Instruction Book. See "Lubrication'.
IMPORTANT-reference.
Read the Instruction Book. Keep this book for future use and
safety
precautions.
It symbol
means: to"Attention!
Become
WARNING:
Look for this
point out important
Alert! Your Safety Is Involved."
F- 98534
10
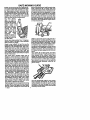
PREPARATION
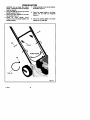
UNPACKING INSTRUCTIONS
Jpper Handle
The mower was fully assembled at the factory.
When the mower was put in the carton, the
handle was put in the storage position. To put
the handle in the operating posilion, follow the
stops below.
Offset Hole
Lower
1, Remove the mower frem the carton.
2. Putthe lower handle inthe oper_ng pesition(Figure1).
Upper Pin
3. Remove the hair pins from the lower pin.
Attach the hair pins to the upper pins.
4.
Put the upper handle in the operating
pesition. "Rghtonthe knobs.
Figure 1
CAUTION: Be careful when you fold or
raise the handle. Do not damage the
cables. A cable that Is bent win not work
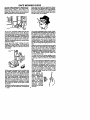
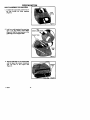
Recoil-Start
Grip
correctly. Before you use the unit, replace a bent or damaged cable.
5. To attach the recoil- start grip to the rope
guide, twist the rope through the rope
guide mounted on the right side of the handle (Figure 2).
NOTE:
If you
cannot
attach
the
recoil- start grip because the rope Is too
short,
hold the engine stop lever
against the handle. Slowly pull the
recoil- start grip.
Figure 2
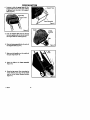
HOW TOADJUSTTHE HANDLEHEIGHT
The mounting holes in the lower handle are
offset (Figure 1). To change the hole offset, rotato the lower handle. This will change the
angis of the handle and make the height of the
handle higher or lower (Figure 3).
The lower handle has two assembly positions, A HIGH and a LOW position (Figure 3).
The HIGH posilJon will raise the handle approximately four inches.
1. Remove the cable ties that fasten the can-
,ow
trol cables to the lower handle (Figure 4).
The cable ties can be re- used. To remove
a cable tie, pullthe tab on the cable tie to
free the cable.
2. Remove the bolts and wlngnut= that faston the upper handle to the lower handle.
3. Put the upper handle on the ground behind the mower.
Figure
F- 98534
11
PREPARATION
CAUTION:
Do not bend the control
cables. A cable that Is bent or dan]aged
must be replaced.
4. Remove the hair pin from the right and left
handle bracket. (Figure 1)
5. Remove the lower handle from the handie brackets (Figure 1),
6. Rotate
the
lower
handle
around
7,
InstaJlthe hair pin on the rlght and left handle bracket (Figure 1).
8. Fasten the upper handle to the lower
handle with the bolts and wlngnuts
(Figure 4).
9. Secure the control cables to the lower
handle wi_ the cable ties.
(Figure 4). Mount the lower handle to the
handle brackets.
Tab
\
Cable "lie
Figure 4
F- 98534
12
PREPARATION
HOW TO ASSEMBLETHE GRASSBAG
1. To attach the support tube, pull the rear of
the bag through the front opening
(Figure 5).
Front
Figure 5
2. Look for a small opening in the grass bag
next to the tag START LOOP HERE
(Figure 6). Slide the small opening in the
grass bag onto the support tube.
T,
START L_I_P HERE
3. Slide the gran bag onfo the support tube
un_l the grass bag material is gathered
onto one side of the support tuba
(Figure 7),
Figure 7
F- 98534
13
PREPARATION
4. Continue to slide the grass bag onto the
support tube until the grass beg material
is gathered onto the top of the support
tube (Figure 8).
Support Tube
Grass Bag
Frame Assembly
Figure 9
Figure 8
Frame
Assembly
/
5, Push the support tube and bag through
the front opening until only the two ends of
the support tube are visible (Figure 9),
Clips
6.
Slide the frm
assembly into the ends of
the support tube (Figure g).
Figure lC
Top
Cover
7. Make sure the handle is on the outsideof
the grassbeg (Figure10).
8. Attach the €llpo to the frame assembly
(Figure 10).
9.
CIc_sethe top cover, W"nen operating the
mower wi_ the grass beg, the top cover
must be in the closed operating position
(Figure 11)
F- 98534
Figure11
14
PREPARATION
HOW TO MOUNT THE GRASS BAG
1.
To mount the grass bag on the mower,
raise the rear door. Hold the handle of the
grass bag. Put the grass bag in the
operaling posi_on (Figure 12). Lower the
rear door.
IMPORTANT: Make sure the hooks, on each
side of the frame assembly, are mounted
on the pivot rod.
A
WARNING: Do not use the grass
bag unless the cover is In the op
erating postlon.
Handle
Rear Door
MountFrame
HooksTo PivotRod
Figure 12
HOWTO EMPTYTHE GRASS BAG
WARNING: Before you remove
the grass bag, stop the engine.
A
from
efore the
you remove
mower any
housing,
grass
disconnect
the wire from the
spark plug.
1,
Hold the rear door. Raise the rear door to
a verlical position (Figure 12).
2.
Lift the frame assembly
handle notches,
3.
Open the top covar (Figure 13). Empty the
grass from the grass bag.
4.
To mount the grass bag on the mower, see
"How To Mount The Grass Bag'.
over the two
Top Cover
Figure 13
FINAL ASSEMBLY
Before you use the mower, check the
assembly of the wheels, the handle, and the
F- 98534
controls.Make sure all the fastenersare tght,
Make sure the throttle controland the engine
stopleverwork correctly.
15
PREPARATION
HOWTO DISCHARGEOUTTHE SIDE
W'bngnut
1. Stop the engine.
2. Loo6en the wlngnut (Figure 14).
3. Move the chute deflector to the open
SIDE DISCHARGE position.
4. Tighten the wfognut.
5.
If equipped, remove the grass bag. Make
sure the rear door is completely closed.
Chute Deflector
HOW TO MULCH
1. Stop the engine.
2. Loosen the wlngnut
....iii'
Figure 14
Wingnut
(Figure 15).
3. Move the chute deflector
to the clo6ed
MULCH position.
4. Tighten the wlngnut.
5. If equipped, remove the grass bag. Make
sure the rear door is completely closed.
Chute Deflector
Figure15
MULCHING TIPS
•
Mulching finely cuts the grass so that the grass
can be easily recycled. Because the nutrients
are returned to the soil, the lawn will need less
fertilizer. To correctly mulch the lawn, follow
the tips below.
•
The grass must be dry. If the grass is
wet, it will be difficult to cut and cause
heavyclumps
of grass.
•
The grass must nat be too tall. The
maximum height to effoc_valy cut is 4 1/2
inches. Set the height adjusters so that
only the top third of the grass is cut.
•
•
Clean the underside of the mower
housing. Grass and other debris can
keep the mower from working correctly.
ff the quality of cut is marginal,
following:
try the
•
Set the height edjusters at a higher
cutting height.
•
Cut the grass more frequerrUy.
•
Operate the mower at a slower ground
If the grass is more than 4 1/2 inches
speed.
high, two mowings will be necessary. For
the first mowing, set the height adjusters
in the highest pos_on. Then, lower the
height adjusters for the second mowing.
F- 98534
Keep a sharp edge on the blade. A blade
that is not sharp will cause the ends of
the grass to become brown.
16
•
Overlap the cutting swaths instead of
cuffing a full swath with each pass.
•
Mow across the marginal areas a second
time.
PREPARATION
HOW TO PREPARE THE ENGINE
ENGINE DOES NOT CONTAIN
OIL OR GASOLINE
See the engine manufacturer's instructions for
the type of gasoline and oil to use. Before you
use the unit, read the information on safety, operation, maintenance, and storage.
WARNING: Follow the
engine
manufacturer's
Instructions for
the type of gseollne and oll to
use. Always use a safety gasowhen
adding gasoline
to the
enline contelner.
Do not
smoke
gine. When Inside an enclosurs,
do not fill with gseollne. Before
you add gasoline,
stop the
angina. Let the engine cool for
several minutes.
IMPORTANT: This unit Is equipped with an
Internal oombusUon snglne and must not
be used on or near any unlmprovad forestcovered, brush- covered or grass- covered
land unless the engine's exhaust system is
equipped with • spark errester
meeUng
applicable local or state iaws (if any). If a
iperk arrseter Is used, It must be maintelned In effective working order by the oporator.
In the State of California
the above Is re-
qulrad by law (Sactlon 4442 of the California Public Rseourcse Cede). Other states
may have slmiler laws. Federal laws apply
on federal lands. See an Authorized Service Center
muffler.
for a spark
errseter
for the
FINAL ASSEMBLY
Before you use the mower, check the assembly ofthe wheels, the handle, and the controls.
Make sure all the fasteners are tig_. Make
sure the throttle €ontrol and the engine stop lever work correctly.
F- 98534
17
OPERATION
ENGINE STOP LEVER
Retease the engine stop lever end the engine
and the blade will automatically stop. To run
the engine, hold the engine stop lever in the
Operating position (Figure 17).
Before you start the engine, operate the engine stop lever several times, Make sure the
cable moves easily,
_R_
WARNING: For safe operation,
the drive system must immediately disengage when the drive
lever is released. If the drive
system
does
not disengage
correslJy, do not operate the
mower until the drive system is
adjusted
or repaired
by an
authorized service center.
Drive Lever
En : top
Figure 16
FRONT WHEEL DRIVE SYSTEM
The mower has a front wheel drive system.
Operate the drive system as follows.
1.
2.
Hold the engine stop lever in the OperatIng Position (Figure 16 end Figure 17).
Push the drive lever completely forward,
When the drive lever clicks, release the
drive lover, The drive system is now engaged.
NOTE: To stop the engine, release the
engine stop lever,
3.
To disengage the drive system and step
the engine, completely release the engine
stop lever.
4,
To disengage only the drive system, release the engine stop lever approximately two inches. The drive system will
disengage but the engine will continue to
run,
NOTE:
When
the
drive
system
Is
disengaged on a new unit, It Is possible for
the front wheels to rotate if lifted off the
ground. This Is normal with a new belt and
will stop after one or two hours of
operegon.
18
F-98534
To go forward, move the
drive lever forward.
Figure 17
HOW TO STOP THE ENGINE
To stop the engine, release the engine stop
lever, Disconnect the wire from the spark plug
to prevent the engine from starting. On models
equipped with an electhc start engine, remove
the key from the key switch, Keep the key
away from children,
If _ engine will not stop, hold a screwdriver
against the spark plug and against the engine
cooling fins, The spark will go to ground and
the engine will stop. Before you start the engine, check the engine stop cable. Make sure
the engine stop cable is assembled correctly.
Before you operate the unit, replace a bent or
damaged engine step cable.
OPERATION
HOW
TO START
WARNING:
ENGINE
A
WARNING:
The blade
when
the engine
runs. will rotate
IMPORTANT: Before you start the engine,
operate the engine stop lever several
times. Make sure the engine stop cable
moves freely.
6.
NOTE: A two speed throttle control is Iorated on the engine. Set the throttle control
In the FAST position for cuffing grass, bagglng grass, and for extended engine life.
1.
Check the oil.
2.
Fill the fuel tank with regular unleaded gasoline. Make sure the gasoline is clean.
Leaded gasoline will increase deposits and
shorten the life of the valves.
To prevent an ascl-
In the DISENGAGED
position.
dent,
sure lever
the drive
lever
Is
When make
the drive
Is In the
ENGAGED position, do not start the
engine.
Some models have a primer button on the
front or side of the engine (Figure 18).
Push the primer button. Every time you
push the primer button, wait two seconds.
For the number of times required to push
the primer
button, see the engine
manufacturer's instructions.
I I
I
.,
I ..
NOTE: Do not use gesohol or methanol. Do
not use premium unleaded tiesollne.
WARNING: Always use a safety
gasoline container. Do not smoke
A
L
whan adding gesonne to the fuel
tank. When Inside an enclosure,
do not add gasoline. Before you
add gesollns, stop the entilne and
let the engine cool for several
minutes.
Primer Sutton
__F.gl_el
NOTE:
Do not use the primer
start a warm engine.
_
button to
7.
Stand behind the mower (Figure 19). Use
one hand to hold the engine atop lever in
the operating position as shown. Use the
other hand to hold the recoil- start grip.
3.
Make sure the spark plug wire isconnected
to the spark plug.
4.
Move the throttle cerdml, located on the engine, to the FAST position.
8.
Rapidly pull the recoll-stad
return the recoil- start tirlp.
5.
Make sure the drive lever is in the DISEN-
9.
If the engine does not start in 5 or 6 thas,
See the =Problem and Repair" Instructions.
GAGED pos_on.
grip. Slowly
Ho_dthe engine
stop lever in the
operating postJon.
Recoil- Start
Figure 19
F- 98534
19
MAINTENANCE
ENGINE MAINTENANCE
7.
Check the front
Use the following maintenence seclfon to keep
your unit in good operating condition. All the
maintenance informalJon for the engine is in
the =Engine Insfruc_on Book'. Before you start
the engine, read this book.
WARNING:
_IL
wheels.
Make sure the
front wheels turn freely. If the drive system
does not disengage correctly, do not oporate the mower until the drive system is edjusted or repaired by an authorized service
center.
Before you make an
Screw_
carburetor),
or repair, dlsconIcapactlon, adjustment
(except
nect the wire from the spark
plug.
LUBRICATION
1.
For maximum performance, lubricate the
wheels end all pivot points wi_ engine oil
every 25 hours.
2.
To lubricato the engine, refer to the "Engine
Instruction Book'.
NOTE: Do not lubricate the engine stop
cable. Lubricants will damage the cable
and prevent the cable from moving freely.
Replace the cable if bent or damaged.
PinionGear
HOW TO CLEANTHE MOWERHOUSING
WARNING:
4_
Front Wheel
The blade will rotate
you
the mower
whee clean
the engine
runs.housing,
Before
stop the engine end disconnect
the wlre from the spark plug.
t.
Stop the engine.
Disconnect the wire from the spark plug.
Clean the top and the bottom of the mower
housing.
WARNING:
Grass end other debris can keep the drive system from working correctly. Check the front
wheels as follows.
4.
5.
6.
The blade will rotate
A
you
the height
of cut,
diewhenchange
the engine
runs.
Before
connect the wire to the spark
plug.
Models
With
Quick
Type Adjusters
To change the height of cut, move the position
of the adjuster arm at each wheel (Figure 21).
Make sure each adjuster arm is in the same
posil_on so that the mower will cut level.
HOW TO CHECKTHE DRIVESYSTEM
1.
2.
3.
Figure 20
HOWTO ADJUSTTHE HEIGHTOF CUT
Grass and other debris can keep the mower
from working correotJy. After you mow, clean
the mower housing as follows.
2.
3.
Washer
1.
Disengage the adjuster
2.
Move the adjuster arm to another position.
arm.
Stop the engine.
Disconnect the wire from the spark plug.
Check the front wheals. The front wheels
must turn freely. If the front wheels do not
turn freely, remove the front wheels
(Figure 20).
Remove any grass or debris from the front
drive wheels and the Pinion gears.
Remove the belt cover. Use a fiat blade
screwdriver end remove any grass or debris from under the belt cover.
Assemble the belt cover and the front
wheels.
F- 98534
Figure21
20
MAINTENANCE
HOW TO REMOVETHE DRIVE BELT
S. Removethe belt fromthe Idlerbracket
(Figure 24).
NOTE: Make sure you replace the drive
belt only with a replacement belt from
the factory.
the
belt, disconnect
wire
WARNING:
Before youthe
remove
from the spark plug.
4_
1.
Remove the belt cover (Figure 22),
2.
Remove the front wheels.
9.
To assemble the drive belt, reverse the
above stops.
Idler Bracket
\
Belt
Figure 24
PinionGear
Front Wheel
Washer
Figure 22
3.
Remove the refainer ring and the spring
pin (Figure 23).
4.
Removetheduetcoverand
5.
Remove the hair pin from the axle.
10. Noto the three assembly holas forthe Idler
pulley (Figure 25). To install a new belt,
use the hole marked wi_ a "B" for Briggs
and S_'_'ton engines and use the hole
marked with a"r" for Tasumseh engines.
Drive Belt IdlerBracket
IdlerArm
plnlongner.
Figure 25
Drive
Dust Cover
Retainer
Ring
Figure 23
6.
7.
Slide the axle as shown untilthe drive belt
can be removed from the drive pulley.
Remove the drive belt from the engine
pulley.
F- 98534
21
11. If the drive belt is excessively worn, the
Idler arm will move to the top of the slot in
the Idler bracket. If the idler arm is at the
top of the slot, the drive belt wilt be loose
and slip, If the drive belt is worn, move the
shoulder belt forward to the next assembty hole.
12. Before you begin to mow, make sure the
drive system will corTeclty disengage and
that the mower wiltstop. If the drive system
will not disengage, take the mower to an
authorized service center before you operate the mower.
MAINTENANCE
BLADE
SERVICE
WARNING: Before you Inspect
the blade or the blade adapter,
plug.
If the the
blade
hitsto an
dtsconnect
wire
the object,
spark
stop the engine. Disconnect the
wire to the spark plug. Check the
unit for damage.
_lb
Blade _ade
:_
'?_'_::i:'_'_
Frequently check the blade for wear or darnage such as cracks. Frequently check the holt
that holds the blade. Keep the holt tig_. If the
blade hits an object, stop the engine. Disconnect the wire to the spark plug. Check the
blade adapter for damage. Check for a bent or
damaged blade, a badly worn blade, or other
damage. Before you operate the unit, damaged parts must be replaced with factory re*
placement parts, For safe_, replace the blade
every two years. Keep a sharp edge on the
blade. A blade that is not sharp will cause the
ends of the grass to become brown. Remove
the blade as follows.
Mu,ching
Blade
Ballevilla Washer
her ,.
I-tgure 26
HOW TO REMOVE THE BLADE
WARNING:
Before
you
remove
HOW TO SHARPEN THE BLADE
the spark plug. The blade has
the blade, disconnect the wire to
sharp edges. When you hold the
blade, use gloves or cloth material to protect your hands.
A
1.
Drain the fuel tank.
2.
Lift the side of the mower that has the
muffler or spark plug.
3.
A
WARNING: Vibration Is the result
If the blade Is not correctly belancad. A blade that is damaged
with cracks can break and cause
an ascidenL
1.
Sharpen the blade two times a year or every 25 hours.
Use e piece of wood to keep the blade
from rotetlng.
Remove the bolt that holds the blade.
2.
If the blade is on the unit, do not sharpen.
Remove the blade according to the instructions in "How To Remove The Blade'.
Check the blade according to the "Blade
Service" instructions. Replace a badly
worn or damaged blade with a factory replacement blade.
Mount the blade with the curved edges toward the housing. If the blade is upside
down, the blade will not cot correclty and
can cause an accident.
3.
7.
Fasten the blade with the original washers and bolt. Make sure the outside rims
of the Bellevllle washers are toward the
blade (Figure 26).
5.
8.
"['lghtenthe bolt that holds the blade to a
torque of 30 foot pounds.
Clean the blade with a brush, soap, and
water. Check the blade. Look for cracks,
nicks, or other damage. Replace a blade
that is badly worn, bent, or damaged with
a factory replacement blade.
Sharpen the blade wi_ a file. Make sure
you keep the original beveled cutting edge
(Figure 27).
Make sure the blade is balanced. Use a
screwdriver and hold the blade parallel to
the ground as shown. A blade that is balancad will stay parallel to the ground. If the
blade is not balanced, the heavy end will
rotate toward the ground. Sharpen the
heavy end until the blade is balanced.
A new blade will cut better than a bedty
worn blade. Every two years replace the
old blade with a factory replacement
blade.
4.
5.
6.
A
F- 98534
4.
6.
WARNING: Always keep the bolt
that holds the blade tighL A loose
bolt or blade can cause an eccidenL
22
(Continued
following
page}
MAINTENANCE
3.
die. Move the ends of the lower handle
past the locking pins or locking tabs.
Rotate the handle forward over the engine
as shown. Make sure the cables are not
damaged.
Folding Handle
Screwdr__
e
t whenparallelto
/
.
_
_
I
theground.
I
I
Ground
CHECK
THE
I
LEVEL
Figure 27
OF
CUT
Test the unit in a small area. If the height of cut
is not level or if the cut grass is not discharged,
the cause can be: (1) the blade is bent or damaged, (2) the blade is nut sharp, (3) a worn
blade, (4) or a broken blade adapter. Before
you use the unit, correct the problem.
STORAGE
FOR HANDLES
Figure 28
How To Raise
1.
2.
THAT FOLD
CAUTION:
Be careful when you fold or
raise the handle. Do not damage the
cables. A cable that is bent will not work
The Handle
Pull the handle back until the ends of the
lower handle lock into position.
Lift the upper part of the handle intothe op
erator's position. "nghten the fasteners
that hold the handle,
STORAGE FOR
NON- FOLDING UPPER HANDLES
correctly. Before you use the unit, replace a
bent or damaged cable.
For storage, fold the handle forward,
How To Fold The Handle
1.
Push in on the ends of the lower handle,
2.
Move the ends of the lower handle past
locking tabs.
Rotate the handle forward over the engine. Make sure the cables are not darn-
1,
2.
Loosen the fasteners that hold the upper
part of the handle to the lower pert of the
handle. As you fold the handle, make sure
the cables are not around the loose fasteners and do not become damaged. Rotate
the upper part of the handle hack
(Figure 28}.
Remove the hair pins from the lower handle. Push in on the ends of the lower hen-
How To Fold The Handle
aged.
How To Raise
1.
HOW TO PREPARE
THE MOWER FOR STORAGE
WARNING:
Do not remove gaso5.
a fire, or while you smoke.
line
while Inside
building,
Gasoline
fumes • can
cause near
an
expIoelon or a fire.
1.
2.
3.
6.
7,
Drain the fuel tank.
Let the engine run until it is out of gasoline.
8.
Drain the oil from the warm engine. Fill the
engine crankcase wi_ new oil.
9.
4. Remove the spark plug from the cylinder.
23
F- 98534
The Handle
Pull the handle back until the ends of the
lower handle lock into po6ition.
Pour one ounce of oil into the cylinder.
Slowly pull the recoil- start grip so that the
oil will protect the cylinder. Install a new
spark plug in the cylinder.
Clean the dirt and debris from the cylinder
cooling fins and the engine housing.
Clean the bottom of the mower housing.
Make sure the grass bag is empty of grass.
Grass remaining in the bag during storage
will damage the bag.
Completely clean the mower to protect the
paint.
Put the unit in a building that has good ventilation.
TROUBLE
SHOOTING
CHART
The Engine will not start.
1. Move the throttle control lever to the FAST or START poaition.
2.
Make sure the fuel tank is filled with clean gasoline. Do not use old gasoline.
3.
On a cold engine, push the primer button (optionol on some modals) five timas.
4.
Make sure the wire for the spark plug is connected to the spark plug.
5.
Adjustthe Carburetor. See the "Engine tnstruc_on Book'.
6.
There is too much gasoline in the engine cylinder. Remove and dry the spark plug. Put the
throttle control in the SLOW position. Pull the recoil- start grip several times. Install the spark
plug. Connect the wire to the spark plug. Start the engine.
7.
The engine is dltfificult
to start in heavy or high grass. Move the mower to a clean dry surface.
8.
Make sure the engine stop lever is in the operating position.
g.
Make sure the fuel valve is in the ON position. See the "Engine Instruction Book'.
10. On eleotric start models, make sure the wiring harn_s
The Engine
is connected. Charge the battery.
will not stop.
1.
Release the engine stop lever.
2.
Check the engine stop cable. Replace the cable if bent or damaged.
The
Engine
performance
is bad.
1.
Check the height of cut settings. Raise the height of cut if the grass is high.
2.
Check the bottom of the blade housing. Clean the blade housing of grass and other debris.
3.
Check the wire to the spark plug. Make sure the wire is connected.
4.
Clean the engine cooling fins of grass and other debris.
5.
Check the carburetor adjustments. See the "Engine Instrucllon Book'.
6.
Check the spark plug gap. Set the spark plug gap ot 0.030".
7.
Check the amount of oil in the engine. Fill with oil if necessary.
8.
Check the engine air cleaner. See the =Engine Instruction Book'.
9.
The gasoline is bad. Drain and cisan the fuel tank. Fill the fuel tank with clean gasoline.
10. Check the throttle control. Make sure the lever is nut in the CHOKE position.
Excessive
Vibration.
1.
Remove the blade. Check the blade and balance if necessary. See the blade maintenance
instructions.
2.
Check for a bent or broken blade. A DAMAGED BLADE IS DANGEROUS
REPLACED.
3.
4.
Check the blade adapter. REPLACE A BROKEN BLADE ADAPTER.
If the vibration continues, take the mower to an Authorized Service Center.
AND MUST BE
The grass will not discharge
correctly.
1. Clean the bottom of the mower housing.
2.
Check for a badly worn blade. Remove and sharpen the blade. For safety, rapis_.e the blade
every two years with a factory replacement blade.
3.
Move the thruttle control lever to the FAST poeltion. Check the speed of the engine according
to the "Engine Instruction Book'.
The grass
is not cut even.
1.
Check the haight adjustment at each wheel. The height adjustme_ must be the same for each
wheel.
2.
3.
Make sure the blade is sharp.
Check for a bent or broken blade. A DAMAGED
REPLACED.
4.
BLADE IS DANGEROUS
Check for a broken blade adapter. REPLACE A BROKEN BLADE ADAPTER.
F-98534
24
AND MUST BE
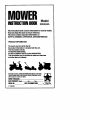
MODEL 20646x9A
8
\
9
\
5
11
/
12
/
16
11
13
11
11
KEY
NO.
DESCRIPTION
1
Handle,Upper(Black)
672665E701
8
Lever,Stop
672580E701
2
Handle,Lower(Black}
671917E701
9
Bracket,StopLever
43628BC
3
Bolt
26x256
11
Fastener,Cable
71372
4
Control,Drive
672580
12
Bolt
2x77
5
Locknut
15x116
13
Knob
71294
6
Cable,Stop
672551
16
Guide,Rope
71530
F- 98534
KEY
NO.
PART NO.
25
DESCRIPTION
PART NO.
MODEL 20646x9A
61
62
2
3
7
6
54
38
37
/
\ 26
29
70 71
41
46
32
F- 98534
48
42
26
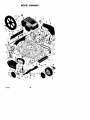
MODEL 20646x9A
KEY
NO_
DESCRIPTION
KEY
NO.
PARTNO,
DESCRIPTION
PARTNO.
1
Housing
776002
38
Screw
4x21
2
3
Engine*
Pulley,Engine
*
71434
39
40
HubCap- Optional
Washer
43615
17x169
4
Pin,Spdng
32x64
41
Nut,Flange
15x84
6
7
Cover,Belt
Screw
671928
26x279
42
43
Wheel,Drive
Washer
672083
17x120
8
9
Adjuster,
Left RearHeight
Bolt,Shoulder
672607
9x50
44
45
Cover,Dust
Washer,Belleville
71780
17x137
10
Pulley
71779
46
Washer
17x124
11
12
Spacer
Bracket,ldlarSuppart
71788
671935Z
47
48
Bolt
Blade
13
Pulley,Idler
71778
4g
Adapter,Blade
14
15
Bearing
Nut,Push
71793
28x49
50
51
Adjuster,RightFrontHeight 672602
Bolt,Carriage
2x16
16
Bracket,LeftHandle
17
Bracket,Cable
18
19
20
672593E701
lx153
671921E701
672503
52
Screw
26x221
671934
53
Bolt,Engine
25x6
Nut,Hex
15x43
54
Knob
672449
Spacer
Arm,Idler
71789
671936
55
56
Washer
Nut,Flange
17x146
15x88
21
22
Bolt,Carriage
Bolt,Shoulder
2x53
lx81
57
58
Rod,Pivot
Deer,Rear
215xl7 Z
672610
23
E- Ring
11x16
59
Spring
166x44
24
25
26
Gear,Pinion
Bolt
Washer
71792
lx85
17x186
60
61
62
Guard,Rear
Wheel,Rear
Washer
671970
672077
17x91
27
26
Adjuster,LeltFrontHeight
Belt
672603
37x84
63
64
Bracket,RightHandle
672592E701
Adjuster,RightRearHeight 672606
29
Pulley,Axte
71791
65
Screw
26x245
30
31
Screw
Pin,Hair
26)(263
31x9
66
67
Wingnut
Retainer,Push
71495
28x64
32
33
Pin,Spdng
Axle
43629
671931
68
69
Bezel
Pin,Pivot
671926
215x18Z
34
Cover,Axle
671948
70
Dmlector,
Chute
671927
35
36
Nut,Flange
Nut,He)(
15:(68
15x102
71
72
PushOnCap
Brace
28x42
672598
37
Washer
17x38
--
Instruction
Book
F-98534
Partsareavailablefroman AuthodzadEngineServiceCen_r.See=Engines,
Gasoline"or "Gasoline
Engines"inthe yellowpagesofthetelephonedirectoq/.
F-as534
27
MODEL 20646x9A
KEY
NO.
F- 98534
DESCRIPTION
PART NO.
1
Frame, Top
71592
2
Frame Assembly
672614
3
Bag, Cloth
672069
28
NOTES
F- 98534
29
NOTES
F-9B534
30
SLOPE GUIDE
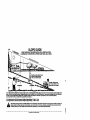
SIGHT AND HOLD THIS GUIDE LEVEL WITH A VERTICAL TREE,
A CORNER OF A STRUCTURE, A POWER LINE POLE, OR A FENCE.
Operate a walk-beilind
mower
across the face of slopes,
never up or down slopes.
up or down Mopes, never
across the face of slopes.
On a riding mower to determine if a slope is safe to mow: (1) disengage the blade(e), (2) put the unit in reverse, and (3) try to hack straight up the
elope, ff you can back up the slope it Is generally safe to mow. However, if you do nat feel safe or if you are nat completely sure, use this guide
and do not mow a slope that Is greater than 15 degrees, If the riding mower Is used with s poll-behind
or rear mounted attachmlmt,
do nat operate the unit on a slope that is grest_ than 10 degrees.
A 15 degree slope Is a hill that increases
A 10 degree slops Is a hill that increases
A
In height at approx|rnately
In height at approximately
2.5 feet in 10 feeL
1.7 feet in 10 feet.
slopes, Opme
riding mower up or down slopes, never across the face of s]opes. Operate a walk-behind
mower acmes the face
se exbeme care at all times, end avoid sudden turns or maneuvers.
Follow other ]natruations In this manual for safety In mowing on
of elopes, never up or down slopes. Use extra _sre when operating on or near slopes and obstructions.
.....................
_u__'R{fo'u§E'si._{
Au_D_
.................
,,'
HOW TO ORDER REPAIR PARTS
Onlyusen factoryrel_r pert.I_epalrpads,exceptfortheengineorthetransmission,
areavalleblefromthestorewhere
theunitwas psmhased,.aserviceshoprecommended
bythestore,oran w,'tho_ed serviceshopfoundin thepallow
pagesd.thetelephoned=rectory.
If youcannotgeta repmrpenorservzceandascnbed
above,callor writeto theContrst
PartsDistributor
shownbelow.Whenyouorder,include thefollowinginformation:
(1)Comp_e ModelNumber(see
nameplate),(2)Date of Manufacture,
(3) CompletePro1Number,(4) Description,(5)Quantity,
Repairpartsforthe engineorthetransminsinn
areavailablefromthemacufasturer'sauthorizedservicecenterfound
inthe yellowpagesofthetelephonedimutory.Seetheindividualengineor transmb;sinn
warranties.
MURRAY,INC. LAWNMOWERCENTRALPARTSDISTRIBUTORS
BEBCO,INC.
22212nd.Ave.
SouthBirmingham,
AL 35233
(2O5)251-46OO
1- 800-826. 8094
Alabama, Florida, Georgia,
PuerioRico
BILLIOIJ',_ INC.
1343SouthMainSt.
Pottmvilla, CA. 93257
(2C9)784-4162
1-800-24.%5468
FAX 1-800-226-7337
Arizona, Callfomle, Hawaii,
Nevada
Arkansas(countiesClay,
Cralgheed,Crineedan,Cross,
Greene, Jackson,Lawrence,Lee,
Mh_dsalppi,
Monroe,Phillips,
Poinsett,Randolph,St. Francis,
Woodruff),Mlss_/ppl (counties
Desota,Pertob,Quztman,late,
Tunica),Mio,lmur/(counties
Dunkin, NewMadrid,Phmincut),
Tennm,
Wrginfa (counties
Bland,Buchanan,Dickasson,Lee,
Ru_all, Scott,Smyth,Tazewell,
Washington,
Wine)
ENGINESSOUTHWEST
1255No. Home
BROWN & WISER, INC.
Shreveport,LA. 71107-7108
9991S.W. AveryStreet
{318)222- 3871
P.O.Box 1109
1-800-386-6995
Tunisian,
OR. 97062
Arkeneoo (exceptthesecounties:
(S03)
e_- 0330
Clay,Creighead,Cfitteedan,Cm_s,
f- 800-882- 4782
Greene,Hempsteed,Howard,
Jackson,Lafayette,Lawrence,Lee,
Alaska,Idaho (countiesAdo,
Adonis,Banewah,Boise,Banner,
littleRiver,Miller,M'malanippi,
Houedry,Canyon, Clearwater,
Monwe,Nevada,Phillips,Pike,
Poinoutt,
Randolph,Bovler,SL
Elmore,Gem,Idaho,Kouten,
Lstah,Lewis,NEZ Phrce, Owyee, Francis,Woedn_f)Loub/ana,
Payeffo,Ravalli,Shoshone,Valley, Mlss/oslppl (exceptthese
counties:Desuta,Panoin,Quitman
Washington),Montana (counties
late,Tuni_,)
Flethead,L_e, Lincoln, Mineral,
Minsoulo,Rasalli,Sanders),
FRANKEDWARDSCO.
Oregon,Washington
3653 South500West
CANADAPOWERTECHNOLOGY Salt LakeCity, UT 84101
(801)972-0128
1-800- 36e-4563
161WutlineAvenue
Colorado,Idaho (counties
M_ssiasauga,
Ont. L4Z.1P2
BannockUeariahe,Bin9ham
,
(2OS)890-6900
Blaine,Booneville,Butte,Damon,
1-800-861-9559
Caribou,Cassia,Custer,Franklin,
Edmonton
Fremont,Gcodin9,Jefferson,
13315-146ST
Jerome,Lemhi, Lincoln,Madison,
Edmonton
AB
Minidoka,Onexta,Power,Tetou,
TSL4S8
TwinFalls)Montana all counties
(403)453- 57gf
exceptBrownandWiser, U/Oh,
Wyoming
_L_
234 Mignemn
GARDNER,INC.
QCH4T1Y7
1150Che_eake Ave.
Columbus,OH. 43212
(8f4)731-3559
(614)486- 7951
Canada
f- 800-848- 8946
CHILTONAIR COOLEDENGINE
Indiana,Kentucky,M/oh/gin
319 4th.Ave.South
(exceptupperPeninsula),Oh/o,
RO. Box 150806
WesternPennsylvaniawithzip
Nashvlile,TN. 37215
codesupto andincluding16999,
(EfS)2S4. f694
West Wrginla
1- 800-621-6934
F- 98534
GULF COASTENGINE,INC.
4202RussellDr.
P.O.Box 9724
CorpusChristi,TX. 7840B
(512)886-6999
1-800- 825-6999
Arkansas (countiesHempateod,
Howard,Lafayette,little River,
Miller,Nevada,P_e, Savior)New
Mexico,Oklahoma,Text,
Moxlco
OSCARWILSON
ENGINE& PARTS
826 LoneStarDr.
O'Fnlicn,MO. 63366
(314)976.1313
1- 800-873- 6722
IlUnolo(S. of Hw'/.80),/owe,
Koneoe,Ml_urt (allcounties
exceptDunkin,NewMadrid,
Pemiscot)Nahrukn
R.B.L CORPORATION
P.O.Box 9318
Richmond,VA. 23227
(so4)983-22f0
1-800-886-7149
Connecticut,Deiowara,Diohtcf
of Columbia,Maine,Maryland,
Maenachueott_ NewHampshire,
NewJereny,New Yor/_N. & S.
Caroline,Pennsylvaniazips
17000& up, Rhode Is/Ind,
V_mon_ VIrgfnla(all counties
exceptBland,Bushanan,
Dickenson,Lee, Russell,Scutt,
Smyth,Tazewall,Washington,
Woe)
WISCONSINMAGNETO
(2 LOCATIONS)
4727N. TeutonleAve.
Milwaukee,WI. 53209
(414)445- 2800
f- 800-733- 7388
Illino/o N. ofHwy.80) M/ohlgen
upperPeninsula),Wisconsin
800McKinleySt.
Anoka,MN.
(612)323- 7477
1-800-248-4016
Mlnneoofa, North& South
Dakota