1
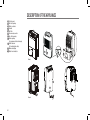
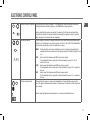
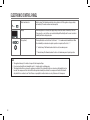
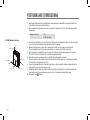
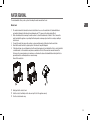
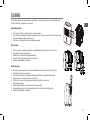
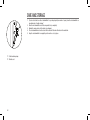
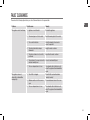
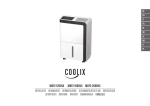
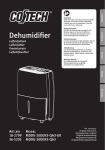
DEHUMIDIFIER MDF2-12DEN3 MDF2-16DEN3 MDF2-20DEN3 MDN1-10DEN3 GB DESCRIPTION OF THE APPLIANCE 54 ELECTRONIC CONTROL PANEL 55 MANUAL CONTROL PANEL 57 POSITIONING AND COMMISSIONING 58 WATER REMOVAL 59 WATER REMOVAL 60 CLEANING 61 CARE AND STORAGE 62 FAULT CLEARANCE 63 WEEE 65 TERMS OF SALE 65 OPERATING INSTRUCTIONS CAUTION Dear Customer, Thank you for choosing a product that has been developed and tested to the highest standards. Please read these operating instructions carefully prior to commissioning, so that you are closely acquainted with all functions of this appliance. Keep these operating instructions to hand for future reference. INFORMATION Air always contains a certain amount of water in the form of vapour. This water vapour determines the humidity level of the ambient air. The ability of the air to absorb water vapour increases with temperature. That's why as soon as the temperature in our home drops, the air will emit its intrinsic water vapour. This ultimately precipitates as condensate on all cold surfaces such as windows, walls etc. The air dehumidifier ensures that a proportion of the humidity is removed from the ambient air, hence preventing damage caused by condensate (e.g. mildew). Experts have discovered that a healthy, comfortable room climate for people present in the room and for conserving furnishing, fixtures and humidity-sensitive devices such as musical instruments, cameras and computers is a relative humidity of between 40 % and 60 %. At a lower humidity, the air is too dry and can cause skin problems and even electrical discharge. SAFETY INSTRUCTIONS 1. Do not operate the air dehumidifier if it is damaged or shows signs of damage or is not functioning correctly. Pull the mains plug from the socket immediately. 2. Do not place the air dehumidifier in a position that is accessible by children. 3. Do not use the air dehumidifier: A. close to heat sources, e.g. a heater or a heating device, tumble dryer, etc. B. in places that can be sprayed with oil or water. C. in places were it is exposed to direct sunlight. D. close to bathtubs, showers or swimming pools. E. in a greenhouse. F. close to easily inflammable gases or materials. G. behind curtains or other objects or obstacles that can impair air circulation. H. outdoors 52 4. Always store the appliance in an upright position to keep the compressor operable. 5. Should the mains cable of the air dehumidifier become damaged, it must be repaired at a manufacturer-approved workshop as special tools are required. 6. Always pull the mains plug from the socket when the air dehumidifier is not in use or when it is moved, handled or cleaned. Do not remove the mains plug by pulling on the cable. 7. Before removing the mains plug from the socket, always turn the appliance off by pressing the POWER button on the control panel. 8. The air dehumidifier operates optimally at a room temperature of 4 °C to 32 °C. It may malfunction if used outside of this temperature range. 9. The water container must not be removed while the air dehumidifier is operating. 10. Do not place fingers or other foreign object in the grill or openings. This can cause overheating, fire or electric shock. Ensure that children are warned against these dangers. 11. Do not immerse the air dehumidifier in water or other liquids and do not pour water or other liquids over the appliance or into the air and water openings. 12. The air dehumidifier must be cleaned on a regular basis. Please observe the cleaning instructions. The appliance must be unplugged from the mains before cleaning. 13. The air dehumidifier must not be covered. 14. Do not spray insecticide sprays or other flammable sprays onto the appliance. 15. No parts need to be maintained by the user. If the appliance or mains cable is damaged, the air dehumidifier must be returned to the manufacturer or customer service. 16. Empty the water container before transporting the air dehumidifier. This requires the appliance to be unplugged from the mains. 17. The appliance is equipped with an automatic defrost function. This cuts in at a room temperature of below 5 °C to prevent a build-up of ice. The air dehumidifier operates in cycles and switches itself on and off. 18. Do not let the appliance operate unsupervised over a prolonged period. GB 53 DESCRIPTION OF THE APPLIANCE 1 2 3 4 5 6 7 8 Control panel Air inlet opening Water container Handle Air filter Free-moving castors Air outlet opening Drain opening (for permanent water drainage) 9 Cable fastener (for fastening the cable) 10 Mains cable/plug 11 Water level indicator 4 1 4 1 4 1 7 2 2 5 5 3 11 3 11 3 6 11 Front 7 7 5 2 5 8 9 8 9 9 6 Back 54 10 10 10 8 ELECTRONIC CONTROL PANEL Activate/deactivate the appliance 1/O GB Indicator lamp: When the appliance is connected to the mains for the first time, the small lamp flashes slowly. Once the appliance is activated, it illuminates permanently (the appliance is ready for operation). When the appliance is deactivated, the lamp extinguishes. POWER Required air humidity WETindicator lamp: This illuminates when WET mode has been selected. The air dehumidifier will now operate until a relative air humidity of approx. 60 – 70 % is achieved in the room. COZYindicator lamp: This illuminates when COZY mode has been selected. The air dehumidifier will now operate until a relative air humidity of approx. 50 % is achieved in the room. DRYindicator lamp: This illuminates when DRY mode has been selected. The air dehumidifier will now operate until a relative air humidity of approx. 35 % is achieved in the room. WET COZY DRY Continuous water removal MODE. After the appliance is activated, the humidity setting value can be raised/lowered by repeatedly pressing this button – the setting range is selected in increments of 5 from 35 % R.H. to 80 % R.H. Dehumidification starts and ends automatically once the set humidity level is reached. MODEPressing this button selects the dehumidification mode on the appliance. Pressing the button repeatedly switches the operating mode in the following sequence: Cont./Wet/Cozy/Dry/Cont. and so on. MODE. CON T. Pressing this button activates the appliance – the POWER indicator lamp now illuminates permanently. Pressing this button deactivates the appliance – the POWER indicator lamp extinguishes. Pressing this button changes to continuous air dehumidification. Pressing this button again stops this mode. The appliance then automatically switches to "Standard mode" and will runs until the set air humidity is achieved. Indicator lamp: This illuminates when the appliance is in continuous dehumidification mode. 55 ELECTRONIC CONTROL PANEL Water level indicator Indicator lamp: This illuminates when the water container is full. The appliance stops operating automatically. The water container must be emptied. Display When the appliance is activated, the display always shows the current air humidity of the room. If you press the + and – buttons, your selected setting will flash briefly and the room's current air humidity will then be displayed again. Fan (optional) Pressing this button controls the fan. Set the fan to "+" for maximum air dehumidification. When the air humidity has reduced and a quieter operation is required, set the fan to "–". WATER FULL "+" indicator lamp: This illuminates when the fan is set to maximum power. "-" indicator lamp: This illuminates when the fan is set to minimum power for quiet operation. NOTE 1. The appliance takes up to 5 minutes to respond to the changed settings. 2. If you have deactivated the air dehumidifier, wait 3 – 5 minutes before activating again. 3. The integrated fan will run as long as the appliance is activated. If the air humidity in the room rises above the humidity level you have set, the compressor will also kick-in. When the required air humidity is achieved, the compressor will switch off automatically while the fan continues to run. This difference is perceptible from the minimal noise only at the moment of changeover. 56 MANUAL CONTROL PANEL GB 90% 10% 80% 20% 70% 60% 30% 40% 50% Air humidity controller: The air humidity level can be set in a range from 10 % relative air humidity to 80 % relative air humidity. For dryer air, rotate the controller clockwise to a low percentage value. For moister air, rotate the controller counterclockwise to a higher percentage value. If the controller is set to , the air dehumidifier will work towards maximum dehumidification until the collector tank is full. To deactivate the appliance, set the selector switch to . Indicator lamp: Once the appliance has been activated, this lamp illuminates permanently (the appliance is ready for operation). When the appliance is deactivated, the lamp extinguishes. Indicator lamp: This display illuminates when ice forms on the evaporation coils, the compressor switches off and the blower continues to runs until the ice has disappeared. Indicator lamp: This illuminates when the water container is full. The appliance stops operating automatically. The water container must be emptied. NOTE 1. The appliance takes up to 5 minutes to respond to the changed settings. 2. If you have deactivated the air dehumidifier, wait 3 – 5 minutes before activating again. 57 POSITIONING AND COMMISSIONING 1. Read through all these instructions carefully before commissioning the air dehumidifier. Pay special attention to the safety information in these operating instructions. 2. Before commissioning, the appliance must be stood upright for a minimum of 24 hours. This applies especially after transportation. Working environment CAUTION: Maintain a distance! 40 cm and more 20 cm and more 20 cm and more 58 20 cm and more 20 cm and more 5~35 °C 25 % R.H. and above 3. Position the air dehumidifier on an even, solid surface. Make sure the air dehumidifier is stable so that it cannot topple over or fall down. Escaping water can damage furniture and floor coverings. 4. Maintain a safety clearance of approx. 20 cm between the front and rear of the appliance and other objects. The air dehumidifier should not be positioned below tables or in cabinets as this will affect the air flow. 5. Before placing the air dehumidifier in operation, make sure that the air inlet and outlet openings are not covered. The air outlet nozzle must always be freely accessible during dehumidification. 6. Removable covers and containers must be correctly fitted before the appliance is activated. 7. Do not use extension cables, multiple sockets being used by other electrical appliances or stepless speed regulators. This can result in overheating and cause a fire. 8. Connect the air dehumidifier only to a functional, single-phase, earthed socket with the mains voltage stated on the rating plate. The socket should be easily accessible. 9. Completely unwind the mains cable from the winder and insert the mains plug into the socket. An incompletely unwound cable can result in overheating and cause a fire. Do not touch the mains cable with wet hands. 10. The indicator lamp flashes. WATER REMOVAL The air dehumidifier offers you two options for draining the water removed from the air: GB Water tank 1. The water is drained into the water tank and collected there. As soon as the water tank is full, dehumidification is automatically interrupted, the indicator lamp illuminates and "P2" appears in the display (where fitted). 2. Wait a few minutes before removing the water container to allow the residual water to drain off. Do not remove the water tank while the appliance is operating. Overflowing water can damage objects and floor coverings, resulting in electric shock. 3. To empty the water tank, remove the container as shown and then empty all the water from the water tank. 4. Now slide the water tank into its original position. The indicator lamp will extinguish. 5. If the indicator lamp does not extinguish, pull out the water tank again and check whether the float is correctly installed or whether water or other substances may have accumulated on the float. These must be removed. However, the float may not be removed under any circumstances as otherwise the automatic dehumidification interrupt will not be guaranteed and the overflowing water can cause damage. Now refit the water tank. 1 2 3 Gently pull out the collector tank. Hold the collector tank firmly on both sides and pull it out of the appliance evenly. Pour the collected water away. 59 WATER REMOVAL Permanent water drain Should you want to install a permanent water drain, please follow the following instructions: Ensure that the air dehumidifier is deactivated and pull the mains plug out of the socket. APPLIANCE TYPE A 1 APPLIANCE TYPE A 1. Carefully remove the rubber plugs (it two fitted, remove the right hand one) from the back of the appliance (see figure). 2. Now slide a hose onto the drain. Ensure that the hose is fixed onto the water drain and cannot come loose. 3. Now guide the loose end of the hose into an external water drain. Make sure that the hose is at a gradient along its entire length and that it is not bent, knotted or blocked. This will ensure water can drain safely and freely. 4. You can now refit the water tank and restart the appliance. 5. Regularly check that the water hose is secure and sealed at both ends. Remove the rubber plugs and connect the APPLIANCE TYPE B water hose to the drain. 3 2 1 APPLIANCE TYPE B Remove the plastic cover. Slide the hose through the opening. Water drain 60 1. Carefully remove the rubber cover from the back of the appliance. The hose connection is concealed behind. 2. Remove the water tank. As shown in the Figure (3), the water drain of the appliance is located there (the condensate normally flows through this drain and into the water tank). 3. How slide a hose from the back of the appliance through the opening to the front. 4. Then slide the end of the hose onto the water drain from the front. Ensure that the hose is fixed onto the water drain and cannot come loose. 5. Now guide the loose end of the hose into an external water drain. Make sure that the hose is at a gradient along its entire length and that it is not bent, knotted or blocked. This will ensure water can drain safely and freely. 6. You can now refit the water tank and restart the appliance. 7. Regularly check that the water hose is secure and sealed at both ends. CLEANING We recommend cleaning the air dehumidifier on a regular basis. To maintain the function of the air dehumidifier, please follow the instructions for cleaning, care and storage. GB Important principles: 1. Do not use petrol, thinner or other chemicals to clean the appliance. 2. Do not clean the air dehumidifier by placing it directly under a tap or in a water container. The electrical parts inside can become damaged, resulting in electric shock. 3. Do not clean in a dishwasher, this includes individual components. Daily cleaning 1. 2. 3. 4. 5. Before you commence cleaning, deactivate the air dehumidifier and pull the mains plug out of the socket. Empty the water tank as described above. Carefully rinse out the water tank with lukewarm water. Clean the outside of the water tank with a soft, moist cloth. Restart the air dehumidifier as described. Weekly cleaning 1. 2. 3. 4. 5. Before you commence cleaning, deactivate the air dehumidifier and pull the mains plug out of the socket. Empty the water tank as described above. Clean the water tank with a commercially available detergent. Then thoroughly flush with warm water. Clean the outside of the water tank with a soft, moist cloth. Pull the air filter out from its holder (see figure) and wash it out with clear, warm water. Then let it dry thoroughly. 6. Slide the air filter and water container back into their original positions. 7. Clean the external surfaces of the air dehumidifier with a soft moist cloth and rub with a dry cloth. 8. Restart the air dehumidifier as described. DRY CONT POWER WET COZY MODE 1/O DRY CONT POWER WET COZY MODE 1/O DRY CONT POWER WET COZY MODE 1/O 61 CARE AND STORAGE 1. If you do not intend to use the air dehumidifier for a prolonged period (one week or longer), clean the air dehumidifier as described under "weekly cleaning". 2. Allow the air dehumidifier and all its components to dry completely. 3. Rewind the mains cable onto the winder (see diagram) 4. The air dehumidifier must not be stored with a soiled air filter and with water in the water tank. 5. Keep the air dehumidifier in an upright position and in a cool, dry place. 1 2 Cable fastening clamp Flexible cord 62 FAULT CLEARANCE Please check the following options before you contact the manufacturer or its representative: GB Problem Possible cause Remedy The appliance is not functioning. 1. Appliance is not activated. Activate the appliance. 2. The mains plug is not in the socket. Insert the mains plug into the socket. 3. The socket is defective. Check the domestic fuse board or consult a specialist. 4. The water tank indicator lamp is illuminated. Empty the water container. 5. The water container is not correctly positioned. Reposition the water container. 6. The moisture in the room is below the selected humidity level. Select a lower humidity level. 7. The room temperature is too low. The automatic defrost function is activated. The appliance then dehumidifies again. 1. The air filter is clogged. Clean the filter as described under "weekly cleaning". 2. Windows and doors in the room are open. Close windows and doors in the room. 3. The room temperature is too low. The automatic defrost function is activated. The appliance then dehumidifies again. The appliance does not dehumidify or dehumidifies inadequately. 63 Problem Possible cause Remedy The appliance does not dehumidify or dehumidifies inadequately. 4. The air inlet or outlet opening is blocked. Ensure that the openings are free. 5. The room is too large. This is normal. 6. There are too many moisture sources in the room. This is normal. 1. The air dehumidifier is incorrectly installed, is on a tilt and wobbles. Position the air dehumidifier on an even, solid surface. If necessary, place a cushioning base below the air dehumidifier to reduce the noise. 2. The air filter is clogged. Clean the filter as described under "weekly cleaning". 3. Water is on the floor. Fix the water hose. Ice has built up on the evaporator coils. This is normal. The air dehumidifier has a self-defrost function. E1, E2, P1 or P2 appears on the display. E1 – Fault, humidity sensor Unplug the appliance and then plug back in. If the fault recurs, call customer service. E2 – Fault, temperature sensor Unplug the appliance and then plug it back in. If the fault recurs, call customer service. P1 – Appliance defrosts Allow the appliance time to defrost automatically. The fault is cleared once the appliance is defrosted. P2 – Collector tank is full Empty the collector tank and refit in the correct position. The appliance is too loud. Comment: If more than one fault occurs, the code display sequence is P2 – E2 – E1 – P1. 64 WEEE The appliance must not be disposed of with the domestic waste. This appliance is labelled in accordance with European Directive 2002/96/EC on Waste Electrical and Electronic Equipment (WEEE). The directive defines the framework for an EU-wide acceptance and recycling of used appliances. Please return your used appliance in the return and collection systems provided. GB TERMS OF SALE The buyer assumes, as a purchase condition, responsibility for the correct use and care of the product in accordance with these operating instructions. The buyer and user must decide themselves when and for how long this appliance will be used. Should problems occur with this product, please follow the instructions in the warranty conditions. Please do not try to open or repair this appliance yourself, as this may invalidate the warranty and can cause physical injury and property damage. Technical changes, errors and printing errors excepted. 65 MIDEA EUROPE GmbH Zülpicher Str. 5 40549 Düsseldorf Germany Service-Hotline DE 01805 - 12 16 17 (14 Cent pro Minute aus dem deutschen Festnetz) Service-Hotline Europe 0049 - 1805 - 12 16 17 (german and english) www.mideaaircon.de [email protected]