1
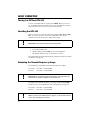
Cat. No. 19-1126 OWNER’S MANUAL HTX-242 TWO-METER MOBILE TRANSCEIVER Please read before using this transceiver. INTRODUCTION Your HTX-242 Two-Meter Mobile Transceiver is an exciting addition to Radio Shack’s growing line of high-quality amateur radio equipment. It offers some of the most advanced, and most requested, features available in a mobile transceiver. Be sure to read this entire manual to understand how to use all the radio’s features. ! You must have a Technician Class or higher Amateur Radio Operator’s License and a call sign issued by the FCC to legally transmit using this transceiver. Transmitting without a license carries heavy penalties. Getting a license is easier than ever. Your local Radio Shack store has training materials for all classes of Amateur Radio Operator. FEATURES Auto Memory Store (AMS)—automatically searches for active frequencies and stores them in memory, including the appropriate repeater offset. High (45 Watt) and Low (10 Watt) Power Settings—let you select the best power setting for effective communications. True FM Modulation—provides a clear, natural-sounding signal. 41 Memory Channels—hold one calling frequency and 40 standard frequencies. Priority Memory Channel 1—lets you set the HTX-242 to periodically check the frequency stored in Memory Channel 1 and alert you if there is activity on it. Individually Programmable Repeater Offsets —let you program different repeater offset frequencies for each memory, and a default repeater offset for manually-tuned frequencies. Subaudible Tone Transmit and Receive (CTCSS) —transmits the subaudible tones required to use some repeaters, and also lets you set a subaudible tone that your transceiver must receive to open squelch. DTMF Page with Group Calling—lets you set a sequence of up to seven DTMF tones that your transceiver must receive to sound an alert tone and open squelch. DTMF Transmit and Memory —lets you manually send DTMF tones or send DTMF sequences of up to 15 digits each from one of 10 DTMF memories to quickly access DTMF-access repeaters, autopatches, or other stations equipped with a DTMF page feature. 1996 Tandy Corporation. All Rights Reserved. Radio Shack is a registered trademark used by Tandy Corporation. 2 Programmable Frequency Step—lets you set the frequency step for tuning or scanning to 5, 10, 12.5, 20, 25, 50, or 100 kHz. Extended Band Coverage —receives from 136 to 174 MHz and lets you extend transmit coverage to include 2-Meter ham, MARS (Military Amateur Radio Service), and CAP (Civil Air Patrol). Dual VFO (Variable-Frequency Oscillator) and Duplex Modes— two independent VFOs let you quickly select between two directlyentered frequencies. You can also use one of the VFOs as a repeater input frequency and the other as a repeater output frequency for odd-split repeaters. Using this Manual To make this manual as easy to use as possible, we give you several ways to find information. Contents—lists all sections in the order they appear in the manual. Understanding the Display—lists all display indicators and gives a brief explaination and notes the sections where the indicator is fully explained. Using the Menu—lists the options in the configuration menu and gives the page numbers where the options are discussed. Quick Reference Card—gives brief instructions for most functions. Type Conventions—make the references to keys and displays easier to find in the text: • Keys are bold. For example, VFO. • When a key has more than one marking (for example, DTMF and ALM refer to the same key), we refer to the key by the name appropriate to the task. • Where you are instructed to press two keys at once, the keys are separated by a + symbol. For example, F+DTMF. • Text and symbols that appear on the transceiver’s display appear in a special typeface. For example, 144.940. Important notes in this manual have a large exclamation mark (!) in the margin. Warnings and cautions you should follow to prevent injury to a person or damage to the transceiver have a large lightning bolt ( ) in the margin. 3 CONTENTS Installation . . . . . . . . . . . . . . . . . . . . . . . . . . . . . . . . . . . . . 6 Unpacking the Transceiver . . . . . . . . . . . . . . . . . . . . . . . . . 6 Connecting the Microphone . . . . . . . . . . . . . . . . . . . . . . . . . 6 Mounting the HTX-242 in a Vehicle . . . . . . . . . . . . . . . . . . . 7 Connecting an Antenna . . . . . . . . . . . . . . . . . . . . . . . . . . . . 8 Connecting to your Vehicle’s Power . . . . . . . . . . . . . . . . . . . 9 Using the HTX-242 as a Base Station . . . . . . . . . . . . . . . . 10 Using the HTX-242 with Packet Radio . . . . . . . . . . . . . . . . 11 Connecting an External Speaker (Optional) . . . . . . . . . . . . 11 Understanding the HTX-242 . . . . . . . . . Dual VFO Modes . . . . . . . . . . . . . . . . . DTMF (Touch-Tone) Features . . . . . . . Subaudible Tone (CTCSS) Features . . . Repeater Operation . . . . . . . . . . . . . . . Memory Channels . . . . . . . . . . . . . . . . Understanding the Display . . . . . . . . . 4 .............. ............... ............... ............... ............... ............... ............... 12 12 12 13 13 13 14 Basic Operation . . . . . . . . . . . . . . . . . . . . . . . . . . . . . . . . . Turning On/Off Your HTX-242 . . . . . . . . . . . . . . . . . . . . . Resetting the HTX-242 . . . . . . . . . . . . . . . . . . . . . . . . . . . Extending the Transmit Frequency Range . . . . . . . . . . . . . Setting Volume and Squelch . . . . . . . . . . . . . . . . . . . . . . . Using the Light . . . . . . . . . . . . . . . . . . . . . . . . . . . . . . . . . Setting the Power Level . . . . . . . . . . . . . . . . . . . . . . . . . . . Locking the Controls . . . . . . . . . . . . . . . . . . . . . . . . . . . . . Selecting a Frequency . . . . . . . . . . . . . . . . . . . . . . . . . . . . Directly Entering a Frequency . . . . . . . . . . . . . . . . . . . Tuning to a Frequency . . . . . . . . . . . . . . . . . . . . . . . . Scanning for a Frequency . . . . . . . . . . . . . . . . . . . . . . Setting the Frequency Step . . . . . . . . . . . . . . . . . . . . . . . . Setting the Scan Options . . . . . . . . . . . . . . . . . . . . . . . . . . Storing Scan Skip Frequencies . . . . . . . . . . . . . . . . . . Setting the Scan Resume Condition . . . . . . . . . . . . . . Setting the Scan Resume Delay . . . . . . . . . . . . . . . . . . Setting the Scanning Range . . . . . . . . . . . . . . . . . . . . Receiving Transmissions . . . . . . . . . . . . . . . . . . . . . . . . . . Transmitting . . . . . . . . . . . . . . . . . . . . . . . . . . . . . . . . . . . Manually Transmitting DTMF Tones . . . . . . . . . . . . . . Transmitting DTMF Tones from Memory . . . . . . . . . . . Limiting Transmit Duration . . . . . . . . . . . . . . . . . . . . Turning the Keytone Beep On and Off . . . . . . . . . . . . . . . . 16 16 16 16 17 17 17 17 18 18 18 19 19 20 20 20 21 21 22 22 23 23 24 24 Advanced Operation . . . . . . . . . . . . . . . . . . . . . . . . . . . . . Frequency Offset Defaults . . . . . . . . . . . . . . . . . . . . . . . . . Turning Auto Duplex On and Off . . . . . . . . . . . . . . . . Changing the Default Offset . . . . . . . . . . . . . . . . . . . . Reversing the Offset . . . . . . . . . . . . . . . . . . . . . . . . . . Overriding the Duplex Offset . . . . . . . . . . . . . . . . . . . . Using the Dual VFOs for Duplex Operation . . . . . . . . . . . . 25 25 25 26 26 26 27 Using Memory Channels . . . . . . . . . . . . . . . . . . . . . . . . . . Storing a Frequency . . . . . . . . . . . . . . . . . . . . . . . . . . . . . Changing Stored Settings . . . . . . . . . . . . . . . . . . . . . . . . . Using Auto Memory Store (AMS) . . . . . . . . . . . . . . . . . . . . Tuning to a Standard Memory Channel . . . . . . . . . . . . . . . Using the Calling-Frequency Memory . . . . . . . . . . . . . . . . Checking Priority Channel 1 . . . . . . . . . . . . . . . . . . . . . . . Scanning Memory Channels . . . . . . . . . . . . . . . . . . . . . . . Clearing a Memory Channel . . . . . . . . . . . . . . . . . . . . . . . Enabling/Disabling Scanning for Memory Channels . . . . . 28 28 28 29 30 30 30 31 31 31 Using DTMF and Subaudible Tones . . . . . . . . . . . . . . . . . . Storing a DTMF Sequence . . . . . . . . . . . . . . . . . . . . . . . . . Transmitting a DTMF Sequence . . . . . . . . . . . . . . . . . . . . Using DTMF Page . . . . . . . . . . . . . . . . . . . . . . . . . . . . . . . Using Group Calling . . . . . . . . . . . . . . . . . . . . . . . . . . Using Auto-Reply . . . . . . . . . . . . . . . . . . . . . . . . . . . . Using DTMF Auto Send . . . . . . . . . . . . . . . . . . . . . . . . . . . Using Subaudible Tones . . . . . . . . . . . . . . . . . . . . . . . . . . Valid Subaudible Tones . . . . . . . . . . . . . . . . . . . . . . . Setting the Subaudible Tones . . . . . . . . . . . . . . . . . . . Activating Subaudible Tone Transmit and Squelch . . . Setting the DTMF Page and Subaudible Tone Alert . . . . . . 32 32 32 33 33 34 35 36 36 36 37 37 Using the Menu . . . . . . . . . . . . . . . . . . . . . . . . . . . . . . . . . 38 Troubleshooting . . . . . . . . . . . . . . . . . . Error Codes . . . . . . . . . . . . . . . . . . . . Common Problems and Solutions . . . . Replacing the Fuse . . . . . . . . . . . . . . . .............. ............... ............... ............... 40 40 40 41 Specifications . . . . . . . . . . . . . . . . . . . . . . . . . . . . . . . . . . 42 Schematics . . . . . . . . . . . . . . . . . . . . . . . . . . . . . . . . . . . . 44 5 INSTALLATION Unpacking the Transceiver As you unpack the transceiver, check to be sure you have all the items shown in this illustration. Connecting the Microphone Plug the microphone’s connector into the microphone jack, secure the microphone holder to either the left or right side of the transceiver, then clip the microphone to the holder. 6 Mounting the HTX-242 in a Vehicle When you select a mounting location for the HTX-242, be sure: • You can easily reach it • No wires or cables will interfere with the vehicle’s operation • It is not directly in front of heating vents • All wires will reach their connection points Cautions: • To avoid damaging your vehicle’s electronic systems, contact your vehicle’s manufacturer before you install the HTX-242 to find out about the proper transceiver mounting locations, antenna locations, and power and antenna cable routing guidelines. • Do not apply power to the transceiver until after you properly mount and connect an antenna. Use the supplied screws, metal washers, bracket, rubber washers, and mounting knobs, as shown, to mount the transceiver. 7 Connecting an Antenna You can connect a variety of antennas for both mobile and basestation use (see “Using the HTX-242 as a Base Station” on Page 10). Each type of antenna has its benefits. Choose one that best meets your needs. When deciding on a mobile or base-station antenna and its location, consider the following: • The antenna should be as high as possible on your vehicle or house. • The antenna and antenna cable should be as far away as possible from sources of electrical noise (ignition systems, power cables, and so on). • The antenna should be vertical. • The antenna should have an SWR of less than 1.5:1. An SWR of 1.8:1 or greater can prevent the HTX-242 from performing to its specified ratings. After you select an antenna, follow its mounting instructions. Then route the antenna cable from the antenna to the HTX-242 and connect it to the antenna connector. Connect the antenna to your HTX-242 using 50-ohm coaxial cable. The cable should end in a PL-239 connector. Cautions: 8 • To prevent damage to your HTX-242, you must connect an antenna to it before you operate it. • Do not run the cable over sharp edges or moving parts that might damage the cable. • Do not run the cable through the engine compartment or other areas that produce extreme heat. • Check with your vehicle manufacturer for antenna cable routing guidelines. Connecting to your Vehicle’s Power Follow these steps to power the HTX-242 in your vehicle. 1. Connect the black wire to your vehicle battery’s negative (–) terminal or to a metal part of the vehicle’s frame. Be sure the metal part is not insulated from the vehicle’s frame by a plastic part. 2. Connect the red wire to a source of voltage that turns on and off with the ignition and that can handle the transceiver’s 10-amp maximum power draw. Or, if you do not want the HTX-242 to turn on and off with your vehicle’s ignition, connect the red wire directly to the battery’s positive (+) terminal. ! Note: You might need to connect the red wire directly to the battery if you experience ignition noise. 9 Using the HTX-242 as a Base Station Although we designed the HTX-242 primarily for use as a mobile transceiver, you can also use it as a base station. To do so, you need these items: • 13.8-Volt DC regulated power supply that can supply at least 10 amps continuous power • Base station antenna • 50-ohm coaxial antenna cable and connectors Follow these steps to connect the HTX-242 as a base station. 1. Mount the base station antenna according to its instructions. Warning: For your safety, follow all cautions and warnings included with the base station antenna. 10 2. Connect the antenna cable to the antenna jack on the back of the HTX-242. 3. Connect the black power wire to the power supply’s negative (–) terminal. 4. Connect the red power wire to the power supply’s positive (+) terminal. 5. Connect the power supply to a source of power. Using the HTX-242 with Packet Radio You can connect your HTX-242 directly to a packet radio terminal node controller, as shown below. Note: You can purchase an 8-pin plug that matches your HTX242’s MIC jack at your local Radio Shack store (Cat. No. 279-440). Connecting an External Speaker (Optional) You can connect an external speaker to your HTX-242. Use an 8-ohm communications or PA speaker that can handle 5 or more watts of power (such as Radio Shack Cat. No. 21-549). The speaker’s cable must end in a 1/8-inch plug. Simply plug the speaker cable into the HTX-242’s EXT. SP jack. If your vehicle has a cassette player, you can easily connect your transceiver to your vehicle’s audio system using a CD-to-cassette adapter and a mono-to-stereo audio plug. 11 UNDERSTANDING THE HTX-242 This section explains some of the HTX-242’s features. See “Basic Operation” on Page 16 for instructions about how to use these features. Dual VFO Modes The VFO (Variable-Frequency Oscillator) modes let you directly select a frequency anywhere within the HTX-242’s operating range. Your HTX-242 has two VFOs: VFO-A and VFO-B. You typically use the VFOs to tune to frequencies you have not stored into one of the HTX-242’s memory channels (see “Memory Channels” on Page 13). A related feature of the HTX-242 lets you transmit on the frequency selected with one VFO and receive on the frequency selected with the other VFO. (See “Using the Dual VFOs for Duplex Operation” on Page 27.) DTMF (Touch-Tone) Features DTMF (Dual-Tone, Multiple Frequency) is another term for touchtones (the tones a telephone produces when you press a digit). This standard set of tones is used by many different amateur radio systems for accessing programmable features and dialing through autopatches. Your HTX-242 produces all 16 standard DTMF tones (0-9, ✱, #, A, B, C, and D). It has 10 DTMF memories which can each hold up to 15 digits for quick transmission. You can also set the HTX-242 to listen for a specific set of DTMF tones, and alert you when it detects them (this feature is called DTMF Paging). Until it hears the sequence, the HTX-242 does not pass any transmissions to the speaker. Group Calling lets you DTMF page a single person or an entire group of people. To use group calling, every person in the group selects the same first three digits as their DTMF page sequence. They then select up to four additional digits unique to each person. To page an individual, you transmit their entire DTMF page sequence. To page the entire group, you transmit at least the first three digits of the sequence, followed by the DTMF tones for A, B, and C. ! 12 Note: Group Calling only works with the HTX-242 and other transceivers that support this feature. Subaudible Tone (CTCSS) Features Subaudible tones, also known as CTCSS (Continuous Tone-Coded Squelch System) are low-frequency tones that are mixed with a transmission. They are used by many repeaters to limit interference from other nearby radio transmitters. When a repeater uses a subaudible tone, it does not react to any transmission that does not include that tone. Your HTX-242 includes all 38 standard subaudible tones. You can set your HTX-242 to include any of these tones with your transmissions. You can also set your HTX-242 to limit reception to only those transmissions that include the selected tone. Repeater Operation Operation through a repeater, where you transmit on one frequency and receive on another, is called duplex operation. Operation direct to another station where you transmit and receive on the same frequency is called simplex operation. A repeater is a station that receives signals on one frequency (the input frequency) and then retransmits them on a different frequency (the output frequency). Repeater antennas are typically at the tops of tall buildings or on antenna towers, so a relatively lowpower signal can reach the repeater. The repeater retransmits the signal at a higher power. This gives users of low-power transceivers the ability to communicate over a much greater range. To use a repeater, you must know the repeater’s input and output frequencies. Repeaters are usually identified by their output frequency. Thus, a repeater that has an output frequency of 146.94 is referred to as the 146.94 repeater. To determine the input frequency you must know the frequency offset (600 kHz for most of the 2-meter band) and the offset direction (+ if you add 600 kHz to the output, or – if you subtract 600 kHz from the output). Your HTX-242 is programmed with the default 600 kHz frequency offset and direction for the 2-meter band. See “Frequency Offset Defaults” on Page 25. When you tune to a frequency that is normally assigned for repeater use, the HTX-242 automatically selects the correct input frequency if you turned on the AS option. Memory Channels Your HTX-242 has 41 memory channels (40 standard memory channels and one calling-frequency memory channel). Each memory channel can hold a transmit and receive frequency, subaudible transmit and receive tones, the transmit power level, and whether subaudible tone transmit and squelch are on or off. The HTX-242 can even scan a selected range and automatically store active frequencies in unused memory locations. 13 Understanding the Display One or more of the following indicators appear when you turn on and use your HTX-242. VFO-A or VFO-B — appears when you select one of the VFO modes. See “Dual VFO Modes” on Page 12. VFO-A-T VFO-B — appears when you select the DUP-A mode (transmit on VFO-A and receive on VFO-B). See “Using the Dual VFOs for Duplex Operation” on Page 27. VFO-A VFO-B-T — appears when you select the DUP-B mode (receive on VFO-A and transmit on VFO-B). See “Using the Dual VFOs for Duplex Operation” on Page 27. BUSY — appears when the HTX-242 is receiving a transmission. See “Receiving Transmissions” on Page 22. FUNC — appears after you press F. Flashes after you hold F for at least 1 second. LOCK — appears when you lock the HTX-242’s functions. See “Locking the Controls” on Page 17. T — appears when transmit subaudible tone is turned on. See “Using Subaudible Tones” on Page 36. T-SQL — appears when both transmit subaudible tone and subaudible tone squelch are turned on. See “Using Subaudible Tones” on Page 36. ALT — appears when you turn on the DTMF page/subaudible tone alert. See “Setting the DTMF Page and Subaudible Tone Alert” on Page 37. 14 + or – — indicates the duplex offset direction. See “Overriding the Duplex Offset” on Page 26. DTMF — appears when you turn on DTMF squelch. See “Using DTMF Page” on Page 33. HIGH or LOW — indicates the transmit power level. See “Setting the Power Level” on Page 17. ON-AIR — appears when you transmit. See “Transmitting” on Page 22. — appears when you turn on the Channel 1 alarm. Flashes when there is a transmission on Memory Channel 1 and the alarm is turned on. See “Checking Priority Channel 1” on Page 30. M-CH — appears when you tune to a memory channel. See “Memory Channels” on Page 13. 15 BASIC OPERATION Turning On/Off Your HTX-242 To turn your HTX-242 on or off, press POWER. When you turn it on, all display elements briefly turn on and the HTX-242 sounds five tones. Then it returns to the last-used settings. Resetting the HTX-242 When you first use your HTX-242, if it displays PLL Err or EEP Err, or if you ever want to reset the HTX-242 to the factory defaults and clear all memory, follow these steps. ! Important: This procedure clears all stored information. 1. Turn off the HTX-242. 2. While holding down F+T-SQL, turn on the HTX-242. All display elements stay on for about 1 second. See “Extending the Transmit Frequency Range” (below) and “Using the Menu” on Page 38. Extending the Transmit Frequency Range The following are the HTX-242’s default frequency ranges: Transmit: Receive: ! 144.000 – 148.000 MHz 136.000 – 174.000 MHz Important: Do not expand the transmit frequency coverage unless you are licensed to operate on MARS or CAP frequencies. To expand the transmit frequency coverage, hold down F+DTMF while you turn on the HTX-242. The new frequency ranges are: Transmit: Receive: ! 16 142.500 – 149.500 MHz 136.000 – 174.000 MHz Note: To return to the default frequency ranges, you must reset the transceiver. See “Resetting the HTX-242”. Setting Volume and Squelch SQUELCH sets the minimum signal level that must be present for the HTX-242 to amplify the signal through the speaker or to stop when scanning. Follow these steps to set the squelch. 1. Rotate SQUELCH fully counterclockwise. 2. Set VOLUME so you can hear the background hiss between transmissions. Note: If you do not hear hissing, turn TUNE/M-CH to select a frequency that does not have communications in progress. 3. Slowly turn SQUELCH clockwise until the hissing stops. If you turn SQUELCH too far clockwise, you might miss parts of transmissions. If you do not turn SQUELCH far enough clockwise, you hear hissing between transmissions and the HTX-242 might not scan properly. Using the Light Your HTX-242 has two display light levels. To switch between the two levels, press F then DIM. Setting the Power Level Your HTX-242 has two transmit power levels. Low is about 10 watts, and high is about 45 watts. To switch between the two power levels, press LOW. LOW or HIGH appears on the display. The power setting is saved when you store settings in memory. Locking the Controls To lock the controls on the microphone (except the push-to-talk button, PTT), slide LOCK ON to the right. This does not lock the HTX-242’s front panel controls. To lock all controls except POWER, VOLUME, SQUELCH, and the push-to-talk button, press F then LOCK. LOCK appears on the display. To unlock the controls, press F then LOCK again. 17 Selecting a Frequency You can select a frequency in any of three ways: • Direct entry • Tuning • Scanning Directly Entering a Frequency 1. Press VFO to select either VFO-A or VFO-B. 2. Enter the last five digits of the frequency. For example, to enter 145.050, simply press 45050. Notes: ! • The HTX-242 rounds the last digit down to 5 or 0. • The HTX-242 does not accept entries outside its range. • If you have turned on the AS option, the HTX-242 automatically selects the correct duplex offset for frequencies normally assigned to repeaters and selects no offset for other frequencies. See “Turning Auto Duplex On and Off” on Page 25. Tuning to a Frequency 1. Press VFO to select either VFO-A or VFO-B. 2. Rotate TUNE, or press UP or DOWN on the microphone, to step through the frequencies. Notes: ! 18 • You can set the HTX-242 to step in 5, 10, 12.5, 20, 25, 50, or 100 kHz increments. The default is 20 kHz. See “Setting the Frequency Step” on Page 19. • To step in 1 MHz increments, press MHz. Press MHz again to return to the previous frequency step. • If you have turned on the AS option, the HTX-242 automatically selects the correct duplex offset for frequencies normally assigned to repeaters and selects no offset for other frequencies. See “Turning Auto Duplex On and Off” on Page 25. Scanning for a Frequency 1. Press VFO to select either VFO-A or VFO-B. 2. Press F. Then press ▲ to scan up or ▼ to scan down. Notes: ! • You can set the HTX-242 to scan in 5, 10, 12.5, 20, 25, 50, or 100 kHz steps. The default is 20 kHz. See “Setting the Frequency Step” on Page 19. • You can program up to five frequencies for the HTX-242 to skip when scanning. See “Storing Scan Skip Frequencies” on Page 20. • When the HTX-242 reaches one end of the scanning range, it starts over at the other end. To set the scanning range, see “Setting the Scanning Range” on Page 21. • When the HTX-242 stops on a transmission, it either stops scanning, resumes scanning in 10 seconds even if the transmission continues, or stays on the frequency until the transmission ends. To select the scan resume option, see “Setting the Scan Resume Condition” on Page 20. • If you set the HTX-242 to resume scanning after the transmission ends, it pauses to ensure you do not miss a reply. To set the scan delay, see “Setting the Scan Resume Delay” on Page 21. • If you press PTT on the microphone, scanning stops. • To resume scanning after the HTX-242 stops, press MHZ. Setting the Frequency Step The factory default frequency step is 20 kHz. Each time you rotate TUNE one click, or press UP or DOWN on the microphone, the frequency changes by 20 kHz. When scanning, the HTX-242 scans up or down 20 kHz per step. Follow these steps to change the frequency step. 1. Press VFO. 2. Press F then STEP. The HTX-242 displays St and the current frequency step. 3. Rotate TUNE, or press UP or DOWN on the microphone, to select the desired frequency step (5, 10, 12.5, 20, 25, 50, or 100 kHz). 4. Press MHz or PTT to save the setting. 19 Setting the Scan Options Storing Scan Skip Frequencies You can store up to five frequencies for your HTX-242 to skip when scanning. This lets you prevent the HTX-242 from stopping on beacon or packet repeater frequencies. 1. Press VFO. 2. Hold F for at least 1 second. FUNC flashes. 3. Press MR. The HTX-242 displays SC and the current scan resume setting. 4. Repeatedly press ▲ until the HTX-242 displays S1 and the first scan skip frequency (or –––.––– if no frequency is stored). 5. Select the first scan skip frequency by rotating TUNE, pressing UP or DOWN on the microphone, or directly entering the last five digits of the frequency. 6. Press 7. Repeat Steps 5 and 6 for each scan skip frequency. 8. Press MR or PTT to save the setting. ▲ for the next scan skip memory— S2, S3, S4, or S5. Setting the Scan Resume Condition When you scan VFO frequencies or frequencies you stored in memory, the HTX-242 stops at any signal strong enough to break squelch. The HTX-242 is preset to ti, meaning it resumes scanning in 10 seconds, even if the signal continues. Follow these steps to change the scan resume condition. 20 1. Press VFO. 2. Hold F for at least 1 second. FUNC flashes. 3. Press MR. The HTX-242 displays SC and the current option. ti cr Resumes scanning in 10 seconds SE Does not resume scanning Resumes scanning after the carrier drops and the scan resume delay expires 4. Rotate TUNE, or press UP or DOWN on the microphone, to select the desired option. 5. Press MR or PTT to save the setting. Setting the Scan Resume Delay When you set the scan resume condition to cr (carrier), the HTX242 resumes scanning after the carrier drops. The scan resume delay option lets you set the HTX-242 to pause before resuming so you can hear replies. The factory default is 2 seconds. Follow these steps to change the scan resume delay. 1. Press VFO. 2. Hold F for at least 1 second. FUNC flashes. 3. Press MR. 4. Repeatedly press ▲ until the HTX-242 displays Sd and the current scan resume delay (0.5, 1, 2, or 4 seconds). 5. Rotate TUNE, or press UP or DOWN on the microphone, to select the desired scan resume delay. 6. Press MR or PTT to save the setting. Setting the Scanning Range When you scan in a VFO mode, the HTX-242 scans frequencies within a selected range. The default range is 144.0 to 148.0 MHz. Follow these steps to change the scanning range. ! 1. Press VFO. 2. Hold F for at least 1 second. FUNC flashes. 3. Press MR. 4. Repeatedly press lower scan limit. 5. Rotate TUNE, press UP or DOWN on the microphone, or directly enter the lower scan limit’s last five digits on the microphone’s keypad. 6. Press ▲. The HTX-242 displays SH and the upper scan limit. 7. Rotate TUNE, press UP or DOWN on the microphone, or directly enter the upper scan limit’s last five digits on the microphone’s keypad. 8. Press MR or PTT to save the settings. ▲ until the HTX-242 displays SL and the Note: The frequency gap between the lower and upper scan limits should be no less than two times the current frequency step. If the frequency gap is less than this, the HTX-242 does not scan. 21 Receiving Transmissions To receive a transmission, turn on the HTX-242, adjust the volume and squelch, and tune to the frequency you want to monitor. The HTX-242 displays BUSY, and the signal-strength indicator shows the relative signal strength when it receives a signal. Note: If BUSY appears but you hear nothing from the speaker, be sure the DTMF page and tone-squelch features are turned off and SQUELCH is set correctly. To turn off DTMF page, press DTMF once. To turn off tone squelch, press T-SQL until neither T nor T-SQL appears on the display. See “Activating Subaudible Tone Transmit and Squelch” on Page 37. Transmitting ! Caution: It is illegal to transmit if you do not have a Technician Class (or higher) license issued by the FCC. 1. Select the desired frequency. Note: If you select a repeater frequency, the HTX-242 displays + or – to show the offset direction. To operate with no offset (simplex) on that frequency, press SHIFT until neither + nor – appears. 2. Press LOW so LOW appears on the display. This selects the low power (10 watt) setting. 3. Press the push-to-talk button (PTT) on the side of the microphone to transmit. The signal strength meter shows halfscale for low power (or full-scale for high power). Release PTT to listen for a reply. Notes: ! • power (about 45 watts). To return to low power, press LOW again. • 22 If the other party advises you to improve your signal, press LOW. HIGH appears on the display, and the HTX-242 transmits at high If you try to transmit outside the permitted range, the HTX-242 displays tF Err and beeps twice. Manually Transmitting DTMF Tones To transmit DTMF tones, follow the steps for transmitting. Then, while holding down PTT, press the digits on the microphone to transmit the tones. ! Note: If auto-reply is turned on, you must hold down PTT while you transmit. If auto-reply is off, you can release PTT after you enter the first digit. The HTX-242 transmits for 1 second after you enter the last digit. See “Using Auto-Reply” on Page 34. Transmitting DTMF Tones from Memory 1. Press DTMF so the HTX-242 displays DTMF and the current DTMF memory number. 2. To select a different DTMF memory, press and hold F for at least 1 second. Then press DTMF. 3. Rotate TUNE or press memory. 4. Press and hold PTT. Then press DTMF to send the current DTMF memory. ▲ or ▼ to select the desired DTMF Notes: • If you turn on the DTMF auto send option and turn on DTMF memory (DTMF appears on the display), the HTX-242 sends the DTMF sequence in the current memory every time you press PTT. See “Using DTMF Auto Send” on Page 35. • To store DTMF sequences, see “Storing a DTMF Sequence” on Page 32. ! 23 Limiting Transmit Duration When you communicate on the 2-meter band, you should keep your transmissions as brief as possible. Most repeaters have builtin timers that limit single transmissions to 3 minutes or less. You can set the transceiver to stop transmitting and sound a beep if a single transmission exceeds the selected time (none, 1, 2, 3, 5, 7, 10, or 15 minutes). Follow these steps to select the transmission time-out setting. 1. Press VFO. 2. Hold F for at least 1 second. FUNC flashes. 3. Press MR. 4. Repeatedly press ▲ until the HTX-242 displays to and either the selected time (if the option is on) or oFF (if the option is off). 5. Rotate TUNE, or press UP or DOWN on the microphone, to select the desired time-out time (to turn on the time out option) or oFF (to turn off the option). 6. Press MR or PTT to save the settings. Turning the Keytone Beep On and Off Your HTX-242 sounds a beep each time you press a button. Follow these steps to turn off this keytone beep. ! 24 Note: This does not affect the tone-alert beep, alarm scan beep, or the transmit limit beep. 1. Press VFO. 2. Hold F for at least 1 second. FUNC flashes. 3. Press MR. 4. Repeatedly press ▲ until the HTX-242 displays bp and either on (if the beep option is on) or oFF (if the option is off). 5. Rotate TUNE, or press UP or DOWN on the microphone, to select on (to turn on the beep option) or oFF (to turn off the option). 6. Press MR or PTT to save the settings. ADVANCED OPERATION Frequency Offset Defaults When you select a frequency, the HTX-242 defaults to the following frequency offsets if auto duplex is turned on: Receive Frequency Below 144.600 MHz 144.600 to 144.905 MHz 144.910 to 145.205 MHz 145.210 to 145.505 MHz 145.510 to 146.005 MHz 146.010 to 146.375 MHz 146.380 to 146.605 MHz 146.610 to 146.995 MHz 147.000 to 147.395 MHz 147.400 to 147.595 MHz 147.600 to 147.995 MHz 148.000 MHz and above Transmit Offset No offset (Simplex) + offset No offset (Simplex) – offset No offset (Simplex) + offset No offset (Simplex) – offset + offset No offset (Simplex) – offset No offset (Simplex) The default offset is 600 kHz. For example, if you tune to receive 146.940 MHz, the HTX-242 automatically transmits at 146.340 MHz (600 kHz less than 146.940). ! Note: Outside these ranges, the HTX-242 operates with no offset. Turning Auto Duplex On and Off The HTX-242 can automatically select the correct duplex offset for frequencies normally assigned to repeaters and selects no offset (simplex) for other frequencies. Follow these steps to turn this option on or off. 1. Press VFO. 2. Hold F for at least 1 second. FUNC flashes. 3. Press MR. 4. Repeatedly press ▲ or ▼ until the HTX-242 displays AS and either on (if the option is on) or oFF (if the option is off). 5. Rotate TUNE, or press UP or DOWN on the microphone, to select on or oFF. 6. Press MR or PTT to save the setting. 25 Changing the Default Offset Follow these steps to change the default offset for the VFO modes. ! 1. Press VFO. 2. Hold F for at least 1 second. FUNC flashes. 3. Press SHIFT. The HTX-242 displays oS and the current offset (in MHz). 4. Rotate TUNE, press UP or DOWN on the microphone, or directly enter the step using the microphone’s keypad to select an offset default (from 0 to 38 MHz). 5. Press SHIFT or PTT to save the setting. Note: This setting does not affect frequencies already stored in memory. Reversing the Offset To reverse the transmit and receive frequencies when you operate duplex, press F then REV. For example, if you tune to 146.940 (which has a – offset), pressing F then REV makes the transceiver receive on 146.340 and transmit on 146.940. The setting returns to the default if you change frequencies. Overriding the Duplex Offset When you tune to a frequency, the HTX-242 automatically selects either simplex operation, or duplex operation with the correct offset direction (if the auto duplex option is on). To override this setting, press SHIFT. Each time you press SHIFT, the offset switches between +, –, and no offset. The setting returns to the default if you change frequencies. 26 Using the Dual VFOs for Duplex Operation Follow these steps to use one VFO to transmit and the other to receive. 1. Press VFO to select VFO-A. 2. Select a frequency. 3. Press VFO to select VFO-B. 4. Select a frequency. 5. Press DUP. When the HTX-242 displays: VFO-A-T VFO-B it transmits on the VFO-A frequency and receives on the VFO-B frequency. When it displays: VFO-A VFO-B-T it transmits on the VFO-B frequency and receives on the VFO-A frequency. 27 USING MEMORY CHANNELS The HTX-242 has 40 standard memory channels and one callingfrequency memory, where you can store frequently-used frequencies, along with all settings, for quick access. Storing a Frequency 1. Press VFO and tune to a frequency you want to store. Set all duplex and subaudible tone settings (see “Using Subaudible Tones” on Page 36), the transmit power setting, and the DTMF option. 2. To store the frequency in the calling-frequency memory, press and hold F for at least 1 second. FUNC flashes on the display. Then press CALL. To store the frequency in a standard memory, press F. Rotate TUNE, or press UP or DOWN on the microphone, until the HTX-242 displays the desired memory number to the left of the frequency. Then press MR. The HTX-242 beeps twice and stores all settings into the selected memory channel. Changing Stored Settings To change the receive frequency, follow the steps under “Storing a Frequency.” To change the transmit frequency or a tone squelch option without changing the receive frequency, follow these steps. 1. To change the calling memory, press CALL. To change a standard memory, press MR. Then rotate TUNE, or press UP or DOWN on the microphone, to select the memory channel you want to change. 2. If you want to turn tone squelch on or off, repeatedly press TSQL to select the desired tone squelch mode. (See “Using Subaudible Tones” on Page 36.) 3. For the calling-frequency memory, press and hold F for one second. Then press CALL. For a standard memory, press F, then press MR. The HTX-242 displays rF and the receive frequency, and MCH flashes. 28 4. Rotate TUNE, press UP or DOWN on the microphone, or enter the receive frequency using the microphone’s keypad. 5. Press ▲. The HTX-242 displays tF and the transmit frequency. 6. Rotate TUNE, press UP or DOWN on the microphone, or enter the transmit frequency using the microphone’s keypad. 7. Press ▲. The HTX-242 displays rC and the current receive subaudible tone. 8. Rotate TUNE, or press UP or DOWN on the microphone, to change the receive subaudible tone. 9. Press ▲. The HTX-242 displays tC and the current transmit subaudible tone. 10. Rotate TUNE, or press UP or DOWN on the microphone, to change the transmit subaudible tone. 11. For the calling-frequency memory, press CALL to save all settings. For a standard memory, press ▲. The HTX-242 displays Sn. Rotate TUNE, or press UP or DOWN on the microphone, to select whether the memory is included in a memory scan (On) or locked out of a memory scan (Off). Then press MR to save all settings. Using Auto Memory Store (AMS) Follow these steps to have the HTX-242 scan through a selected range and store active frequencies in memory. 1. Set the upper and lower scan limits (see “Setting the Scanning Range” on Page 21). 2. Set the scanning step (see “Setting the Frequency Step” on Page 19). 3. Set the squelch (see “Setting Volume and Squelch” on Page 17). 4. Hold F for at least 1 second. Then press MHz. The HTX-242 scans between the lower and upper scan limits. When it detects a transmission, it checks all memories to see if that frequency is already stored. If the frequency is not in a memory, the HTX-242 stores the frequency in the lowest unused memory, then resumes scanning. The HTX-242 continues auto store until all memories are used. 5. To stop auto store before all memories are used, press VFO, DUP, MR, CALL, or MHz. Notes: ! • The HTX-242 turns off tone squelch during auto store. • Auto store does not work if all memories are used. 29 Tuning to a Standard Memory Channel 1. Press MR. 2. Rotate M-CH, or press UP or DOWN on the microphone, to select the desired memory channel. Using the Calling-Frequency Memory Press CALL. The HTX-242 recalls all settings saved in the callingfrequency memory. Notes: ! • If you rotate TUNE, press UP or DOWN, or directly enter a frequency, the HTX-242 returns to the last-used VFO. • To return to the mode selected before you used the callingfrequency memory, press CALL again. Checking Priority Channel 1 To have the HTX-242 periodically “look back” at Memory Channel 1 to check for a transmission, press F then ALM. appears on the display. The HTX-242 looks back at Memory Channel 1 every 4, 8, 12, or 16 seconds. If there is a transmission, the HTX-242 beeps to let you know to tune to it, if desired. Follow these steps to change the look-back time. 30 1. Press VFO. 2. Hold F for at least 1 second. FUNC flashes. Then press MR. 3. Repeatedly press ▲ until the HTX-242 displays Lb and the current look-back time. 4. Rotate TUNE, or press UP or DOWN on the microphone, to select the desired look-back time (4, 8, 12, or 16 seconds). 5. Press MR or PTT to save the setting. Scanning Memory Channels To set the HTX-242 to scan memory channels, press and release MR. Then press and hold MR for at least 1 second. .flashes, and the HTX-242 scans memories that have the scan option turned on (see “Enabling/Disabling Scanning for Memory Channels” on this page). The HTX-242 stops when it encounters a transmission. It resumes scanning according to the saved scan settings (see “Setting the Scan Options” on Page 20). To resume scanning immediately, press MHz. ! Note: Scanning stops if you press MR or PTT. Clearing a Memory Channel You can clear any memory channel except Memory Channel 1 and the calling-frequency memory. 1. Tune to the memory channel you want to clear. 2. Hold F for at least 1 second. FUNC flashes. 3. Press MR. All settings are cleared from the memory channel. Enabling/Disabling Scanning for Memory Channels You can disable (lock out) individual memory channels, so the HTX-242 does not stop on them when you scan memory channels. 1. Tune to the memory channel you want to enable or disable for scanning. 2. Press F, then press MR. 3. Repeatedly press scan setting. 4. To enable scanning for the current channel, rotate TUNE, or press UP or DOWN on the microphone, to select on. ▲ until the HTX-242 displays Sn and the To disable scanning for the current channel, rotate TUNE, or press UP or DOWN on the microphone, to select oFF. 5. Press MR or PTT to save the setting. 31 USING DTMF AND SUBAUDIBLE TONES Your HTX-242 has 10 DTMF (Dual-Tone, Multiple Frequency— another name for touch tones) memories where you can store DTMF sequences. DTMF Memory 0 can hold a 7-digit DTMF paging sequence your HTX-242 must receive for DTMF paging. DTMF Memories 1-10 each hold 15 digits you can quickly transmit. Storing a DTMF Sequence 1. Hold down F for at least 1 second. FUNC flashes. 2. Press DTMF. The HTX-242 displays the sequence stored in the currently selected memory. 3. Rotate TUNE, or press UP or DOWN on the microphone, to select one of the 10 transmit DTMF memories (1–10) or the receive DTMF memory (0). Note: td appears with transmit DTMF Memories 1-10, and rd appears with receive DTMF Memory 0. 4. Press SHIFT. Then use the keypad to enter the sequence you want to store. Note: DTMF Memories 1–10 hold 15 digits each. DTMF Memory 0 holds 7 digits. 5. ! Repeat Steps 3 and 4 to store more DTMF sequences, or press DTMF or PTT to save all sequences and return to normal operation. Note: To clear a DTMF sequence, repeat these steps but do not enter a frequency in Step 4 after you press SHIFT. Transmitting a DTMF Sequence ! 32 1. Hold F for at least 1 second. FUNC flashes. 2. Rotate TUNE, or press UP or DOWN on the microphone, to select the DTMF memory that contains the sequence you want to transmit. 3. Press the push-to-talk button. While holding down PTT, press DTMF. The HTX-242 transmits the stored sequence. Note: If the DTMF auto send feature is turned on, the HTX-242 transmits the tones in the selected DTMF memory every time you press PTT. Using DTMF Page DTMF page lets other operators page you. To turn on DTMF page, press DTMF so DTMF appears. The HTX-242 does not pass transmissions to the speaker until it receives the sequence you stored in DTMF Memory 0. If DTMF Memory 0 is empty, DTMF page does not operate. When you receive a DTMF page, the HTX-242 turns on the speaker and turns off DTMF page so all transmissions come through. Notes: ! • If you turn on auto-reply, the HTX-242 immediately sends the sequence in the currently selected DTMF memory when it receives the sequence you set. See “Using Auto-Reply” on Page 34. • If you turn on tone-alert, the HTX-242 sounds four tones when it receives its DTMF sequence you set. See “Setting the DTMF Page and Subaudible Tone Alert” on Page 37. • If you turn on DTMF auto send, the HTX-242 opens squelch only for transmissions that start with the sequence stored in DTMF Memory 0. After the transmission, DTMF squelch is still turned on. See “Using DTMF Auto Send” on Page 35. Using Group Calling Group calling lets you page several users at once. Each user must have a transceiver that has this feature. When the HTX-242 receives at least three DTMF tones followed by the sequence A-B-C, it compares the DTMF tones it received before the A-B-C with the sequence in DTMF Memory 0. If the tones match, it operates as if it received the entire sequence. For example, if these sequences are assigned to a group: Name George Bob Doug Bill Cary Paul Kim James Beth Assignment West Side West Side East Side North Side East Side South Side North Side South Side East Side DTMF Page Sequence 4654321 4654254 4651823 4652252 4651855 4653552 4652183 4653122 4651931 33 • Assuming all club members have DTMF page activated, to page everyone, transmit 465ABC. • To page West Side members, transmit 4654ABC. • To page Doug and Cary, transmit 46518ABC. • To page only one person, transmit the 7-digit sequence. Using Auto-Reply If you turn on the auto-reply feature, the HTX-242 automatically sends the sequence stored in the currently-selected DTMF memory when it receives a DTMF page. Follow these steps to turn on auto-reply. 1. Press VFO. 2. Hold F for at least 1 second. FUNC flashes. 3. Press MR. The HTX-242 displays the first configuration menu item. 4. Repeatedly press ▲ to select the Ar option. Then rotate TUNE, or press UP or DOWN on the microphone, to set the option to on. 5. Press MR or PTT to save the setting. To turn off auto-reply, set the option to oFF in Step 4. 34 Using DTMF Auto Send If you turn on the DTMF auto-send feature, the HTX-242 automatically sends the sequence stored in the currently-selected DTMF memory every time you press PTT. Follow these steps to turn on auto send. 1. Press VFO. 2. Hold F for at least 1 second. FUNC flashes. 3. Press MR. 4. Repeatedly press ▲ to select the dA option. Then rotate TUNE, or press UP or DOWN on the microphone, to set the option to on. 5. Press MR or PTT to save the setting. 6. Press DTMF so DTMF is on the display. To temporarily turn off auto send, press DTMF so DTMF is not on the display. To turn off auto send, set the option to oFF in Step 4. Notes: ! • This feature works with the DTMF page feature. If you stored a sequence in DTMF Memory 0, the HTX-242 does not pass transmissions to the speaker until it receives that sequence. After the transmission, DTMF squelch is still turned on. • If there is no sequence stored in DTMF Memory 0, the HTX-242 still transmits the currently selected DTMF memory sequence each time you press PTT, but passes all transmissions to the speaker. 35 Using Subaudible Tones Some repeaters require you to transmit a subaudible tone to activate them. You can set your HTX-242 to transmit any of the 38 standard subaudible tones. You can also limit incoming reception by setting the HTX-242 to open the squelch only when someone transmits a subaudible tone you select. Valid Subaudible Tones Code XZ XA WA XB WB YZ YA YB ZZ ZA ZB 1Z 1A Freq. (Hz) 67.0 71.9 74.4 77.0 79.7 82.5 85.4 88.5 91.5 94.8 97.4 100.0 103.5 Code 1B 2E 2A 2B 3Z 3A 3B 4Z 4A 4B 5Z 5A 5B Freq. (Hz) 107.2 110.9 114.8 118.8 123.0 127.3 131.8 136.5 141.3 146.2 151.4 156.7 162.2 Code 6Z 6A 6B 7Z 7A M1 M2 M3 M4 M5 M6 M7 Freq. (Hz) 167.9 173.8 179.9 186.2 192.8 203.5 210.7 218.1 225.7 233.6 241.8 250.3 Setting the Subaudible Tones Some repeaters require you to transmit a subaudible tone with your transmission. You can also set a tone that must accompany transmissions for your HTX-242 to open squelch. Follow these steps to set the subaudible tones for the VFO mode. After you set the tones, you must activate the function to turn it on. Changing this setting does not change the tones stored in any memory channel. 36 1. Press VFO. 2. Hold F for at least 1 second. FUNC flashes. 3. Press T-SQL. The HTX-242 displays rC and the currently set receive tone. 4. Rotate TUNE, or press UP or DOWN on the microphone, to set a different receive tone. If you do not want a receive tone, select oFF. 5. Press ▲. The HTX-242 displays tC and the currently set transmit tone. 6. Rotate TUNE, or press UP or DOWN on the microphone, to set a different transmit tone. If you do not want a transmit tone, select oFF. 7. Press T-SQL or PTT to save the settings. Activating Subaudible Tone Transmit and Squelch 1. Press T-SQL once. T appears. The HTX-242 includes the selected transmit tone with your transmissions. 2. Press T-SQL again. T-SQL appears. The HTX-242 includes the selected transmit tone with your transmissions and requires the selected receive tone to open squelch. 3. Press T-SQL a third time to turn off both subaudible tone transmit and squelch. Neither T nor T-SQL appears on the display. Setting the DTMF Page and Subaudible Tone Alert When the alert function is turned on, the HTX-242 sounds a sequence of three tones when it receives a DTMF page (if DTMF page is activated) or a transmission that includes the correct subaudible tone (if tone squelch is activated). To turn on the alert function, press F then ALT. ALT appears. To turn off the alert function, press F then ALT again. ALT disappears. 37 USING THE MENU Your HTX-242 has a menu that lets you select how some functions work. The previous sections included procedures that access this menu—this section provides an overview. Follow these steps to use the menu: 38 1. Press VFO. 2. Hold F for at least 1 second. FUNC flashes. 3. Press MR. The first menu item appears. Then press to select the desired menu option. 4. Rotate TUNE, or press UP or DOWN on the microphone, to select the setting. For options that require a frequency (such as scan skip), you can use the microphone keypad to directly enter the frequency’s last five digits. 5. Press MR or PTT to save the settings. ▲ or ▼ Menu Item SC Sd S1 S2 S3 S4 S5 Lb SL SH Ar Default Option Explanation/Available Settings Scan resume option. ti —time out in 10 seconds. Cr —resume after carrier drops. SE —do not resume scanning. Scan delay (delay before resume when 2.0 SC is set to Cr). 0.5, 1, 2, or 4. –––.––– Scan skip frequency 1 (frequency for HTX-242 to skip when scanning VFO). –––.––– Scan skip frequency 2. ti –––.––– –––.––– –––.––– 4 to oFF bp AS oN on dA oFF 20 21 20 20 Scan skip frequency 3. 20 Scan skip frequency 4. 20 Scan skip frequency 5. 20 Look-back time (how often the HTX242 checks Priority Memory Channel 1 for a transmission when the alarm is activated). 4, 8, 12, or 16. 144.000 Lower scan limit. With SH, determines the VFO scanning range. 148.000 Upper scan limit. oFF Page # Auto reply (controls whether the HTX242 transmits a DTMF memory sequence when it is DTMF paged). oFF or on. Time-out option (sets whether the HTX-242 limits transmissions). oFF, 1, 2, 3, 5, 7, 10, or 15. Keytone beep option. Auto duplex/simplex option (controls whether the HTX-242 uses the standard repeater offsets). oFF or on. DTMF auto send (controls whether the HTX-242 transmits the contents of the currently-selected DTMF memory each time you press PTT). oFF or on. 30 21 21 34 24 24 25 35 39 TROUBLESHOOTING Error Codes Your HTX-242 has the following three built-in error codes. tF Err —appears if you try to transmit outside the allowed range (see “Extending the Transmit Frequency Range” on Page 16). PLL Err —appears if the HTX-242’s PLL (phase-locked loop) section malfunctions. If turning the HTX-242 off then back on does not correct this error, take it to your local Radio Shack store to arrange for service. EEP Err —appears if the HTX-242’s EEPROM checksum fails. Try resetting the HTX-242 (see “Resetting the HTX-242” on Page 16). If this does not clear the error, take it to your local Radio Shack store to arrange for service. Common Problems and Solutions If your HTX-242 does not seem to be operating properly, check this section for a possible solution. Problem Possible Solutions Signal strength meter Be sure DTMF is not on the display. If it is, press DTMF to turn off DTMF page. shows a signal and BUSY appears, but no sound from speaker. Be sure T-SQL is not on the display. If it is, press T-SQL until neither T nor T-SQL appears. Be sure VOLUME and SQUELCH are properly adjusted. Be sure nothing is plugged into the EXT. SP jack. No controls operate. Be sure LOCK is not on the display. If it is, press F then LOCK to unlock the controls. Be sure LOCK on the microphone is set to its leftmost position. 40 Other party cannot hear your transmission. Be sure the duplex offset is set correctly. The display does not light when you press POWER. Check the power connections. Set the output power to high by pressing LOW so HIGH appears on the display. Check the fuse (see “Replacing the Fuse” on Page 41). Replacing the Fuse Your HTX-242 (and vehicle) are protected by a 15-amp fuse in the HTX-242’s positive (red) power wire. If the HTX-242 does not turn on, even when you are sure the power wire is properly connected to a 12V DC power source, check the fuse and replace it, if necessary. 1. Snap open the in-line fuse holder. 2. Remove the fuse from the holder, and slide the fuse out of the end connectors. 3. If the fuse’s filament is no longer intact, replace the fuse with a 15-amp 1 1/4 × 1/4-inch fuse (Cat. No. 270-1073). Caution: Use only a fuse of the recommended size and type. Using another type fuse, or defeating the fuse protection, could damage your vehicle or your HTX-242. If the fuse frequently blows, there is a problem with the HTX-242 or its wiring. Have that problem fixed as soon as possible. 4. Replace the fuse in the holder and snap it closed. 41 SPECIFICATIONS General Frequency Range (Factory) Transmit . . . . . . . . . . . Receive. . . . . . . . . . . . . Frequency Step . . . . . . . . . Frequency Stability . . . . . . Antenna Impedance . . . . . . Speaker . . . . . . . . . . . . . . . Microphone . . . . . . . . . . . . Operating Temperature . . . Dimensions (HWD) . . . . . . . . . . . . . . . . . . . . . . . . . . . . . . . . . . . . . . . . . . . . . . . . . . . . . . . . . 144 – 148 MHz . . . . . . . 136.000 – 174.000 MHz . 5/10/12.5/20/25/50/100 kHz . . . . . . . . . . . . . . . . . . ±10 ppm . . . . . . . . . . . . . . . . . . 50 Ohms . . . . . . . . . . . . . . . . . . . 8 Ohms . Electret Condenser (1.2 kOhms) . . . . . . 14 to 140°F (–10 to 60°C) . . . . . 1 5/8 × 5 9/16 × 6 3/16 Inches (42 × 142 × 160 mm) Supply Voltage . . . . . . . . . . . . . . . . . . . . . . . . . . 13.8 V DC (±15%) Receiver Intermediate Frequency 1st IF . . . . . . . . . . . . . . . . . . . . 2nd IF . . . . . . . . . . . . . . . . . . . Sensitivity 12 dB sinad . . . . . . . . . . . . . . 20 dB nq. . . . . . . . . . . . . . . . . Squelch Sensitivity Threshold . . . . . . . . . . . . . . . . Tight . . . . . . . . . . . . . . . . . . . . Spurious Response Attenuation . . . Adjacent Channel Rejection . . . . . . Modulation Acceptance Bandwidth. Hum and Noise . . . . . . . . . . . . . . . Audio Output Power at 10% THD . . Audio Distortion . . . . . . . . . . . . . . . Audio Response . . . . . . . . . . . . . . . Stand-by Current . . . . . . . . . . . . . . CTCSS Sensitivity. . . . . . . . . . . . . . DTMF Squelch Sensitivity. . . . . . . . 42 . . . . . . . . . . . . . . . . 21.4 MHz . . . . . . . . . . . . . . . . . 455 kHz . . . . . . . . . . . . . . . . . 0.25 µV . . . . . . . . . . . . . . . . . 0.39 µV . . . . . . . . . . . . . . . . . . . . . . . . . . . . . . . . . . . . . . . . . . . . . . . . . . . . . . . . . . . . . . . . . . . . . . . . . 0.1 µV 10 dB above threshhold . . . . Better than 70 dB . . . . Better than 70 dB . . . Better than 7.5 kHz . . . . Better than 40 dB . . . . .Better than 2.0 W . . . . . . . . . . . . . . . . 2% . . . . . . . . –6 dB/Octave . . . . . . . . . . . . 500 mA . . . . . . . . . . . . 0.15 µV . . . . . . . . . . . . . 0.2 µV Transmitter RF Power Output . . . . . . . . . . . . . . Maximum Deviation . . . . . . . . . . . . Hum and Noise . . . . . . . . . . . . . . . Audio Distortion . . . . . . . . . . . . . . . Audio Response . . . . . . . . . . . . . . . Spurious and Harmonic Emissions Frequency Error . . . . . . . . . . . . . . . Microphone Sensitivity . . . . . . . . . . CTCSS Tone Deviation . . . . . . . . . . DTMF Tone Deviation . . . . . . . . . . . Current Drain . . . . . . . . . . . . . . . . . . . . . . . . . . . . . . . . . . . . . . . . . . . . . . . . . . . . . . . . . . . . . . . . . . . . . . . 45 W (high)/10 W (Low) . . . . . . . . . . . . . . 5 kHz . . . . Better than 35 dB . . . . . . . . . . . . 3% (TX) . . . . . . . . . . +6 dB/Oct . . . . Better than 60 dB . . . . . . . . . . . ±10 ppm . . . . . . . . . . . 4 mV rms . . . . . . . . . . . 0.75 kHz . . . . . . . . . . . . 3.5 kHz . Less than 8 A at 45 W Less than 4 A at 10 W Specifications are typical; individual units might vary. Specifications are subject to change and improvement without notice. 43 SCHEMATICS 44 RF SCHEMATIC 45 DIGITAL SCHEMATIC 46 MICROPHONE SCHEMATIC 47 Radio Shack Limited Warranty This product is warranted against defects for 1 year from date of purchase from Radio Shack company-owned stores and authorized Radio Shack franchisees and dealers. Within this period, we will repair it without charge for parts and labor. Simply bring your Radio Shack sales slip as proof of purchase date to any Radio Shack store. Warranty does not cover transportation costs. Nor does it cover a product subjected to misuse or accidental damage. EXCEPT AS PROVIDED HEREIN, RADIO SHACK MAKES NO EXPRESS WARRANTIES AND ANY IMPLIED WARRANTIES ARE LIMITED IN DURATION TO THE DURATION OF THE WRITTEN LIMITED WARRANTIES CONTAINED HEREIN. Some states do not permit limitation or exclusion of implied warranties; therefore, the aforesaid limitation(s) or exclusion(s) may not apply to the purchaser. This warranty gives you specific legal rights and you may also have other rights which vary from state to state. We Service What We Sell 10/95 Radio Shack A Division of Tandy Corporation Fort Worth, Texas 76102 7A6 Printed in Korea