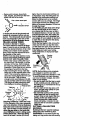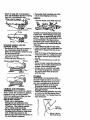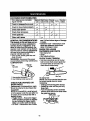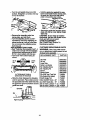
1
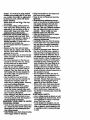
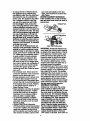
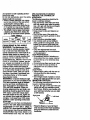
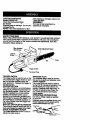
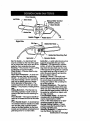
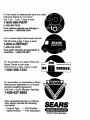
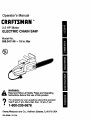
Operator's
Manual
CRRFTSMR.N
2.5 HP Motor
ELECTRIC CHAIN SAW
Model No.
358.341140 - 16 in. Bar
®
Read and followall Safety Rules and Operating
WARNING:
Instructionsbefore first use of this product.
"illl_
ir
•
For answers to your quest!ons about this product:
Call 7 am--7 pm, Mon--Sat, Sun, 10 am-7 pm
1-800-235-5878
Seam_oebuck
530-087666
0_17R8
and Co., Hoffman Estates, IL 60179 USA
Warranty
Safety Rules
Assembly
Operation
Maintenance-_
2
2
7
7
12
Service and Adjustments
Storage
.
Trouble Shooting
Spanish
Parts Ordering
13
15
15
18
Back
This v_arrdnb,
.
r and chain, which are expendable parts
and become worn'during hormal use.
If this Craftsman Electric Chain Saw is used for commemial purposes,
this warran_ app.lies for only 90 days from the date of purchase. If this
CraftsmanElectncChain Saw is usedfor rentalpurposes,thinwarranty
appliesfor only30 daysfrom thedate of purchase.This warrantyappliesonlywhilethisproductis in use in the UnitedStates.
WARRANTY SERVICE IS AVAILABLE BY RETURNING THE CRAFTSMAN
ELECTRIC CHAIN SAW TO THE NEAREST SEARS SERVICE CENTER IN THE
UNITED STATES.
This warranty gives you specific legal rights, and you may also have other rights which vary from state to state.
Roebuck and
Inc,, Hoffmen Estates
60179 U.S.A.
WARNING: When using an electric
chain saw, basic safety precautions, including the following, should always be
followed to reduce the risk of fire, electric shock, and injuryto persons. Read
all instructions.
WARNING: Always disconnectpower
sourcewhen maldngrepairs.Becausea
chainsaw is a high-speedwoodcutting
tool,carelessor improperusa of thistool
-_=can cause seriousinjury.
PLAN AHEAD
proved safety hard hat; and sound
barriers (ear plugs or mufflers) to protect your hearing. Regular users
should have hearing checked regularly as chain saw noise can damage
hearing.
Clothing
Gloves
• Restricttheuss'ofyeurssw to adult
userswhoundemtand
andcanfollow
the saf_y rules, precautions, and oper-
a_ng i_
found _ _s marn_
• Keep chgdrenaway. Do notlet vidtom
contsctchslnsaw or extermicncord.All
visitorsshouldbe I=pt at least30 feet
Safety
Shoes "_
f
Safety Chaps
NI
• Secure hair above shoulderlength.Do
not wear Ioo_...clothin_or jew.d_ they
, * Dress properly. Wear protective gear.
.cccccccc_n
get caught,n mov,_..garB.
.
AIw..
ays use steel-toed safety footwear
_eep all parts of your ocoy away rmm
with non-slipsoles; snug-rdtingcloththe chain when saw is running.
Do not handleor operatea _
saw
ing, heavy-duty, non-slip gloves; eye
F¢otection such as non-fogging,
when you am fatigued, ill,upset,orif
you have taken alcohol,drugs,or mevented goggles or face screen; an ap-
(lO mste_)aweyfrornworkarea
dication.Youmust be in good physical
cor_rdion.andmentallyalerL ff you have
any concFdonthat mightbe aggravated
by strenuouswork, check with doctor
before operating.
Watch what you are doing. Use commonsense.
_
::....
• Do not start cutting until you have a
" clear work area, secure footing, and
especially if you are felling a tree, a
retreat path. Keep work area clean.
Cluttered areas invite injudas.
OPERATE YOUR SAW SAFELY
• Do not operate with one hand. Sedous injuryto the operator, helpers, or
bystanders may result from onehanded operation. A chain saw is intended for two-handed use.
• Do not operate saw from a ladder or
in a tree.
• Make sure the chain will not make
contact with any object while starting
the saw. Never start the saw when the
guide bar is in a cut•
• Don't force chain saw. It will do the job
better and safer at the rate for which it
was intended.
• Do not put pressure on the saw, especially at the end of the cut. Doing
so can cause you to lose control
when the cut is completed.
• Stop the saw before setting it down.
Hand carry sew only when motor is
stopped. Carrythe chainsaw by the
fronthandlewiththe saw sty,
fmgor offtbe switck _le guide bar and
saw chainto the rear.
• Use the righttool, cut wood only.
Don't use chain saw for purpose not
intended;for example, don't usa
chain saw for cutting plastic, masonry,
non-wood buildin_ rnstedals.
• Usa extreme caution when cuffing
• small's_ brush and saplings because the tender matedal m.ay catch
the saw chain and be wh-ipp_l toward
- you or pull you off balance.
• When cuttinga limb that is under tension be alert for epnng back so you
will not be struckwhen the tension in
the wood fibers is released.
MAINTAIN YOUR SAW IN GOOD
WORKING ORDER
• Have all chain saw service performed
_ya Sears Service Center except the
listed in the maintenance saction of this manual.
•
• Ma_e-_ef_dn saw chain stops moving
when trigger switch is released.
and grease.
i free
Keepfrom
the oil
handles
dry and clean and
Keep oil cap andfastenere securely
tightened. •
• N-onco orming
re _cament
corrconants ortbe removalof safety devices
may osuse damage to tha unitand
_sta_eminjuw to the operatoror by• Usa only Craftsmanaccassodes and replacementparis as r_ommended. Never modi_,yoursaw.
• Maintain chain saw with care.
i Keep
and safer
unitsharp
performance.
and clean for better
Follow instructionsfor lubricatingand
changing accessodee.
• Unplug the chainsaw fromthe power
source when not in use, before servicing, and when changing accessories
and attachments, such as saw chain
and guard,
• Check for damaged parts. Before further use of the chain saw, a guard or
other part that is damaged should be
carefully checked to determine that it
will operate properly and perform its intended function. Check for alignment of
moving parts, binding of moving paris,
breakage of pads, mounting and any
other conditions that may affect its operation. A guard or other part that is
damaged should be properly repaired
or replaced by a Sears Service Center
unless otherwise indicated elsewhere in
the operator's manual.
• Do not operate a chain saw that is
damaged, improperly adjusted, or is
not completely and securely assembled. Inspect chain saw cords periodically, and if damaged have re-
paired by a Sears Service Center.
• When not in use, chain saws should
be stored in a dry, high or locked-up
place out of the reach of children.
• When storingsaw, unplug and use a
bar sheath or carrying case. Store idle
chain saw.
ELECTRICAL SAFETY
• Use a voltagesupply as shown on unit
• Avoid dangerous environments. Don't
usa appliances in damp or wet locations. Don't use in rain.
• Avoid dengemus situations.Do not
use in the presence of flammable liquids or gases to avoid creating a fire
or explosion and/or causing damage
to unit.
* To reducethe risk of aiectrical shock,
this appliancehas a polarizedplug
(one blade is wider than the other)and
will requirethe use of a polarizedextensioncord.The applianceplugwl]lfit
intoa polarizedextension cord ordy
one way. If the plugdoes notlit fully
intothe ex_ion cord,.mversethe
pbg. the
saw cords pedodioallyand if damaged, have repaired by a Sears Service Center.
GUARD AGAINST KICKBACK
Fonow
aasafety
ruk te.h p.avoUk k-
back and otherforcaswhichcan rasultin
serious"
"
qury.
Kickback
Path
doesnotfit,obt
a correctpolarized extensioncord. A
polarizedextensioncord will requirethe
of a polarizedwell outlet.This plug
w_llfit intothe polarizedwail outistonly
one way. If plug does not fit fullyinte
the wail outlet,reveme the plug. ffthe
_ectridanSbll
does not _ contacta qualified
to installthe proper wall outlet. Do not changethe equipmentplug,
extensioncord receptacle,or extension
cord plug _ any way.
.
• To reduce nsk of electricalshock, use
extensioncordsspecltk_dly_
as
suitablefor outdoorappliancesha_ng
electricalratingnot lessthan the rating
of unit.Cord must be markedwithsuffix
"V_. Make sure your extensioncord is
in good condition.Inspectextension
cord before use and replace ifdamaged. An undersizedextensioncord
will cause a drop in linevoltageresulting in lossof power and overheating.If
in doubt,use the next heavier gauge.
The lowerthe gauge number,the
heavierthe cord (see =Selectan extension cord').
• Do not abuse cord. Never carry the
unit by the extension cord or yank extension cord to disconnect unit.
• Secure extension cord to power cord
to prevent disconnectionfrom unit.
• Do not use the unit if the switch does
not turn the unit on and off properly,or
if the lockout does not work. Repairs
to the switch must be made by a
_--Sears Service Center.
• Keep extension cord clear of operator
and obstacles-at all times. Position
cord so that it will not be caught on
brancbas. Do not expose cords to
heat, oil, water, or s...ha.,
rp edges.
* To avo=dthe poss=bdityof electric
shock, avoid body contact with any
grounded conductor, such as metal
fences or pipes.
.
• Ground Fault Circuit Interrupter
(GFCI) protection should be provided
on circuitor outletto be used. Receptacles are available having built-in
-GFCI protection and may be used for
this measure of safety. Inspect chain
•
Clear The WorldngArea
WARNING: Rotational Kickback can
occurwhen the moving chain contacts
an object,at the upper portionof the tip
of the guide bar. Contact at the upper
portion of the tip of the guide bar .can
cause the chain to dig intothe object,
which stops the chain for an instant.
The resultis a lightningfast, reverse
reaction which kicksthe guide bar up
and back toward the operator.
Pinch-Kickbackand Pull-In occur when
the chain is suddenly stopped by being
pinched, caught, or by contacting a foreign object in the wood. This sudden
stoppingof the chain resultsin a reversal of the chain force used to cut wood
and causes the saw to move in the opposite directionof the chain rotation.
Pinch-Kickbackdrives the saw straight
back toward the operator. Pull-In pulls
the saw away from the operator.
KICKBACK WARNING:
IOckbackcan occur whan the moving
_
contacts.an objectat the upper
porSonof the Upof the guidebar orwhen
the..w_:l, doses in and p_ches the saw
cl_in in the cut. The _xnputed }Ockbeck
Angle(CKA) rmtedon yoursaw and rm_d
in the followingCKA Tablerepresentsthe
angleof Idckbackyour bar and chain
cord_
will have wi'_n tested io
acosrdancewith CSA and ANSI standard= Computod
ang mp. od
the CKA cokrnn indicate tetai anergy and
angleassociatedWl_'_uta cbainbrako.
purches rep
g osmo consU-
erationsshouldbe givento the lower
CKA values. In all cese_ lower CKA vak
4
ues represent a safer operating environCKA requirements
per standard.
merit for the user.
REDUCE THE CHANCE OF
Do not rely exclusively upon the safety KICKBACK
devices built into your saw.
The following presauliom dlould be fal• Either of these reactions may cause
lowed to minimize Idckback:
you to lose control of the saw which
. • Grip saw firmly. Hold chain saw finnly
coul.d result in sedous, ih_lry. -"....
withbothhandswhenmotorisrunning.
• _,incning the saw cnaJn along the tip
Usa a firm grip with thumbs and fingers
* of the guide bar may push the guide
encircling chain saw handles.
bar rapidly back toward the operator.
• Do not over reach.
-, "lip cohtact in some cases may cause
• Keep proper footing and baiance at
a lightning fast REACTION, kicking the
all times.
guide bar up and bsck toward operator.
• Don't let the nose of the guide bar
CKA TABLE
contact a log, branch, ground or other
obstruction.
BAR
CHAIN
MODEL
P/N
358341140
71-36366
_
P/N
16"
71-36_1
CK/=
2_'
CHAIN BRAK]E & CKA ANGLE
WARNING:
The effectiveness of a
chain brake in reducing operator injuries
has not yetbeen fully determined. We
cannot represent that a chain brske is an
effective safe_ device to preventor reduce the hazard of injurias resulting from
kJc_
DO NOT ASSUME THAT THE
CHAIN BRAKE WILL PROTECT YOU IN THE
EVENT OF A KICKBACK..Instead, use the
saw properly and carefully to avoid Idckback. Reduced KT_kback bars and Low
l_]ddoack
chainsreducethe hazard of
Idcld:_ck and are recommended. Repairs
on a chain brake should be roads by a
Sears Service Center. Take your unit to
theplaceofpurchaesif purchesed
from
a Servicing Center, or to the nearest
SearsServiceCenter.
WARNING: Computed
kickback
angle
(CKA) listsd on your saw and rstsd in the
CKAtabis
represents
_
of
yourbar _d
d'minocrabinatkmswUl
havewhen teetedin_xx_:lancewiLh
CSA ar_SI
standards. When pur.
chasing
rel_ceme_barandch_r_coosiders_ons
should
begivan
Tott_elower
CKAvalues.LowerCKAvaluesrepresentsafer
ang|es
totheuser,
.hig.her
." _-
Don't cut above shoulder height.
Use devices such as low Id_ck
chain, guide bar nose guards, chain
brakes, and special guide bars that
reduce the risks associated with kickback.
• Only use replacement bars and
chains specified by the manufacturer
or the equivalent.
Avoid Pinoh-Kickback:
• Be extremely aware of situations or
obstructions that can cause material
to pinch the top of or otherwise stop
the chain.
• Do
logat
Do not
not cutmore
twist the thanone
saw as the
bar aistime.
withdrawn from an undercut when
bucking.
Avoid Putl-ln:
• Always begin cutting with the saw at
full speed and the saw housing
againstwood.
• Usewedgesmadeof plasticorwood.
Never use metal to holdthe cut open.
MAINTAIN CONTROL:
The following precautionsshould be followed to minimize Idckback.
• A good, firm grip on the saw with both
hands will help you maintaincontrol.
Don't let go. Grip the rear handle with
your right hand whether you are right
or left handed.
uas"_r_te..moroangleandhigherkick
. enengles. In all cases lower CKA valuss
_,ant
a sa_ opera_ an_onmant
for the user.
The guide bar and chain combination(s)
shown in the CKA Table meet kickback
requirements of CSA Z62.1, Z62.3, &
ANSI B175.1 when used on saw(s) Ibtod
in this manual. Usa of barand chain combinaflor_o"ther than those listed is not
recommended and may not meet the
• Wrap the fingers of your left hand
over and around the front handlebar,
and your left thumb under the front
handlebar.
• Low Kickback Chain has met kickback performance requirements when
tested on the representative sample
of these chain saws specified in ANSI
B175.1.
LowKickbackChain
• Whenmakingbuckingor pruning
cuts,positiohi_/our
left h_mdonth.e
fronthandlebarso it is ona stnught
line with your righthand on the roar
handle. Stand slightlyto the left side
of the saw to keep your body from being in a direct line with the cutti'ng .
chain. Keep your left arm straight with
the elbow locked.
• Stand with your weight evenly balanced on both feet.
• Do not overrsash. You couldbe drawn
or thrownoff balance and lose control.
• Do not cut above shoulder height. It is
difficultto maintain control of saw
• ,_..P---_,
_
_=_
Contoured Depth Gauge
Elongated Guard Unk
Deflects Iqcld3ackForce
And Allows Wood To
Gradually Ride Into Cutter
SAFETY NOTICE: F.xposurato
vibrationsthrough prolonged use of
hand tools could cause blood vessel or
nerve .damagein the fingers, hands,
and j0untsof people prone to circulation
disoiders orabnormal swelling.
Prolonged use in cold weather has
been Innkedto blood vessel damage in
otherwise healthy people. If symptoms
occur such as numbn.ess,pain, loss of
aboveshoulderheight.
strength, change m skin color or
KICKBACK SAFETY FEATURES
texture, or lossof feeling in the fingers,
WARNING: The followingfeatures are hands, or joints, discontinuethe use of
this tool and seek medical attention. An
includedon your saw to help reduce
hazard of kickback; however, such fee- anti-vibration system does not
guarantee the avoidance of these
turns will not totally eliminate this danger. Do not rely only on safety devices. problems. Users who operate power
tools on a continual and regular basis
• Handguard: designed to reduce the
must closely monitor their physical
chance of your left hand contacting
condition and the condition of this tool.
the chain if your hand slips off the
DOUBLE INSULATION
front handlebar.
• Positionof front and rear handlebars: CONSTRUCTION
designed with distance between han- This unitis DoubleInsulatedto help prodles and "in-line"with each other. The tectagainstelecl_ shock.Double insulation_
consistsof two sspemte
spread and "in-line"positionof the
=layers"
of
electrical
insula6oninsteadof
hands provided by this design work
together to give balance and resis_"
"withthis insulationsystemars
tance in controllingthe pivot of the
notIntendedto
ba grounded.No groundsaw back toward the operator if kickingmeans
is
providedon
this unit,nor
back occurs.
shoulda
meansof
grounding
be added
• Reduced-Kickback Guide Bar. detothle
untL
signed with a small radius tip which
seduces the size of the kickback dan- Safetyprecautionsmustbe observed
when operaiingany electricaltcol.The
ger zone. This type bar has been
deuceuU!on
r ovk .
demonstrated to significantlyreduce
the number and sedousness of kickbacks when tested in accordance
failure.
with ANSI B175.1.
STANDARDS: This product is listed by
Underwriters Laboratodos, Inc. in acSmall Radius
cordar_e with UL Standard 1662 and
Tip Guide Bar
CSA Standards Z62.1 and Z62.3 and
ANSI B175.1.
SAVE THESE INSTRUCTIONS
-
CARTON CONTENTS
Models358.341140
ChainSaw(fullyassembled)
" BarShsath
_
........
partsmissingor damaged,pleasecall
1-800-235-5878
ASSEMBLY
Examine parts for damage. Do not use
damaged parts.
NOTE: If you need assistance or find
Your saw ts fully assamblad; no .
assembly is necessary.
KNOW YOUR SAW
READ THIS OPERATOR'S MANUAL AND SAFETY RULES BEFORE OPERATING YOUR CHAIN SAW. Compare the Illustrationswith your unit to farnlliadze
yourself with the location of the various controlsend adjustments. Save this
manual for future reference.
OiLerActuator/
Bar Oil Cap
Chain AdjustmentScrew
Lockout
B_ton
Chain
Tdggar Switch
Recessed Plug
TRIGGER SWITCH
The trigger switch is used to tum on the
unit. Squeeze the trigger switch to operate the unit after lockoutbutton has
RECESSED PLUG
The recessed plug is used to connect
the saw to an approved extension cord.
CHAIN TENSION
It is normal for a new chain to stretch
tumbeenthePUShedunit
off.in"
Release the trigger to duringfirst 30 minutes of ope.rat_n. You
LOCKOU:r-BU'rTON
should check your chain tensnonfreThe Lockout Buttonis a control feature quently. Readjust chain after every 15
designed to prevent the metor_-fi'om
be- minutes of operation.See Chain Tening accidenUy stadad. When the rear
sion under the Service end Adjusthandle is gdpped in a normal cutting
ments section.
position,the lockout button can be
OPERATING INSTRUCTIONS
pushed in by the thumb, permitting the
Use onlya vobagesupplyas specified
nndexfinger to squeeze .thetrigger. It is on your unit.
not necessaW to maintain pressure on
Extensioncords are avallabisfor this unit.
the lockoutbutton once the trigger has
Secureextonsioncordto powercordto
been engaged.
.
prevent_
fromunit.
BAR OIL CAP/OILER ACTUATOR
The oil cap is used to access the bar oil
tank end pressed to supply oil to chain.
CHAIN ADJUSTMENT SCREW
The chain adjustment screw is used to
adjust the chain tension.
_
_
_
_
I11
SELECT AN EXTENSION CORD
MINIMUM WIRE GAUGE
RECOMMENDATIONS
Volts I100ft. orless
120
14 o
A.W.G.
I
100ft.tot50ft. I
12
A.W.G.*
"Americln WI_ GwJge
BEFORE STA_ITING S_.W
WARNING: Be sure to read the electrical safety information in the safety
rules section of this manual before you
begin. If you do not understandthe
electrical safety Informationdo not attempt to use your uniL Seek help from
someone that does understand the informationor call the customer assistanca help line at 1-800-235-5878.
GUIDE BAR AND CHAIN OIL
The manuallyoperatedchaln,oilerpmvtdeslubrica_onto the chainand guide
Imr. Be sum to fillthe bin"o_ltankbofom
ead_ cuttingsession.Tim oilero_liv'ator/
bar o, cap mus_be um_l n_julmlyand
oftenenoughto maintaina thin_Im of on
on tha bar and chainwh_ sew Is cutting.
It is recommended that the o_r actuator/
bar oil cap be operatedsix (6) times per
minute and heldfor appro_matelythree
(3) secondseach time it is pressed. For
maximumguide bar and chainI'Ve,we
recommendyou use Craftsmanchain
saw bar o_1.If Cral_rnan bar o=1is not
available,you may use a goodgrade
SAE 30 oil unblyou are able to obtain
_man
b.m_. The oiloutputis manuamymetered dunngoperation. Use a funnel to fillthe tank. Replaceoil cap securely. Checkoil level after every 15
minutesof operate.
STOPPING YOUR SAW
• Release the trigger switch.
If motor does not stop, disconnectthe
extension cord.
STARTING YOUR SAW
_Connect the saw to a power source
using the proper__siz_
extension cord;
see SELECT AN EXTENSION CORD.
• Push in switch lock out button.
• Squeeze and hold the tdgger switch.
OPERATING TIPS
• Check chain tension before first use
and after I minute of operation. See
Chain Tension in the Maintenance
section and Service and Adjustment
section.
• Cut wood only. Do not cut metal, plastics, masonry, non-wood buildingmateriels, etc.
• Stop the saw if the chain strikes a foreign object. Inspect the saw and repair parts es necessary.
• Keep the chain out of dirt and sand.
Even a small amount of dirtwill quickly dull a chain and mcresse the posel• bilityof kickback.
Practice cuttinga few small logs using _
, the following steps. Thin will help you
got the =feel" of using your saw before
you begin a major sawing operation.
• Squeeze the trigger switch and allow
unitto rea.chfull speed before cutting.
• Begin cutting with the saw frame
against the log.
• Kee..pthe motor at full speed the entire time _u are cutting.
• Release trigger switch as soon as cut
is comlpIsted, allowing motor to stop.
• To avoid losingcontrolwhen out is
complete, do not put pressure on saw
at end of cut.
• Stopmotorbeforesettingsaw down.
TREE FELLING TECHNIQUES
Checkfor brokenordead branches
whichcanfall wh=lecuttingcausingseriousinjury.Do notcutnear b_'ldingsor
electricelwirss ifyoudo notknowthe direct_ of treefall, norcutat nightsince
youwillnotbe ableto see well, norduringbed wsathersuchas rain,snow,
strongwinds,etc. Ifthe tres makes contactwith any _T_lyline, the ubqitycompla-
ouldbe
• _=_mfut_.planyour saw=ngoperationin
• Clear the work area. You need a clear
area all aroundthe tree so you can
have securefooting.
• Studythe naturalcondtJo_ that can
cause the tree to fell in a parlJcular
direction,suchas:
• The wind directionand speed,
• The lean ofthe tree.The lean of a tree
might not be apparentdue to uneven
orsloping terrain.Usa a plumborlevel
to deten'ninethe directionof tree lean.
• Weight and branches on one side.
• Surroundingtrees and obstacles,
• Look for decay and roL If the trunk is
rotted,if can snap and fall toward the
operator.
• Make sure there is enough room for
the tree to fall. Mamteln a distance of
2.1/2tree lengthsfrom the nearest
person or other objects. Motor noise
can drown out a wammg call.
R
• Remove dirt, stones, loose bark,
nails, staples, and wire from the tree
where cuts are to be made.
higher than the horizontal notchingcut
as illustrated.Keep the felling back cut
parallel to the horizontal notchingcut.
Make the felling back cut so enough
wood
is left to act as a hinge. The hinge
Plan a clear retreat path
wood helpsthe tree fromtwisting and
falling in the wrong direction. Do not cut
through the hinge.
As the feel_g cutgets dose ot the hinge
the tree shouldbeginto fall. If them .is
any chancethat the tree may notfall in
the desked cruectionorit may rockback
A retreat path should be planned and
and bind the saw chain, atop cuttingbecleared as necessary before cuts are
started. The retreat path should extend fore the fellingbeck cutis complsteand
wedges of wood, plasticor aluminum
back and diagonally to the rear of the
to
open
the cut and dropthe tree along
e_-'ted rm of fall as illusl_ed abeve.
the desiredline of fail.
FELLING LARGE TREES
Whon the tree bsgins to fall,remove the
_6hinchesin diameter or larger)
cheinsaw fromthe cut, stop the motor,
e notch method ksused to fell large
put the chainsaw down, then uss the retrees. A notch is cut on the side of the
tree in the desired directionof fall. After treat path planned.Be alert for overhead
limbsfallingand watchyour foo_ng.
a felling cut is made on the opposite
Hinge holds tree on stump and helps
side of tree, the tree will tend to fall in
control fall,
the direction of the notch.
. ....
-,"-
.
,-
Y#
NOTE: If tree has large buttress roots,
remove them before making the notch.
NOTCH CUT AND FELLING TREE
• Make notch cut by cuffing the top of
the notch first. Cut through 1/3 otthe
diameter of the tree. Next complete
the notch by cuffingthe bottom. See
illustration.Once notch is cut, remove
the wedge of wood from the tree.
• After removingthe wood, make the
felling cut on the opposite side of the
• notch. This is done by making a cut
about two inches higher than the center of the notch. Thkswill leave
enough uncut wood between the felling cut and the notch to form a hinge.
This hinge will help prevent the tree
from falling in the wron direction.
Final cut hem
Opening
of felling
Closing of
notch
NOTE: Before felling cut is complete,
use wedges to open the cut when
necess.aryto controlthe direction of fall.
To avoid kickback and chain damage,
use wood or plastic wedges, but never
steel or iron wedges.
• Be alert to signs that the tree is ready
to fall: crackingsounds,widening of
the felling cut, or movement in the up-
. per branches.
As tree starts to fall, stop saw, put it
down, and get away quicklyon your
planned retreat path.
• Be extremaly sautious with partially
offal
fallen trees that may be poorly supported. When a tree doesn't fall completaiy,set the saw aside and pull
down the tree with a cable winch,
block and taclde, or tractor.Do not
Notching Undercut - Make the notch
use your saw to cut down a partially
1/3 the diameter of the tree, perpendicfallen tree.
ular to the direction of fall as illustrated.
Make the lower horizontal notchingcut cUTrlNG A FALLEN TREE
BUCmNG)
fl..rs.L
This will help to avoid pinching of
uckmg m thetermusedforcutting
a
eithe.r,the saw chain or the guide bar
fallen
treetothedesiredlogsize.
when tllrSecond notch is being made.
Felling Back Cut - Make the felling
WARNING: Do not stand on the log
back cut at least 2 inches (50.Bmm)
being cuL Any portion can roll causing
"R_-cut| r,
Notch
"_[_.
/ o.lr
/
loss of footing and control. Do not stand
downhill of the log being out.
IMPORTANT POINTS
ing in injury and/or damage to the saw.
Stop the saw; drive a wedge of plastic
or wood into cut until the saw can be
• It is importantto make sure your footing removed easily. Restart saw and careis firm and your weight is evenlydistn'b- fully reenter the cut. Do not use a metal
uted on both feet. When poss_e, the
wedge, Do not attempt to restart your
logshouldbe raised and suppodedby saw when it is pinched or hung in a log.
Use a wedge to remove pinchedsaw
• use of limba,__ogs,
or blocks.
• Cut only onelog at a time.
Cut shattered wood very carefully;,
sharp pieces of wood could be flung
toward operator.
• Use a sawhorse to cut small logs.
Never allow another person to hold
the log while cutting and never hold
the log with your leg or foot.
• Do notcut in an area where logs,
androots
aretan . Draglogs
•
•
•
•
il_Oa dsarareab_Z_ cuing._.
When "cuttingthrough', to maintain
complete control, release the cuffing
pressure near the end of the cut without looseningyour grip on the chain
saw handles.
Don't let the chain contact the ground.
After completing the cut, wait for the
saw chain to stop before you move
the chain saw.
Always stopthe motor before moving
from tree to tree.
__k
Jl_
Tumsaw OFF andusea plasticor
woodenwedgeto forcecutopen.
Overcuttlng begins on the top side of
the log with the bottom of the saw
against the log. When overcuttinguse
lightdownward pressure,
Undercuttlng-"-_.
Undercutting involves cutting on the
underside of the log with top of saw
against the log. When undercutting use
light upward pressure. Hold saw firmly
and maintain control. The saw will tend
to push back toward you.
Standon uphillside
WARNING: Never tum saw upside
downto undercut.The saw cannot be
controlledin this position.
When the log is supported along its entire length as illustratedbelow, it is cut
from the top (overbuck).
when cuffing because
roll
The chain saw operator should keep on
the uphillside of the terrain as the tree
is likelyto roll or slide downhill after it is
felled.
When bucldngon a slopealways stand
on the uphillside of the log, as illustrated
above. When "cutting]
through',to maintain completecontrol release the cutting
pressurenear the end of the cutwithout
relaxingyour grip on the chainsaw handes. Don't let the chain contactthe
ground.After completingthe cut, wait for
the saw chain to stopbefore you move
the chain saw. Always stopthe motorbefore moving from the tree to tree.
BUCKING TECHNIQUES
WARNING: If saw becomes pinched
:9.1'hung in a log, don't try to force it out.
You can lose control of the saw, result-
Always mal_.eyour first cut on the compressionside of the log.
Secondcut
Second cut
Rrst cut on compression side of log
BUCKING WITHOUT A SUPPORT
• Overcut through 1/3 of the diameter of
the log.
• Roll the log over and finish with a second overcut.
10
• Watchfor logswith a compression
• Frequentlyclearbranchesoutof the
side.Seeillustrationabovefor cuffing way to avoid tnppmgover them.
logs with a compression side.
Usinga tog for support f 2ndC_
......
_'ISt
out
Cut
-
LIMBING
Remove Small LimbsWith One Cut
Umbing is removingthe branches from
a fallen tree. When Umbing, leave larger lower limbsto supportthe log off the
ground. Remove the small Limbs in one
cut as illustratedin the figure above.
Branches under tension should be cut
from the bottom up to avoid bindingthe
chain saw.
BUCKING USING A LOG OR
SUPPORT STAND
Limb a tree only after it is cut down.
Leave the larger limbs undemeath the
• Remember your firat cut is always on
felled
tree to supportthe tree as you
the compression side of the log.
work.
(Refer to the _lostration below for your • Start at the base of the felled tree and
first and second cut)
work toward the top, cuffing branches
• Your first cut shouldextend 1/3 of the
and limbs. Remove small limbswith
diameter of the log.
one cut.
• Finish with your second cut.
• Keep the tree between you and the
chain.
• Remove larger, supportingbranches
Using/_Cut
with the 1/3, 2/3 cuttingtechniques descdbed in the buckingsection.
• Always use an overcut to cut small
and freely hangin_ _imbs. Undercutting could cause hmbsto fall and
pinch the saw.
/
L
LIMBING AND PRUNING
WARNING: Never climb-int6 a tree to
limb or prune. Do not stand on ladders,
platforms, a log, or in any position
which can cause you to lose your balance or conb'olof the saw.
IMPORTANT POINTS
• Watch out for spdngp0les.
Springpoles are small size limbs
which can whip toward you or pull you
off balance. Use extreme caution
when cuttingsmall size limbs.
• Be alell for springback, Watch out for
brenekeethat are bent or under pressure. Avoid being struck by the
branch or the saw when the tension in
the wood fibers is released.
PRUNING
WARNING: Limitpruning to limbs
shoulder height or below. Do not cut if
branches are higher than your shoulder. Get a professionalto do the job.
• Make your first cut 1/3 of the way
through the bottom of the limb.
• Next make a secondcut all the way
through the limb.
• Finish-the pruningoperation by using
an overcutso that the stump of the
limb protrudes1 to 2 inches from the
trunk of the tree.
Second cut
First cut
3rd cut 1to 2 in.
f_m trunkof b'ee
CUSTOMER
RESPONSIBILITIES
Fill in dates as you complete
regular service
Check for dar_aged/wom
Before After Every Every Yearly
Use
Use 15 min. 5 hrs.
parts
p.
,
v.,
Check for loose tasteners/parts
p,-
y-
Check chain tension
v"
/I
Check chain sharpness
p-
v"
Check guide bar
_,
p,,
Clean unit & labels
p-
p,,
p,,
GENERAL RECOMMENDATIONS
The warranty on this unit does not cover items that have been subjected to
ope.rator abuse or negligence. To recewe full value from the warranty, the
operator must maintain unit as instructed in this manual. Vadous adjustments
will need to be made periodically to
propedy maintain your unit.
• Once a year, check guide bar and
chain for wear.
WARNING:
Disconnect the power
source before performing maintenance.
LUBRICATION
1 Bar
Sprocket
Service
Dates
2 BarOil
Fill Cap
saw if oil tank shows signs of damage
or leaks.
• Extension Cord - Discontinueuse if
chain saw extension cord shows
signs of damage or wear.
CHECK FOR LOOSE
FASTENERS AND PARTS
• Bar Clamp Nut
• Chain
° Bar AdjustingScrew
CHECK CHAIN TENSION
• Use the screwdriverend of the bar
tool to move chain around guide bar
to ensure kinks do not exist. The
chain should rotate freely.
I"
1 Use sprocket lubrication
2 Use Craftsman chain saw bar oil
CHECK FOR DAMAGED OR
WORN PARTS
. _Replacement of damaged/wom parts
should be referred to your Sears Service Center.
NOTE: It is norm_ for a small amount
of oil toappear under the saw after motor stops. Do not confuse this with a
leaking oil tank.
• Td_ger Switch - Ensure the tdgger
switch functions propedy by s,queezing and holding the tdgger switch.
Make sure motor starts and stops.
• Oil Tank- Discontinue use of chain
Bar Clamp Nuts
NOTE: It is recommended that the saw
be tumed upside down for chain
tensioning.
• Unplug unit from the power source.
• Loosen bar nuts until they are only
finger tight.
• Turn the adjusting screw clookwisa
until the drive links on the chain enter
the guide bar groove.
Drive Unks
12
NOTE:Totightenthe chain,tumthe
adjustingscrewclockwise;to loosen
the chain,'tumthe adjusting screw
counterclockwise.
AdjustingScrew
• Check the tension by lifting the chain
from the guide bar. Remove some of
the stiffness in the chain by pulling
down and letting go of the chain several times.
Check the conditionof the guide bar
each time the chain is sharpened. A
worn guide bar wiUdamage the chain
and make cutting difficult.To maintain
guide bar:.
• Disconnect the chain saw from the
power source. See instructionsunder
"Chain Replacement'.
• Remove bar and chain from saw
• Clean all sawdust and any other
debris from the guide bar groove and
sprocket hole after each use.
Remove Sawdust From Guide
Sprocket Hole
• Continue tuming the adjusting screw
until the tension is correct.
• Tighten bar mounting nuts with a
wrench.
• Recheck chain tension.
CHECK CHAIN SHARPNESS
A sharp chain makes wood chips. A
dull chain makes a sawdust powder
and cuts slowly.
CHAIN SHARPENING
Chain sharpening requires special
tools. You can purchase sharpening
tools at Sears or go to a professional
chain sharpener.
CHECK GUIDE BAR
.Condit_one.which require guide bar
malntsnanca:
has to
forced
through
the cut.
i Saw
Saw cuts
to be
one
side or
at arJangle.
Inadequate supply of oil to the bar
and chain.
CHAIN REPLACEMENT
WARNING: Avoidaccidental
stadJn_
/Owaysunplugsaw frompowerscuma
before_
a bar and/orcbai_
CA I_i"IONG Wear protective gloves
when IT'4fidlingchain. The chain is
sharp and can cut you even when it is
not moving..
• Add lubricant to sprocket hole after
each use.
• Burring of guide bar rails is a normal
process of rail wear. Remove these
burrs with a flat file.
• When rail top is uneven, use a flat file
to restore square edges and sides.
Rle Edges and
sides Square
Worn Groove
Correct Groove
Replace the guide bar when the groove
is worn, the guide bar is bent or
cracked, or when excess heating or
burringof the rails occurs, If replacement is necessary, use only the guide
bar specified for your saw in the repair
parts list or on the decal located on the
chain sew.
CLEAN UNIT & LABELS
• Clean the unit and labels using a
damp cloth with a mild detergent.
• Wipe off the unit and labels with a
clean dry cloth.
It is normal for a new chain to stretch
during the first 30 minutes of operation.
You should recheck your chain tension
frequently and adjust the chain tension
as required. See "Check Chain Tension" in the Maintenance section.
•Tum the unit upside down on a flat
surface. Straighten out chain, then lay
it on a flat surface.
• Hold the guide bar against the saw
frame and install thebar
clamp plate.
Be sure the tab on the bar clamp
plate is toward the rear of bar.
,.,..=_
Adjusting Pin Slot -.
laD
Adjusting
Screw
Plate _
Bar Nuts
• Remove bar mounting nuts, bar
clamp plata, and old chain.
• Turn the adjustingscrew counterdookwisa to move the adjusting pin
almost as far as it will go to the rear.
Do not remove the adjusting screw
from the unit.
REPLACEMENT
SAW CHAIN
• See "Customer Serviceable Parts'. A
chain must comply with the kickback
performance requirements of ANSI
B175.1 when tested with this saw.
• Hold chain with cutters facing as
shown.
Tip of
Bar
Chain
Saw
\
CUBERS MUST FACE IN
DIRECTION OF ROTATiON
• Slide the chain between the housing
and the sprocket. Place chain around
the sprocket and fit the drive links into
the guide bar groove and then around
guide bar nose.
II
, Secure the guide bar and bar clamp
plate with the bar nuts; tighten finger
tight only..
CAUTION: If saw chain is installed
backwards, the saw will vibrate excessively and will not cut wood.
CHAIN ADJUSTMENT
See "Check Chain Tension" in
Maintenance section.
CUSTOMER
SERVICEABLE
PARTS
WARNING:
Use of any other accessory or attachment might present a risk
of iniury to the operator.
REPLACEMENT PART
PART NO.
Hex Nuts
Oil Cap
Guide Plate
5300153O3
_82
530029285
53OO25873
Safety Lock Button
,5,3O015514
Bar AdjustingScrew
53O023492
Bar AdjustingPin
Spacer
530015832
Spacer Screw
530015835
7136524
File(5/32"d'_)TwinPak
7136565
Rle Guide (Re Holder)
7136557
Depth Gauge Tool
Xtra GUARD ® Chain -16"
713629
Lo-lrucke Guide Bar - 16"
I 7136366
Bar & Chain Lubricant-1 qt :7136556
Bar & Chain I.ubricant-1 gal 7136554
Sprocket
Rig
14
Prepareyourunitfor s..t.orage
at the end EXTERNAL SURFACES
of theseasonor if it wdlnot be usedfor If yourchainsawis to bestomdfora
30 daysor more.
_
......
periodof t_3e, clean itthoroughly
" WARNING:
.iI_e_hs_oraoe.
Storeinadeen d_ =e_
= Allow the motor to cool, then secure
the unit before stodng or tr._rting.
• • Store chain saw and extenszon cord
in a well ventilated area
• Store chain saw with all guards in
place and positionchain saw so that
any sharp object cannot accidentally
cause injury.
• Store chain sew unplugged, well out
of the reach of children.
TROUBLESHOOTING
TROUBLE
Chain does not
move when
tdgger switch
is engaged.
I.i_h_ oil external metal surfaces and
gu,de bar,
• Oil the chain and wrap it in heavy
paper or cloth.
To prevent chain oil seepage dudng
storacje,store _e saw as follows:
• ups,de down if stored on a shelf, or
• hung on a hook or nail through the
hole in the bar
CHART
CAUSE
•
•
•
Chain tension too tight.
Guide bar rails
pinched.
Trigger Switch failure.
REMEDY
• See "Chain Tension."
• Repair or replace.
•
•
• Circuit breaker
tdppedfiuse blown.
Chain clatters
or outs
roughly.
•
•
•
•
•
Chain tension incorrect.
Cutters damaged.
Chain wom.
Cutters dull, impropedy
sharpened, or depth
gauges too high.
Sprocket worn.
I
!ChaJnstops
• Chain cutter tops not
within the cut.
filed flat.
• Guide bar burred or
bent;,rails uneven.
Oil inade_luate
for bar and
chain
lubrication.
•
•
Chain cuts at
• Cutters damaged on
one side.
• Chain dull on one side.
• Guide bar bent or wom.
an angle.
Oil tank empty.
0il outlet clogged.
Guide bar oil hole
Contact Sears Service.
Reset circuit breaker/
replace fuse.
• See =Chain Tension."
!• Resharpen or replace chain.
!• Resharpen or replace chain.
• See"Chain Sharpening"
instructions.
Contact Sears Service.
• See the chain sharpening
instructions.
• Repair or replace guide
bar.
• Fill oil tank.
• Contact Sears Service.
• Remove bar and clean.
blocked.
•
See "Sharpening Chain."
See "Sharpening Chain."
•" Replace guide bar.
If situations occur which are not covered in this manual, use care and good
judge_tmt_lf you need assistance, contact Sears Service or the CUSTOMER
ASSISTANCE HELPLINE at 1-800-235-5878.
Front Handle
Left Side
Saw Chain.
Manual Oiler Control
Switch Lockout
Rear Handle
Guide Bar
Power Cord
Right Side
_o_'nting
/_
Pad
Sprocket J
Bar Tip Guide - An attachmentthat
may be providedon the end of the guide
bar to preventthe chain at the end of the
_uide bar from contactingthe wood.
cking- The process of cross cutting
a felled tree or log into lengths.
Chain Brake -A device used to stop
the chain saw.
Chain Saw Powerheed - A chain saw
without the saw chain and guide bar.
Clutch - A mechanism for connecting
and disconnectinga driven member to
and from a rotatingsource of power.
Ddve Sprocket or Sprocket - The
toothed part that drives the saw chain.
• -elling- The process of cutting down a
tree.
Felling Back Cut --The final cut in a
tree felling operation made on the opposite of the tree from the notchingundercut.
Front Handle - The support handle located at or toward the front of the chain
saw.
Front Handle Guard - A structuralbarder between the front handle of a chain
saw and the guide, typ!callylocated
dose to the hand position on the front
.handle and sometimes employed as an
=aGtivating lever for a chain brake.
_- Spocket Guide
Guide Bar- A solid railed structure that
supports and guides the saw chain.
Kickback- The backward or upward
motion,or both of the guide bar occurring when the saw chain near the nose
of the top area of the guide bar contacts
any object such as a log or branch, or
when the wood closes in and pinches
the saw chain in the cut.
Kickback, Pinch - The rapid pushback of the saw which can occurwhen
the wood closes in and pinches the
moving saw chain in the cut along the
top of the guide bar. _
Kickback, Rotational The rapid upward and backward motionof the saw
which can occur when the moving saw
chain near the upper porllon of the tip of
the guide bar contacts an object, such
as a log or branch.
Low-Kickback Chain - A chain that
complieswith the kickbackperformance requirements of ANSI
B175.1-1991 when tested on a representative sample of chain saws.
Normal Cutting Position _'nThose
positionsassumed in performing the
bucking and fellingcuts.
'
Notching Undercut - A notch cut in a
tree that directs the tree's fall.
Continued on next page
16
Oiler Control - A system for oiling the
that is ddvan by the motor and is sup
,_ortedby the guide bar.
_uide
bar and Thechain.
ear Handle
support handle Iopiked Bumper (Spike) - The pointed
ceted at or toward the rear of the saw.
tooth or teeth for use when felling or
Reduced Kickback Guide Bar- A
buckingto pivot the saw and maintain
guide bar which h.a.sbeen demon_wosiUonwhile sawing.
- strated to reduce kicld0acl_lgniflcariUy.
tch - A device that when operated
Replacement Saw Chain__ A chain-willcomplete or interruptan aieotdcal
that complieswith the kickback perforpower circuitto the motorof the chain
mance requirements of ANSI
saw.
B175.1-1991 when tested with specific Switch Unkage - The mechanismthat
chain saws. It may not meet the ANSI
transmits motionfrom the rigger to the
switch.
performance requirements when used
with other saws.
Switch Lockout- A movable stop that
Saw Chain - A loop of chain having
prevents the unintentionaloperation of
cuttingteeth, that out the wood, and
the switch untilmanually actuated.
_saw
For the repair or replacement parts you need
delivered directly to your home
Call 7 am - 7 pm, 7 days a week
1-800-366-P ,RT
._
(1-800-366-7278)
Para ordenar piezas con entrega a
domicilio- 1-800-659-7084
For in-house major brand repair service
Call 24 hours a day, 7 days a week
1-800-4-REPAIR
(1-800-473-7247)
Para.p.edir servicio de reparacidn a
dommdlo- 1-800-676-6811
For the location of a Sears Parts and
Repair Center in your area
Call 24 hours a day, 7 days a week
1-800-488-1222
For information on purchasing a Sears
Maintenance Agreement or to inquire
"aboi3t:-ahexisting Agreement
Call 9 am - 5 pm, Monday-Saturday
1-800-827-6655
Nhen requesting service or ordering
)arts, always provide the following
nformation:
, Product Type
• Part Number
, -M_el
• Part Description
Number
SF.AR$
America's Repair Specialists