1
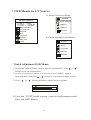
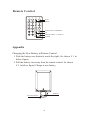
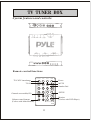
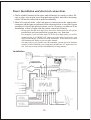
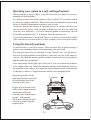
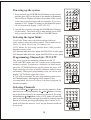
20" CEILING MOUNT TFT-LCD MONITOR
WITH TV TUNER SYSTEM & IR HEADPHONE
PLVW20T
Table of Contents
1. Table of Contents------------------------------------------------------ 1
2. Warning ---------------------------------------------------------------- 1
3. Usage Notice ---------------------------------------------------------- 2
4. Package ---------------------------------------------------------------- 3
5. Function Descriptions --------------------------------- -- ------------- - 4
6. Start Your Installation ------------------------------------------------- 4
7. Setting Up The Dome Lamps----------------------------------------- 5
8. Installation Your Monitor--------------------------------------------- 6
9. Operating the Monitor--- ---------------------------------------------- 7
10. Closing Monitor ------------------------------------------------------- 7
11. OSD Menus in A/V Source --------------------------------------------8
12. Remote Control----------------- ---------------------------------------9
13. Appendix--------------- ------------------------------------------------9
14. Specifications ------------------------------------------------------- 10
15. TV TUNER BOX -----------------------------------------------------11
16. Remote Control Function --------------------------------------------11
17. Tuner Intstallation and Electrical Connections --------------------12
18. Installation ----------------------------------------------------------- 12
19. Specifications --------------------------------------------------------16
WARNING
This unit is not intended for installation in the front Driver / Passenger Compartment
where it may be seen by the Driver. Installation of this unit in any portion of the vehicle
which could impair or distract the Driver is improper and dangerous and
assumes No liability what so ever for failure to follow the proper installation of this
product.
To reduce the risk of electric shock, please do not expose this unit to rain, moisture or
open the unit. Dangerous high voltages are present inside the unit.
Our warranty could be voided if you make changes or modifications not expressly
approved by
1
Usage Notice
Follow all warnings, precautions and maintenance as
recommended in this user's manual to maximize the life of
your LCD monitor
To avoid the damage of the LCD monitor and risk of
electronic shock, do not allow the LCD monitor to get wet.
If the monitor gets wet, turn off the power, unplug the
power cord and send the LCD monitor to your local dealer
or our service cen-ter as soon as possible.
Use a regular power specification of DC 12V . Do not use
any other power supply with different voltage.
Do not place objects on or suspend them with the power
cord.
This will damage the power cord.
Do not tangle or twist the power cord . And do not expose it
to any heated object.
Do not try to repair the power cord when it is damaged or
broken, change a new one immediately.
Avoid dropping any metal objects or inflammable liquids
into the LCD monitor from ventilation slots.
Do not attempt to open or disassemble the LCD monitor
yourself as this may cause electronic shock.
When there is smoke or peculiar smell in use, unplug the
power cord immediately and send it to your local dealer or
our service center.
When there is damage to the LCD monitor casing, send it to
your local dealer or our service center.
Do not use this LCD monitor in areas susceptible to
excessive dust, dirt, and humid.
Do not install the LCD monitor in areas that are exposed to
direct sunlight, extreme heat, and extreme cold
environment.
Do not expose the LCD monitor to rain or moisture.
2
Package
This LCD monitor comes with all the items below. Check to make
sure your unit complete. Contact your dealer immediately if
anything is missing.
* 20" High RES TFT-LCD Wide Screen Monitor
* Overhead Console Mounting Bracket
* Credit Card Size Remote Control with Batteries
* Interface Cable with RCA jacks for Audio / Video
Connection and 12V DC
* User's Manual
* Warranty Card
* Infrared Wireless Headphone
User Control Overview
* Panel Control
POWER
MENU
UP
DOWN
3
Function Descriptions
* Power:
You may also turn the monitor on and off with the
"Power" button.
* Menu:
Press the "MENU" button to pop up the OSD menus.
*
/
* Mute:
Keys: 1. Press the " / " key to increase or decrease volume.
2. Make item selection in OSD menus to increase or
decrease parameters as well.
Press the "Mute" button from the remote control
to turn off the sound of the LCD monitor.
Start Your Installation
* Monitor connection
4
Setting Up The Dome Lamps
*Operating the dome Lamps
1. There are three function buttons for the Dome lamps operation: OFF,
DOOR, and ON. (Refer to the following figure)
A. OFF:
To turn off the lamps.
B. DOOR: To make the lamps turn on
only when car doors are
opened.
C. ON:
To turn on the lamps.
ON
OFF
DOOR
ON
OFF
DOOR
* The electric circuit figure
OFF
W
DOOR
B
ON
LAMPS
R
BATTERY +
Connection
Point Power Cord Color
R
Red
Connecting With Power Supply
W
White
Connecting With Sensor of Car Doors
B
Black
For Ground Connection
* Remarks:
1. There is no wiring connection necessary at"B" point as
"B" has been connected when the metal bracket is
screwed in.
2. Only use 12 volt DC power.
5
Installation your Monitor
Take care to select a suitable installation location and secur method
fastening for the monitor:
*The unit should not distract or obstruct the driver.
*The installation should not inhibit the entry to, or the exit from the
vehicle.
*The unit should not interfere with other vehicle components e.g.,
(sliding sunroof).
*Make sure the unit is installed to a secure, mounting location
and cannot become dislodged in the event of an emergency stop.
*Do not support the unit using only the vehicle interior fabric roof
lining.
*If driving screws is required, take care not to penetrate through the
other sheet metal of the vehicle.
*Avoid prolonged use of the monitor when the engine is not running
to prevent draining the vehicle battery.
*Place the mounting metal plate with the nuts facing upward, then,
mount the monitor using the screws included.
6
Operating the Monitor
* Powering up the monitor
The monitor will be automatically turned on when releasing the
monitor from the base unit and "OFF" when it is closed.
Operating Instructions
Opening the Monitor
1. Press the monitor release button to lower the LCD screen.
2. Lower the monitor until is at the proper viewing angle.
(Refer to the following figure.)
Closing Monitor
1. Return the monitor to the central viewing position.
(Refer to the following figure)
2. Push the monitor back into the monitor base unit until
the screen engages with the release button.
7
* OSD Menus in A/V Source
A. Source Selection Menu
SOURCE
MAIN MENU
AUTO DETECT
CUBS.1 = NTSC
H. SYNC = +15.7K Hz
V. SYNC = +60.0Hz
1
2
BRIGHTNESS
CONTRAST
COLOR
HUE
SOURCE
AUDIO
RECALL
VIDEO 1
VIDEO 2
RETURN
B. Audio Input Selection Menu
AUDIO
EXIT
MUTE
VOLUME
RECALL
RETURN
* Quick Adjustment OSD Menus
1. By pressing "MENU" button, you may open the MAIN MENU, using " " or "
"
buttons to pick out OSD functions.
2. In order to select desire options, it is necessary to press "MENU" again to
enter each mode, than using " "/ "
3. Press "
" or "
" to increase or decrease parameters as well.
" button directly to adjust speaker volume.
VOLUME
4. Press the " EXIT" mode to store your selected parameter and
leave the OSD Menus.
8
Remote Control
TV/CATV
TV/AV
MUTE
POWER
Power
MUTE
1 2 3 4
5 6 7 8
9 0
FM/AM
SETUP
Monitor
UP
+
VOL
FUNCTION / OSD MENU
UP
MODE VIDEO 1 / VIDEO 2
DOWN
FUNC
CH
DN
-
MODE
Appendix
Changing the New Battery in Remote Control
1. Push the battery case button to wards the right. (As shown # 1 in
below figure)
2. Pull the battery case away from the remote control. As shown
# 2 in below figure) Change a new battery.
2
Cassette Button
1
9
Battery
Specifications
1. Type
Roof Mount Color Display Monitor
2. Signal Input
Sync. : Separate TTL sync.
Video : Composite sync.
System : NTSC M,N PAL
SECAM
Audio : 1.0Vp-p
3. Display System
Active Matrix High Resolution TFT-LCD Monitor
4. Environment
Operating Temperature : 0 C~35 C
Storage Temperature : -20 C~ 60 C
Humidity : 20% ~ 90%
20" High Resolution TFT-LCD 4:3 Wide Screen Flip-Down
Monitor With Infrared Wireless Headphone and Dome Lights
Features
* Active Matrix High Resolution TFT-LCD Monitor
* 20" Widescreen (4:3) Display
* Polarized, Anti-glare, Hard Coated Panel
* 450 cd/m brightness for unparalleled picture quality
* Wide Viewing Angle: H 160 degree, V 140 degree
2
* Multi-System
Video: NTSC/PAL/SECAM
* Overhead Console Flip-Down Mounting Bracket Included
* Wireless Remote Control Included
* On screen Menu
* Built-in Twin Dome Lights
* Interface Cable with RCA Jacks for Easy Connection
* Dual RCA Audio / Video Inputs.
* 11~13.8V DC Power source with Noise Filter Circuit
* Display Colors : 8 bits interface (16.7 M colors)
* Infrared wireless headphone included
10
TV TUNER BOX
System features and controls:
Remote control functions
TV/CATV
TV/CATV interchange
TV/AV
TV/AV
MUTE
1 2 3 4
5 6 7 8
9 0
FM/AM
Channels convertible(CH)
POWER
SETUP
Power
MUTE
Number Pad
SETUP
Monitor
UP
+
VOL
FUNC
CH
DN
Volume control buttons
(Useless with Main Monitor)
-
MODE
TV01
11
Monitor
(Useless with DVD Player)
Tuner Installation and electrical connections
1. Find a suitable location for the tuner unit and mount it securely in place. Be
sure to place it in an area away from moisture and dirt, and where incoming
cables will not be walked on or pulled accidentally.
2. Make all required audio, video and power connections to the appropriate
connectors on the tuner as indicated in the drawing below to suit your system
installation. Install the infrared remote eye in a location you know will be
Installation in line-of-sight with the remote control use location
Please note that the drawing below describes connections for all system
possibilities and your particular system may vary from this.
For example, if your car radio lacks AUX line level input jacks, you will be
unable use the A/V VIDEO OUT jacks to provide audio. In this case, you
can take advantage of the built-in FM transmitter in the tuner box which
will broadcast the audio to your car radio instead.
You may chose to use just the car radio antenna, just the diversity antenna
system, or both. Similarly, you system may include one A/V input source or
two. You may or may not have an additional viewing monitor.
Installation
IR Interface cable
12
Operating your system in a safe and legal manner
When operating a motor vehicle, it should always be your highest priority to
maintain safe driving habits.
It is illegal in many areas of the country to drive with the TV or monitor turned
on, when it is visible to the driver. Please check your local and state laws governing
the use of Mobile Entertainment systems in your use area.
If you have installed the monitor in a position where it is visible to the driver, be
sure to install the Safety Cord (included with this system).Wire the cord to an
Accessory wire which has + 12V power when the ignition is switched on. The will
Prevent the operation of the TV or monitor when the ignition is on.
If you do not know how to install this Safety Cord, please consult with a mobile
video installer in your area and have it done properly prior to using the system.
Using the diversity antennas
To attach firmly to your car's exterior. These magnets have a rubber coating to
permit secure mounting without risk of damaging your car's finish.
The ideal placement for you antennas is on the vehicle's roof. Use the picture
below as a rough guideline for installation; yours may vary due to the shape of
your car. Note that the antenna module contains one antenna in a fixed position
and one which may be adjusted.
Place one antenna on the right edge of the roof of your car at about the midpoint
of the length of the roof. Orient the antenna so that the fixed antenna is closer to
the centerline of the vehicle. Now adjust the repositionable portion of the antenna
so that there is about a 15 angle between it and the fixed antenna portion.
Repeat this procedure with the
other antenna module, again with
the fixed antenna closer to the
centerline of the vehicle.
Option
Plug the jacks at the ends of the
cables from the antennas into the
antenna jacks on the tuner
according to the diagram shown
on page 2 of this manual.
The diversity antennas provided
with your system use powerful
magnets option.
13
Powering up the system
TV/AV
MUTE
POWER
1
2
3
4
5
6
7
8
9
0
FM/AM
SETUP
TV/CATV
1. Press and hole the POWER On/Off button on the remote
until the green LED on the front of the monitor is illuminated.
The On Screen Display will show the position of the system
at the time it was last turned off (for example, if you were
watching CATV Channel 38 when you last turned the power
off, the system will display "CATV CH 38").
Monitor
UP
+
FUNC
DN
-
MODE
TV/AV
MUTE
POWER
1
2
3
4
5
6
7
8
9
0
FM/AM
VOL
CH
2. Turn off the system by pressing the POWER On/Off button
on the remote. The screen will go dark and the green LED
will go out; the tuner unit will be in STANDBY mode.
TV/CATV
Selecting the input Mode
Your Video Tuner can switch between four different
video sources using the remote control. These modes are as
follows; TV Mode: for receiving TV Channels 2-69
CATV Mode: for receiving satellite dish, Cable or other
broadcast source video
AV1:External audio and video inputs for DVD,VCR or video game
AV2:External audio and video inputs for DVD,VCR or video game
SETUP
Monitor
UP
+
FUNC
DN
-
MODE
TV/AV
MUTE
POWER
1
2
3
4
5
6
7
8
9
0
FM/AM
SETUP
VOL
CH
Programming Channels for TV/CATV
The tuner system can memorize channels in both TV
(VHF and UHF) mode and CATV mode in two independent
memory sections. To memorize channelss in either mode,
press the AUTO PROG button on the remote-the tuner will
begin scanning all of the available channels and put them
int memory. During this programming cycle, the screen will
display "AUTO"in the upper left corner.
IF you wish to interrupt the auto programming mode. press
the Channel button. Interrupting in this manner is not
recommended, however, because it will not program all
channels properly.
TV/CATV
Monitor
UP
+
FUNC
DN
-
MODE
TV/AV
MUTE
POWER
1
2
3
4
5
6
7
8
9
0
FM/AM
VOL
CH
Selecting Channels
Use the Channel and buttons for selecting channels. If the
unit has been auto programmed, the and buttons will step
up or down through only the memorized channels. Pressing
and holding the or buttons in the CATV mode will cause the
unit to step automatically through all available channels until the
Button is released; pressing and holding these buttons in TV
mode will cause the tuner to "seek" any air channel which can
be received.
14
TV/CATV
SETUP
Monitor
UP
VOL
CH
+
FUNC
DN
MODE
-
Adjusting the sound
TV/AV
MUTE
POWER
1
2
3
4
5
6
7
8
9
0
FM/AM
TV/CATV
The tuner system permits you to adjust many viewing
parameters easily. These are:
Audio Mute: Pressing the MUTE button will disable the audio
.output, and will display "MUTE" on the upper right corner of
the monitor screen. To cancel the muting function, press MUTE
again.
SETUP
Monitor
UP
VOL
CH
+
FUNC
DN
MODE
-
Please note that if you are using FM Modulation to provide audio signal from the
tuner to you car radio, applying the mute function will also mute the audio portion
of the signal delivered by the transmitter but not the tuner's output carrier signal.
This may result in noise on your car radio.
Providing A/V audio to your car radio
This system offers you two ways of playing the A/V audio through your car radio
system. If your radio has AUX line-level inputs, you can attach the A/V Audio
output connectors to these inputs with RCA-RCA interconnect cables.
If your car radio lacks these AUX line level inputs, your other option is to use the
tuner's audio transmission ability (described in the next paragraph)to broadcast
the audio signal within your car directly to the radio via FM modulation.
Transmitting audio to your car radio
This tuner system is able to transmit the audio signal to your car radio in the
FM radio spectrum. By tuning your radio to a corresponding channel, you can
listen to the audio from your program source. This function is particularly
important when installing in car whose radio lacks AUX line level inputs.
To use this system tune your car radio from FM 88.1 to FM 99.9 for 20 channels
the on you're A/V audio source.
You should be able to hear your AV audio broadcast through your car radio system.
If you do not, go back into the Fm CHANNEL mode of the menu system and
select FM 88.1 MHz to FM 91.9 MHz by channel step 0.2 MHz,,and exit the
menu system.
To stop broadcasting your Video sound thru your car radio, tune the FM Band
to any other channel or enter the menu system and select OFF in the FM
CHANNEL submenu.
15
Specifications
1. Signal system
NTSC
2. Audio/Video Inputs
Audio R/L x2, Video x 2
3. Audio/Video Outputs
Audio R/L x2, Video x 1
4. FM Modulator
20 Channels: FM 88.1 MHz to FM 91.9 MHz
By channel step 0.2 MHz
5. TV Channel
Channels 2~125
16