1
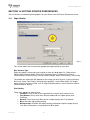
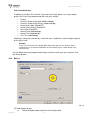
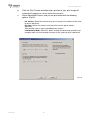
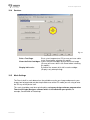
Puma Disc Inkjet Printer
COMPLETE SOLUTIONS FOR ON-DEMAND CD & DVD PRODUCTION
Photo-Quality CD/DVD Inkjet Printer
OPERATING & MAINTENANCE
MANUAL
ZZ 004 833
-1-
Puma Disc Inkjet Printer
Thank you for purchasing the Verity Systems
Puma Disc Printer.
OPERATING & MAINTENANCE MANUAL
Document Reference No. TP 004 833 (Rev 1.01)
Production Standard
ZZ 004 833
VERITY SYSTEMS LTD
VERITY SYSTEMS, INC.
2 Eastern Road
5441 Merchant Circle, Unit A
Aldershot
Placerville
Hampshire
California
GU12 4TD
95667
United Kingdom
United States
Tel: +44 (0) 1252 317000
Tel: (530) 626-9363
Fax: +44 (0) 1252 316555
Fax: (530) 626-9395
Email: [email protected]
Email: [email protected]
www.veritysystems.com
ZZ 004 833
-2-
Puma Disc Inkjet Printer
WARNING
To avoid electrical shock hazards, unit covers should only be removed by
authorized personnel.
©
COPYRIGHT
This document is the property of Verity Systems and it may not be
reproduced, copied or exhibited to a third party without the written
permission of Verity Systems.
ENVIRONMENTAL PROTECTION
Waste electrical products should not be thrown away with household waste.
Please recycle where facilities exist.
Check with your local authority r retailer for recycling advice.
Verity Systems reserves the right to amend or modify the specifications and design criteria
applying to these products.
ZZ 004 833
-3-
Puma Disc Inkjet Printer
SOFTWARE WARRANTY (LIMITED)
If you discover physical defects in the media on which the software is
distributed or in the User’s Manual, Verity Systems will replace the media or
manual for a period of ninety (90) days after the purchase by the retail
customer. You must return the disk or manual to Verity Systems or an
authorized Verity Systems dealer within the warranty period accompanied by
proof of purchase.
VERITY SYSTEMS DISCLAIMS ALL IMPLIED WARRANTIES ON THE
PRODUCT, INCLUDING WITHOUT LIMITATION WARRANTIES OF
MERCHANTABILITY,
PERFORMANCE
AND
FITNESS
FOR
A
PARTICULAR PURPOSE. Verity Systems WILL NOT BE LIABLE FOR ANY
BUG, ERROR, OMISSION, DEFECT, DEFICIENCY, OR NONCONFORMITY
IN ANY SOFTWARE. AS A RESULT, THE SOFTWARE IS SOLD “AS IS”,
AND THE PURCHASER ASSUMES THE ENTIRE RISK AS TO ITS
QUALITY AND PERFORMANCE.
VERITY SYSTEMS SHALL IN NO EVENT BE LIABLE FOR DIRECT,
INDIRECT, SPECIAL, INCIDENTAL, CONTINGENT OR CONSEQUENTIAL
DAMAGES RESULTING FROM ANY DEFECT IN THE SOFTWARE OR ITS
DOCUMENTATION INCLUDING DAMAGES FROM LOSS OF DATA, EVEN
IF VERITY SYSTEMS OR AN AUTHORIZED VERITY SYSTEMS DEALER
HAS BEEN ADVISED OF THE POSSIBILITY OF SUCH DAMAGES. YOU
AGREE THAT
VERITY SYSTEMS’ LIABILITY, ARISING OUT OF
CONTRACT, NEGLIGENCE, STRICT LIABILITY IN TORT OR WARRANTY
SHALL NOT EXCEED ANY AMOUNTS PAID BY YOU FOR THIS
PRODUCT.
Any written or oral information or advice given by Verity Systems
dealers, distributors, agents or employees will in no way increase the
scope of this warranty. Nor may you rely on such oral or written
communication. Some states do not allow the exclusion or limitation of
implied warranties or liability for incidental or consequential damages,
so the above limitation or exclusion may not apply to you. This warranty
gives you specific legal rights, and you may also have other rights that
vary from state to state.
ZZ 004 833
-4-
Puma Disc Inkjet Printer
TABLE OF CONTENTS
Section 1 INTRODUCTION
1.1
1.2
1.3
7-8
Overview………………………………………………………………. 7
Features……………………………………………………………….. 7
Specifications………………………………………………………… 7-8
Section 2 BOX CONTENTS
8
Section 3
9
CONNECTING YOUR PUMA
Section 4 BUTTONS & LIGHTS
9-10
4.1
Cancel Button…………………………………………………………. 9
4.2
Print Cartridge Status Light………………………………………… 9
4.3
Resume Button & Light……………………………………………… 9
4.4
Power Button & light………………………………………………… 9
4.5
CD Tray Button……………………………………………………….. 10
Section 5 INSERTING A DISC INTO THE PUMA
10
5.1
Inserting a Standard CD/DVD………………………………………. 10
5.2
Inserting a CD Business Card & Mini Disc………………………. 10-11
Section 6 INSERTING/CHANGING PRINT CARTRIDGES
11
Section 7 INSTALLING PRINTER SOFTWARE
12-13
Section 8 INSTALLING CD LABEL DESIGNER (Graphics Software)
13
Section 9 USING CD LABEL DESIGNER & PRINTING A DISC
13-15
Section 10 SETTING PRINTER PREFERENCES
16-24
10.1
Paper/Quality……………………………………………………….…. 16-17
10.2
Basics.……………………………………………………………….…. 17-18
10.3
Colour…………………………………………………………………... 19
10.4
Services………………………………………………………………… 20
10.5
Mask Settings………………………………………………………… 20-21
10.6
Calibration……………………………………………………………... 22-24
ZZ 004 833
-5-
Puma Disc Inkjet Printer
Section 11 ERRORS
25
Section 12 TECHNICAL SUPPORT
26
Appendix A OTHER GRAPHICS SOFTWARE PACKAGES
27-34
CorelDRAW & Photoshop………………………………………….. 27
Create a Page………………………………………………………… 27
Introducing the Mask……………………………………………….. 27
Understanding the Mask Interface……………………………….. 28-30
Mask Type………………………………………………………. 28
Enable Mask……………………………………………………. 28
Standard Area Settings………………………………………. 29
Hub Area Settings…………………………………………….. 29-30
Mask Origin…………………………………………………….. 30
Parameter Unit…………………………………………………. 30
Templates……………………………………………………………... 30
Appendix B Recommendations & Maintenance
31-33
Standard Terms & Conditions
34-37
ZZ 004 833
-6-
Puma Disc Inkjet Printer
SECTION 1: INTRODUCTION
1.1 Overview
Verity Systems, world leading developers & manufacturers of optical disc duplication and printing
systems, has launched a brand new, drawer mechanism CD/DVD printer: the Puma.
Working in partnership with Hewlett-Packard, the Puma brings professional print quality to the inhouse production of CDs, DVDs, CD Business Cards and Mini CDs, delivering outstanding photo
quality images directly onto the surface of discs, enabling customers to choose colourful
backgrounds and images that reflect their company.
What’s more, the Puma has been specifically designed to provide maximum versatility and highspeed printing and can be used in a variety of settings. The PC-based Puma offers professional
desktop printing for the low volume/small business user, while the Puma can also be used in
conjunction with an autoloader or automated disc duplicator for fast, unattended printing of greater
quantities.
1.2 Features
•
•
•
•
•
•
•
•
•
•
•
Professional, photo quality CD & DVD inkjet printer
Desk-top printer
Combine with autoloader
Direct to surface colour inkjet printing
Laser-sharp printing
Perfect clean crisp graphics
High speed printing
4800 dpi resolution with 16.7 million colours
Hewlett-Packard inkjet Technology
Genuine HP inks
Ultra small ink drops (about 32 per dot)
1.3 Specifications
Minimum System
Requirements:
Windows 2000: Pentium 133MHz, 64Mb RAM;
Windows XP: Pentium 233 MHz, 128 Mb RAM
Power Requirement:
100 to 240 VAC, 50/60Hz
Environment:
Recommended operating temperature: 15 to 365 °C
Recommended operating humidity: 20 to 80% RH noncondensing
Width: 17.6” (447mm) Depth: 14” (356mm) Height: 6”
(152.4mm) Net Weight: 5.5kg/12.12lbs (approx. without
cartridges)
Prints directly onto the surface of inkjet printable 120mm CDs
& DVDs, 86x61mm rectangular and 80mm x 61mm & 80mm x
x63mm saddle CD business cards & 80mm mini discs
Bi Universal Serial Bus. 2.0 Full Speed (USB), centronics
parallel IEEE-1284 compliant.
Dimensions:
Media Support:
Connectivity:
Maximum Resolution:
ZZ 004 833
Black: Up to 1200 dpi
Colour: 4800 x 1200 optimised dpi colour printing on premium
photo papers with 1200 x 1200 dpi input dpi resolution.
Full colour spectrum of 16.7 million colours.
HP PhotoREt III Colour Management System
-7-
Puma Disc Inkjet Printer
Print Speed:
25% mono coverage @ normal, text quality approx.* 16
seconds per disc
25% mono coverage @ normal, inkjet quality approx.* 19
seconds per disc
100% full colour coverage @ normal, inkjet quality approx.*
24 seconds per disc
100% full colour coverage @ best Inkjet (PhotoRet) approx.*
52 seconds per disc
100% full colour coverage @ photo quality (PhotoRet),
approx.* 134 seconds per disc
(*Speeds given are approximations and are dependant on file
size, disc coverage and processing speed)
Cartridges:
Dual Ink Cartridges:
C8856A Black Ink Cartridge
C8857A Tri-Colour Ink Cartridge
SECTION 2: BOX CONTENTS
Carefully remove your Verity Systems Puma from its shipping carton and verify that all parts are
present. If there are missing or damaged parts contact Verity Systems or an authorised distributor
immediately.
You should find the following:
Verity Systems Puma
Power Cable
USB Cable
Quick Start Guide
CD, including Printer Driver, User Manual, Test Image, Templates
2 Blank Printable CDs
One C8856A Black Ink Cartridge & One C8857A Tri-Colour Ink Cartridge
CD Label Designer Graphics Software CD
Note:
Be sure to remove all pieces of protective tape. Remove the tape holding down the printer
lid. Open the lid and remove the piece of foam holding the CD Tray in place.
Note:
If your Verity Systems Puma is damaged during shipment, please contact the freight carrier
first, then, contact your distributor or Verity Systems. You should save your shipping
materials so that if the need arises, you can return your Puma for service. This packaging
was designed specifically for shipping your Puma. Other packaging may not be suitable.
ZZ 004 833
-8-
Puma Disc Inkjet Printer
SECTION 3: POWER ON
1.
2.
3.
Connect the power cable to the printer and plug into the power supply.
Power up the Puma by pressing the Power Button. (See Fig. 1)
The Power Button light will flash for a short period then remain illuminated.
SECTION 4: BUTTONS & LIGHTS
The Printer Buttons let you turn the printer on & off, cancel a print job, open & close tray or resume
printing. The lights give you visual clues about the status of the printer.
Print Cancel Button
CD Tray Button
Print Cartridge Status Light
Power Button & Light
Fig. 1
Resume Button & Light
4.1 Print Cancel Button
Pressing the Print Cancel Button cancels the current print job.
3.2 Print Cartridge Status Light
This light flashes when a print cartridge is low in ink or incorrectly installed, or the printer’s
top cover is open.
4.3 Resume Button & Light
This light will flash when an action is required such as loading a CD or clearing a CD jam.
When the action is completed, press the Resume Button to continue printing.
The Puma also has a multiple print capability. If a multiple print command is sent from a
PC, the first CD is printed as normal. Then when the CD tray is ejected, the resume light
will flash. Place a new CD into the tray and press the Resume button. The CD tray will
retract and the CD will be printed and so on for the number of copies requested.
4.4 Power Button & Light
The Power Button turns the printer on and off. It may take a few seconds for the printer to
turn on after you press the Power button. The green light flashes when the printer is
processing.
ZZ 004 833
-9-
Puma Disc Inkjet Printer
Caution!
Always use the Power button to turn the printer on and off. Using a power strip,
surge protector, or a wall-mounted switch to turn the printer on and off may cause
printer failure.
4.5 CD Tray Button
Pressing this button will slide the CD tray back and forth into the printer.
SECTION 5: INSERTING A CD INTO THE PRINTER
5.1 Standard (120mm) CDs & DVDs
With your Puma switched on, push the CD Tray Button on the front of the printer (see Fig.1
on the previous page) and the CD tray will slide out. Place a CD onto the tray ensuring that
the disc sits against the two pins at the front of the tray as shown below in Fig. 2
Position the CD so that the
edge of the CD sits against the
edge of the two pins.
Fig. 2
When you send your image to printer, the CD Tray will tray slide back into the printer and
printing will commence.
5.2 CD Business Cards & Mini Discs (option)
The Puma will also print directly onto inkjet printable CD Business Cards (rectangular and
saddle/hockey rink) and Mini Discs, via the special adaptors (Fig. 3), which can be
purchased separately (see your dealer for details). The adaptors come in two parts.
1. Open the CD tray by pressing the CD tray button on the front of the printer.
2. Place Part 1 of the adaptor onto the CD tray making sure that the 2 pins on the tray
fit snugly into the corresponding holes on the adaptor part (Fig. 4).
Part 1
Fit Part 1
onto the 2
locating
pins on
the CD
tray
Part 2
Fig. 3
ZZ 004 833
Fig. 4
- 10 -
Puma Disc Inkjet Printer
3. Open the printer cover
4. Using your hand, slowly slide the CD tray back into the printer until approximately 1
inch of the CD tray remains protruding from the front of the printer.
5. Fit Part 2 of the adaptor matching the pin on the adaptor to the hole on the CD tray
(Fig 5 & Fig. 6).
Locator
hole on
CD tray
Fit
adaptor
part into
locator
hole
Fig. 5
Fig. 6
6. Close the printer cover and press the CD tray button so that the CD tray slides out.
7. Place the inkjet printable CD Business Card or Mini Disc into the adaptor, ensuring
that it sits completely flat (Fig. 6).
8. As the tray slides back into the printer, Part 2 of the adaptor closes against the discs
and holds it securely in place for printing.
SECTION 6: INSERTING/CHANGING THE PRINT CARTRIDGES
1.
2.
3.
4.
5.
6.
7.
8.
Press the Power Button to turn on the printer
Open the top cover
Lift the print cartridge latch to the open position (Fig. 7)
Slide the print cartridge out of the cradle (Fig. 8)
Remove the plastic tape from the print cartridge (Fig. 9)
Hold the cartridge so that the copper strip is on the bottom and rear
Slide the cartridge firmly into the cradle, colour on the left, black on the right. (Fig. 10)
Push down the print cartridge latch until it snaps closed. Close the top cover.
Fig. 7
ZZ 004 833
Fig. 8
- 11 -
Fig. 9
Fig. 10
Puma Disc Inkjet Printer
SECTION 7: INSTALLING THE PRINTER SOFTWARE
Note:
Your Puma should not be connected to your PC during the initial software installation. If
connected, remove the USB and power cables from the printer. There may be
variations in the following instructions depending on operating system (2000 or XP) and
configuration.
1.
2.
3.
4.
5.
6.
7.
8.
9.
10.
11.
Place the Printer Driver CD into the CD-ROM drive of your PC. The Verity_Puma
installation wizard should automatically start.
Follow the on-screen instructions, clicking Next when prompted. When prompted, click
Install to begin installation.
The Digital Signature Not Found message box will appear (see Fig.11). You will be asked if
you wish to continue installation, select Yes. In Windows XP, select Continue Anyway.
On the final screen click Finish.
Connect the Puma to your PC via the USB cable.
Connect the power cable to the back of the Puma and plug into the power supply. Switch on
the printer.
If the Digital Signature Not Found message box appears again, select Yes to continue
installation. In Windows XP, select Continue Anyway.
The Found New Hardware box will appear on screen, which will search for the driver. In
Windows XP select No, not at this time and click Next.
At the next box, select Install the software automatically (Recommended) and click Next.
If the Digital Signature Not Found message box appears again, select Yes to continue
installation. In Windows XP, select Continue Anyway.
When prompted, click Finish.
Fig. 11
Note:
The message, which appears above, is merely precautionary from Windows and it is not
necessary to stop the installation.
Note:
If your PC does not recognize the new Puma hardware when you first connect it to your
PC, you should load the print driver via the Add Printer icon on your Printer settings:
a. Place the Print Drive CD into your PC’s CD-ROM drive
b. On you PC’s desktop, select Start, Settings and Printers
c. Double click the Add Printer icon and follow the on screen instructions
ZZ 004 833
- 12 -
Puma Disc Inkjet Printer
d. When prompted, select Local Port
e. When the Wizard asks for the name of the printer, click the Have Disk button and
navigate to the enu/drivers/win2k_xp/Puma.inf file on the CD-ROM and select
Open and then OK.
f. The driver will begin to install on your PC.
g. Whenever prompted click Next.
h. When complete, select Finish and the Verity Systems Puma print driver icon will
appear in your printer settings
i. The Digital Signature Not Found message box (see Fig. 11) will appear. You will
be asked if you wish to continue installation, select Yes. In Windows XP, select
Continue Anyway.
SECTION 8: INSTALLING CD LABEL DESIGNER (Graphics Software)
The CD Label Designer software allows you to create stunning designs for your discs. There may
be variations in the following instructions depending on your operating system (2000 or XP) and
configuration.
1. Insert the CD Label Designer software disc into the CD-ROM drive in your PC and the
installation wizard should automatically start.
2. Click Next when prompted to continue. Read the license agreement, and tick the box to
confirm that you agree.
3. Continue to click Next when prompted to continue with the installation.
4. Click finish following the installation to confirm.
5. When you start the software for the first time, you will be prompted to enter a registration
key; this is printed on the label on the CD Label Designer wallet.
SECTION 9: USING CD LABEL DESIGNER SOFTWARE
Double click the CD Label Designer icon on your desktop, or select the program from your start
menu.
CD Label Designer will automatically default to a blank label (Fig. 12), here you can create your
own label using the software, or you can open a previously saved project.
ZZ 004 833
- 13 -
Puma Disc Inkjet Printer
Fig.12
To open a saved project, click
File Open, browse for your file, then click Open.
The toolbar in CD Label Designer allows you to import graphics, add text, and add shapes to your
design.
CD Label Designer also enables you to add track listings and many other features. The software is
very similar to many Windows applications in terms of functionality. When you have finished
creating your label, save the project by clicking File Save. Enter a filename and click the Save
button.
To print a disc:
•
•
•
•
Click on File Print.
Ensure the printer selected at the top of the Window is the Puma
Ensure the ‘Print Layout’ selected on the left hand side of the window is the ‘Puma
Classic/Mini’
Click on the Print button.
Note:
Every Puma is factory set for the correct position however, CDs can vary in size and it may
be necessary to make minor adjustments. The print position can be adjusted in the Print
window within CD Label Designer.
ZZ 004 833
- 14 -
Puma Disc Inkjet Printer
These options adjust the
dimensions of the label –
entering in lower values
will decrease the printable
area, higher values will
increase it.
If the printed image is off
centre on your disc, you
can adjust these values
to change the position of
the disc.
Increasing the Left value
will move the print to the
right, increasing the Top
value will move the print
down.
Fig.13
When you are happy that the template is in the correct position, place a blank CD into the CD tray.
Select Print again.
These values will be saved for future prints, so you will only have to adjust these settings once.
ZZ 004 833
- 15 -
Puma Disc Inkjet Printer
SECTION 10: SETTING PRINTER PREFERENCES
You can choose a number of printing options on your Puma from the Printer Preferences menu.
10.1
Paper/Quality
Fig. 17
This screen allows you to select the appropriate output quality for your disc.
Disc Surface Type
Select the type of surface you want to print on from this drop down list. Choose from:
White Inkjet; Premium Inkjet; Other Inkjet; Premium Glossy; Premium Plus Glossy;
Premium Matt; Colorfast Glossy; Glossy; 4800x1200dpi; Other Photo Quality; Text Quality
The choice you make here will depend on the image you wish to print. If you are printing
basic text, select Text Quality. If printing basic graphics, select White Inkjet. For images
where only the very best will do, such as high-resolution photos, select Premium Inkjet or
Premium Matt or Glossy.
Print Quality
There are 6 options to choose from:
• FastDraft: Prints at the fastest speed while using the least amount of ink.
• Fast Normal: Prints faster then Normal mode and at a higher quality than
FastDraft.
• Normal: Prints faster than Best and at a higher quality than Fast Normal.
• Best: Provides high quality printing
• Maximum dpi: Provides the highest quality printing but requires longer to print
than Best and requires a large amount of disk space.
ZZ 004 833
- 16 -
Puma Disc Inkjet Printer
Print Task Quick Sets
In addition to using the Disc Surface Type and Print Quality options to set your output
quality, the Puma is pre-programmed with nine print settings:
Default
Premium Photo Quality Matt (4800x1200 dpi)
Premium Photo Quality Glossy (4800x1200 dpi)
Photo Quality Matt (PhotoRET)
Photo Quality Glossy (PhotoRET)
Best Inkjet (PhotoRET)
Normal Inkjet (600x600 dpi)
Normal Text (300x300 dpi)
Fast Text (300x300 dpi)
•
•
•
•
•
•
•
•
•
Selecting a setting will automatically select the most suitable disc surface and print quality
for the job in hand.
Example
If you select Premium Photo Quality Matt (4800x1200 dpi), the Disc Surface Type is
automatically set to Premium Matt whilst the Print Quality Type is automatically set to
Maximum dpi.
You can delete these pre-programmed settings and even create your own using the Save
and Delete buttons.
10.2
Basics
Fig. 18
This tab allows to you:
a.
Select multiple copies to print in the Copies field.
ZZ 004 833
- 17 -
Puma Disc Inkjet Printer
b.
c.
Click the Print Preview checkbox and a preview of your print image will
automatically appear on screen each time you print.
Select Advanced Features and you are presented with the following
options (Fig.19):
Ink Volume: Select this feature to lessen or increase the amount of ink used
to print a document.
Dry time: Select this feature to increase the time the printer holds a
document
After printing if ink on your printed document smears.
Low Memory Mode: Select this option to allow the draft to be printed if your
computer does not have enough memory or disk space to print a document.
Fig. 19
ZZ 004 833
- 18 -
Puma Disc Inkjet Printer
10.3
Colour
Fig. 20
Saturation:
Brightness:
Colour Tone:
Colour Space:
ZZ 004 833
Intensity of printed colour
Lightness or darkness or printed colours
Warmth or coolness of printed colours
Defines the range of colours that can be printed.
sRGB/sYCC is an appropriate colour space for most print
jobs.
Adobe RGB is an emerging colour space that offers more
colours than sRGB/sYCC, but which only works for images.
- 19 -
Puma Disc Inkjet Printer
10.4
Services
Fig. 21
Print a Test Page:
Prints a test image onto a CD (ensure you have a disc
in the Puma before selecting this option).
Clean the Print Cartridges: Cleans the print cartridges & prints out a test image
(Ensure you have a disc in the Puma before selecting
this option).
Display Ink Levels:
Estimates the amount of ink left in each cartridge.
(Displays only when printing)
10.5
Mask Settings
The Puma’s built in mask determines the printable area for your image and prevents your
image from being printed outside the printable area of the CD media you are using or onto
the CD tray of the printer itself.
This mask should be used when printing discs using any design software program other
Than the CD Label Designer software which is included with your printer; for
example, CorelDRAW or Photoshop.
ZZ 004 833
- 20 -
Puma Disc Inkjet Printer
Fig. 22
Mask Type:
Enable Mask:
Standard Area
Setting:
Hub Area Setting:
Mask Origin:
Parameter Unit:
Select the mask that matches the media to which you wish to
print on. Choose from the following:
Standard CD/DVD (120mm)
Business Card Rectangle (86x 61mm)
Business Card Rectangle (80 x 61mm)
Mini CD (80mm)
Click this checkbox to switch the Puma’s mask on or off.
IMPORTANT. If you are using CD Label Designer software,
you MUST switch off the mask.
Adjust the printable area of your design.
To print on the central hub of a CD, check this box and adjust
dimensions accordingly.
To alter the origin of the mask when printing through a
graphics package other than CD Label Designer.
Select the size of unit you wish to make changes with,
I.e., either 1mm or 0.1mm increments.
For more information on using the Puma mask and using graphics
software other than CD Label Designer, see Appendix A
10.6
Calibration
Your Puma comes from the factory pre-calibrated to print the image in the centre of the CD.
However, during the life of the printer it may be necessary to recalibrate it to ensure a perfect
image position on the CD. This tab allows you to fine-tune the position of the printed image
with the CD.
ZZ 004 833
- 21 -
Puma Disc Inkjet Printer
Fig. 23
Note:
In order to set the calibration, the Puma must be attached to your PC via the USB cable.
Calibration will not work if the printer is connected via the parallel port.
Click the Set Print Position button, the Calibration Screen appears (See Fig. 24).
Fig. 24
Follow the on screen instructions.
1. Step 1: Set both offsets to ‘0’. This is the default setting.
2. Step 2: Place a disc onto the CD tray and retract the tray into the printer. Click ‘1st Test
Print’. A series of solid black circles will print onto the disc as shown in Fig. 24 on the
previous page.
ZZ 004 833
- 22 -
Puma Disc Inkjet Printer
3. Step 3: rotate to discs 180 degrees in the CD tray and retract the tray once more into the
printer. Click ‘2nd Test Print’. A series of broken, red circles will print onto the disc as shown
in Fig. 24 on the previous page.
4. If the printer is in calibration, the 2nd Test Print should sit directly on top of the 1st. If this is
not the case, the ‘Offsets’ need to be adjusted.
5. Adjust the Offset
Example 1
nd
2 Test print (red
broken circles) is
printing too far
down the Y-axis
Example 1
The 2nd test image prints out of line as shown in Example 1 (the red broken circles are
printing perfectly on the X-Axis, but too far down on the Y-Axis). To bring the two test prints
together you would need to adjust the Y-axis by a negative value.
Under Step 1 on the Calibration screen, select the negative (‘-‘) check box next to the Yaxis and enter a value between 1 and 5. An offset value of 1 will move the print position by
0.01” or 0.254mm.
ZZ 004 833
- 23 -
Puma Disc Inkjet Printer
Example 2
Example 2
The 2nd test image prints out of line as shown in Example 2 (the red broken circles are
printing too far right on the X-axis and too far down on the Y-axis). To bring the two test
prints together you would need to adjust the X-axis by a negative value and the Y-axis by a
negative value.
Under Step 1 on the Calibration screen, select the negative (‘-‘) check box next to the Xaxis and the Y-axis and enter a value in each between 1 and 5.
6. Once you have entered a value, repeat Steps 2, 3 and 4 until both Test prints align.
Some trial an error will be required in order to get the alignment exactly right.
7. When you have completed the calibration, hit the Exit button, the numbers you have
entered are stored inside the printer’s memory so the calibration you have set will remain if
the printer is powered down or disconnected from the PC.
ZZ 004 833
- 24 -
Puma Disc Inkjet Printer
SECTION 11: ERRORS
You can identify many common problems using the lights on the printer’s control panel. The
Following list highlights common errors and the recommended corrective measures:
Print Cancel Button
Print Cartridge Status Light
Resume Button & Light
Power Button light
1. Printer Cartridge light is On or Flashing
The top cover is open
Close the cover
Problem with print cartridge
Verify correct cartridge is installed and that installation
is correct
Cartridges may be low in ink
If this is the case, the printer cartridge light will stop
flashing once the top cover is opened or the printer is
printing. The problem is not related to the ink volume if
the light continues to flash when the top cover is
opened.
2. Power Light is Flashing
The printer is preparing to print.
The light stops flashing when the printer has received
all data.
3. All Lights are flashing
The printer may need to be restarted.
Press the Power Button to turn off the printer, then press the Power Button again to restart
the printer.
If the lights continue to flash, press the Power Button to turn off the printer. Disconnect the
printer from the power source. Reconnect the printer to the power source. Press the
Power Button to turn on the printer.
ZZ 004 833
- 25 -
Puma Disc Inkjet Printer
SECTION 12: TECHNICAL SUPPORT
You should first attempt to get technical assistance from your dealer or distributor.
Verity Systems support personnel can be reached at:
VERITY SYSTEMS LTD
VERITY SYSTEMS, INC.
2 Eastern Road
5441 Merchant Circle, Unit A
Aldershot
Placerville
Hampshire
California
GU12 4TD
95667
United Kingdom
United States
Tel: +44 (0) 1252 796901
Tel: (530) 626-9363
Fax: +44 (0) 1252 316555
Fax: (530) 626-9395
Email: [email protected]
Email: [email protected]
Open GMT Time
ZZ 004 833
Open PST Time
- 26 -
Puma Disc Inkjet Printer
APPENDIX A: Using other Graphics Software Packages
CorelDRAW & Photoshop
While CD Label Designer offers a quick and easy method for designing CDs, if greater
control & more flexibility is what you need, you may wish to use a package such as
Photoshop or CorelDRAW to design your discs.
Create A Page
If you wish to use CorelDRAW or Photoshop graphics software to create an image
to print on the Puma, we recommend you start by creating a page 120 mm x 120
mm in your design software.
Introducing the Mask
Unlike other CD & DVD printers on the market, the Puma boasts a unique and easy
to use mask, which makes the accurate printing of CDs from graphics software
packages such as CorelDRAW & Photoshop easier than ever before.
The Puma mask looks something like Fig. A. The shaded area represents the mask
itself and through the use of the mask, the printer is prevented from printing an
image onto this area.
Mask
Fig. A
ZZ 004 833
- 27 -
Puma Disc Inkjet Printer
Understanding the Mask Interface
The Puma mask interface, located in the Printer Preferences, looks like this:
Selected mask
will be
displayed here
Fig. B
Using the mask, adjustments can be made to match exactly the size of media you wish to
print. Each of the features included on the mask interface is described on the following
pages:
Mask Type:
The Puma has pre-determined masks for the following types of media:
Standard CDs & DVDs (120mm)
Business Card Round (63mm) (i.e. Saddle/Hockey)
Business Card Round (61mm) (i.e. Saddle/Hockey)
Business Card Round (58mm) (i.e. Saddle/Hockey)
Business Card Rectangular (58mm)
Business Card Rectangular (63mm)
Mini CDs (80mm)
Select the media you wish to print from the drop down list and a picture of that mask
will appear on the interface (see Fig. B).
Enable Mask:
Ensure this box is checked.
ZZ 004 833
- 28 -
Puma Disc Inkjet Printer
Standard Area Settings:
This feature allows you to adjust the print area of the mask. You can amend the
following dimensions:
Outer Diameter – Can be used when printing standard 120mm CDs & DVDs and
Mini Ds
Note:
The maximum print area for a CD is 120mm in diameter. The mask will not accommodate
and the printer will not print beyond this diameter.
Fig.C
However, this outer diameter can be reduced to accommodate the slightest
variation in printable media.
Inner Diameter:
Height:
Width:
Corner Height:
Corner Width:
This can be increased or decreased in size
To adjust the height of the mask for CD business
cards
To adjust the width of the mask for CD business cards
To adjust the corner height of the mask for CD
business cards
To adjust the corner width of the mask for CD
business cards
Hub Area Settings:
To print on the hub of your chosen media, first check the “Printing on Hub” checkbox as
shown in Fig. D.
Hub
Fig. D
ZZ 004 833
- 29 -
Fig. E
Puma Disc Inkjet Printer
The mask interface displays the hub.
Once again the Outer & Inner diameters of the hub can be adjusted to fit your media’s
requirements exactly. See Fig. B.
Mask Origin:
The Calibration tab should be used to align your print image with the CD, however, the
masks origin can also be used to more the position of the image by entering values in the X
& Y axis.
Fig. F
As you will see from the above diagram (Fig. F), the maximum distance you can move the
mask is 1mm in any direction. It is therefore advisable to change the unit of parameter from
x 1mm to x0.1mm as shown below in Fig. G This way, tiny movements can be made to
align the mask perfectly.
Fig. G
Parameter Unit:
As mentioned above, the parameter unit can be changed from x1 mm to x 0.1 mm
movements allowing you to adjust your mask by tiny increments at a time so that a perfect
mask can be achieved.
Changing this setting to x 0.1mm will result in all measurements on the Mask interface
being shown as tenths of a millimetre as shown in Fig. H
Parameter Unit = x1mm
Fig. H
Parameter Unit = x0.1mm
Templates:
To help you position your images correctly in either CorelDRAW 11 or Photoshop7,
templates are included on the CD enclosed.
These templates should be used as guides as to where to position your graphics in relation
to the media you wish to print.
ZZ 004 833
- 30 -
Puma Disc Inkjet Printer
APPENDIX B: RECOMMENDATIONS & MAINTENANCE
Positioning your Puma
♦
Ensure your Puma is placed on a flat surface.
♦
Ensure there is sufficient ventilation around your printer.
♦
Avoid places subject to dust, moisture & vibrations.
Maintaining your Printer
♦
DO NOT force the print cartridge cradle – always follow the correct procedures for changing
ink cartridge (see section 5).
♦
DO NOT manually force the CD tray into the printer
♦
From time to time the CD tray of the Puma may collect deposits of ink where an
image has printed directly onto the CD tray. To clean the tray simply wipe with a moist
cloth.
♦
DO NOT put your hand or any other object inside the printer while it is printing.
♦
DO NOT spill liquid onto the printer
Getting the Most out of Your Puma
♦
If you wish to print photo-quality graphics onto your CDs & DVDs, the higher the input the
higher the output.
♦
Use jpegs, tiff files that are 300dpi resolution
Cleaning Procedure
The following procedures will cure most print quality issues such as distorted images/text and
banding. If printing does appear to be off-centre, these procedures should also provide a suitable
remedy.
1. Eject the printer tray. On the front left hand corner of the tray is a white tab (see image below).
This tab is an optical sensor for the printer and should be kept brilliant white. To clean it, use a
fresh pencil eraser.
ZZ 004 833
- 31 -
Puma Disc Inkjet Printer
White Tab
Sensor
Toothed
section
2. On the left hand side of the tray there is a toothed drive section (see image above). If this drive
section is dirty, it may effect the tray action. This can cause print quality issues and distorted
images.
The toothed section is very easy to clean. Simply brush it gently with a soft damp (not wet)
toothbrush or similar, and wipe away any excess with a soft cloth.
3. With the printer lid open, you will see the brass cog/wheel (see picture below) that drives the
printer tray. Clean this in the same way as the toothed section using a soft damp toothbrush.
Again remove any excess with a soft cloth.
Linear
Encoder
Metal Slide
Bar
Brass Drive
Wheel
4. The print carriage moves left to right on a metal slide bar (see picture above). Over time, this
can become contaminated with ink/dirt. To clean, simply dampen a lint-free cloth with some
light machine (or 3-in-1) oil, and wipe along the slide bar. This will clean and lubricate the bar
at the same time.
ZZ 004 833
- 32 -
Puma Disc Inkjet Printer
5. Approximately 20mm (3/4 inch) above the slide bar runs the linear encoder (see image above).
This encoder tells the print carriage where to stop horizontally. If it becomes contaminated with
ink, it may cause banding on the printed disc.
To clean the linear encoder, wipe it with a damp lint-free cloth.
Calibration
The Puma comes with its own calibration tool within the printer driver. If the printed image is
slightly off centre, you can re-align and re-centre the printed image.
For more information regarding calibration, please refer to section 10.6 (page 23) of the printer
user manual.
ZZ 004 833
- 33 -
Puma Disc Inkjet Printer
STANDARD TERMS AND CONDITIONS OF SALE
In these conditions “Verity Systems” is Verity Systems Limited, having its registered office at Verity House, 2,
Eastern Road, Aldershot, Hampshire, GU12 4TD, UK. And the “Purchaser” is an individual or company with
whom Verity Systems contracts.
All orders are accepted by Verity Systems subject to Conditions of Sale set out below
1. GENERAL
These conditions shall prevail over any terms or conditions, which the Purchaser may seek or have
sought to impose. Any conditions in the Purchaser’s Order will be binding only so far as they are
compatible with these Terms and Conditions and are expressly accepted by a Director of Verity
Systems in writing.
2.
ERRORS
Clerical errors may be corrected by Verity Systems at any time.
3.
PRICES
The prices quoted are Ex Works and exclude Value Added Tax/sales tax. Any published list price
shall be subject to revision without notice according to Verity Systems prices ruling at the time of
delivery.
4.
SETTLEMENT TERMS
Punctual payment is the essence of the Contract and the Purchaser will pay interest at the rate of
2%
per month or part thereof of any overdue payments. Provided that the Purchaser has produced
references which are in Verity Systems’ opinion are satisfactory Settlement Terms will be net 30
days from delivery. In all other cases payment shall be in advance upon submission by Verity
Systems of a pro forma invoice.
5.
DELIVERY
All times quoted for delivery are from receipt from the purchaser of a written order to proceed.
Unless otherwise agreed in writing any quoted delivery date shall only be an estimate thereof and
shall not be essence of the Contract. Whilst all reasonable endeavours will be made to comply with
estimated delivery dates Verity Systems does not accept any liability in respect of failure or delay in
delivery. Where a Purchaser’s Order calls for a number of items Verity Systems reserves the right to
deliver all or any as soon as they are available at Verity Systems’ premises and the Purchaser shall
honour all statements presented in respect of such deliveries in accordance with the Settlement
Terms. Notification to the Purchaser by Verity Systems that the goods are available for delivery to
an independent carrier or to the Purchaser or his agent shall constitute delivery to the Purchaser. In
all cases the carrier acts as Agent of the Purchaser.
6.
EXPORT CONTROL
If the goods or components thereof are licensed by the US Government for ultimate destination
within the United Kingdom and any other EEC Country then the goods may not be re-exported
without the approval of Verity Systems in writing.
7.
INSPECTION AND ACCEPTANCE
THE PURCHASER MUST INSPECT THE PRODUCTS as soon as is reasonably practicable after
delivery and shall within 3 working days of delivery give notice to Verity Systems in detail of any
defect in the Products or of any other complaint which the Purchaser may have in relation to the
Products. Upon acceptance of the goods the Purchaser shall be deemed to acknowledge that the
goods so accepted conform in all respects with the specification of the goods ordered. If the
Purchaser desires to inspect the goods prior to delivery such inspection must be made at Verity
Systems’ premises and notification of this requirement must be given in writing at the time of placing
the order. If upon inspection the goods are approved by or on behalf of the Purchaser such approval
shall constitute acceptance of the goods If no such inspection is made the Purchaser shall be
deemed to have accepted the goods when they are delivered to him or his agent or carrier unless
the Purchaser gives written notice to the contrary to Verity Systems within three working days of
delivery. If the Purchaser fails to give such notice, the Products shall be conclusively presumed to
be in all respects in accordance with the contract and free from any defect which would be apparent
on reasonable examination and the Purchaser shall be deemed to have accepted the Products
ZZ 004 833
- 34 -
Puma Disc Inkjet Printer
accordingly. The Purchaser acknowledges that Verity Systems does not write software comprised in
Products sold by it and, accordingly, the Purchaser acknowledges that it is its sole responsibility to
check (by the application of appropriate diagnostic software) for the presence of computer viruses in
software comprised in Products before such Products are used or disposed of. In the event that the
Purchaser establishes to Verity Systems’ reasonable satisfaction that the Products are not in
accordance with the contract or are so defective, the Purchaser’s sole remedy in respect of such
non-accordance or defects shall be limited as Verity Systems may elect to the replacement of the
Products or refund of the purchase price or, where sums are owed by the Purchaser to Verity
Systems, the issue of a credit note against the return of the Products.
THE PURCHASER MUST REFUSE PARCELS DELIVERED TO HIM IN A DAMAGED CONDITION.
In no circumstances shall Verity Systems be liable to compensate the Purchaser in damages or
otherwise for non-delivery or late delivery of the Products or for any loss consequential or otherwise
arising from non-delivery or late delivery.
8.
CANCELLATION OF ORDER
If at any time the Purchaser cancels an order for goods or services which Verity Systems specifies to
be “non-standard”, i.e. not detailed on the current price list, Verity Systems shall be entitled to claim
as damages an amount equal to 75% of the value of the order. For standard goods or services
damages would equate to 50% of the value of the order. These amounts the Purchaser agrees
represents a genuine pre-estimate of Verity Systems’ loss. Upon the cancellation of any order,
Verity Systems shall have the right to realize at its discretion after 60 days all monies, securities or
goods pledged with or held by it on behalf of the Purchaser and to apply the proceeds in or towards
the satisfaction of such claim for damages and the Purchaser shall have no claim whatsoever
against Verity Systems in connection therewith.
9.
PASSING OF PROPERTY AND RISK
The goods shall remain the sole and absolute property of Verity Systems as legal and equitable
owner until such times as the Purchaser shall have paid to Verity Systems the agreed price. From
delivery of the goods the Purchaser acknowledges that he is in possession of the goods solely as
bailee for Verity Systems as shall as bailee insure and keep the same insured in the name of Verity
Systems in their full reinstatement value in some reputable insurance office and indemnify Verity
Systems for any uninsured loss thereof. For the purpose of recovering the goods Verity Systems
may enter any premises where the goods are stored or where they are reasonably thought to be
stored and may repossess the same. Until such time as the purchaser becomes the owner of the
goods he will store them on his premises in a manner, which makes them readily identifiable as the
goods of Verity Systems. The Purchaser is licensed by Verity Systems to agree to sell Verity
Systems’ goods subject to the express conditions that the entire proceeds thereof are held in trust
for Verity Systems and are not mingled with other monies or paid into any overdrawn Bank Account
and shall be at all times identifiable as Verity Systems monies. The Purchaser is licensed to use the
goods in the manufacture of other goods provided that if the goods being the property of Verity
Systems are mixed with goods being the property of the Purchaser or are processed with or
incorporated therein the product shall be deemed to be the sole and exclusive property of Verity
Systems.
If the goods being the property of Verity Systems are mixed with goods being the property of any
person other than the Purchaser or incorporated therein the product thereof shall become or shall be
deemed to be owned in common with that other person in proportion to the value of the constituent
parts therein. The Purchaser is licensed by Verity Systems to agree to sell on the said product
subject to the express condition hereinbefore mentioned in relation to the proceeds of sale thereof.
10. SPECIFICATION
All drawings, specifications and particulars of the goods submitted are approximate only. The
descriptions and illustrations contained in catalogues, price lists and other advertising of Verity
Systems are intended merely to present a general idea of the goods described therein and shall not
form part of the Contract. Whilst every effort is made to ensure that the latest specification is
available Verity Systems reserves the right to incorporate new features and to supply products which
may not be strictly in accordance with the specification agreed upon, provided that any changes in
specification shall not materially prejudice the performance of the goods.
ZZ 004 833
- 35 -
Puma Disc Inkjet Printer
11. FORCE MAJEURE
Verity Systems shall not be liable for failure to perform or delay in performance of any contract or for
the loss or damage to goods directly or indirectly caused by force majeure to include acts of God,
fire, theft, riot, war, embargo, strike, shortage of labour, delays in delivery of material by suppliers,
prohibition or export or import, confiscation or any other occurrence (whether or not of a similar
nature to those specified) beyond the control of Verity Systems. No consequences of any such
event shall give rise to the recession of the Contract unless in the opinion of Verity Systems the
contract becomes incapable of performance.
12. WARRANTY
a)
Verity Systems warrants that the goods will be of good quality and that Verity Systems has title to
sell the same. Verity Systems’ warranty of workmanship (if provided) shall be effective from the date
on which the goods were accepted in accordance with Clause 8 and limited to 12 months from
dispatch or such period as may be notified (“the warranty period”). During the warranty period Verity
Systems will replace, free of charge, any part or parts of the goods which fail to function as a result
of faults caused during their manufacture providing always that such faulty goods are returned
carriage paid to Verity Systems’ premises. The goods when repaired by Verity Systems will then be
returned carriage paid to the Purchaser. Verity Systems shall not be liable under this warranty:
i)
where the defect results from the goods being subjected to abnormal usage or where the defect
is due to the act, neglect or default of anyone other than Verity Systems
ii) for the replacement or repair of the goods or part or parts thereof where such replacement, or
repair becomes impossible as a result of force majeure or any other circumstances beyond
Verity Systems’ control
iii) where the goods or any components or parts thereof are the subject of a separate guarantee
given by a third party.
iiv) where failure is caused by abuse or neglect.
a)
The Purchaser acknowledges that if he has not notified to Verity Systems any particular purpose for
which the goods are required all express or implied warranties or conditions statutory or otherwise as
to quality of or fitness for any particular purpose of the goods are hereby expressly excluded and
Verity Systems shall not (except as set out above) be under any liability whatsoever in respect of
defects in goods delivered or for any injury, damage or loss resulting from such defects from any
cause whatsoever.
13. LEGAL CONSTRUCTION
except where otherwise stipulated in writing the relations, arrangements and agreements between
the parties shall be governed by the laws of England and all disputes which may arise under out of or
in connection with any contract between Verity Systems and the Purchaser shall be submitted to
arbitration by the London Court of Arbitration in accordance with its Rules for the time being in force.
Service of any notices in the course of such arbitration to the address of the Purchaser given in the
Contract shall be valid and sufficient. All references in the Terms and Conditions to the masculine
gender shall be deemed to include the feminine and neuter genders. Failure or neglect by Verity
Systems to enforce at any time any of the provisions hereof shall not be construed a waiver of Verity
Systems’ rights nor in any way affect the validity of the whole or part of this contract nor prejudice
Verity Systems’ rights to take subsequent action. The headings of the Terms and Conditions are
inserted for convenience or reference only and are not intended to be part of or to affect the meaning
or interpretation of any of the terms and conditions of this Contract. In the event that any of these
terms, conditions or provisions shall be determined invalid, unlawful or unenforceable it shall be
severed from the remaining terms, conditions and provisions that shall continue to be valid to the
fullest extent permitted by law.
14. STERLING PROTECTION
any quoted or listed sterling prices are subject to variation in the rate of exchange between sterling
and the currency paid by Verity Systems for whole or major components between the date of the
contract and the time of the submission of Verity Systems’ invoice to the Purchaser. Verity Systems
reserves the right to vary the price so that it accords with the said rate of exchange prevailing at the
time of Verity Systems’ invoice.
15. DEFAULT
If the Purchaser shall default in the performance of any of its obligations under the Contract Verity
Systems shall on giving the Purchaser notice in writing have the right without prejudice to any other
rights or remedies to take all or any of the following actions:
ZZ 004 833
- 36 -
Puma Disc Inkjet Printer
cancel all or any part of any discount which might otherwise have been due under the terms of
the contract;
b) suspend any outstanding delivery of goods or parts thereof until such default shall have been
made good;
c) recover possession of that part of the goods to which the default relates and the Purchaser shall
allow Verity Systems free access to his premises to enable Verity Systems to do so.
a)
No waiver or delay in exercise by Verity Systems of its right under this clause shall be deemed to
imply acceptance of the default or any subsequent default. If the Purchaser shall become bankrupt,
go into liquidation, have a Receiving Order made against him, or carry on his business under a
Receiver Verity Systems shall have the liberty without prejudice to any further remedies under the
Contract to terminate the Contract forthwith by notice in writing to the Purchaser or Liquidator and
recover possession of all equipment for which full payment of the contract price has not been
received in c. above.
ZZ 004 833
- 37 -
Puma Disc Inkjet Printer
Supplied by:
VERITY SYSTEMS LTD
2 Eastern Road
Aldershot
Hampshire
GU12 4TD
United Kingdom
VERITY SYSTEMS, INC.
5441 Merchant Circle, Unit A
Placerville
California
95667
United States
Tel: +44 (0) 1252 317000
Fax: +44 (0) 1252 316555
Email: [email protected]
Tel: (530) 626-9363
Fax: (530) 626-9395
Email: [email protected]
Website: http://www.veritysystems.com
ZZ 004 833
- 38 -