1
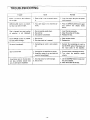
OWNERS
MANUAL
MODEL NO.
LXI
564.9752175O
COMPACT DISC PLAYER
SERIES
TABLE
OF CONTENTS
Page
Specifications
Precautions
.............
for usa
Features
Safety
sEmES
..........
.................
certifications
Connections
1
2
2
.........
..............
3
4
Controls
.................
5
Inserting
dbsc ..............
6
Operat_ofl
................
7
Maintenance
TrouhleshootLng
..............
............
P/N L46-381072-3
Record the Model Number and Serial Number of
your compact disc pJaver. The Numbers are on
the rear panel,
Model No.
Serial
No.
Keep these numbers
for future
9
10
Sears, Roebuck
and Co,, Chicago. IL 60684 U.S.A.
use.
_b;]1bel
of
Frequency
Dynamic
cNa[:I_t!is
.......
response
.....
range
.........
Signal-to-noise
ratio
Harmonic
distortion
Separation
............
Wow
Sampling
5
and flutter
20,000
.....
90 dB
.....
0,03%
let
number
Transmission
bit rate .....
44,1 kHz
....
Power requirements
Less than measurable
.........
.....
frequency
Quantization
16 bit linear/channel
4,3218
limits
.....
AC 120 V, 60 Hz
Power consumption
.....
12 W
Dimensions (W x HxD)
. . 420x85x270mm
W, Peak)
( 16-1/2x3-3/8x 10-5/8 inches)
3.4 kg
(7 Ib 6 oz)
Connecting pin cord
1.8V
Weight
DISCS
Type ...............
Diameter .............
Mb/sec
GENERAL
1 kHz!
80 dB (at 1 kHzl
........
voltage
dB
90 dB
(+-0.001%
Output
Hz -0,5
..............
Accessories
Compact Disc
120 mm (4-3/4 inches)
...........
* Because its products are subject to continuous improvement, Sears reservesthe right to modify product
designsand specifications without notice and without incurring any obligation.
I CAUTION:
Use of controls
hazardous
radiation
or adjustments
exposure.
CAUTION:
TO REDUCE
or performance
of procedures
other
WARNING:
those specified
herein may result in_
Explanation of Graphlcel Symbols
The lightning flash with arrowhead symbol,
within an equilateral triangle, is intended to
alert the user to the presence of uninsulated
"dangerous voltage" within the product's enclosure that may be of sufficient magnitude to
constitute a risk of electdc shock to persons.
THE RISK OF ELECTRIC
SHOCK, DO NOT REMOVE COVER. NO
USER-SERVICEABLE
PARTS INSIDE.
REFER SERVICING TO QUALIFIED SERVICE PERSONNEL.
The exclamation point within an equilateral
triangle is intended to alert the user to the
presence of important operating and maintenance (servicing) instructions in the literature
accompanying the appliance.
TO PREVENT
FIRE OR ELECTRIC
APPLIANCE TO RAIN OR MOISTURE.
i
than
SHOCK,
DO
NOT
EXPOSE
THIS
•
INFORMATION
This
equipment
dance with
generates
It has been type
cations
in
interference
However,
J
of
in a residential
Part
that interference
Reorient
the receiving antenna
•
Relocate
the equipment
•
Move the equipment
•
Plug the equipment
user may find
with
and if not
with
installed
and used properly,
to radio and television
the limits for a Class B computing
Rules,
which
are
designed
to
that is, in strict accor-
reception.
device in accordance
provide
reasonable
with
protection
the specifi-
against
such
to try to correct
reception,
the interference
installation.
which
can be determined
by one or more
by turning
of the following
the equip-
measures:
the receiver
into a different
user should
will not occur in a particular
to radio or television
respect to the receiver
away from
consult
th,.' following
and Resolve Radio-TV
Interference
This booklet
is available from the
L_.....
FCC
does cause interference
•
The
of
energy
may cause interference
to comply
15
off and on, the user is encouraged
the
frequency
installation.
there is no guarantee
If necessary,
[
instructions,
tested and found
Subpart
If this equipment
ment
and uses radio
the manufacturer's
outlet so that equipment
the dealer
booklet
prepared
Problems"•
US. Government
and receiver are on different
or an experienced
by the
Federal
Printing
-t-
Office,
radio/television
Communications
Washington,
branch circuits.
technician
Commission
D.C.,
20402,
for additional
helpful:
Stock
"How
suggestions.
to Identify
No. 004-000-00345-4.
J
! PRECAUTIONS
• I_);s(_
wh,ci_car_ _e pla,leu_ ;m_
playerhave the followingmark on
them
•
:
!
FOR USE
__I+]COM_PA_CT
IDIGITAL
•
•
o)O
F!O[
;_iGV,i
:i_ e
pldyOl
Sudd'¢liy
lrorf'i
8
very
COl(J
room into a warm room. When a chilled player is
moved suddenly to a warm location, moisture condensation may form on the optical lens, preventing proper
operation. In this case, turn the power on end wait 30
minutes before starting play.
AUDIO
During play, if the player is subjected to a sudden
shock or jolt,some noisemay be produced.Thisisnot a
malfunction.
• If the player is operated while you are receivingan
FM/AM
radio broadcast,you may hear noise on the
radiobroadcast.
Inthiscase,turntheplayer's
power switchoff.
•
_l
•
Do not place foreign objects in the disc tray and
attempt to operate the disc tray control function. It
may cause damage to the mechanism.
•
Do not store discs in high-temperature, high-humidity
locations. The discs may develop warps and become
If other audio components or theirconnecting cords
are installed
nearthisplayer,you may hear a humming
sound.
In this event,try changing the locationof the other
components or their wiring.
Whenever moving the player, be sure to first remove
the disc from it. If the player is moved with a disc
inserted, the disc may be damaged.
This unit has a wide dynamic range. As a result, if you
turn your amplifier's volume up too high during soft
(low volume) parts of a program, your speakers may
be damaged when the dynamic range of a sudden loud
passage is produced,
•
•
unable to play. Also, discs with moisture on them may
be unplayable. Wipe any moisture off with a soft, dry
cloth, and be sure discs are fully dry before using.
If the unit is installed in a confined location, heat dissipation will be poor end malfunctions may occur. Also,
do not install the unit on top of amplifiers or other components liable to become hot.
If the unit malfunctions,
do not remove it from its
cabinet to attempt a repair yourself. Have it bench
tested by a Sears service center/department.
FEATURES
I
Conventional
records are all made using analog recording techniques in which the audio signals are recorded as
mechanical vibrations in the shape of the groove on the
record surface, having the possibility of noise caused by
scratches, dust and dirt on the record surface.
In the digital recording system, the audio signal is converted into a binary encoded signal which is not susceptible to noise interference.
• Contactless Signal Dctection by Semiconductor
Pickup
Laser
• High Performance Sound Reproduction
• S/N Ratio of 90 dB
This compact disc player incorporates a semiconductor
laser pickup for playing compact discs with high-density
digitalized sound signals.
It gives superior sound quality and operation when compared to the conventional analog systems.
•
•
Dynamic Range of 90 dB
Distortion Ratio of 0.03%
•
Wow
•
Audio Cimuitry Seeks for Sound Quality.
and Flutter
of less than
Measurable Limits
• Horizontal Front Loading System
• Various Functions
2-
•
•
•
•
Random Memory Search System
Various Search System (Direct, Skip, Manual)
Repeat Play
High-Speed Access
•
Track and Index Nos, or Elapsed Play Time Display
SAFETV
PROOUCT
CERT[FICAT!ONS
COMPLIES
WITH
CFR SUBCHAPTER
J, PART
OATE OF MANUFACTURE
MANUFACTURED:
MANUFACTURER:
DHHS
RULES
1040
10 AT
-],,
2 i
SRS
_
MODEt
NO
I
-3-
',*i49,'b2t_50
[
F
CONNECTIONS
1
Amplifier
1. Turn
off your
2. Connect
the
left
on the
cord.
3
Connect
on tile
hold AC
the
amplifier.
unit's
left
NOTES:
and
and right
CD/AUX
amplifier
using
the
power
rea_ paf/_!l of
120V 60Hz
cord
right
OUTPUT
or TAPE
the
to
PLAY
supplied
the
the stereo
auxiliary
ampllfier
jacks
with
input
jacks
connecting
pin
power
•
•
outlet
or to a house-
ou'det,
-4-
Switch
off
necting
or disconnecting
the power
Do not connect
to
the
components
the pin cords,
to the PHONO
jacks.
when
con-
" CONTROI_S
q
?
?
?
Z
COWPACTOLS¢ SLA_En
_OWEm C_lO",
I_$fR/_S
I ]_nEA_ L,Slm
Mi
if-.....
(_
_--!
PLAY Jl REPEAT IL
(_)
POWER Switch
Press this switch
to turn
the power
again to turn the power
(_
(_
(_)
disc with the label surface
disc play
MULTI
To
facing up.
the
disc
tray.
Press the
resume
CRYSTAL
button
Theplay
DISPLAY
i)lay,
during
MULTI
play
indicator
(_
SEARCH
Button
Button ( 414 )
indicator
lights
DISPLAY.
to temporarily
in the LIQUID
stop the
the
or backward
Forward
Button
SKIP
(
Also, press this button
(
CRYSTAL
in the play
mode to move
at high speed.
Button
(
_
) and Backward
SKIP
)
in the stop or play mode to
on the
track
5 _
) and Backward
select
a desired
track
is pressed,
backward.
bL_tton aga,_/
_
IHm,
Press one of these buttons
button
flashes.
pfPss
Forward
SEARCH
forward
again to close the disc tray.
Press this
to stop play,
Press one of these buttons
open
PLAY/PAUSE
Button
( I_/11 )
Press this button
to start play. The play
in the LIQUID
(==)
to clear the program,
off,
OPEN/CLOSE
Button
Press this button
to
button
(_)
STOP Button
Press this button
on. Press the switch
Disc Tray
Place a compact
sEm
Also
No.
the
track
keep the button
No, continuously
disc. Each time the
No.
and rapidly.
moves
pressed
forward
or
to change
the
,_,
MEMORY
Buttorl
MIN!SEC
REPEAl'
Button
Press this button
to designate
_)
play
the selection
being played.
Indicator
@ INDEX
PLAY Indicator
The PLAY
indicator
during
repeat
lights
during
play
and
flashes
During
pause mode.
segments
@ TRACK
REPEAT
Indicator
The REPEAT
indicator
@)PROGram
Lights
system
Hghts
during
repeat
play.
During
selection
Indicator
when
the
Indicators
programs
for random
memory
the
search
play,
the
within
display
shows
the
index
number
for
selection.
Indicator
play,
the display
being
player,
played.
the
display
shows the track
When
No.
of the
the disc is inserted
shows
the total
number
into
of
tracks on the disc.
is memorized.
INSERTING DISC
1. Press the POWER
MIN/SEC
tray
opens.
touching
the
of
upward.
4. To close
button.
indicator
3. Without
center
the
indicates
the
tray,
the disc tray,
PAUSE
the
disc tray
button,
disc
"OPEn"
surface,
with
the
place
label
Do not place any foreign objects in the disc tray.
It may result in matfunction.
the
•
If your finger or any object should get caught in the
disc tray, press the OPEN/CLOSE button to open the
disc tray.
button,
•
•
Do not force the disc tray open or close by hand.
When not using the unit, keep the disc tray closed to
prevent the entry of dust and dirt.
PLAY/
•
Do not press down hard on the disc tray, since it may
result in damage to or malfunction of the disc tray.
•
Before first operation, remove the sheet placed on the
disc tray.
disc
surface
on
facing
button.
is closed
the unit
•
and the disc
press the OPEN/CLOSE
or press the PLAY/PAUSE
When
NOTES:
switch.
2. Press the OPEN/CLOSE
The
1
enters
by pressing
the play
the
mode
from
the
first selection.
_gwith the label surface facing upward,
-6
Y OPERATION
_I _ORMAL
I+ Turn
on
which
the
amplifier
this unit
4.
the
the disc.
Press the
OPEN/CLOSE
inserted
seconds
time,
disc
while
etc.,
number
to close
reads
stop
the
will
button
number
inserting,
placed
the
disc
tray.
NOTE:
for
the
When
several
No.,
play
playing
disc's
total
•
one
of
mode,
player
will
No.
the
the
play
SKIP
will
SKIP
track
mode
select
you
new
wish
track
to
No.
button.
light,
and the play
buttons
Nos.
and
the
is kept
will
change
will
begin at
pressed
rapidly
in the
and
the
begin at that selection.
search
To
the
selection,
the appropriate
the
track
_s m
a different
The selected track
that selection.
to
stop
listen
function
to
the
press the forward
•
stop
When
is not
down,
the
automatically
make
try
disc
•
To
stop.
displayed
sure
and
listen
to
the
press the backward
play.
it will
to
To
again.
of tracks
upside
temporarily
flash.
to
cheek
disc
player
b _ST_-M
is also
made
selection
during
following
pause
that
mode.
presently
being played:
press the button
total
to
tray
to start play.
button
indicator
STOP
If the
the
move
lights.
to the end of its play,
disc
When
disc
rotate
its
displaying
button
PLAY/PAUSE
To resume play,
•
to
Skip
indicator
The play
comes
source
the
open
automatically
player
then
to
button
will
the
and
the
7. Press
input
of tracks.
The play
play.
the
by tapping
button
5. Press the PLAY/PAUSE
6. Press
select
switch.
OPEN/CLOSE
and insert
The
and
is connected.
2. Press the POWER
3. Press
8K_;_ 6EA_GH
PLAY
listen
to
the
SKIP button
once.
presently
playing
SKIP
track
button
previous
track
once again:
once.
to the
one
presently
playing:
after
you
have
not
to
insert
the
press the backward
SKIP
button
twice
in succession,
disc again.
•
If
play
does
PLAY/PAUSE
operate
not
begin
button,
even
press the
after
pressing
STOP
button,
the
then
again for play.
•
PROGRAM PLAY WITH RANDOM
MEMORY SEARCH SYSTEM
The random memory search system searches for the desired selections on the disc in the desired order and
• DIRECT
With
the player
ing track
No. will
When
SEARCH
in the stop mode,
No. using
the SKIP
light in the LIQUID
the
plays them automatically.
SYSTEM
PLAY/PAUSE
select the desired
buttons.
CRYSTAL
button
mode,
This
the
allows
track
No. displayed
you to select
verse directions
track
The selected track
MULTI
is pressed,
begin from the selected track No.
If one of the SKIP buttons
is kept
DISPLAY.
2. First select the desired track Nos. using the SKIP
buttons; pressthe MEMORY button after each selection.
The selected track No. will be lit on the LIQUID
CRYSTAL
MULTI
DISPLAY
and the PROGram
the play will
pressed
will change
No.
1. Insert the disc and start the programming after the
LIQUID CRYSTAL MULTI
DISPLAY has displayed
the total number of tracks.
start-
in the stop
continuously.
in the forward
indicator will light.
Example
To select the third track, pressthe forward SKIP button
three times, and then pressthe MEMORY button.
To select the twelfth track in succession, press the
forward SKIP button nine times, followed by the
MEMORY button.
or re-
quickly.
A maximum of 16 selections may be programmed ill
this way.
•
If you wish to confirm the programmed selections,
pressthe MEMORY button.
3. Press the PLAY/PAUSE
button. The selections are
automatically
7
•
played in the programmed order.
• REPEAT
NOTE:
4. When
all
player
be stop
been pJayed,
program
button.
all selections
button
is pressed,
play
the
Repeat play
selections
once
•
programmed
be cleared.
with
During
random
memory
programming,
track
No.
will
CRYSTAL
During
program
play,
corrected
the
appears.
and
a track
in the stop
track
No. will be memorized.
press the
Adding the selection
Select
the
to add
track
desired
the MEMORY
selected
LIQUID
CRYSTAL
MULTI
(and index
No.) of
No. memorized,
MEMORY
until
•
button
again.
a track
No.
button
into
in
the
the program
made,
mode
until
No. using the SKIP
button;
press
No. disappears.
track
button.
Clearing all the programs
To clear all selections programmed, press the STOP button
twice during play or once during stop mode. When the
programs are cleared, the PROGram indicator will go out.
NOTE:
•
When the OPEN/CLOSE button
mode, programs will be cleared.
or
only
programmed
Press the REPEAT button to designate repeat play.
The REPEAT indicator lights. Press the PLAY/PAUSE
button (after programming).
Unless the random memory search system is used, all
the selections will be played repeatedly until the
STOP button is pressed.
When the STOP button is pressed, repeat play is
cancelled, and the REPEAT indicator
will go out.
•
If the REPEAT button is pressed during normal play,
repeat play of all selections on the disc will commence.
•
Even if the REPEAT button is pressed during program play, repeat play will commence.
A new
stop
selections,
NOTES;
No. to be
to select a new
button
all
If the REPEAT button is pressed during repeat play,
repeat play is cancelled and resume normal play.
press the
a track
of
If the random memory search system is used, only
those selections which have been programmed will be
played repeatedly.
into program
MEMORY
programmed
No.
mode
Use the SKIP
No.
wish
LIQUID
the track
track
the
the
the
contents
to correct
button
press
of
on
being played.
MEMORY
If you
No.
displayed
DISPLAY.
Changing the program
you wish
track
be
will display
the selection
search system
the
only
MULTI
DISPLAY
If
have
To repeat
If the STOP
Displays
•
select,ons
mode.
again, press the PLAY/PAUSE
will
•
prograrrlmed
wilt
PLAY
is pressed during play
8
¸
•
MANUAL
SEARCH
•
',','he_
ut?rform_ng
manua_
s_a_gh,
•
mode,
that por[_on
•
When
the
during
play,
forward
•
forward
manual
When
the
during
play,
During
found
the
the
play
will
the
button
_s kept
be advanced
serving
pressed
rapidly.
SEARCH
play
will
button
is kept
be fast reversed
•
pressed
rapidly.
manual
of
lease
the
SEARCH
from
that
point.
the
this
(Fast
If
the
button
search
the
operation,
selections
button
and
you
normal
when
wish
play
you
to
have
hear,
will
. ¸
desired
CRYSTAL
any sound
manual
H:!I
your
,
iota[ion
MULTI
i
i
L
ob
DISPLA_
being produced.
search,
two
speed
modes
of search-
forward
is
kept
SEARCH
pressed,
or
the
backward
search
SEARCH
speed becomes
faster.
re-
begin
J
[ MAINTENANCE
• Treat disc surface carefully
Handle the discs so that fingerprints
here to the surfaces of the discs.
LIQUID
fo_
he
Will
volume
ing are reserved.
search)
part
In
_
,:a_t f,earch
along without
NOTE:
(Fast
search)
backward
back manual
•
the
SEARCH
you
tr_e
• Clean cabinet and panels when dirty
Clean off dirt on the surfaces with a dry cloth.
Never use thinner, benzene or alcohol since these will
damage the surface finish.
and dust do not ad-
To clean-off, use a soft cloth. Do not use a hard cloth
since this will mar the disc.
-9-
!
'TROUBLESHOOTING
Trouble
Cause
Power is turned on, but indicators
do not light,
1. Power plug is not connected
Remedy
secure-
ly.
1. insert the power plug into the power
outlet securely.
OPEN/CLOSE button is pressed,
but disc tray does not open.
1. Tray open signal is not received correctly,
1. Press the OPEN/CLOSE button again
and confirm the display
shows
OPEn.
Disc is inserted, but total number
of selection is not displayed,
1, Disc is inserted upside down.
2, Disc is dirty.
3. Disc used is nonstandard.
1. Insert the disc correctly.
2. Clean the surface of the disc.
3. Replace the disc.
PLAY/PAUSE
1. Disc is dirty.
1. Clean surface of disc.
but play does not begin.
button
is pressed,
2. Disc has scratch or is warped,
2. Replace disc.
No sound is produced.
1. Connecting pin cord is not connected.
1. Connect the connecting pin cord to
the OUTPUT jacks of the player and
the input jacks of the amplifier.
Sound is distorted.
1. Connections to amplifier are wrong.
2. Amplifier output is set too high and
sound is being clipped,
1. Connect player to amplifier correctly.
2. Turn down the amplifier output
volume.
A particular spot on the disc does
not play correctly
(sound cuts
out, or same spot is repeated).
1. Disc has scratch or other damage.
2. Disc is dirty,
1. Use the SEARCH button to pass over
the part scratched.
2. Clean the surface of the disc.
-10-
WE SERVICE WHAT WE SELL-
,A/RS
'_Ne
Service
What
We Sell"
our customers can depend
Your
OWNERS
MANUAL
Sears
consider
professional
Home
Compact
that
we
technicians
Entertainment
equipment
Disc
have
......
is our
assurance
to
you
that
when
you
on Sears for service nationwide.
Player
Service
who
Products.
has added
Units
are
value
Nationwide,
staffed
specifically
trained
on
Sears has the
parts,
tools
by
Sears
and
to ensure that we can meet our pledge to you.
!
MODEL NO.
564.97521750
,:'i
FULL ONE YEAR WARRANTY
SERIES
ONI_Xls_r_es
COMPACTDISC PLAYER
For one year from the date of purchase, Sears will repair this
/..,_l_Em_s Compact Disc Player free of charge, if defective in
material or workmanship.
WARRANTY SER VICE IS AVAI LABLE BY CONTACTING THE
NEAREST SEARS SERVICE CENTER/DEPARTMENT
IN THE
UNITED STATES, THIS WARRANTY APPLIES ONLY WHILE
THIS PRODUCT IS IN USE IN THE UNITED STATES.
This warranty gives you specific legal rights, and you may also
have other rightswhich vary from state to state.
Sears, Roebuck and Co., Department 698-731A,
Sears Tower, Chicago, IL 60684
|
P/N L46-381072-3
Printed
in Japan