1
Owner’s Manual
PMDT
Modular DVD
Transport
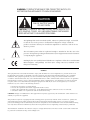
WARNING: TO REDUCE THE RISK OF FIRE OR ELECTRIC SHOCK, DO
NOT EXPOSE THIS APPLIANCE TO RAIN OR MOISTURE.
CAUTION
RISK OF ELECTRIC SHOCK
DO NOT OPEN
CAUTION: TO REDUCE THE RISK OF ELECTRICAL SHOCK, DO
NOT REMOVE COVER. NO USER-SERVICEABLE PARTS INSIDE.
REFER SERVICING TO QUALIFIED PERSONNEL.
The lightning flash with arrowhead symbol, within an equilateral triangle, is intended
to alert the user to the presence of uninsulated “dangerous voltage” within the
product’s enclosure that may be of sufficient magnitude to constitute a risk of electric
shock to persons.
The exclamation point within an equilateral triangle is intended to alert the user to the
presence of important operating and maintenance (servicing) instructions in the literature
accompanying the appliance.
2
Marking by the “CE” symbol (shown left) indicates compliance of this device with the EMC
(Electromagnetic Compatibility) and LVD (Low Voltage Directive) standards of the
European Community.
NOTICES
This equipment has been tested and found to comply with the limits for a Class B digital device, pursuant to Part 15 of
the FCC Rules. These limits are designed to provide reasonable protection against harmful interference in a residential
installation. This equipment generates, uses and can radiate radio frequency energy and, if not installed and used in
accordance with the instructions, may cause harmful interference to radio communications. However, there is no guarantee
that interference will not occur in a particular installation. If this equipment does cause interference to radio or television
reception, which can be determined by turning the equipment on and off, the user is encouraged to try to correct the
interference by one or more of the following measures:
•
•
•
•
Reorient or relocate the receiving antenna;
Increase the separation between the equipment and the receiver;
Connect the equipment into an outlet on a circuit different from that to which the receiver is connected;
Consult the dealer or an experienced radio/TV technician for help.
CAUTION: Changes or modifications to this equipment not expressly approved by the manufacturer could void the user’s
authority to operate the equipment.
This product incorporates copyright-protected technology that is protected by method claims of certain U.S. patents and
other intellectual property rights owned by Macrovision Corporation and other rights owners. Use of this copyrightprotected technology must be authorized by Macrovision Corporation, and is intended for home and other limited viewing
uses only unless otherwise authorized by Macrovision Corporation. Reverse engineering or disassembly is prohibited.
The information contained in the manual is subject to change without notice. The most current version of this manual will
be posted on our Website at http://www.madrigal.com.
Important Safety Instructions
Please read all instructions and precautions carefully and completely before operating your Proceed® Modular
DVD Transport.
1.
ALWAYS disconnect your entire system from the AC mains before connecting or disconnecting
any cables, or when cleaning any component.
2.
This product is equipped with a three-conductor AC mains power cord which includes an
earth ground connection. To prevent shock hazard, all three connections must ALWAYS be
used. If your electrical outlets will not accept this type of plug, an adapter may be purchased.
If an adapter is necessary, be sure it is an approved type and is used properly, supplying an
earth ground. If you are not sure of the integrity of your home electrical system, contact a
licensed electrician for assistance.
3.
AC extension cords are not recommended for use with this product. If an extension cord must
be used, be sure it is an approved type and has sufficient current-carrying capacity to power
this product.
4.
NEVER use flammable or combustible chemicals for cleaning audio components.
5.
NEVER operate this product with any covers removed.
6.
NEVER wet the inside of this product with any liquid.
7.
NEVER pour or spill liquids directly onto this unit.
8.
NEVER block air flow through ventilation slots or heatsinks.
9.
NEVER bypass any fuse.
10. NEVER replace any fuse with a value or type other than those specified.
11. NEVER attempt to repair this product. If a problem occurs, contact your Proceed retailer.
12. NEVER expose this product to extremely high or low temperatures.
13. NEVER operate this product in an explosive atmosphere.
14. ALWAYS keep electrical equipment out of the reach of children.
15. ALWAYS unplug sensitive electronic equipment during lightning storms.
3
From all of us at Madrigal Audio Laboratories, thank you for choosing this
Proceed product.
4
A great deal of effort went into the design and construction of this precision
device. Used properly, it will give you many years of enjoyment.
Table of Contents
Unpacking and Placement ....................................................................... 7
Unpacking the PMDT ......................................................................................... 7
Placement of the PMDT .................................................................................... 7
Operating Voltage & Frequency ............................................................... 8
voltage label ............................................................................................... 8
A Quick Start ............................................................................................... 9
check & connect ac power ..................................................................... 9
quick video connection ............................................................................ 9
quick audio connection ............................................................................ 9
loading a disc ............................................................................................. 9
Warmup/break-in period .................................................................................. 9
Special Design Features ........................................................................... 11
Modular hardware .......................................................................................... 11
Updatable software ........................................................................................ 11
No-compromise audio .................................................................................... 11
Unexcelled video techniques ........................................................................ 12
Ease of use ....................................................................................................... 12
Industrial design ............................................................................................... 13
Front Panel, PMDT ...................................................................................... 14
Rear Panel, PMDT ...................................................................................... 20
trigger tip polarity ..................................................................................... 21
IR input tip polarity .................................................................................... 21
building a link cable ................................................................................. 21
The PMDT Remote Control ........................................................................ 25
The PMDT Menus ....................................................................................... 32
Using the menus ............................................................................................... 32
Video setup ...................................................................................................... 32
TV type ....................................................................................................... 32
composite setup ....................................................................................... 32
component setup .................................................................................... 32
black level ................................................................................................. 34
white level ................................................................................................. 34
chroma ...................................................................................................... 34
dvd pause ................................................................................................. 34
Audio setup ...................................................................................................... 35
spoken ....................................................................................................... 35
subtitles ...................................................................................................... 36
favorite multichannel ............................................................................... 36
alternative sound ..................................................................................... 37
audio delay ............................................................................................... 37
96kHz enabled .......................................................................................... 37
CD Record ................................................................................................ 38
Disc behavior ................................................................................................... 38
after load ................................................................................................... 38
Disc Status ................................................................................................. 39
play key ..................................................................................................... 39
,
keys ................................................................................................ 39
stop dvd .................................................................................................... 40
power user tip ........................................................................................... 40
use ESP ...................................................................................................... 40
User preferences .............................................................................................. 41
key feedback ........................................................................................... 41
5
OSD position .............................................................................................. 41
background .............................................................................................. 41
link options ................................................................................................. 42
display time ............................................................................................... 43
auto standby ............................................................................................ 43
screen saver .............................................................................................. 43
Information preferences ................................................................................. 43
disc time .................................................................................................... 44
sound type ................................................................................................ 44
camera angle ........................................................................................... 44
a/v processor ............................................................................................ 44
play status ................................................................................................. 44
time of day ................................................................................................ 45
set clock .................................................................................................... 45
Technical menu ............................................................................................... 45
teach IR commands ................................................................................ 45
restore defaults ......................................................................................... 45
delete programs ....................................................................................... 46
Programming the PMDT ............................................................................ 47
6
Electronically saved preferences (ESP™) ...................................................... 47
audio, language ...................................................................................... 47
subtitles ...................................................................................................... 48
subtitle on/off ............................................................................................ 48
aspect ratio ............................................................................................... 48
black level ................................................................................................. 48
audio delay ............................................................................................... 48
save settings .............................................................................................. 48
Ad hoc programming ..................................................................................... 49
ad hoc program menu ............................................................................ 49
Troubleshooting ......................................................................................... 51
Care & Maintenance ................................................................................ 53
U.S. and Canadian Warranty ................................................................... 54
90-Day limited warranty .................................................................................. 54
five year extended warranty ......................................................................... 54
Obtaining Service ..................................................................................... 55
Specifications ............................................................................................ 56
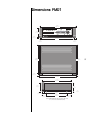
Dimensions: PMDT ..................................................................................... 57
Rack Mount Kit .......................................................................................... 58
Unpacking and Placement
Unpacking the PMDT
Unpack your PMDT modular DVD transport and remove all accessories from
the carton.
The accessories include:
•
•
•
•
Important!
Placement of the PMDT
an AC mains cable
the PMDT remote control
4 AAA alkaline batteries for the remote control
a 2-meter link cable for use with the Proceed AVP/AVP2
(necessary only for interoperation between the two units)
Keep all packing materials for future transport of your PMDT.
Shipping your new component in anything other than its
purpose-designed packing material may result in damage
that is not covered by the warranty.
The PMDT should be placed close to your audio and video processors, thus
keeping interconnect cabling reasonably short. It may be placed on a shelf or
in a cabinet where it is convenient to operate.
Drawings are included in this manual to facilitate special installations and custom cabinetry (see Dimensions, page 57).
7
Operating Voltage
& Frequency
The PMDT is set at the factory (internally) for 100V, 120V, 200V, 220V or 240V
AC mains operation as appropriate for the country in which it is to be sold.
(230V/50Hz only in European Union countries, in compliance with CE
regulations.) Make sure that the label on the rear panel of the PMDT (beside
the AC input receptacle) indicates the correct AC operating voltage for your
location. Attempting to operate the PMDT at an incorrect voltage can damage
the unit.
The PMDT modular DVD transport is also set at the factory for operation
on either 50Hz or 60Hz AC line frequencies, as appropriate for the country
in which it is to be sold. It will not operate if it senses an incorrect line
frequency.
Neither the voltage nor the line frequency setting may be changed by the user.
Voltage label
WARNING: BEFORE ATTEMPTING TO OPERATE THIS
DEVICE, REFER TO OWNER'S MANUAL FOR PROPER
OPERATING INSTRUCTIONS AND SAFETY PRECAUTIONS.
HAZARDOUS VOLTAGE AVAILABLE INSIDE; DISCONNECT
AC ~ MAINS CABLE BEFORE OPENING UNIT.
modular DVD transport
8
S/N
designed and manufactured in USA
www.madrigal.com
Apparatus Claims of U.S. Patent Nos. 4,631,603; 4,577,216;
4,819,098 and 4,907,093 licensed for limited viewing uses only.
No User Serviceable Components Inside. For service, contact Madrigal Audio
Laboratories or an Authorized Dealer. Any modifications to this equipment will void all warranties.
If the AC mains voltage or frequency indicated on your PMDT is incorrect,
please contact your local, authorized Proceed dealer or distributor.
The PMDT can easily be powered by a normal 15-Ampere AC mains line. If
other devices are also powered from the same AC line, their additional power
consumption should be taken into account.
A Quick Start…
Out of the box, the PMDT is designed to operate much as a fully featured CD
transport when playing compact discs, and much like other DVD players
when playing DVD discs (with the exception, of course, that the PMDT is a
transport – it has only digital audio outputs).
check & connect ac power
If you have not already done so, check the voltage label on the rear of your
PMDT to ensure that it matches the AC mains supply in your area. (See
previous page.) If your PMDT matches the power in your AC outlets, attach the
detachable power cord to the rear panel receptacle of your PMDT, and then to
the AC mains plug in the wall.
Once this is accomplished, depress the latching power button mounted in the
base (or plinth) of the PMDT, on the right side. The PMDT will run through
some self-testing diagnostics, and enter standby when satisfied that all is well.
quick video connection
quick audio connection
loading a disc
Warmup/break-in period
All video outputs on your PMDT are active at all times. Select component
(Y/Pb/Pr), S-Video, or composite (on either RCA or BNC), as needed by your
display device, and make the appropriate connection(s). For example, if you
have an S-Video-equipped Proceed AVP/AVP2, you would probably want to
set up an S-Video input on the AVP/AVP2, and rely on the AVP/AVP2 to then
get the signal to the television. If your television also has component (Y/Pb/
Pr) inputs, you should take advantage of the higher quality that connection
standard offers and also run a direct connection from the PMDT to your
television. Then, when you want the best possible picture quality from your
PMDT, remember to switch your TV to its component input.
All the digital audio outputs on your PMDT are active at all times. Select the
one that matches the available input on your A/V processor, and make the
audio connection. If you have a choice, the best options are either the
AES/EBU output (the one using an xlr connector), or the bnc output. These
digital transmission interfaces have a slight performance edge over S/PDIF on
an RCA, and a larger edge over EIAJ (sometimes called “Toslink™”).
Pressing drawer at this point, on either the front panel or the remote control,
will “wake up” the PMDT (bring it out of standby) and open the drawer so
you can load a disc. Select either a CD or a DVD and press play to start
enjoying your PMDT.
Although your Proceed PMDT modular DVD transport delivers outstanding
performance straight out of the box, you should expect to hear it continue to
improve as it reaches its normal operating temperatures and its various components “break-in.” It has been our experience that the greatest changes occur
within the first few hours as the PMDT reaches thermal equilibrium. Depending on how cold the PMDT was when you first connected it to AC power, full
thermal equilibrium might take as long as a day or so. After this initial break-in
period, its performance will remain quite constant, assuming that the unit is
toggled between operate and standby (rather than being turned fully off).
9
The only exception to this rule is if power is removed from the unit for a few
hours, allowing it to cool down. Depending on the degree of cooling involved, you should expect a brief warm-up period before the PMDT’s sound
quality is at its best. Unless your PMDT was allowed to become quite chilled,
subsequent thermal restabilization should not take long.
10
Special Design Features
Modular hardware
Perhaps the most obvious distinction of the PMDT is its card-cage design. With
seven slots on a powerful and flexible backplane, the PMDT represents an investment in avoiding premature obsolescence in state-of-the-art DVD playback. With the exception of the power supplies (there are four of them), all
important circuitry resides on these easily replaced cards.
These cards include the MPEG decoder and transport interface (immediately
adjacent to the transport loader); a component video output card; a composite
and S-Video output card; a digital audio output card; and the communications/
control card. This leaves two slots open for future expansion. After all, what
good does an “expandable” design such as this do if there is no room to expand?
Updatable software
Less obvious, but every bit as important, is the degree of software modularity
built into the PMDT. We chose not to accept the standard DVD navigation
software that comes with a laser transport mechanism, with all its limitations
and confusion. Instead, we rewrote all of the software from an extremely low
level on up. While this was a huge undertaking, the benefits seemed more
than worth the effort: we would be able to address many of the failings found
in the typical DVD user experience, making the PMDT a pleasure to use; we
would also be able to incorporate new technologies more easily as they were
developed.
Thus, if standards evolve to the point that a new transport is required to read
new data formats on discs, we can swap out the necessary hardware, and
make some new “connections” between it and our own software. Rather than
having to start all over again, we can continue to use the infrastructure we
have developed, and our customers can continue to enjoy the benefits of what
we hope you’ll agree is a superior user experience. Just as important, movie
enthusiasts don’t have to throw away everything they own and start over something that cannot be said for products that do not have equivalent hardware and software modularity.
No-compromise audio
For DVD machines, audio is usually an afterthought. The usual assumption is
that people are buying DVD for the video quality and that the audio is good
enough. The result is that often little effort is put into optimizing DVD systems
for exceptional audio performance.
Madrigal’s roots and its reputation are inseparable from audio. The PMDT uses
techniques developed for Mark Levinson Reference products to ensure the
best possible recovery and transmission of digital audio signals. The PMDT is
a digital audio transport – it has no analog audio outputs. It is designed to
read DVD video discs (including 24-bit/96kHz music recordings on this format) as well as standard compact discs. The transport is compatible with
Dolby® Digital and DTS®. With hardware and software changes, the PMDT can
be reconfigured to read future DVD Audio discs.
Madrigal’s CLJR™ (Closed Loop Jitter Reduction™) system is employed to optimize performance by minimizing jitter in the digital output, regardless of
11
whether from CD or DVD sources. In other machines, the audio clock is
slaved to the video – not to the audio data. This is done to keep audio synchronized with video. In the PMDT, the audio is optimized, independent of
the video, while maintaining proper synchronization. The PMDT even lets you
delay audio to compensate for recordings where the video is not synchronized
with the audio. This same feature can correct for systems where video processors delay the video signal by such a degree that the audio is no longer in
sync.
Digital audio outputs are provided on four different connector standards: EIAJ
(Toslink), S/PDIF on RCA and BNC, and AES/EBU on XLR.
Unexcelled video techniques
Many people think good video performance is a given when it comes to DVD.
While it’s true that even the most basic DVD players deliver much higher performance than VHS tape, many fall short of the full potential of the format.
The PMDT is designed to extract video information from the disc with the
greatest fidelity, preserving the digital signal, converting to analog and buffering the analog output with the greatest care. The PMDT achieves superior
video performance through attention to detail. Careful selection of parts and
construction details – such as trimming circuit elements by hand – allow us to
achieve better results. This is the same approach that distinguishes our audio
designs and contributes to both their cost and their value.
The PMDT uses a 5-part-per-million TCXO (temperature-controlled crystal oscillator – the same type used for our digital audio) to ensure low-jitter recovery of the digital video signal.
12
The PMDT uses 10-bit, oversampled video DACs (rather than the standard 8bit variety) for highest resolution. An active I-V (current-to-voltage) converter,
phase-accurate analog filters and broadcast-quality analog output buffers combine to form a system where all aspects of the video path are well balanced.
Analog video outputs include composite on RCA and BNC, S-Video, and Component (BNC). The optional PVP cards provide a 480p (y, pb, pr) output and
video processing for additional video inputs.
Ease of use
For all of the advantages that DVD can bring to audio and video performance,
the frustrating difficulty of the format has been its user interface. DVD players
tend to be difficult and awkward to use – and no two seem to work the same
way. The operation of most players even varies from disc to disc, complicating
the operation of an otherwise familiar player.
The PMDT makes significant progress in this area. It allows the setting of system defaults to help automate basic selections such as language, surround format and aspect ratio. System defaults are easily overridden for individual discs
with different, preferred settings. What’s more, the PMDT can automatically
recall the settings of a DVD from the last time it was used – with no additional
programming required.
People around the world are listening to DVDs with Dolby Pro Logic® because
they don’t know that they need to select Dolby Digital, sometimes for their
player, sometimes for each disc they play, sometimes each time they play it.
This simple example points to the problem the PMDT solves. System defaults
are used to bypass the usual navigation of DVDs as much as possible. You
could simply tell the PMDT that if English, Dolby Digital and a 16:9 aspect ratio are available, those are your preferences. Load your discs and press play –
the PMDT “navigates” for you.
Since some discs will undoubtedly be played using different options (such as
subtitles on the occasional foreign film) than your system defaults, the PMDT
is capable of remembering the unique settings you choose for this disc. The
next time this disc is loaded, the PMDT overrides the system defaults and
plays the disc using the settings you have saved. The PMDT can remember
how you want to play each disc. These electronically saved preferences
(ESP™) eliminate much of the day-to-day annoyance of using DVD players.
Programming is also available to permanently record settings for individual
discs. This method allows the PMDT to recognize when you have preferences
that you want remembered, regardless of how the disc was last used. Other
programming features, such as reordering or skipping titles/chapters/tracks,
are included as well.
On-screen menus simplify the navigation of discs and programming of system
and disc defaults. A help menu is offered to guide users through more advanced functions.
The PMDT is intuitive to use. It works like a CD player (with advanced features) when playing CDs, and like a well-designed DVD player when playing
DVDs. Our goal has been to allow the use of multiple formats without requiring the user to fully understand the navigation and confusing options on different discs. Load the disc, press play and get what you want – that’s the way
the PMDT works. That is a high-performance user interface.
Industrial design
The PMDT shares the handsome industrial design of other Proceed components such as the AVP/AVP2 audio/video processor. Dark buttons against a
light face simplify the operation of the PMDT, even in a dimly lit room.
The large, easily read display provides information as to the operational status
of the PMDT from across the room, making the supplied remote control more
genuinely useful than on products lacking such a display.
In keeping with its sophisticated design, the PMDT also incorporates a Madrigal-designed loading mechanism. Contrasting strongly with the bulky, plastic
drawers commonly used, the slim drawer is machined from a solid piece of
aluminum and rides on highly polished steel and Teflon® bearings. Its variable-speed design opens and closes quickly, but without jarring the disc contained within or risking a jam from dislodging it.
13
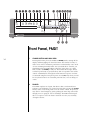
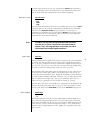
쐃 쐇 쐋 쐏 쐄 쐂 쐆쐊 쐎 쐅
쐈 쐉 씈씉씊씋씌
m o d u l a r DVD t ra n s p o r t
menu
standby
stop
previous
play
next
pause
return
title/track
chap/index
enter
time
program shuffle
drawer
display mode
display
intensity
repeat
p owe r
power
PR O C E E D
modular DVD transport face art
part#501xxx
fonts used: Avant Garde
5.28.98
for color and material information see mechanical print
씍 씎 씏
Front Panel, PMDT
14
1
STANDBY BUTTON AND INDICATOR
Pressing this button places the PMDT in standby mode, turning off the
display and disengaging all control functions. The internal circuitry remains on in order to maximize performance on demand by virtue of all
circuits remaining thermally stable. Lest you think this is wasteful, you
should know that the PMDT draws about the same power as a light
bulb, whether in standby or fully on. The benefits of having it always
warmed up and ready to go (and always able to respond to the remote
control commands) far outweigh the small amount of power used. We
recommend using the front panel power switch (19) only when you will
be away from home for an extended period of time, such as during vacation.
2
DRAWER
The PMDT employs an elegant, slim drawer that is machined from a
solid piece of aluminum. It is opened and closed by pressing the drawer
button, either on the front panel or on the remote control. If opened, it
may also be closed simply by gently pushing the front edge inward (as
though you were going to close it manually). The PMDT will interpret
this as a request to close the drawer and take over for you, smoothly
closing the drawer.
If the PMDT senses an obstruction during opening of the drawer mechanism, it will attempt to reclose. If successful, it will read the disc’s table
of contents and display the disc’s number of titles & chapters (or tracks
on a CD) and total time (followed by the playlist’s track and time information, if one exists). If for any reason the drawer does not close fully,
it will stop where it is and wait for your intervention. After removing the
obstruction, press the drawer button again to close the drawer normally.
Similarly, if the PMDT senses an obstruction during the closing of its
drawer (as might be caused by an inquisitive child’s finger), it will stop
immediately and attempt to reopen. If the obstruction prevents this also,
it will stop where it is and wait for your intervention. After removing the
obstruction, press the drawer button again to close the drawer.
3
STOP BUTTON
Unfortunately, DVD players and CD players often treat the stop button
differently. This can be confusing. We allow you to make the PMDT
work the way you think it should (see the section on Disc Behavior on
page 37). However, by default,
•
•
Pressing stop once with a CD will actually stop the disc from
spinning (introducing a slight delay upon pressing play, as
the disc spins up).
Pressing stop once with a DVD will actually pause the disc
with a blank screen, allowing you to resume where you left
off in a movie quickly and easily by pressing play.
15
4
PREVIOUS BUTTON
If you are playing a DVD, pressing this button momentarily will return
you to the beginning of the current chapter and in the case of a CD, to
the beginning of the previous track. To return to the beginning of a track
on a CD, simply tap the play button. Pressing the previous button
repeatedly will move you backward through the available chapters/
tracks, one at a time. Note that some DVD discs may prevent you from
using this button (and others) at certain times.
5
PLAY BUTTON
Press this button in order to play a disc. If a programmed sequence of
tracks exists for that particular disc, the program will be played from its
beginning. Also, as you might expect, you may press the play button immediately after placing a disc in the PMDT’s drawer; the drawer will
close and the PMDT will enter the play mode as soon as it has read the
disc’s table of contents.
6
NEXT BUTTON
Pressing the next button momentarily will advance the PMDT to the beginning of the next track. Pressing it repeatedly will move you forward
through the available chapters/tracks, one at a time. Note that some DVD
discs may prevent you from using this button (and others) at certain
times.
7
PAUSE BUTTON
Pressing this button during play will pause the PMDT at that point within
the track; the time display will show a “double quotation mark” (") as a
reminder that you are in the pause mode.
8
DRAWER BUTTON
The PMDT employs an elegant, slim drawer that is machined from a
solid piece of aluminum. It is normally opened and closed by pressing
the drawer button located to its right. If opened, it may also be closed
simply by gently pushing the front edge inward (as though you were going to close it manually). The PMDT will interpret this as a request to
close the drawer and take over for you, smoothly closing the drawer.
If the PMDT senses an obstruction during opening of the drawer mechanism, it will stop where it is and wait for your intervention. After removing the obstruction, press either the play or the drawer button again to
close the drawer normally.
Similarly, if the PMDT senses an obstruction during the closing of its
drawer (as might be caused by an inquisitive child’s finger), it will stop
immediately and attempt to reopen. If the obstruction prevents this also,
it will stop where it is and wait for your intervention. After removing the
obstruction, press the drawer button again to close the drawer.
9
DISPLAY INTENSITY BUTTON
Pressing the display intensity button will cycle the PMDT’s display
through the four available levels of brightness: high, medium, low and
off. For example, during bright daytime hours you may wish to use high;
in the evening, in a dimly lit room, a low setting is probably easier on
the eyes.
10
DISPLAY WINDOW
This window contains eight large and eight smaller alphanumeric characters that provide information on the current status of the PMDT. The information it displays depends on the type of disc being played:
16
•
•
with DVDs, it provides the title, chapter and time information
for the disc being played;
with CDs, it provides track, index and time information.
There is a legend above the display window that describes the information normally displayed.
In addition, this window displays a number of messages designed to
keep you informed as to the status of the PMDT, including SELF-TEST
(during initial connection to the AC mains), LOADING (with a spinning
slash, during disc spinup), and other cues to help you get along with the
on-screen display should you be playing a CD without the television on.
11
DISPLAY MODE BUTTON
The time section of the display can be set to display any of the following
four indications of time in minutes and seconds: time elapsed on title/
disc, time remaining on title/disc, time elapsed on chapter/track, time
remaining on chapter/track (depending on whether you have loaded a
DVD or a CD). These four options are accessed by pressing the display
mode button, which cycles through the four modes of time display, using both the onscreen display and the front panel display window to indicate which mode is chosen at any moment.
12
INFRARED TRANSMITTER (WITHIN DISPLAY)
The PMDT has the ability to teach a learning remote control its own
commands from an IR transmitter located in this area. (See Teach IR
Commands on page 45 for more information.)
13
RETURN BUTTON
Used in both DVD and CD navigation, the return button will also return
you to where you were on the disc after a stop command. It may also be
used by a DVD disc author for navigating the on-screen menu system.
14
MENU BUTTON
In the DVD standard, there are provisions for both disc menus and
player menus, which can get confusing. When you first press the menu
button, you will be presented with a choice on the on-screen display:
Disc Menu
Player Menu
Help Menu
About…
(In the front panel display window, you will see only the currently selected menu.)
Note:
If you have the optional PVP cards installed, your menu
options will be different. Please refer to your PVP owner’s
manual.
Subsequent presses of the menu button will cycle through your options.
When you have highlighted the one you want to use, press enter.
Note that using this system, you can (for example) access the player
menu to check on your PMDT’s setup at any time, without having to
stop the disc.
Once you are working in the player’s menu system, the menu button
acts like a “cancel” button on your computer, allowing you to exit a particular menu item without having made any changes.
17
Since some DVD discs use the menu button as part of their internal navigation, when you are already within a disc menu, the list of choices presented on screen will change to:
Send MENU command to disc
Player Menu
Help Menu
About…
Pressing enter while the first item on the above menu is highlighted will
issue the menu command that some discs require for navigation. Note
that the menu shown immediately above only appears when you are
within the DVD’s own menu structure - not while watching a movie, or
while stopped, or while listening to a CD. The PMDT is smart enough to
be context-sensitive. That is, it will give you access to the things you
might need, when you might need them.
15
ENTER BUTTON
As you might expect, the enter button allows you to explicitly save any
changes you might make in the menu system. It may also be used by
DVD discs as part of their own navigation system.
16
PROGRAM BUTTON AND INDICATOR
The program button on the front panel duplicates the function of the
prog button on the remote control. Pressing either generates a popup
menu on the on-screen display containing the following:
18
Add Item
Delete Item
Save Program
Delete Program
Turn Program On
(or Turn Program Off, depending on which mode you are in)
Pressing program repeatedly cycles you through the listed options. The
currently selected option is highlighted on the screen, and appears in the
front panel display. For more information on programming your PMDT,
see Programming the PMDT on page 47.
The program indicator LED is lit when the PMDT’s program mode is
engaged; e.g., while a programmed playlist is being played. If a program
has been saved for the current disc, you may toggle the program on and
off by pressing program (or prog on the remote), moving the highlight
to turn Program On or turn Program Off (the last item on the popup list),
and pressing enter. For more information on programming your PMDT,
see Programming the PMDT on page 47.
Pressing and holding the program button will activate the ESP menu.
It’s functions are described on page 47.
17
SHUFFLE INDICATOR
By pressing shuffle on the remote control, the PMDT will enter a random
play mode in which the order of the current disc’s playlist is scrambled,
and then played. The shuffle LED on the front panel will light to indicate
this random play mode. Moreover, placing the PMDT into random play
mode while the disc repeat function is engaged will cause it to play the
various tracks on the disc randomly indefinitely (until you stop it). This is
a great way to provide background music during a dinner party, for
example.
18
NAVIGATION CLUSTER (UP/DOWN, LEFT/RIGHT) & IR SENSOR
This cluster of four buttons (up, down, left, right) duplicates the same set
of buttons on your remote control, allowing you to operate the PMDT
fully from the front panel whenever that is more convenient (such as
when the remote has gone astray between the cushions on the couch).
In addition, during normal play (as opposed to when you are in a
menu), left and right can be used to access scan reverse and scan forward, respectively.
The space on the inside of this cluster is used for the infrared receiver.
Infrared commands transmitted from the remote control are received by
a receiver behind this section of the display. Remote control of the
PMDT may be unreliable if there is not a clear line of sight between the
remote control and the receiver (if the remote is far off-axis, or if the
PMDT is within a cabinet, for example). In such a case consider using a
third-party IR repeater to route the signal to the IR input jack on the rear
panel (see Rear Panel, PMDT, page 20).
19
19
POWER & POWER LED
Assuming that the PMDT’s power cord is connected to AC power, pressing this latching power button connects the PMDT to the AC mains. After
a brief self-test routine to ensure that all is well with the internal hardware, the unit will enter standby. Pressing standby will “wake up” the
unit, making it operational.
Whenever AC power is being applied to the PMDT, the LED above the
latching power button is amber. Naturally, when the PMDT is disconnected from AC power (either at the wall, or using the latching power
switch), this LED is off.
20
REPEAT BUTTON AND INDICATOR
You may choose to either repeat the entire title/disc (including any programs you might have entered for that particular title/disc) or an individual chapter/track by pressing the repeat button. Both the front panel
window display and on-screen messages are visible to let you know
what you have selected, for example:
Repeat Off
Repeat Chapter
Repeat Title
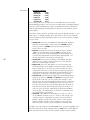
1
2
3
4
5
audio outputs
7
video
video
video
video
8
S Pb/B
video
Y/R
s-video
232
9
WARNING: BEFORE ATTEMPTING TO OPERATE THIS
DEVICE, REFER TO OWNER'S MANUAL FOR PROPER
OPERATING INSTRUCTIONS AND SAFETY PRECAUTIONS.
HAZARDOUS VOLTAGE AVAILABLE INSIDE; DISCONNECT
AC ~ MAINS CABLE BEFORE OPENING UNIT.
modular DVD transport
composite
Pr/R
control ports
S/N
designed and manufactured in USA
www.madrigal.com
Apparatus Claims of U.S. Patent Nos. 4,631,603; 4,577,216;
4,819,098 and 4,907,093 licensed for limited viewing uses only.
CLASS 1
LASER PRODUCT
No User Serviceable Components Inside. For service, contact Madrigal Audio
Laboratories or an Authorized Dealer. Any modifications to this equipment will void all warranties.
composite
Y/G
Pr/B
composite
PHASTLink compatable
Pb/G
composite
digital
trigger remote
in
ir
~ ac
mains
6
Rear Panel, PMDT
1
20
~ AC MAINS CONNECTOR
The latching AC power switch on the front panel disconnects the PMDT
from the wall outlet’s AC power. Check to ensure that the power switch
is disengaged (protruding from the front panel), then plug the supplied
three-prong power cord into the AC mains receptacle before plugging
the power cord into the wall. (If a longer AC power cord is required for
your application, be sure to use a three-conductor power cord which
conforms to IEC standards.) Once the connections are all firmly made,
switch on power at the front panel. After a few moments of self-test, the
PMDT will enter standby mode. Pressing the standby button will make it
ready for use.
The PMDT is designed to be left in standby when not in use, rather than
completely “off.” Being in standby allows it to respond to commands
from the remote control and maintains a stable operating temperature at
all times for optimal performance and longevity.
The Proceed PMDT has been safety-tested and is designed
for operation with a three-conductor power cord. Do not
defeat the “third pin” or earth ground of the AC power cord.
2
COMMUNICATIONS CARD
The PMDT provides for robust communications between components
using this card.
Working from the top down, an RS-232 port (on an RJ-11 connector)
provides both for software downloads and for external control. Software
download capability makes it easier to update the unit for many of the
possible changes in disc formats that can be expected in this rapidly
changing environment. External control provides a critical link for twoway communication with automation systems like those from AMX and
Crestron.
The trigger input will toggle the PMDT in and out of standby when used
with less sophisticated control systems than those that use RS-232. The
tip polarity for this trigger is as shown below:
–
trigger tip polarity
+
5-12 volts @ less
than 100 mA
A 1⁄8" “mini” jack labeled remote ir provides direct access to the infrared
control circuitry of the PMDT. It may be used instead of the front panel
IR receiver in circumstances when use of the front panel receiver is impractical (as when the PMDT is located inside of a cabinet, for example).
The incoming signal for the remote IR input should conform to widely
accepted IR repeater standards: that is, the signal present should be between 5 and 12 volts DC at less than 100mA current, with a positive tip
polarity, as shown below:
–
IR input tip polarity
+
21
5-12 volts @ less
than 100 mA
Your Proceed dealer can help you take advantage of these design features to maximize your system’s versatility.
The remaining two PHASTLink™ control ports at the bottom of the module
provide for sophisticated intercomponent communications between the
PMDT and other Proceed products, as well as with PHAST home automation systems. (See link options, page 41.)
A suitable RJ-45 cable used for the Link connection between the PMDT
and the AVP/AVP2 is included with the PMDT. It may also be made to
length using two RJ-45 connectors and the appropriate length (up to 100
feet/30 meters) of RJ-45 (flat, eight-conductor) cable. (Your AVP/AVP2
may require an additional hardware module in order to take advantage
of Linking features. Please see your dealer for further information.)
RJ-45 cables and connectors are used throughout the world for both telecommunications and computers, and are widely available at low cost.
The connectors are crimped onto the ends of the cable so that pin 1 at
one end is connected to pin 1 at the other end. Such a “straight-through”
connection is (counter-intuitively) made by introducing a 180° twist in
the cable between the two ends, as shown below.
building a link cable
To PMDT
Locking tab
To AVP
180° twist
Locking tab
Warning!
Connecting the communication ports other than as
described in this manual can damage the PMDT and the
associated Proceed components, and will void those
products’ warranties.
3
BLANK SLOT (FOR FUTURE USE)
What good would expansion slots be if they were all full? There would
be no room to expand. This slot is reserved for possible future audio
applications.
4
DIGITAL AUDIO OUTPUT CARD
The PMDT is a “transport” rather than a “player.” That is, it provides digital audio outputs, but no analog audio outputs, under the reasonable assumption that people purchasing this product already have sophisticated,
good-sounding audio/video preamplifiers such as the Proceed AVP/AVP2
(or similar). After all, how many times do you want to have to pay for
high-quality digital-to-analog conversion?
Since we have no way of knowing what type of digital output you may
require, we provide you with four choices. You only need to use one,
and may pick whatever matches the needs of your system. From the top
down (physically):
22
EIAJ (“Toslink”): This output provides the digital audio signal (DAS) via
optical cables equipped with EIAJ-type connectors to the processor.
S/PDIF on RCA: This output provides the digital audio signal (DAS) via
cables equipped with RCA-type connectors to the digital processor.
S/PDIF on BNC: This output provides the digital audio signal (DAS) via
cables equipped with BNC-type connectors to the digital processor.
The previous two outputs conform to the Sony/Philips Digital Interface
Standard (S/PDIF), which calls for a 75Ω transmission of the DAS. We
recommend using a digital interconnecting cable specifically designed for
the 75Ω S/PDIF standard, such as Madrigal MDC-2 cable, when using
these outputs. (In our experience, a BNC-terminated S/PDIF cable has a
slight advantage over the same cable terminated with RCAs. This is probably due to the fact that a BNC connector can have a true 75Ω impedance, whereas RCA connectors cannot.)
AES/EBU: This output provides the digital audio signal (DAS) via cables
equipped with XLR-type connectors to the digital audio processor.
This output conforms to the Audio Engineering Society/European Broadcast Union (AES/EBU) professional digital audio standard, which calls for
a 110Ω transmission of the DAS. Use a digital interconnecting cable specifically designed for the 110Ω AES/EBU standard, such as Madrigal
MDC-1 cable, when using this output, with pin assignments as follows:
1 2
3
Pin 1: chassis ground
Pin 2: noninverted digital
Pin 3: inverted digital
Connector ground lug: chassis ground
It our experience, the AES/EBU interconnection standard offers the best
quality of all digital transmission interfaces when fully optimized, and we
recommend its use wherever possible between Proceed components. If
you are using a Madrigal-designed digital processor, we recommend using the AES/EBU connection for the best results; the two S/PDIF electrical connections follow closely behind AES/EBU. EIAJ is (unfortunately)
the most widely used digital interconnection standard, yet offers the
poorest performance. We include it for compatibility reasons.
However, optimizing any digital interface completely represents a significant engineering challenge. It is entirely possible that a different type of
input may actually outperform a less-than-optimized AES/EBU implementation on some brands of digital processors. For this reason, we have
gone to great lengths to fully optimize all four of the digital outputs on
the PMDT. If you are using your PMDT with a different brand of processor, we recommend experimenting to determine which type of input on
that processor results in the best audible performance.
5
BLANK SLOT (FOR PVP)
This slot is reserved for use with the optional PVP card.
6
COMPOSITE & S-VIDEO OUTPUT CARD
This slot provides the video signal (along with any PMDT on-screen
menus and messages) to your audio/video preamplifier or display device. Specifically, this card provides two composite outputs (one on the
consumer-standard RCA connector, the other on a professional-standard
BNC connector), and one S-Video output.
7
COMPONENT OUTPUT CARD
This card provides broadcast-quality video output in the SMPTE Component (Y/Pb/Pr) format. Consistent with the SMPTE standard, there is normally no black setup on this output. If your specific installation requires
black setup (sometimes called “pedestal”), you can introduce it on this
card via the TV Type/Component setup menu.
(see component setup on page 32)
If your display device or video processor can accept a 480i component
video input, we recommend using these outputs for your critical viewing. The improvement in image dynamic range, clarity and realism can
be quite remarkable, since using this connection bypasses a great deal of
circuitry, both in the PMDT and in your video processor and/or display
device.
23
24
8
MPEG DECODER CARD
Although there are no rear panel connectors on this card, there is a critically important card in this slot. It contains the MPEG decoder that translates the information on the disc into something that resembles (in a
digital way) the picture you want to see. It also contains the circuitry that
interacts most intimately with the laser mechanism and transport assembly itself.
9
SERIAL NUMBER & INFORMATION LABEL
Please write down your serial number on the warranty card that came
with your PMDT and send in the card now, if you have not already done
so. That way, we can stay in better contact with you should there be a
software update made available for your product, or to let you know
about future products that you might want to consider to complement
your PMDT.
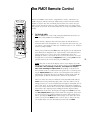
The PMDT Remote Control
1
2
3
4
1
5
6
The Proceed PMDT comes with a comprehensive remote control that can
handle all player and disc functions. While many of these functions will be
familiar to anyone who has used DVD players before, the remote also provides several conveniences that you have probably never seen. This section
will provide an overview of the many functions served by your PMDT remote
control.
7
8
THE DISPLAY AREA
info: The info button can be used to display information about the current status of the PMDT in two different ways.
When clicked, it displays those info items from the Info Preferences
menu that have been designated “on,” one after the other. This way, you
can choose a few things to which you would like quick access, and have
them be readily available.
9
10
When pressed and held, the info button will display a list of information
items (both those designated “on” and “list only” in the Info Preference
menu), giving you access to quite a bit of information all at once
(though, of course, it uses more of the screen to do so). You can scroll
through these items with the navigation buttons; pressing enter will display that item on the screen until you press info again.
mode: The time section of the display can be set to display any of the
following four indications of time in minutes and seconds: time elapsed
on title/disc, time remaining on title/disc, time elapsed on chapter/
track, time remaining on chapter/track (depending on whether you
have loaded a DVD or a CD). These four options are accessed by pressing the display mode button, which cycles through the four modes of
time display, using both the on-screen display and the front panel display window to indicate which mode is chosen at any moment.
There are some discs that are authored so that the PMDT will indicate
menu on the front panel during play. This is the disc author’s way of
telling you that you can use normal menu navigation commands such as
“Prev” and “Next” to choose different buttons or functions available on
the screen. Many of these discs are music discs and may be hybrid DVD/
DVD-A discs. By camping on (or holding the button depressed) the
mode button at this time, the display will toggle from menu to the normal Title/Chapter/Time display. In this mode the navigation cluster now
acts as if a movie were playing rather than a menu being used. For instance, pressing the FFWD button will no longer act to move the cursor
on the screen, but will FFWD the disc. You are free to choose the way
you would rather view the information presented by the PMDT.
25
intensity: Pressing the display intensity button will cycle the PMDT’s dis-
play through the four available levels of brightness: high, medium, low
and off. For example, during bright daytime hours you may wish to use
high; in the evening, in a dimly lit room, a low setting is probably easier
on the eyes.
2
STANDBY & DRAWER
Stdby: Pressing this button places the PMDT in standby mode, turning
off the display, disengaging all control functions, and turning off all outputs to the main zone (remote zone functions are still available). The internal circuitry remains on in order to maximize performance on demand
by virtue of all circuits remaining thermally stable.
drawer: Pressing this button once while a disc is playing will stop the
disc and cause the drawer to open.
Pressing the drawer button will also cause an open drawer to close. If it
senses a disc in the drawer, the PMDT will take a moment to read the
disc’s table of contents so that it may display the total number of titles,
chapters/tracks and the total time on the disc for your information.
3
26
SHUFFLE & REPEAT BUTTONS
shuffle: By pressing shuffle, you will cause the PMDT to enter a random
play mode in which the order of the current disc’s playlist is scrambled,
and then played. The shuffle LED on the front panel will light to indicate
this random play mode. Moreover, placing the PMDT into random play
mode while the disc repeat function is engaged will cause it to play the
various tracks on the disc randomly indefinitely (until you stop it). This
can be a great way to provide background music during a dinner party,
for example.
rpt: You may choose to either repeat the entire title/disc (including any
programs you might have entered for that particular title/disc) or an individual chapter/track by pressing the repeat button. Both the front panel
window display and on-screen messages are visible to let you know
what you have selected; for example: Repeat Off, Repeat Chapter, Repeat Title.
a/b: To repeat (continuously) a specific section of a DVD or CD (when
learning how to play a favorite solo, for example), press a/b on the re-
mote at the beginning of the passage you would like to repeat. The display will blink while continuing to play to indicate that the PMDT is
waiting for you to define the end of your A–B loop. At the end of your
chosen passage, press a/b on the remote again. The passage you selected will repeat continuously. (Note that B must follow A on the disc,
or the A–B loop is not meaningful and will be ignored by the PMDT.)
To return to normal play, press the a/b button again.
4
PREVIOUS, NEXT, STOP, PAUSE
prev ( ): Pressing this button momentarily will return you to the beginning of the current DVD chapter (or CD track). Pressing it repeatedly will
move you backward through the available chapters/tracks, one at a time.
Note that some DVD discs may prevent you from using this button (and
others) at certain times.
next ( ): Pressing the next button momentarily will advance the PMDT
to the beginning of the next track on a CD or the next chapter of a DVD.
Pressing it repeatedly or camping on, it will move forward through the
available tracks/chapters, one at a time. Note that some DVD discs may
prevent you from using this button (and others) at certain times.
stop: Unfortunately, DVD players and CD players often treat the stop button differently. This can be confusing. We allow you to make the PMDT
work the way you think it should (see the section on Disc behavior, on
page 38). However, by default,
•
•
Pressing stop once with a CD will actually stop the disc from
spinning (introducing a slight delay upon pressing play, as
the disc spins up).
Pressing stop once with a DVD will actually pause the disc
with a blank screen, allowing you to resume where you left
off in a movie quickly and easily by pressing play.
pause: Pressing this button during play will pause the PMDT at that
point within the track; the time display will blink slowly as a reminder
that you are in the pause mode.
27
5
NAVIGATION CLUSTER
This centrally located cluster of four buttons (up, down, left, right) duplicates the same set of buttons on the PMDT’s front panel, allowing you to
operate the PMDT fully from the remote control.
up/down/left/right: Use the up, down, left and right buttons to navigate
menus (both the PMDT’s own menus and those of the DVD discs you
play). In addition, during normal play (as opposed to when you are in a
menu), left and right can be used to access scan reverse and scan forward, respectively.
return: Use the return button while playing either a DVD or CD to return
you to where you were on the disc after a stop command. (It is possible
that the authoring of a DVD will explicitly prohibit doing so, in which
case nothing will happen.) The return button may also be used by a
DVD disc author as part of the on-screen menu system navigation.
menu: In the DVD standard, there are provisions for both disc menus
and player menus, which can get confusing. When you first press the
menu button, you will be presented with a choice on the on-screen
display:
Disc Menu
Player Menu
Help Menu
About…
(In the front panel display window, you will see only the currently selected menu.)
Note:
audio delay
If you have the optional PVP cards installed, your menu
options will be different. Please refer to your PVP owner’s
manual.
Subsequent presses of the menu button will cycle through your options.
When you have highlighted the one you want to use, press enter.
You can also use the up and down buttons to navigate through the available options.
Note that using this system, you can (for example) access the player
menu to check on your PMDT’s setup at any time, without having to
stop the disc.
28
Once you are working in the menu system, the menu button acts like a
“cancel” button on your computer, allowing you to exit a particular
menu item without having made any changes.
Since some DVD discs use the menu button as part of their internal navigation, when you are already within a disc menu, the list of choices presented on screen will change to:
Send MENU command to disc
Player Menu
Help Menu
About…
Pressing enter while the first item on the above menu is highlighted will
issue the menu command that some discs require for navigation. Note
that the menu shown immediately above only appears when you are
within the DVD’s own menu structure—not while watching a movie, or
while stopped, or while listening to a CD. The PMDT is smart enough to
be context-sensitive. That is, it will give you access to the things you
might need, when you might need them.
enter: As you might expect, the enter button allows you to explicitly save
any changes you might make in the menu system. It may also be used
by DVD discs as part of their own navigation system.
program: The prog button on the remote control duplicates the function
of the program button on the front panel. Pressing either generates a
popup menu on the on-screen display containing the following:
Add Item
Delete Item
Save Program
Delete Program
Turn Program On
(or turn Program Off, depending on which mode you are in)
Pressing program repeatedly cycles you through the listed options. The
currently selected option is highlighted on the screen, and appears in the
front panel display. For more information on programming your PMDT,
see Programming the PMDT on page 46.
6
NUMERIC KEYPAD
Use these numbers in conjunction with disc menus (when the authoring
of the disc calls for numeric input), and in conjunction with the jump
button to directly access the part of the disc you want.
7
TITLE, HELP, JUMP
title: Use the title button to access a title menu of a DVD if one exists, at
any time.
help: Use the help button to access the online help system built into the
PMDT. Press help, followed by the button that you would like to have
help on. Note that this feature places information on your display device,
so it will have to be on to see the help text.
29
jump: Use the jump button to “jump” directly to a different spot on the
disc. Pressing the button creates a popup window that looks something
like the following:
Jump to: 1 5 00:23
The example above indicates that you pressed the jump button at 23
seconds into Title 1, Chapter 5. By default, the current title is selected.
If you want to jump to a different title, just enter the number and press
play or enter.
Pressing jump again provides access to any chapter within the title displayed in the previous field; the third press of jump allows you to access
a particular time within that chapter. Pressing jump a fourth time cycles
you back to selecting the title you want. When done, press play or enter
to jump to your selected location.
A word of caution; By jumping into certain titles on a DVD, such as an
INTRO or a splash screen title, subsequent disc playback behavior may
be erratic. This will happen because the PMDT may not have received
the required commands from the loaded disc needed for proper
navigation.
8
SLOW AND STEP
Use the slow forward and slow backward buttons to put the PMDT into a
slow motion mode (either forward or backward). Note that the steps between one frame and the next are larger when moving backward than
when moving forward. This is a result of the way MPEG video is encoded on the disc, and is completely normal.
Use the step + and step – buttons to move one frame at a time through
the DVD being watched, forward and backward respectively. Note that
the steps between one frame and the next are larger when moving backward than when moving forward. This is a result of the way MPEG video
is encoded on the disc, and is completely normal.
9
SUBTITLE, ANGLE, ASPECT, AUDIO
subtitle: Click the subtitle button to toggle subtitles on and off. The language used by default depends on the setting in the Audio Setup menu.
However, you can also cycle through the available languages to temporarily change the language you see on-screen, by pressing and holding
the subtitle button, and then making a selection from among the languages available on that disc. (A popup menu gives you your options.)
These will vary from one disc to the next, depending on what the author
of the disc decided to include. But the subtitle button gives you easy access to all of them, and to turning them off entirely.
angle: Use the angle button to explore the various camera angles that
30
may have been included on the DVD you are watching. Again, pressing
this button will cycle you through the available camera angles (assuming
there are any), returning you to where you started after you reach the
end of the list.
aspect: Use the aspect ratio button for quick access to the different as-
pect ratios supported by the disc you are watching. Depending on how
the DVD is produced, you may have as many as three different options:
•
•
•
•
4:3 pan & scan, in which the picture will fill a normal 4:3 dis-
play at all times.
4:3 letterbox, in which a wide aspect ratio film is placed
within a 4:3 frame, leaving black bars above and below the
picture.
16:9 Widescreen, in which an anamorphically squeezed 4:3
picture (with tall, thin people) is passed to your 16:9 television, which should have the capability to “unsqueeze” it to its
widescreen format, retaining the highest possible resolution.
zoom, which is accessed by pressing and holding the
aspect button, and then pressing enter once the popup menu
appears. This feature allows you to “zoom in” on a section of
the screen. The up/down/left/right buttons allow you to slide
the zoomed-in area appropriately, to whatever caught your
interest. To exit the zoom feature, press the prog button on
the remote control.
Note that you should tell the PMDT what type of display you have during initial setup, so it can provide the most appropriate signal to your
television by default. This button is a convenient way of making on-thefly, temporary changes. After pressing and holding the button until the
aspect ratio popup menu appears, it also displays the native format of
the signal on the disc as part of the “header” to that menu. (Try it!)
audio: Use the audio button to cycle through the available soundtracks
on the disc. When you reach the end of the list, it will cycle back to the
beginning.
10
LIGHT
Press the light button to temporarily illuminate the buttons on the PMDT
remote control for better visibility in dimly lit rooms. It will automatically
time-out after about 10 seconds.
31
The PMDT Menus
The PMDT has an unusually extensive, flexible and powerful menu system
which allows you to customize the way it operates. The thought here is that
you should be able to make the PMDT work in a way that makes sense to
you, despite the fact that the DVD standard by its nature tends to be fairly
confusing, and often contradicts what we have come to expect from CD.
A simple case in point: When you put a CD in the drawer and press play, you
pretty much know what to expect. However, the same cannot be said for most
DVDs in most DVD players. You might get any combination of soundtracks
(Dolby Surround, Dolby Digital, DTS, etc., potentially in any of several languages); any of three different aspect ratios (which can have a significant impact on picture quality); subtitles (or not), in any of several different languages. What’s worse, what you get isn’t even consistent. It is usually determined by what the author of the disc “expected” you would want to have.
The PMDT gives you the ability to define how you want your system to work
by default. You always have the ability to override those defaults, to make an
exception for a particular disc.
Moreover such exceptions will be remembered by the PMDT (if you like), so
the next time you play the same disc, all your preferences (whether default or
ad hoc for the particular disc) will be remembered.
32
In any event, in order to take full advantage of the features offered by the
PMDT, you need to review and make some selections in the on-screen menus.
These menus are divided into six functional areas:
•
•
•
•
•
•
Video setup
Audio setup
Disc behavior
User preferences
Information preferences
Technical menu
These menus are explained in detail below, with depictions of the menu structure alongside each description.
Note:
Using the menus
If you have the optional PVP cards installed, your menu
options will be different. Please refer to your PVP owner’s
manual.
Navigation within the PMDT’s menus is simple. All menus are shown in a
three-column layout, with the “top-level” being presented on the left in icon
form. Whenever a particular icon is selected, the menu items and current values associated with those items appear in the center column. If you want to
modify a menu item, move to that item, which then displays the possible values in the right column. In short:
• Press menu to pop up the list of available menus.
• Press menu again to go to the “Player Menu” and press enter.
• Use the up/down buttons to move between menus and menu
items, and use the left/right arrows to access specific menu items
and their settings.
• Press enter or left arrow to save changes, or press menu to exit a
menu without having made any changes.
Video setup
TV type
The video setup menu allows the PMDT to deliver the best possible performance, in the context of the system in which it exists.
TV Type
4:3 letterbox
4:3 pan & scan
16:9
The display setting describes two characteristics: the aspect ratio of your display device (traditional 4:3 or widescreen 16:9), and in the case of a 4:3 display, whether you prefer to watch movies in their original aspect ratio
(letterboxed) or in a full-screen “pan & scan” version. Having selected the appropriate setting for your system and preferences, press enter.
composite setup
Composite setup
0 IRE
7.5 IRE
In the NTSC world, there are two different definitions for the electrical signal
that defines “black.” The unit “IRE” represents a scale of 0 - 100 where 0
equals zero voltage in that signal, and 100 equals the brightest white that the
signal can contain. In most of the world, “black” is defined to exist at 7.5 IRE
units up from zero volts, but in Japan and a few other places, black is defined
as being at 0. This setting is normally preset at the factory to suit the market to
which the PMDT is being shipped, but you can change this should you need
to do so. (Note: The component outputs are unaffected by this setting.)
component setup
Component setup
0 IRE
7.5 IRE
There is no setup in the SMPTE component specification. Therefore, according
to the SMPTE standard for component video, the component outputs of your
PMDT should always be set to have 0 IRE setup.
However, some televisions do not store different black level settings for each
input. This limitation may cause you to want to introduce setup in your component source, so as to make it match your other, normal composite and
S-Video sources. Otherwise, details in the dark areas of the PMDT’s picture
may not be reproduced, since they will be occurring below the threshold that
you set for black (using other sources).
Clearly, the best possible picture, with the greatest possible video dynamic
range, will be obtained by having component black reproduced where it belongs (0 IRE). This requires a display device (or video processor) that can
handle different input levels correctly. Use 7.5 IRE only if it is the only way to
33
maintain consistent and correct black level reproduction on your display device.
black level
Black level
0 to +18 IRE
This adjustment is a PMDT-specific version of the black level (or brightness)
control on your television/display device. Leaving it at zero (assuming black
setup is correct for your location in the world) will ensure that the black level
is exactly where it should be, per broadcast standards. However, if you find
that you have another source that you watch a lot, which has noticeably different black level settings (and no way to adjust them), you can change the way
the PMDT works to match the other component, and then readjust your television to compensate.
Note that you should not use this control to compensate for an atypical disc.
If you want to correct for a poor film tranfer to DVD, use the black level adjustments found in the ESP menu. That way, any corrections can be remembered for that particular disc, and your correct, default settings will be retained
for all other discs.
white level
White Level
75% to 125%
This adjustment is a PMDT-specific version of the white level (or contrast)
control on your television/display device. Leaving it at 100 will ensure that the
white level is exactly where it should be, per broadcast standards. However, if
you find that you have another source that you watch a lot, which has noticeably different white level settings (and no way to adjust them), you can
change the way the PMDT works to match the other component, and then readjust your television to compensate.
34
chroma
Chroma
75% to 125%
This adjustment is a PMDT-specific version of the chroma level (or color) control on your television/display device. Leaving it at 100 will ensure that the
chroma level is exactly where it should be, per broadcast standards. However,
if you find that you have another source that you watch a lot, which has noticeably different color settings (and no way to adjust them), you can change
the way the PMDT works to match the other component, and then readjust
your television to compensate.
dvd pause
DVD pause:
on frame
on field
The PMDT has the option of entering pause while showing either the full
video frame (all 525 lines in the NTSC system, for example) or a single field of
that frame (every other line). For test patterns and the like, pausing on a full
frame is usually more useful. On the other hand, pausing fast action on a
frame can leave you with jagged edges, caused by the motion introduced between the taking of the first field and the second. You may choose whichever
seems best, given the way you use your PMDT.
Audio setup
spoken
The DVD standard provides for many different audio options, including multiple soundtracks on the same disc. The Audio setup menu establishes many
of your personal preferences for how you would like audio handled on most
of the discs you play. Don’t worry about the occasional exceptions to the rule
– they are easily handled on a case-by-case basis without having to return to
this menu.
Spoken
English
French
Spanish
Italian
German
Dutch
Portuguese
Chinese
Japanese
Thai
Swedish
Norwegian
Danish
Finnish
Hebrew
Korean
Russian
Other
No Pref
This setting establishes your preference for the language of the soundtrack
you want to hear on DVDs that you play. You may temporarily override this
setting at any time, using either the audio button on the remote or the disc’s
own menu system. This setting simply establishes the language the PMDT will
look for when playing a disc. Selecting No Pref indicates that you have no
preference and the PMDT will select the language that the DVD author has
programmed as the preferred language.
Choose your preferred language setting and press enter.
35
subtitles
Subtitles
English
French
Spanish
Italian
German
Dutch
Portuguese
Chinese
Japanese
Thai
Swedish
Norwegian
Danish
Finnish
Hebrew
Korean
Russian
Other
No Pref
Match
This setting establishes your preference for the language of the subtitles you
want to see on DVDs that you play. You may temporarily override this setting
at any time, using either the subtitle button on the remote or the disc’s own
menu system. This setting simply establishes the language the PMDT will look
for when playing a disc. No Pref indicates that you have no preference and the
PMDT will select the subtitle language that the DVD author has programmed
as the preferred language. If you select the Match option, the PMDT will try to
match the subtitle language to the audio language chosen for this disc. If this
subtitle language is not available on the disc, the PMDT will select the subtitle
language that the DVD author has programmed as the preferred language.
36
Choose your preferred language and press enter.
favorite multichannel
Fav multichannel
Dolby D
DTS
MPEG
Any
None
No Pref
Similarly, this setting establishes your preference for the type of multichannel
soundtrack the PMDT will give you upon spinning up a disc for the first time.
Note that if your preference is not available, the PMDT will give you the first
soundtrack it finds that meets other criteria (such as alternative sound and
spoken language).
The first three choices are self-explanatory, as they are all multichannelcapable formats. For example, if more than one AC-3® soundtrack exists, selecting Dolby D in this menu will cause the PMDT to choose the one that is
both multichannel and in your preferred language.
Selecting Any tells the PMDT that you have no particular preference for format, as long as it is multichannel. Selecting None indicates that you do not
want the multichannel soundtrack (useful if, for example, you have not yet set
up all the extra speakers in your A/V system). If the No Pref option (which is
set as the default) is chosen, the PMDT will set the multichannel audio track
that the DVD author has programmed as its preferred soundtrack.
alternative sound
Alternative sound
Dolby D
DTS
MPEG
PCM
If your favorite multichannel selection is not available (or if you selected None
to indicate that you do not want a multichannel soundtrack), then the PMDT
will look to the alternative sound setting for guidance on what type of
soundtrack you would like to hear. If the default No Pref is selected, the alternative sound will be set to the primary audio track that the DVD author has
programmed as its preferred soundtrack.
Note:
audio delay
The PMDT can only pass along information that it retrieves
from the disc; it will not convert from one audio format to
another. Thus, selecting PCM does not provide you with a
PCM output from a Dolby Digital soundtrack.
Audio delay
0 to +85 ms
If your system includes sophisticated video processing (such as line multipliers
or scalers), the delay introduced in the video signal’s reproduction may introduce a “lip sync” problem in which the sound arrives slightly ahead of the picture. You can correct this as a one-time setup item by having the PMDT delay
the audio to match the delay introduced by your video processor.
You should be able to determine from the manufacturer of your video processor how much of a delay (the product’s specification sheet may list it as “latency”) that product introduces. If so, simply ask the PMDT to delay things by
the same number of milliseconds (ms). Otherwise, you can adjust this by trial
and error until you no longer notice any lip sync problems. (If you have a
video processor, a good place to start would be around 40 - 50 ms.)
Note that this is not where you should try to compensate for an individual disc
that was mastered poorly with respect to lip sync. You can program in a discspecific audio delay in the audio delay section of the ESP menu (see page 47).
96kHz enabled
96kHz Enabled
yes
no
Some DVD-Video discs include a 24-bit, 96kHz PCM soundtrack. While these
discs can be played (assuming that their copy protection system, called CSS,
allows it) on the PMDT, not all processors can handle a 96kHz digital input. If
yours does not, you may want to change this setting to “no” in order for the
PMDT to output a digital signal at a lower 48kHz rate compatible with nearly
all processors.
37
Note:
CD record
If the author of the disc invokes the CSS copy protection
system, we are legally obligated to not let more than 16 bit,
48 kHz digital information out of the transport. This (16/48) is
what the digital output will provide in that case, regardless of
the setting you choose on “Output 96kHz.”
CD Record
yes
no
A normal digital audio signal (DAS) includes a fair amount of non-audio data,
including track numbers, elapsed time information and other “housekeeping”
details. In many high-resolution systems, performance can be enhanced by
replacing this repeating, non-audio data with other information that is more
innocuous. However, doing so will make it impossible to make CD-R recordings using the PMDT as the digital source component, since the disc being recorded needs to have all this information preserved intact. Also, and more uncommonly, certain A/V processors may not recognize the altered DAS, and
may fail to properly lock onto the signal.
For these reasons, we have included a software “switch” that allows you to
either have your PMDT set for maximum compatibility (CD Record: Yes) or for
maximum subjective performance (CD Record: No). Try not to obsess on this
detail; on many systems the difference is not all that obvious. However, on an
absolutely first-rate system, every little improvement is worthwhile; hence our
including this (admittedly obscure) feature.
38
Disc behavior
Unfortunately, most CD players and most DVD players work differently from
one another when doing seemingly simple things like loading discs, pressing
stop, and so forth. Some people may find this inconsistency quite confusing,
particularly in a single product that plays both kinds of discs. Fortunately, the
PMDT gives you control over how you would like it to work in a number of
potential problem areas.
The default settings from the factory correspond to the way DVD players and
CD players normally work. That is, when playing a CD, the PMDT operates
like most other CD players; when playing a DVD, it works differently, so as to
be like most other DVD players. However, you can make it work the way that
you find most attractive (or least confusing) by changing the settings below.
after load…
After load DVD
Play
Stop
After load CD
Play
Stop
Typically, DVD players begin playing a disc immediately after loading; CD
players typically load the disc and then stop, waiting until you explicitly press
play. This disparity in behavior is just one of many little annoyances in the
way these players tend to work.
Using these two menus, you can have the PMDT work the way that makes
sense to you. Choose either Play or Stop for each type of disc, whichever you
prefer.
Disc status
Disc Status
Query
Auto
The PMDT is capable of reporting certain unique information about a disc
each time it is loaded using its available RS232 port. Since this information
may not always be desired, the automatic transmission of status can be inhibited by the setting Query by which the PMDT will only return this status when
asked. This is the default setting. Setting this option to Auto will enable this
function.
play key
DVD play key
dialog box
resumes
restarts
CD play key
dialog box
resumes
restarts
In a similar vein, DVD players vary in what they do after the stop button is
pushed.
• Some keep the disc itself spinning, effectively placing the player
in pause but with a blue screen showing, so that you can resume where you stopped watching quickly and easily. In this
case, if you press drawer, you must wait for the disc to spin
down before the drawer can be opened.
• Other DVD players actually stop the disc, allowing immediate
use of the drawer button, but this both loses track of where you
were (forcing a restart at the beginning of the disc) and requires
a delay for spinning up the disc before you can start playing it.
Using the two menus shown above, you can determine the behavior you
would like to see upon pressing play after stop, not only for DVDs but also
(and separately) for your CDs. If you would like to be presented a choice
whenever this situation arises, choose dialog box, and a popup menu will let
you choose on an ad hoc basis. Otherwise, simply choose your preference to
avoid having to choose each time.
,
keys
DVD
,
key
latching
simple
CD
,
key
latching
simple
DVD players and CD players also typically differ in the way they handle “fast
forward scan” and “fast reverse scan.” Most DVD players have a latching fast
scan button that requires only a momentary push of the button, and then another push (typically of play or stop) to exit the fast scanning mode. Often,
even higher search speed can be accessed by repeatedly pressing the fast scan
buttons.
39
By contrast, CD players generally only scan forward or backward as long as
you are pressing the button. This simple and intuitive system works great as
long as you do not need to search at multiple speeds. It does not provide access to higher scan speeds, since each release of the button prior to a second
push takes the player out of a fast scan mode. Thus simple fast scanning is
limited to the first (slowest) fast scanning speed.
As elsewhere, the factory defaults are consistent with DVD player norms when
playing a DVD, and with CD player norms when playing a CD. If, for example, you prefer latching fast forward and fast reverse for both types of disc,
select that option here.
stop dvd
Stop DVD
single key
double key
As described above, DVD players vary in what they do when you first press
the stop key during play. Some actually stop the disc, while others keep it
spinning in pause, but present you with a blue screen rather than a still frame
from the movie. These latter models require you to press stop twice if you actually want it to stop spinning the disc.
If you dislike the possibility of walking away with the disc still spinning,
choose single key from the menu. Selecting this option will require some extra
time spinning the disc back up prior to resuming the movie, since it will come
to a full stop the first time you press stop.
If you like the idea of “pause-without-a-picture,” then set this menu item to
double-key (meaning that you have to click stop twice to actually stop the disc
from spinning; the disc will also have to spin down to a stop prior to being
able to eject the disc.)
40
power user tip
use ESP
The return button will always return you to where you stopped, as long as the
drawer has not been opened since the last time you were playing the disc.
Also, pause will also avoid losing your place in a movie. Most DVD players
resort to these odd definitions of stop because they cannot give you access to
the player’s menu during play. The PMDT does. So pick whichever makes
sense for you, based on whether you find the spin-up or the spin-down delay
less annoying.
Use ESP:
yes
no
Perhaps one of the most valuable features of the PMDT in terms of ease of use
is its Electronically Saved Preferences (ESP) feature. If you have been setting
up your PMDT as you read this manual, by now it already knows how to behave in the vast majority of cases, relieving you of a lot of wasted time and
effort searching through disc menus, whose organization varies so wildly.
However, there are occasions when your chosen preferences just aren’t quite
right.
For example, you normally have subtitles off, but when watching a particular
foreign film, you need to have them on. Whenever you play a disc in a way
that is “the exception that proves the rule”, the PMDT can make a note of how
you appear to prefer to have it played. In that way, the next time you play
that disc, even years later, the PMDT will recognize it and play it the way you
played it last time - with the subtitles on (or whatever).
This menu setting determines whether or not the PMDT should make use of
this information about how certain discs merit special treatment upon playback. If you prefer to handle everything manually, on a case-by-case basis,
turn it off. If you prefer for the PMDT to handle such details for you, leave it
on.
Note that this setting must be set to on to enable the altering of the ESP menu
described on page 46. If this feature is enabled and the PMDT has ESP information saved, you see the on-screen message "ESP Activated" as the disc is
loading. This will alert you to the fact that the PMDT will select those options
that were previously saved.
User preferences
key feedback
The PMDT also provides for several general user preferences, reviewed below.
Key feedback
Yes
No
With this menu item, you have the option of receiving visible (on-screen)
feedback about the buttons you push, confirming that the command has been
received by the PMDT. When you press play, stop, previous, next, and so on,
small messages will appear on the screen to let you know “message received.”
If you find these distracting, you can turn them off by choosing No.
41
OSD position
OSD position
upper/left
upper/mid
upper/right
lower/left
lower/mid
lower/right
The on-screen display (messages, prompts, etc.) of the PMDT can be moved
to the various listed locations in order to avoid conflicts with OSDs being superimposed on the signal in other products. If you find such a conflict, you
can move the PMDT’s OSD to a different position to ensure legibility of both
OSDs.
background
Background
blue
black
The background color displayed when the PMDT has a disc in it and is
stopped.
link options
Link Options: 5/6 Enabled
Standby: On
(or Off)
Play Link: On
(or Off)
Intensity: On
(or Off)
Display: On
(or Off)
Projector: On
(or Off)
Slave Only: Off
(or On)
These settings allow you to tailor the way the PMDT interacts with other
linked Madrigal products, such as the Proceed AVP/AVP2 or Madrigal Imaging
projectors. (Your AVP/AVP2 may require an additional hardware module in
order to take advantage of linking features. Please see your dealer for further
information.)
All of these communications capabilities rely upon the PHAST network, so you
must connect a “straight through” RJ-45 cable (such as the one provided) between the PMDT and the AVP/AVP2 in order to have these functions available
to your system.
42
• Standby Link will cause the PMDT and AVP/AVP2 (and amplifiers
linked to the AVP/AVP2) to all exit and enter standby together,
with one push of a standby button (rather than pressing as
many as three or four).
• Play Link automates the selection of whatever input is named
“PMDT” on the AVP/AVP2, whenever play is pressed on the
PMDT. (If you have set up mode defaults on the AVP/AVP2, this
can also select appropriate surround modes automatically - see
the AVP/AVP2 owner’s manual for more details.)
• Intensity Link ensures that the displays of the PMDT and AVP/
AVP2 track one another, so they remain at the same intensity
(off, low, medium high) at all times.
• Display Link reflects the AVP/AVP2’s on-screen messages and
menu information on the PMDT’s component output. With this
feature engaged, you can enjoy the picture benefits of a direct
component connection to your television, without giving up the
useful information that the AVP/AVP2 would normally be superimposing on a composite or S-Video signal it was switching.
• Projector Link will automatically toggle the linked Madrigal Imaging projector between standby and operate as needed, dictated
by the needs of the disc you are playing. For example, it will
turn the projector on when playing a DVD, but leave it off when
playing a CD. It will also automatically switch the projector’s aspect ratio between linear (4:3) and anamorphic (16:9), based on
what the DVD needs, and assuming the projector has been correctly set up by the dealer. (Specifically, projector Recall Memories 1 through 3 should be set for 4:3 normal, 4:3 letterbox and
16:9 Anamorphic, respectively.)
• Slave Only, when on, forces the PMDT to act only as a “slave”
on the PHAST™ network, never as a “master.” This setting is provided for superior compatibility in systems that also include a
PHAST controller, which must be the “master” of the network.
Absent a PHAST controller, either a PMDT or a Proceed AVP/
AVP2 may be the “master” for intercomponent communication.
To toggle any of the links between on and off, move the menu highlight to the
link in question (in the third column), and press enter. (This is a bit different
from most other menus, where the third column contains only the setting’s
value, rather than the setting and its value. For this reason, these links are
displayed in yellow rather than the usual off-white.)
Note that in order for all the links to work properly, you must have the input
that is used for the PMDT named “PMDT” on your AVP/AVP2 or PAV/PDSD.
display time
Display time
1 sec
2 sec
3 sec
4 sec
5 sec
6 sec
This menu item determines the length of time on-screen messages/prompts
are displayed before “timing out” and disappearing again.
auto standby
Auto standby
disable
10 minutes
20 minutes
30 minutes
40 minutes
50 minutes
60 minutes
Auto standby monitors how long it has been since the PMDT has had to either
respond to user commands (buttons pushes, etc.) or play a disc. If the amount
of time exceeds that set in this menu item, it will automatically enter standby.
Thus, if you have a tendency to fall asleep on the couch while watching movies, the movie will finish, the PMDT will wait (for example) 10 minutes, and
then go into standby.
screen saver
Screen Saver
disable
10 minutes
20 minutes
30 minutes
40 minutes
50 minutes
60 minutes
The screen saver keeps track of how long an unchanging image has been sent
to your television (either a DVD menu or its own menu, for example). After
the amount of time you select here, it will engage a screen saver function in
the OSD (center) area of the screen.
Information
preferences
The information preferences menu allows you to have a wealth of information
relevant to the PMDT at your fingertips. In some cases, this may be more information than you really need; in other cases, you may want ready access to
a wide variety of information. Using this menu, you can control exactly what
information is presented, and when.
The information you have selected to have available is represented to you onscreen in either of two ways.
43
• A relatively inconspicuous single-line display will pop up when
you click the info button; subsequent clicks of this button will
cycle through the information items you have designated as being on, eventually turning the single-line display off (whenever
you reach the end).
• A larger list of information items can be presented when you
press and hold the info button; this list contains everything designated as on as well as those items designated list only. You may
either scan this list to get the information you want, or move the
highlighted area down to a particular item and press enter,
which will then place that particular item on the single-line display until you press info again.
Thus, for each item in this menu, you have a choice of having it on, (meaning
available in either single-line or list form) or in the list only, or entirely off.
disc time
Disc time
on
list only
off
This info item displays your time (location) on the disc, consistent with the
display mode you have selected (time elapsed in title, time elapsed in chapter,
etc.)
sound type
44
Sound type
on
list only
off
This info item displays what form of audio/soundtrack you are currently listening to, both in terms of format (AC-3, DTS, MPEG, PCM) and language.
camera angle
Camera angle
on
list only
off
This item tells you what camera angle is currently being displayed. (Note that
most discs only have one camera angle encoded into them.)
a/v processor
A/V processor
on
list only
off
This information item provides the status of the linked Proceed processor (assuming you have one, and it is linked).
play status
Play status
on
list only
off
This item can display (continuously) the status of the transport with respect to
play, stop, scan forward, etc.
time of day
Time of day
on
list only
off
This menu item determines whether the time of day (as determined by the
PMDT’s internal clock) is displayed.
set clock
Set clock
(set time)
This is where you set the clock on your PMDT. Set the hours first (using the
up/down buttons) move to the right with the right button, and then set the
minutes with the up/down buttons. Press enter to save changes.
Technical menu
Important!
teach IR commands
The technical menu contains a few items with which most people never need
concern themselves, but that occasionally are invaluable for solving particular
problems. We recommend that you leave everything in this menu alone unless
you have an extremely specific problem you need to address, and you fully
understand how the item you are changing will address it.
Some items in the PMDT’s Technical Menu can cause you to
lose all programs and other valuable information contained
in its memory. Other settings (depending on the nature of
your television system) can prevent the PMDT from creating
a legible on-screen display in your system. If you have the
slightest doubt as to what you might be tempted to do in this
menu, consult with your authorized Proceed dealer prior to
doing anything.
If you have a macro-capable learning remote control such as Madrigal’s IRIQ,
or a home automation system that uses IR control (such as Audioaccess™) to
coordinate the operations of several pieces of equipment, the teach IR menu
item provides a lengthy list of everything that the PMDT can do in response to
an infrared command. This list includes positive control items for commands
that are normally toggles, such as the standby button. In addition to the normal standby toggle command, we also provide a positive control for “enter
standby” and “exit standby.” The availability of such commands makes the
writing and operation of IR macros vastly more reliable.
When you select the teach IR commands menu item, a long, scrolling list appears on the right side of the menu system. Select the item you need to
“learn” into a remote (or control system), and press enter on the front panel.
restore defaults
Use this menu item to restore the PMDT to its factory default settings. Note
that doing so will cause all customization to be deleted permanently from the
PMDT’s memory; you will have to reenter all this information. This function
cannot be undone. Do not select this item unless told to do so by an authorized representative of Madrigal Audio Laboratories.
45
delete programs
46
Similar to (although somewhat less drastic than) restore defaults, the delete
programs menu item allows you to clear out all the individual disc programs
that may have been saved into memory. (Video setup, audio setup, etc., settings will remain, but all disc programs will be wiped out.) This function cannot be undone.
Programming the PMDT
The PMDT offers an unusually wide range of programming options for advanced users. These options operate on two levels:
• Electronically Saved Preferences (ESP™) that keep track of the
playback options (soundtrack, subtitles, etc.) you want used for
this particular disc;
• ad hoc, on-the-fly changes to the sequence in which you want a
disc played;
We will cover ESP first.
Electronically Saved
Preferences (ESP)
As detailed elsewhere in this manual, the PMDT allows you to set up general
preferences for how you want discs played: spoken language, audio format,
subtitles, audio delay and so forth. However, there are likely to be some exceptions to these general rules. For example, you may have a foreign film in
your collection for which you need subtitles turned on.
In order to take advantage of this “intelligence”, ESP must be turned on in the
disc behavior menu (Use ESP: on). The factory default setting is off. With ESP
turned on you can view the current settings by pressing and holding the program button on the remote for a few seconds. The list of ESP options are displayed, complete with the context-sensitive help along the bottom edge of the
screen. In the example above, the subtitles currently on will be displayed under the Subtitles option. To have the discs always play with the subtitles, you
would highlight the Save Settings item and press enter.
Audio, language
Subtitles
Subtitle On/Off
Black Level
Audio Delay
Save Settings
If you would like to force ESP to remember certain settings regardless of how
the disc was playing when it was last played, edit the ESP settings here, and
then lock the settings using the last menu item. The help bar at the bottom of
the screen will guide you, but the navigation is much like the main menu.
Use the four navigation buttons (up, down, left, right) to move around the
menu system and make selections. Moving to the right from an item displays a
list of the possibilities for that item. Clicking either the program button or the
return button exits the ESP menu, as will clicking the left arrow when the cursor is already on the left-most column of the menu.
audio, language
This field summarizes the information regarding the soundtrack currently playing, including the audio format (Dolby Digital, DTS, MPEG, etc.), how many
channels are available, and the language. (This information is all taken from
the disc itself; its accuracy is limited to what is on the disc. For example, many
old classic movies have two identical channels of audio, which is effectively
mono. Yet because there are two channels, this is what would be reported by
the PMDT.)
47
This feature can also be accessed without using the ESP menu, using the audio
button on the remote control. Clicking that button cycles through the available
settings; pressing and holding the button displays a list of the available settings, from which you may choose your selection using the up and down buttons.
subtitles
This line will tell you what language the subtitles are in.
This feature can also be accessed without using the ESP menu, using the subtitle button on the remote control. Clicking that button cycles through the
available settings; pressing and holding the button displays a list of the available settings, from which you may choose your selection using the up and
down buttons.
subtitle on/off
This item merely toggles the subtitle on or off.
This feature can also be accessed without using the ESP menu, using the subtitle button on the remote control. Clicking that button cycles through the
available settings; pressing and holding the button displays a list of the available settings, from which you may choose your selection using the up and
down buttons.
black level
The black level, or “brightness,” of discs varies somewhat, depending on the
quality of the transfer from film to video. When your PMDT is set to 0, it adheres extremely accurately to broadcast standards. However, if you find a particular disc seems so dark as to obscure details in the picture, it may be the
result of one of these poor transfers. Rather than changing the accurate calibration of the PMDT in the video setup menu, change the black level setting
for that particular disc here, in ESP. Your change will be remembered and
implemented automatically the next time you play the same disc, without affecting the quality of other discs you play.
audio delay
A surprising number of discs are mastered poorly with respect to keeping the
audio and the video properly synchronized. Since this varies from one disc to
the next, there is no way to correct for it in a general setting. Instead, if you
find yourself sensitive to this sort of thing, you can use the Audio Delay adjustment in ESP to remember the best setting for any particular disc in your
collection.
48
Note that the delay offset value you choose is in relation to the Audio Delay
that is set in the Preference Menu. For example, if you have chosen a delay of
50ms in the Preference Menu, you will initially see 50ms for this entry. You are
then able to increase or decrease this value using this offset value. The total
audio offset that will be applied to the digital signal, if and when ESP is enabled, is shown in the Audio Delay setting.
save settings
When you have all items in this menu set to the way you want this disc
played back in the future, pressing the enter button with Save Settings highlighted will store these settings away for future use.
Ad hoc programming
ad hoc program menu
The most common custom program for most people involves deleting a particular chapter (or track on CDs) that they would prefer not to see/hear again.
This could be the annoying FBI warning at the beginning of a movie, or a
song that was overplayed on the radio. This can be done on an ad hoc basis.
Clicking on the program (prog) button brings up a short menu:
Program
Add Item
Delete Item
Save Program
Delete Program
Turn Program On
Clicking on the program button while this menu is displayed cycles you
through the various options; press enter to issue the selected command. A
popup display will either confirm that the command has been issued, or provide you with a space to add more information. For example, you may want
to create programs for frequently watched discs that contain only the movie
itself, skipping all the introductory material, so you can simply press play and
have the movie begin.
A note about programs:
Depending on how a particular disc is “authored,” it may not
be possible to execute the programs exactly as you would
like. Although this problem seems to affect relatively few
discs, it is, unfortunately, beyond our control - the producers
of the discs themselves can do “programming” of their own
that we must honor. Fortunately, these problems are
uncommon. If you create a program that results in
unexpected behavior, simply delete the program as
indicated below, and use as normal.
Add Item allows you to add an item to the current disc’s playlist. With DVD
discs, the “item” in question can be either an entire title or a specific chapter
within a title. (On CDs, the “item” will be a track.) Having selected Add Item, an
editable popup display appears that displays the current Title and Chapter (or
Track on CD). For example, while in Title 2, Chapter 3, the popup display would
look something like this:
2 3 -:--:-<Add Item>
If you press enter while the first field (title) is highlighted, the entire title will be
added to a playlist for that disc. If instead the second field (chapter) is highlighted when you press enter, the PMDT will assume you want to create a more
specific playlist, one chapter at a time. Unless you issue a save program command, this is considered a temporary program - it exists only until the drawer is
opened, and is then forgotten.
Delete Item, as you might expect, allows you to delete the current chapter or
track from the disc’s playlist. With DVD discs, the “item” in question can be either
an entire title or a specific chapter within a title. (On CDs, the “item” will be a
track.) Having selected Delete Item, an editable popup display appears that displays the current Title and Chapter (or Track on CD). For example, while in Title
2, Chapter 3, the popup display would look something like this:
49
2 3 -:--:-<Delete Item>
If you press enter while the first field (title) is highlighted, the entire title will be
deleted from the playlist for that disc. If instead the second field (chapter) is
highlighted when you press enter, the PMDT will assume you want to create a
playlist that omits only that chapter. Unless you issue a Save Program command,
this is considered a temporary program - it exists only until the drawer is opened,
and is then forgotten.
Save Program saves what would otherwise be a temporarily assembled playlist
into nonvolatile memory, so that it will be executed every time that disc is
played, until you decide to delete the program yourself. Having this as a separate
command, rather than assuming it as soon as a playlist is created, gives you the
freedom to experiment at will with various playlists until you get it “just right”;
you can save the program at that time, or decide to forget the whole thing by
simply removing the disc.
Delete Program will delete a saved program from memory, should you later decide that you’d rather play the disc as its producers intended. (On a few discs,
you may need to delete the program if your program conflicts with the one contained on the disc, put there by the author of the disc. See A Note About Programs,
earlier in this section.)
Turn Program On/Off gives you the option of temporarily turning off your cus-
tomized program, without having to actually delete it entirely. For example, you
might have created a program that skips the disc’s navigation system, FBI warning, extra/bonus materials, etc., and plays only the movie itself. If you wanted to
show some friends all of the extra features that DVDs often have, you could simply
turn off your program and play the disc as its authors intended, giving yourself access
to everything on the disc. When finished, simply turn the program back on to return
to your preferred playlist.
50
Note:
If you try to access material outside of your created program
the program will be turned off. You can turn it back on via
the front panel program button or remote “prog” key (and
choose turn program on) or by reloading the disc.
Troubleshooting
In general, refer any service problems to your local authorized Proceed dealer.
Before contacting your dealer, however, check to see whether the problem is
listed here. If it is, try the suggested solutions. If none of these solves the
problem, contact your Proceed dealer.
1.
THE PMDT WON’T FUNCTION, AND THE DISPLAY IS DARK.
✓
The PMDT isn’t plugged into the AC mains.
✓
The power button has not been engaged.
✓
The wall socket (or extension cord, if used) is faulty, or the
wall socket has a tripped circuit breaker or blown fuse.
✓
A fuse is blown in your PMDT (contact your Proceed dealer).
2.
THE DISPLAY IS LIT AND THE ELAPSED TIME NUMBERS APPEAR TO BE
ADVANCING NORMALLY, BUT THERE IS NO AUDIO OUTPUT.
✓
The proper source isn’t selected on your A/V processor.
✓
The volume is set too low or muted on your A/V processor.
✓
The connecting cables are connected incorrectly or are faulty.
✓
The power amplifier(s) is/are not on.
3.
THE PMDT WON’T PLAY A DISC INSERTED IN THE PLAYER.
✓
The disc is inserted upside down.
✓
The disc may be severely scratched and unreadable. Check
the disc.
✓
You may be trying to play a CD-RW disc. The transport used
in the PMDT is not specified to play these discs, and we cannot guarantee that they will play (although sometimes a particular disc may play without problems due to its reflectivity,
the way it was burned, etc.).
✓
There may be condensation (moisture) on the laser pickup.
This can happen if the PMDT is moved from a cold environment (such as a warehouse or a shipper’s truck) to a warm
one. Plug in the PMDT, leave it on for one hour to warm up,
then try playing a disc again.
4.
WHEN A DISC IS PLAYING, THE SOUND AND/OR PICTURE “SKIPS.”
✓
The disc is severely scratched or dirty.
✓
The PMDT is on an unstable surface or is too close to your speakers.
5.
THE REMOTE CONTROL DOESN’T OPERATE THE PMDT.
✓
The remote control is at the wrong angle relative to the
PMDT, and it can’t receive the signal.
✓
The sensor window on the front panel of the PMDT is dirty or
blocked.
✓
The remote control’s projection lens is dirty.
✓
Fluorescent lighting or sunlight is interfering with the operation of the remote control.
✓
The remote control’s batteries need to be replaced.
✓
The remote control’s batteries are installed incorrectly.
51
6.
THE UNIT IS OPERATING ERRATICALLY
✓
The microprocessor’s program may have been temporarily
corrupted by adverse power conditions or severe static shock.
Cycling power off and on should reset it.
✓
The program itself may have been damaged. Enter the Player
Menu and check the “About…” menu for the current software
version numbers and their checksums; then call your dealer/
distributor with this information.
7.
I SEE ERROR MESSAGES WHEN I PRESS BUTTONS AT CERTAIN TIMES
✓
There are several possible error messages that might be displayed on the PMDT’s on-screen display, depending on the
nature of the problem. They are:
• Operation prohibited indicates that the authoring of the
disc will not allow this action to be taken at this time.
This is indicative of one of several flags referred collectively as “UOP” for “User Operation Prohibited,” and is
controlled by the disc rather than by the PMDT.
• Access restricted indicates that the authoring of the disc
will not allow access to that portion of the disc at this
time. This is indicative of one of several flags referred
collectively as “UOP” for “User Operation Prohibited,”
and is controlled by the disc rather than by the PMDT.
• Invalid command indicates that you are asking to do
something that the MPEG decoder cannot do at the moment. This could be because the command itself does
not make sense, or because the decoder is “preoccupied” with another process at the moment.
• Not implemented indicates that this action is not supported at this time. It may, however, be included in a
software update in the future. Stay in touch with your
local dealer for information on new software releases.
• Button inactive indicates that the command (at that point
in time) does not make sense and has been ruled out.
Examples include trying to go into cue forward from
stop, where the PMDT cannot even begin your command for lack of a defined starting point from which to
begin scanning forward.
52
8.
I HAVE LINKED THE PMDT TO MY AVP/AVP2 BUT THE LINKS DON’T
SEEM TO BE WORKING.
✓
Check to make sure your link cable is seated properly, connecting the Control ports (PHASTLink compatible) of the two
products, and that the PMDT’s input name on the AVP/AVP2
is PMDT.
✓
Check to make sure you have version 3.0 software or greater
installed in your AVP/AVP2. (The date code in the About box
will be 10/22/99 or later.) Please consult with your dealer for
more information on your AVP/AVP2 software version.
✓
Your AVP/AVP2 may need the PHAST daughtercard installed.
Please contact your dealer for details.
9.
I CREATED A PROGRAM, BUT NOW THE DISC DOES NOT PLAY
PROPERLY.
✓
It may be that the disc was authored in such a way that it will
not allow us to control its playback. Sorry – delete the program and use the disc as the author/producer intended.
Care & Maintenance
To remove dust from the cabinet of your PMDT, use a feather duster or a lintfree soft cloth. To remove dirt and fingerprints, we recommend isopropyl alcohol and a soft cloth. Dampen the cloth with alcohol first and then lightly clean
the surface of the PMDT with the cloth. Do not use excessive amounts of alcohol that might drip off the cloth and into the unit.
Caution!
At no time should liquid cleaners be applied directly to the
PMDT, as direct application of liquids may result in damage
to electronic components within the unit.
53
U.S. and Canadian Warranty
90-Day Limited Warranty
This Proceed® product is warranted to be free from defects in material and
workmanship under normal use for a period of ninety (90) days from the date
of purchase. To extend the warranty of this Proceed product, return the warranty
registration card along with a copy of the original receipt of purchase to
Madrigal Audio Laboratories, Inc., P. O. Box 781, Middletown, CT 06457.
Five-Year Extended Warranty
The extended warranty for this Proceed product is five (5) years from the date of
purchase. During the warranty period, any Proceed component exhibiting defects in materials and/or workmanship will be repaired or replaced, at our option, without charge for either parts or labor, at our factory. The warranty will
not apply to any Proceed component that has been misused, abused or altered.
Any Proceed component not performing satisfactorily may be returned to the
factory for evaluation. Return authorization must first be obtained by either
calling or writing the factory prior to shipping the component. The factory will
pay for return shipping charges only in the event that the component is found
to be defective as mentioned above. There are other stipulations that may apply to shipping charges.
54
There is no other express warranty on this component. Neither this warranty
nor any other warranty, express or implied, including any implied warranties
of merchantability or fitness, shall extend beyond the warranty period. No responsibility is assumed for any incidental or consequential damages. Some
states do not allow limitations on how long an implied warranty lasts and
other states do not allow the exclusion or limitation of incidental or consequential damages, so that the above limitation or exclusion may not apply to
you.
This warranty gives you specific legal rights, and you may also have other
rights which vary from state to state. This warranty is applicable in the United
States and Canada only. Outside of the U.S. and Canada, please contact your
local, authorized Proceed distributor for warranty and service information.
Obtaining Service
We take great pride in our dealers. Experience, dedication and integrity make
these professionals ideally suited to assist with our customers’ service needs.
If your Proceed component must be serviced, please contact your dealer. Your
dealer will then decide whether the problem can be remedied locally, or
whether to contact Madrigal for further service information or parts, or to obtain a Return Authorization. The Madrigal Technical Services Department
works closely with your dealer to solve your service needs expediently.
Important!
Return authorization must be obtained from Madrigal’s
Technical Services Department BEFORE a unit is shipped for
service.
It is extremely important that information about a problem be explicit and
complete. A specific, comprehensive description of the problem helps your
dealer and the Madrigal Technical Services Department locate and repair the
difficulty as quickly as possible.
A copy of the original bill of sale will serve to verify warranty status. Please
include it with the unit when it is brought in for warranty service.
55
Warning!
All returned units must be properly packaged (preferably in
their original packing material), and the proper return
authorization numbers must be marked on the outer carton
for identification. If the packaging to protect the unit is, in our
opinion or that of our dealer, inadequate to protect the unit,
we reserve the right to repackage it for return shipment at
the owner’s expense. Neither Madrigal nor your dealer can
be responsible for shipping damage due to improper (that is,
nonoriginal) packaging.
Your dealer can order a new set of shipping materials for you if you need to
ship your component and no longer have the original materials. There will be
a charge for this service. We strongly recommend saving all packing materials
in case you need to ship your unit some day.
Specifications
56
■
■
■
■
■
■
■
Video processing:
Video frequency response:
Video signal-to-noise ratio:
Video differential phase:
Video differential gain:
Video output impedance:
Video output complement:
■
■
Video formats supported:
Video aspect ratios:
■
■
■
■
Digital audio output, XLR:
Digital audio output, BNC:
Digital audio output, RCA:
Mains voltage:
■
Mains frequency:
■
■
■
Power consumption:
Overall dimensions:
Shipping weight:
10-bit
±0.5dB up to 5.5MHz
better than –60dB
better than 0.5°
better than 0.1dB
75Ω
component on 75Ω BNC
S-Video on standard mini-DIN
component (Y/Pb/Pr) on 75Ω BNC
NTSC, PAL, PAL-60
anamorphic, 16:9
letterboxed, 4:3
pan & scan, 4:3
zoomed video, 4:3
AES/EBU 110Ω, 3.5V
S/PDIF 75Ω, 0.5V
S/PDIF 75Ω, 0.5V
100V, 120V, 220V, 230V, 240V,
factory-set for destination country only
50Hz or 60Hz,
factory-set for destination country only
60 watts maximum
See “Dimensions”
45 lbs (20.5kg)
For more information, see your Proceed dealer, or contact:
Madrigal Audio Laboratories, Inc.
P.O. Box 781
2081 South Main Street (Route 17)
Middletown, Connecticut 06457 USA
Telephone: (860) 346-0896
Fax:
(860) 346-1540
Internet: http://www.madrigal.com
Madrigal provides an owner-transferable, five-year extended warranty on all
Proceed products within the U. S. and Canada ONLY. Warranty and service
policies outside the U. S. and Canada are set by the local, authorized
distributor and are applicable in the country of purchase ONLY. Madrigal
products are designed to operate at set voltages appropriate for the country
of sale and may be damaged if operated at the wrong voltage. Contact your
local dealer or distributor.
Dimensions: PMDT
17.26"
43.84 cm
m o d u l a r DVD t ra n s p o r t
menu
standby
stop
previous
play
next
pause
return
title/track
chap/index
enter
time
program shuffle
drawer
4.55"
11.6 cm
display mode
display
intensity
repeat
p owe r
power
PR O C E E D
.420"
1.07 cm
15.56"
39.52 cm
modular DVD transport face art
part#501xxx
fonts used: Avant Garde
5.28.98
for color and material information see mechanical print
1.03"
2.62 cm
1.03"
2.62 cm
14.46"
36.73 cm
13.28"
33.73 cm
1.175"
2.98 cm
17.61"
44.73 cm
14.46"
36.73 cm
4.55"
11.6 cm
17.26"
43.84 cm
1.175"
2.98 cm
2.20"
5.59 cm
13.28"
33.73 cm
10.26"
26.06 cm
2.00"
5.08 cm
(note that additional space must be allowed
for connections behind the unit)
0.5"
1.27 cm
57
Rack Mount Kit
If you need or prefer to rack mount your PMDT, contact your Proceed dealer
about the optional rack mount kit. This purpose-designed assembly replaces
the standard top cover of the unit with one designed to support this relatively
heavy component solely from the “ears” that bolt into the rack.
To use the rack mount kit, simply replace the standard top cover with the rack
mount top cover. (Full instructions are included with the top cover when purchased separately.) Once the rack mount top cover is in place, you may bolt
the entire unit securely to any EIA-standard rack. Alternatively, you may find it
easier to mount the top cover in the rack, and to then slide the “topless”
PMDT into place.
58
(The illustration above depicts the Proceed AVP/AVP2, but the kit and mounting system for both is the same.)
59
m
Madrigal Audio Laboratories, Inc.
2081 South Main Street, P.O. Box 781
Middletown, Connecticut 06457 USA
Telephone: (860) 346-0896
Fax: (860) 346-1540
www.madrigal.com
is a registered trademark of Harman International Industries, Inc.
A Harman International Company
630701
© 5/2001 Harman International Industries, Inc. All rights reserved.
Printed in U.S.A.