1
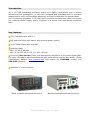
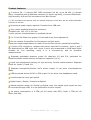
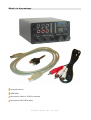
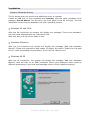
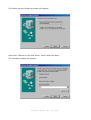
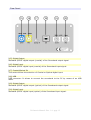
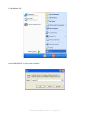
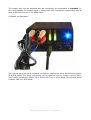
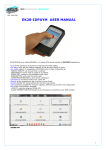
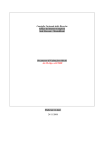
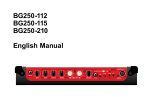
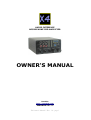
AUDIO INTERFACE
MICROPHONE PRE-AMPLIFIER
OWNER'S MANUAL
Purebits
http://purebits.com
HARDWARE VR. 1.4
X4 Owner's Manual - Rev. 1.4 - page 1
Table of Contents
Precautions and warnings............................................................. 2
Introduction................................................................................. 3
Key features................................................................................. 3
Product features........................................................................... 4
What's in the package................................................................... 5
Installation................................................................................... 6
Generic Windows drivers................................................................ 6
ASIO drivers............................................................................... 10
Controls and Indicators............................................................... 10
Front Panel................................................................................. 10
Rear Panel.................................................................................. 13
Using the X4................................................................................ 14
Playing...................................................................................... 14
Recording, Microphone preamplifier, Phantom power........................ 19
Digital input/output...................................................................... 19
VU-Meters.................................................................................. 20
CE Declaration of Conformity....................................................... 20
END USER WARRANTY................................................................. 21
Precautions and warnings
Please read carefully this manual before operating the unit!
This device uses low voltage (5V) power supply from the computer USB port.
It must be used only on a CE compliant personal computer.
All registered trademarks and brand names used in this document are the registered
property of their respective owners.
X4 Owner's Manual - Rev. 1.4 - page 2
Introduction
X4 is an USB soundcard providing analog and digital input/output and a built-in
microphone/line preamplifier. It has been designed and manufactured for acoustics
measurement and Live Recordings purposes, but can be used also for general tasks.
X4 is completely plug&play in PC, Mac and Linux/Unix environments, does not require
any external power supply and is enclosed in a robust and light-weight aluminum
case.
Key features
Fully Compliant with USB 1.1
Bus powered (does not require any external power supply)
16-bit Delta-Sigma ADC and DAC
Sampling Rate:
- DAC: 32, 44.1, 48 kHz
- ADC: 8, 11.025, 16, 22.05, 32, 44.1, 48 kHz
Uses only Burr-Brown Codec and Operational Amplifiers in the audio signal path.
For more information about specifications and performance see the Burr-Brown (Texas
Instruments) website http://www.ti.com and search for PCM2906 (codec) and
OPA2353 (Opamp).
Available in 2 color options:
Black anodized aluminum enclosure
Natural anodized aluminum enclosure
X4 Owner's Manual - Rev. 1.4 - page 3
Product features
2 channel IN / 2 channel OUT USB soundcard (16 bit, up to 48 kHz (*) sample
rate), compatible with all Windows versions (no driver required), Linux and Macintosh.
High accuracy A/D and D/A converters from Burr-Brown:
(*) The soundcard can operate also at a sample frequency of 96 kHz, but the audio bandwidth
is limited to 22 kHz.
No external power supply required. Powered from USB port.
Very robust anodized aluminum enclosure.
Compact size: 103 x 53 x 120 mm
2 color options: Anodized black or anodized natural
2 x 10 Led VU-Meter bar graphs, for accurate input level adjustment.
Can be used as Preamplifier for Microphone and line levels.
Input and output stages based on state-of-the-art Burr-Brown operational amplifiers
4 inputs, RCA connectors, mixable with stereo input JACK connector. Input 1 and 3
are downmixed to USB input Left. Input 2 and 4 are downmixed to USB input Right.
Suitable for Live recording, using 2 or 4 microphones, and for acoustics
measurements.
Separate switchable phantom power for channels 1/2 and 3/4, optimized for
Panasonic WM6x series electret microphonic capsules (3,6 V).
Input level adjustment realying on high accuracy Cermet potentiometers. Separate
knobs for inputs 1/3 and 2/4.
Separate Preamplifier/Monitor JACK stereo output. It can drive Line/headphone
loads.
USB soundcard stereo JACK/2 x RCA output. It can drive Line/headphone loads.
Line/Microphone input gain switch.
Digital Input / Output, Coaxial and Optical.
Manual selector switch for Coaxial or Optical input (the digital input signal can only
be recorded through USB, it is not buffered to monitor output).
X4 power consumption is 0.75W (all VU meter leds OFF); Peak: 1.75W (all VU
meter leds ON)
X4 Owner's Manual - Rev. 1.4 - page 4
What's in the package
X4 audio device
USB cable
One stereo Jack to 2 RCA converter
One stereo RCA-RCA cable
X4 Owner's Manual - Rev. 1.4 - page 5
Installation
Generic Windows drivers
The X4 device does not require any additional driver to operate.
Locate an USB port of your computer and connect, with the cable provided in the
package, the X4 device. The blu led in the front panel of the X4 will light. The first
installation from this point depends from your operating system.
Windows XP and 2000
After the X4 connection the system will display the message “Found new Hardware”
and will install automatically the required drivers.
After this step, the X4 will be ready to use.
Windows Millenium
After the X4 connection the system will display the message “Add new Hardware
Wizard”. Follow the instructions and enable (if asked) the option “Search for the best
driver”. After completing this procedure, the X4 will be ready to use.
Windows 98 SE
After the X4 connection, the system will display the message “Add new Hardware
Wizard”, that will refer to an USB Composite Device (the displayed name could be
different depending on the local and language version of the operating system).
X4 Owner's Manual - Rev. 1.4 - page 6
Click Next and the following window will appear:
Select the “Search for the best driver” option and click Next.
The following window will appear:
X4 Owner's Manual - Rev. 1.4 - page 7
Now the standard USB Audio windows driver must be installed:
1- Try deselecting all options and click Next.
If no suitable drivers are found, repeat this step:
2a- Insert your Windows 98 CDROM, select the CD-ROM option and click Next.
2b- Alternatively (if your Windows 98 installation files are on the hard disk) use the
“Specify a location” option, Browse for the Windows 98 cabs files (usually they are in
C:\Windows\Options\Cabs location) and click Next.
After this operation, a new window will appear, informing that Windows is ready to
install the best driver for this device.
The message will inform: Location of the driver C:\WINDOWS\INF\USB.INF (this
may vary depending on your Windows installation folder).
Click Next and the last screen will inform that Windows has finished installing the
software and an USB Composite Device is installed. Click Finish.
After this operation another “Add new Hardware Wizard” will be displayed. Follow
exactly the same procedure described above and install the USB Human Interface.
The final dialog will give you the information:
Location of the driver C:\WINDOWS\INF\HIDDEV.INF
After this installation, the last “Add new Hardware Wizard” will be displayed. Follow
again the same procedure to install the USB Audio Device.
The final dialog will inform:
Location of the driver C:\WINDOWS\INF\WDMA_USB.INF (this may be different
depending on many factors)
Now the X4 is operative, and can be disconnected and reconnected to the pc at any
time without additional installation requirements.
The driver installed are the standard MME and/or the WDM drivers (backward
compatible with the MME drivers).
Verifying the correct installation
In Windows XP and Windows 2000, right-click the My Computer icon on the
desktop, click Properties and System Properties, then the Device Manager button.
In Windows 98 SE and Windows Millenium, right-click the My Computer icon on
the desktop, click Properties and, in the System Properties screen, the Device
Manager tab.
If the X4 is installed correctly, 3 new devices should be listed:
X4 Owner's Manual - Rev. 1.4 - page 8
USB Audio Device in the Sound, video and game controllers section:
Composite USB Device in the USB Controller (Universal Serial Bus) section:
USB Human Interface Device in the Human Interface Devices section:
X4 Owner's Manual - Rev. 1.4 - page 9
ASIO drivers
The X4 sound card is compatible with ASIO drivers. To use the X4 with ASIO, a
generic ASIO driver can be used. There are some freeware ASIO drivers on internet.
We suggest ASIO4ALL by Michael Tippach, that can be downloaded from here:
http://www.asio4all.com/
Another free generic ASIO driver is ASIO2KS, by Tobias Erichsen.
It can be downloaded from http://www.asio2ks.de/
Please refer to the respective webpages for instructions about the use of these
drivers.
ASIO is a trademark of Steinberg Media Technologies GmbH
Controls and Indicators
Front Panel
X4 Owner's Manual - Rev. 1.4 - page 10
[1] Input 1 (Left channel) and 2 (right channel).
- The gain of input 1 can be adjusted by means of the IN Level 1/3 knob [13].
- The gain of input 2 can be adjusted by means of the IN Level 2/4 knob [14].
- The signal in input 1 is sent to the left input channel of the soundcard and to the left
channel of the Preamplifier output [11].
- The signal in input 2 is sent to the right input channel of the soundcard and to the
right channel of the Preamplifier output [11].
- The phantom power supply for Input 1/2 (3.6 V) can be enabled and disabled by
means of the switch [10]
- Input 1 is wired to the left channel of the Jack input Stereo IN [7], Input 2 is wired
to the right channel of the Jack input Stereo IN [7].
- The level of input 1 can be monitored by means of the left VU-meter [4]. The level of
input 2 can be monitored by means of the right VU-meter [5].
- NOTE: Input 1 is mixed with Input 3. Input 2 is mixed with Input 4.
[2] Input 3 (Left channel) and 4 (right channel).
- The gain of input 3 can be adjusted by means of the IN Level 1/3 knob [13].
- The gain of input 4 can be adjusted by means of the IN Level 2/4 knob [14].
- The signal in input 3 is sent to the left input channel of the soundcard and to the left
channel of Preamplifier output [11].
- The signal in input 4 is sent to the right input channel of the soundcard and to the
right channel of Preamplifier output [11].
- The phantom power supply for Input 3/4 (3.6 V) can be enabled and disabled by
means of the switch [12]
- The level of input 3 can be monitored by means of the left VU-meter [4]. The level of
input 4 can be monitored by means of the right VU-meter [5].
- NOTE: Input 3 is mixed with Input 1. Input 4 is mixed with Input 2.
[3] Output of the Left and Right channels of the Soundcard
- The Stereo OUT Jack [9] left channel is wired to OUT left [3] and the Stereo OUT
Jack [9] right channel is wired to OUT right [3].
[4] VU-Meter left
- It monitors Input signal 1 and Input signal 3 or the Stereo IN left channel.
- It provides a logarithmic 3 dB/step scale.
- It can be configured to show the Output signal by simply connecting the soundcard
in loopback (input 1 or 3 to Out left) using the provided RCA-RCA cable. The output
signal can then be taken from Pre-Amp OUT jack [11] and its level adjusted by means
of the knob [13].
[5] VU-Meter right
- It monitors Input signal 2 and Input signal 4 or the Stereo IN right channel
- It provides a logarithmic 3 dB/step scale.
- It can be configured to show the Output signal by simply connecting the soundcard
in loopback (input 2 or 4 to Out right) using the provided RCA-RCA cable. The output
signal can then be taken from Pre-Amp OUT jack [11] and its level adjusted by means
of the knob [14].
[6] Power supply led
- It lights when the device is connected to the computer usb port.
X4 Owner's Manual - Rev. 1.4 - page 11
[7] Input 1 (Left channel) and 2 (right channel).
- Wired to IN 1/2 RCA inputs. See note [1] for a functionality description.
[8] Line/Mic selector
- It limits the gain input of the Preamplifier from about 34 dB (Mic position) to about
14 dB (Line position).
[9] Stereo OUT
- Output of Left and Right channels of the Soundcard.
- The Left channel is wired to OUT left [3], The Right channel is wired to OUT right [3].
- It can drive an Headphone.
[10] Phantom power supply for Input 1/2
- A low current 3.6 V phantom power supply is provided to input 1 and 2 when the
switch is in the right position.
- The voltage is obtained from an 8.2KOhm resistor connected to a very clean source
of 3.6 V. This voltage is suitable for most microphone electret capsules such as the
Panasonic WM61 series.
[11] Pre-Amp OUT
- Output of Left and Right channels of the Preamplifier.
- It can be used for monitoring signals in Input 1/3 (left channel) and 2/4 (right
channel).
- It can be used for listening the soundcard output, when the soundcard is connected
in loopback. In this configuration the output level in Jack [11] can be adjusted by
means of the knobs [13] and [14] and the output signal level is shown on the VUmeters [4] and [5].
- It can drive an Headphone.
[12] Phantom power supply for Input 3/4
- See note for switch [10].
[13] IN Level 1/3
- Preamplifier Level gain for channels 1 and 3
[14] IN Level 2/4
- Preamplifier Level gain for channels 2 and 4
X4 Owner's Manual - Rev. 1.4 - page 12
Rear Panel
[15] Digital Output
Standard S/PDIF digital output (coaxial) of the Soundcard output signal.
[16] Digital Input
Standard S/PDIF digital input (coaxial) of the Soundcard input signal.
[17] Coaxial/Optical IN
This switch allows the selection of Coaxial or Optical digital input.
[18] USB
USB connector. It allows to connect the soundcard to the PC by means of an USB
cable.
[19] Digital Output
Standard S/PDIF digital output (optical) of the Soundcard output signal.
[20] Digital Input
Standard S/PDIF digital input (optical) of the Soundcard input signal.
X4 Owner's Manual - Rev. 1.4 - page 13
Using the X4
Playing
When the USB device is connected to the computer, a new audio device will be
automatically available in the system. If some other audio devices are present (such
as a built-in soundcard on the motheboard or another soundcard), the USB audio
device can be selected as preferred audio device in Windows from Control Panel /
Multimedia properties.
Alternatively, the USB audio device can be selected, among all other soundcards, from
your audio software.
The X4 doesn't need any additional software setting to work. The sample rate is set
automatically when the recording and/or playing of a sound is started.
The standard Windows mixer can be used for adjusting the output sound level. It can
be accessed from Windows taskbar START / Programs / Accessories.
The Windows mixer can be started also by writing SNDVOL32 in the “Run” field of
Windows menu.
In Windows 98:
X4 Owner's Manual - Rev. 1.4 - page 14
In Windows XP:
write SNDVOL32 in the next window:
X4 Owner's Manual - Rev. 1.4 - page 15
The Windows mixer will be shown. If more than one soundcard is installed in your
computer, the USB Audio Device must be selected in the Windows mixer. To do this,
simply select the Options/Properties menu item:
and in the next window select USB Audio Device and the Playback section.
Enable the “Master Out” and “Wave” checkboxes and disable all other ones.
X4 Owner's Manual - Rev. 1.4 - page 16
NOTE: the “Master Out” and “Wave” names could be different depending on your
Windows operating system language settings.
NOTE: There is no Recording section available in the mixer for the X4. The input
gain can be adjusted only using the knobs [13] and [14] in the X4 front panel.
Now the mixer will look as follows:
To obtain the best audio results it is recommended to keep always the Wave slider at
the maximum level and to use the Master Out to adjust the output level.
NOTE: when a full-scale digital signal is played and the Wave slider is at 100%, it is
recommended to keep the Master Out slider at about 80%. Otherwise a distortion
could occour on the output.
This is a design choice: the internal gain of the output buffers are fixed in this way in
order to offer an extra-gain amplification in case of low level signals.
X4 Owner's Manual - Rev. 1.4 - page 17
The output level can be adjusted also by connecting the soundcard in loopback. In
this configuration the output signal is taken from the Preamplifier output Jack and its
level is displayed on the 2 VU-Meter bars.
Loopback configuration:
The picture above shows a loopback connection obtained by using the provided stereo
RCA-RCA cable. The same connection can be obtained also by using a stereo JACKJACK cable (connecting Stereo IN to Stereo OUT) or in other ways, for example using
a stereo Jack to 2 RCA cable.
X4 Owner's Manual - Rev. 1.4 - page 18
Recording, Microphone preamplifier, Phantom power
The USB soundcard gets the audio signals for recording from the inputs 1/2 [1], 3/4
[2] and Stereo IN [7]. Inputs 1/2 and 3/4 are mixed (1 and 3, 2 and 4) and can be
used simultaneously. The Stereo IN [7] and inputs 1/2 [1] are wired and must not be
used at the same time.
Examples of use:
- Live music recording: inputs 1 and 2 connected to 2 microphones (phantom power
supply [10] ON), inputs 3 and 4 connected to PA mixer (phantom power supply [12]
OFF).
- MLS analysis with Sample Champion measurement software (with autosync feature
enabled): input 2 connected to OUT right, input 1 connected to the microphone.
NOTE: when the phantom power supply switches are enabled or disabled, please wait
2-3 seconds to allow the charge (or discharge) of the coupling capacitors. During this
period of time the input will be not usable.
Digital input / output
The soundcard selects automatically a digital source when a digital signal is present on
the rear panel coaxial or optical inputs.
To avoid disturbs or noise while recording from analog sources, it is
recommended to set the Coaxial/Optical IN switch [17] on the right position
(Optical IN) and to use the provided cap to close the optical input connector.
NOTE: the input signal (digital or analog) is not replicated on the digital or analog
output; the soundcard cannot be used as a standalone DAC unit.
The output of the soundcard is always present on both the coaxial and digital S/PDIF
outputs, and on the analog output.
The following data formats are accepted for digital input and output. All other data
formats are unusable as S/PDIF.
- 48 kHz 16-bit Stereo
- 44.1 kHz 16-bit Stereo
- 32 kHz 16-bit Stereo
In playback, all possible data-rate sources are converted to the 16-bit stereo format at
the same source data rate.
X4 Owner's Manual - Rev. 1.4 - page 19
VU-Meters
The VU-meter [4] can monitor the Input signal 1 and Input signal 3 or the left channel
of the Stereo IN signal. It can monitor the left channel output signal, in loopback
configuration.
The VU-meter [5] can monitor the Input signal 2 and Input signal 4 or the right
channel of the Stereo IN signal. It can monitor the right channel output signal, in
loopback configuration.
They provide a 10 steps logarithmic 3 dB/step scale and are very useful to check and
adjust the input signal level when recording.
CE Declaration of Conformity
This equipment has been tested and found to comply with the limits for:
CEI
CEI
CEI
CEI
EN
EN
EN
EN
55022 (Radiated and conducted Class B Emissions)
55024 (Radiated and conducted Immunity)
61000-4-3 (Radiated RF Immunity)
61000-4-2 (ESD Immunity)
Tested by Laboratorio CE s.a.s,
Via Garibaldi – 00010 Montelibretti (Roma) - ITALY
July 2004
Complete compliance documentation is available on request.
X4 Owner's Manual - Rev. 1.4 - page 20
END USER WARRANTY
Purebits and its owner, Paolo Guidorzi, warrants the X4 unit audio interface against
defects for a period of one year from the date of purchase. This warranty is nontransferable and is applicable only to the original purchaser.
Purebits will replace or repair any product recognized as defective.
This warranty cannot be applied to damages that are consequence of misuse or
modifications. The device does not contain user-serviceable parts. Opening of the unit
voids the warranty.
THIS PRODUCT IS DISTRIBUTED "AS IS". NO WARRANTY OF ANY KIND IS
EXPRESSED OR IMPLIED. YOU USE THIS PRODUCT AT YOUR OWN RISK. THE
MANUFACTURER WILL NOT BE LIABLE FOR ANY DIRECT, INDIRECT, CONSEQUENTIAL
OR INCIDENTAL DAMAGES WHILE USING OR MISUSING THIS PRODUCT.
Technical support contact:
Paolo Guidorzi - Purebits.com
email: [email protected]
To obtain warranty service the purchaser must send an email request to the above
address before returning the product. An authorization number and further
instructions for the shipment will be sent to the purchaser. The returned unit must be
shipped to Purebits offices in Italy with prepayed freight. Any other kind of shipment
will be rejected.
If the defect is not a consequence of misuse or modification, the product will be
replaced or repaired at no cost and returned to the user at no extra charge.
All features and specifications contained in this document are subject to change
without notice.
X4 Owner's Manual - Rev. 1.4 - page 21