1
Instruction Manual
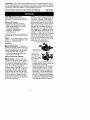
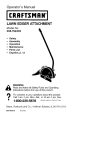
LAWN EDGER ATTACHMENT
Model No.
358.792400
•
•
•
•
•
Safety
Assembly
Operation
Maintenance
Parts List
•
Espahol
WARNING:
Read and follow all Safety Rules and Operating
Instructions before first use of this product.
For answers to your questions about this product:
Call 7 am-7 pm, Mon.-Sat., or 10 am-7 pm, Sun.
1-800-235-5878
Sears, Roebuck
530163553
8/26/02
and Co., Hoffman
<,oo,8
listed are Central Time)
Estates, IL 60179 U.S.A.
Warranty Statement
Safety Rules
Assembly
Operation
Maintenance
2
2
6
7
9
Service & Adjustments
Storage
Parts List
Spanish
Parts and Ordering
10
10
11
12
Back Cover
FULL ONE YEAR WARRANTY ON CRAFTSMAN L_LAWN EDGER ATTACHMENT
For one year from the date of purchase, when this Craftsman Lawn Edger Attachment
is maintained and lubricated according to the operating and maintenance instructions
in this manual, Sears will repair, free of charge, any defect in materials or workmanship.
This warranty excludes expendable parts that become worn during normal use.
If this Lawn Edger Attachment is used for commercial purposes, this warranty applies
for only 90 days from the date of purchase.
If this Lawn Edger Attachment is used for rental purposes, this warranty applies for
only 30 days from the date of purchase.
This warranty applies only while this product is in use in the United States.
WARRANTY SERVICE IS AVAILABLE BY RETURNINGTHE CRAFTSMANLAWN EDGER
ATTACHMENTTO THE NEAREST SEARS STORE OR SERVICE CENTER IN THE UNITED
STATES.
This warranty gives you specific legal rights, and you may also have other rights
which vary from state to state.
Sears, Roebuck and Co., D/817 WA, Hoffman Estates, IL 60179
the blade is in motion. Make sure
powerhead is stopped and spark plug
wire is disconnected (or powerhead is
disconnected from power source)
when removing jammed material from
the cutting blade, Do not grab or hold
attachment by the cutting blade.
41_WARNING:
When using gardening appliances, basic safety precautions must always be followed to reduce the risk of fire and serious injury.
Read and follow all instructions.
This power unit can be dangeroust
Operator is responsible for following
instructions and warnings on unit and
in manual, Read entire instruction
manual before using unit! Be thoroughly familiar with the controls and
the proper use of the unit, Restrict the
use of this unit to persons who have
read, understand and will follow the
instructions and warnings on the unit
and in the manual, Never allow children to operate this unit.
• Dress properly, Always wear safety
glasses or similar eye protection when
operating, or performing maintenance
on your unit (safety glasses are available). Eye protection should be
marked Z87,
• Always wear face or dust mask if operation is dusty,
• Always wear heavy, long pants, long
sleeves, boots, and gloves.
• Always wear foot protection. Do not
go barefoot or wear sandals.
• Secure hair above shoulder length
Secure or remove loose clothing or
clothing with loosely hanging ties,
straps, tassels, etc. They can be
caught in moving parts.
• Being fully covered also helps protect
you from debris and pieces of toxic
plants thrown by spinning blade,
• Stay alert. Do not operate when you
are tired, ill, upset, or under the influ-
INFORMATION
ON THE UNIT
OPERATOR SAFETY
DANGER:
RISK OF CUT.
KEEP HANDS AND FEET AWAY
FROM BLADE AND CUTTING AREA.
Do not attempt to clear away cut material or hold material to be cut when
2
ence of alcohol, drugs, or medication.
Watch what you are doing; use common sense.
• Wear hearing protection.
• Never start or run inside a closed
room or building. Breathing exhaust
fumes can kill.
• Keep handles free of oil and fuel.
• Only operate unit with handlebar
installed.
• Keep hands and feet away from cutting area.
• Never direct discharge of material toward bystanders nor allow anyone
near the area of operation. Use care
in directing discharge to avoid glass
enclosures, automobiles, and the like.
FUEL SAFETY (for gas powerheade)
• Mix and pour fuel outdoors.
• Keep away from sparks or flames.
• Use a container approved for fuel.
• Do not smoke or allow smoking near
fuel or the powerhead.
• Avoid spilling fuel or oil. Wipe up all
fuel spills before starting the powerhead.
• Move at least 10 feet (3 meters) away
from fueling site before starting powerhead engine.
• Stop engine and allow to cool before
removing fuel cap.
• Remove fuel cap slowly.
ELECTRICAL
SAFETY (for electric
powerheade)
•
•
•
_I!_WARNING:
Avoid a dangerous
environment. To reduce the risk of
electrical shock, do not use in rain, in
damp or wet locations, or around
swimming pools, hot tubs, etc, Do not
expose to snow, rain, or water to avoid
the possibility of electrical shock, Do
not handle extension cord plug or unit
with wet hands.
• Use only a voltage supply as shown
on the nameplate of the unit.
• Avoid dangerous situations. Do not
use in presence of flammable liquids
or gases to avoid creating a fire or explosion and/or causing damage to
unit,
• Avoid dangerous environments. Do
not use in unventilated areas or
where dust or explosive vapors can
build up,
• To reduce the risk of electrical shock,
use extension cords specifically
marked as suitable for outdoor applianses, The electrical rating of the
cord must not be less than the rating
of the unit. The cord must be marked
•
•
•
•
•
3
with the suffix "W-A" (in Canada, "W").
Make sure your extension cord is in
good condition. Inspect extension
cord before use and replace if damaged. An undersized extension cord
will cause a drop in line voltage resulting in loss of power and overheating.
If in doubt, use the next heavier
gauge. The smaller the gauge number, the heavier the cord.
Do not use multiple cords.
The powerhead may have a polarized
plug (one blade is wider than the other); if so, it will require the use of a polarized extension cord. The appliance
plug will fit into a polarized extension
cord only one way. If the plug does
not fit fully into the extension cord, reverse the plug. If the plug still does
not fit, obtain a correct polarized extension cord. A polarized extension
cord will require the use of a polarized
wall outlet. This plug will fit into the
polarized wall outlet only one way. If
plug does not fit fully into the wall out*
let, reverse the plug. If it still does not
fit, contact a qualified electrician to
install the proper wall outlet. Do not
change the equipment plug, extension
cord receptacle, or extension cord
plug in any way.
Do not attempt to repair unit. Inspect
the insulation and connectors on the
powerhead and extension cord before
each use. If there is any damage, do
not use until damage is repaired by
your Sears Service Center.
Do not pull or carry by cord; do not
use cord as a handle, close a door on
cord, or pull cord around sharp edges
or corners. Keep cord away from
heated surfaces. Do not unplug by
pulling on cord. To unplug, grasp the
plug, not the cord.
Do not use the powerhead if the
switch does not turn the unit on and
off properly. Have the unit repaired by
your Sears Service Center.
Keep the extension cord clear of operator and obstacles at all times. Do
not expose cords to heat, oil, water, or
sharp edges.
Avoid any body contact with any
grounded conductor, such as metal
fences, or pipes, to avoid the possibility of electric shock. Don't handle plug
or unit with wet hands.
Do not use with damaged cord or
plug. If powerhead is not working as it
should, has been dropped, damaged,
left outdoors, or dropped into water,
return it to your Sears Service Center
for repair.
• Ground Fault Circuit Interrupter (GFCI)
protection should be provided on the
circuit or outlet to be used for the
powerhead. Receptacles are available having built-in GFCI protection
and may be used for this measure of
safety.
Your powerhead should be double insulated to help protect against electric
shock. Double insulation construction
consists of two separate "layers" of
electrical insulation instead of grounding. Tools and appliances built with a
double insulation system are not intended to be grounded. Safety precautions must be observed when operating any electrical tool. The double
insulation system only provides added
protection against injury resulting from
an internal electrical insulation failure.
• Be sure blade stops turning when
engine idles (see CARBURETOR ADJUSTMENTS section of powerhead
manual).
• Remove the blade before making carburetor adjustments. Hold the unit by
hand. Do not make carburetor adjustments from the blade side of the unit.
• Keep others away when making carburetor adjustments.
• Never start the unit with the clutch
housing removed. The clutch can fly
off and cause serious injury.
• Have all maintenance and service not
explained in this manual performed by
a Sears Service Center.
• If blade strikes a foreign object, follow
these steps: stop unit and disconnect
spark plug wire (or disconnect from
power source), inspect for damage,
and repair any damage before resuming operation of the unit.
EDGING SAFETY
_I_WARNING:
All repairs to an
electric powerhead, including housing,
switch, motor, etc., must be diagnosed
and repaired by qualified service personnel. Replacement parts for a
double insulated appliance must be
identical to the parts they replace. A
double insulated appliance is marked
with the words "double insulation" or
"double insulated". The symbolFSq
(square within a square) may also be
marked on the appliance. Failure to
have the unit repaired by your Sears
Service Center can cause the double
insulation construction to become ineffective and result in serious injury.
UNIT/MAINTENANCE
SAFETY
_h_WARNING:
Inspect the area to
be edged before each use. Remove
objects (rocks, broken glass, nails, wire,
string, etc.) which can be thrown by the
blade or can wrap around the shaft.
• Keep others including children, animals, bystanders, and helpers at least
50 feet (15 meters) away. Stop the
unit immediately if you are approached.
• Hold the unit firmly with both hands.
• Keep firm footing and balance. Do
not overreach or stand on unstable
surfaces.
• Always keep the wheel in contact with
the ground.
• Keep all parts of your body away from
the blade and muffler.
• Always push the unit slowly over the
ground. Stay alert for uneven sidewalks, holes in the terrain, large roots,
etc.
• Do not force the unit. Use only for
jobs explained in this manual. Use
only for edging. Do not abuse unit.
Do not use in rain or wet locations.
• To reduce the risk of fire, do not allow
excessive grass, leaves, or grease to
accumulate on the attachment.
• Objects struck by the cutting member
can cause serious injuries to persons.
The lawn should always be carefully
examined and cleared of all objects
prior to edging.
• Never operate without blade shield in
place.
_I, WARNING:
Disconnect powerhead spark plug (or disconnect powerhead from power source) before performing maintenance.
• Inspect entire unit before each use.
Replace damaged parts. Check for
fuel leaks. Make sure all fasteners
are in place and securely fastened.
• Maintain unit according to recommended procedures.
• Throw away blades that are bent,
warped, cracked, broken, or damaged
in any other way. Replace parts that
are cracked, chipped, or damaged
before using the unit.
• Use only recommended Craftsman
parts and accessories. Never use
wire, wire rope, string, flailing devices, etc.
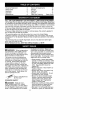
4
+
Safety
Glasses
_lk WARNING:
Blades can throw objects violently
• You can be blinded or injured.
• Wear safety glasses and boots.
t
Boots
,& WARNING:
Hazard zone for thrown objects
• Blades can throw objects violently.
• Others can be blinded or injured.
• Keep people and animals 50 feet
(15 m) away.
Blades move
momentarily
after the
trigger is
Allow blades to stop
before removing them
from the cut.
WARNING:
Blades move momentarily after the
trigger is released.
• The blades can seriously cut you or
others.
• Allow blades to stop before
removing them from the cut.
,& WARNING:
Instruction
Manual
Read instruction manual.
• Follow all warnings and instructions.
• Failure to do so can result in
serious injury.
_cals
TRANSPORTING AND STORAGE
• Do net grasp or hold exposed blade.
• Stop powerhead before leaving work
area.
• Allow powerhead and gearbox to cool
before storing or transporting it in a
vehicle.
• Store unit and fuel in area where fuel
vapors cannot reach sparks or open
flames from water heaters, electric
motors or switches, furnaces, etc.
• Store attachment so blade cannot accidentally cause injury,
• Store attachment indoors, out of reach
of children.
If situations occur which are not covered in this manual, use care and
good judgment. If you need assistance, call 1-800-235-5878.
SPECIAL NOTICE: Exposure to
vibrations through prolonged use of
gasoline powered hand tools could
cause blood vessel or nerve damage
in the fingers, hands, and joints of
people prone to circulation disorders
or abnormal swellings, Prolonged use
in cold weather has been linked to
blood vessel damage in otherwise
healthy people, If symptoms occur
such as numbness, pain, loss of
strength, change in skin color or texture, or loss of feeling in the fingers,
hands, or joints, discontinue the use of
this tool and seek medical attention.
An anti-vibration system does not
guarantee the avoidance of these
problems. Users who operate power
tools on a continual and regular basis
must monitor closely their physical
condition and the condition of this unit.
SAVE THESE INSTRUCTIONS
STANDARDS: This edger attachment is Listed by Underwriter's Laboratories,
Inc., in accordance with UL Standard 1602, "Gasoline-Engine-Powered,
RigidCutting-Member
Edgers and Edger Trimmers," only when used with the following
models:
25cc Pewerhead (with trimmer attachment) ...................
358,795100
32cc Pewerhead (with trimmer attachment) ...................
358.795190
5
CARTON CONTENTS
Check carton contents against the followinglist,
Model 358.792400
Edger Attachment
Handlebar (with Clamp and Knob)
Clamp Base (with Spacer Tabs)
Clamp Screws (4)
Attachment Hanger
Hex Wrench
Examine parts for damage. Do not
use damaged parts.
NOTE: If you need assistance or find
parts missing or damaged, call
1-800-235-5878.
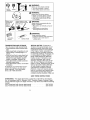
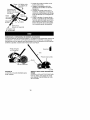
ASSEMBLY
Spacer Tabs
_
posi!ioned for use_ _
_
on 1 diameter
__D.,,,_-_,_
upper tube
_U
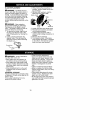
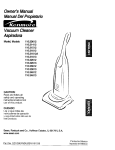
1. Place the tube clamp over the upper tube above the arrow on the
safety decal.
2. Position the clamp base under the
upper tube and align the tube
clamp and clamp base screw holes
(use spacer tabs between tube
clamp and clamp base if necessary
to secure clamp, i.e. for 1" diameter
upper tube).
_WARNING:
If received assembled, repeat all steps to ensure
your unit is properly assembled and all
fasteners are secure.
• A hex wrench (provided) is required
for assembly.
HANDLEBAR ASSEMBLY
Handlebar
POWERHEAD
END
Handlebar Clamp
between arrows on
handlebar decal
DANGER:
RISK OF CUT, To
avoid serious injury, the barrier portion
of the handlebar must be installed as
shown on the upper tube of the powerhead to provide a barrier between
operator and the spinning blade, Attach tube clamp above arrow on safety warning decal on the upper tube
(powerhead end of unit). Ensure handlebar is positioned on handlebar
clamp between the arrows on the handlebar decal.
NOTE: The tube clamp base has four
spacer tabs attached, These tabs are
provided to adapt this attachment for
use with powerheads that have a 1"
diameter upper tube (the tube clamp
will not tighten down securely on the
1" diameter upper tube without using
these spacer tabs). The tabs must be
broken off completely before use and
placed over the screw holes on the
clamp base. These tabs are not needed for powerheads with a 7/8" upper
tube.
HANDLEBAR CLAMP BASE
Clam
Knob
SCOWS
Arrow on
Safety Decal
ATTACHMENT
END
3. Insert the four screws into the
screw holes.
4. Secure tube clamp by tightening
screws with the hex wrench,
5. Position the handlebar as shown,
ensuring the handlebar is positioned on the handlebar clamp between the arrows on the handlebar
decal,
6. Retighten handlebar by turning
clamp knob clockwise until handlebar is secure and stationary in
clamp (clamp knob cannot be overtightened).
6
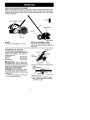
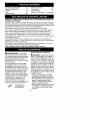
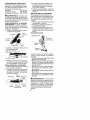
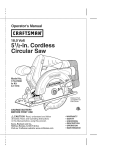
KNOW YOUR EDGER ATTACHMENT
READTHiS INSTRUCTIONMANUALAND SAFETY RULES BEFORE OPERATING YOUR
EDGERATTACHMENT Compare the illustrations with your attachment to familiarize
yourself with the location of the various controls and adjustments. Save this manual
for future reference.
Hanger
Depth Adjustment
Knob
Tube
J
Blade Shield
Gearbox
Edger Blade
DEPTH ADJUSTMENT KNOB
The DEPTH ADJUSTMENT KNOB is
used to adjust the wheel for blade cutting depth.
BLADE
The BLADE is designed to cut sod.
OPERATING THE COUPLER
Your powerhead is equipped with a
coupler which enables optional attachments to be installed. The optional
attachments are:
Cultivator ............
358.792410
Blower ..............
358.792420
Brushcutter ..........
358.792430
Upper Tube
Coupler
Lower
Attachment
_!_ WARNING:
Always disconnect
powerhead spark plug (or disconnect
powerhead from power source) before
removing or installing attachments.
REMOVING ATTACHMENT
CAUTION: When removing or installing attachments, place the powerhead and attachment on a flat surface
for stability.
1. Loosen the coupler by turning the
knob counterclockwise.
\
TIGHTEN
OOSEN
Knob
2. Press and hold the locking/release
button.
Locking/Release
Button
/
Lower Attachment
UpperTube
3. While securely holding the upper
tube, pull the attachment straight
out of the coupler.
7
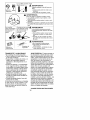
INSTALLING ATTACHMENT
1. Remove the tube cap from the attachment (if present) and discard.
2. Position locking/release button of
attachment into guide recess of upper tube coupler.
Coupler Primary Hole
_k WARNING:
Never attempt to
adjust the edger wheel when the unit
is in operation. Always stop the powerhead, wait until the blade stops turning, and disconnect the spark plug (or
disconnect powerhead from power
source) before making adjustments.
EDGING
As you become familiar with use of
your edger attachment, you will be
able to determine your own operating
pace. Conditions such as depth of cut
and material being cut will regulate the
speed and time required for your edging job.
• Allow the engine to warm up before
you begin edging.
• Increase the engine speed before
placing the blade in the cut. For best
results, run the engine at full throttle
while cutting.
• Always work going away from people
and solid objects such as walls, large
stones, trees, automobiles, etc.
• Be careful when edging near trees or
valuable plants. The high speed metal blade may cut roots and cause
damage to the plants.
• If the blade stalls, immediately move
the unit back slightly to allow the
blade to restart. If the blade continues
to stall, stop the engine, disconnect
the spark plug, and inspect for blockage or damage.
uide Recess
Upper
Tube
Locking/
Release
Button
Attachment
3. Push the attachment into the coupler until the locking/release button
snaps into the primary hole.
4. Before using the unit, tighten the
knob securely by turning clockwise.
INSTALLING ATTACHMENT
HANGER
An attachment hanger is provided for
storage when attachment is not in
use.
To install hanger on attachment:
1. Remove the tube cap from the attachment (if present) and discard.
2. Press and hold the locking/release
button.
3. Push hanger onto the attachment
until the Iocking/releese button
snaps into the hole.
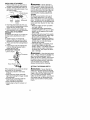
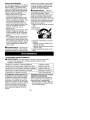
OPERATING POSITION
ALWAYS WEAR:
_ WARNING:
Keep the blade area
clean. Always release the throttle trig_
ger, move the powerhead ON/OFF
switch to the OFF position, disconnect
the spark plug (or disconnect powerhead from power source), and make
sure the blade has completely
stopped turning before cleaning.
Eye Protection
Long Pan£
Heavy
Shoes
SETTING THE EDGING DEPTH
_WARNING:
Never attempt to
adjust the cut depth when the engine
is running. Always release the throttle
trigger, wait until the blade stops turning, move the powerhead ON/OFF
switch to the OFF position, and discom
nect spark plug (or disconnect from
power source) before making adjustments.
When operating unit, stand as shown
and check for the following:
• Wear eye protection and heavy
clothing.
• Keep right arm slightly bent with
right hand holding the trigger handle
ofpowerhead.
• Keep left arm extended with left
hand holding the handlebar.
• Keep unit below waist level.
• Adjust edger wheel for proper cut
depth.
8
eo
A0,ost__
bh
MAINTENANCE
1. Loosen the depth adjustment knob.
2. Slide the wheel to the desired position.
• Raising the wheel wilt increase
the cutting depth.
• Lowering the wheel will decrease
the cutting depth.
3. Tighten the depth adjustment knob
securely.
SCHEDULE
WARNING:
Always stop unit and disconnect spark plug wire (or disconnect powerhead from power source) before performing maintenance.
CARE AND MAINTENANCE
TASK
WHEN TO PERFORM
Before each use
Before each use
After each use
Check for loose fasteners and parts
Check for damaged or worn parts
Inspect and clean unit and decals
Check or replace blade
GEN ERAL RECOMMEN DATIONS
The warranty on this attachment does
not cover items that have been subjected to operator abuse or negligence. To receive full value from the
warranty, the operator must maintain
the edger attachment as instructed in
this manual.
CHECK FOR DAMAGED OR
WORN PARTS
Contact Sears Service Center for replacement of damaged or worn parts.
• Blade Shield - Discontinue use of
edger if blade shield is damaged.
CHECK FOR LOOSE
FASTENERS AND PARTS
• Blade nut
• Fasteners
INSPECT AND CLEAN UNIT AND
DECALS
• After each use, inspect complete
unit for loose or damaged parts.
Clean the unit and decals using a
damp cloth with a mild detergent.
• Wipe off unit with a clean dry cloth.
Every 5 hours of operation
BLADE MAINTENANCE
_WARNING:
The blade will corn
tinue to spin after the engine stops or
after the throttle trigger has been released. To avoid serious injury, make
sure the blade has stopped coasting
and disconnect the spark plug (or disconnect powerhead from power
source) before performing work on the
blade.
zl,
_
all.WARNING:
Always replace a
blade that is bent, warped, cracked,
broken, or damaged in any other way.
Never attempt to straighten and reuse
a damaged blade, Use only specified
replacement blade. Wear protective
gloves when handling or performing
maintenance on the blade to help
avoid injury,
• The blade is reversible. When the
cutting edge on one side becomes
worn, turn the blade over (see
BLADE REPLACEMENT in the SERVICE AND ADJUSTMENTS section).
• Check blade for flatness periodically.
Lay the blade on a flat surface to inspect for flatness. Throw away a
blade that is not flat.
9
BLADE REPLACEMENT
_IkWARNING:
The blade will continue to spin after the engine stops or
after the throttle trigger has been released. To avoid serious injury, make
sure the blade has stopped coasting
and disconnect the spark plug (or disconnect powerhead from power
source) before performing work on the
blade.
_1_WARNING:
Wear protective
gloves when handling or performing
maintenance on the blade to avoid
injury. The blade is sharp and can cut
you even when it is not moving.
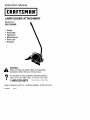
1. To remove the blade, align hole in
the dust cup with the hole in the
side of the gearbox by rotating the
blade.
2. Insert a small screwdriver into
aligned holes. This will keep the
shaft from turning while loosening
the blade nut.
3. While holding the screwdriver in
position, remove blade nut by turning clockwise.
4. Remove both washers, and the
blade from the blade shaft.
Blade shield
_
Blade
_" Washers
_=-_Z_,_
B_a__ _F
Biad_ee
nut
5. Install new blade onto blade shaft.
6. Reinstall both washers and blade
nut (counterclockwise).
7. Tighten blade nut firmly with a
wrench while holding screwdriver in
position.
8. Remove the screwdriver.
9. Turn blade by hand. If the blade
binds against the shield, or appears
to be uneven, the blade is not centered, and you must reinstall.
Screwdriver
d_WARNING:
Perform the following steps after each use:
• Allow attachment and gearbox to
cool before storing or transporting.
• Store attachment with blade shield
in place. Position attachment so that
any sharp object cannot accidentally
cause injury.
• Store the attachment in a dry, well
ventilated area out of the reach of
children.
SEASONAL STORAGE
Prepare attachment for storage at end
of season or if it will not be used for 30
days or more.
If your edger attachment is to be
stored for a period of time:
• Clean the entire attachment.
• Inspect the blade shield area and
clean any dirt, grass, leaves, or debris that has collected. Inspect the
blade and blade shield; replace a
blade that is bent, warped, cracked,
broken or damaged in any other
way.
• Lightly oil external metal surfaces.
• Apply a coating of oil to the entire
surface of the blade; wrap it in heavy
paper or cloth.
• Check entire attachment for loose
screws or nuts. Replace any damaged, worn or broken parts.
• At the beginning of the next season,
use only fresh fuel having the proper
gasoline to oil ratio.
10
Declaraci6n de Garantia
Reglas de Seguridad
Montaje
Uso
Mantenimiento
12
12
17
18
20
Servicio y Ajustes
Almacenaje
Lista de Piezas
Repuesto y Encargos
21
22
11
Contratapa
GARANTIA COMPLETA DE UN ANO PARA LA CORTADORA DE BORDES ACCESORIO CRAFTSMAN ®
Durante un afio, a partir de la fecha de compra, siempre que se haga el mantem
imiento, la lubricaci6n y los ajustes a esta Cortadora de Berdes Accesorio Craftsman segt_n las instruccienes en el manual de instrucciones, Sears reparar_ cualquiet defecto de materiales o de mano de obra gratuitamente.
Esta garantia excluye las partes que se gastan durante el use normal.
Si se usa esta Certadora de Berdes Accesorio para fines comerciales, esta garantia tendr_ validez s61amente por 90 dias a partir de la fecha de compra,
Si se usa esta Certadora de Berdes Accesorio para fines de alquiler, esta garantia tendr& validez s61amente por 30 dias a partir de la fecha de compra.
Esta garantia tiene validez exclusivamente cuande el aparate es utilizade dentro
de los Estades Unidos.
SE OBTENDRA SERVICIO BAJO GARANTIA DEVOLVIENDO LA CORTADORA DE
BORDES CRAFTSMAN AL TIENDA CE SEARS O CENTRO DE SERVICIO SEARS MAS
CERCANO EN LOS ESTADOS UNIDOS.
Esta garantia confiere derechos legales especificos al prepietario, que tal vez
tenga asimismo otres dereches que varian entre estades.
Sears, Roebuck and Co., D/817 WA, Hoffman Estates, IL 66179
_kADVERTENCIA:
AI usar cualquier herramienta de fuerza de jardineria, debergn observarse precaucienes
basicas de seguirdad en tode memento
para reducir el riesgo de incendie y
graves heridas, Lea y cumpla con todas
las instrucciones,
i Esta herramienta de fuerza puede
serpeligrosa!
Cabe al usuario le re_
sponsabilidad de cumplir con todas
las advertencias e instrucciones, iLea
el manual de instrucciones en su totalidad antes de user el aparato! Est6
completamente familiarizado con los
controles y con el use correcto del
aparato. Limite el uso de este aparato
a aquellas personas que hayan leido
y comprendido, y que vayan a obedecer, todas las advertencias e
instrucciones tanto en el aparato
come en el manual. No permita nunca
a los nifios que usen este aparato.
._
DE SEGURIDAD
INFORMAClON
DEL APARATO
SEGURIDAD
DELOPERADOR
• _IbPELIGRO:
RIESGO DE CORTADURA - MANTENGA LAS MANOS Y
LOS PIES ALEJADOS DE LAS CUCHILLA Y DEL AREA DE CORTE. No
intente remover el material o sostenga
el material a ser cortado mientras las
cuchillas se encuentren en movimiento.
Asegt_rese que la cuchilla y el motor del
cabeza se haya detenido y/o desconecte el aparato de la corriente el6ctrica
antes de remover el material que se
haya atascado en la cuchilla de corte,
No sostenga ni agarre el aparato per la
cuchilla de corte,
• Vistase apropiadamente. Siempre
use anteojos de seguridad o similar
protecci6n para los ojos cuando use o
d6 mantenimiento a este aparato (anteojos de seguridad est&n disponibles), La protecci6n para los ojos
debe ser marcada con Z87.
• Siempre utilize mascarilla para la cara
o mascarilla a prueba de polvo si se
va a trabajar en condiciones donde
hay polvo.
12
• Siempre utilize pantalones pesedos
y largos, mangas largas, botas y
guantes,
• Siempre utilize protecci6n para los
pies, No trabaje descalzo ni en
sandafias.
• Mantenga el cabello por encima de
los hombros, at&ndolo para tal efecto
si es neceserio. No use ropa suelta ni
ropa con corbatas, tiras, borlas, etc,
que cuelgan libremente. Pueden enredarse en las piezas en movimiento,
• Si est9 completament tapado, estar_
m_s protegido de los escombros y
pedazos de plantas t6xicos arrojados
per la cuchilla girante,
• Mantengase alert& No haga uso del
aparato estando cansado, enfermo,
trastornado o bajo la influencia del alcohol, de drogas o de remedios. Vigile bien Io que esta haciendo; use
del sentido comt3n,
• Use protecci6n de oidos.
• Nunca ponga el aparato en marcha ni
Io deje en marcha dentro de un recinto cerrado. Respirar los vapores del
combustible Io puede matar.
• Mantenga las manijas libres de aceite
y de combustible.
• Use t]nicamente el aparato cuando el
mango es instalado.
• Mantenga los pies alejados del area
de corte.
• No intente remover el material ya
cortado ni tampoco sostener el material que se va a cortar mientras el
motor se encuentre en marcha o
cuando la pieza que hace el corte
se encuentre en movimiento.
• Nunca dirija la descarga del material
hacia espectadores, ni permita que
nadie se encuentre cerca del &rea
de trabajo, Trabaje con sumo cuidado al dirigir la descarga de material
para evita cristales, autom6viles, y
cosas de tal naturaleza.
SEGURIDAD
CON EL COMBUSTIBLE (para cabezas motrices a gasolina)
• Mezcle y vierta el combustible al aire
libre.
• Mantengalo alejado de las chispas y
de las llamas.
• Use recipiente aprobado para el combustible.
• No fume ni permita que se fume cerca del combustible ni del aparato ni
mientras 6ste est6 en uso.
• Evite derramar el combustible o el
aceite. Limpie todo el combustible
derramado.
• AI6jese a per Io menos 3 metros (10
pies) del lugar de abastecimiento
antes de poner en marcha el motor.
• Pare el motor y permita que se enfrie
el aparato antes de retirar la tapa del
tanque,
• Remueva la tapa del tanque de combustible lentamente.
SEGURIDAD ELECTRICA
_ ADVERTENCIA:
Evite ambientes peligrosos. No use su aparato en
lugares ht3medos e mojades ni cerca
de piscinas, de los hidromasejes, etc.
No expenga el aparate a la nieve, a la
Iluvia ni al agua para evitar la posibilidad de choque el6ctrico. No toque el
enchufe del cable de extensi6n ni el
del aparate con las manos mojadas.
• Use exclusivamente el voltaje que
censta en la placa del aparate.
• Evite situacienes peligresaa No use
el aparate en presencia de liquidos
ni gases inflamables, para evitar incandies, explosienes y/o dafios al
aparato.
• Evite ambientes peligrosoa No use
su aparato en &reas peco ventiladas
donde haya alta concentraci6n de
polve o vaperes explesivos.
• Para reducir el riesgo de choque el6ctrice, use cables de extensi6n especfficamente marcados cemo aptos
para user con aparatos de use exterior y que tengan una clasificacien
el6ctrica no menor que la clasificaci6n
del aparate. El cable debe venir marcado con el sufijo "W-A" ("W" en Canada). Aseg_rese que el cable de extensi6n se encuentre en buenas
cendiciones. Siesta dafiado, cambieIo. Los cables de extensi6n demasiado finos causaran una baja en el veltaje de line& prevecando baja de
potencia y excese de calentamiento.
En case de dud& use un cable de
clasificaci6n m_s alta. Cuante m_s
baje es el nQmero de clasificaci6n
mas grueso ser9 el cable.
• No utilice m_s de uno los cables de
extensi6n.
• El cabeza de motor puede tenet un
enchufe polarizade (una aleta es
m_s ancha que la otra); si es asi,
este enchufe entrar& selamente en
una sola pesici6n en un enchufe pelarizado del cable de extensi6n.
AsegQrese de tenet un cable de extensi6n polarizade. A su vez, el enchufe polarizade del cable de extensi6n entrara en el temacerriente de
13
una sola forma. Si el enchufe no em
tra completamente en el tomacorriente, invierta el enchufe. Si todavia
no entra, contacte un electricista au*
torizado para que instale el tomacorriente apropiado. No cambie el enchufe de niguna forma.
• No intente reparar el aparato. Inspeccione el aislante y los conectores en
el aparato yen el cable de extension
antes de cada uso. Si encuentra
algQn dafio, no Io use hasta no ser
reparado por su Centro de Servicio
Sears.
• No arrastre el aparato ni Io Ileve por el
cable; no use el cable como mango,
no cierre las puertas contra el cable.
ni tire del cable si 6ste estA apoyado
contra un borde filoso. Mantenga el
cable alejado de superficies calientes.
No tire del cable para desconectarlo
del tomacorriente. Para desconectar,
sujete el enchufe, no el cable.
• No use el cabeza de motor si el interruptor no Io enciende o apaga como
corresponde. H&galo reparar en un
Centro de Servicio Sears.
• Mantenga el cable de extensi6n aleja*
do del usuario y de obstAculos en
todo momento, No exponga al calor,
al aceite ni a bordes filosos.
• Evite todo contacto del cuerpo con los
conductores a tierra, tales como los
carlos de metal o las cercas de
alambre, para evitar la posibilidad de
choque el6ctrico. No maneje el enchufe o el aparato con las manos mojadas.
• No use el cabeza de motor con el
cable o el enchufe dafiados, Si el cabeza de motor no est_ funcionando
como debe, si se ha caido, se ha
dafiado, dejado a la interperie o deja*
do caer al agua, devuelvalo a su
Centro de Servicio Sears para ser reparado,
• Debe proveerse Interruptor de Fallas
en el Circuito a Tierra (Ground Fault
Circuit Interruptor- GFCl) en el circuito
o en el tomacorriente usado con este
aparato. Hay tomacorrientes disponibles con protecci6n GFCl incorporaday estos pueden ser usados para
cumplir con esta medida de seguridad,
CONSTRUCCION DE DOBLE AISLAMIENTO
Este cabeza de motor debe ser doble
aislado para ayudar a proteger el mismo en contra de choques electricos.
La construcci6n de doble aislamiento
consiste en dos "capas" de aislamiento el6ctrico en lugar de tener toma de
tierra, Herramientas y aparatos
construidos con el sistema de doble
aislamiento no han sido disefiados para
que tomen tierra. Precauciones de seguridad deben ser observadas cuando
se use cualquier herramienta el6ctrica.
El sistema de doble aislamiento s61o
provee protecci6n adicional en contra
de accidentes causados por fallo interno de aislamiento el6ctrico.
_kADVERTENCIA:
Toda reparaci6n el6ctrica hecha a este aparato, im
cluyendo la cubierta, el interruptor, el
motor, etc., debe ser diagnosticada y
reparada por un personal de servicio
cualificado. Las piezas de reemplazo
en productos de doble aislamiento deber_n ser id6nticas alas piezas que se
est_n reemplazando. Los aparatos de
doble aislamiento, vienen marcados
con las palabras "doble aislamiento" o
"aislado doblemente', El simbolo []
(cuadrado dentro de otro cuadrado)
puede tambi6n aparecer en el aparato.
De no permitir que sea el personal de
servicio de Sears quien haga las reparclones a este aparato, puede causar
que la construcci6n de doble aislamiento se convierta ineflcaz y resulten accidentes muy serios.
SEGURIDAD DEL APARATO
_!_ ADVERTENCIA:
Desconecte
la bujia (o desconecte aparato de la
corriente el6ctrica) antes de hacer cualquier mantenimiento.
• Inspeccione el aparato totalmente
antes de cada uso. Cambie las piezas daSadas. Verifique que no haya
p6rdidas de combustible. AsegQrese
que todos los fijadores est6n en su
lugar correspondiente y bien fljos.
• Haga el mantenimiento del aparato
segt_n los procedimientos recomem
dados.
• Deseche toda cuchilla doblada, torcida, resquebrajada, quebrada o daSada de cualquier otro modo. Cambie
todas las piezas resquebrajadas, descantilladas o daSadas antes de usar
el aparato,
• Use Qnicamente las piezas y accesorios recomendados de la marca Craftsman, Nunca utilice alambre, cable,
soga, hilo, dispositivos desgranadores, etc.
• Aseg_rese que la cuchilla se detenga por completo cuando el motor
14
est9 en marcha lenta (vea los
AJUSTES AL CARBURADOR en el
manual de instrucciones de cabeza
de motor),
• Retire la cuchilla del aparato antes
de hacer los ajustes al carburador.
Sostenga el aparato con la mano.
No haga ajustes al carburador
desde el lado de la cuchilla.
• Mantenga alajadas alas demas personas siempre que est6 haciendo
ajustes al carburador.
• Nunca ponga el aparato en marcha
sin tener la caja de cambios instalada. El embraque puede salir volam
do y causar graves heridas.
• Todo mantenimiento y servicio no explicados en este manual deberan ser
efectuados por un Centre de Servicio
Sears.
• Si el aparato choca con un objeto extrafio, siga el siguiente procedimiento:
detenga el motor, desconecte la bujia
(o desconecte cabeza de motor de
la corriente electrica) , inspec_ione
los dafios, y repare cualquier daSo
antes de continuar la operaci6n.
SEOURIDAD AL CORTAR BORDES
_h, ADVERTENCIA:
Inspeccione
el _rea a ser corada antes de cada
uso. Retire los objetos (piedras, vicrio
roto, clavos, alambre, hilo, etc.) que
puedan ser arrojados por la cuchilla o
que puedan enroscarse en el eje.
• Mantenga a los demas, inclusive a
los ni_os, los animales, los especta*
dores y los asistentes fuera de la ona
de peligro de 15 metros (50 pies).
•
•
•
•
•
•
•
•
•
Pare el aparato immediatamente si
alguien se le acerca.
Sostenga el aparato firmemente con
las dos manos.
Mantenga el balance. No se extienda
demasiado o se pare en superficies
inestables.
Mantenga siempre las rueda en con*
tacto con el suelo,
Mantenga todas las partes de su
cuerpo alejadas de la cuchilla y del
silenciador.
Siempre empuje el aparato lentamente sobre el terreno, Cuidese
constantemente contra las aceras
desniveladas, hoyos en el terreno,
raices grandes, etc.
Use el aparato exclusivamente para
los fines descritos en este manual,
Use t3nicamente para bordear. No
abuse el aparato. No use bajo la Iluvia ni en lugares que se encuentren
mojados,
Para reducir el riesgo de incendio, no
permita la acumulaci6n excesiva de
c6sped, hojas o grasa en el accesorio,
Los objetos golpeados por la cortadora podrian causar accidentes
graves a personas. Se deber_ examinar cuidadosamente el c6sped y
aclarar todos los objetos antes de
comenzar a bordear o cortar.
Nunca use aparato sin los protector
en su lugar.Siempre apague el apa*
rato y desconecte la bujia (o desconecte aparato de la corriente el6ctrica),
15
Las cuchillas
Gafas de
Seguridad
_!_
s
objetos
H
pueden arrojar
lent&
_
al aire
ADVERTENClA:
•Objetos
Usted arrojados
puede perder
vista
o accial airelade
forma
viodentarse.
• Use gafas de seguridad y botas.
ADVERTENCIA:
Zona de peligro de objetos arrojados al aire.
• Las cuchillas pueden arrojar objetos al aire
violentamente.
• Otras personas pueden perder la vista o accidentarse.
• Mantenga a personas y animales pot Io menos
15 metros (50 pies) alejados de la zona de trabajo.
Las cuchilla
giran momentaneamente despu#s
de soltar e!
gati!!o,
Permita que las cuchil- ,_ ADVERTENClA"
la se detengan antes
_'_
de remover las de la
Las cuchillas permanecen girando
zona que se est#
momentaneamente
despu6s de soltar
cortando,
el gatillo.
• Las cuchillas pueden causar serias
cortaduras a usted o a otras personas.
• Permita que las cuchiIIas se detengan antes de removerlas de la zona
t
de code.
,& ADVERTENCIA:
_s
Manual de
instrucciones
de
seguridad
TRANSPORTE Y ALMACENADO
No sostenga el cuchilla expuesta.
• Pare le cabeza de motor antes de dejar el _rea de trabajo.
• Deje enfriar el cabeza de motor y el
cajetin de engranajes antes de
guardarlo o de transportarlo en un
vehiculo.
• Guarde el aparato y el combustible
en un lugar donde los vapores del
combustible no puedan Ilegar hasta
conde haya chispas o llamas abiertas provenientes de termotanques,
motores o interruptores el6ctricos,
calefactores centrales, etc.
• Guarde el aparato de modo que la
cuchilla no pueda causar heridas accidentalmente.
• Guarde el aparato dentro, fuera del
alcance de los niSos.
Si acontencen situaci6nes no tratadas
en este manual, tenga cuidado y use
de buen criterio. Si necesita ayuda,
Ilame al Centre de Servicio Sears al
1-800-554-6723.
Lea el manual de instrucciones.
• Siga todas las advertencias e
instrucciones.
• De Io contrario, accidentes de gravedad podrian ocurrir.
AVISO ESPECIAL: El estar expuesto a
las vibraciones a traves del uso prolom
gado de herramientas de fuerza a gasolina, puede causar da_os a los vasos
sanguineos o a los nervios de los dedos, las manos y las coyunturas a
aquellas personal propensas a los trastornos de la circulaci6n o alas hinchazones anormales. El uso prolongado en
climas frios ha sido asociado con
da_os a los vasos sanguineos a personas que por otra parte se encuentran
en perfecto estado de salud. Si ocurriera sintomas tales come el entumecimiento, el color, la falta de sentido en
los dedos, las manes o en las coyunturas, pare de usar esta maquina de inmediato y procure atenci6n m6dica. Los
sistemas de anti-vibraci6n no garantizan que se evitan tales problemas. Los
usuarios que hacen uso continuo y proIongado de las herramientas de fuerza
deben fiscalizar atnetamente st] estado
fisico y el estado del aparato.
GUARDE ESTAS INSTRUCCIONES
16
CRITERIOS:
Esteaccesorio
delcortadora
debordes
est&Enlistado
porUnderwriter'sLaboratories,
Inc.,deacuerdo
conlaNorma
UL1602,"Motores
a Gasolina,Miembro
Rfgido
delCorte,Cortadoras
deBordes
y Recortadoras
deBordes"
solamente
cuando
est&utilizado
conlosmodelos
siguientes:
Cabeza
demotorde25cc(conelaccesorio
delcortadora)
..... 358.795100
Cabeza
demotorde32cc(conelaccesorio
delcortadora)
..... 358.795190
CONTENIDO DE LA CAJA
Use la siguiente lista para verificar
que todas la piezas hayan sido incluido:
Modelo 358.792400
• Cortadora de Bordes Accesorio
• Mango (con Abrazadara y Perilla)
• Base de Abrazadera (con Tabulaciones del Espaciador)
• Tornillos de Abrazadera (4)
• Suspensor del Accesorio
• Llave Hexagonal
Examine las piezas para verificar que
no haya daSos. No use piezas daSadas.
AVlSO:
Si necesita ayuda, si faltan
piezas o si hay piezas daSadas, Ilame
al n6mero 1-800-235-5878.
MONTAJE
A
4tIADVERTENCIA:
Si recibi6 el
aparato ya armado, repita todos los pasos para asegurarse de que se Io haya
armado correctamente y de que todos
los fijadores est6n bien ajustados.
• Un Ilave hexagonal (provista) se requiere para el montaje.
INSTALLATION DEL MANGO
_IIPELIGRO:
RIESGO DE COR*
TADURA. Para evitar graves heridas,
la parte del mango en forma de barrera debe ser instalada en el tube superior de la cabeza del motor/tubo superior con el fin de mantener la
distancia entre el operador y la cuchilla durante el giro de 6sta. Instale la
abrazadera del tube sobre la fiecha
de la etiqueta de seguridad del tubo
superior (extremo a la cabeza del motor de su aparato). Asegure que el
mango este en posici6n con la abra*
zadera del mango entre las fiechas de
la etiqueta del mango.
AVlSO: La base de la abrazadera del
tubo tiene cuatro (4) tabulaciones del
espaciador incluidas, Estas tabula_
clones se proporcionan para adaptar
esta accesorio para el uso con las ca*
bezas de motor/tubo superior que tienen 1 pulgada del tubo superior de
digmetro (la abrazadera del tubo no
apretar& abajo con seguridad en el
tubo superior de 1 pulgada de diametro sin usar estas tabulaciones del espaciador). Estas tabulaciones se de_
ben remover antes del uso y pongalos
sobre los huecos del tornillo en la
base de la abrazadera. Estas tabulaclones no son necesarias para las ca*
bezas de motor / brazo con un 7/8 de
pulgada en el tubo superior.
BASE DE ABRAZADERA
Tabuiaciones/e_ _//_P_
del Espaciador
del Espaciador
_
colocadas para el
uso en el 1 pulgaTabulaciones
da
de diametro del
tubo superior
_
•
1. CoIoque la abrazadera del tubo en
la parte superior sobre la fiecha en
la etiqueta de seguridad.
2. Coloque la base de la abrazadera
debajo del tubo superior y alinee
los huecos del tornillo de la abrazadera con el tubo y la base de la
abrazadera (use las tabulaciones
del espaciador entre la abrazadera
del tubo y la base de la abrazadera
en caso de necesidad para asegurar
la abrazadera, es decir para 1 pulga*
da de di_metro del tubo superior).
17
Mango
EXTREMO CON
EL CABEZA DE
MOTOR
Abrazadera
Mango entre las
flechas de la etic
del mango
Base de
Abrazadera
Perilla
de la
Abrazadera
del tubo
Tornillos
3. Inserte los cuatro tornillos en los
huecos del tornillo.
4. Asegure la abrazadera del tubo
apretando los tornillos con la Ilave
hexagonal.
5. Coloque el mango como se lea
mostrado, asegurado el mango se
coloca en la abrazadera del mango
entre las flechas en la etiqueta del
mango.
6. Vuelva a apretar el mango dando
vuelta a la perilla de la abrazadera
hacia la derecha hasta que el mare
go es seguro e inm6vil en la abrazadera (la perilla de la abrazadera
no se puede apretar demasiado).
Flecha en la
Etiqueta de Seguridad
EXTREMO CON
EL ACCESORIO
CONOZCA EL CORTADORA DE BORDES ACCESORIO
LEA ESTE MANUAL DE INSTRUCCIONES Y LAS REGLAS DE SEGURIDAD ANTES DE
COMENZAR A USAR ESTE CORTADORA DE BORDES ACCESORIO. Compare las
ilustraciones con su aparato para familiarizarse con la ubicaci6n de los diversos
controles y ajustes. Guarde este manual para uso futuro.
Perilla de Ajuste
de Profundidad
Suspensor
Tubo
Protector del Cuchilla
Rueda
Caja de Engranajes
CUCHILLA
La CUCHILLA ha sido disefiada para
cortar c6sped.
Cuchilla
PERILLA DE AJUSTE DE PROFUNDIDAD
La PERILLA DE AJUSTE DE PROFUNDIDAD se utiliza para ajustar la rueda
para regular la profundidad de corte
de la cuchilla.
18
OPERAClON DEL ACOPLADOR
Este modelo est_ equipado con un
acoplador, el cual permite la instalaci6n de accesorios opcionales. Los
accesorios opcionales son:
Cultivador ...........
358.792410
Propulsor de Aire .....
358.792420
Cortadora de Malezas. 358.792430
_I!IADVERTENClA:
Siempre desconecte la bujia de la cabeza de motor (o desconecte cabeza de motor de
la corriente el6ctrica) antes de retirar o
instalar los accesorios.
COMO REMOVER EL ACCESORIO
PRECAUCION: AI retirar o instalar
las accesorios, ponga el cabeza de
motor y el accesorio en una superficie
plana para estabilidad.
1. Afloje el acoplador dando vuelta a
la perilla a la izquierda.
Tubo
Acoplador
3. Empuje el accesorio inferior en el
acoplador hasta que el bot6n de
conexi6n/desconexi6n
se encaje
en el primer agujero.
4. Antes de usar el aparato, apriete la
perilla firmemente dando vuelta a la
derecha.
INSTACALI(3N DEL SUSPENSOR
Una suspensor de la accesorio se
proporciona para el almacenaje cuando la accesorio no se est& utilizando.
Para instalar la suspensi6n en la accesorio:
1. Retire la tapa de tubo del accesorio
(si presente) y deseche.
2. Presione y sostenga el bot6n de
conexi6nldesconexi6n.
3. Empuje la suspensor sobre la accesorio hasta que el boton de conexi6n/desconexi6n se encaja en el
hueco.
POSICION DE USO
SiEMPRE
AFLOJE
USE:
Protecci6n
para los Ojos
Accesono
Inferior
Pantolone5
Largos
Perilla
2. Oprima y sostenga
exi6n/desconexi6n.
Bot6n de Conexi6n/
Desconexi6n "_,
el bot6n
de con-
Tubo Superio
Accesorio
Inferior
3. Mientras sostiene el tubo superior
con firmeza, quite el accesorio inferior del acoplador en forma recta.
INSTALACION DEL ACCESORIO
1. Retire la tapa de tubo del accesorio
(si presente) y deseche.
2. Coloque el bot6n de conexi6n/desconexi6n de] accesorio inferior en
el agujero de la guia del acoplador
de la tubo superior.
Primer
Acoptador
Agujero Agujero de
\
Tubo
Superior
/
la Gufa
Bot6n de Accesorio
Conexi6n/
Inferior
Desconexi6n
Zapatos
Gruesos"-_
Cuando de operar el aparato, par6se
como se vea en la figura y verifique io
siguiente:
• Usando anteojos de seguridad y ropa
gruesa como protecci6n.
• Mantenga brazo derecho ligeramente
doblado, y la mano derecha sostiene
el mango del gatillo acelerador del cabeza de motor.
• Mantenga el brazo izquierdo extendido con la mano izquierda sostenga el mango.
• Mantenga el aparato debajo del nivel
de la cintura.
• Ajuste rueda del cortadora de bordes
para Iograr una profundidad de corte
correcta.
_]kADVERTENCIA:
Nunca intente
ajustar la rueda con el aparato en funcionamiento, Siempre pare el motor,
aseg_rese de que la cuchilla se haya
detenido por completo, y desconecte
la bujia (o desconecte aparato de la
corriente el6ctrica) antes de hacer
ajustes.
19
PAR& CORTAR BORDES
A medida que se familiarice con el aparato, ud, pordri& determina y su propio
ritmo de trabajo, Los factores tales
como la profundidad del corte y el material que se est& cortando afectar_n la
velocidad y el tiempo requeridos para
hacer un trabajo en particular.
• Permita que el motor se caliente
Antes de empezar a cortar.
• Aumente las revoluciones antes de
colocar la cuchilla en el corte. Para
obtener los mejores resultados, corte
con el motor acelerado a fondo,
• Trabaje siempre alej_ndose de la
genre y de los abjetos s61idos tales
como los paredones, las rocas
grandes, los 9rboles, los autom6viles, etc,
• Tenga cuidado al cortar cerca de los
_rboles o de plantas valiosas. La
cuchilla met&lica de alta velocidad
puede cortar las raices y daSar las
plantas.
• Si la cuchilla se para, haga retroceder inmediatemente el aparato para
permitir que la cuchilla vuelva a firar.
Si la cuchilla sigue detenida, pare el
motor, desconecte la bujia e inspecclone el aparato para detectar bloqueo o daSo.
,_IkADVERTENCIA:
Mantenga limpia &rea de la cuchilla. Pare el motor,
asegQrese de que la cuchilla se haya
CRONOGRAMA
detenido por completo y desconecte
la bujia (o desconecte aparato de la
corriente el6ctrica) antes de limpiar.
AJUSTE DE PROFUNDIDAD
,I_ADVERTENCIA:
Nunca intente ajustar la profundidad con el motor en funcionamiento.
Suelte
siempre el gatillo acelerador, espere
hasta que la cuchilla deje de girar,
ponga el interruptor ON/OFF de la ca*
beza del motor en posici6n OFF y desconecte la bujia (o desconecte aparato aparato de la corriente el6ctrica)
antes de hacer ajustes,
1. Afioje la perilla de ajuste de profundidad,
Perilla de Ajuste
de Profun___l
2. Deslice la rueda hasta la posici6n
deseada,
• Enlevar la rueda aumenta la profundidad de core,
• Bajar la rueda disminuye la profundidad de corte.
3. Apriete la perilla de ajuste con firmeza.
DE MANTENIMIENTO
ADVERTENCIA:
Siempre apague el aparato y desconecte la bujia
(o desconecte aparato de la corriente el6ctrica) antes de hacer
cualquier mantenimiento.
TAREA DE CUIDADO Y MANTENIMIENTO
CUANDO HACER
Verificar que no haya piezas ni fijadores sueltos
Antes de cada uso
Verificar que no haya piezas daSadas ni gastadas
Antes de cada uso
Inspeccione y limpie el aparato y las placas
Inspeccionar o cambiar la cuchilla
Despu6s de cada uso
Cada 5 horas de uso
RECOMENDACIONES GENERALES
La garantia de este aparato no cubre
los articulos que han sido sometidos
al abuso o a la negligencia por parte
del usuario. Para recibir el valor completo de la garantia, el usuario debera
mantener el aparato segtJn las instrucclones en este manual. Har& falta
hacer varios ajustes peri6dicamente
para mantener el aparato de forma
debida.
VERIFIQUE QUE NO HAYA PIEZAS
DANADAS NI GASTADAS
Entre en contacto con el Centro de
Servicio Sears para el remplazo de
piezas da_adas o desgastadas.
• Protector para la cuchilla - Deje de
usar el accesorio si el protector para
la cuchilla esta da_ado.
20
VERIFIQUE QUE NO HAYA FIJADORES SUELTOS NI OTRAS PIEZAS SUELTAS
• Tuerca de la cuchilla
• Fijadores
INSPECCIONE
Y
LIMPIE
EL
APARATO Y LAS PLACAS
• Despu6s de que cada use, inspecclone la aparato completa para
saber si hay piezas flojas o
dafiados. Limpie el aparato y sus
placas usan- do u trapo hQmedo
con detergente suave.
• Seque el aparato con un trapo
limpio y seco.
MANTENIMIENTO DE LA CUCHILLA
_IkADVERTENCIA:
La cuchilla
sigue girando despu6s de que el motor para y despu6s de que se suelte el
gatillo, Para evitar graves heridas,
asegt]rese de que la cuchilla se haya
detenido completamente y desco-
CAMBIO DE LA CUCHILLA
_ ADVERTENCIA:
La cuchilla
sigue girando despu6s de que el motor para y despu_s de que se suelte el
gatil[o. Para evitar graves heridas,
asegt_rese de que la cuchilla se haya
detenido completamente y desconecte la bujia (o desconecte aparato
de la corfente el6ctrica) antes de hacer ningQn tragajo con la cuchilla.
_ ADVERTENCIA:
Use guantes
de protecci6n al tocar o al hacer mantenimiento a la cuchilla para evitar
heridas, La cuchilla es muy filosa y
corta a_n no estando en movimiento.
1. Gire la cuchilla para hacer coincidir
el officio del taza para el polvo con
el officio lateral del cajetin de
engranajes.
2. Introduzca un destomillador pequefie por los officios confrontados.
Esto previene que el eje gire
mientras usted afloje la tuerca de la
cuchilla.
necte la bujia (o desconecte aparato
de la corriente el6ctrica) antes de hacer ningQn tragajo con la cuchilla.
_1_ ADVERTENClA:
Cambio
siempre la cuchilla si est& doblada,
otro forma. Nunca intente enderezar
y volver a usar una cuchilla dafada.
Use t_nicamente la cuchilla de repuesto especificada. Use guantes protec_
tores al tocar u al hacer mantenimiem
to a la cuchilla para evitar heridas.
• La cuchilla es reversible. Cuando el
filo se baya gastado de un lado, im
vierta la cuchilla (yea CAMBIO DE LA
CUCHiLLA en la secci6n SERVICIO Y
AJUSTES),
• Peri6dicamente verifique que la cuchilla este perfectamente recta.
Apoye la cuchilla en una superficie
plana e inspecci6nela.
Descarte la
cuchilla si no est9 perfectamente
plan&
3. Manteniendo el destornillador en su
posici6n, remueva la tuerca de la
cuchilla dando vuelta a la derecha.
4. Remueva ambas arandelas, y la
cuchilla de la eje.
Protector del
cu_hlla _
_='_
Cuchilla
_ Arandelas
Eje
5.
6.
7.
8.
9.
Destomillador_
21
Tuerca del
cuchilla
Coloque la cuchilla nueva en el eje.
Reinstale ambas arandelas y tuer_
ca dando vuelta a la izquierda.
Manteniendo el destornillador en su
posici6n, apriete la tuerca flrme_
mente usando una Ilave,
Remueva el destornillador,
Gire la cuchilla de mano, Si la
cuchilla se aproxima a la protector
o parece girar irregularmente,
significa que no est& centrada y
sera necesafo reinstalarla.
_IbADVERTENCIA:
Realice los
siguientes pasos despu6s de cada
USO:
• Deje enfriar el motor y el cajetin de
engranajes antes de guardarlo o de
transportarlo.
• Almacene el aparato con todos los
protector del cuchilla en su lugar
correspondiente,
Posicione al apa*
rato de modo que la cuchilla no pueda herir accidentalmente,
• Almacene el aparato en un _rea
seca, bien ventilada y fuera del alcance de los niSos.
ESTAClONAL ALMACENAJE
Prepare el aparato para almacenarlo
al final de la temporada o si no Io va a
usar por m_s de 30 dias.
Si se almacene su accesorio por UR
periodo del tiempo:
• Limpie el aparato en su totalidad.
• Inspeccione el _rea del protector y
limpie toda la tierra, el hierba, las
hojas y los escombros que ha acumulado, Inspeccione la cuchilla y el
protector; cambie la cuchilla si est_
doblada, torcida, resquebrajada,
quebrada o daSada de cualquier
otto modo.
• Aplique una leve capa de aceite a
las superficies met_licas exteriores,
• Aplique una capa de aceite a la su*
perficie entera de la cuchilla; envu61valo en papel grueso o tela.
• Examine el aparato en su totalidad
para verificar que no haya tornillos
ni tuercas sueltos, Cambie toda pieza daSada, gastado o quebrada.
• AI comienzo de la proxima temporada, utilice solamente combustible
fresco mezclado en proporcion con
el aceite.
22