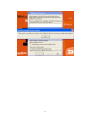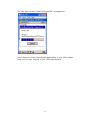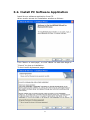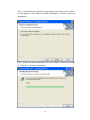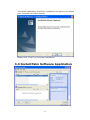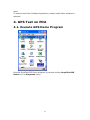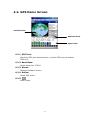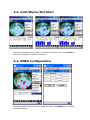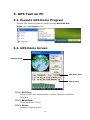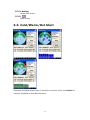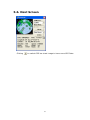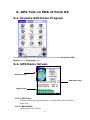
1
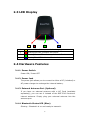
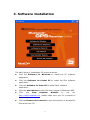
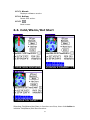
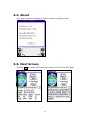
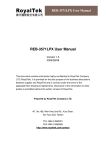
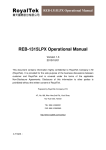
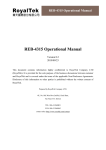
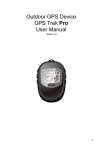
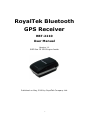
RoyalTek Bluetooth
GPS Receiver
RBT-2210
User Manual
Version 1.1
SiRF Star III GPS Engine Inside
Published on May, 2008 by RoyalTek Company Ltd.
i
Content
1. Product Introduction ................................................................ 4
1.1 Overview..........................................................................................................4
1.2 Main Features...................................................................................................4
1.3 Product Notification.........................................................................................4
1.4 Application .......................................................................................................4
2. Before Start .............................................................................. 5
2.1 Check the Package Content .............................................................................5
2.2 Power Switch, Power Jack & External Antenna Port ......................................5
2.3 LED Display ....................................................................................................6
2.4 Hardware Features ...........................................................................................6
2.4.1. Power Switch .......................................................................................6
2.4.2. Power Jack ...........................................................................................6
2.4.3. External Antenna Port (Optional) ........................................................6
2.4.4. Bluetooth Status LED (Blue) ...............................................................6
2.4.5. GPS Status LED (Green) .....................................................................7
2.4.6. Battery Status LED (Red/Yellow)........................................................7
2.5. Getting Started ................................................................................................7
2.5.1. STEP 1: Charge the Battery .................................................................7
2.5.2. STEP 2: Turn on Receiver and Wait for GPS Fix ................................7
2.5.3. STEP 3: Connect to Bluetooth-Enabled Devices.................................7
2.5.4. STEP 4: Connect to your Navigation Software ...................................7
2.6 How to replace Lithium-ion Battery ................................................................8
2.7 How to use Car Charger to charge your handheld device................................8
3. Software Installation ................................................................ 9
3.1. Install PDA Software Application.................................................................10
3.2. Install PC Software Application....................................................................13
3.3 Install Palm Software Application .................................................................15
4. GPS Test on PDA................................................................... 16
4.1. Execute GPS Demo Program........................................................................16
4.2. GPS Demo Screen.........................................................................................17
4.2.1. GPS Port: ...........................................................................................17
4.2.2. Baud Rate:..........................................................................................17
ii
4.2.3. About:.................................................................................................17
4.2.4. Action:................................................................................................17
4.2.5.
..................................................................................................17
4.3. Cold/Warm/Hot Start ....................................................................................18
4.4. NMEA Configuration....................................................................................18
4.5. About.............................................................................................................19
4.6. Next Screen ...................................................................................................19
5. GPS Test on PC...................................................................... 20
5.1. Execute GPS Demo Program........................................................................20
5.2. GPS Demo Screen.........................................................................................20
5.2.1. GPS Port: ...........................................................................................20
5.2.2. Baud Rate:..........................................................................................20
5.2.3. About:.................................................................................................20
5.2.4. Action:................................................................................................21
..................................................................................................21
5.2.5.
5.3. Cold/Warm/Hot Start ....................................................................................21
5.4. NMEA Configuration....................................................................................22
5.5. About.............................................................................................................22
5.6. Next Screen ...................................................................................................23
6. GPS Test on PDA of Palm OS ............................................... 24
6. GPS Test on PDA of Palm OS ............................................... 24
6.1. Execute GPS Demo Program........................................................................24
6.2. GPS Demo Screen.........................................................................................24
6.2.1. GPS Port: ...........................................................................................24
6.2.2. Baud Rate:..........................................................................................24
6.2.3. About:.................................................................................................25
6.2.4. Action:................................................................................................25
6.2.5.
..................................................................................................25
6.3. Cold/Warm/Hot Start ....................................................................................25
6.4. About.............................................................................................................26
6.5. Next Screen ...................................................................................................26
7. Explanation of GPS Terminology.......................................... 27
iii
1. Product Introduction
1.1 Overview
RoyalTek the first SiRF Star III Bluetooth GPS receiver, RBT-2210, is
the successor of well-known RBT-2210 Bluetooth GPS receiver in 2006.
It uses SIRF Star III extreme fast TTFF GPS engine and inherits the
previous strength point by using the same battery (Lithium-ion
battery) of Nokia 6100 cell phone. With the same dimension of 72(L)
x 41(W) x 24mm(H) and weight only 62g, making it an ideal solution
to carry everywhere.
1.2 Main Features
SiRF Star III GPS chipset
20 parallel channels
NMEA0183 compliant protocol
Extreme fast TTFF at low signal level.
Auto recovery while RTC crashes
Adopt TCXO as GPS core clock source
Industrial Standard
Selectable Baud Rate
Trickle Power is supported
WAAS/ ENGOS is supported
1.3 Product Notification
Operating temperature range -10 ºC to +60 ºC
Charger operating temperature range 0 ºC to +60 ºC
Battery Storage temperature range -20 ºC to +70 ºC
7hr at full charge continuous operation mode.
Humidity range up to 95% no condensing
1.4 Application
PDA and Cellular Phone Navigation
Consumer wireless GPS
Automotive Vehicle Tracking
Personal Positioning
Sporting and Recreation
4
2. Before Start
2.1 Check the Package Content
Before you start using RBT-2210, please check out if your package includes
the following items. If any item is damaged or missed, please contact your
reseller at once.
● RBT-2210 Bluetooth GPS receiver ● Car Charger ● CD (optional)
● AC Adapter(optional) ● External antenna(optional)
● Backup battery(optional) ● Leather case(optional)
● String(optional)
2.2 Power Switch, Power Jack & External
Antenna Port
Power Jack
External Antenna
Port
(Optional)
5
Power
Switch
2.3 LED Display
1
2
3
4
1
Yellow LED indicates power is in charging
2
Blinking Red LED indicates low power
3
Glowing Green LED indicates position is fixed
4
Glowing Blue LED indicates Bluetooth is connected
2.4 Hardware Features
2.4.1. Power Switch
Power ON / Power OFF
2.4.2. Power Jack
The power jack allows you to connect to either a DC (included) or
AC power charger to recharge the internal battery.
2.4.3. External Antenna Port (Optional)
If you have an external antenna with a MC Card (available
separately), you can use it instead of the RBT-2210 receiver’s
internal antenna. Simply plug your external antenna into the
antenna port.
2.4.4. Bluetooth Status LED (Blue)
Glowing - Bluetooth is on and ready to transmit.
6
2.4.5. GPS Status LED (Green)
Glowing - Position is fixed.
Steady light – Device is on but position is not fixed.
2.4.6. Battery Status LED (Red/Yellow)
None - Battery has adequate power supply.
Red - Power is low. Charging immediately is required.
Yellow - Connected to power charger, charging.
LED off - Battery is fully charged.
2.5. Getting Started
2.5.1. STEP 1: Charge the Battery
Before you use RBT-2210, the battery must be charged for at least
4 hours. Plug car charger into power jack and cigar-lighter
separately. As RBT-2210 is in charging, the Yellow LED will be
lighted up. When the battery is fully charged, the Yellow LED will be
turned off. Unplug car charger from power jack and cigar-lighter
separately.
2.5.2. STEP 2: Turn on Receiver and Wait for GPS Fix
If the position has not been fixed yet, the Green LED will be still. If
the position has been fixed, the Green LED will be Glowing.
You are ready to connect to your Bluetooth-enabled mobile device
and use your GPS application.
2.5.3. STEP 3: Connect to Bluetooth-Enabled Devices
From your Bluetooth-enabled handheld device, execute Bluetooth
application software to search RBT-2210 and then connect it to
your device. If the connection between your device and RBT-2210
is successful, the Blue LED will be Glowing.
Note: Type in pin code=0000 during configuration.
2.5.4. STEP 4: Connect to your Navigation Software
Load your GPS mapping or routing software, along with the
corresponding maps of the areas that you are occupying or
plan to travel to.
Start the application. Make sure the application is set for the
7
COM port that your Bluetooth-enabled mobile device will use
for serial communication. Now you should be ready to use
your GPS application as directed by the user documentation
that came with the software. More configurations may be
necessary.
Refer to the following software application user manual to set
up the parameters of the device via Bluetooth radio.
2.6 How to replace Lithium-ion Battery
Open the bolt on the bottom cover of RBT-2210 and take the
Lithium-ion battery out.
Place new Lithium-ion battery into the room of RBT-2210.
The RBT-2210 Lithium-ion battery is replaceable and
rechargeable.
The RBT-2210 Lithium-ion battery can last more than 7 hours in
continuous operation mode.
2.7 How to use Car Charger to charge
your handheld device
Connect car charger into your adapter connector of RBT-2210.
Plug adapter connector into handheld device connector and plug car
charger into cigar-lighter.
8
3. Software Installation
The Main Menu of Installation CD shows as above.
Click the Software for Windows to install the PC software
application.
Click the Software for Pocket PC to install the PDA software
application.
Click the Software for Palm OS to install Palm software
application.
Click the User Manual to open the user manual of Bluetooth GPS.
Click
the
View
Royaltek
Website
to
link
our
http://www.royaltek.com, please make sure your PC connects to
Internet first.
Click the Browse CD Contents to open the explorer to browse the
files within the CD.
9
3.1. Install PDA Software Application
Before you click the “Software for Pocket PC ” to install the PDA
software application from CD, you have to synchronize the PDA and
your system. Then the following window will show in your system as
below:
Click “Yes>” to continue. Or click ”No” to select the other destination
to install, or “Cancel” to give up installation.
Click “ OK” to complete the installation.
10
11
You can also see the “Installing RoyakTek” message box.
Note: About to install the software application to your PDA, please
refer to your user manual of your PDA manufacturer.
12
3.2. Install PC Software Application
Install the pc software application from CD.
When screen shows the installation window as follows:
Click “Next> to next page”, or click”<Back” to back last stage or
“Cancel” to give up installation.
To the License Agreement page:
13
Click “ I accept the terms of the license agreement” then click “Next>”
to next page, or click”<Back” to back last stage or “Cancel” to give up
installation.
Click “Install” to start installation. Or click”<Back” to back last stage
or “Cancel” to give up installation.
14
Then start installation. And finish installation will ask you to restart
your computer as follow window.
Please click “Finish” to finish the Installation.
3.3 Install Palm Software Application
15
Note:
To execute this Palm Software Application, please install Palm software in
advance.
4. GPS Test on PDA
4.1. Execute GPS Demo Program
Execute RoyalTek GPS Demo program by double clicking RoyalTek GPS
Demo icon on Programs menu.
16
4.2. GPS Demo Screen
Satellite View
GPS Data View
Signal View
4.2.1. GPS Port:
Searching GPS port automatically or select COM1 as the default
COM port.
4.2.2. Baud Rate:
Select baud rate: 57600.
4.2.3. About:
Displays software version.
4.2.4. Action:
Select GPS action.
4.2.5.
Next screen.
17
4.3. Cold/Warm/Hot Start
Selecting Cold/Warm/Hot Start in function scroll bar, then click Action to
initialize Cold/Warm/Hot Start function.
4.4. NMEA Configuration
Selecting NMEA CFG in function scroll bar, then click Action to do NMEA
sentence setting.
18
4.5. About
This page shows the software version and the copyright claim.
4.6. Next Screen
Clicking > to switch GPS bar chart image to have more GPS data.
19
5. GPS Test on PC
5.1. Execute GPS Demo Program
Execute GPS Demo program by double clicking RoyalTek GPS
Demo icon on Programs menu.
5.2. GPS Demo Screen
Satellite View
GPS Data View
Signal View
5.2.1. GPS Port:
Searching GPS port automatically or select COM1 as the default
COM port.
5.2.2. Baud Rate:
Select baud rate: 57600.
5.2.3. About:
Displays software version.
20
5.2.4. Action:
Select GPS action.
5.2.5.
Next screen.
5.3. Cold/Warm/Hot Start
Selecting Cold/Warm/Hot Start in function scroll bar, then click Action to
initialize Cold/Warm/Hot Start function.
21
5.4. NMEA Configuration
Selecting NMEA CFG in function scroll bar, then click Action to do NMEA
sentence setting.
5.5. About
This page shows the software version and the copyright claim.
22
5.6. Next Screen
Clicking
to switch GPS bar chart image to have more GPS Data.
23
6. GPS Test on PDA of Palm OS
6.1. Execute GPS Demo Program
Execute RoyalTek GPS Demo program by double clicking RoyalTek GPS
Demo icon on Programs menu.
6.2. GPS Demo Screen
Satellite View
GPS Data View
Signal View
6.2.1. GPS Port:
Searching GPS port automatically or select COM1 as the default
COM port.
6.2.2. Baud Rate:
Select baud rate: 57600.
24
6.2.3. About:
Displays software version.
6.2.4. Action:
Select GPS action.
6.2.5.
Next screen.
6.3. Cold/Warm/Hot Start
Selecting Cold/Warm/Hot Start in function scroll bar, then click Action to
initialize Cold/Warm/Hot Start function.
25
6.4. About
This page shows the software version and the copyright claim.
6.5. Next Screen
Clicking >
to switch GPS bar chart image to have more GPS data.
26
7. Explanation of GPS Terminology
TTFF
Time to first fix(cold start, warm start and hot start)
27
Revision History
Data
Revision
Note
5/8/2008
V1.1
Company address modified
Contact information
Headquarters
4F, No. 188, Wen Hwa 2nd Rd.,
Kuei-Shan, Tao-Yuan 333, Taiwan
TEL: 886-3-3960001
FAX: 886-3-3960065
Http://www.royaltek.com
Sales: Http://www.royaltek.com/contact
FAE: [email protected]
28