1
Owner's Manual
CRAFTZMAIi°
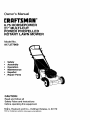
6.75 HORSEPOWER
21" MULTI-CUT
POWER PROPELLED
ROTARY LAWN MOWER
Model No.
917.377960
•
•
•
•
Safety
Assembly
Operation
Maintenance
• EspaSol
• : Repair Parts
CAUTION:
Read and follow all
Safety Rules and Instructions
before operating this equipment
i
Se_rs, Roebuck and Co., Hoffman Estates, IL 60179
Visit'our Craftsman website: www.sears.com/craftsman
Warranty
Safety Rules
Assembly
Operation
Maintenance Schedule
Maintenance
2
2
4
6
10
10
Product Specifications
Service and Adjustments
Storage
Troubleshooting
Repair Parts
Parts Ordering
11
14
14
16
34
Back Cover
LIMITED TWO YEAR WARRANTY ON CRAFTSMAN POWER MOWER
For two years from date of purchase, when this Craftsman Lawn Mower is maintained,
lubricated, and tuned up according to the operating and maintenance instructions in the
owner's manual, Sears will repair free of charge any defect in material or workmanship.
If this Craftsman Lawn Mower is used for commemial or rental purposes, this warranty
applies for only 90 days from the date of purchase.
This Warranty does not cover:.
• Expendable items which become worn during normal use, such as rotary mower
blades, blade adapters, belts, air cleaners and spark plug.
• Repairs necessary because of operator abuse or negligence, including bent crankshafts and the failure to maintain the equipment according to the instructions contained in the owner's manual.
Warranty service is available by retuming the Craftsman power mower to the nearest
Sears Service Center/Department in the United States. This warranty applies only while
this product is in use in the United States.
This Warranty gives you specific legal rights, and you may also have other rights which
vary from state to state.
SEARS, ROEBUCK AND CO., D/817 WA, HOFFMAN ESTATES, ILLINOIS 60179
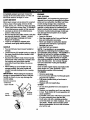
Safety standards require operator presence controls to minimize the dsk of injury.
Your unit is equipped with such controls.
Do not attempt to defeat the function of the
operator presence controls under any
circumstances.
TRAINING:
Alwayshave damage repairedbefore using
your mower.
• DOnot use accesso_ attachmentsthat are
not recommendedby the manufacturer.
Use of such attachmentsmay be hazardOUS.
• The bladeturnswhen the engine is running.
PREPARATION:
• Read thisoperator'smanualcarefully.
Become familiarwiththe controlsand know
howto operateyour mower properly. Leam
howto quicklystopmower.
• Do not allowchildrento use your mower.
Never allow adultsto use mowerwithout
properinstrucUons.
• Keep the area of operationclear of all
persons,especiallysmallchildren and pets.
• Use moweronlyas the manufacturer
intendedand as describedin this manual.
• Do not operate mowerif ithas been
droppedor damaged in any manner.
• Alwaysthoroughlycheck the area to be
mowed and clear itof all stones, sticks,
wires,bones,and otherforeignol_jects.
These objectswillbe thrown by the blade
and can cause severe injury.
• Alwayswear safety glasses or eye shields
when startingand while usingyour mower.
• Dressproperly. DOnot operate mower
when barefootor wearing open sandals.
Wear only solidshoes with good traction
when mowing.
2
• Check fuel tank before starting engine. Do
not fillgas tank indoors, when the er_jine is
running or when the engine is hoL Allow the
engine to cool for several minutes before
filling the gas tank. Clean off any spilled
gasoline before starting the engine.
• Always make wheel height adjustments
before starting your mower. Never attempt
to do this while the engine is running.
• Mow only in daylight or good artificial light.
• Never cut grass by pulling the mower
towards you. Mow asross the face of
slopes, never up and down or you might
lose your footing. DO not mow excessively
steepslopes.Use caution when opa_
the mower on uneven terrain or when
OPERATION:
MAINTENANCE AND STORAGE:
• Keep your eyes and mind on your mower
and thearea beingcut. Do not let other
interestsdistractyou.
• Do notmow wet or src)perygrass. Never
runwhileoperatingyour mower. Always he
sureof yourfooting- keep a firm holdon the
handlesand waJk.
• Do notput hands orfeet near or under
rotatingparts. Ksep dear ofthe dmcharge
openingat all times.
• Alwaysstopthe enginewhenever you leave
or are not using your mower,or before
crossingdriveways,walks, roads,and any
gravel-coveredareas.
• Never directd'mchargeof materialtoward
bystandersnorallow anyone nearthe
mower while you are operatingit.
• Beforecleaning,inspecting,or repairing
yourmower,stopthe engine and make
absolutelysure the blade and all moving
partshave stopped. Then d'_connectthe
sparkplugwireand keep itaway fromthe
sparkplugto preventaccidentalstarting.
• DOnotcontinueto runyour mower ifyou hit
a foreignobjecL Followthe procedure
outlinedabove, then repairany damage
hefore restartingand operatingyour mower.
• Do not changethe governorsettingsor
overspeedthe engine. Engine damage or
personalinjurymay resulL
• DOnot operateyour mower if itvibrates
abnormally, Excessivevibrationisan
indicationof damage; stop the engine,
safelycheckfor the cause of vibrationand
repairas required.
• DOnot runthe engine indoors. Exhaust
fumes are dangerous.
• Check _
changing directions - maintain good footing.
• Never operate your mower without proper
guards, plates, grass catcher or other safety
devices in place.
blade and the engine mounting
boltsoftento be suretheyaretightened
propedy.
• Check all bolts, nuts and screws at frequent
intervals for proper lightness to be sure
mower is in safe working condition.
• KsepaJsafetydev_es_ plecaand
woddng.
• To reducefirehazard,keeptheanginefrse
of grass, leaves or excessive grease and Oil.
• Check grass catcher often for deterioration
andwearandreplacawornbags. Useody
replacement
begsthat arerecommended
byandcompty
w_ spedr_Uons
ofthe
manufacturer of your mower.
• Always keep a sharp blade on your mower.
• Allow engine to cool before storing in any
enclosure.
• Never store mower with fuel in the tank
inside a building where fumes may reach an
open tiame or an ignition source such as a
hot water heater, space heater, clothes
dryer, etc.
Look for this symbol to point out important
safety precautions. It means CAUTION!II
BECOME ALERTff! YOUR SAFETY IS
INVOLVED.
CAUTION: Always disconnect spark plug
wire and place wire where it cannot
contact spark plug in order to prevent
accidental starting when setting up,
transporting, adjusting or making repairs.
WARNING: The engine exhaust from this
product contains chemicals known to the
State of California to cause cancer, birth
defects, or other reproductive harm.
3
accessories
wereavailablewhenthislawnmowerwasproduced.They arenot
shippedwith your mower.TheyarealsoavailableatmostSearsretailoutletsandservice
centers.MostSears storescan alsoorder repairpartsfor you,when you providethe model
numberof your lawn mower. Some ofthese accessoriesmay not applyto your lawn mower.
LAWN MOWER PERFORMANCE
CUPPING DEFLECTOR
FOR REAR DISCHARGE LAWN MOWERS
GRASS CATCHERS
FOR
REAR DISCHARGE
LAWN MOWERS
LAWN MOWER
MULCNER K_S
STABlUZER
GRASS CATCHERS
FOR
LAWN MOWERS
SlOE DISCHARGE
I_
GAS CANS
MAINTENANCE
AIR FILTERS
MUFFLERS
SPARK PLUGS
ENGINE OIL
Read these instructions and this manual in
its entirety before you attempt to assemble
or operate your new lawn mower.
IMPORTANT: This lawn mower is shipped
WITHOUT OIL O R GASOLINE in the
engine.
Your new lawn mower has been assembled at the factory with the exception
of those pads left unassembled for
shipping purposes. To ensure safe and
proper operation of your lawn mower, all
parts and hardware you assemble must be
tightened securely. Use the correct tools
as necessary to ensure proper tightness.
All parts such as nuts, washers, bolts, etc.,
necessary to complete the assembly have
been placed in the parts bag.
TO REMOVE LAWN MOWER FROM
CARTON
• Remove all packing materials except
padding between upper and lower
handle and padding holding operator
presence control bar to upper handle.
• Roll lawn mower out of carton and check
carton thoroughly for additional loose
pads.
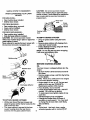
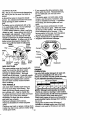
HOW TO SET UP YOUR LAWN
MOWER
TO UNFOLD HANDLE
IMPORTANT: Unfold handle carefully so
as not to pinch or damage control cables.
• Raise lower handle section to operating
position and squeeze the bottom ends of
lower handle towards each other until
the pin in handle can be inserted into
one of the three height adjustment
holes.
• Remove protective padding, raise upper
• Remove loose parts included with
handle section into place on lower
mower.
handle and tighten both handle knobs.
• Cut down two end corners of carton and • Remove any packing material from
lay end panel down flat.
around control bar.
4
• Yourhandlesmay be adjustedforyour
mowingcomfort. Referto Serviceand
Adjustmentssectionof this manual.
Operator presence
control bar
TO INSTALL
Your lawn mower was shipped ready to be
used as a mulcher. To convert to bagging
or discharging; See OPERATION section
of this manual.
Lift up
Lift up
Lower
handle
ATTACHMENTS
Mowing
position
Handle
pin
3-position
Handle
adjustment
bracket
5
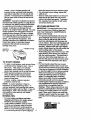
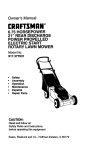
KNOW YOUR LAWN MOWER
READ THIS OWNER'S MANUALAND SAFETY RULES BEFORE OPERATING YOUR LAWN
MOWER. Compare the illustrations with your lawn mower to familiarize yourself with the
location of various controls and adjustments. Save this manual for future reference.
These symbols may appear on your lawn mower or in literature supplied with the product.
Learn and understand their meaning.
CAUTION
ENGINE
OR WARNING
(_,
ENGINE
OFF
FAST
SLOW
CHOKE
FUEL
OIL
DANGER, KEEP HANDS
AND FEET AWAY
Operator presence control
Drive
Speed control lever
Starter handk
Cable clip
Grass catcher
Engine oil cap w/dipstick
Wheel adjuster
lever
Mulcher
plug
Gasoline cap
Mulcher door
IMPORTANT:
This lawn mower is shipped
without oil or gasoline in the en_line.
MEETS
CPSC SAFETY
Housing
REQUIREMENTS
Sears rotary walk-behind power lawn mowers conform to the safety standards of the
American National Standards Institute and the U,S. Consumer Product Safety Commission. The blade turns when the engine is running.
Drive control bar - used to engage
power-propelled foward motion of lawn
mower.
Mulcher plug - Located at the rear
discharge opening must be removed when
converting to bagging operation.
Operator presence control - must be
held down to the handle to start the
engine. Release to stop the engine.
Primer - pumps additional fuel from the
carburetor to the cylinder for use when
starting a cold engine.
Starter handle - used for starting the
engine.
6
TO OPERATE
The operationof any lawn mowercan resultin
foreign objectsthrownintothe eyes, whichcan
resultin severe eye damage. Alwayswear
safetyglasses or eye shieldswhileoperating
your lawn moweror performingany adjustmeritsor repairs. We recommenda wide
visionsafety mask overthe spectaclesor
standardsafety glasses.
HOW TO USE YOUR LAWN MOWER
ENGINE SPEED
DRIVE SYSTEM
• With engine running, select ground
speed by moving speed control lever to
desired position.
• To start forward motion, pull drive
control bar back against handle.
• To stop forward motion, release drive
control bar.
IMPORTANT:
Always keep drive control
bar fully engaged against handle when in
use.
The enginespeed was set at the factoryfor
optimumperformance. Speed is notadjustable.
ENGINE ZONE CONTROL
CAUTION: Federal regulationsrequirean
engine contrelto be installedon this lawn
mower in orderto m'mirnizethe riskof blade
contactinjury.Do not underany circumstances
attemptto defeat the funcUonof the operator
contrel.The bladeturnswhen the engineis
running.
• Your lawn moweris equippedwi_ an
operatorpresencecontrolbar which
requiresthe operatorto be pos_
behind the lawn mowerhandleto start and
operatethe lawn mower.
TO ADJUST cUTrlNG HEIGHT
• All fourwheels are adjustedby a single
lever.
• Pulladjusterlevertowardwheel. To raise
mower, move leverforwardto desired
position.To lowermower,move the lever
towardthe rear.
lever
; ..
Speed control_
"
Operatorpresence
control bar
Drive control
engaged
Ddve control
disengaged
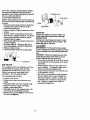
TO CONVERT MOWER
Yourlawn mowerwasshippedreadytobe
usedasa mulcher.Toconvedto baggingor
discharging:
Lower Wheels for high cut
REAR BAGGING• Open rear doorand remove mulcherplug.
Store mulcharplugin a safe place.
• You can now installgrass catcher.
• Toconvert
tomulching
orcr_t_ging
Raise Wheels for low cut
GROUND
DRIVE
operation,installmulcher plugintorear
dischargeopeningof mower.
SIDE DISCHARGING-
SPEEDS
Your lawn mower provides multiple speeds
to let you select the speed that suits you
best.
• Lower speeds are for slow, heavy/thick
grass cutting or trimming.
• Medium speeds are for normal grass
cutting or trimming.
• High is for light cutting and for ground
transport.
NOTE: Do not move speed control lever
unless the engine is running
• Mulcherplug must be installedintorear
dischargeopening of mower (see above
instructions).
• Open mulcherdoor and installdischarge
deflector under guardas shown.
• Mower is now ready for discharging
operation.
• To convertto mulchingor baggingoperation,dischargedeflectormustbe removed
and mulcherdoormust be closed.
7
SIMPLE STEPS TO REMEMBER
WHEN CONVERTING YOUR LAWN
MOWER
FOR MULCHING
-
CAUTION: Do net run your lawn mower
without rear mulcher plug or approved grass
catcher in place. Never attempt to operate the
lawn mower with the rear door removed or
propped open.
• Rear mulcherplug installed.
• Mulcherdoorclosed.
door
slots
Grass
FOR REAR BAGGING • Rear mulcher plug removed.
• Grass catcher installed.
• Mulcher door dosed.
FOR SIDE DISCHARGING
handle
-
• Rear mulcherplug installed.
• Side dischargedeflectorinstalled.
CAUTION: Do net runyour lawn mower
withoutrear mulcherplug in place or approved
grasscatcherin place.
Never attemptto operatethe lawn mower with
the rear doorremoved orproppedopen.
hook
TO EMPTY GRASS CATCHER
• Lift up on gress catcher using the frame
handle.
• Remove grass catcher with clippings from
under lawn mower handle.
• Empty clippings from beg using both frame
handle end bag handle.
NOTE: DO net drag the beg when emptying;
it will cause unnecessary wear.
Mulcher plug
BEFORE STARTING ENGINE
OIL
Your lawn mower is shipped without oil in the
engine.
• Be sure mower is level and area around oil
fill is dean.
• Remove engine oil cap and till to _ full line
Mulcher door
Open
mulcher door
onthedips_,k.
NOTE:
Allow oil to settle down into
engine
for accuratedipstickreading.
• Engine holds 27 ozs. of oil. For type and
grade of offto use, see "ENGINE' in
Maintenance section of this manual.
Discharge deflector
• Pour oil slowly. Do not over till.
• Check oil level before each use. Add oil if
needed. RII to full line on dipstick.
• To read proper level, tighten engine oil cap
each time.
TO ATTACH
• Reinstall engine oil cap end lighten.
• Chenge the oil after every 25 hours of
operation or each season. You may need
to change the oil more often under dusty,
dirty conditions.
GAS
GRASS CATCHER
• Liftthe rear door.of the lawn mower and
place the grass catcher frame hooks into the
slots of the rear door.
• The grass catcher is secured to the lawn
mower housing when the rear door is
lowered onto the grass catcher frame.
• Fill fuel tank. Use fresh, clean, regular
unleaded gasoline with a minimum lof 87
8
octane. (Use of leaded gasoline will
increase carbon and load oxide deposits
and reduce valve I'Ve). Do not mix oil with
gasoline. Purchase fuel in quantities that
can be used within 30 days to assure fuel
freshness.
WARNING: Experience indicates that alcohol
blended fuels (called gasohol or using ethanol
or methanol) can attract moisture which loads
to separation and formation of acids during
storage. Acidic gas can damage the fuel
system of an engine while in storage. To avoid
engine problems, the fuel system should be
emptied before storage of 30 days or longer.
Drain the gas tank, start the engine and let it
run until the fuel lines and carburetor are
empty. Use fresh fuel next season. See
Storage Instructions for addlti_,
information.
Never use engine or carburetor cleaner
products in the fuel tank or permanent
damage may occur.
Gasoline
filler cap
TO START ENGINE
• To start a cold engine, push primer three
(3) times before trying to start. Use a
firm push. This step is not usually
necessary when starting an engine
which has already run for a few minutes.
• Hold operator presence control bar
down to the handle and pull starter
handle quickly. Do not allow starter
rope to snap back.
• To stop engine, release operator
presence control bar.
NOTE: In cooler weather it may be
necessary to repeat pdming steps. In
warmer weather over priming may cause
flooding and engine will not start. If you do
flood engine, wait a few minutes before
attempting to start and do not repeat
priming steps.
MOWING TIPS
• For mostcuttingconditionsand better
baggingperformance,the enginespeed
shouldbe set in the fast position.
• Under certainconditions,such as when
mowingvery tallgrass, raisethe mower
heighton the firstcutto reduce pushing
effort,to avoidoverheatingthe engine,and
to avoid leavingclumpsof grass clippings.
Make the second cut to the desired height.
For extremely heaw cutting, reduce the
width of cut.
Pores in cloth grass catchers can become
filled with dirt and dust with use and the
catcher will collect less grass. To prevent
this, regularly hose catcher off with water
and lot dry before use.
MULCHING
MOWING TIPS
IMPORTANT: For bestperfo_,
keep
mowerhousingfree of built-upgrass and
trash. See "Cleaning"in MAINTENANCE
sectionof this manual.
• The specialmulchingblade willrecurthe
grassclippingsmany times and reduce
them in size so that as they fallonto the
lawnthey willdisperseintothe grass and
not be noticed. Also,the mulchedgrass will
biodegrade quicklyto providenutrients for
the lawn. Alwaysmulchwith your highest
engine(blade) speed as this willprovidethe
best recuttingactionof the blades.
• Avoidcuttingyour lawn when itis weL Wet
grasstendsto form clumpsand interferes
withthe mulchingaction. The besttime to
mow your lawnis the earlyaftemnon. At
this time the grass has driedand the newly
cut area willnot be exposed to the direct
sun.
• Forbest results,adjustthe lawn mower
cuttingheightso thatthe lawn mower cuts
offonlythe top one-thirdof the grass blades.
Ifthe lawn is overgrownitwillbe necessary
to raisethe heightof cutto reduce pushing
effortand to keep from overloadingthe
engineand leavingdumps of mulched
grass. Forextremelyheavy mulching,
reduceyourwidthof cutby overlapping
previouslycutpath and mow slowly.
• Certaintypesof grass and grassconditions
may requirethat an area be mulcheda
secondtime to completelyhidethe
clippings.When doinga secondcut, mow
acrossorpeqoendloularto the first cut path.
• Change your cuttingpatternfrom week to
week. Mow north to south one week than
changeto eastto westthe nextweek. This
will helppreventmattingand grainingofthe
lawn.
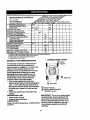
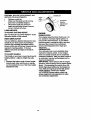
MAINTENANCE SCHEDULE
FILL IN DATES
AS YOU COMPLETE
REGULAR SERVICE
SERVICE DATES
Check for Loose Fasteners
Clean/Inspect Grass Catcher
!_'
(If Equipped)
_/
t/
_
M
Lawn Mower
Clean Under
Drive Cover
{Power-PropelledMowers)
W
Check drive belt/puUeys
(Power-PropelledMowers)
If
R
Check/ShaqoeniReplace Blade
LubdcationChart
I/3
II_
I_
Clean Battery/Recharge
_l=!m'tricStart Mowers1
II_
I_4
Change Engine Oil
E Check En_lineOil Level
GI Clean
Air
Filter
Inspect
Muffler
N
a
_1
€
Clean
orAir
Replace
Spark Cartridge
Plug
Replace
Filter Paper
I 234-
=
Ch_,ge more often when operating under a heavy load or in high ambient temperatures.
Sefvlce more ol_enwhen operating In dirty or dusty condi_ns.
Replace blades more often when mowing in sandy soil.
Charge 48 hours at end of season,
LUBRICATION
GENERAL RECOMMENDATIONS
CHART
(_ Wheel
The warranty on this lawn mower does not
coveritemsthathavebeensubjectedto
I
adjuster
operator abuse or negligence. To receive full
value from _ wananty, operator must
maintain mower as instructed in this manual.
Some adjustments will need to be made
pedodicagy to properly maintain your unit.
All aGrjustrnentsin the Service end Adjjustments section of this manual should be
checked at least once each season.
• Once a year, replace the spark plug,
replace air filter element and check blade for
wear. A new spark plug and cleaR/new air
fiitsr element assures proper air-fuel mixture
and hellOSyour engine run better and last
longer.
• Follow the maintenance schedule in this
manual.
BEFORE EACH USE
• Check engine oillevel.
• Checkfor loosefasteners.
LUBRICATION
Keep unitwell lubricated(See "LUBRICATION
CHART").
\
(_
Engine oil
\
(_
Drive pins
(_) Spray lubricant
(_) Refer to MAINTENANCE
"ENGINE" section.
IMPORTANT: Do net oil or grease plastic
wheel bearings. Viscous lubricants will
attract dust and dirt that will shorten the
life of the self lubricating bearings. If you
feel they must be lubricated, use only a
dry, powdered graphite type lubricant
sparingly."
10
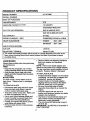
=RODUCT SPECIFICATIONS
MODEL
NUMBER
SERIAL
NUMBER
917.377960
)ATE OF PURCHASE
HORSEPOWER:
6.75
GASOLINE
1.5 QUARTS
CAPACITY/TYPE:
UNLEADED
OIL TYPE (API-SF/SG/SH):
REGULAR
SAE 30 (ABOVE
32°F)
SAE 5W-30 (BELOW
OIL CAPACITY:
SPARK PLUG(GAP:
32°F)
27 OZS.
.030")
CHAMPION
VALVE CLEARANCE:
RJ19LM
or J19LM
INTAKE:
.004 - .008
EXHAUST:
.004 - .008
;OLID STATE IGNITION
AIR GAP:
.0125 IN.
BLADE BOLT TORQUE:
35-40 FT. LBS.
The model and serial numbers will be found on a decal attached to the rear of the
lawn mower housing.Record
provided above.
LAWN
both serial number and date of purchase in space
MOWER
Always obsewe safety rules when performing
any maintenance.
TIRES
• Keep tiresfree of gasoline,oil,or insect
controlchemicalswhich can harm robber.
• Avoidstumps,stones,deep ruts,sharp
objectsand otherhazards that may cause
tire damage.
BLADE CARE
For best results, mower blade must be
kept sharp.
Replace bent or damaged
blades.
TO REMOVE
BLADE
• Disconnect spark plug wire from spark
plug and place wire where it cannot
come in contact with spark plug.
• Turn lawn mower on its side. Make sure
air filter and carburetor are up.
• Use a wood block between blade and
mower housing to prevent blade from
turning when removing blade bolt.
• Protect your hands with gloves and/or
wrap blade with heavy cloth.
• Remove blade bolt by turning counterclockwise.
• Remove blade and attaching hardware
(bolt, lock washer and hardened
washer).
NOTE: Remove the blade adapter and
check the key inside hub of blade adapter.
The key must be in good condition to work
properly. Replace adapter if damaged.
TO REPLACE
BLADE
• Posit:Ion the blade adapter on the engine
crankshaft. Be sure key in adapter and
crankshaft keyway are aligned.
• Position blade on the blade adapter
aligning the two (2) holes in the blade
with the raised lugs on the adapter.
• Be sure the trailing edge of blade
(opposite sharp edge) is up toward the
engine.
• Install the blade bolt with the lock
washer and hardened washer into blade
adapter and crankshaft.
• Use block of wood between blade and
lawn mower housing and tighten the
blad e bolt, turning clockwise.
• The recommended tightening torque is
35-40 ft. Ibs.
IMPORTANT:
BLADE BOLT IS GRADE 8
HEAT TREATED.
11
SHARPENBLADE
_TE: We do not recommend sharpening
de - but if you do, be sure the blade is
anced.
re should be taken to keep the blade
anced. An unbalanced blade will cause
mtual damage to lawn mower or
line.
"he blade can be sharpened with a file
)r on a grinding wheel. Do not attempt
o sharpen while on the mower.
"o chock blade balance, drive a nail into
I beam or wall. Leave about one inch of
he straight nail exposed. Place center
lole of blade over the head of the nail.
f blade is balanced, it should remain in
t hodzontal position. If either end of the
)lade moves downward, sharpen the
)eavy end until the blade is balanced.
Blade
Crankshaft
keyway
• If you remove the drive pinions, wipe
clean with dry cloth. Reassemble dry.
Do not lubricate. Do not use oil or
grease.
• The pinion gear, on both sides of the
mower, are the same, however, they
must be installed correctly. If installed
incorrectly, the drive system will not
work.
• There are arrows embossed on both
sides of the pinion gear. With the arrow
at the top of the pinion, the arrow must
point towards front of mower. If the
arrow points to the rear, turn the pinion
around and assemble to mower.
• Place wheels back on adjuster axles.
• Replace Iocknuts and hubcaps.
Correct
Blade
Pinion
.de
,\
Locknut
sher
Hardened
washer
Trailing
edge
Crankshaft
Dustcover
adaptor
Washer
]ASS CATCHER
The grass catcher may be hosed with
Nater, but must be dry when used,
Check your grass catcher often for
damage or detedoration. Through
normal use it will wear. If catcher needs
replacing, replace only with a manufac:
lurer approved replacement catcher.
Give the lawn mower model number
when ordering.
:lIVE WHEELS
lock rear drive wheels each time you
_w to be sure they move freely. The
1eels not turning freely means trash,
ass cuttings, etc., may be inside the
ive wheel and dust cover area and must
Jcleaned out to free drive wheels.
necessary to clean the drive wheels,
_ockboth rear wheels.
Hubcap
ENGINE
LUBRICATION
Use only highqualitydetergentoilratedwith
API serviceclassificationSF, SG or SH.
Selectthe oil'sSAE viscositygrade according
to yourexpectedoperatingtemperature.
SAE VISCOSITY
GRADES
-2O"
40"
"20"
-IO'
0"
T_MFIERATURE RANGE ANTK_PATED
20"
30"
BEFORE NEXT OfL CHANGE
NOTE: Althoughmulti-viscosity
oils(5W30,
10W30 etc.) improvestartingin coldweather,
thesemulti-viscosity
oilswillresultin increased
oilconsumption when usedabove 32°F.
Check yourengine oil level more frequent_ to
avoid possible engine damage from running
Remove hubcaps and Iocknuts.
:
low on o
Remove wheel_ from wheel adjuster
_
Change the o after every 25 hours of
axles.
_
operation or at least once a year if the lawn
Remove any trash or grass cuttings froth
mower ls net used for 25 hours in one year.
inside the dust cover, pinion and/or dd_,e
wheel gear teeth.
! 12
Check the crankcase oil level before starting
the engine and after each fk,e (5) hours of
continuous use. Ttghten o'dplug securely each
time you check the oil level.
TO CHANGE ENGINE OIL
NOTE: Before tipping lawn mower to drain oil,
drain fuel tank by running engine until fuel tank
is empty.
• Disconnect spark plug wire from spark plug
and place wire where it cannot come in
contact with spark plug.
• Remove engine oil cap; lay aside on a clean
surface.
• Tip lawn mower on its side as shown and
drain oil into a suitable container. Rock lawn
mower back and forth to remove any oil
trapped inside of engine.
• Wipe off any spilled oil on lawn mower and
onsideofengine.
• Fill engine with oil. Fill only to the =FULL"
line on the d'_ostk:k.DO NOT OVER FILL
• Replace engine oil cap.
• Reconnect spark plug wire to spark plug,
Cover knob
Air filter cover
Hinge
Paper filter
MUFFLER
Inspectand replacecorroded muffler as it
could create afirehazard and]or damage.
SPARK PLUG
Change your spark plug each year to make
your engine starteasier and runbetter. Set
spark pluggap at .030 inch.
CLEANING
IMPORTAN'£: For best performance, keep
mower housing free of built-up grass and trash.
Clean underside of mower housing after each
use.
Container
AIR
FILTER
Your engine will not run properly and may
be damaged by using a dirty air filter.
Replace the air fitter every year, more
often if you mow in very dusty, dirty
conditions. Do not wash air filter.
TO CHANGE
AIR FILTER
• Loosen cover knob.
• Swing cover down and remove from
hinge.
• Pull paper filter out of air cleaner body.
• Clean air cleaner cover and body.
• install a new paper fitter.
• Reinstall cover to air cleaner body. Be
sure hinge is assembled properly.
• Swing cover up and tighten cover knob.
(Do not overtighten).
CAUTION: Disconnect spark plug wire from
sparkplugand place wire where itcannot
come incontactwiththespark plug.
• Clean the underside of your lawn mower
by scraping to remove build-upof grass
and trash.
• Clean engine often to keep trash from
accumulating. A clogged engine runs
hotter and shortens engine life.
• Keep finished surfaces and wheels free
of all gasoline, oil,etc.
• We do not recommend using a garden
hose to clean lawn mower unless the
electrical system, muffler, air filter and
carburetor are covered to keep water
out. Water in engine can result in
shortened engine life.
13
CAUTION: BEFORE PERFORMING
SERVICE OR ADJUSTMENTS:
ANY
•
•
Release controlbar.
Make surethe bladeand all moving
parts have completelystopped.
•
Disconnectsparkplugwirefrom
sparkplugand place where itcannot
come in contactwithplug.
LAWN MOWER
TO ADJUST CU'I'rlNG HEIGHT
See 'TO ADJUST CUTI'ING HEIGHT" in the
Operationsectionofthis manual.
REAR DEFLECTOR
The rear deflector,attachedbetweenthe rear
wheeis ofyour lawn mower,isprovidedto
minimizethe possibilitythat objectswillbe
thrownout the rear of the lawnmower intothe
operator'smowingposition. Ifthe rear
deflector becomesdamaged, it shouldbe
replaced.
TO ADJUST HANDLE
The handieon yourlawn mower has three (3)
height pesitions - adjustto heightthat suits
yOU.
• Squeeze the bottomends of lowerhandle
towardseach otheruntilthe pinin handle
can be insertedintoone ofthe three height
adjustment
hofes.
Handle pin
Hi
Med.Low
J
3-position
Handle
adjustment
bracket
ENGINE
ENGINE SPEED
Yourengine speed has been factory set. Do
not attemptto increaseenginespeed or it
may resultin personalinjury.Ifyou believe
that the engineis runningtoo fast ortoo slow,
take your lawnmowerto an authorized
servicecenter/departmentfor repairand
adjustment.
CARBURETOR
Yourcarburetor has a non-adjustablefixed
mainjet for mixturecontrol. If yourengine
does notoperate properlydue to suspected
carburetor problems, take your lawn mowarto
an authorized service center/department for
repairand adjustment.
IMPORTANT: Never tamper withthe engine
governor,whichis factory set for properengine
speed. Overspeecingthe engineabove the
factoryhighspeed settingcan be dangerous.
it youthink the engine-governedhighspeed
needs adjusting,contactyour nearest
AUTHORIZED servicecenter, whichhas
properequipmentand experienceto make
any neceesarya_stments.
14
Immediately
prepareyourlawnmowerfor
storageattheendoftheseasonor iftheunit
willnotbeusedfor 30 days or more.
LAWN MOWER
When lawn mower is to be stored for a period
of time, clean it thoroughly, remove all dirt,
grease, leaves, etc. Store in a dean, dry area.
• Clean entire lawn mower (See "CLEANING"
in the Maintenance section of this manual).
• Lubricate as shown in the Maintenance
section of this manual.
• Be sure that all nuts, bolts, screws, and pins
are securely fastened. Inspect moving
parts for damage, breakage end wear.
Replace if necessary.
• Touch up all rusted or chipped paint
surfaces; sand lightly before painting.
HANDLE
ENGINE
FUEL SYSTEM
IMPORTANT: It is importantto preventgum
depositsfromformingin essentialfuel system
partssuchas carburetor,fuel filter,fuel hose,
ortank duringstorage. Also, experience
indicatesthat alcoholblendedfuels (called
gasoholor usingethanolor methanol) can
attract
moisturewhich leads to separationand
formation of acidsduring storage.Acidicgas
can damage the fuel system of an engine
whilein storage.
• Drain the fueltank.
• Stad the engineand let itrun untilthefuel
linesand carburetorare empty.
• Never use engineor carburetorcleaner
productsin thefuel tank or permanent
damage may occur.
• Use freshfuel next season.
• You can fold your lawn mower handle for
storage.
• Loosen the two (2) handle knobs on sides of
the upper handle and allow handle to fold
down to the rear.
NOTE: Fuel stabilizeris an acceptable
alternativein minimizingthe formation offuel
gumdepositsduring storage. Add stabilizerto
gasolinein fuel tank orstoragecontainer.
Alwaysfollow the mix ratiofound on stabilizer
container. Runengine at least 10 minutes
afteraddingstabilizerto allow the stabilizerto
reach thecarburetor. Do not drainthe gas
tankand carburetor if usingfuel stabilizer.
ENGINE OIL
• Squeeze the bottom ends of lower handle
toward each other until pins in handle clear
the brackets and pivot entire handle
assembly forward and allow it to rest on
mower.
• When setting up your handle from the
storageposition, the lower handle will
require manually locking into the mowing
position.
IMPORTANT: When folding the handle for
storage or trar_tion
be sure to fold the
handle as shown oryou may damage the
control cables.
Drain oil (withenginewarm) and replacewith
clean engineoil. (See "ENGINE" in the
Maintenancesectionof this manual).
CYUNDER
• Remove spark plug.
• Pour one ounce (29 mi) of oil through spark
plughole intocylinder.
• Pullstaderhandle slowlya few times to
distributeoil.
• Replace with new spark plug.
OTHER
Operator presence
control bar
Upper handle
Lower
handle
• Do notstore gasolinefrom one seasonto
another.
• Replace yourgasoline can ifyourcan starts
to rusL Rustend/or dirtin your gasoline will
cause problems.
• If possible,storeyour unitindoorsand cover
itto giveprotectionfrom dustand dirL
• Cover your unitwith a suitableprotective
coverthat does not retain moisture. Do not
use plastic. Plasticcannotbreathe which
allows condensationto form and willcause
position
your unit to rust.
15
IMPORTANT: Never cover mowerwhile
engine and exhaust areas are stillwarm.
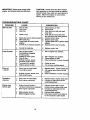
TROUBLESHOOTING
Loss of power
CORRECTION
2.
3.
Dirty air filter.
Out of fuel.
Stale fuel.
2.
3.
4.
Water in fuel.
4.
5.
6.
7.
5.
6.
7.
8.
Spark plug wire is disconnected.
Bad spark plug.
Loose blade or broken blade
adapter.
Control bar in released position
8.
Clean/replace air filter.
Fill fuel tank.
Drain tank and refill with fresh
clean fuel.
Drain fuel tank and carburetor
and refill tank with fresh gasoline.
Connect wire to plug.
Replace spark plug.
Tighten blade bolt or replace blade
adapter.
Depress control bar to handle.
9.
Control bar defective
9.
Replace control bar.
1.
1. Set in "Higher Cut" position.
5.
6.
Rear of lawn mower
housing/blade dragging
in heavy grass.
Cutting too much grass.
Dirty air filter.
Buildup of grass, leaves
and trash under mower.
Too much oil in engine.
Walking speed too fast.
1.
2.
Worn, bent or loose blade.
Low engine speed.
1.
2.
3.
4.
Poor cut
- uneven
the lawn mower
inside a building
an open flame or
to cool before
CHART
CAUSE
PROBLEM
Will not start
CAUTION:
Never store
with gasoline in the tank
where fumes may reach
spark. Allow the engine
storing in any enclosure.
! 3.
1,
2. Set in "Higher Cut" position.
3. Clean/replace air filter.
4. Clean underside of mower housing
5.
Check oil level.
6.
Cut at slower walking speed.
.
2.
Replace blade. Tighten blade bolt.
Set engine speed control in fast
position.
Clean underside of mower housing
Buildup of grass, leaves, and
trash under mower.
3.
1. Replace blade. Tighten blade bolt.
2. Contact an authorized service
center/departmant.
Excessive
vibration
1.
2.
Worn, bent or loose blade.
Bent engine crankshaft.
Starter rope
hard to pull
1,
Engine flywheel brake is
1. Depress control bar to upper
on when control bar is released.
handle before pulling starter rope.
Bent engine crankshaft
2. Contact an authorized service
centerldepartment.
Blade adapter broken.
3. Replace blade adapter.
Blade dragging in grass.
4. Move lawn mower to cut grass or
to hard surface to start engine.
i
2.
3.
4.
16
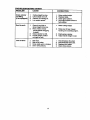
TROUBLESH(
PROBLEM
OTING CHART
CAUSE
CORRECTION
Grass catcher
not filling
(If so equipped)
1.
2.
Cutling height too low.
Uft on blade wom off.
3.
4.
Catcher not venting air.
Low engine speed.
Hard to push
1.
Grass is too high or
wheel height is too low.
Rear of lawn mower
housing/blade dragging
in grass.
Grass catcher too full.
Handle height position
not right for you.
2.
3.
4.
Loss of drive
1.
Belt wear.
2.
3.
4.
Belt off of pulley.
Drive cable worn or broken.
Dirt in drive pinions.
17
1.
2.
3.
4.
Raise cutting height.
Replace blade.
Clean grass catcher.
Set engine speed control in
fast position.
1. Raise cutting height.
2.
Raise rear of lawn mower
housing one (1)setting higher.
3.
4.
Empty grass catcher.
Adjust handle height to suit.
1.
2.
3.
4,
Check/replace ddve belt.
Check/reinstall ddve belt.
Replace drive cable.
Clean ddve pinions,
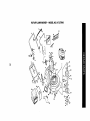
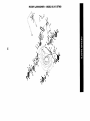
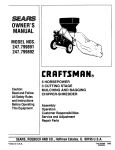
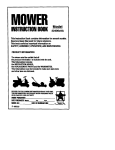
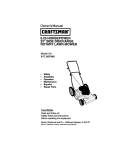
ROTARY LAWN MOWER - - MODEL NO. 917.377960
CO
(3)
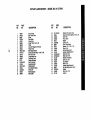
ROTARY LAWN MOWER - - MODEL NO. 917.377960
KEY
NO.
co
1
2
3
4
5
6
7
8
9
10
11
12
13
14
15
16
17
19
19
20
21
22
23
24
25
25
27
28
29
30
31
32
33
34
35
36
37
PART
NO
167163
161105X479
131036
132001
63601
66426
131959
87692
164265
161551
73990500
51793
162949
850733X004
83816
162085
161548
165261
166907
161568X479
168227X479
150078
163183
63124
161333
163409
161550
88652
166036X479
851514
159267
851074
850263
851084
166032
166385
150406
DESCRIPTION
Handle, Upper DIx Comf. (Includes Gdp)
Handle, Lower
Bail, Cont. Wire DIx Comf. BIk
Guide, Rope, Side
Nut, Hex Lockwasher 1/4-20
Wire, Tie
Bolt, Handle 5/16-18 x 1.75
Knob, Handle
Grip, Hdl Foam Smooth
Bolt, Sq. Neck
Nut, Hex Lockwasher Ins. 5/16-18 UNC
Cotter, Hairpin
Engine control
Bracket, Upstop
Screw, Hex Washer Head Tapping 10-2
Kit, Door Rear
Seal, Door
Plug, Mulcher
Kit, Housing
Handle, Bracket Asm. Left
Handle, Bracket Asm. Right
Screw, Hex Wshd
Bolt, Hex Head 5/16-18 x 5/8
Nut, Hex Lock Wshr 5/16-18
Baffle, Side
Screw 12 x 5/8
Skirt
Screw, Hinge 1/4-20 x 1.25
Belt Cover, Top
Adapter, Blade w/key Longer
Blade, 21"
Washer, Hardened
Lockwasher, Helical Spring 3/8
Screw, Hax Head 3/8-24 x 1.38
Pulley, Fixed
Bearing Support Assy.
Bolt, Engine
KEY
NO.
PART
NO
38
.....
39
40
41
45
46
47
48
49
50
51
52
53
54
55
56
57
58
59
60
61
62
63
64
65
66
67
68
---
169294
161358
85463
166034
166041
1200014
85179
166039X007
54583
166045
166115
166037
750097
166383X479
68038
166391X004
57808
166042
166050
145212
155552
166022X007
166043
160829
166885
166028
88349
161058
169206
DESCRIPTION
Engine (See Breakdown)
Craftsman 143.996710
Grass Catcher Bag
Grass Catcher Frame
Danger Decal
Rod, Pulley Engage
Bushing
E-ring
Retainer Clip
Clamp
Screw
Spacer
Sallevilla Washer
Belt Cover, Bottom
Screw
Cable Support Bracket
Nut
Bracket Assy.
Screw
V-Groove Pulley
Idler Arm Spacer
Range Nut
Locknut
Idler Arm
Idler Pulley
Shoulder Bolt
Door Assy.
Multi Cut Guard
Nut
Warning Decal (Not Shown)
Owner's Manual
Available accessories not included with lawn mower:.
71
33623
Gas Can (2.5 gal.)
71
33500
Fuel Stabilizer
71
33300
SAE 30W Oil (27 oz.)
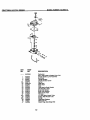
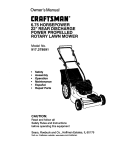
ROTARY LAWN MOWER - - MODEL NO. 917.377960
11,
23
r.o
41
24
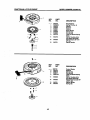
ROTARY LAWN MOWER - - MODEL NO. 917.377960
KEY
NO.
CD
1
2
3
4
5
6
7
8
9
10
11
12
13
14
15
16
17
18
t9
20
21
22
PART
NO
166047
167259
54583
167498
161537
750634
166060
132010
166049
166021X004
17541011
166189
166388
145354
57079
161584X479
161602
160477X004
167650
12000022
163365
166849
DESCRIPTION
Drive Control
Bail Control Drive
Screw
Ddve Cable
Cover Drive
Screw Thdro110-25 x .50
V-Belt
Nut Lock Ranged 3/8-16 Zinc
Pulley Driven
Belt Keeper Bracket
Screw Hex Wash Head 10-24 X .668
Pivot Rod Cover
Transmission Asm.
Pin Spdng Thrust
Washer Hardened
Rod Connecting
Spdng Extension
Spdng Selector
Knob Selector Spdng
E-Ring 7/8
Baadng Support
Baadng Ball
KEY
NO.
23
24
25
26
27
28
29
30
32
33
34
35
36
37
38
39
40
41
42
43
44
45
PART
NO
161118X004
57808
166453
166450
52160
12000058
88080
67725
150342
145212
150181
160785 X004
160786X004
161463
163409
700279
150339
150182
83923
19572216
144929
751152
DESCRIPTION
Retainer Drive Asm. Strop,
Screw Hex Head Tapping 1/4-20 x .75
Drive Pawl
Pinion, Drive
Washer
E-Ring 7/16
Cover, Dust Wheel
Washer 1/2x 1-112 x.134
Wheel 9 x 2
Nut Hex Flange Lock
Hubcap, Mag Platinum 9"
Shaft Asm. Rear
Shaft Asm. Front
Retainer Front Shaft
Screw 12 x 5/8
Clip Retainer
Wheel 8 x 2
Hubcap, Mag Platinum 8"
Nut, Hex Flange Lock 3/8-16
Washer
Screw 1/4 x 2.12
Locknut
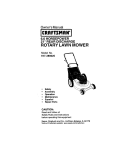
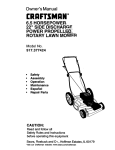
CRAFTSMAN
4-CYCLE
MODEL NUMBER 143.996710
ENGINE
93
301
_262
2_L
lglA_
e
I
i
/
292
310
307
277
12
45
187A
3O
40
38O
41
42
251
4O
MODEL NUMBER 143,996710
CRAFT_;MAN4-CYCLE ENGINE
KEY
NO.
1
2
6
9
10
11
12
12C
14
15
16
17
18
PART
NO.
36177
27652
36O59
59o568
360GZ
36003A
32447
36005A
28277
36OO6
36(X_
31335
651018
19
20
25
36103
36010
37149
26
30
4O
4O
65O802
36178
4OOO4
4OO05
41
36070
41
36071
42
42
43
45
4OOO6
4O007
2O381
35O23A
46
48
50
52
69
70
32610A
36030
36031A
29914
36032A
37271
75
80
81
82
36010
30574A
30590A
3O591
83
85
86
89
90
91
92
93
100
101
103
36057
36O34
650924
611154
611155
611156
650815
650816
34443B
610118
651007
110
119
120
125
36054
36061
36187
36471
125
126
36472
29314C
130
135
6021A
35395
150
31672
KEY
NO.
PART
NO.
Cylinder(Incl.2,10,12,20 &
126)
Dowel Pin
Breather Element
Screw, 10-24 x3/4"
BreatherValve Body
Check Valve
BreatherTube
* BreatherCover & Gasket
FlatWasher
GovernorRod (Machined)
GovernorLever
GovernorLeverClamp
Serew, TorxT-15, 6-32 x
19/64"
GovernorSpring
Oil Seal
BlowerHousingBalfle
151
151A
169
172
174
177
184
186
187A
190
191A
192
193
194
195
198
199
239
31673
40016A
27234A
32755
30200
65O925A
36183
36009
37148
36013
36012
36016
36015
36014
610973
36017
36018
36048
_mw, 1/4-20 x 5/8"
Cranl_lt
Pi_on,Pin,FU_ Set (_d.)
P_on,Pin,Ring Set (o010
OS)
Piston& Pin Ass'y.(Std.)
(Ind. 43)
Piston& Pin Ass'y.(.010
OS)(Ind.4o)
Ring Set (Std.)
Ring Set (.010 OS)
PistonPin RetainingRing
ConnectingRod Ass'y.
(Incl.46)
ConnectingRod Bolt
Valve Lifter
Camshaft(MCR)
Oil PumpASS'y.
* Mour_ng FlangeGasket
MounlJngFlange(Ind. 72
thru85)
Oil Seal
GovernorShaft
Washer
GovernorGear Ass'y.
(Incl.81)
GovernorSpool
IdlerGear
Screw, 1/4-20 x 1-9/16"
FlywheelKey
Flywheel
FlywheelFan
BellevilleWasher
FlywheelNut
SolidState IgniUon
SparkPlugCover
Screw,To_xT-15, 10-24 x
15/16"
GroundWire
* CylinderHead Gasket
240
36190
DESCRIPTION
243B
651O41
245 36046
25O
36161
251
65ofl28
261A
650933
255
361fl_
256
650983
26O
36188
262
650737
263A
361
275
36107A
276
36043
277
650927
285
34449A
287
650926
290
29774
292
26460
300
36189
301
36246
305
36063
307
35499
308
36040
310
36064
346A
28763
347
65O898A
350
36045
370A
36261
370C
37318
370R
37317
380
390
400
590739
36062D
416
36085
417
65O8_1
CylinderHead
ExhaustValve(Std.)(Ind.
900
151)
ExhaustValve (1/32" OS)
IntakeValve (Std.)(Incl.
151)
Screw,5/16-18 x 1-1/2"
ResistorSpan'<Plug
(FU19LM)
900
DESCRIPTION
LowerValve SpringCap
Intake Valve Seal
* Valve SpringBoxGa._et
Valve SpringBox Cover
Screw, 10-24 x 9/16"
Carburetc¢Mauniing Stud
CarburetorGasket
GovernorLink
Air Baffle
BrakeLeverAss'y.
BrakeControlLever
BrakeControlLeverLink
BrakeSp_ng
RetainingRing
TerminalAss'y.
BrakeControlLeverSpdng
BrakeLeverBoshing
* Carburetor To Air Cleaner
Gasket
Air Cleaner Body(Ind. 239
&350)
Air CleanerStud
Air Cleaner Filter
Air CleanerCover
LockNut, 1/4-20
Wing Nut, 114-20
ControlPlate
Screw,8-32 x 21/64"
BlowerHou_ng
Screw, 1/4-20 x 1/2"
StarterGrill
Muffler
LockingPlate
Screw, 5/16-18 x 2-11/32'
StarterCOp
Screw,8-32 x 21/64"
Fuelline
Fuelline Clamp
FuelTank (Incl.301)
FuelCap
Oil RII Tube
"O" Ring
RHTube CI_
DipslJck
Screw, 10-3_ x35/64"
Screw, 10-32 x27/32"
Pnmer
LubricationDecal
PdmerDecal
Warning Decal
Carburetor (Incl.184,187A
&239)
RewindStarter
Gasket Set (Incl.items
Marked *)
,SparkAn'e._ _ (ind.
417)(opeonal)
Screw, 10-32 x 1/2"
(OpUonal)
_cemant
Engine
NONE
ReplacementShodBlock
75O791C,
orderfrom71-999
RPM High 2900 to3200
NOTE: This engine couldhave b_n builtwith59070_
starter.
NOTE: Allcomponentdimensionsgivenin U.S. inches
1 inch= 25A mm
vak,e Spring
41
CRAFTSMAN 4-CYCLE ENGINE
MODEL NUMBER 143.996710
I
I
I
I
I
I
I
PART
NO.
NO.
DESCRIPTION
_A
1
5
6
7
14A
25
27
28
29
3O
32
33
36
37
37A
38
38A
39
40
47
Carburetor
(Ind. 187B & 239 of Engine Parts List)
Throttle Shaft & Lever Assembly
Dust Seal
Throttle Shutter
Throttle Shutter Screw
Ventud
Float Bowl
Float Shaft
Roar
Float Bowl to Body Gasket
Inlet Needle & Seat
Bowl Drain Screw
Bowl Drain Washer
Main Nozzle Tube
"O" Ring
"O" Ring, Main Nozzle Tube
Spdng, Main Nozzle Tube
Spdng
Float Bowl Retainer
Main Fuel Jet
Welch Plug, Idle MixingWell
_2_9
_2593
_2_1
6505_
632773
_2_5A
_2544
_2_3
_2_8
6327_
_26_
_26_
_2_7
_2_7
_2_5
_2_5
_2_9
_21
632554
42
CRAFTSMAN 4-CYCLE ENGINE"
MODEL NUMBER 143.996710
h
I1
KEY
NO.
m--
1
2
3
4
5
6
7
8
PART
NO.
590702
590599A
59O6OO
590696
590601
590697
590698
590699
590700
11
590703
12
590535
13
590701
DESCRIPTION
Recoil Starter
Spring Pin (IncL 4)
Washer
Retainer
Washer
Brake Spdng
Starter Dog
Dog Spring
Pulley & Rewind Spring
Ass'y.
Starter Housing Ass'y.
(40 degree grommet)
Starter Rope ( 98" X 9/
64" dla.)
Starter Handle
--$
Vii4
KEY
NO.
--m
3
6
7
8
r
43
PART
NO.
590739
590740
590616
590617
590618A
11
59O638
12
590535
13
14
590701
590760
DESCRIPTION
Rewind Starter
Retainer
Starter Dog
Dogsp_ng
Pulley & Rewind Spdng
Ass'y
Starter Housing Ass'y
(40degreegrommat)
Starter Rope (Length 98"
x 9/64"dia.)
Starter Handle
Spdng Clip
For in-home major brand repair service:
Call 24 hoursa day, 7 days a week
1-800-4-MY-Home
s" (1-800-469-4663)
Para pedir servicio de reparaci6n a domicilio
1-800-676-5811
In Canada for all your service and parts needs call
Au Canada pour tout le service ou les pi_ces
1-800-665-4455
For the repair or replacement parts you need:
Call 6 am-11pm CST, 7 days a week
PartsDirect
1-800-366-PART
sM
(1-800-366-7278)
Para ordenar piezas con entrega a domicilio
1-800-659-7084
For the location of a Sears Parts and RepairCenter
in your area:
Call 24 Hours a day, 7 days a week
1-800-488-1222
For information on purchasing a Sears Maintenance
Agreement or to inquire about an existing Agreement:
Call 9 am-5 pm, Monday - Saturday
1-800-827-6655
169206
03.09.99
VB
Pdntedin
U.S.A,