1
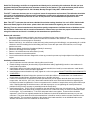
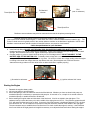
QUICK FUEL TECHNOLOGY®
Installation Instructions
HOT ROD SERIES CARBURETORS
SLAYER SERIES CARBURETORS
SUPER STREET SERIES CARBURETORS
HR-580-VS 580 CFM Vac. Secondary !
!
!
SS-680-VS 680 CFM Vac. Secondary
HR-680-VS 680 CFM Vac. Secondary !
!
!
SS-735-VS 735 CFM Vac. Secondary
HR-780-VS 780 CFM Vac. Secondary !
!
!
SS-780-VS 780 CFM Vac. Secondary
HR-600 600 CFM Mech. Secondary
!
!
!
SS-880-VS 880 CFM Vac. Secondary
HR-650 650 CFM Mech. Secondary
!
!
!
SS-650 650 CFM Mech. Secondary
HR-750 750 CFM Mech. Secondary
!
!
!
SS-750 750 CFM Mech. Secondary
HR-850 850 CFM Mech. Secondary
!
!
!
SS-650-AN 650 CFM Mech.Secondary
SS-650-E85 650 CFM Mech. Sec.
!
!
!
SS-750-AN 750 CFM Mech. Secondary
SS-750-E85 750 CFM Mech. Sec.
!
!
!
SS-830 830 CFM Mech. Secondary
SS-850 850 CFM Mech. Secondary
!
!
!
SL-600-VS 600 CFM Vac. Secondary
SL-750-VS 750 CFM Vacuum Secondary
Please Stop and Read these Instructions before proceeding. If you do not fully
understand the installation and tuning instructions you should seek professional
help. Failure to follow the proper installation and tuning may result in damage or
injury.
Quick Fuel Technology®
129 Dishman Lane
Bowling Green, KY 42101
270-793-0900
www.quickfueltechnology.com
Quick Fuel Technology would like to congratulate and thank you for purchasing this carburetor. We feel you have
purchased the finest street performance carburetor currently on the market. If you need assistance please call the
QFT Sales and Tech Support staff @ 270-793-0900, Monday through Friday 8AM – 5PM central time.
This QFT™ carburetor has been ran on an engine to insure all components are functional. The calibration should be
very close for all adjustments. Different engine combinations could require adjustment of idle mixture, idle speed
and main jets. The fuel level was set with 6 ½ lbs. of fuel pressure. The recommended fuel pressure for this
carburetor is 6 ½ PSI.
Note: This QFT™ carburetor has not been submitted for emission testing, therefore it is not C.A.R.B. (California Air
Resources Board) legal in all 50 states - please check with local authorities regarding the use of this carburetor.
Warning: There are several manufacturers that produce quality components to facilitate the use of kickdown on the
Hot Rod Series Carburetors with an overdrive transmission. Please insure you have the proper hardware before
using this carburetor and that it is installed per the manufacturers specifications.
Remove old carburetor:
1. Disconnect negative battery terminal to prevent any accidental arcing in the presence of fuel.
2. Remove air cleaner, PCV hose and any other vacuum lines connected to the carburetor. For future reference identify
the vacuum lines to ensure proper re-connection.
3. Remove fuel line(s)…be careful not to twist fuel line(s) when removing fuel inlet fitting(s), use penetrating oil or similar
chemical to assist in breaking the fuel inlet fitting nut loose. Protect the open ends of the fuel lines, so no foreign
particles can enter.
4. Disconnect electric choke wires if equipped (identify if necessary).
5. Disconnect all linkage and return springs.
6. Remove the 4 hold down nuts and washers (if used).
7. Remove carburetor from intake manifold.
8. Cover intake manifold carburetor flange with a clean rag or towel to prevent any foreign objects from falling into the
engine.
Installation of New Carburetor
1. Set old carburetor and new carburetor side-by-side on work bench.
2. Examine linkage connection (throttle cable [rod] and kickdown cable [if applicable]) transfer to new carburetor in
same location if possible.
3. Install flange gasket over intake manifold studs on intake manifold, then install your new carburetor. Install throttle
cable bracket on driverʼs side rear stud if applicable.
4. Install hold down nuts and washers (if used), tighten in a criss-cross pattern DO NOT TIGHTEN HOLD DOWN NUTS
COMPLETELY.
5. Attach throttle and kickdown linkage then operate from inside the vehicle to be certain there is no interference of
throttle plates, throttle linkage, accelerator pump arms or fast idle cam lever.
6. If there is no interference or resistance in throttle operation then you can tighten the hold down nuts to their final
torque value, 100 Inch Lbs. (8 Ft. Lbs.). Most intake manifold studs are a fine thread and therefore tightening the
hold down nuts must be tightened in a criss cross pattern and in a number of steps before arriving at the final torque
value. Rapidly tightening the hold down nuts to the final torque spec or over-tightening will cause performance
problems as this process can warp or potentially break the throttle body.
7. Install vacuum hoses. The PCV hose is installed on the rear 3/8” tube at the rear of the throttle body. This tube can
also accommodate power brake hose connection as well if PCV is either not used or is routed to a different location
on the engine. It is not advisable to “T” the PCV and power brake hose together. These two lines should be
separated. If the PCV was originally attached to the carburetor it should be installed the same way on your new
carburetor. The power brake hose must be attached then it should be routed to another vacuum connection in the
intake manifold. This connection should be to the plenum of the intake manifold, not an individual intake runner.
Vacuum connections to the new carburetor as shown below:
Timed Spark Port
PCV
(rear of carburetor)
Full Manifold
Vacuum
Timed Spark Port
Distributor vacuum advance may also be connected to the tube in the primary metering block.
!
Manifold vacuum is typically used for transmission modular or any accessory
that requires a full manifold vacuum signal, i.e. heat and/or A/C control, vacuum actuated fresh air induction, etc. . The
Ported or timed vacuum is typically used for the vacuum advance canister on the distributor if applicable. NOTE: some
distributor vacuum advance canisters require full manifold vacuum, not ported or timed vacuum.
Check the specifications for your distributor.
8. Install fuel inlet fittings DO NOT USE TEFLON® TAPE ON INVERTED FLARE FUEL INLET FITTINGS. Clean
threads and flare of any dirt and debris before installation. Check to be certain the fuel inlet fittings in the fuel bowl
are tight, then install the fuel line nuts. Tighten sufficiently to prevent fuel leakage.
9. Connect positive (+) wire for electric choke to an key on 12 volt voltage source. DO NOT CONNECT TO THE
BATTERY SIDE OF THE IGNITION COIL. Preferably check voltage with a volt meter to determine the correct
voltage. NOTE: battery voltage will be 12 volts or greater. You need to recheck the voltage reading when the engine
is running to be certain the voltage does not drop below 12.6 volts. (Some engines use a field wire from the
alternator that only produces 9.5 volts which does not allow the choke to operate properly.)
(-) Grounded to carburetor
(+) Ignition activated 12V source
Starting the Engine
1. Reattach the negative battery cable
2. You are now ready to start the engine.
3. Before attempting to start; the fuel bowls need to be filled with fuel. Whether you have an electric fuel pump or a
mechanical pump, it is necessary to operate the fuel pump for 15 seconds or so, a couple of 10 second cranks for
mechanical pumps, to enable the bowls to fill with fuel.
4. Before starting the engine make an initial check of the float level. If fuel is not visible in the sight glass. This
carburetor was pre-set at the factory to be in the middle of the sight glass at 6.5 P.S.I. Fuel pressure greater than 6.5
P.S.I. will cause the float level to be too high. Conversely, if the fuel pressure is significantly below 6.5 P.S.I. the float
level will be too low. For the carburetor to operate correctly the float levels must be in the middle of the sight glass.
The most accurate way to establish the correct float level is to check it while the engine is running. If the initial float
level is not visible in the sight glass then it might be necessary to re-adjust the float level before starting the engine.
Raise or Lower Float with a 5/8” wrench
Set fuel level in middle of window with engine
running at idle speed with proper fuel pressure
(note the arrows in the casting)
DO NOT ADJUST WITH ENGINE RUNNING
5. With the float level verified and correct, rotate the throttle to wide open twice. If the temperature is below 72 degrees,
the choke will close and the accelerator pump nozzles should discharge fuel. You can now start the engine.
6. It should not be necessary to continue operating the throttle while attempting to start the engine. If it does not start on
the first attempt, rotate the throttle a couple of additional times, then try starting the engine again. The engine should
start.
7. If the engine still will not start, try holding the throttle open slightly while starting in the event to much fuel entered the
engine while operating the throttle or the idle speed might be too low for your application.
8. Once the engine has started, the fast idle cam should raise the idle speed, however, if the fast idle is still too low then
you can adjust the idle speed screw behind the primary throttle lever. The engine should idle between 1,600 and
2,000 RPM. Let it idle at this speed for approximately 5 minutes. The choke should open on its own during this time
and be fully open (vertical position) after approximately 3 minutes (will vary with outside temperature).
9. After the engine has reached operating temperature and the choke has reached the open vertical position, rotate the
throttle open slightly, the idle speed should drop down between 700 and 1,000 RPM. If you had to adjust the idle
speed screw then turn it counter-clockwise to reduce the idle speed to the desired RPM.
10. If possible using a manifold vacuum gage, set the idle mixture screws to attain the highest manifold vacuum reading
at idle. It is not necessary to keep all four mixture screws at exactly the same number of turns from seated, but they
should be close to the same number of turns. Make adjustments in small increments of ¼ turn per adjustment. See
how the engine responds then adjust the mixture screws to smooth out the idle. Turning in one mixture screw could
not have any noticeable effect, if the other three mixture screws are out too far. The mixture screws should be
adjusted in conjunction with each other to achieve the proper mixture. When engineʼs RPM increases during the
adjustment process, adjust it back down to the desired rpm and continue mixture screw adjustment until the engine
RPM or vacuum drops. When the engine RPM or vacuum drop, the idle mixture is too lean and the mixture screws
will need to be backed out to the highest vacuum or RPM.
11. Turning the mixture screws in (clockwise) leans the mixture, turning the mixture screws out (counter-clockwise)
richens the mixture.
12. After you have attained the highest manifold vacuum (or best idle quality), with an automatic transmission apply the
brake then shift the transmission into gear. This will create a load on the engine and may change the idle
characteristics. With performance camshafts with longer duration it is often necessary to add a little more fuel
because the engine is not as efficient and therefore must be over fueled slightly to keep the engine from laboring
when a load is placed on the engine such as shifting the transmission into gear.
13. You are now ready to drive the vehicle. It may require some minor adjustments with the mixture screws and idle
speed but the engine should drive smoothly and have good throttle response.
14. Once you are satisfied with the general drivability then take the car out on the highway to determine how well the
engine runs while holding a steady RPM. Generally any RPM above 2,000 RPM the carburetor is operating off the
main metering system. The air fuel ratio in this system is usually controlled by the main metering jets. If the engine
surges while driving at a steady RPM on flat ground then the mixture is probably too lean and the main jets need to
be increased in size. If the engine labors and has difficulty holding a steady speed without opening the throttle more,
then the mixture is probably too rich. Ultimately, you should look at the spark plug color after 75 to 100 miles to help
determine the general air/fuel mixture the carburetor is delivering and the engine is operating. White plug color
indicates a lean mixture, dark gray or black indicates a rich mixture.
This carburetor has been calibrated to operate on a broad cross-section of engine combinations. While it is not
possible for a single calibration to work virtually every conceivable application it should work on most engines and it
will not be necessary to make any additional adjustments and/or tuning. Should it be necessary to alter the fuel
curve in our Hot Rod Series there is plenty of tuning capability available with changeable air bleeds, power valve
channel restrictions, and idle feed restrictions.
Adjustments & Tuning
Choke Adjustments - Choke Indexing
The electric choke cap is adjustable for varying conditions and personal preference should you desire. The normal choke
setting is for the choke plate to just barely close at 72 degrees Fahrenheit. Loosening the three screws securing electric
choke spring will allow the choke cap to rotate. Rotating the choke cap clockwise reduces the choke effect (lean) whereas
rotating the choke cap counter-clockwise increases the choke effect (rich).
Clockwise Rotation Leans Choke (closes higher temperature, opens faster)
!
!
Rotate to adjust
Clockwise rotation reduces temperature for choke to close and shortens the time for the choke plate to completely open. Full
clockwise rotation the choke will never close. Counter-clockwise rotation raises the temperature for the choke to close and
lengthen the time the choke plate is closed, so it will take longer for the choke plate to open to full vertical position.
!Fast Idle Speed
"The fast idle speed can be altered by adjust the fast idle speed screw, located as shown below. Easiest access is at wide
open throttle with the engine off. Ordinarily a good fast idle speed is approximately 1,600 RPM with the engine at normal
operating temperature. The correct procedure to check the fast idle is to manually open the throttle, close the choke plate
with your finger, release the throttle lever, then release the choke plate. This sets the fast idle cam. Start the engine without
touching the throttle lever or accelerator pedal. When the engine starts it will be at fast idle and you can adjust accordingly.
The fast idle screw has a 5/16” hex head however there is also a slot cut in the head so it can also be adjusted with a screw
driver. Access is somewhat limited especially with vacuum secondary carburetors so often times the easiest access is by hold
the throttle wide open (with the engine off of course) then either turn the screw clockwise to increase the fast idle speed or
counter-clockwise to lower the speed. Having an
assistant hold the throttle wide open makes this procedure much easier.
Loosen three retainer screws to adjust choke cap
Fast idle speed screw clockwise
increases fast idle RPM speed
Quick Fuel Technology®
129 Dishman Lane
Bowling Green, KY 42101
270-793-0900
www.quickfueltechnology.com