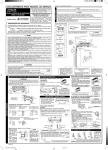
1
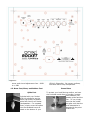
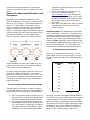
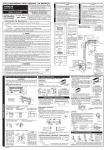
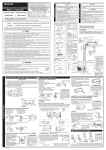
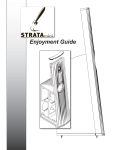
Your Rocket
UFW-10
Subwoofer
Enjoyment
Guide
Yours exclusively through
1001 Delaware Ave. • Suite C • Longmont, CO 80501 • Toll Free 1-877-543-7500 • e-mail: [email protected]
A Suggestion
Your Rocket UFW-10 subwoofer is carefully hand-packaged utilizing molded
foam inserts to protect its fine furniture-grade finish. Please use care when
unpacking your new subwoofer. When removing it from the box, hold the
wood sides of the cabinet, while taking care not to exert pressure on the front
cloth grille.
We strongly recommend that you save the foam inserts and shipping cartons
to protect your speakers, should you ever need to move or ship them to a
new location.
Thank you. And Congratulations!
Our thanks for buying Rocket Series speakers from AV123. We sincerely appreciate your confidence in us and our products.
Although we know these speakers represent extraordinary value, we also
know that the real test is how you feel about your speakers several months
from now. That’s why AV123 will continue to work hard to earn your respect
with technical advice and customer service that is second to none in our industry.
You can visit the AV123 website (www.av123.com) at any time for up-to-date
product information, answers to FAQ’s, or to seek advice from the AV123
community at our new online forum (www.av123forum.com).
Should you require that personal touch, please don’t hesitate to contact our
support department, toll-free, at (877) 543-7500. You’ll find our knowledgeable Technical Services Department eager and willing to help.
We ask you read this owner’s manual first. It contains many tips on getting
your new subwoofer set up, connected, configured, and performing its absolute best in your unique environment. We hope you find it clear, concise, and
useful.
Again, thank you for your support.
Your Rocket UFW-10 Subwoofer
Enjoyment Guide
Table of Contents
Introduction
Section 1—Product Overview
•
•
1.1 Control Panel Features
1.2 Brass Feet, Discs, and Rubber Feet
a. Spike Feet
b. Brass Discs
c. Rubber Feet
Section 2—Subwoofer Placement and Location
•
•
2.1 Subwoofer Placement
2.2 Subwoofer Location
Section 3—Connecting Your UFW-10 Subwoofer
Section 4—Setting Up Your Surround Processor or Receiver
•
•
•
•
4.1
4.2
4.3
4.4
Small or Large?
Simple Calibration
Crossover Settings
UFW-10 Phase Adjustment
Section 5—Advanced Calibration and Correction
•
•
•
5.1 Performing a Room Frequency Sweep
5.2 Interpreting the Results
5.3 Advanced Parametric EQ Adjustments
Section 6—Proper Care and Feeding
•
•
•
•
6.1
6.2
6.3
6.4
Warranty Policy and Terms
Stay in Touch!
UFW-10 Specifications
Miscellaneous
Thank you for your support
Introduction to AV123 and your new
Rocket UFW-10 Subwoofer
Section 1—Product Overview
1.1 Control Panel Features (see figure 1.1)
At AV123, our absolute highest
priority begins and ends with you,
the customer. You can rest assured that if you’re not 100% satisfied with your purchase within 30
days from your original receipt
date, you may return your product(s) for a
prompt refund in full (excluding shipping
charges) no questions asked. In addition to the
expert advice available on our website, or
through our trained advisors, there is simply not
a safer way to buy. At AV123, misleading and
high-pressure sales tactics are a thing of the
past. Not only do we offer you the tools and resources necessary to fully evaluate your purchase before the order is placed, we’ll back each
and every sale after the fact with our in-home
trial period.
We’ve done our best to provide you with products and services meeting or exceeding your expectations. However as good as our products
are, they do not match our dedication to each
and every sale. Should you need any further
assistance in the future with your A/V system,
you can bet that AV123 will be there supporting
and assisting you as you make your way to your
next level of audio/visual enjoyment.
The Onix Rocket UFW-10 (Ultra Fast Woofer) is a
very potent and agile subwoofer. Special care
and attention was given to the UFW to ensure
clean, accurate, and extremely detailed low-end
performance in both music and home theater
systems. Features include a 500-watt amplifier,
single band parametric equalizer, adjustable
crossover, and infinite phase adjustment for easy
in-room placement. This flexibility will result in a
seamless blend with all Onix loudspeakers, as
well as those from other manufacturers.
A. Power switch
B. Power On Indicator – Glows brightly when
the unit is on. Glows dimly when unit is
in standby. The unit will automatically
turn on in the presence of an audio signal.
Approximately 15 minutes of signal absence will cause the subwoofer to go into
standby mode. To fully turn off the unit,
please unplug it from the wall.
C. Line Fuse – The UFW-10 is equipped with
a 4-amp fast blow fuse. Always replace
with the same rating.
D. Power Cord – A standard IEC socket allows removal of the power cord.
E. LFE/MONO XLR (balanced) connection. If
your preamplifier has XLR output available, use this connection.
F. Audio Inputs – Standard RCA
(unbalanced) type cables will work here.
If your preamplifier or receiver has only
one sub out, use the R (L+R Summed)
connection.
G. Crossover In/Out switch – When set to
IN, the crossover is activated. When set
to OUT, the crossover is disabled.
H. Crossover Adjustment – This controls the
high-frequency cut off. Generally this is
set to 80Hz if used. We will cover this in
detail later in the manual.
I. Phase – This controls the phase of your
subwoofer relative to the rest of your
speakers. Rotate this dial in small
amounts while you listen at your listening
position for the most bass.
J. Gain – This control allows you to match
the output of your main/satellite speakers
to the sub. Set this to the lowest level
when powering your system for the first
time. When calibrating your system, do
not exceed 75% gain. You’ll want some
room for adjustment...try to avoid setting
the gain in either your receiver (through
the channel “trim” menus) or your subwoofer near maximum levels. Doing so
will also minimize the potential for a distorted input signal.
K. EQ – Single band parametric equalizer.
Includes controls for Frequency, Bandwidth and Level. Use these controls to
modify the frequency response at any
point. The frequency range is 20Hz to
80Hz…bandwidth from 0.1 to 1.0 oc-
Figure 1.1
taves…and a level adjustment from –15dB
to + 6dB.
1.2 Brass Feet, Discs, and Rubber Feet
Spike Feet
Included with your Rocket
UFW-10 subwoofer are the
same high quality threaded
spike feet used on all Rocket
Loudspeakers. For carpeted
floors, simply screw the spikes
into the threaded inserts located on the bottom of your
UFW-10 Subwoofer. On uneven surfaces,
use these feet to help compensate.
Brass Discs
To protect your hard flooring surface, we have
also included metal discs to provide a contact
point between your
speaker spikes and the
floor. To use, simply
place the disc under
the spike such that the
small indentation is
aligned with the point
of each foot.
Rubber Feet
As an alternative to both methods above we’ve
also included soft selfadhesive rubber bumpers
with your UFW-10 Subwoofer. These provide a
safe alternative to the metal
spikes, and will also absorb
any vibrations between the
subwoofer and underlying
surface. The choice is yours
for preference and practicality, but you'll find the results
to be very good either way.
Section 2—Subwoofer Placement
and Location
2.1 Subwoofer Placement
board 1 band parametric equalizer. As “boomy”
bass is often the result of the largest untamed
peak, we're confident that you will find this feature an indispensable tool for shaping your subwoofer into the way you'd like to hear it. Flat,
clean, and powerful. More on this in section 5.
2.2 Subwoofer Location
The low frequencies played by your UFW-10 subwoofer tend to be non-directional due the extraordinarily long wavelengths involved. As a
result, regardless of where your subwoofer is
placed, it should not be easily localized, but
should instead produce a balanced and enveloping response. Factors that can affect performance in this regard are rattles from shelves,
walls, or other nearby objects, as well as distorted output. If you are having issues with subwoofer localization, try to isolate any rattling or
buzzing objects, or place the sub in another corner of your room. If the sub's output is distorted, check to see that you are not at the
maximum sub level setting on your receiver or
pre/pro. An overdriven output can induce audible distortion. To resolve, you may need to turn
down the subwoofer level on your processor and
turn the gain level up on the subwoofer itself to
compensate.
Section 3—Connecting Your UFW-10
Subwoofer
Figure 2.1
Unlike regular loudspeakers, subwoofers will often work best when placed in a corner, even if
located a few feet to the side and/or behind the
closest main speaker. Typically the front right
and left corners sound the most natural, though
rear corner placement is also an acceptable option. The driver can be facing you or be pointed
along either wall. The low frequency sound
waves emitted by the UFW-10 are quite long and
will therefore interact greatly with the walls of
your room. As a result, even small placement
adjustments can have a significant impact on the
sound you hear. A room corner will provide
maximum output at a given power level, and the
maximum number of room modes will be excited, translating to a flatter response in most
rooms. Often one rather large peak in the subwoofer’s operational frequency range will stand
out with corner placement,. For this we've also
provided the UFW-10 with the ability to alter its
response for your new environment with an on-
NOTE: Please be sure your subwoofer is not
plugged in and the rest of your system is turned
off.
LFE Output
Or
Mono RCA/XLR Interconnect
L+R Summed Input
Figure 3.1
When making your connections, be sure to use a
high quality and reliable interconnect cable. It
should be shielded and long enough to do the
job, but not excessively long. Your subwoofer
cable is likely to be the longest interconnect in
your system.
The simplest and recommended connection between a home theater receiver or processor and
your UFW-10 Subwoofer is directly from the sub/
LFE output to the “R” (L+R summed) input on
the UFW-10. If your processor has a "balanced"
subwoofer output, it's use is recommended. See
figure 3.1.
If used with a 2-channel integrated amplifier, or
any source without a dedicated sub/LFE output,
you will need to use both the L and R inputs on
the UFW-10’s back panel from a low-level output
on your preamplifier or receiver. Often “Tape” or
“Monitor” outputs will provide an appropriate
low-level stereo signal if the dedicated output
does not exist. See figure 3.2 below…
Stereo R and L Output
Stereo pair RCA Interconnects
sub-80Hz information better than "most" loudspeakers in "most" rooms. This is mainly due to
the tendency for competing sources of information below 80Hz to result in destructive bass
wave cancellation, thus eliminating the very frequencies your subwoofer was designed to play.
In addition, when crossed over with your UFW10, the other loudspeakers in your system will
play with greater ease and less distortion, free
from the demands of deep and complex sub80Hz waveform reproduction.
Your speaker system amplifier will be less taxed
as well, since much of the stress of producing
deep bass will be eliminated. Consequentially
your loudspeakers should sound cleaner and
more controlled.
An easy and "user friendly" way to test different
methods and frequencies for crossing over your
subwoofer is to use low frequency sweeps recorded on special program material. One of our
favorite is the "AVIA Guide To Home Theater"
DVD. Specifically, the tones that descend in
frequency from the individual satellite speakers
to the subwoofer are quite useful and effective.
Using your SPL meter (explained in the following
sections), watch for the smallest amount of overall needle fluctuation while you direct and descend the tones from speaker to subwoofer as
you go around your system. In other words, the
point at which the signal transitions between
your satellites and subwoofer should be completely seamless and without definition.
4.2 Simple Calibration
Figure 3.2
Section 4—Setting Up Your Surround
Processor or Receiver
4.1 Small or Large?
Many of today’s surround processors and home
theater receivers will allow you to set all 5
speakers in your room to either small or large,
thus changing the way your UFW-10 interacts
with your system.
Like almost all things audio, which setting to use
is somewhat subjective, though it’s also a function of your room. By a good majority, most
rooms will obtain their best sound with all speakers set to "small" and crossed over to the UFW10 at 80Hz. Of course this is assuming the use
of a high performance subwoofer such as the
UFW-10. A strong sub ideally placed will handle
To begin configuring your subwoofer for optimum performance
(a) in your room and (b) in combination with your other loudspeakers, you’ll first need a Sound Pressure Level (SPL) meter. Radio
Shack sells an analog SPL meter
(shown to the left) that works very
well for this purpose. Set the meter
to "Slow" with a “C” weighting. The
dial should be set at either 70 or 80
depending on your pre/pro or receiver’s test tone
level. Consult your owner’s manual to determine
what reference point your unit uses. Most use
75dB, so the "70" setting on the meter would be
appropriate for them.
Let's start by setting the level of your sub to
match the rest of your speakers.
•
From the receiver or pre/pro's speaker calibration menu, set the subwoofer level to
0dB. Start with the gain on the subwoofer
around 1/4 to 1/2 of the way up from the -15
mark.
•
In the speaker configuration menu, be sure
all your speakers are set to “small” with subwoofer to "yes". For this exercise, the crossover should be set to 80Hz.
•
Set the volume control on your pre/pro or
receiver to the "00 dB" level. See the note
below if your unit uses a positive number
scale for volume instead of a minus-to-plus
scale.
•
Ensure that all main, center, and rear channels are calibrated to the reference point using your test tones, then direct the tone to
the subwoofer. Adjust it's level using the
gain control on the subwoofer itself until it
reaches the sound pressure level used for the
other speakers.
An assistant is very helpful in this process.
Some like to run their sub a bit louder (“hot”) for
movies by increasing the sub level (in the receiver’s control panel) by 5dB or so above the
main channel level. This can be very effective at
lower listening levels, but be sure to use care
when watching that big action movie for the first
time...especially at or near reference levels!
Once the subwoofer is calibrated, small adjustments can be made easily using the subwoofer
level control in your processor. If you find the
need to go much above +2 or +3 consistently,
we recommend adjusting the gain control on the
sub’s amplifier upward rather than using the receiver’s volume control—this will eliminate the
possibility of the subwoofer receiving a distorted
input signal. Conversely, using too low of a
value for the subwoofer level on the processor
may result in difficulty keeping the subwoofer's
auto-on feature "awake" during quiet passages.
Note: If your unit does not use a minus/plus volume scale, activate the test tones and increase
the volume of your pre/pro or receiver until it
reaches 75dB or 85dB on your SPL meter. Remember this number as this will be “reference
level*.” Remember to check with your unit’s
manual to determine if they use a 75dB or 85dB
test tone.
*What is reference level? Reference
level allows for peaks of 105dB from the
speakers and 115dB for the LFE channel.
When calibrated as above, the correct
relative volume of each speaker will be
as the director/sound engineer of the
film intended.
4.3 Crossover Settings
Your UFW-10 Subwoofer features a defeatable,
continuously variable crossover that allows you
to set a low-pass filter at any point between
40Hz and 150Hz. In addition, many popular receivers and surround processors also feature
built-in electronic crossovers (please consult your
receiver’s instruction manual). If present, we
recommend using your receiver’s crossover and
setting the UFW’s crossover switch to “out” thus
disabling this feature.
After setup is completed, during which an 80Hz
crossover is recommended, you can adjust your
crossover accordingly either in the subwoofer itself or as recommended in your receiver’s setup
menu. Typically, the smaller your speaker OR
the louder the system will be played, the higher
the crossover point. Conversely, larger speakers
OR lower volumes allow for lower crossover settings. The THX standard, and the recommended
crossover with your UFW-10 is 80Hz for home
theater.
4.4 UFW-10 Phase Adjustment
The phase dial (see “I” on figure 1.1) controls
the relative phase of the subwoofer to best reinforce the other loudspeakers in your system.
Adjustments to this control will change your
UFW-10’s interaction with the rest of your
speaker system, providing the least cancellation,
and thus the best response in any room. With
SPL meter in hand (or, better yet, on a tripod),
play an 80Hz tone (for this exercise the crossover point must be set to 80Hz) and slowly rotate the phase control from "0" towards “180.”
Watching your SPL meter, find the point that results in the biggest peaks in sound pressure levels (i.e. reads highest on the meter). This setting indicates the least amount of bass wave cancellation, and should be held constant until the
subwoofer or other speakers in your room are
moved, or placement is altered in any way. With
typical front corner placement in most rooms,
you may very well find the "0" setting to be optimum.
Section 5—Advanced Calibration and
Correction
One of the most impressive features of your
UFW-10 Subwoofer is the built-in parametric EQ
shown as “K” in figure 1.1 and detailed below in
figure 5.1. Depending on the nature of your
room or listening environment, your subwoofer
may be reinforcing certain frequencies in the
UFW-10’s operating range such that they are significantly louder (at your listening position) than
the desired response. Using the three dials
shown in figure 5.1 below, the UFW-10’s para-
channels to reference level, set your sub’s
volume to 70dB.
d. Play a 20Hz track from a test tone CD,
such as one available through
www.rivesaudio.com, and record BOTH
the frequency (your x-axis), which corresponds to the track on the test disc, and
the SP level (your y-axis) as shown on
the meter.
e. Next, play the tracks from 25Hz to 120Hz
and record the SP Level for each frequency played.
Important Note: The RadioShack sound meter
uses C-weighting. As a result, a correction key
is needed to ensure proper response before your
final measurements are plotted. We suggest
gathering your data using the readings on the
meter and then correcting your results with the
compensation coefficients shown in figure 6.1 (at
the end of this manual). The Rives disc mentioned above includes compensated test tones.
5.2 Interpreting the Results
Once you’ve completed this exercise, you will
have a data list much like that shown in figure
5.2 below (though much more detailed and complete).
Figure 5.1
metric equalizer will allow you to flatten up to 1
peak in your room, thus giving you the flattest
(most natural) overall response.
In order to find out exactly how your room is affecting your UFW-10 Subwoofer, you need to
perform a “frequency sweep” of your room. This
will give you a graphical representation of how
the UFW-10 is performing in your unique listening environment.
5.1 Performing a Room Frequency Sweep
Though there are a number of ways to perform
an accurate frequency sweep, we’ve detailed the
steps involved in the most basic method below.
a. Sit in your favorite seat and hold your Radio Shack SPL meter at a 45-degree angle
half way between horizontal and vertical.
b. The meter should be placed at ear level
when seated in the primary listening position, and is best if supported by a stationary object such as an end table or tripod.
c. Assuming you have already calibrated all
Frequency
(Hz)
Gain (dB)
20
64
25
67
32
70
40
71
55
74
63
71
80
72
100
70
Figure 5.2
Now that you have a complete data set derived
from YOUR room, you need to plot this response
visually, either in MS Excel or simply on graph
paper (a computer application is recommended
to smooth the curve) to obtain a graphical representation of your room’s effect on the UFW-10.
An example, derived from figure 5.2 above, is
shown on the following page in figure 5.3.
the filter to be applied. In our example above,
we want to tame the peak that is centered at
just about 45Hz, and thus set our frequency filter to the corresponding 45Hz level.
79
73
67
30
50
80
Frequency (Hz)
Figure 5.3
Note the relative flatness of the overall response
as well as the magnitude of your largest peak.
Some nulls are likely to be present, however filling in a null or dip with any EQ is not likely to be
effective, and the power required can make such
an attempt undesirable. If desired or necessary,
you may wish to try moving the sub to a new location for a flatter response. Sometimes only a
few inches can make a significant difference. It's
recommended that these tests be performed using the same speaker configuration and placement you'll be using while enjoying your system,
such that the interaction between the speakers
and the subwoofer can be observed. By and
large we recommend sticking with front corner
placement if possible for the benefit of the
"corner loading" increase in output, thus using
the EQ only to flatten the response.
B) Bandwidth—The bandwidth control on your
UFW-10 allows you to set the WIDTH of the filter
you want applied. This control is based on a
percentage of a full octave above, or a doubling
of frequency. Thus, when set to 1.0, the width
of the area you’ll be cutting or boosting will be a
full (one) octave, corresponding to an overall
width (start to finish) of double the frequency
(half above AND below your center point). In
this example, we estimate the “beginning” of the
peak in figure 5.3 to be at about 25Hz and the
“end” of the peak at about 80Hz...a range of
Center
25Hz
(45Hz)
Desired Curve Width
30
50
80Hz
80
Figure 5.4
around 55Hz.
5.3 Advanced Parametric EQ Adjustments
And the fun begins...
For this adjustment, you will need a test disc
with frequencies from at least 20Hz to 120Hz.
Stereophile Magazine and the previously mentioned www.rivesaudio.com have test discs available for sale, or you can create your own disc
with a CD writer using files found on the internet.
A web search should yield suitable tones.
Once your data is plotted as shown in figures 5.2
and 5.3 , use the Frequency (A), Bandwidth (B),
and Level (C) controls (as shown in figure 5.1) to
adjust your subwoofer’s response as follows:
A) Frequency—This control allows you to set
the exact point at which you want the CENTER of
However, the 45Hz point is not centered in this
range. Because the EQ needs a range equidistant to each side of our center frequency, set in
step 1, we have to extend our area slightly (or
move our center point...more on this later) to
fully compensate the range we require. Thus, in
this example, because we want our high point at
80Hz, or 35Hz above our 45Hz center frequency,
we also have to adjust 35Hz below our center
frequency, therefore expanding the width of our
“beginning” and “end” points to 10Hz and 80Hz
respectively (as shown in figure 5.5).
need our width points, we must calculate the
percentage of a full octave this translates to.
This can be done with the following equation:
[(Bandwidth)x(Center Hz)] + (Center Hz)
Which breaks down to:
Center
Actual Curve Width
10Hz
Bandwidth(B) = High Cutoff(H) - Center Hz(C)
Center Hz (C)
(45Hz)
80Hz
Thus, in this example, we substitute our points
as follows
20
30
50
Figure 5.5
80
However, in this example, there is one problem...our low point is far below the actual width
of our desired curve, thus even the flat portion of
the UFW’s desired response will be attenuated.
To avoid this, we need to move our center point
up just a bit, such that it is closer to equidistant
between our “beginning” and “end” points. In
other words, if we move our center point up from
45Hz to 55Hz, our “end” point of 80Hz is now
only 25Hz above our center (instead of 35Hz),
and our “beginning” point is now 30Hz below
our center (instead of 20Hz). Because we must
be equidistant from this center frequency, our
range thus becomes 25Hz to 85Hz—much closer
to our desired value. In addition, because the
system will likely be crossed over at 80Hz, the
additional attenuation above the actual curve will
not affect the UFW’s response.
(B) = (H) 85Hz - (C) 55Hz
(C) 55Hz
And, finally, we have B = 0.55. In other words,
the bandwidth dial should be adjusted to 0.55 in
order to set a curve width between 25Hz and
85Hz on a 55Hz center point.
C) Level—Now that we’ve defined our peak’s
width, we move on to the goal of this exercise...to flatten it out. For this, we need to decide how much boost or cut will be necessary.
In our sample data, our center frequency (55Hz)
74
72
70
(C)
68
20
Figure 5.7
New Center
25Hz
20
(55Hz)
Actual Curve Width
30
50
85Hz
80
Figure 5.6
Now that we know how far above and below we
30
50
80
Hz
corresponds to a gain of right about 74 dB.
However, as you can see in the above figure, the
rest of our curve is flat at about the 69 dB level.
Thus, in this example, a 5dB cut applied to our
curve will sufficiently “tame” this peak and flatten the response of the UFW-10 in your room.
NOTE: After the filter is set, we recommend performing a new frequency sweep to check results
and to identify where to make fine tuning adjustments.
Section 6—Proper Care and Feeding
Your Rocket UFW series subwoofer does not
need much exterior maintenance other than an
occasional dusting. Please use care with the
gloss black ends and treat them as you would a
piano finish. They can be waxed with automotive carnauba wax if desired. We recommend
the 3M Yellow Detail Cloth (part # 39016) for
dust removal as it will not scratch the black surface. The durable matte finish on the wood veneer requires only some dusting, or can be wiped
off with a water dampened soft cloth.
Above all, listen and enjoy!
6.1 Warranty Policy and Terms
All AV123 products carry a limited manufacturer’s parts and labor warranty. All UFW series
subwoofers are guaranteed to be free from
manufacturer’s defects for a period of one year
from the date of purchase.
Get and extra two years of warranty coverage free!
When you register your product online at
www.av123.com, we will extend the warranty an
additional two years on the cabinet and driver,
and an additional 1 year on the amplifier and
electronics. This extended warranty is free simply by registering within 60 days of your purchase. We urge you to take advantage of this
offer.
For the latest information on the entire Rocket
line or to register your product, please visit us
online at www.av123.com
6.3 UFW-10 Specifications
Type: Acoustic suspension, single-driver system
Driver: 10" black-anodized alloy cone woofer
Frequency Response: 25 Hz—150Hz +/- 2 dB
Size (W x D x H): 13.5" x 13" x 13.5"
Weight: 52 lbs.
Finish: Rocket Rosewood w/ piano-black lacquer
end caps
Other Features:
• One-band parametric EQ (freq, bandwidth,
and level),
• Continuously (infinitely) variable phase, gain,
and crossover adjustments (40Hz - 150Hz)
• Crossover disable option
• LFE summed R/L RCA input
• Balanced mono XLR input
• Auto-on / standby mode
6.4 Miscellaneous Information
Figure 6.1 below shows the correction values for
the SPL meter mentioned earlier in this manual.
For any number read (left column) from this meter, it is necessary to add the correction value
(right column) before plotting actual results.
RS SPL Reading
(dB)
Add (dB)
20
+7.5
25
+5
32
+3
40
+2.5
50
+1.5
63
+1.5
80
+1.5
100
+2
Warranties apply to the original owner and are
non-transferable. AV123 will exchange all defective merchandise, including shipping charges, to
the original shipment destination, at no charge
for up to 60 days after the date of purchase.
After 60 days the product must be returned to
AV123 for repair only and return shipping costs
are the responsibility of the customer. All questions should be directed to customer service.
6.2 Stay in Touch
Remember that personalized tech support is only
a phone call away. Call USA toll-free
877.543.7500 or worldwide at 303.543.7500.
Whether you need technical assistance, have a
suggestion to make your UFW-10 even better, or
simply want to let us know how much you enjoy
your new subwoofer, please feel free to contact
us at any time!
Figure 6.1
Thank you for supporting AV123