1
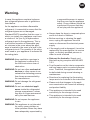
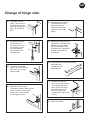
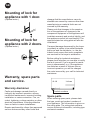
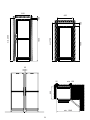
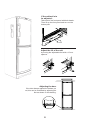
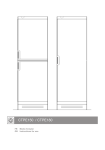
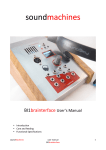
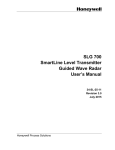
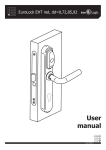
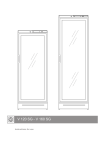
V 160 DP / V 160 SP / V 120 SP Instructions for use GB Get to know your wine cooler. Controlpanel. Toplight. Shelf Nameplate. Door. Doorhandle. Kickplate. Adjustable feet 2 GB Warning. In case this appliance contains hydrocarbon refrigerant please refer to guidelines listed below. a responsible person to ensure that they can use the appliance safely. Young children should be supervised to ensure that they do not play with the appliance As the appliance contains a flammable refrigerant, it is essential to ensure that the refrigerant pipes are not damaged. ●● Always keep the keys in a separate place and out of reach of children Standard EN378 specifies that the room in which you install your appliance must have a volume of 1m³ per 8 g of hydrocarbon refrigerant used in the appliances. This is to avoid the formation of flammable gas/ air mixtures in the room where the appliance is located in the event of a leak in the refrigerant circuit. The quantity of the refrigerant used in your appliance is indicated on the rating plate. ●● Before servicing or cleaning the appliance, unplug the appliance from the mains or disconnect the electrical power supply ●● If the supply cord is damaged, it must be replaced by the manufacturer, its service agent, or similarly qualified persons in order to avoid a hazard ●● Relevant for Australia: Supply cord fitted with a plug complies with AS/NZS 3112. WARNING:Keep ventilation openings in the appliance’s cabinet or in the built-in structure clear of obstruction ●● Frost formation on the interior evaporator wall and upper parts is a natural phenomenon. Therefore, the appliance should be defrosted during normal cleaning or maintenance WARNING:Do not use other mechanical devices or other means to accelerate the defrosting process than those recommended by the manufacturer ●● Directions for replacing the illuminating lamps are to be included in the instruction WARNING:Do not damage the refrigerant system ●● Please note that changes to the appliance construction will cancel all warranty and product liability WARNING:Do not use electrical appliances inside the refrigerated storage compartment, unless they are of a type recommended by the manufacturer ●● This appliance is intended to be used exclusively for the storage of wine ●● This appliance is intended to be used exclusively for the storage of wine WARNING:Do not expose the appliance to rain WARNING:This appliance is not intended for use by young children or infirm persons unless they have been adequately supervised by 3 GB Contents Before starting the appliance Get to know.............................................2 Check that the cabinet is undamaged. Please report any damage immediately to your dealer. Wash the cabinet and inner lining with a mild unscented detergent and wipe it dry. Do not use abrasive scouring powder, steel wool or similar. Warning...................................................3 Before starting the appliance................... 4 Maintenance............................................ 4 Has the appliance stopped working?...... 5 Installation...............................................5 Maintenance Technical data......................................... 6 Control panel........................................... 6 Only use an unscented detergent when cleaning the cabinet inside. General advice........................................ 6 Change of hinge side.............................. 7 You may remove the top panel and wash it when cleaning the cabinet inside. Lock.........................................................8 Switch off the appliance and pull out the plug when cleaning the cabinet. Warrenty and spare parts........................ 8 Disposal...................................................9 The skirting board can be removed to facilitate a vacuum-cleaning of the floor. To make the cooling system work at its optimum it is necessary from time to time to clean the wire condensator and the compressor at the back of the cabinet by means of a brush or a vacuum cleaner. Remember to clean the drain. 4 GB Has the appliance stopped working? Before calling a repairman, check that takes up more room in the width and therefore the door must either be placed outside the cupboard or there must be a space of at least 1,5 cm at the hinge side. 3. The distance to the wall at the hinge side must be of a sufficient size. . Furthermore is it possible to build together the appliance and another cabinet. ●● The plug is properly plugged into the wall socket. ●● The fuse is intact. ●● The power has not been cut off. ●● All controls are correctly set. ●● Switch off the cabinet for 15 minutes (for instance at the thermostat). Switch it on again and after 5 minutes check whether frost has formed on the evaporator. It is safest to place the earthed wall socket above the appliance and at least 1.7 / 2.0 m above the floor. Any local installation rules for appliances of this kind must be observed. ●● Do not open the cabinet when unnecessary. During a storm the electricity supply might be cut off. Installation. You should be aware of this when installing the appliance in weekend cottages or elsewhere where you would not immediately observe that the power has been cut off. Construction and details in the accessories are subject to alteration without previous notice. See page A and B. Install the cabinet in a dry place and so that it is not exposed to direct sunlight or any other source of heat. Place the cabinet in a level position. This is easily achieved by adjusting the adjustable feet at the front edge of the base. Max. 85 kg. The cabinet may not rest against a wall on its hinged side. When placing the cabinet on a carpet or on a wooden floor you should adjust it once more after some time as the cabinet might settle in soft foundations. If you want to build the appliance into a cupboard you must consider 3 factors: 1. There must be space above the appliance in order to make the cooling system work satisfactorily. 2. When the door is opened the appliance 5 GB Technical data. General advice. This device complies with relevant EU directives including Low Voltage Directive 2006/95 EEC. and Electromagnetic Compatibility Directive 2004/108/EC If the unit is not used for more than two days it should be switched off and the doors should be left open for ventilation to prevent a bad smell in the unit. The rating plate provides various technical information as well as type and serial number. The appliance is equipped with a high quaity skin condenser. Therefore, a slight heating of the sidewalls is quite normal. Lighting. This appliance is equipped with a device which causes the light to switch off if the door is open / left ajar for abnormally long time. When the door has been closed for a couple of minutes, the device is cut off and the light switches on in normal way again. Defrosting. The evaporator is automatically defrost. The thawed water is led to a tray on top of the compressor where it evaporates. Control panel. 1 3 1. Lamp. 2. Thermostat knob. 3. Indicator for the connection to the electricity supply (green). 2 The thermostat knob is adjustable from 0 (stop) to 7 (coldest). Find the position of the thermostat which gives you the desired temperature. Start at position 4. 6 GB Change of hinge side. 1) Dismantle the top hinge. This one is to be used later as top hinge at the opposite side. Lift off the top door. 4) Dismantle the screws in the middle of the new hinge side. Mount the bottom door and screw on the middle hinge. 2) On appliances with a door closer on the upper door, this door closer should be removed and remounted on the opposite side. 5) Adjusting the bottom door: Loosen the 3 screws in the bottom hinge and push the bottom hinge to the required side. Tighten the screws and mount the kick panel. 6) The kick panel is mounted and the hole plugs are mounted on the opposite side. 3) Dismantle the middle hinge. Lift off the bottom door. Mount the hinge screws again. 7) Ajustment of the top door: loosen the screws in the hinge above the door, loosen the hinge above the door and turn the hinge to the wanted side. Tighten the screws. 4) Remove the kick panel. The bottom hinge is dismounted at the 3 screws. The hinge is turned 180° and mounted on the opposite side. 8) Move the handle. 7 GB Mounting of lock for appliance with 1 door. damage that the manufacturer can substantiate are caused by reasons other than manufacturing or material faults are not covered by the warranty. (Optional extra.) Please note that changes to the construction of the appliance or changes to the component equipment of the appliance will invalidate warranty and product liability, and the appliance cannot be used lawfully. The approval stated on rating plate will also be invalidated. Mounting of lock for appliance with 2 doors. Transport damage discovered by the buyer is primarily a matter to be settled between the buyer and the distributor, i.e. the distributor must ensure that such complaints are resolved to the buyer’s satisfaction. (Optional extra.) Before calling for technical assistance, please check whether you are able to rectify the fault yourself. If your request for assistance is unwarranted, e.g. if the appliance has failed as a result of a blown fuse or incorrect operation, you will be charged the costs incurred by your call for technical assistance. Warranty, spare parts and service. Warranty disclaimer Faults and damage caused directly or indirectly by incorrect operation, misuse, insufficient maintenance, incorrect building, installation or mains connection. Fire, accident, lightening, voltage variation or other electrical interference, including defective fuses or faults in mains installations. Product numbers Spare parts When ordering spare parts, please state the type, serial and product numbers of your appliance. This information is given on the rating plate. The rating plate contains various technical information, including type and serial numbers. Repairs performed by others than approved service centres and any other faults and 8 GB Disposal For business users in the European Union. If you wish to discard electrical and electronic equipment, please contact your dealer or supplier for further information. Information for Users on Collection and Disposal of Old Equipment and used Batteries These symbols on the products, packaging, and/or accompanying documents mean that used electrical and electronic products and batteries should not be mixed with general household waste. For proper treatment, recovery and recycling of old products and used batteries, please take them to applicable collection points, in accordance with your national legislation and the Directives 2002/96/EC and 2006/66/EC. [Information on Disposal in other Countries outside the European Union] These symbols are only valid in the European Union. If you wish to discard this product, please contact your local authorities or dealer and ask for the correct method of disposal. Note for the battery symbol (bottom two symbol examples): By disposing of these products and batteries correctly, you will help to save valuable resources and prevent any potential negative effects on human health and the environment which could otherwise arise from inappropriate waste handling. This symbol might be used in combination with a chemical symbol. In this case it complies with the requirement set by the Directive for the chemical involved. For more information about collection and recycling of old products and batteries, please contact your local municipality, your waste disposal service or the point of sale where you purchased the items. Penalties may be applicable for incorrect disposal of this waste, in accordance with national legislation. 9 600 A 1550 min. 1700 1850 min. 2000 150 150 600 600 25 25 min. 150 min. 1040 If the cabinet is to be adjusted: Take hold of the front panel with both hands. Then lift up the front panel and turn out the bottom part. Adjust the tilt of the unit by turning the adjustable feet with a 13 mm spanner. Adjusting the door If the door bumps against the bottom panel, this can be remedied by adjusting the feet as shown on the drawing. B Reserves the right to alter specifications without prior notice. 91.20.006-04